1990 VOLKSWAGEN TRANSPORTER coolant temperature
[x] Cancel search: coolant temperaturePage 6 of 165
Downloaded from www.Manualslib.com manuals search engine
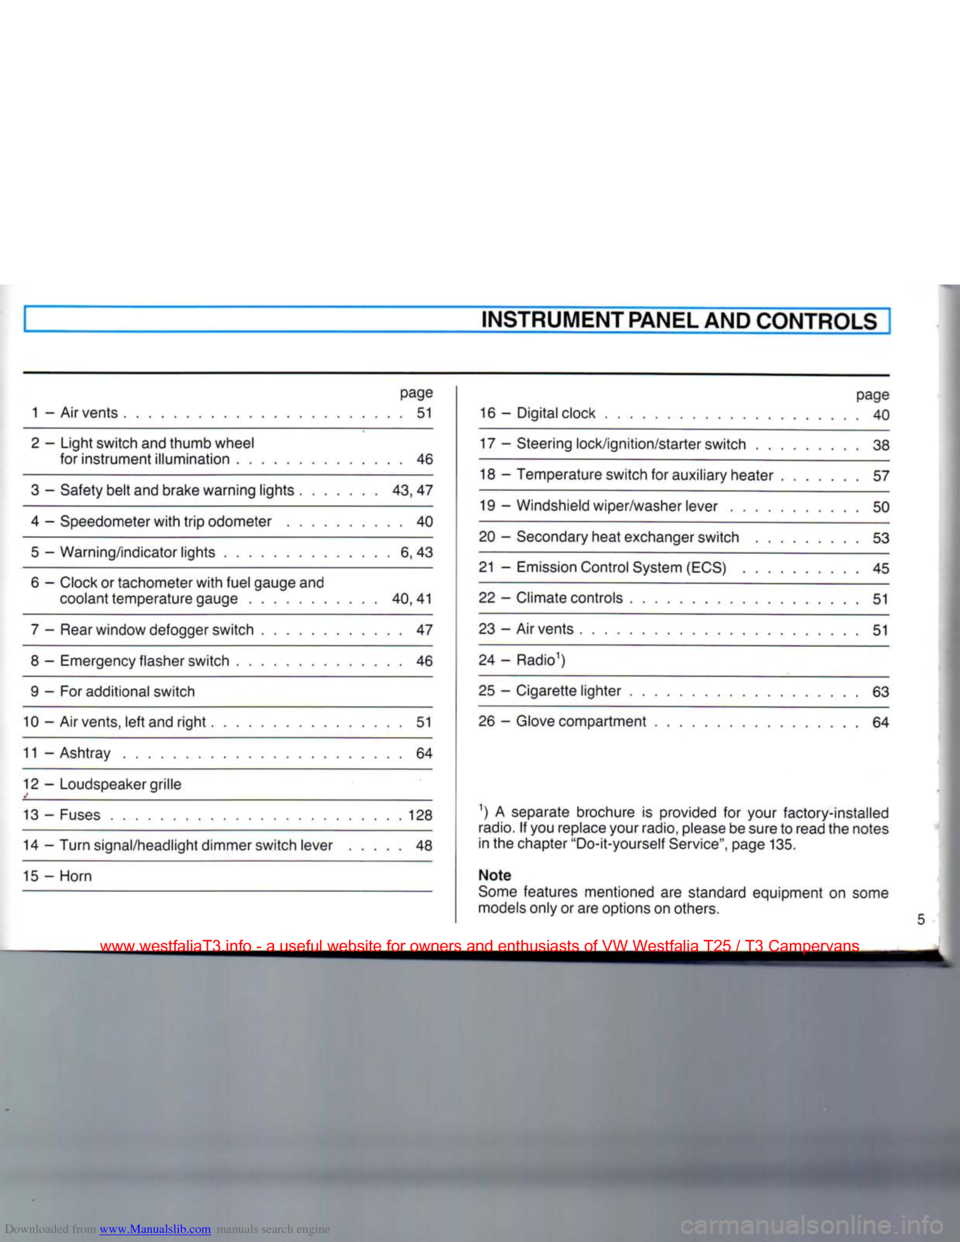
INSTRUMENT PANEL AND CONTROLS
page
1 - Air vents 51
2 - Light switch and thumb wheel for instrument illumination 46
3 - Safety belt and brake warning lights 43, 47
4 - Speedometer with trip odometer 40 5 — Warning/indicator lights 6, 43
6 - Clock or tachometer with fuel gauge and coolant temperature gauge 40,41
7 - Rear window defogger switch 47
8 - Emergency flasher switch 46 9 - For additional switch
10 - Air vents, left and right 51
11 - Ashtray 64
12 - Loudspeaker grille
13 - Fuses 128 14 - Turn signal/headlight dimmer switch lever 48
15 - Horn page
16 - Digital clock 40
17 - Steering lock/ignition/starter switch 38
18 - Temperature switch for auxiliary heater 57
19 - Windshield wiper/washer lever 50
20 - Secondary heat exchanger switch 53
21 - Emission Control System (ECS) 45
22 - Climate controls 51
23 - Air vents 51
24 - Radio1)
25 - Cigarette lighter 63 26 - Glove compartment 64
1) A separate brochure is provided for your factory-installed
radio.
If you replace your radio, please be sure to read the notes
in the chapter "Do-it-yourself Service", page 135.
Note
Some features mentioned are standard equipment on some
models only or are options on others.
www.westfaliaT3.info - a useful website for owners and enthusiasts of VW Westfalia T25 / T3 Campervans
Page 7 of 165
Downloaded from www.Manualslib.com manuals search engine
[INSTRUMENT
PANEL
AND
CONTROLS
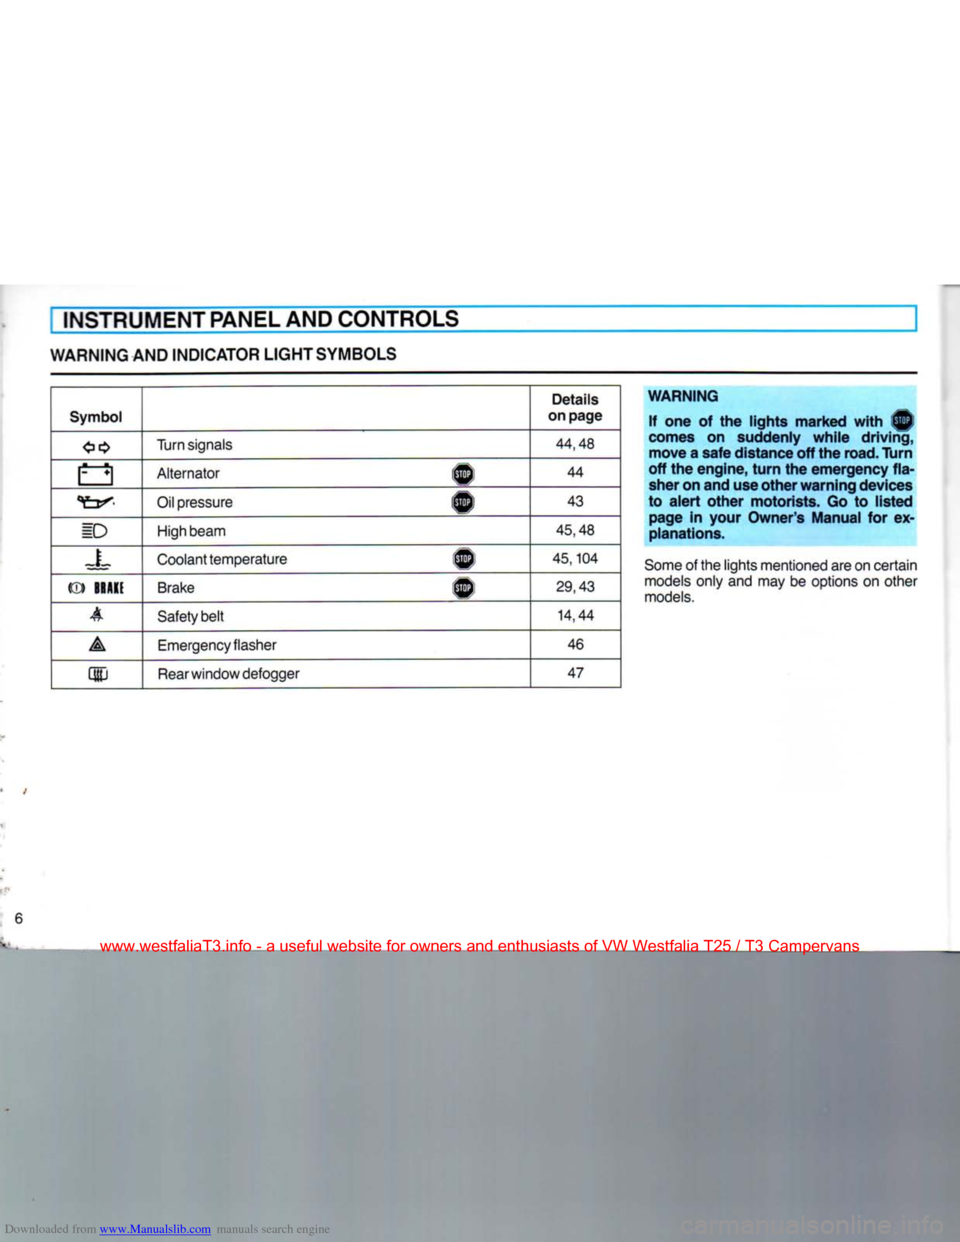
WARNING AND
INDICATOR
LIGHT
SYMBOLS
Symbol
Details
on
page
Turn
signals
44,48
a Alternator A
44
Oil pressure 1^1
43
ID
High beam
45,48
=L Coolant temperature 1^
45,104
(®)
BRAKE
Brake
®
29,43
A Safety belt
14,44
A Emergency flasher
46
m
Rear
window defogger
47
WARNING
If one of the lights marked with ®
comes
on suddenly while driving, move a safe distance off the
road.
Turn
off the engine,
turn
the emergency
fla
sher on and use other warning devices
to alert other motorists. Go to listed page in
your
Owner's
Manual for ex
planations.
Some
of the lights mentioned are on certain
models
only and may be options on other
models.
6
www.westfaliaT3.info - a useful website for owners and enthusiasts of VW Westfalia T25 / T3 Campervans
Page 40 of 165
Downloaded from www.Manualslib.com manuals search engine
CONTROLS
AND
EQUIPMENT
STARTING
PROCEDURES
WARNING
•
Fasten safety belts before driving.
•
Never
start or let the engine run in a
confined or enclosed, unventilated
area.
Exhaust fumes from the engine
contain carbon monoxide, which is a
colorless
and odorless gas. Carbon monoxide can be
fatal
if inhaled.
•
Never
leave engine idling unatten
ded.
An unattended vehicle with a run
ning
engine is potentially hazardous.
•
Do not park or operate the vehicle in
areas
where the hot exhaust system may come in contact with dry grass,
brush,
fuel
spill
or other
material,
which can cause a fire.
•
Do not leave engine unattended at
idle.
When starting engine, be ready to
drive off immediately. Maintain moder
ate
speed until the engine is
com
pletely warm. Remember that
your
en
gine performs best at operating
tem
perature.
Automatic
Transmission
Engine will only start with selector lever in
Neutral or Park.
Manual
Transmission
Start with gearshift lever in Neutral, clutch
pedal
depressed, so that the starter only
has
to crank the engine.
Starting
engine
•
Do not depress accelerator pedal
when starting. At extrem low temperatures
the engine will probably start better, if you depress accelerator pedal slighly.
•
As soon as the engine starts, release
the ignition key.
•
If the engine does not start the first time
or
stalls,
turn
the ignition off and restart. Depress the accelerator pedal slowly
during the second starting attempt.
•
Operate the starter for no more than
10
seconds.
•
Allow about 30 seconds between each
starting
attempt.
STOPPING
ENGINE
Do not stop engine immediately after
hard or extended driving. Keep engine
running for about two minutes to pre
vent
excessive heat build-up.
WARNING
•
Before you check anything in the
engine compartment, stop the engine and let it cool down. Hot components
can
burn skin on contact.
•
The radiator fan switches on auto
matically
when the coolant reaches a cer
tain
temperature and will continue to run
(even
with ignition off) until the coolant
temperature drops.
39
www.westfaliaT3.info - a useful website for owners and enthusiasts of VW Westfalia T25 / T3 Campervans
Page 41 of 165
Downloaded from www.Manualslib.com manuals search engine
CONTROLS
AND
EQUIPMENT
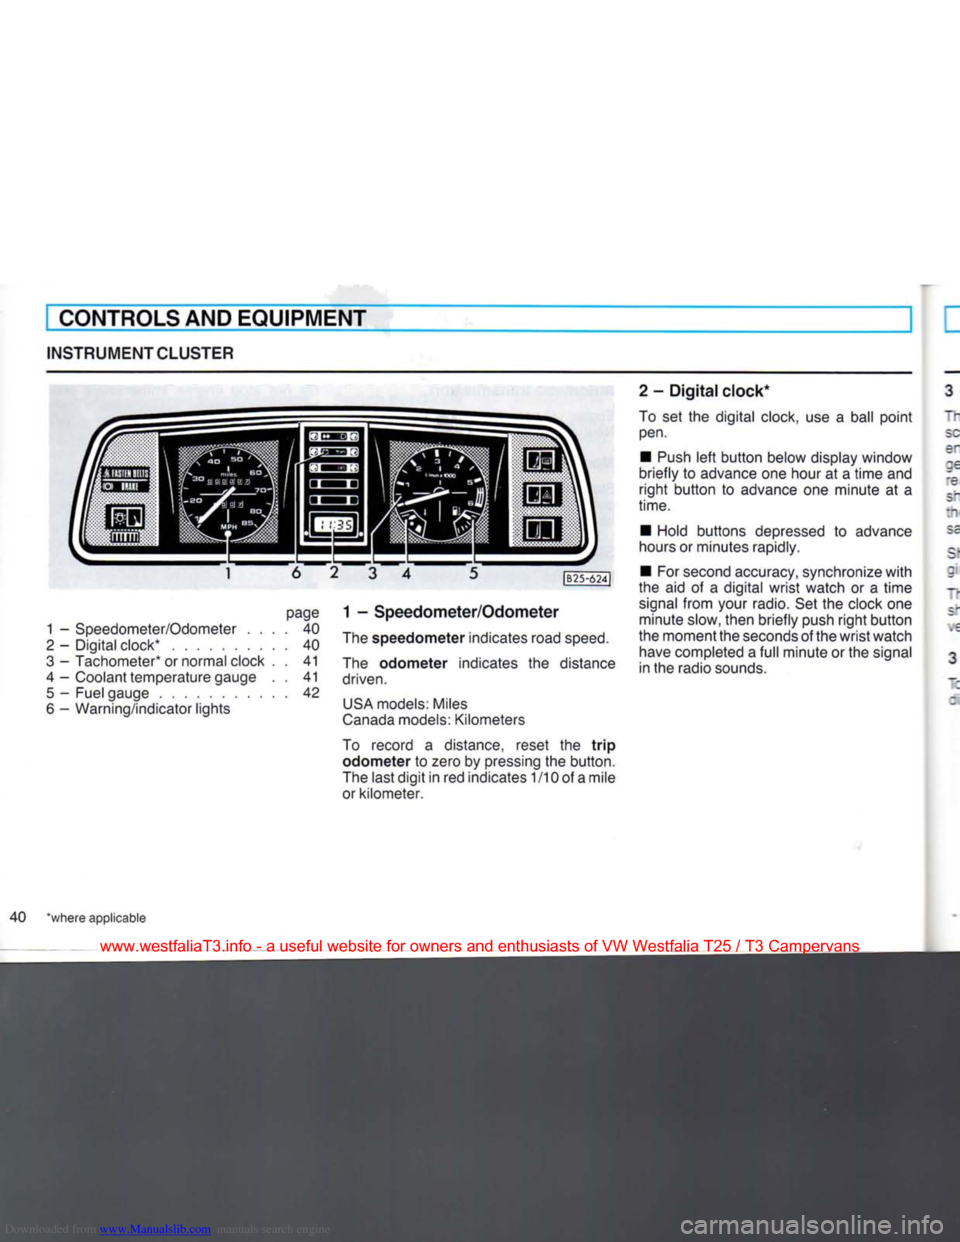
INSTRUMENTCLUSTER
page
1 -
Speedometer/Odometer
.... 40
2
-
Digital clock*
40
3
-
Tachometer* or normal clock
. . 41
4
-
Coolant temperature gauge
. . 41
5
-
Fuel gauge
42
6
-
Warning/indicator lights
|B25-624J
1 -
Speedometer/Odometer
The
speedometer
indicates road
speed.
The
odometer
indicates
the
distance
driven.
USA
models: Miles
Canada
models: Kilometers
To record
a
distance, reset
the
trip
odometer to
zero by pressing the button.
The last
digit
in red indicates
1
/10 of a mile
or kilometer. 2
-
Digital
clock*
To
set the
digital clock, use
a
ball
point
pen.
•
Push
left
button
below display window
briefly
to
advance one hour
at a
time
and
right
button
to
advance
one
minute
at a
time.
•
Hold buttons depressed
to
advance
hours or minutes rapidly.
•
For second accuracy, synchronize
with
the
aid of a
digital
wrist
watch
or a
time
signal
from
your radio. Set the clock one minute slow, then briefly push
right
button
the moment the seconds of the
wrist
watch have completed a
full
minute or the signal
in the radio sounds.
40 *where applicable
www.westfaliaT3.info - a useful website for owners and enthusiasts of VW Westfalia T25 / T3 Campervans
Page 42 of 165
Downloaded from www.Manualslib.com manuals search engine
CONTROLS AND EQUIPMENT
I - Tachometer*
"he red shaded area at the end of the scale indicates the maximum permissible
engine rpm (revolutions per minute) for all gears after the break-in period. Before
'eaching this area, the next higher gear
snould be selected or the foot eased off
the accelerator pedal. Earlier shifting saves fuel and reduces noise.
Sniff to the next lower gear when the en-
; ne rpm drops below 1500 rpm.
~ne green shaded area on the scale snows the speed at which the engine is de-
•
eloping its most favourable torque.
3 - Normal clock*
~J
set the clock, depress the knob in the : al center and
turn.
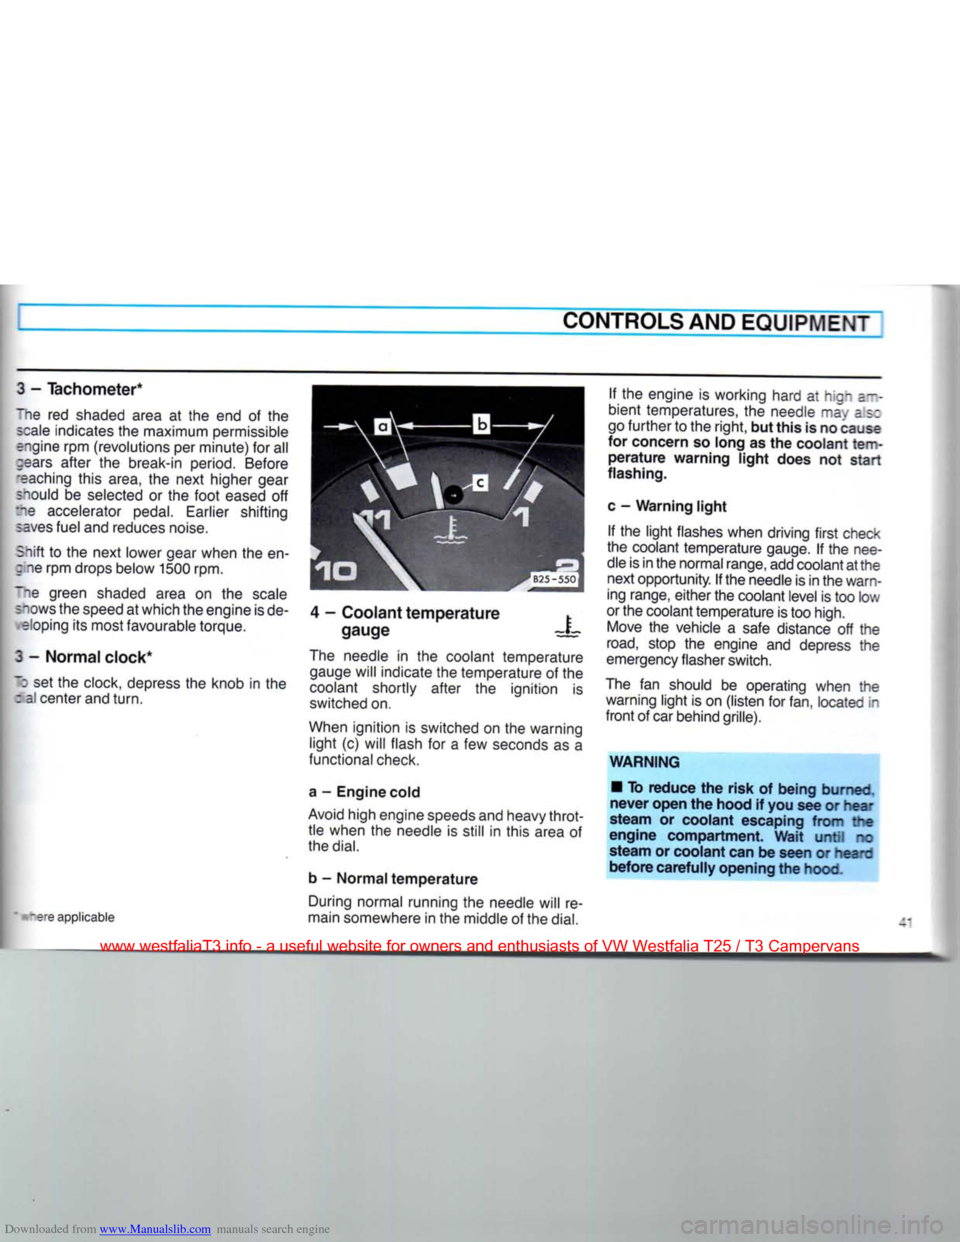
4 - Coolant temperature
gauge X
tare applicable The needle in the coolant temperature
gauge will indicate the temperature of the
coolant shortly after the ignition is
switched on.
When ignition is switched on the warning light (c) will flash for a few seconds as a
functional check.
a - Engine cold
Avoid high engine speeds and heavy throt tle when the needle is still in this area of
the
dial.
b - Normal temperature During normal running the needle will re
main somewhere in the middle of the
dial.
If the engine is working hard at hign a--
bient temperatures, the needle may as:
go further to the right, but this is no cause
for concern so long as the coolant
tem
perature warning light does not start
flashing.
c - Warning light If the light flashes when driving first check
the coolant temperature gauge. If the nee
dle is in the normal range, add coolant at the next opportunity. If the needle is in the warn
ing range, either the coolant level is too low
or the coolant temperature is too high. Move the vehicle a safe distance off the
road,
stop the engine and depress the
emergency flasher switch.
The fan should be operating when the warning light is on (listen for fan, located in
front of car behind grille).
WARNING • To reduce the risk of being burned,
never open the hood if you see or hear
steam or coolant escaping from the
engine compartment. Wait until no
steam or coolant can be seen or heard
before carefully opening the hood.
www.westfaliaT3.info - a useful website for owners and enthusiasts of VW Westfalia T25 / T3 Campervans
Page 44 of 165
Downloaded from www.Manualslib.com manuals search engine
CONTROLS
AND
EQUIPMENT
WARNING
/ INDICATOR
LIGHTS
1 2 3 4 5 6 7 8
your vehicle is equipped
with
several
•nportant indicator and warning devices to
~ionitor the continued reliable operation of .our vehicle. Familiarize yourself
with
:hese
devices so if one should come on .ou know what to do.
-allure to heed applicable warnings and "nportant vehicle information may result in
serious
personal injury or vehicle damage.
WARNING
•
Whenever
stalled
or stopped for
epair,
move
the
vehicle
a
safe
distance
off the road, stop the
engine
and
turn
on the
emergency
flasher
(see
page
46).
• The
engine
compartment
of any
-lotor
vehicle
is a
potentially
hazard
ous
area.
Before
you check
anything
in
?ie
engine
compartment,
stop the
engine
and let it cool down.
Always
exercise
extreme
caution
when
work
ing
under
the
engine
hood.
Heed
all of
re
WARNINGS
on
page
97.
page
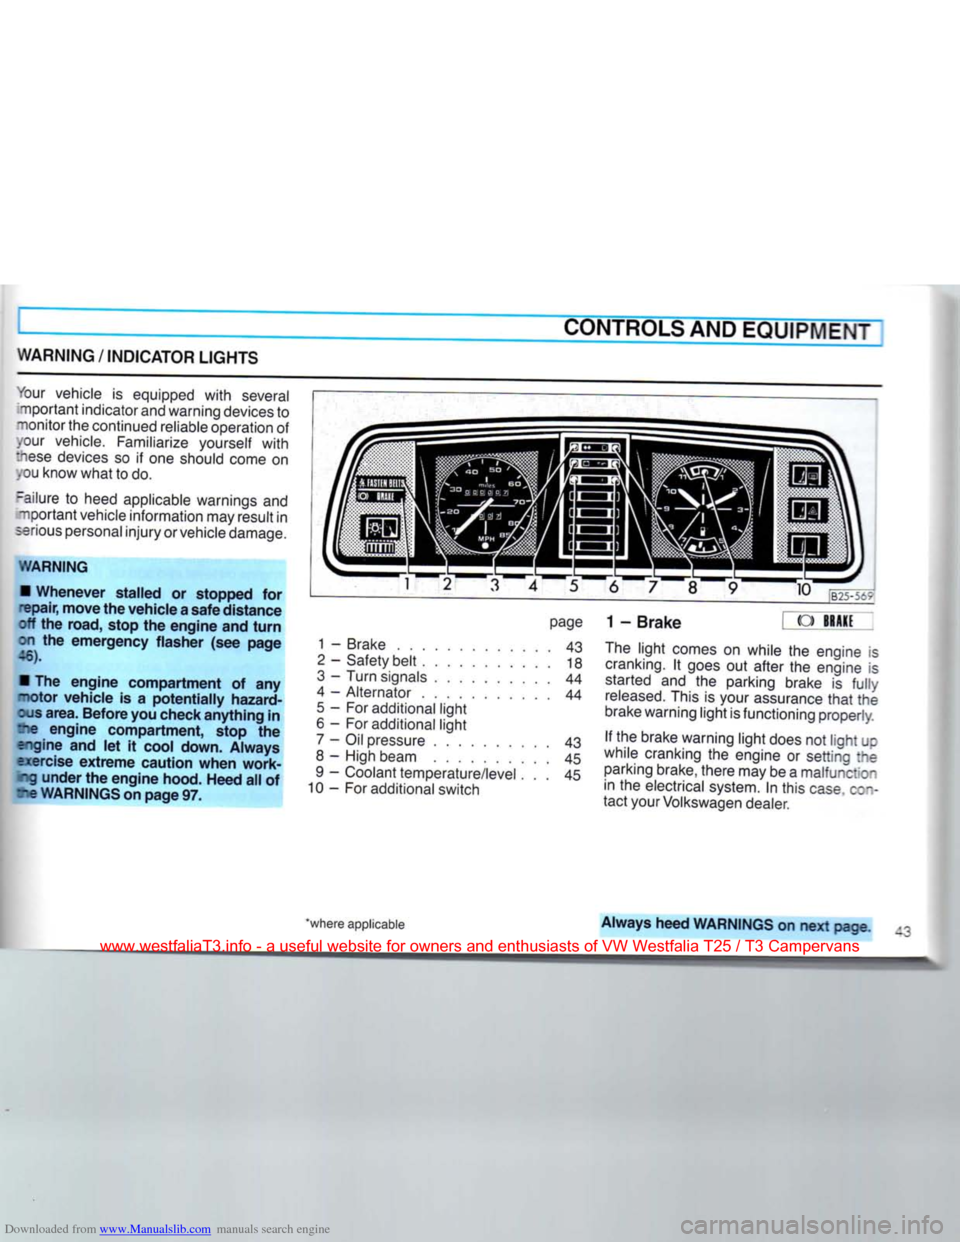
1 - Brake 43
2
- Safety belt 18
3
- Turn signals 44
4 - Alternator 44
5
- For additional light
6 - For additional light 7 - Oil pressure 43
8 - High beam 45
9 - Coolant temperature/level . . . 45
10 - For additional switch 9 10
B25-5t?
1-Brake
« ->
The
light comes on while the engine is
cranking.
It goes out after the engine is started and the parking brake is
fully
released.
This is your assurance
that
the
brake warning light is functioning properly.
If the brake warning light does not light JC
while cranking the engine or setting :ne parking brake, there may be a malfunction in the electrical system. In this
case
c;~-
tact your Volkswagen dealer.
'where applicable
Always
heed
WARNINGS
on next page
www.westfaliaT3.info - a useful website for owners and enthusiasts of VW Westfalia T25 / T3 Campervans
Page 61 of 165
Downloaded from www.Manualslib.com manuals search engine
I
CONTROLS AND EQUIPMENT
AUXILIARY HEATER* (Syncro models only)
The auxiliary heater* heats the coolant in the heating circuit and supplies the heat exchanger in the normal heating system
and the additional heat exchanger* for the
passenger compartment heating with heated coolant.
The system is switched off and on or the
switch-
on time preselected by means of a
switch and indicator unit located on the left under the instrument panel.
Air distribution and regulation is done with the controls of the normal heating and
ven
tilation system (see "Ventilation/Heating"
on page 51).
The auxiliary heater can be used with vehicle stationary or when it is moving.
When vehicle is stationary, the heater only runs for a maximum of 30 minutes in order
to avoid draining the battery. It also switches off automatically when a coolant
temperature of 80° C (175° F) is reached.
When the coolant temperature drops below 70° C (158° F) the heater is automatically switched on again. The heater runs on fuel from the vehicle
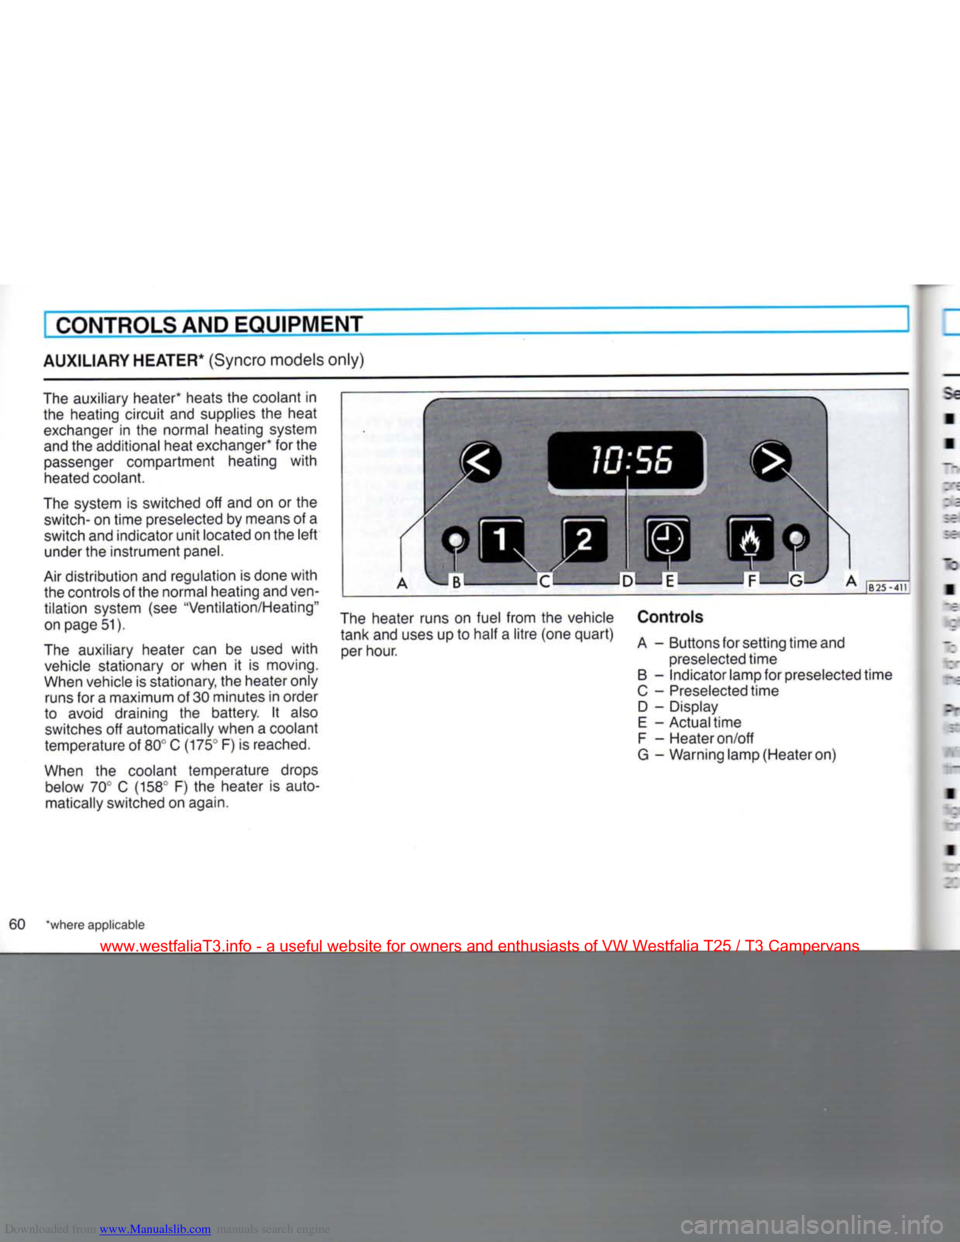
tank and uses up to half a litre (one quart) per hour. Controls
A - Buttons for setting time and
preselected time
B - Indicator lamp for preselected time
C - Preselected time D - Display
E - Actual time
F - Heater on/off
G - Warning lamp (Heater on)
60 "where applicable
www.westfaliaT3.info - a useful website for owners and enthusiasts of VW Westfalia T25 / T3 Campervans
Page 74 of 165
Downloaded from www.Manualslib.com manuals search engine
iLER TOWING
VEHICLE OPERATION
phLT .'jlkswagen was primarily designed
pr : assenger transportation. If you plan to
m*
B.
trailer you should be mindful that
MLT
:ar will be performing a service it was
•cr "tended for. The additional load will
Wee durability and economy of per-
m~ ance. • :. :ow a trailer, your Volkswagen may
mc. -9 more frequent maintenance due to
ft* extra
load.
Gc not tow a trailer during the break-in kriod of your vehicle.
Keep an eye on your coolant tempera-
fere gauge. If coolant temperature warn- rc light comes on pull off the road to a sa's place to allow engine to cool down.
Maximum trailer weight
A vailer for your vehicle is limited to a
typi-
ca class I trailer. The maximum gross
Bier weight and the tongue load must not
eoeed the specifications listed in the
[fechnical Information/Data section of this
ranual.
Do not exceed the gross vehicle weight
•rhich is the weight of the driver, passen ger, luggage, trailer hitch and tongue
weight of the loaded trailer. Trailer hitch
Use a weight-carrying hitch conforming to
the gross trailer weight. The hitch must be suitable for your vehicle and trailer and
securely bolted to the body. Always check
with the trailer hitch manufacturer to make
sure that you are using the correct hitch. Do not use a bumper hitch.
The hitch must be installed in a way not to interfere with the impact-absorbing
bumper system. No modifications should
be made to the vehicle exhaust and brake
systems. From time to time check that all hitch mounting bolts remain securely fas
tened.
If not towing a trailer for a long period of
time,
remove the trailer hitch. This pre
vents the hitch from causing damage should your vehicle be struck from behind.
When removing the trailer hitch, seal all bolt holes to prevent water and exhaust
fumes from entering the vehicle.
Trailer brakes If your trailer is equipped with a braking
system,
check to be sure that it conforms
to all regulations.
The trailer brake system must not be di rectly connected to the vehicle's brake sys
tem.
Tire pressure
When towing a trailer, inflate the tires of
your vehicle to the cold tire pressure listed on the label on the left front door jamb. In
flate trailer tires to trailer and tire manufac
turer's specifications.
Safety chains
Always use safety chains between your car and trailer.
Trailer lights
Trailer lights must meet all regulations. Do not connect the trailer light system directly
to the light system of your vehicle. Be sure
to check with your Volkswagen dealer for
correct wiring, switches and relays.
Before you tow a trailer
Correct and even load distribution. All ob
jects inside the trailer should be held securely in place to guard against shifting, be it forward, backward or sideways.
Never allow a passenger in a moving
trailer.
www.westfaliaT3.info - a useful website for owners and enthusiasts of VW Westfalia T25 / T3 Campervans