1990 VOLKSWAGEN CORRADO oil level
[x] Cancel search: oil levelPage 325 of 906

A/C COMPRESSOR OIL CHECKING
Article Text (p. 7)
1990 Volkswagen Corrado
For Volkswagen Technical Site: http://vw.belcom.ru
Copyright © 1998 Mitchell Repair Information Company, LLC
Thursday, March 23, 2000 09:41PM
compressor, receiver-drier and expansion valve. Clean expansion valve
screen. Flush entire system. Install new compressor and receiver-
drier. New compressors contain correct amount of oil. If installing
overhauled compressor, add 1.5 ounces of new refrigerant oil through
suction port.
PANASONIC ROTARY VANE DRAIN & REFILL
1) Before checking and adjusting oil level, operate
compressor at 1000-1500 engine RPM, and set controls at maximum
cooling and high blowing speed for about 10 minutes to return oil to
compressor.
2) Stop engine. Discharge refrigerant and remove compressor
from vehicle. See SERVICING PRECAUTIONS at the beginning of this
article. Drain oil from compressor through suction and discharge
ports. Measure amount of oil drained. If amount drained is more than
2.4 ounces, fill with same amount using new oil. If amount drained is
less than 2.4 ounces, fill with 2.4 ounces. Install compressor and
recharge.
3) If A/C components are replaced, add refrigerant oil to
system. Add 1.4 ounces if condenser is replaced. Add 2 ounces if the
evaporator is replaced. Oil does not need to be added if receiver-
drier is replaced.
SANDEN SCROLL DRAIN & REFILL
Discharge system. Remove compressor from vehicle. Drain oil
from compressor through inlet and outlet holes. Refill compressor with
2.8 ounces of oil through suction port. When replacing condenser, add
.5 ounce. When replacing evaporator, add 1.7 ounces. When replacing
other A/C components, add .5 ounce per component replaced.
SANDEN 5-CYL DRAIN & REFILL
1) Discharge system. Remove compressor belt and loosen
mounting bolts. Rotate compressor in brackets until filler plug is at
top. Clean area around filler plug and remove plug slowly. Rotate
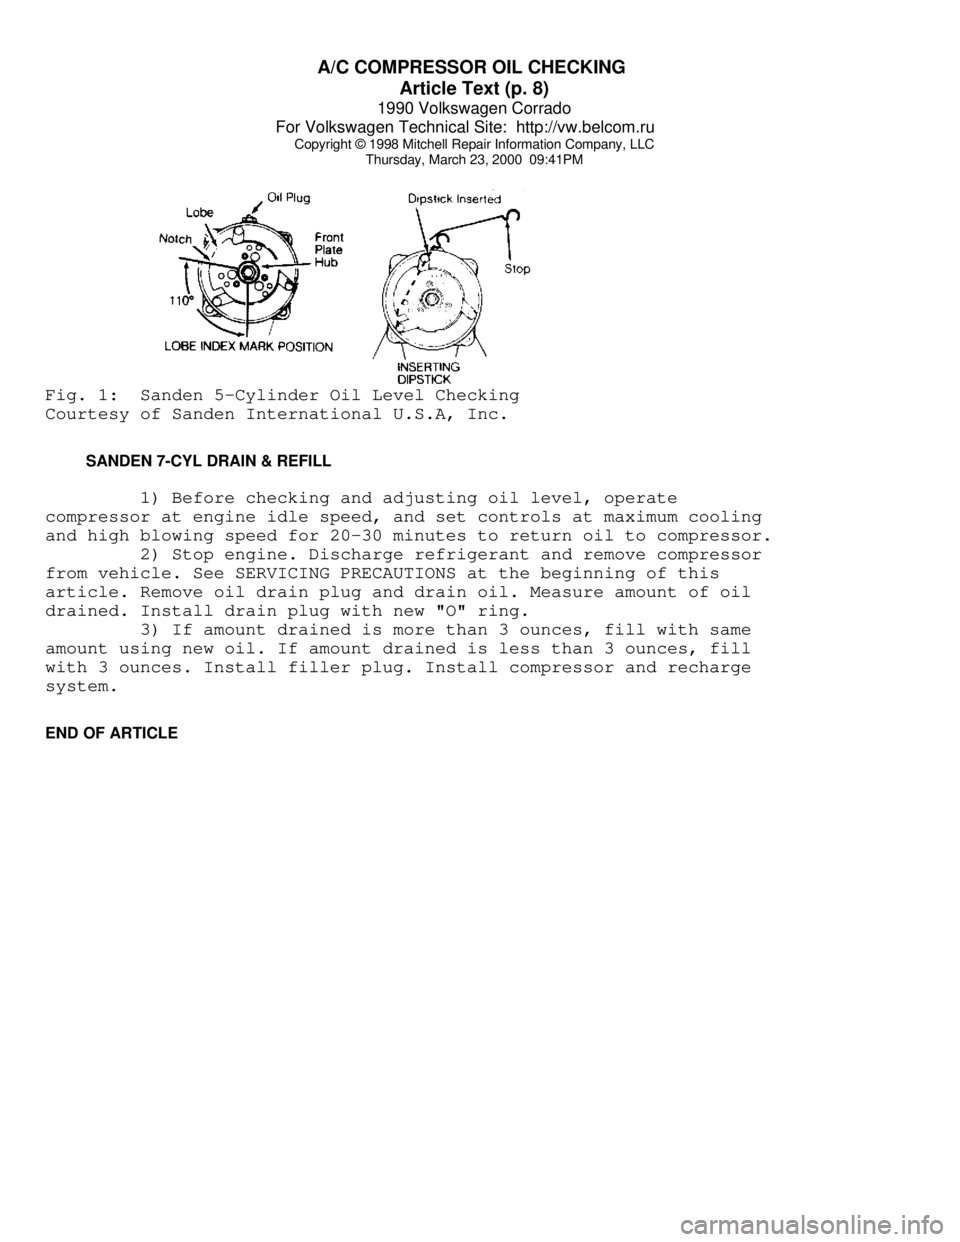
front hub plate so notch in lobe is 110 degrees from the bottom. This
rotates ball end of top piston to align with oil fill port and allows
clearance for dipstick. See Fig. 1.
2) Insert compressor dipstick diagonally from right to left
until stop on dipstick contacts filler plug surface. Remove dipstick
and note oil fill level. Each increment on dipstick represents one
ounce of oil. Add oil if necessary to reach 3-4 ounce level.
Page 326 of 906
A/C COMPRESSOR OIL CHECKING
Article Text (p. 8)
1990 Volkswagen Corrado
For Volkswagen Technical Site: http://vw.belcom.ru
Copyright © 1998 Mitchell Repair Information Company, LLC
Thursday, March 23, 2000 09:41PMFig. 1: Sanden 5-Cylinder Oil Level Checking
Courtesy of Sanden International U.S.A, Inc.
SANDEN 7-CYL DRAIN & REFILL
1) Before checking and adjusting oil level, operate
compressor at engine idle speed, and set controls at maximum cooling
and high blowing speed for 20-30 minutes to return oil to compressor.
2) Stop engine. Discharge refrigerant and remove compressor
from vehicle. See SERVICING PRECAUTIONS at the beginning of this
article. Remove oil drain plug and drain oil. Measure amount of oil
drained. Install drain plug with new "O" ring.
3) If amount drained is more than 3 ounces, fill with same
amount using new oil. If amount drained is less than 3 ounces, fill
with 3 ounces. Install filler plug. Install compressor and recharge
system.
END OF ARTICLE
Page 327 of 906

A/C COMPRESSOR SERVICING
Article Text
1990 Volkswagen Corrado
For Volkswagen Technical Site: http://vw.belcom.ru
Copyright © 1998 Mitchell Repair Information Company, LLC
Thursday, March 23, 2000 09:41PM
ARTICLE BEGINNING
1990 AIR CONDITIONING & HEAT
Compressor Service
* PLEASE READ THIS FIRST *
CAUTION: When discharging air conditioning system, use only approved
refrigerant recovery/recycling equipment. Make every attempt
to avoid discharging refrigerant into the atmosphere.
ISOLATING COMPRESSOR
NOTE: Only compressors with stem-type service valves can be
isolated.
1) Connect service gauge set to the compressor service valves
and open compressor valves slightly (turn in clockwise). Start engine
and operate air conditioning. Slowly turn compressor suction valve
clockwise toward closed (front-seated) position.
2) When suction pressure is reduced to zero or less, turn off
engine and compressor and quickly turn suction valve stem in to full
front-seated position. Suction pressure should be slightly above zero.
Turn discharge valve into front-seated position.
3) To check oil level, slowly open compressor crankcase plug
to relieve any remaining pressure. After oil level is corrected, cap
service gauge ports on both valves. Back-seat suction service valve to
allow refrigerant to enter compressor. Open discharge valve halfway.
4) Loosen discharge service valve cap, allowing refrigerant
pressure to force air out of compressor. Back-seat service valve and
tighten cap. Compressor is now ready for operation.
REFRIGERANT OIL
Only new, pure, moisture-free refrigerant oil should be used
in the air conditioning system. This oil is highly refined and
dehydrated to a point where moisture content is less than 10 parts per
million. The oil container must be tightly closed at all times when
not in use, or moisture will be absorbed into the refrigerant oil from
the air.
DISCHARGING SYSTEM PRECAUTIONS
CAUTION: When discharging air conditioning system, use only approved
refrigerant recovery/recycling equipment. Make every attempt
to avoid discharging refrigerant into the atmosphere.
If compressor has stem-type service valves, it can be
isolated and removed without discharging entire system. Otherwise,
discharge system completely using approved refrigerant
Page 330 of 906
A/C COMPRESSOR SERVICING
Article Text (p. 4)
1990 Volkswagen Corrado
For Volkswagen Technical Site: http://vw.belcom.ru
Copyright © 1998 Mitchell Repair Information Company, LLC
Thursday, March 23, 2000 09:41PM
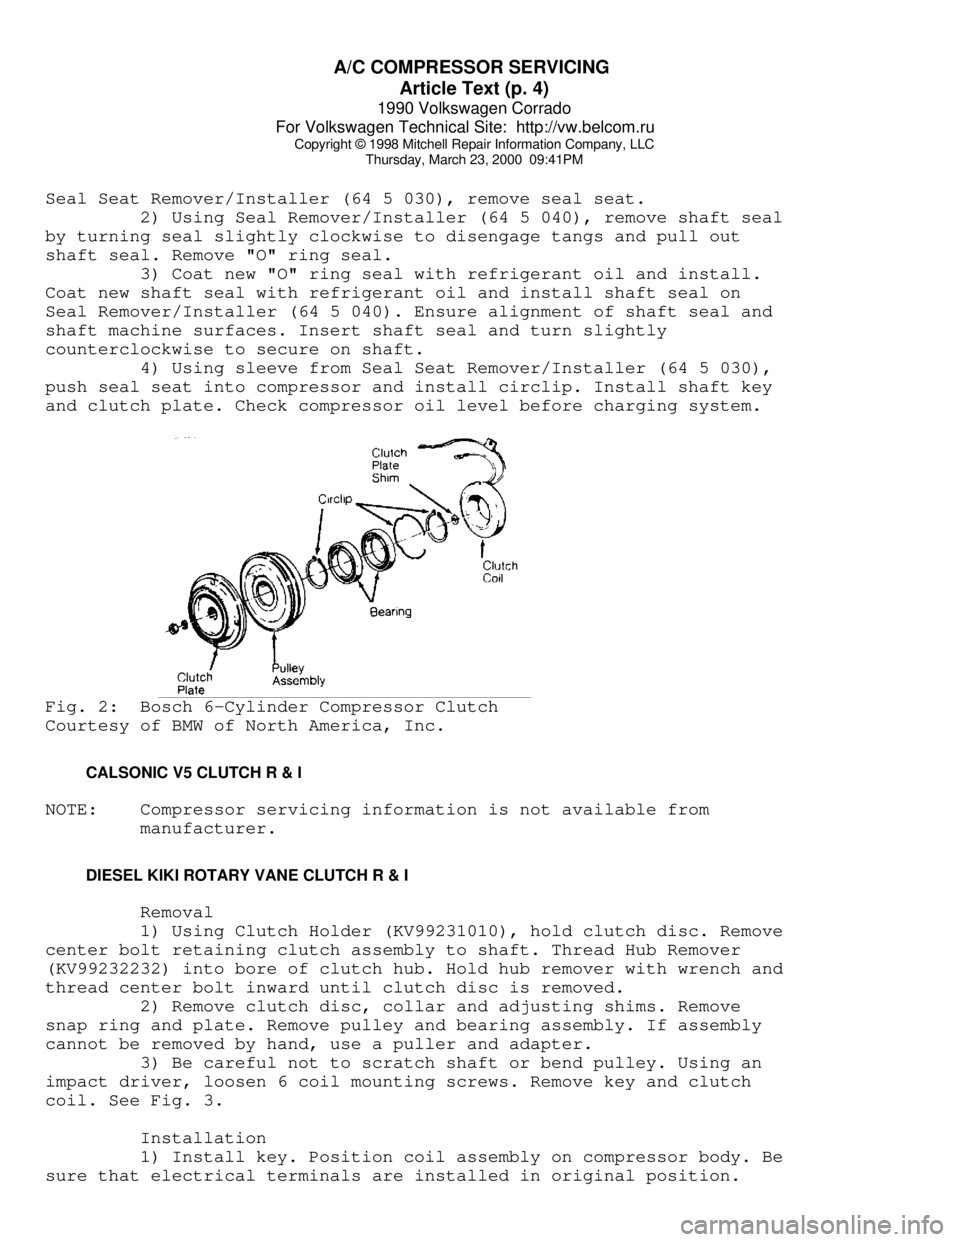
Seal Seat Remover/Installer (64 5 030), remove seal seat.
2) Using Seal Remover/Installer (64 5 040), remove shaft seal
by turning seal slightly clockwise to disengage tangs and pull out
shaft seal. Remove "O" ring seal.
3) Coat new "O" ring seal with refrigerant oil and install.
Coat new shaft seal with refrigerant oil and install shaft seal on
Seal Remover/Installer (64 5 040). Ensure alignment of shaft seal and
shaft machine surfaces. Insert shaft seal and turn slightly
counterclockwise to secure on shaft.
4) Using sleeve from Seal Seat Remover/Installer (64 5 030),
push seal seat into compressor and install circlip. Install shaft key
and clutch plate. Check compressor oil level before charging system.Fig. 2: Bosch 6-Cylinder Compressor Clutch
Courtesy of BMW of North America, Inc.
CALSONIC V5 CLUTCH R & I
NOTE: Compressor servicing information is not available from
manufacturer.
DIESEL KIKI ROTARY VANE CLUTCH R & I
Removal
1) Using Clutch Holder (KV99231010), hold clutch disc. Remove
center bolt retaining clutch assembly to shaft. Thread Hub Remover
(KV99232232) into bore of clutch hub. Hold hub remover with wrench and
thread center bolt inward until clutch disc is removed.
2) Remove clutch disc, collar and adjusting shims. Remove
snap ring and plate. Remove pulley and bearing assembly. If assembly
cannot be removed by hand, use a puller and adapter.
3) Be careful not to scratch shaft or bend pulley. Using an
impact driver, loosen 6 coil mounting screws. Remove key and clutch
coil. See Fig. 3.
Installation
1) Install key. Position coil assembly on compressor body. Be
sure that electrical terminals are installed in original position.
Page 338 of 906
A/C COMPRESSOR SERVICING
Article Text (p. 12)
1990 Volkswagen Corrado
For Volkswagen Technical Site: http://vw.belcom.ru
Copyright © 1998 Mitchell Repair Information Company, LLC
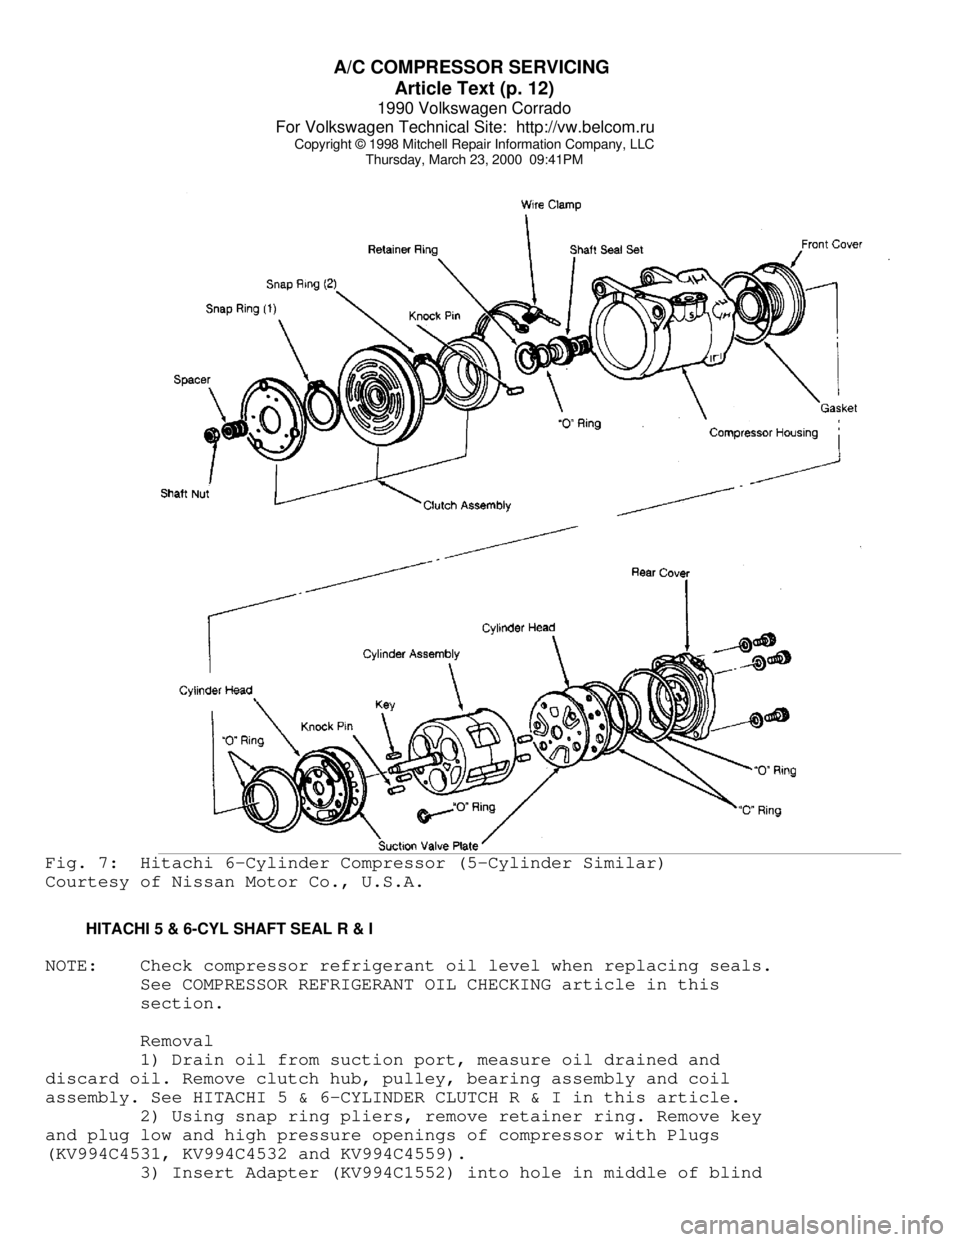
Thursday, March 23, 2000 09:41PMFig. 7: Hitachi 6-Cylinder Compressor (5-Cylinder Similar)
Courtesy of Nissan Motor Co., U.S.A.
HITACHI 5 & 6-CYL SHAFT SEAL R & I
NOTE: Check compressor refrigerant oil level when replacing seals.
See COMPRESSOR REFRIGERANT OIL CHECKING article in this
section.
Removal
1) Drain oil from suction port, measure oil drained and
discard oil. Remove clutch hub, pulley, bearing assembly and coil
assembly. See HITACHI 5 & 6-CYLINDER CLUTCH R & I in this article.
2) Using snap ring pliers, remove retainer ring. Remove key
and plug low and high pressure openings of compressor with Plugs
(KV994C4531, KV994C4532 and KV994C4559).
3) Insert Adapter (KV994C1552) into hole in middle of blind
Page 342 of 906

A/C COMPRESSOR SERVICING
Article Text (p. 16)
1990 Volkswagen Corrado
For Volkswagen Technical Site: http://vw.belcom.ru
Copyright © 1998 Mitchell Repair Information Company, LLC
Thursday, March 23, 2000 09:41PM
To install, reverse removal procedure. Ensure snap rings are
installed with beveled side up. tighten shaft bolt to 10 ft. lbs.
(14 N.m). Ensure clutch clearance is .014-.026" (.36-66 mm). adjust
clearance by adding or subtracting shims as necessary.
NIPPONDENSO 6 & 10-CYL SHAFT SEAL R & I
NOTE: Check compressor refrigerant oil level when replacing seals.
See COMPRESSOR OIL CHECKING article in the AIR CONDITIONING &
HEAT section.
Removal
1) Hold clutch hub stationary and remove center nut. Screw
remover into center of hub. Turn center bolt to remove pressure plate.
2) Remove shims from shaft. Remove snap ring from inside of
pulley. Tap pulley off of shaft with plastic mallet. Be careful not to
distort pulley while removing.
3) Disconnect clutch coil wires from compressor housing.
remove snap ring inside coil and lift coil off compressor. Pry dust
seal out from around compressor shaft (if equipped).
4) Place shaft key remover on shaft and turn to remove key.
Remove drain plug (if equipped). Remove service valves-to-compressor
body bolts. Remove valves. Discard "O" rings. Drain oil out of
compressor.
5) Remove 6 through bolts from front head of compressor and
discard washers. Tap head loose from compressor; be careful not to
scratch sealing surfaces. remove snap ring (if equipped) from front
housing. Press seal plate out. Remove seal from shaft. See Fig. 12.
Installation
1) Lubricate shaft seal with clean refrigerant oil and place
on compressor shaft. Lubricate seal plate and "O" ring (if equipped)
and install in front housing. Install snap ring (if equipped).
2) Place front housing on compressor body. Install through
bolts with new washers. Tighten bolts evenly and alternately to
18 ft. lbs. (24 N.m). Install shaft key using installer and plastic
mallet. Insert dust seal into front of compressor.
3) Install drain plug with new gasket. Add correct amount of
refrigerant oil to compressor. If service valves were removed, coat
new "O" rings with refrigerant oil and install service valves.
4) Place clutch coil on compressor and install snap ring.
Install shims on shaft to adjust pressure plate-to-rotor clearance to
.016-.028" (.41-.71 mm). Tighten shaft nut to 12 ft. lbs. (16 N.m).
Page 345 of 906
A/C COMPRESSOR SERVICING
Article Text (p. 19)
1990 Volkswagen Corrado
For Volkswagen Technical Site: http://vw.belcom.ru
Copyright © 1998 Mitchell Repair Information Company, LLC
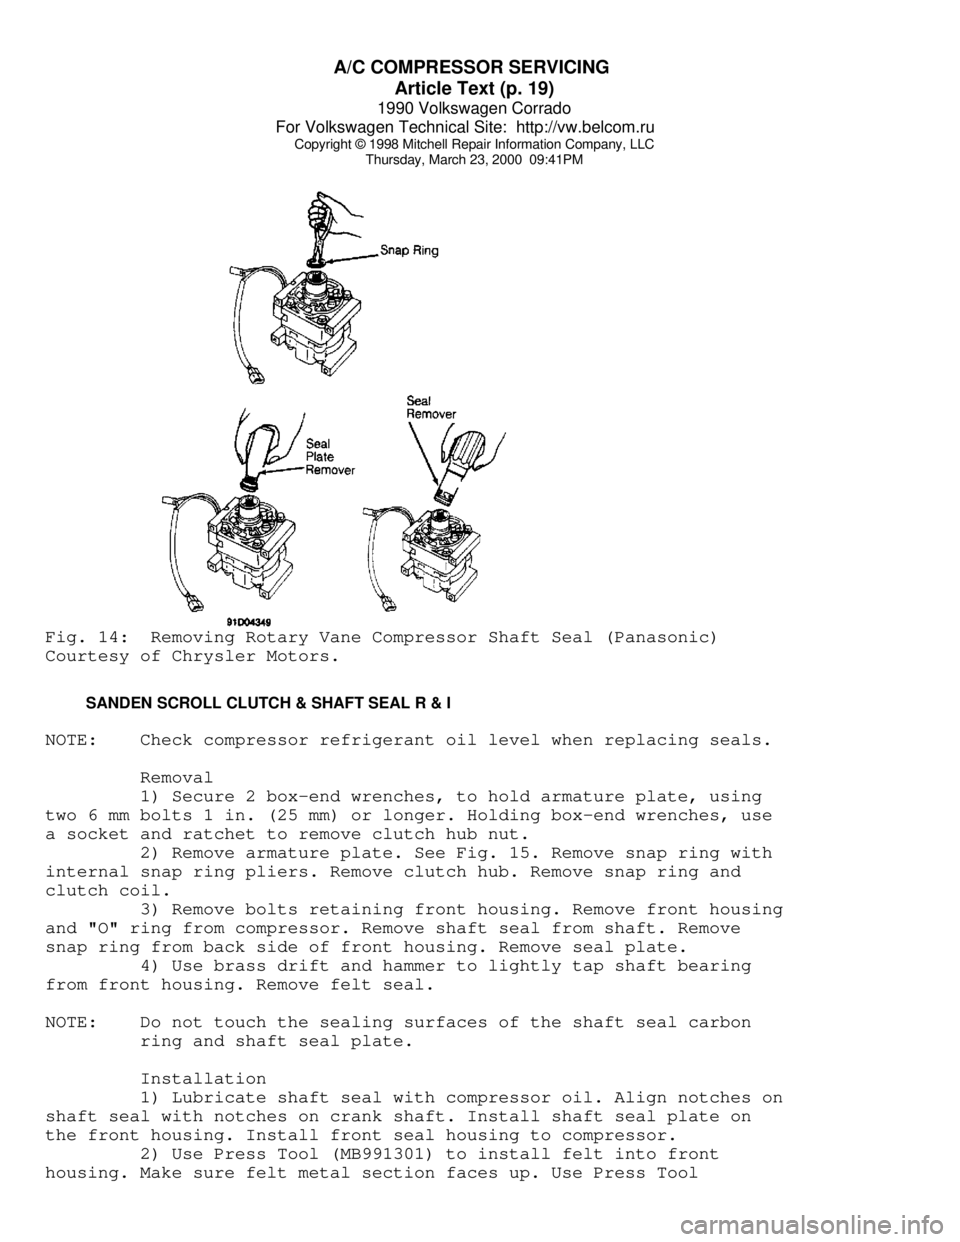
Thursday, March 23, 2000 09:41PMFig. 14: Removing Rotary Vane Compressor Shaft Seal (Panasonic)
Courtesy of Chrysler Motors.
SANDEN SCROLL CLUTCH & SHAFT SEAL R & I
NOTE: Check compressor refrigerant oil level when replacing seals.
Removal
1) Secure 2 box-end wrenches, to hold armature plate, using
two 6 mm bolts 1 in. (25 mm) or longer. Holding box-end wrenches, use
a socket and ratchet to remove clutch hub nut.
2) Remove armature plate. See Fig. 15. Remove snap ring with
internal snap ring pliers. Remove clutch hub. Remove snap ring and
clutch coil.
3) Remove bolts retaining front housing. Remove front housing
and "O" ring from compressor. Remove shaft seal from shaft. Remove
snap ring from back side of front housing. Remove seal plate.
4) Use brass drift and hammer to lightly tap shaft bearing
from front housing. Remove felt seal.
NOTE: Do not touch the sealing surfaces of the shaft seal carbon
ring and shaft seal plate.
Installation
1) Lubricate shaft seal with compressor oil. Align notches on
shaft seal with notches on crank shaft. Install shaft seal plate on
the front housing. Install front seal housing to compressor.
2) Use Press Tool (MB991301) to install felt into front
housing. Make sure felt metal section faces up. Use Press Tool
Page 347 of 906

A/C COMPRESSOR SERVICING
Article Text (p. 21)
1990 Volkswagen Corrado
For Volkswagen Technical Site: http://vw.belcom.ru
Copyright © 1998 Mitchell Repair Information Company, LLC
Thursday, March 23, 2000 09:41PM
clutch coil on compressor.
2) Support compressor on rear mounting ears. Align rotor on
front housing hub. Use adapter and press to install rotor (or drive
into place with soft mallet). After rotor is seated, install front
snap ring.
SANDEN 5-CYL SHAFT SEAL R & I
NOTE: Check compressor refrigerant oil level when replacing seals.
Removal
1) Hold clutch hub stationary and remove shaft nut with thin
wall socket. Use clutch plate puller to remove clutch plate. Tap key
out of slot in crankshaft.
2) Remove seal retainer with seal remover and 3/4" socket
wrench. Use seal seat remover tongs to pull seal seat off compressor
shaft. Insert seal remover into front housing and turn to engage tangs
on seal. Lift seal out. Remove seal "O" ring from front housing, being
careful not to scratch shaft.
Installation
1) Coat "O" ring with refrigerant oil and install into
groove. Load a new seal onto installer, being careful not to touch
carbon sealing surface with fingers. Install shaft protector. Dip seal
in refrigerant oil and install on shaft. Rotate seal clockwise until
seal fits into flats on shaft. Remove seal installer by turning
counterclockwise.
2) Coat seal seat with refrigerant oil and install with
tongs. Reinstall seal seat retainer (with flat side down). Install
shims and shaft key. Rotate shaft several times to help break in seal.
3) Use a press to install clutch plate. Make sure that air
gap is .016-.031" (.41-.79 mm). Hold plate stationary and install
shaft nut.