1990 VOLKSWAGEN CORRADO wiring
[x] Cancel search: wiringPage 728 of 906

STARTER - BOSCH
Article Text
1990 Volkswagen Corrado
For Volkswagen Technical Site: http://vw.belcom.ru
Copyright © 1998 Mitchell Repair Information Company, LLC
Thursday, March 23, 2000 09:51PM
ARTICLE BEGINNING
1990-92 ELECTRICAL
Starters - Bosch
1990-92 Passat
1991-92 Cabriolet, Corrado, Fox, Golf GL, GTI, Jetta, Vanagon
DESCRIPTION
Starter is a brush type, series-wound electric motor with an
overrunning clutch. Field frame is enclosed by commutator end frame
and drive bushing and carries pole shoes and field coils. A splined
armature shaft drive end carries drive assembly.
TROUBLE SHOOTING
CHARGING SYSTEM TROUBLE SHOOTING TABLEÄÄÄÄÄÄÄÄÄÄÄÄÄÄÄÄÄÄÄÄÄÄÄÄÄÄÄÄÄÄÄÄÄÄÄÄÄÄÄÄÄÄÄÄÄÄÄÄÄÄÄÄÄÄÄÄÄÄÄÄÄÄÄÄÄPROBLEM
Possible Cause Action
ÄÄÄÄÄÄÄÄÄÄÄÄÄÄÄÄÄÄÄÄÄÄÄÄÄÄÄÄÄÄÄÄÄÄÄÄÄÄÄÄÄÄÄÄÄÄÄÄÄÄÄÄÄÄÄÄÄÄÄÄÄÄÄÄÄNO START CONDITION
Dead Battery ............................ Check/Replace Battery
Bad Cable Connections .................... Clean/Replace Cables
Ignition Switch/Circuit Fault ............ Check Switch/Circuit
CHARGING SYSTEM WARNING LIGHT STAYS ON
Loose/Worn Alternator Belt ............... Tighten/Replace Belt
Loose Alternator Connections ......... Check/Repair Connections
Warning Light Wiring ...................... Check/Repair Wiring
Faulty Stator/Diodes ................... Test/Repair Alternator
Faulty Voltage Regulator ................ Test/Repair Regulator
WARNING LIGHT OFF WITH IGNITION SWITCH ON
Blown Fuse ................................. Check/Replace Fuse
Faulty Alternator ............................. Test Alternator
Bad Warning Light Bulb ...................... Test/Replace Bulb
WARNING LIGHT ON WITH IGNITION SWITCH OFF
Alternator Wiring Short ................... Check/Repair Wiring
Faulty Rectifier Bridge ................ Test/Repair Alternator
AMMETER INDICATES DISCHARGE
Loose/Worn Alternator Belt ............... Tighten/Replace Belt
Loose Alternator Connections ......... Check/Repair Connections
Page 729 of 906

STARTER - BOSCH
Article Text (p. 2)
1990 Volkswagen Corrado
For Volkswagen Technical Site: http://vw.belcom.ru
Copyright © 1998 Mitchell Repair Information Company, LLC
Thursday, March 23, 2000 09:51PM
Faulty Ammeter ........................... Test/Replace Ammeter
NOISY Defective Battery ....................... Replace Battery
Defective Alternator ................... Test/Repair Alternator
Defective Regulator ..................... Test/Repair RegulatorÄÄÄÄÄÄÄÄÄÄÄÄÄÄÄÄÄÄÄÄÄÄÄÄÄÄÄÄÄÄÄÄÄÄÄÄÄÄÄÄÄÄÄÄÄÄÄÄÄÄÄÄÄÄÄÄÄÄÄÄÄÄÄÄÄ ON-VEHICLE TESTING
STARTER DOES NOT CRANK ENGINE
1) Ensure battery is fully charged. Make sure electrical and
ground connections are clean and tight. With ignition switch in START
position, measure voltage at spade terminal of starter solenoid.
Reading should be at least 8 volts (9.5 volts on Fox). If so, check
engine for mechanical problems. If voltage is not as specified, go to
next step.
2) Measure voltage at ignition switch. If reading is at least
8 volts (9.5 volts on Fox), check wiring between ignition switch and
starter solenoid. If voltage is not as specified, replace ignition
switch.
3) Measure voltage at field (starter) terminal of starter
solenoid. If reading is 8 volts or more, repair or replace starter. If
reading is less than 8 volts, replace starter solenoid.
NOTE: On vehicles with automatic transmission, also check
park/neutral switch.
STARTER CRANKS TOO SLOWLY
Ensure engine crankcase is filled with recommended viscosity
oil. Check charging system to ensure battery is fully charged. Make
sure electrical and ground connections are clean and tight. If starter
still turns slowly, repair or replace starter.
VOLTAGE DROP TEST
Starter Main Terminal
Connect a voltmeter between starter main terminal and starter
body. Disconnect ignition coil positive terminal and operate starter.
Voltage reading should not be more than 1.0 volt less than battery
voltage. If a larger voltage drop is indicated, circuit between
battery and starter terminal may be defective.
Main Starter Case
Connect a voltmeter between positive battery terminal and
starter motor "M" terminal. With ignition off, operate starter for 2-3
seconds. Battery voltage should be present, then drop to less than one
volt. If voltage is greater than specification, high resistance may be
present in circuit. Go to ACROSS SOLENOID SWITCH test.
Across Solenoid Switch
Connect a voltmeter between 2 starter solenoid terminal stud
Page 732 of 906
STARTER - BOSCH
Article Text (p. 5)
1990 Volkswagen Corrado
For Volkswagen Technical Site: http://vw.belcom.ru
Copyright © 1998 Mitchell Repair Information Company, LLC
Thursday, March 23, 2000 09:51PM
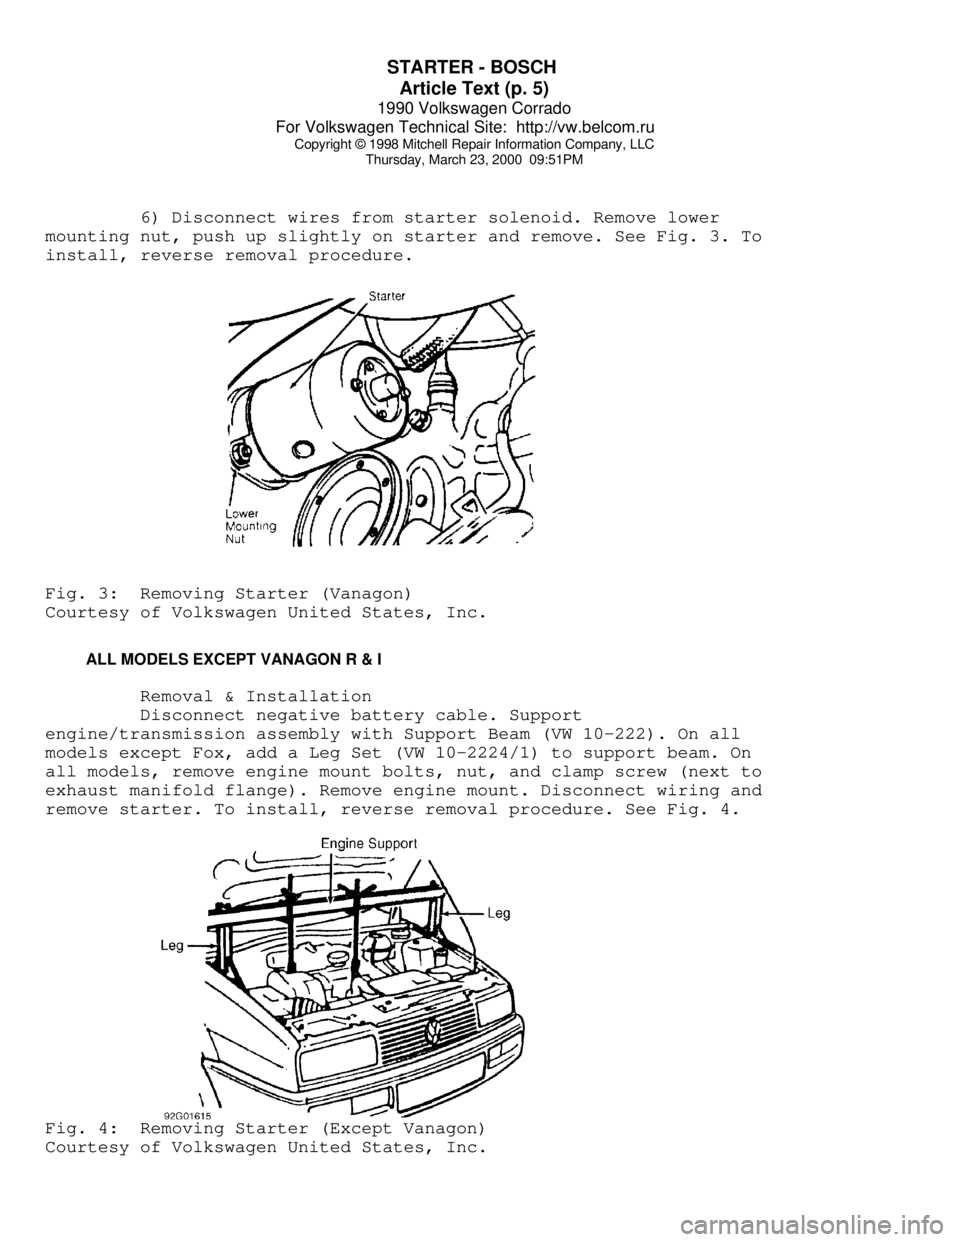
6) Disconnect wires from starter solenoid. Remove lower
mounting nut, push up slightly on starter and remove. See Fig. 3. To
install, reverse removal procedure.Fig. 3: Removing Starter (Vanagon)
Courtesy of Volkswagen United States, Inc.
ALL MODELS EXCEPT VANAGON R & I
Removal & Installation
Disconnect negative battery cable. Support
engine/transmission assembly with Support Beam (VW 10-222). On all
models except Fox, add a Leg Set (VW 10-2224/1) to support beam. On
all models, remove engine mount bolts, nut, and clamp screw (next to
exhaust manifold flange). Remove engine mount. Disconnect wiring and
remove starter. To install, reverse removal procedure. See Fig. 4.Fig. 4: Removing Starter (Except Vanagon)
Courtesy of Volkswagen United States, Inc.
Page 736 of 906

STEERING COLUMN
Article Text (p. 2)
1990 Volkswagen Corrado
For Volkswagen Technical Site: http://vw.belcom.ru
Copyright © 1998 Mitchell Repair Information Company, LLC
Thursday, March 23, 2000 09:51PM
Corrado and Passat, spread horn button locating lugs, then separate
contact plates. On other models, pry center cover from steering wheel.
2) Disconnect horn wiring. Ensure steering wheel is in
straight-ahead position. Mark shaft and wheel for reassembly
reference. Remove retaining nut and washer. Pull steering wheel from
shaft. Reverse removal procedure to install.
TURN SIGNAL SWITCH
Removal & Installation
Remove steering wheel. See STEERING WHEEL & HORN PAD. Remove
retaining screws. Unplug harness connector. Remove turn signal switch.
To install, reverse removal procedure.
WINDSHIELD WIPER SWITCH
Removal & Installation
Remove steering wheel. See STEERING WHEEL & HORN PAD. Remove
turn signal switch. See TURN SIGNAL SWITCH. Remove retaining screws.
Unplug harness connector. Remove windshield wiper switch. To install,
reverse removal procedure.
IGNITION SWITCH (ALL BUT CORRADO)
Removal (All But Corrado)
1) Remove steering wheel. See STEERING WHEEL & HORN PAD.
Remove lower cover from steering column. Remove turn signal and
windshield wiper switches. See TURN SIGNAL SWITCH and WINDSHIELD WIPER
SWITCH. Remove lock washer, spring and horn contact ring.
2) Remove bolt retaining steering column tube to steering
column housing. Disconnect wiring from ignition switch. Unlock
steering with ignition key. Remove steering column housing, ignition
lock and upper half of steering column switch cover. Remove retaining
screw and ignition switch.
Installation
To install ignition switch, reverse removal procedure.
Removal (Corrado)
1) Remove steering column and steering column switch. Insert
ignition key in ignition lock. Mark dimension "a" in Fig. 1. on line
with key (0.5" (12mm)).
2) Bore hole approximately 0.12" (3mm) in diameter through
steering lock housing until stop spring of lock cylinder is visible;
hole depth is approximately 0.12" (3mm). Compress stop spring with a
punch and pull out lock cylinder with key.
Page 742 of 906
STEERING COLUMN SWITCHES
Article Text (p. 3)
1990 Volkswagen Corrado
For Volkswagen Technical Site: http://vw.belcom.ru
Copyright © 1998 Mitchell Repair Information Company, LLC
Thursday, March 23, 2000 09:51PM
follow air bag service precautions may result in air bag
deployment and personal injury. See SERVICE PRECAUTIONS.
After component replacement, perform a system operational
check to ensure proper system operation. See SYSTEM
OPERATION CHECK.
Removal
1) Before proceeding, follow air bag service precautions. See
SERVICE PRECAUTIONS. Disable air bag system. See DISABLING &
ACTIVATING AIR BAG SYSTEM.
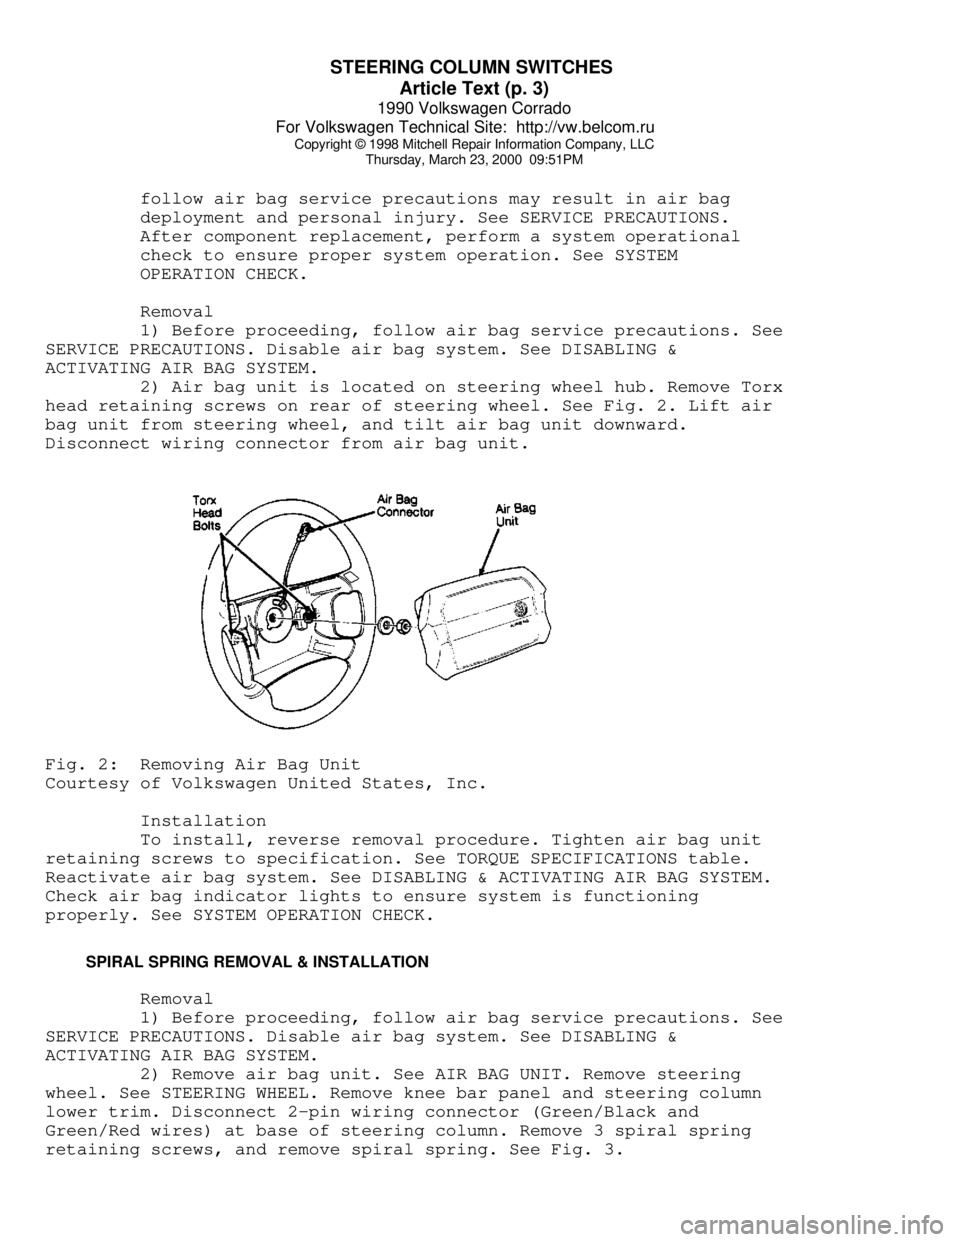
2) Air bag unit is located on steering wheel hub. Remove Torx
head retaining screws on rear of steering wheel. See Fig. 2. Lift air
bag unit from steering wheel, and tilt air bag unit downward.
Disconnect wiring connector from air bag unit.Fig. 2: Removing Air Bag Unit
Courtesy of Volkswagen United States, Inc.
Installation
To install, reverse removal procedure. Tighten air bag unit
retaining screws to specification. See TORQUE SPECIFICATIONS table.
Reactivate air bag system. See DISABLING & ACTIVATING AIR BAG SYSTEM.
Check air bag indicator lights to ensure system is functioning
properly. See SYSTEM OPERATION CHECK.
SPIRAL SPRING REMOVAL & INSTALLATION
Removal
1) Before proceeding, follow air bag service precautions. See
SERVICE PRECAUTIONS. Disable air bag system. See DISABLING &
ACTIVATING AIR BAG SYSTEM.
2) Remove air bag unit. See AIR BAG UNIT. Remove steering
wheel. See STEERING WHEEL. Remove knee bar panel and steering column
lower trim. Disconnect 2-pin wiring connector (Green/Black and
Green/Red wires) at base of steering column. Remove 3 spiral spring
retaining screws, and remove spiral spring. See Fig. 3.
Page 764 of 906

TRANSMISSION REMOVAL & INSTALLATION - A/T
Article Text
1990 Volkswagen Corrado
For Volkswagen Technical Site: http://vw.belcom.ru
Copyright © 1998 Mitchell Repair Information Company, LLC
Thursday, March 23, 2000 09:51PM
ARTICLE BEGINNING
1990-91 TRANSMISSION SERVICING
Automatic Transmission Removal & Installation
Cabriolet, Corrado, Fox, Golf GTI, Jetta, Passat
CABRIOLET, GOLF, GTI & JETTA
NOTE: For manual transaxle replacement procedures, see appropriate
CLUTCH article in the CLUTCHES Section.
REMOVAL & INSTALLATION
1) Disconnect battery ground cable. Disconnect speedometer
cable from transaxle. Raise and support vehicle. Remove left front
wheel.
2) Support engine from above. Remove left rear transaxle
mount and support. Remove upper transaxle-to-engine bolts. Remove
upper bolts from front engine/transaxle mount.
3) Remove lower bolts on front mount and remove mount. Remove
protective plate from transaxle. Remove torque converter-to-drive
plate bolts.
4) Disconnect accelerator and selector cables from transaxle.
Place mating marks on drive axle flanges and remove left and right
axle shaft flange bolts.
NOTE: If clearance is needed to remove transaxle, separate ball
joint from left side steering knuckle and move axle shaft
away from transaxle.
5) Remove left rear engine mount. Remove starter. Remove
subframe mounting bolts and allow subframe to hang free. Support
transaxle with jack. Remove lower mounting bolt. Lower transaxle. To
install, reverse removal procedure. Adjust accelerator and selector
cables.
CORRADO & PASSAT
NOTE: For manual transaxle replacement procedures, see appropriate
CLUTCH article in the CLUTCHES Section.
REMOVAL & INSTALLATION
1) Disconnect battery ground cable. Remove air ducts to brake
caliper and engine air intake. Disconnect speedometer cable from
transaxle. Remove upper transaxle-to-engine bolts.
2) Disconnect and plug transaxle cooler lines. Support engine
from above. Remove starter. Disconnect accelerator and selector cables
from transaxle. Remove left transaxle mount and support.
3) Remove electrical wiring from transaxle. Remove lower
Page 785 of 906

TROUBLE SHOOTING - BASIC PROCEDURES
Article Text (p. 9)
1990 Volkswagen Corrado
For Volkswagen Technical Site: http://vw.belcom.ru
Copyright © 1998 Mitchell Repair Information Company, LLC
Thursday, March 23, 2000 09:52PM
malfunction necessaryÄÄÄÄÄÄÄÄÄÄÄÄÄÄÄÄÄÄÄÄÄÄÄÄÄÄÄÄÄÄÄÄÄÄÄÄÄÄÄÄÄÄÄÄÄÄÄÄÄÄÄÄÄÄÄÄÄÄÄÄÄÄÄÄÄÄÄÄÄÄAlternator Light Loose or worn alternator Check alternator drive
Stays On With drive belt tension and
Engine Running condition, See Belt
Adjustment in TUNE-UP
article in the
TUNE-UP section
Loose alternator wiring Check all charging
connections system connections
Short in alternator light See Indicator Warning
wiring Lights in STANDARD
INSTRUMENTS in the
ACCESSORIES &
EQUIPMENT section
Defective alternator stator See Bench Tests in
or diodes ALTERNATOR article
Defective regulator See Regulator Check in
ALTERNATOR article
ÄÄÄÄÄÄÄÄÄÄÄÄÄÄÄÄÄÄÄÄÄÄÄÄÄÄÄÄÄÄÄÄÄÄÄÄÄÄÄÄÄÄÄÄÄÄÄÄÄÄÄÄÄÄÄÄÄÄÄÄÄÄÄÄÄÄÄÄÄÄAlternator Blown fuse See WIRING DIAGRAMS
Light Stays Off
With Ignition
Switch ON
Defective alternator See Testing in
ALTERNATOR article
Defective indicator light See Indicator Warning
bulb or socket Lights in STANDARD
INSTRUMENTS in the
ACCESSORIES &
EQUIPMENT section
ÄÄÄÄÄÄÄÄÄÄÄÄÄÄÄÄÄÄÄÄÄÄÄÄÄÄÄÄÄÄÄÄÄÄÄÄÄÄÄÄÄÄÄÄÄÄÄÄÄÄÄÄÄÄÄÄÄÄÄÄÄÄÄÄÄÄÄÄÄÄAlternator Short in alternator wiring See On-Vehicle Tests
Light Stays OFF in ALTERNATOR article
With Ignition
Switch ON
Defective rectifier bridge See Bench Tests in
ALTERNATOR article
ÄÄÄÄÄÄÄÄÄÄÄÄÄÄÄÄÄÄÄÄÄÄÄÄÄÄÄÄÄÄÄÄÄÄÄÄÄÄÄÄÄÄÄÄÄÄÄÄÄÄÄÄÄÄÄÄÄÄÄÄÄÄÄÄÄÄÄÄÄÄLights or Fuses Defective alternator wiring See On-Vehicle Tests
Burn Out in ALTERNATOR article
Frequently
Defective regulator See Regulator Check in
ALTERNATOR article
Page 786 of 906

TROUBLE SHOOTING - BASIC PROCEDURES
Article Text (p. 10)
1990 Volkswagen Corrado
For Volkswagen Technical Site: http://vw.belcom.ru
Copyright © 1998 Mitchell Repair Information Company, LLC
Thursday, March 23, 2000 09:52PM
Defective battery Check and replace as
necessaryÄÄÄÄÄÄÄÄÄÄÄÄÄÄÄÄÄÄÄÄÄÄÄÄÄÄÄÄÄÄÄÄÄÄÄÄÄÄÄÄÄÄÄÄÄÄÄÄÄÄÄÄÄÄÄÄÄÄÄÄÄÄÄÄÄÄÄÄÄÄAmmeter Gauge Loose or worn drive belt Check alternator drive
Shows Discharge belt tension and
condition. See Belt
Adjustment in TUNE-UP
article in the
TUNE-UP section
Defective wiring Check all wires and
wire connections
Defective alternator or See Bench Tests and
regulator On-Vehicle Tests in
ALTERNATOR article
Defective ammeter, or See Testing in
improper ammeter wiring STANDARD INSTRUMENTS
connection in the ACCESSORIES &
EQUIPMENT section
ÄÄÄÄÄÄÄÄÄÄÄÄÄÄÄÄÄÄÄÄÄÄÄÄÄÄÄÄÄÄÄÄÄÄÄÄÄÄÄÄÄÄÄÄÄÄÄÄÄÄÄÄÄÄÄÄÄÄÄÄÄÄÄÄÄÄÄÄÄÄNoisy Loose drive pulley Tighten drive pulley
Alternator attaching nut
Loose mounting bolts Tighten all alternator
mounting bolts
Worn or dirty bearings See Bearing
Replacement
ALTERNATOR article
Defective diodes or stator See Bench Test in
ALTERNATOR article
ÄÄÄÄÄÄÄÄÄÄÄÄÄÄÄÄÄÄÄÄÄÄÄÄÄÄÄÄÄÄÄÄÄÄÄÄÄÄÄÄÄÄÄÄÄÄÄÄÄÄÄÄÄÄÄÄÄÄÄÄÄÄÄÄÄÄÄÄÄÄBattery Does Loose or worn drive belt Check alternator drive
Stay Charged belt tension and
condition. See
Belt Adjustment in
appropriate TUNE-UP
article in the
TUNE-UP section
Loose or corroded battery Check all charging
connections system connections
Loose alternator connections Check all charging
system connections
Defective alternator or See On-Vehicle Tests
battery and Bench Tests in