1990 VOLKSWAGEN CORRADO display
[x] Cancel search: displayPage 96 of 906

* ELECTRICAL SYSTEM UNIFORM INSPECTION GUIDELINES *
Article Text (p. 31)
1990 Volkswagen Corrado
For Volkswagen Technical Site: http://vw.belcom.ru
Copyright © 1998 Mitchell Repair Information Company, LLC
Thursday, March 23, 2000 09:30PMÄÄÄÄÄÄÄÄÄÄÄÄÄÄÄÄÄÄÄÄÄÄÄÄÄÄÄÄÄÄÄÄÄÄÄÄÄÅÄÄÄÄÄÄÄÄÄÄÄÄÄÄÄÄÄÄÄÄÄÄÄÄÄÄÄÄÄÄÄÄLeaks
³ Require repair or replacement.
ÄÄÄÄÄÄÄÄÄÄÄÄÄÄÄÄÄÄÄÄÄÄÄÄÄÄÄÄÄÄÄÄÄÄÄÄÄÅÄÄÄÄÄÄÄÄÄÄÄÄÄÄÄÄÄÄÄÄÄÄÄÄÄÄÄÄÄÄÄÄMissing
³ Require replacement.
ÄÄÄÄÄÄÄÄÄÄÄÄÄÄÄÄÄÄÄÄÄÄÄÄÄÄÄÄÄÄÄÄÄÄÄÄÄÅÄÄÄÄÄÄÄÄÄÄÄÄÄÄÄÄÄÄÄÄÄÄÄÄÄÄÄÄÄÄÄÄMissing, damaged mounting hardware
³ Require repair or replacement
³ of mounting hardware.
ÄÄÄÄÄÄÄÄÄÄÄÄÄÄÄÄÄÄÄÄÄÄÄÄÄÄÄÄÄÄÄÄÄÄÄÄÄÅÄÄÄÄÄÄÄÄÄÄÄÄÄÄÄÄÄÄÄÄÄÄÄÄÄÄÄÄÄÄÄÄDamaged
³ Suggest repair or replacement.
ÄÄÄÄÄÄÄÄÄÄÄÄÄÄÄÄÄÄÄÄÄÄÄÄÄÄÄÄÄÄÄÄÄÄÄÄÄÁÄÄÄÄÄÄÄÄÄÄÄÄÄÄÄÄÄÄÄÄÄÄÄÄÄÄÄÄÄÄÄÄ HOSES/NOZZLES
HOSES/NOZZLES
ÄÄÄÄÄÄÄÄÄÄÄÄÄÄÄÄÄÄÄÄÄÄÄÄÄÄÄÄÄÄÄÄÄÄÄÄÄÂÄÄÄÄÄÄÄÄÄÄÄÄÄÄÄÄÄÄÄÄÄÄÄÄÄÄÄÄÄÄÄÄCondition
³ Procedure
ÄÄÄÄÄÄÄÄÄÄÄÄÄÄÄÄÄÄÄÄÄÄÄÄÄÄÄÄÄÄÄÄÄÄÄÄÄÅÄÄÄÄÄÄÄÄÄÄÄÄÄÄÄÄÄÄÄÄÄÄÄÄÄÄÄÄÄÄÄÄLeaks
³ Require repair or replacement.
ÄÄÄÄÄÄÄÄÄÄÄÄÄÄÄÄÄÄÄÄÄÄÄÄÄÄÄÄÄÄÄÄÄÄÄÄÄÅÄÄÄÄÄÄÄÄÄÄÄÄÄÄÄÄÄÄÄÄÄÄÄÄÄÄÄÄÄÄÄÄMissing
³ Require replacement.
ÄÄÄÄÄÄÄÄÄÄÄÄÄÄÄÄÄÄÄÄÄÄÄÄÄÄÄÄÄÄÄÄÄÄÄÄÄÅÄÄÄÄÄÄÄÄÄÄÄÄÄÄÄÄÄÄÄÄÄÄÄÄÄÄÄÄÄÄÄÄMissing, damaged mounting hardware
³ Require repair or replacement
³ of mounting hardware.
ÄÄÄÄÄÄÄÄÄÄÄÄÄÄÄÄÄÄÄÄÄÄÄÄÄÄÄÄÄÄÄÄÄÄÄÄÄÅÄÄÄÄÄÄÄÄÄÄÄÄÄÄÄÄÄÄÄÄÄÄÄÄÄÄÄÄÄÄÄÄIncorrect spray pattern
³ Suggest repair or replacement.
ÄÄÄÄÄÄÄÄÄÄÄÄÄÄÄÄÄÄÄÄÄÄÄÄÄÄÄÄÄÄÄÄÄÄÄÄÄÅÄÄÄÄÄÄÄÄÄÄÄÄÄÄÄÄÄÄÄÄÄÄÄÄÄÄÄÄÄÄÄÄBlocked
³ Require repair or replacement.
ÄÄÄÄÄÄÄÄÄÄÄÄÄÄÄÄÄÄÄÄÄÄÄÄÄÄÄÄÄÄÄÄÄÄÄÄÄÅÄÄÄÄÄÄÄÄÄÄÄÄÄÄÄÄÄÄÄÄÄÄÄÄÄÄÄÄÄÄÄÄDamaged
³ Suggest repair or replacement.
ÄÄÄÄÄÄÄÄÄÄÄÄÄÄÄÄÄÄÄÄÄÄÄÄÄÄÄÄÄÄÄÄÄÄÄÄÄÁÄÄÄÄÄÄÄÄÄÄÄÄÄÄÄÄÄÄÄÄÄÄÄÄÄÄÄÄÄÄÄÄ PASSIVE RESTRAINT SYSTEMS
FOR ALL SIR COMPONENTS AND CONDITIONS, CUSTOMER MUST BE
REFERRED TO DIAGNOSIS AND PART REPLACEMENT.
FACILITY ACCREDITATION PROGRAM
The mission of the Motorist Assurance Program (MAP) is ...
To promote trust and the assurance of customer satisfaction in the
vehicle repair industry through education and the creation of industry
guidelines. In continuing to fulfill its mission, MAP will be
establishing a facility accreditation procedure to provide customers
with some assurance that standards of service are being followed
throughout the industry, and that when those standards are not met,
there is a method for the customer to achieve satisfaction.
A repair facility which commits to participate in the program
will be permitted to display the MAP Facility Accreditation Program
sign. Display of the sign will notify the consuming public that they
can have confidence in the inspection performed at the facility, and
that any dispute over repairs or service will be resolved fairly.
Facilities participating in the MAP Accreditation Program
Page 372 of 906

AA - USING THIS SECTION (GENERAL HELP INFORMATION)
Article Text
1990 Volkswagen Corrado
For Volkswagen Technical Site: http://vw.belcom.ru
Copyright © 1998 Mitchell Repair Information Company, LLC
Thursday, March 23, 2000 09:41PM
ARTICLE BEGINNING
ENGINE PERFORMANCE
How To Use This Section
INTRODUCTION
NOTE: Because there are so many possible combinations of
articles for the different manufacturers and models,
the new hyper-text capabilities built into this product
DO NOT apply to this article.
It is the purpose of this repair information system to help
professional automotive technicians maintain top vehicle performance
and correct driveability problems related to today's high tech
vehicles.
Because of the limited amount of space allowable for the this
product, our titles have been condensed to fit into the menus. An
alphabetical designation has been added to the front of each title to
allow the titles to be displayed in a way that reflects their
respective order of use. References to the titles in some of the
diagnostic flow charts sometimes will not correlate with the titles in
the this product menu. If not, refer to the MENU CROSS-REFERENCE table
below.
MENU CROSS-REFERENCE TABLEÄÄÄÄÄÄÄÄÄÄÄÄÄÄÄÄÄÄÄÄÄÄÄÄÄÄÄÄÄÄÄÄÄÄÄÄÄÄÄÄÄÄÄÄÄÄÄÄÄÄÄÄÄÄÄÄÄÄÄÄÄÄÄÄÄÄÄÄÄÄTitle Associate Print (Book) Title:
A - ENGINE/VIN I D .................................... Introduction
B - EMISSION APPLICATION ..................... Emission Applications
C - TUNE-UP SPECS .............. Service & Adjustment Specifications
C - SPECIFICATIONS ............. Service & Adjustment Specifications
D - ADJUSTMENTS ............................. On-Vehicle Adjustments
E - THEORY/OPERATION ............................ Theory & Operation
F - BASIC TESTING ...................... Basic Diagnostic Procedures
G - TESTS W/ CODES ................................ Self-Diagnostics
H - TESTS W/O CODES .................... Trouble Shooting - No Codes
I - SYS/COMP TESTS ..................... Systems & Component Testing
J - PIN VOLTAGE CHARTS .......................... Pin Voltage Charts
K - SENSOR RANGE CHARTS .............. Sensor Operating Range Charts
L - WIRING DIAGRAMS ................................ Wiring Diagrams
M - VACUUM DIAGRAMS ................................ Vacuum Diagrams
N - REMOVE/INSTALL/OHAUL .......... Removal, Overhaul & Installation
ÄÄÄÄÄÄÄÄÄÄÄÄÄÄÄÄÄÄÄÄÄÄÄÄÄÄÄÄÄÄÄÄÄÄÄÄÄÄÄÄÄÄÄÄÄÄÄÄÄÄÄÄÄÄÄÄÄÄÄÄÄÄÄÄÄÄÄÄÄÄ Because of this we recommend that you read the rest of these
INTRODUCTION paragraphs to better understand why the information is
presented in this new format.
The A - ENGINE/VIN I D article will help you identify the
vehicle and its systems. It will also explain the VIN code and in many
cases, show its location.
Page 384 of 906

ABBREVIATIONS
Article Text (p. 7)
1990 Volkswagen Corrado
For Volkswagen Technical Site: http://vw.belcom.ru
Copyright © 1998 Mitchell Repair Information Company, LLC
Thursday, March 23, 2000 09:42PMÀÄÄÄÄÄÄÄÄÄÄÄÄÄÄÄÄÄÁÄÄÄÄÄÄÄÄÄÄÄÄÄÄÄÄÄÄÄÄÄÄÄÄÄÄÄÄÄÄÄÄÄÄÄÄÄÄÄÄÄÄÄÄÄÄÄÄÄÄÙ "J" ABBREVIATION TABLE
"J" ABBREVIATION TABLE
ÚÄÄÄÄÄÄÄÄÄÄÄÄÄÄÄÄÄÂÄÄÄÄÄÄÄÄÄÄÄÄÄÄÄÄÄÄÄÄÄÄÄÄÄÄÄÄÄÄÄÄÄÄÄÄÄÄÄÄÄÄÄÄÄÄÄÄÄÄ¿
³ABBREVIATION
³DEFINITION ³
ÃÄÄÄÄÄÄÄÄÄÄÄÄÄÄÄÄÄÅÄÄÄÄÄÄÄÄÄÄÄÄÄÄÄÄÄÄÄÄÄÄÄÄÄÄÄÄÄÄÄÄÄÄÄÄÄÄÄÄÄÄÄÄÄÄÄÄÄÄ´
³J/B
³Junction Block ³
ÀÄÄÄÄÄÄÄÄÄÄÄÄÄÄÄÄÄÁÄÄÄÄÄÄÄÄÄÄÄÄÄÄÄÄÄÄÄÄÄÄÄÄÄÄÄÄÄÄÄÄÄÄÄÄÄÄÄÄÄÄÄÄÄÄÄÄÄÄÙ "K" ABBREVIATION TABLE
"K" ABBREVIATION TABLE
ÚÄÄÄÄÄÄÄÄÄÄÄÄÄÄÄÄÄÂÄÄÄÄÄÄÄÄÄÄÄÄÄÄÄÄÄÄÄÄÄÄÄÄÄÄÄÄÄÄÄÄÄÄÄÄÄÄÄÄÄÄÄÄÄÄÄÄÄÄ¿
³ABBREVIATION
³DEFINITION ³
ÃÄÄÄÄÄÄÄÄÄÄÄÄÄÄÄÄÄÅÄÄÄÄÄÄÄÄÄÄÄÄÄÄÄÄÄÄÄÄÄÄÄÄÄÄÄÄÄÄÄÄÄÄÄÄÄÄÄÄÄÄÄÄÄÄÄÄÄÄ´
³k/ohms
³1000 ohms (kilo as in k/ohms) ³
³kg
³Kilograms (weight) ³
³kg/cm
ý ³Kilograms Per Square Centimeter ³
³KAM
³Keep Alive Memory ³
³KAPWR
³Keep Alive Power ³
³KM/H
³Kilometers Per Hour ³
³KOEO
³Key On Engine Off ³
³KOER
³Key On Engine Running ³
³KS
³Knock Sensor ³
ÀÄÄÄÄÄÄÄÄÄÄÄÄÄÄÄÄÄÁÄÄÄÄÄÄÄÄÄÄÄÄÄÄÄÄÄÄÄÄÄÄÄÄÄÄÄÄÄÄÄÄÄÄÄÄÄÄÄÄÄÄÄÄÄÄÄÄÄÄÙ "L" ABBREVIATION TABLE
"L" ABBREVIATION TABLE
ÚÄÄÄÄÄÄÄÄÄÄÄÄÄÄÄÄÄÂÄÄÄÄÄÄÄÄÄÄÄÄÄÄÄÄÄÄÄÄÄÄÄÄÄÄÄÄÄÄÄÄÄÄÄÄÄÄÄÄÄÄÄÄÄÄÄÄÄÄ¿
³ABBREVIATION
³DEFINITION ³
ÃÄÄÄÄÄÄÄÄÄÄÄÄÄÄÄÄÄÅÄÄÄÄÄÄÄÄÄÄÄÄÄÄÄÄÄÄÄÄÄÄÄÄÄÄÄÄÄÄÄÄÄÄÄÄÄÄÄÄÄÄÄÄÄÄÄÄÄÄ´
³L
³Liter(s) ³
³L/D
³Light Duty ³
³LCD
³Liquid Crystal Display ³
³LED
³Light Emitting Diode ³
³LH
³Left Hand ³
³LOS
³Limited Operation Strategy ³
³LT BLU
³Light Blue ³
³LT GRN
³Light Green ³
³LUS
³Lock-Up Solenoid ³
³Lbs.
³Pounds ³
³Lt(s).
³Light(s) ³
³Lugg.
³Luggage ³
ÀÄÄÄÄÄÄÄÄÄÄÄÄÄÄÄÄÄÁÄÄÄÄÄÄÄÄÄÄÄÄÄÄÄÄÄÄÄÄÄÄÄÄÄÄÄÄÄÄÄÄÄÄÄÄÄÄÄÄÄÄÄÄÄÄÄÄÄÄÙ "M" ABBREVIATION TABLE
"M" ABBREVIATION TABLE
Page 396 of 906

ABBREVIATIONS
Article Text (p. 7)
1990 Volkswagen Corrado
For Volkswagen Technical Site: http://vw.belcom.ru
Copyright © 1998 Mitchell Repair Information Company, LLC
Thursday, March 23, 2000 09:42PM³Inj. ³Injector ³
ÀÄÄÄÄÄÄÄÄÄÄÄÄÄÄÄÄÄÁÄÄÄÄÄÄÄÄÄÄÄÄÄÄÄÄÄÄÄÄÄÄÄÄÄÄÄÄÄÄÄÄÄÄÄÄÄÄÄÄÄÄÄÄÄÄÄÄÄÄÙ "J" ABBREVIATION TABLE
"J" ABBREVIATION TABLE
ÚÄÄÄÄÄÄÄÄÄÄÄÄÄÄÄÄÄÂÄÄÄÄÄÄÄÄÄÄÄÄÄÄÄÄÄÄÄÄÄÄÄÄÄÄÄÄÄÄÄÄÄÄÄÄÄÄÄÄÄÄÄÄÄÄÄÄÄÄ¿
³ABBREVIATION
³DEFINITION ³
ÃÄÄÄÄÄÄÄÄÄÄÄÄÄÄÄÄÄÅÄÄÄÄÄÄÄÄÄÄÄÄÄÄÄÄÄÄÄÄÄÄÄÄÄÄÄÄÄÄÄÄÄÄÄÄÄÄÄÄÄÄÄÄÄÄÄÄÄÄ´
³J/B
³Junction Block ³
ÀÄÄÄÄÄÄÄÄÄÄÄÄÄÄÄÄÄÁÄÄÄÄÄÄÄÄÄÄÄÄÄÄÄÄÄÄÄÄÄÄÄÄÄÄÄÄÄÄÄÄÄÄÄÄÄÄÄÄÄÄÄÄÄÄÄÄÄÄÙ "K" ABBREVIATION TABLE
"K" ABBREVIATION TABLE
ÚÄÄÄÄÄÄÄÄÄÄÄÄÄÄÄÄÄÂÄÄÄÄÄÄÄÄÄÄÄÄÄÄÄÄÄÄÄÄÄÄÄÄÄÄÄÄÄÄÄÄÄÄÄÄÄÄÄÄÄÄÄÄÄÄÄÄÄÄ¿
³ABBREVIATION
³DEFINITION ³
ÃÄÄÄÄÄÄÄÄÄÄÄÄÄÄÄÄÄÅÄÄÄÄÄÄÄÄÄÄÄÄÄÄÄÄÄÄÄÄÄÄÄÄÄÄÄÄÄÄÄÄÄÄÄÄÄÄÄÄÄÄÄÄÄÄÄÄÄÄ´
³k/ohms
³1000 ohms (kilo as in k/ohms) ³
³kg
³Kilograms (weight) ³
³kg/cm
ý ³Kilograms Per Square Centimeter ³
³KAM
³Keep Alive Memory ³
³KAPWR
³Keep Alive Power ³
³KM/H
³Kilometers Per Hour ³
³KOEO
³Key On Engine Off ³
³KOER
³Key On Engine Running ³
³KS
³Knock Sensor ³
ÀÄÄÄÄÄÄÄÄÄÄÄÄÄÄÄÄÄÁÄÄÄÄÄÄÄÄÄÄÄÄÄÄÄÄÄÄÄÄÄÄÄÄÄÄÄÄÄÄÄÄÄÄÄÄÄÄÄÄÄÄÄÄÄÄÄÄÄÄÙ "L" ABBREVIATION TABLE
"L" ABBREVIATION TABLE
ÚÄÄÄÄÄÄÄÄÄÄÄÄÄÄÄÄÄÂÄÄÄÄÄÄÄÄÄÄÄÄÄÄÄÄÄÄÄÄÄÄÄÄÄÄÄÄÄÄÄÄÄÄÄÄÄÄÄÄÄÄÄÄÄÄÄÄÄÄ¿
³ABBREVIATION
³DEFINITION ³
ÃÄÄÄÄÄÄÄÄÄÄÄÄÄÄÄÄÄÅÄÄÄÄÄÄÄÄÄÄÄÄÄÄÄÄÄÄÄÄÄÄÄÄÄÄÄÄÄÄÄÄÄÄÄÄÄÄÄÄÄÄÄÄÄÄÄÄÄÄ´
³L
³Liter(s) ³
³L/D
³Light Duty ³
³LCD
³Liquid Crystal Display ³
³LED
³Light Emitting Diode ³
³LH
³Left Hand ³
³LOS
³Limited Operation Strategy ³
³LT BLU
³Light Blue ³
³LT GRN
³Light Green ³
³LUS
³Lock-Up Solenoid ³
³Lbs.
³Pounds ³
³Lt(s).
³Light(s) ³
³Lugg.
³Luggage ³
ÀÄÄÄÄÄÄÄÄÄÄÄÄÄÄÄÄÄÁÄÄÄÄÄÄÄÄÄÄÄÄÄÄÄÄÄÄÄÄÄÄÄÄÄÄÄÄÄÄÄÄÄÄÄÄÄÄÄÄÄÄÄÄÄÄÄÄÄÄÙ "M" ABBREVIATION TABLE
Page 493 of 906

ELECTROSTATIC DISCHARGE WARNING - BASIC INFORMATION
Article Text
1990 Volkswagen Corrado
For Volkswagen Technical Site: http://vw.belcom.ru
Copyright © 1998 Mitchell Repair Information Company, LLC
Thursday, March 23, 2000 09:44PM
ARTICLE BEGINNING
GENERAL INFORMATION
Electrostatic Discharge (ESD) Warning - Basic Information
All Makes amd Models
* PLEASE READ THIS FIRST *
NOTE: This article is intended for general information purposes
only.
INTRODUCTION
All Electrostatic Discharge (ESD) sensitive components
contain solid state circuits (transistors, diodes, semiconductors)
that may become damaged when contacted with an electrostatic charge.
The following information applies to all ESD sensitive devices. The
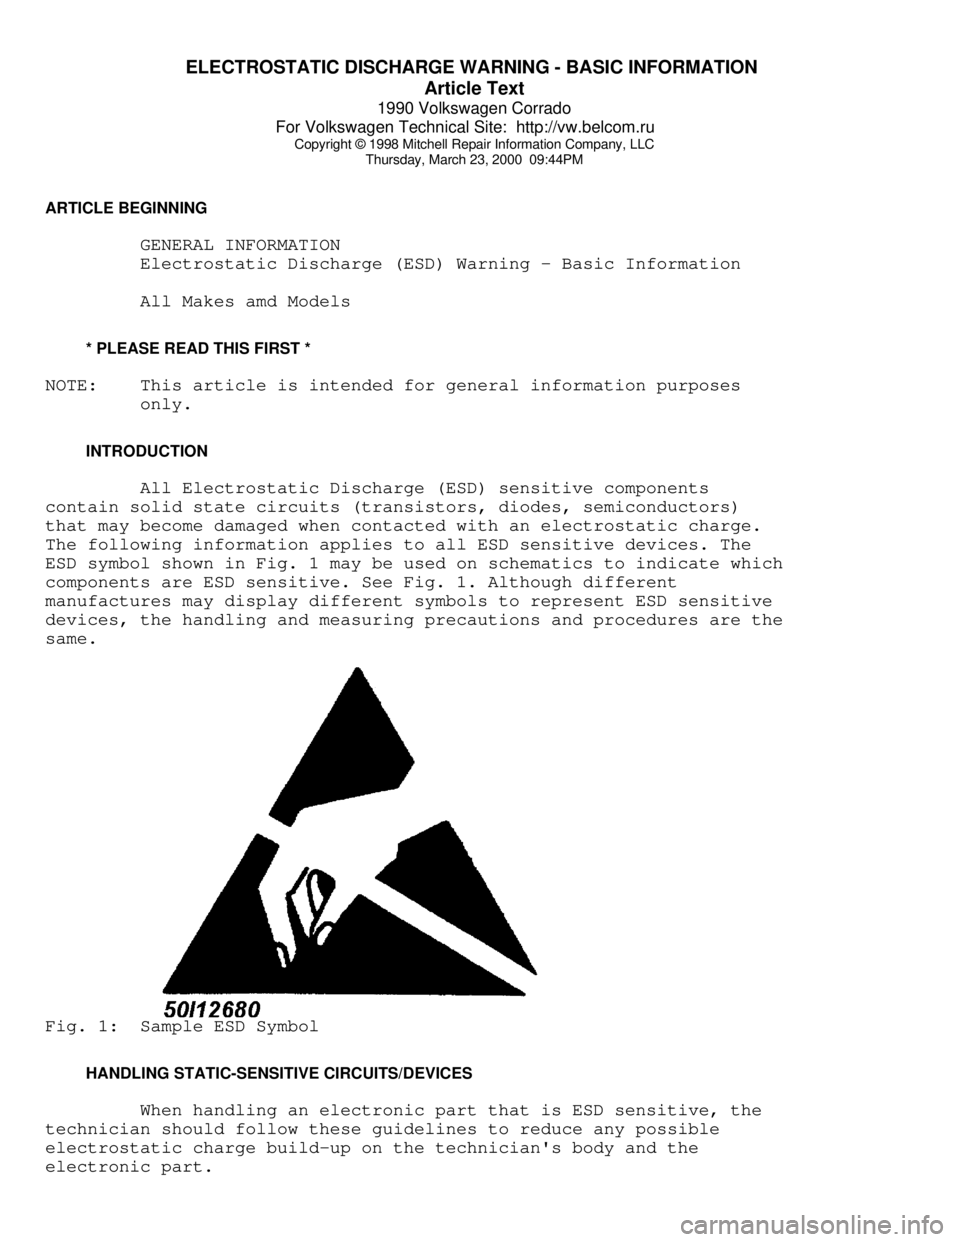
ESD symbol shown in Fig. 1 may be used on schematics to indicate which
components are ESD sensitive. See Fig. 1. Although different
manufactures may display different symbols to represent ESD sensitive
devices, the handling and measuring precautions and procedures are the
same.Fig. 1: Sample ESD Symbol
HANDLING STATIC-SENSITIVE CIRCUITS/DEVICES
When handling an electronic part that is ESD sensitive, the
technician should follow these guidelines to reduce any possible
electrostatic charge build-up on the technician's body and the
electronic part.
Page 508 of 906

EMISSION CONTROL VISUAL INSPECTION PROCEDURES
Article Text (p. 14)
1990 Volkswagen Corrado
For Volkswagen Technical Site: http://vw.belcom.ru
Copyright © 1998 Mitchell Repair Information Company, LLC
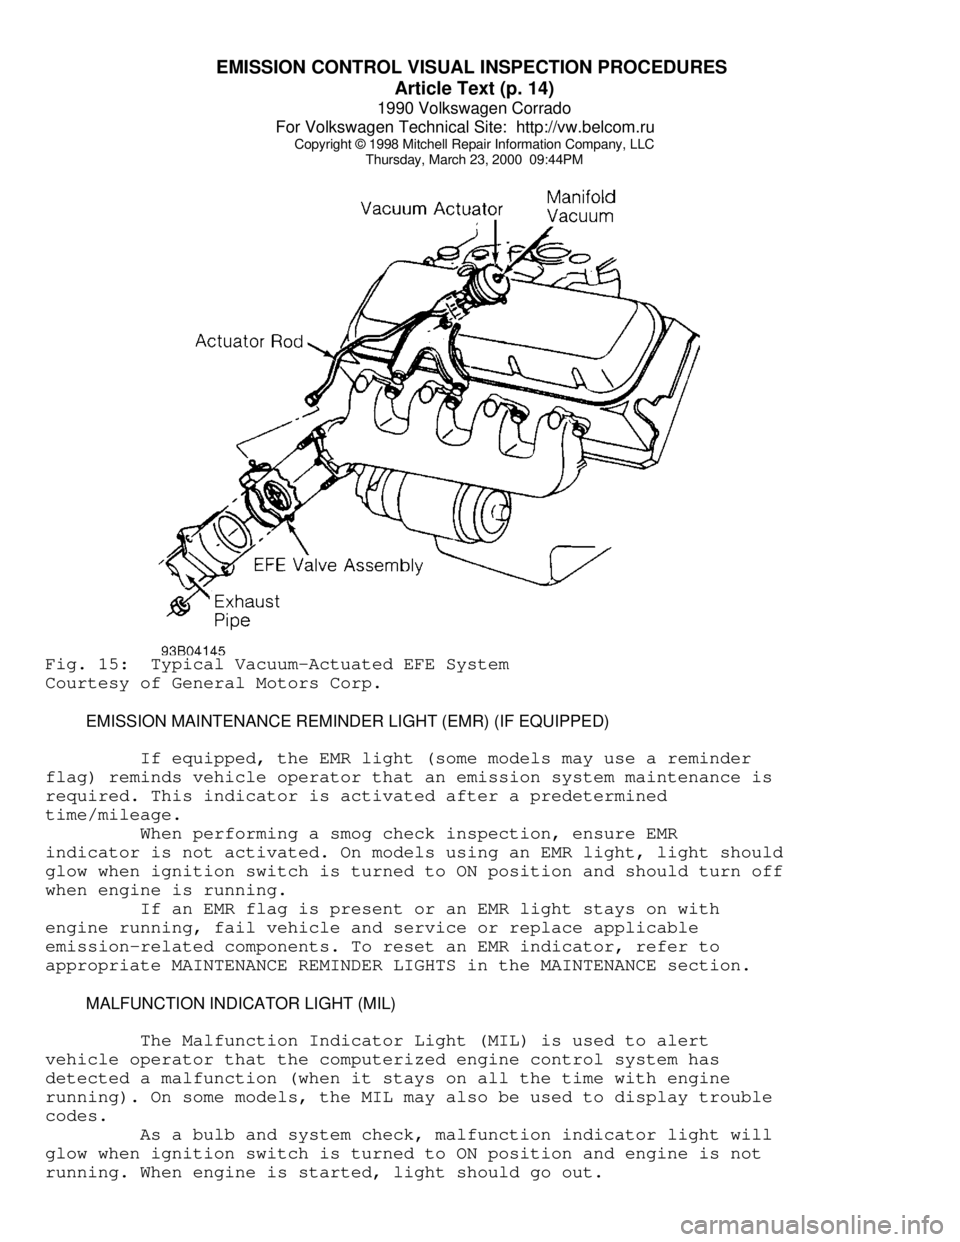
Thursday, March 23, 2000 09:44PMFig. 15: Typical Vacuum-Actuated EFE System
Courtesy of General Motors Corp.
EMISSION MAINTENANCE REMINDER LIGHT (EMR) (IF EQUIPPED)
If equipped, the EMR light (some models may use a reminder
flag) reminds vehicle operator that an emission system maintenance is
required. This indicator is activated after a predetermined
time/mileage.
When performing a smog check inspection, ensure EMR
indicator is not activated. On models using an EMR light, light should
glow when ignition switch is turned to ON position and should turn off
when engine is running.
If an EMR flag is present or an EMR light stays on with
engine running, fail vehicle and service or replace applicable
emission-related components. To reset an EMR indicator, refer to
appropriate MAINTENANCE REMINDER LIGHTS in the MAINTENANCE section.
MALFUNCTION INDICATOR LIGHT (MIL)
The Malfunction Indicator Light (MIL) is used to alert
vehicle operator that the computerized engine control system has
detected a malfunction (when it stays on all the time with engine
running). On some models, the MIL may also be used to display trouble
codes.
As a bulb and system check, malfunction indicator light will
glow when ignition switch is turned to ON position and engine is not
running. When engine is started, light should go out.
Page 657 of 906

MAINTENANCE REMINDER LIGHT RESET PROCEDURES
Article Text
1990 Volkswagen Corrado
For Volkswagen Technical Site: http://vw.belcom.ru
Copyright © 1998 Mitchell Repair Information Company, LLC
Thursday, March 23, 2000 09:48PM
ARTICLE BEGINNING
1983-96 MAINTENANCE
Volkswagen Maintenance Reminder Light Reset Procedures
EGR MAINTENANCE LIGHT (IF EQUIPPED)
EGR light comes on at 15,000 mile intervals to indicate EGR
servicing is required. After checking EGR system, reset mileage
counter. See RESETTING MILEAGE COUNTER.
OXYGEN SENSOR WARNING LIGHT (IF EQUIPPED)
Oxygen sensor (OXS) light comes on at 30,000 mile intervals
to indicate oxygen sensor replacement. After installing new sensor,
reset mileage counter. See RESETTING MILEAGE COUNTER.
RESETTING MILEAGE COUNTER (IF EQUIPPED)
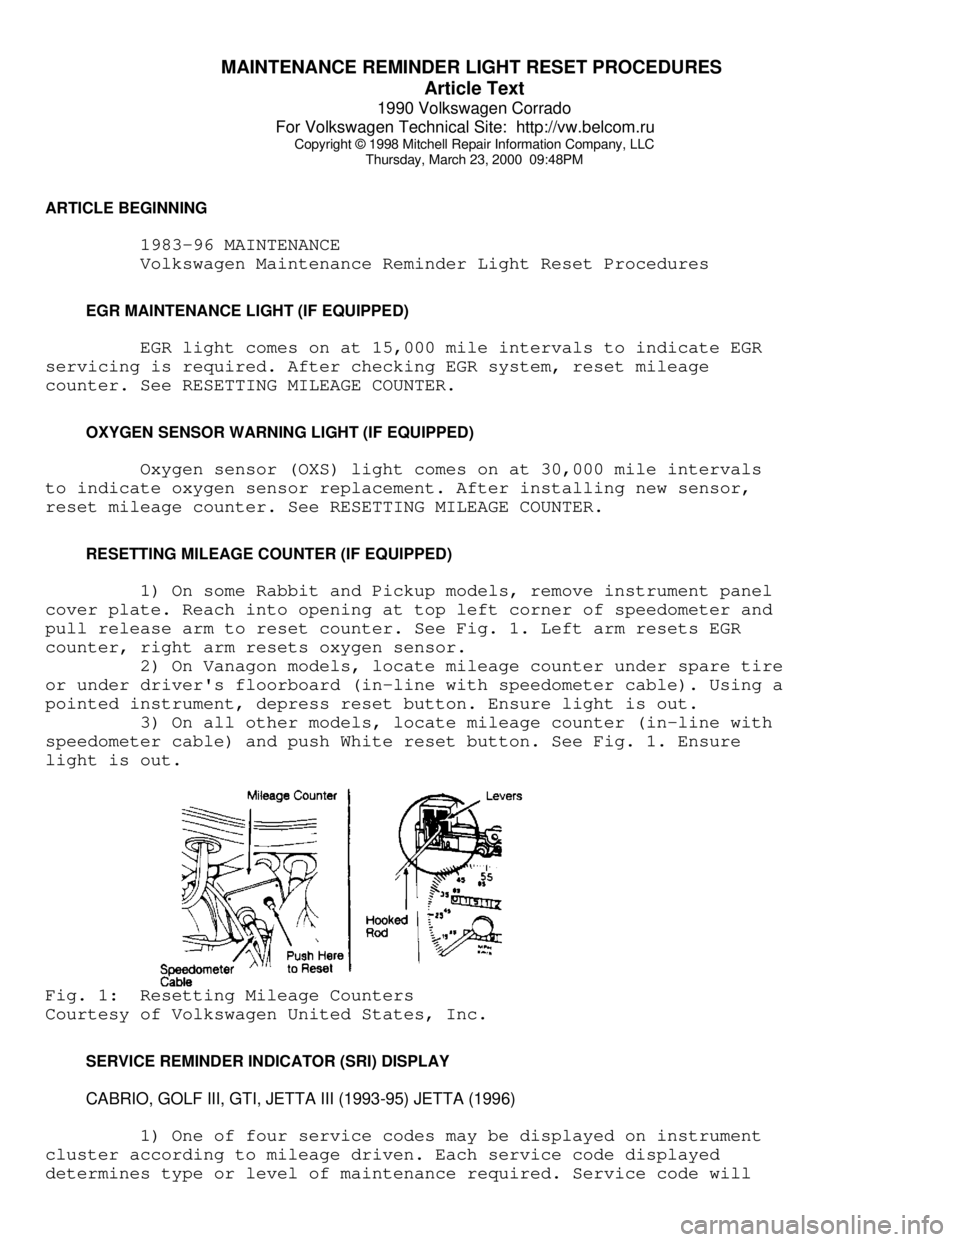
1) On some Rabbit and Pickup models, remove instrument panel
cover plate. Reach into opening at top left corner of speedometer and
pull release arm to reset counter. See Fig. 1. Left arm resets EGR
counter, right arm resets oxygen sensor.
2) On Vanagon models, locate mileage counter under spare tire
or under driver's floorboard (in-line with speedometer cable). Using a
pointed instrument, depress reset button. Ensure light is out.
3) On all other models, locate mileage counter (in-line with
speedometer cable) and push White reset button. See Fig. 1. Ensure
light is out.Fig. 1: Resetting Mileage Counters
Courtesy of Volkswagen United States, Inc.
SERVICE REMINDER INDICATOR (SRI) DISPLAY
CABRIO, GOLF III, GTI, JETTA III (1993-95) JETTA (1996)
1) One of four service codes may be displayed on instrument
cluster according to mileage driven. Each service code displayed
determines type or level of maintenance required. Service code will
Page 658 of 906

MAINTENANCE REMINDER LIGHT RESET PROCEDURES
Article Text (p. 2)
1990 Volkswagen Corrado
For Volkswagen Technical Site: http://vw.belcom.ru
Copyright © 1998 Mitchell Repair Information Company, LLC
Thursday, March 23, 2000 09:48PM
flash for approximately 3 seconds in odometer display window as
ignition is turned on. When servicing becomes due (every 7500 miles),
appropriate service code will flash for approximately 60 seconds. The
four service codes available for display are as follows:
* IN 00 (No Service Necessary)
* OEL (Oil Change Service) Every 7500 Miles
* IN 01 (Inspection Service) Every 15,000 Miles
* IN 02 (Additional Servicing Work) Every 30,000 Miles
2) After performing required maintenance, each effected
service code displayed must be reset individually. For example, at 15,
000 miles service codes OEL and IN 01 will both need to be reset.
3) To reset service codes, turn ignition on. Press and hold
odometer reset button located below speedometer. While holding button,
press clock reset button (lower button for digital clock) located to
left of fuel gauge. Release buttons. Programming mode is now
activated. Service code OEL1.S (distance counter) should be displayed.
4) Press clock reset button once more. 7500 miles should now
be indicated on display. Desired mileage for reset may be attained by
pressing clock reset button. Mileage displayed will decrease in
increments of 500 miles each time button is pressed. This feature
should only be used to calibrate mileage when instrument cluster is
replaced. When desired mileage is displayed, press odometer reset
button.
5) Service code OEL2.S (time counter) should be displayed.
Press clock reset button. 6 (months) will be indicated on display.
Time counter for next oil change may be set by pressing clock reset
button if instrument cluster was replaced. When desired time is
displayed, press odometer reset button.
6) Service code IN 01.S (time counter) should be displayed.
Press clock reset button. 12 (months) will be indicated on display.
Time counter for next maintenance interval may be set by pressing
clock reset button if instrument cluster was replaced. When desired
time is displayed, press odometer reset button.
7) Service code IN 02.S (distance counter) should be
displayed. Press clock reset button. 30,000 (miles) will be indicated
on display. Desired mileage for reset may be attained by pressing
clock reset button. Mileage displayed will decrease in increments of
500 miles each time button is pressed. This feature should only be
used to calibrate mileage when instrument cluster is replaced. When
desired mileage is displayed, turn ignition off. Programming is now
stored in memory.
END OF ARTICLE