Page 75 of 143

CAUTION:
Before starting out, check the operation of the lights and all car/
trailer connections. After driving a short distance, stop and
recheck the lights and connections.
Reversing is difficult and requires practice. While backing-up,
the trailer may pivot off-course. To correct for this, grip the bottom of the steering wheel and move your hand to the left to
move the trailer to the left, or to the right to move the trailer to
the right. Turn the steering wheel a little at a time, and keep the
speed very low. Have someon e guide you when backing.
To help
prevent overheating of the brakes, shift into a lower
gear to make use of engine braking before descending steep or
long grades. Do not make sudden downshifts. Pay strict attention to the coolant temperature gauge when
going up hills. Because of the added load of the trailer, your car's
engine may overheat on hot days. Turning off the air conditioner
will reduce the load on the cooling system.
On cars equipped with automatic transmission. —Do not hold the car stationary on an incline by using the accelerator pedal; this can cause the transmission fluid tooverheat. Instead, use the handbrake or footbrake.
—When towing trailers, avoid high transmission fluid temperatures (caused by the transmission frequently shiftingbetween 3rd and 4th gears) by driving in S3.
NOTE:
Be sure to check state and local laws concerning maximum speed or
other driving restrictions for cars towing trailers. If you are driving
across several states, check each state's requirements before
leaving home, because restrictions may vary.
Parking with a Trailer
Whenever parking your car on an incline with a trailer attached, first
place and seat chocks at each wheel of the car and trailer. This is in
addition to the normal parking preparations of firmly applying the parking brake and placing the transmission in first or reverse
(manual transmission) or P (automatic transmission).
CAUTION:
Parking on an incline is not recommended and should be done only
if it cannot be avoided. Follow all precautions mentioned above
and turn the wheels to point towards a curb if facing downhill,
away from a curb if facing uphill. When leaving an inclined parking place, move the car slightly to unseat the chocks. Then while
keeping the foot brakes firmly applied, have an assistant remove
the chocks.ProCarManuals.comMain Menu t s
Page 77 of 143
Check the following items at each fuel stop:
1. Engine oil level.
2. Radiator coolant level.
Check the following items periodically: 1. Brakes: for braking efficiency, brake pedal travel and hydraulic fluid level.
2. Lights: for operation of headlights, taillights, side marker lights, stoplights, turn signals and back-up lights.
3. Tires: for correct pressures (including spare); inspect for cuts and uneven or excessive wear. Rotate every 7,500 miles (12,000 km)
in the pattern shown on page 107.
4. Steering: for excessive play or vibration while driving. 5. Exhaust system: for leaks or loose mounts.
6. Wipers: for operation of windshield wipers and washer, and condition of wiper blades.
7. Seat belts: for condition of fabric and buckles, and operation of the restraint mechanism.
8. Battery condition.
(cont'd)ProCarManuals.comMain Menu t s
Page 82 of 143
Fluid Locations
AUTOMATIC TRANSMISSIONFLUID DIPSTICK
POWER STEERING
FLUID RESERVOIR
ANTI LOCK BRAKE
FLUID RESERVOIR (Si with ALB) ENGINE OIL
FILLER CAP
CLUTCH FLUID
RESERVOIR (Manual Transmission Only)
RADIATOR
RESERVE
TANK CAP
RADIATOR
CAP ENGINE OIL
DIPSTICK WASHER FLUID
RESERVOIR BRAKE FLUID
RESERVOIRProCarManuals.comMain Menu t s
Page 96 of 143

Fuel Filters/Clutch Fluid
Fuel Filters
(2.0 S)
There are two fuel filters in your car; the main filter is located near
the left side of the fuel tank and an auxiliary filter is at the left side
of the air filter in the engine compartment. Both should be replaced at 60,000 miles (96,000 km) or 48 months,
whichever comes first, or any time you suspect contaminated gas
may have clogged them.
For easier access to the main filter, remove the left rear wheel to
inspect or replace the filter.
The fuel filter is located in the engine compartment, on the right
center of the firewall. It should be replaced at 60,000 miles (96,000km) or 48 months whichever comes first, or any time you suspect
contaminated gas may have clogged it.
CAUTION:
Because the fuel system is under pressure, the filter should be
replaced only by a qualified Honda technician.
CLUTCH FLUID
RESERVOIR
Clutch Fluid
Check the fluid level in the clutchreservoir periodically; it should be
between the MAX and MIN marks
on the reservoir.
If the level is near the MIN mark, add
fluid to raise it to the MAX mark. Do not overfill. Use only brake fluid
manufactured to DOT 3 or DOT 4
specifications from a sealed
container. Follow the manufacturer's instructions printed on the can.
NOTE:
A low clutch fluid level may be an indication of clutch fluid leakage.
You should have your clutch checked if the clutch fluid level in the reservoir is low.
When removing the rear wheel, use safety stands to support the
car.
AUXILIARYFILTER
(2.0 Si,Si)
MAIN FILTERProCarManuals.comMain Menu t s
Page 98 of 143

Brakes
Brake System Design
The diagonally-separated dual service brake systemis designed so half the
system will still provide
braking action if the other
half fails.However, stopping the car with only half the system will require
more pedal pressure and pedal travel than normal. Also, the distance
required to stop will be longer using only half the brake system. If
the brakes fail suddenly, downshift to a lower gear for increased engine braking, and pull off the road as soon as possible.
It is dangerous to drive your car with a problem in either the
brake electrical or hydraulic system; have your dealer check
both systems if you suspect brake trouble. Do not ride the brakes, In other words, don't put your foot on
the brake pedal unless you intend to brake. This causes excessive brake wear and can damage, or lead to loss of braking
effectiveness through overheating. Your brake lights may also
confuse drivers behind you.Driving through deep water may affect the brakes.
Check their effectiveness by pressing the brake pedal gently.If the car does not slow down at the normal rate, continue
gently applying the brakes, while maintaining a safe speed, until
they dry out and normal performance returns.
Brake Wear
Both front and rear brakes should be inspected for wear at the
intervals shown in the maintenance schedule on page 78
When the brakes require maintenance, use only genuine Honda replacement parts or their equivalent.
Brake Wear Indicators
Your car is equipped with audible brake wear indicators. When the
brake pads need to be replaced, the wear indicators will make a "screeching" sound or a high pitch chirp.
NOTE:
Due to some driving habits or climates, brakes may "squeal" when
you first apply them or when you have them partially applied; this is normal, and does not indicate excessive wear. The wear indicator
makes a "screeching" sound while the brakes are applied.ProCarManuals.comMain Menu t s
Page 99 of 143
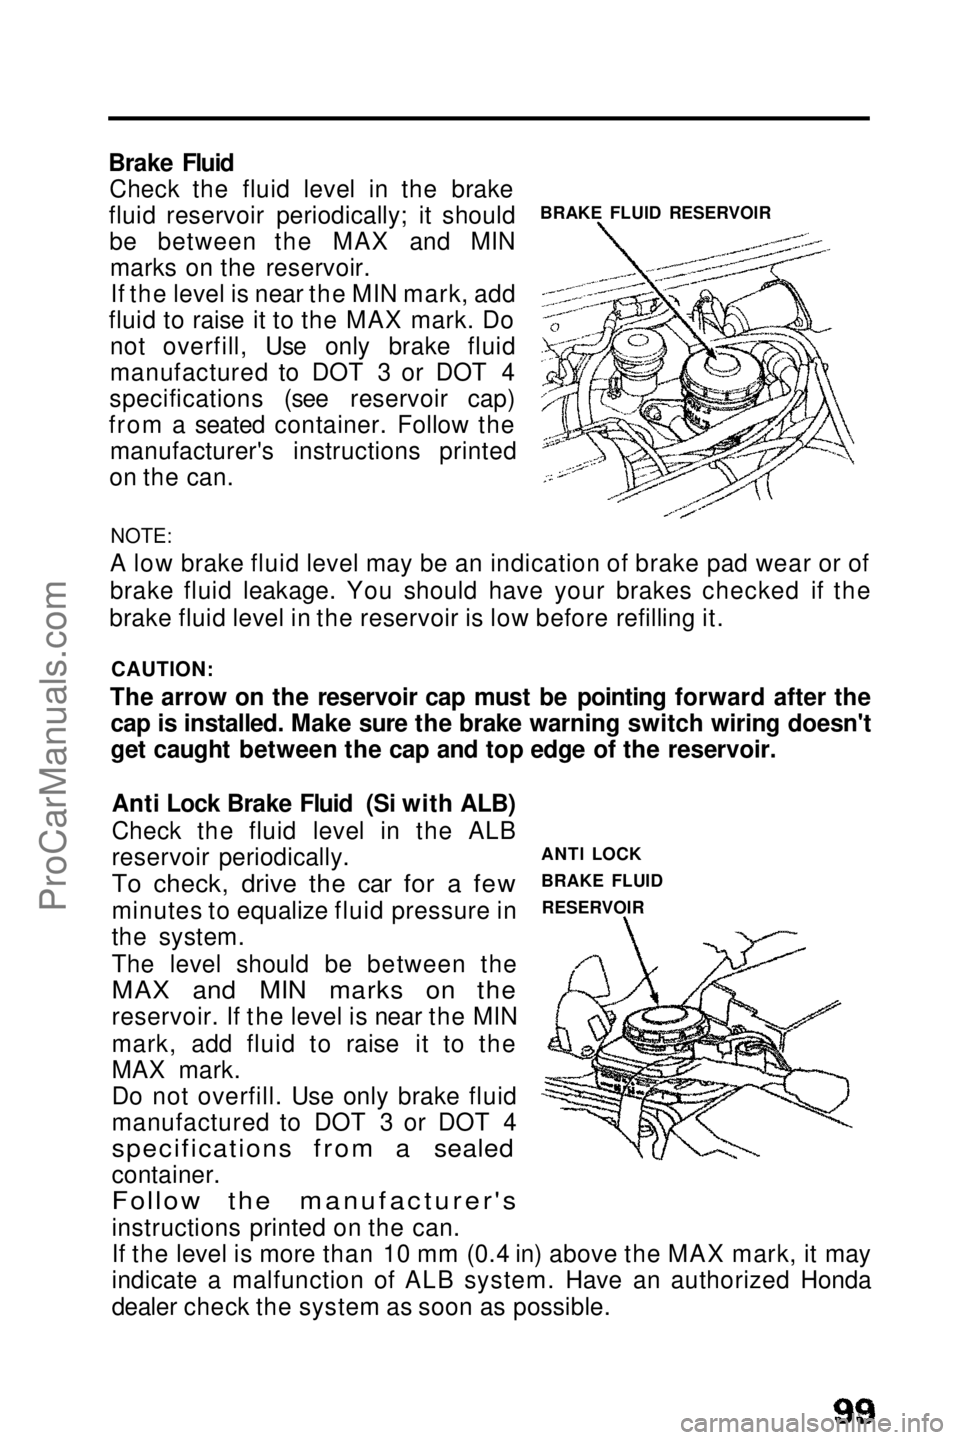
BRAKE FLUID RESERVOIR
Brake Fluid
Check the fluid level in the brake
fluid reservoir periodically; it should be between the MAX and MINmarks on the reservoir.If the level is near the MIN mark, add
fluid to raise it to the MAX mark. Do not overfill, Use only brake fluid
manufactured to DOT 3 or DOT 4
specifications (see reservoir cap)
from a seated container. Follow the manufacturer's instructions printed
on the can.
NOTE:
A low brake fluid level may be an indication of brake pad wear or of
brake fluid leakage. You should have your brakes checked if the
brake fluid level in the reservoir is low before refilling it.
CAUTION:
The arrow on the reservoir cap must be pointing forward after the cap is installed. Make sure the brake warning switch wiring doesn't
get caught between the cap and top edge of the reservoir.
ANTI LOCK
BRAKE FLUIDRESERVOIR
Anti Lock Brake Fluid (Si with ALB)
Check the fluid level in the ALB
reservoir periodically.
To check, drive the car for a few
minutes to equalize fluid pressure in
the system.
The level should be between the
MAX and MIN marks on the
reservoir. If the level is near the MIN
mark, add fluid to raise it to the
MAX mark.
Do not overfill. Use only brake fluid
manufactured to DOT 3 or DOT 4
specifications from a sealed
container.
Follow the manufacturer's
instructions printed on the can.
If the level is more than 10 mm (0.4 in) above the MAX mark, it may
indicate a malfunction of ALB system. Have an authorized Honda
dealer check the system as soon as possible.ProCarManuals.comMain Menu t s
Page 103 of 143
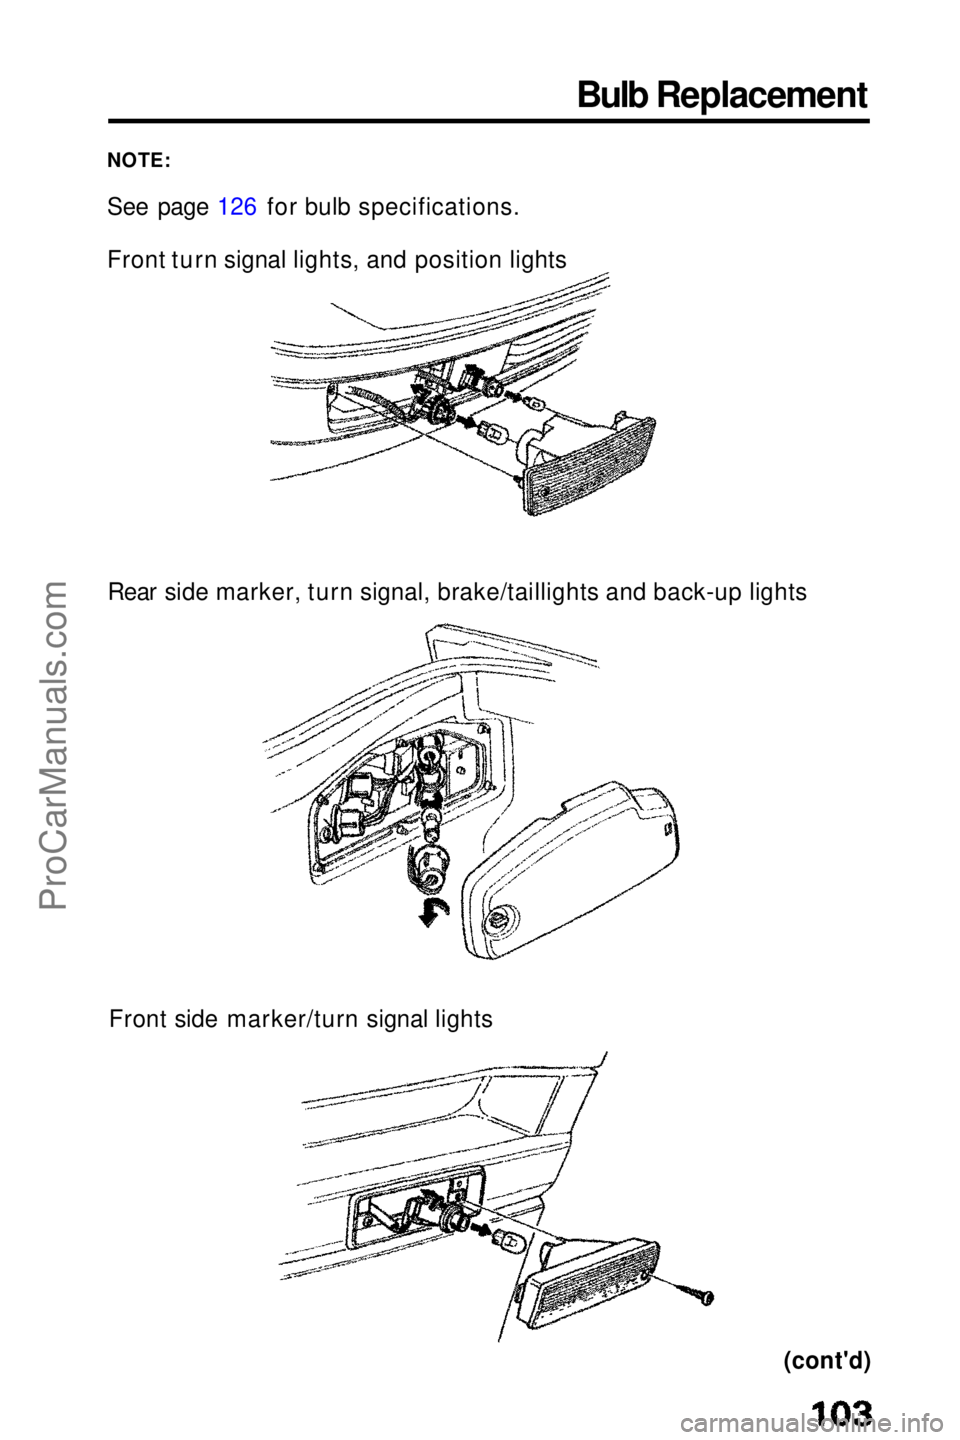
Bulb Replacement
NOTE:
See page 126 for bulb specifications.
Front turn signal lights, and position lights
Rear side marker, turn signal, brake/taillights and back-up lights
Front side marker/turn signal lights
(cont'd)ProCarManuals.comMain Menu t s
Page 104 of 143
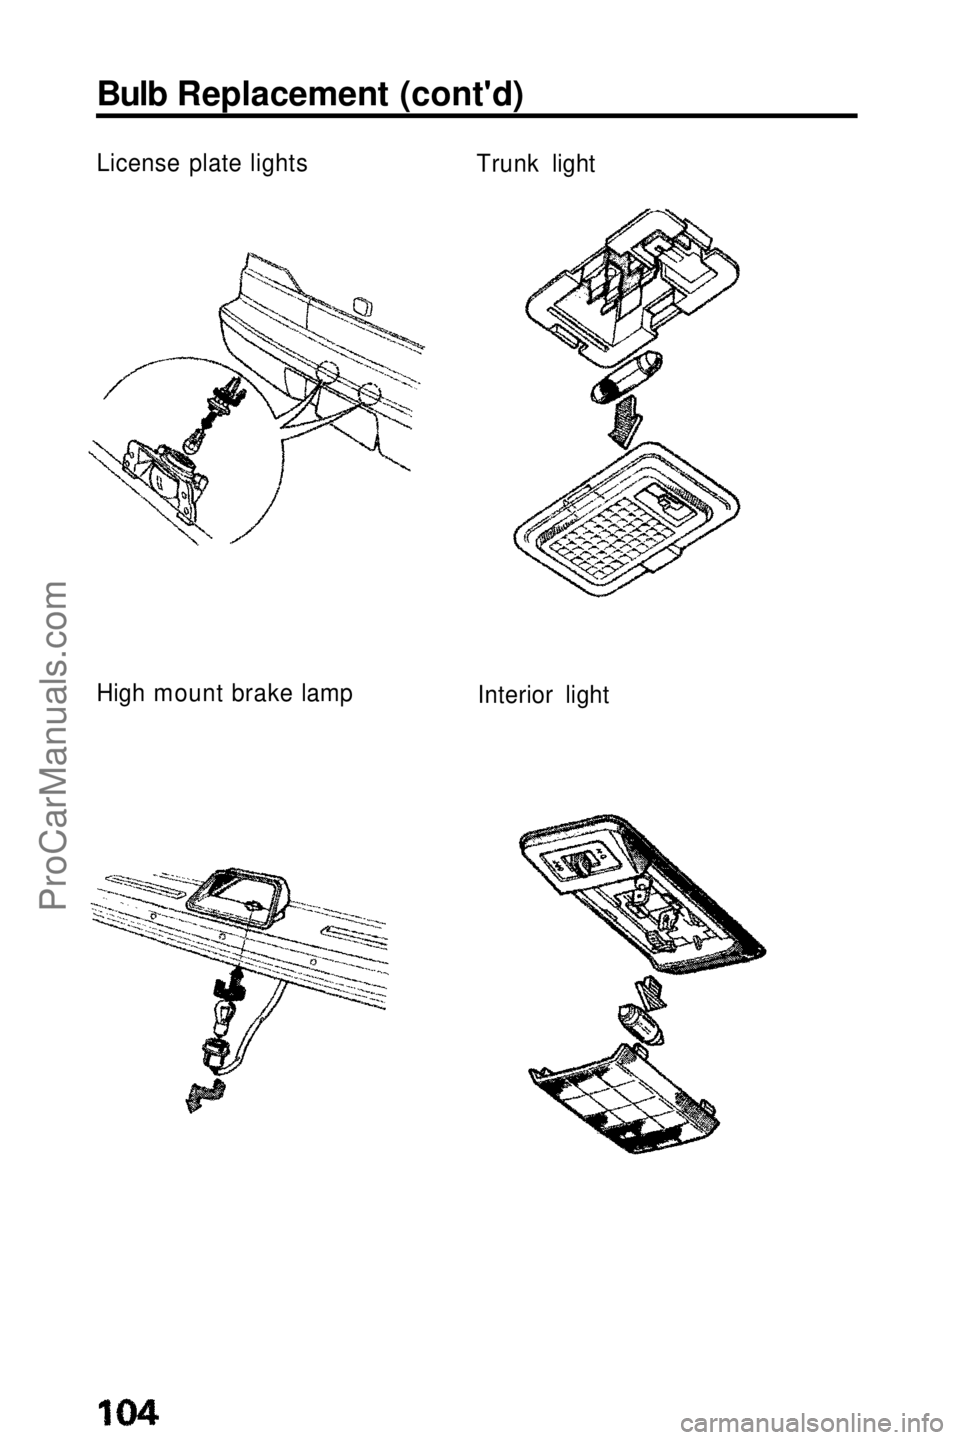
Bulb Replacement (cont'd)
License plate lights
Trunk light
High mount brake lamp
Interior lightProCarManuals.comMain Menu t s