1988 PONTIAC FIERO brake rotor
[x] Cancel search: brake rotorPage 308 of 1825
BRAKES 5-15
lnspect rear drum brake shoe and lining assemblies.
Install or Connect (Figures 12 and 13)
When the thickness of any lining is worn within 0.76 mm
Raise vehicle. See Section OA. (0.030-inch)
of the shoe or rivet, the shoe and lining
1. Cable at brake shoe operating lever. assemblies must
be replaced. Replace shoe and lining
Bend retainer fingers. assemblies
in axle sets.
2. Brake drum and wheel.
3. Rear cable at connector.
0 Lower vehicle. See Section oA. INSPECTING AND REFINISHING ROTORS
Adjust
0 Parking brake. See Section 5C3.
Parking Brake Rear Cable (Disc Brakes)
Remove or Disconnect (Figures
12 and 13)
0 Raise vehicle. See Section OA.
1. Rear cable from connector.
0 Loosen adjusting nut at equalizer.
2. Cable from brake caliper.
Push forward on caliper parking brake apply
lever.
@ Remove cable from tang in lever.
Release lever.
Lower vehicle. See Section OA.
Install or Connect (Figures 12 and
13)
Raise vehicle. See Section OA.
1. Cable to brake caliper.
0 Push forward on caliper parking brake apply
lever.
0 Install cable in lever tang.
Release lever.
2. Rear cable to connector. 0 Lower vehicle. See Section OA.
0 Parking brake. See Section 586.
BRAKE LINING INSPECTION
(Figure 14)
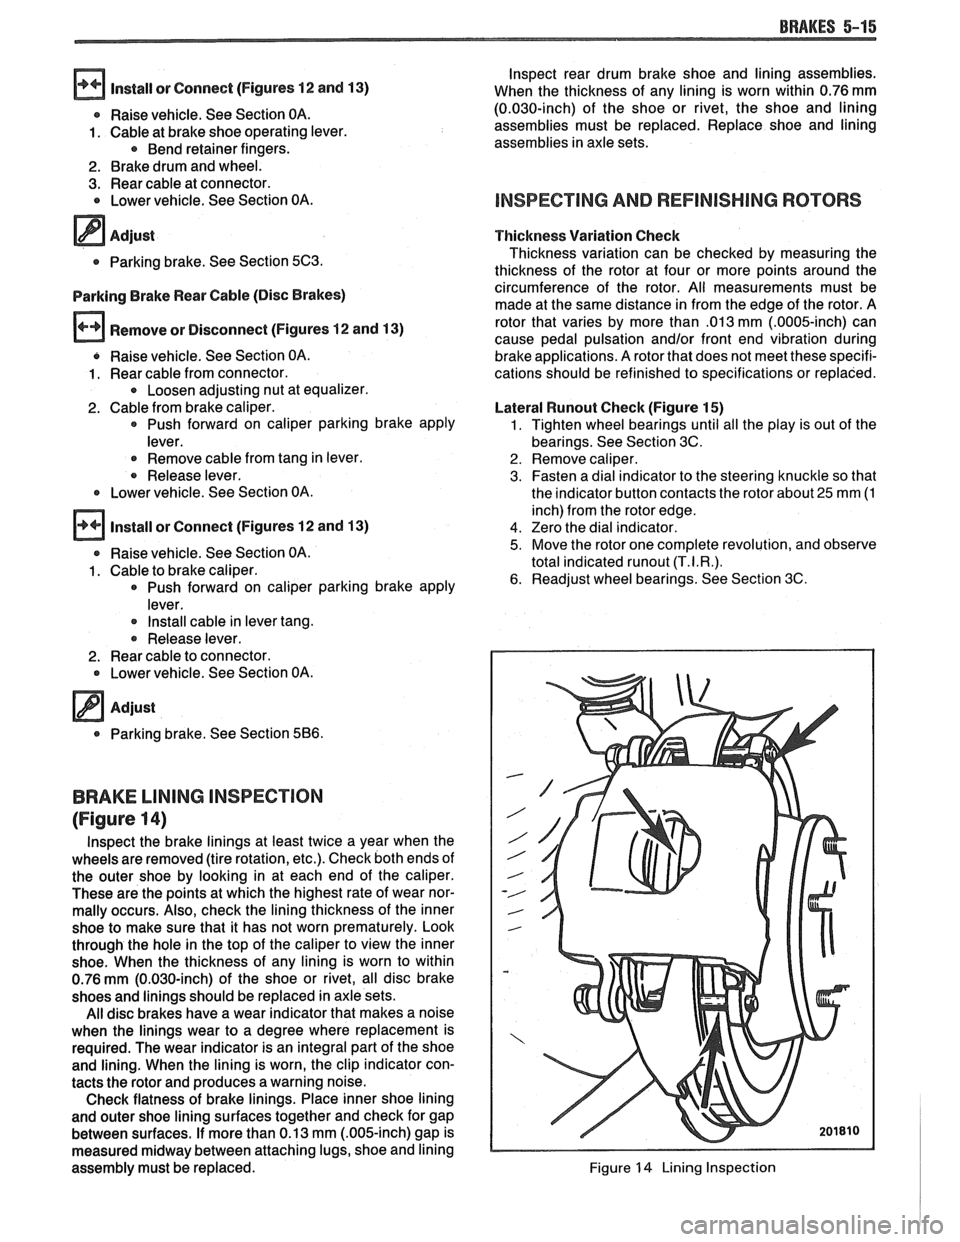
lnspect the brake linings at least twice a year when the
wheels are removed (tire rotation, etc.). Check both ends of
the outer shoe by looking in at each end of the caliper.
These are the points at which the highest rate of wear nor-
mally occurs. Also, check the lining thickness of the inner
shoe to make sure that it has not worn prematurely. Look
through the hole in the top of the caliper to view the inner
shoe. When the thickness of any lining is worn to within
0.76
mm (0.030-inch) of the shoe or rivet, all disc brake
shoes and linings should be replaced in axle sets.
All disc brakes have a wear indicator that makes a noise
when the linings wear to a degree where replacement is
required. The wear indicator is an integral part of the shoe
and lining. When the lining is worn, the clip indicator con-
tacts the rotor and produces a warning noise.
Check flatness of brake linings. Place inner shoe lining
and outer shoe lining surfaces together and check for gap
between surfaces. If more than 0.13 mm
(.OO&inch) gap is
measured midway between attaching lugs, shoe and lining
assembly must be replaced. Thickness
Variation Check
Thickness variation can be checked by measuring the
thickness of the rotor at four or more points around the
circumference of the rotor. All measu'rements must be
made at the same distance in from the edge of the rotor. A
rotor that varies by more than
.013 mm (.0005-inch) can
cause pedal pulsation
and/or front end vibration during
brake applications. A rotor that does not meet these specifi-
cations should be refinished to specifications or replaced.
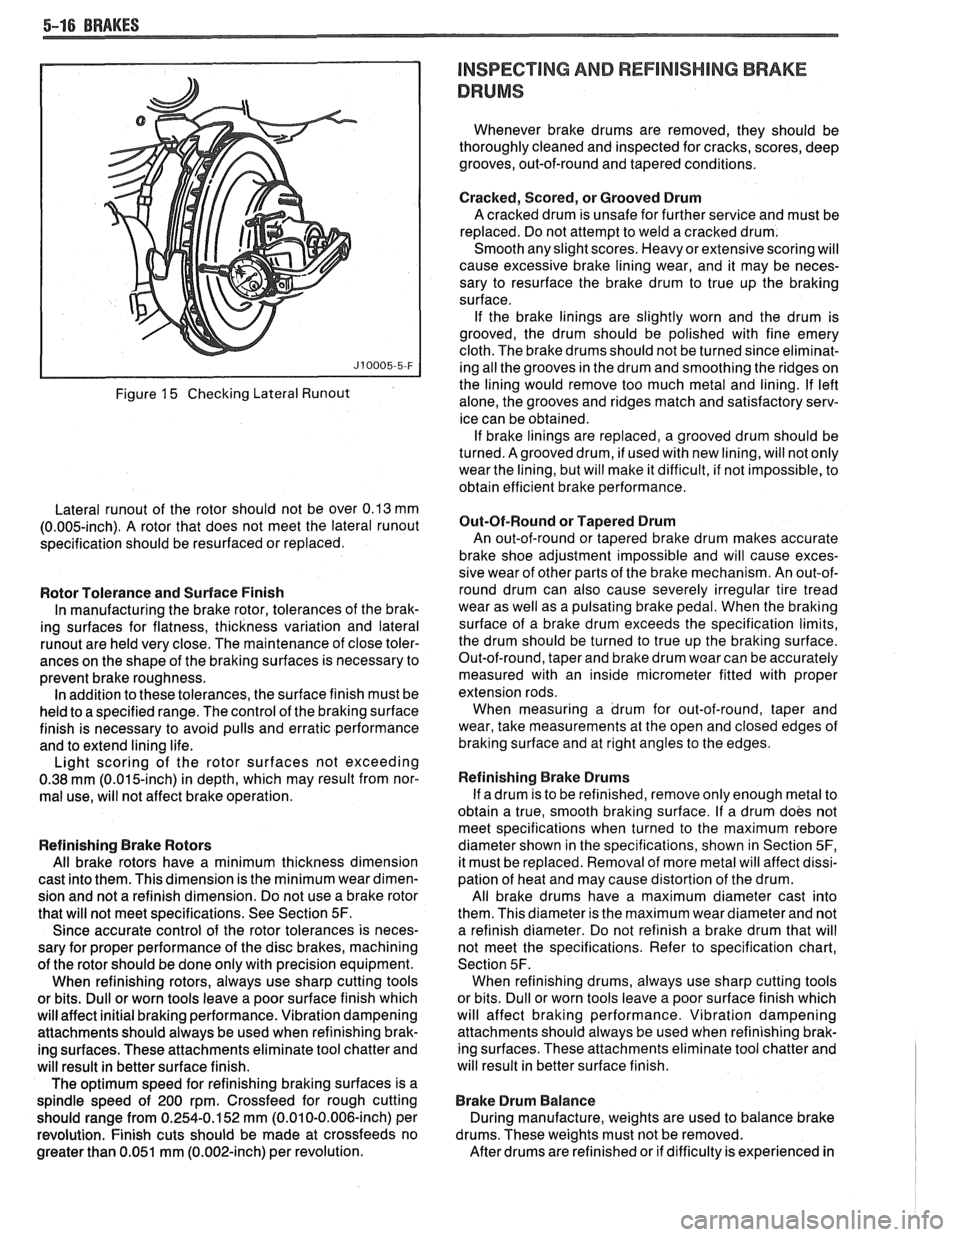
Lateral
Wunout Check (Figure 15)
1. Tighten wheel bearings until all the play is out of the
bearings. See Section 3C.
2. Remove caliper.
3. Fasten a dial indicator to the steering knuckle so that
the indicator button contacts the rotor about
25 mm (1
inch) from the rotor edge.
4. Zero the dial indicator.
5. Move the rotor one complete revolution, and observe
total indicated
runout (T.I.R.).
6. Readjust wheel bearings. See Section 3C.
Figure 14 Lining Inspection
Page 309 of 1825
5-16 BRAKES
Figure 15 Checking Lateral Runout
Lateral runout of the rotor should not be over 0.13 mm
(0.005-inch). A rotor that does not meet the lateral runout
specification should be resurfaced or replaced.
Rotor Tolerance and Surface Finish
In manufacturing the brake rotor, tolerances of the brak-
ing surfaces for flatness, thickness variation and lateral
runout are held very close. The maintenance of close toler-
ances on the shape of the braking surfaces is necessary to
prevent brake roughness. In addition to these tolerances, the surface finish must be
held to a specified range. The control of the braking surface
finish is necessary to avoid pulls and erratic performance
and to extend lining life.
Light scoring of the rotor surfaces not exceeding
0.38
mrn (0.015-inch) in depth, which may result from nor-
mal use, will not affect brake operation.
Refinishing Brake Rotors
All brake rotors have a minimum thickness dimension
cast into them. This dimension is the minimum wear dimen-
sion and not a refinish dimension. Do not use a brake rotor
that will not meet specifications. See Section
5F.
Since accurate control of the rotor tolerances is neces-
sary for proper performance of the disc brakes, machining
of the rotor should be done only with precision equipment.
When refinishing rotors, always use sharp cutting tools
or bits. Dull or worn tools leave a poor surface finish which
will affect initial braking performance. Vibration dampening
attachments should always be used when refinishing brak-
ing surfaces. These attachments eliminate tool chatter and
will result in better surface finish.
The optimum speed for refinishing braking surfaces is a
spindle speed of 200 rpm. Crossfeed for rough cutting
should range from 0.254-0.152 mm (0.010-0.006-inch) per
revolution. Finish cuts should be made at crossfeeds no
greater than 0.051 mm (0.002-inch) per revolution.
INSPECTING AND REFlNlSHlMG BRAKE
DRUMS
Whenever brake drums are removed, they should be
thoroughly cleaned and inspected for cracks, scores, deep
grooves, out-of-round and tapered conditions.
Cracked, Scored, or Grooved Drum
A cracked drum is unsafe for further service and must be
replaced. Do not attempt to weld a cracked drum.
Smooth any slight scores. Heavy or extensive scoring will
cause excessive brake lining wear, and it may be neces-
sary to resurface the brake drum to true up the braking
surface.
If the brake linings are slightly worn and the drum is
grooved, the drum should be polished with fine emery
cloth. The brake drums should not be turned since eliminat-
ing all the grooves in the drum and smoothing the ridges on
the lining would remove too much metal and lining. If left
alone, the grooves and ridges match and satisfactory serv-
ice can be obtained. If brake linings are replaced, a grooved drum should be
turned. Agrooved drum, if used with new lining, will not only
wear the lining, but will make it difficult, if not impossible, to
obtain efficient brake performance.
But-Of-Round or Tapered Drum
An out-of-round or tapered brake drum makes accurate
brake shoe adjustment impossible and will cause exces-
sive wear of other parts of the brake mechanism. An out-of-
round drum can also cause severely irregular tire tread
wear as well as a pulsating brake pedal. When the braking
surface of a brake drum exceeds the specification limits,
the drum should be turned to true up the braking surface.
Out-of-round, taper and brake drum wear can be accurately
measured with an inside micrometer fitted with proper
extension rods. When measuring a drum for out-of-round, taper and
wear, take measurements at the open and closed edges of
braking surface and at right angles to the edges.
Refinishing Brake Drums
If adrum is to be refinished, remove only enough metal to
obtain a true, smooth braking surface. If a drum does not
meet specifications when turned to the maximum
rebore
diameter shown in the specifications, shown in Section 5F,
it must be replaced. Removal of more metal will affect dissi-
pation of heat and may cause distortion of the drum.
All brake drums have a maximum diameter cast into
them. This diameter is the maximum wear diameter and not
a refinish diameter. Do not refinish a brake drum that will
not meet the specifications. Refer to specification chart,
Section 5F. When refinishing drums, always use sharp cutting tools
or bits. Dull or worn tools leave a poor surface finish which
will affect braking performance. Vibration dampening
attachments should always be used when refinishing brak-
ing surfaces. These attachments eliminate tool chatter and
will result in better surface finish.
Brake Drum Balance
During manufacture, weights are used to balance brake
drums. These weights must not be removed.
After drums are refinished or if difficulty is experienced in
Page 317 of 1825
SBO-2 DISC BRAKE CALIPER ASSEMBLY
GENERAL DESCRIP"F0N
This caliper has a single bore and is mounted to
the support bracket with two mounting bolts.
Hydraulic pressure, created by applying the brake
pedal, is converted by the caliper to a stopping force.
This force acts equally against the piston and the
bottom of the caliper bore to move the piston outward
and to move (slide) the caliper inward resulting in a
clamping action on the rotor. This clamping action
forces the linings against the rotor, creating friction to
stop the vehicle.
Important
e Replace all components included in repair kits
used to service this caliper.
Lubricate rubber parts with clean brake fluid to
ease assembly.
e Do not use lubricated shop air on brake parts as
damage to rubber components may result.
e If any hydraulic component is removed or
disconnected, it may be necessary to bleed all or
part of the brake system.
Replace shoe and linings in axle sets only.
e The torque values specified are for dry,
unlubricated fasteners.
s Perform service operations on a clean bench free
from all mineral oil materials.
ON-GAR SERVICE
CALIPER ASSEMBLY
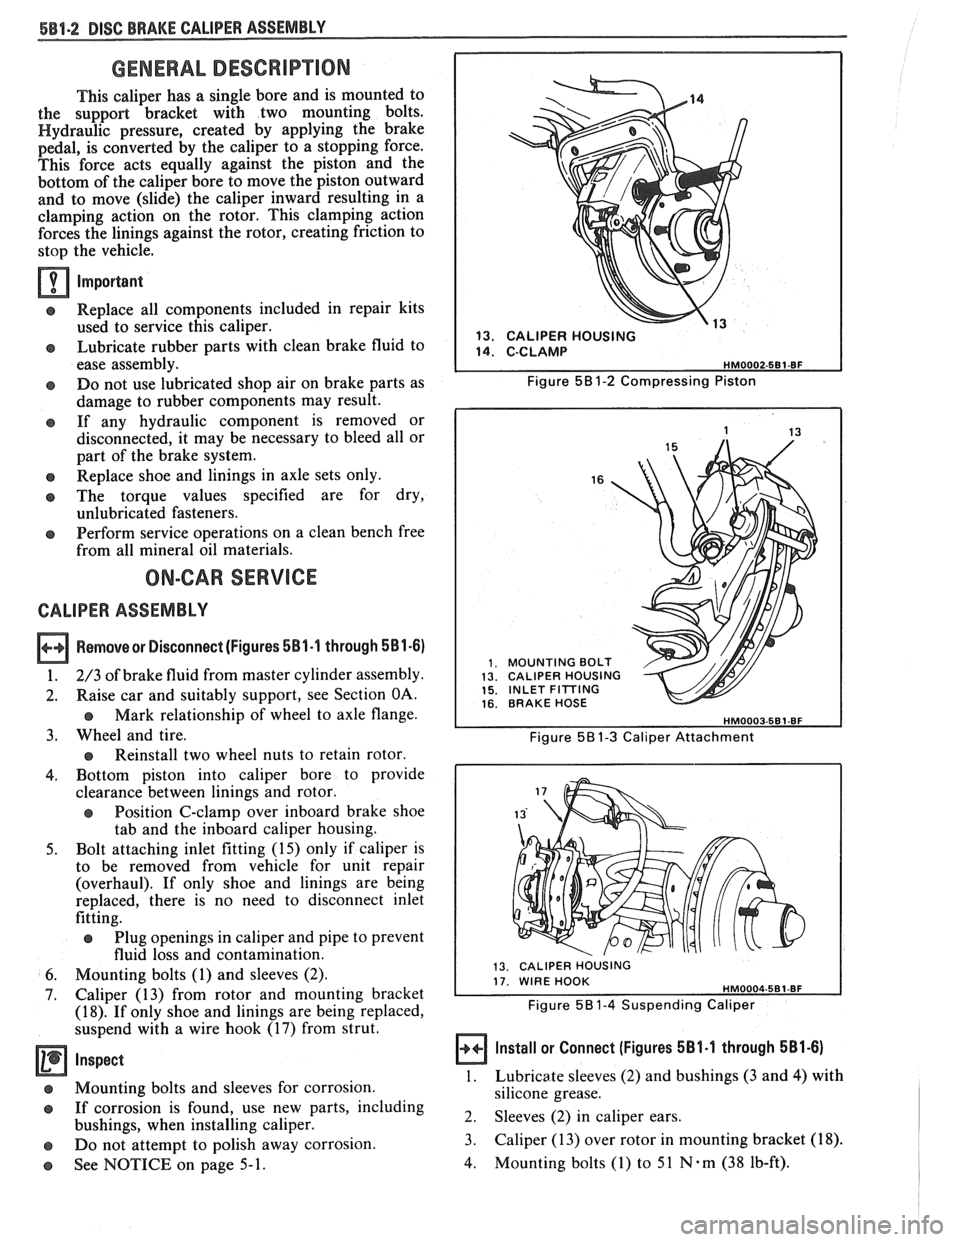
Removesr Disconnect (Figures 581-1 through 581-6)
1. 2/3 of brake fluid from master cylinder assembly.
2. Raise car and suitably support, see Section OA.
Mark relationship of wheel to axle flange.
3. Wheel and tire.
Reinstall two wheel nuts to retain rotor.
4. Bottom piston into caliper bore to provide
clearance between linings and rotor.
e Position C-clamp over inboard brake shoe
tab and the inboard caliper housing.
5. Bolt attaching inlet fitting (15) only if caliper is
to be removed from vehicle for unit repair
(overhaul). If only shoe and linings are being
replaced, there is no need to disconnect inlet
fitting.
e Plug openings in caliper and pipe to prevent
fluid loss and contamination.
6. Mounting bolts (1) and sleeves (2).
7. Caliper (13) from rotor and mounting bracket
(18). If only shoe and linings are being replaced,
suspend with a wire hook (17) from strut.
Inspect
@ Mounting bolts and sleeves for corrosion.
@ If corrosion is found, use new parts, including
bushings, when installing caliper.
e Do not attempt to polish away corrosion.
See NOTICE on page 5-1.
," 13. CALIPER HOUSING
Figure
58 1-2 Compressing Piston
16
MOUNTING BOLT CALIPER HOUSING INLET FITTING BRAKE HOSE
Figure 58 1-3 Caliper Attachment
13. CALIPER HOUSING
Figure 5B1-4 Suspending Caliper
Install or Connect (Figures 581.1 through 581-6)
1.
Lubricate sleeves (2) and bushings (3 and 4) with
silicone grease.
2. Sleeves (2) in caliper ears.
3. Caliper (13) over rotor in mounting bracket
(18).
4. Mounting bolts (1) to 51 N-m (38 lb-ft).
Page 318 of 1825

DISC BRAKE CALIPER ASSEMBLY 581-3
a Measure
Clearance between caliper (13) and bracket
(1 8) stops.
If necessary, remove caliper and file ends of
bracket
(18) stops to provide proper
clearance.
5. Inlet fitting (15), if removed, to 45 N-m (33 lb-ft).
6. Wheels and tires, aligning previous marks.
Remove wheel nuts securing rotor to hub.
e Lower car.
e Torque wheel nuts. See Section 3E
WHEELS AND TIRES.
7. Fill master cylinder to proper level with clean
brake fluid.
Bleed caliper if inlet fitting was removed.
Recheck fluid level.
CLEARANCE BEWEEN CALIPER AND
BRACKET STOPS
SHALL BE
0.13-0.30 MM (0.0050.012 IN.) THREE PLACES
13. CALIPER HOUSING
18. BRACKET
Figure 581-5 Caliper to Bracket Clearance
6. INBOARD SHOE B( LlNlNG 7. WEAR SENSOR 8. SHOE RETAINER
SPRING
13. CALIPER HOUSING
6
2. SLEEVE 3. BUSHING 4. BUSHING 5. OUTBOARD SHOE
LlNlNG
* LUBRICATE WITH SILICONE
Figure 58 1-6 Shoe & Lining Assembly
SHOE AND LINING ASSEMBLIES
Remove or Disconnect (Figures 5B1-6 through
581-18)
1. Calipe; as previously described.
2. Outboard shoe and lining
(5).
6, INBOARD SHOE 8. SHOE RETAINER
Figure 581-7 lnboard Shoe & Retainer
6. INBOARD SHOE B( 8. SHOE RETAINER
LINING SPRING
7. WEAR SENSOR 13. CALIPER HOUSING
Figure 581-8 Installing lnboard Shoe and Lining
5. OUTBOARD SHOE & LINING
13. CALIPER HOUSING
Figure 581-9 Installing Outboard Shoe & Lining
Install or Connect (Figures 581.6 through 581.10)
1. Lubricated new bushings (3 and 4) in grooves in
mounting bolt holes.
3. Inboard shoe and lining (6). 2. Lubricated sleeves (2) in mounting bolts holes.
4. Bushings (3 and 4) from grooves in mounting bolt
holes.
3. Retainer spring (8) on inboard shoe (6).
Page 323 of 1825
586.2 DISC BRAKE CALIPER ASSEMBLY
GENERAL DESCRIPUON
This caliper has a single bore and is mounted to
the support bracket with two mounting bolts.
Hydraulic pressure, created by applying force to the
brake pedal, is converted by the caliper to a stopping
force. This force acts equally against the piston and the
bottom of the caliper bore to move the piston outward
and to move (slide) the caliper inward resulting in a
clamping action on the rotor. This clamping action
forces the linings against the rotor, creating friction to
stop the vehicle.
When the parking brake is applied, the lever turns
the actuator screw which is threaded into a nut in the
piston assembly. This causes the piston to move
outward and the caliper to slide inward mechanically,
forcing the linings against the rotor. The piston
assembly contains a self-adjusting mechanism to keep
the parking brake in proper adjustment.
NOTICE: Replace all components included in
repair kits used to service this caliper. Lubricate
rubber parts with clean brake fluid to ease
assembly. Do not
uhe lubricated shop air on brake
parts as damage to rubber components may result.
If any hydraulic
coniponent is removed or
disconnected,
it may he necessary to bleed all or
part of the brake system. Replace shoe and linings
in axle sets only. The torque values specified are
for dry,
unlubricated fasteners. Perform service
operations
011 a clean bench free from all mineral
oil materials.
ON-CAR SERVICE
CALIPER ASSEMBLY
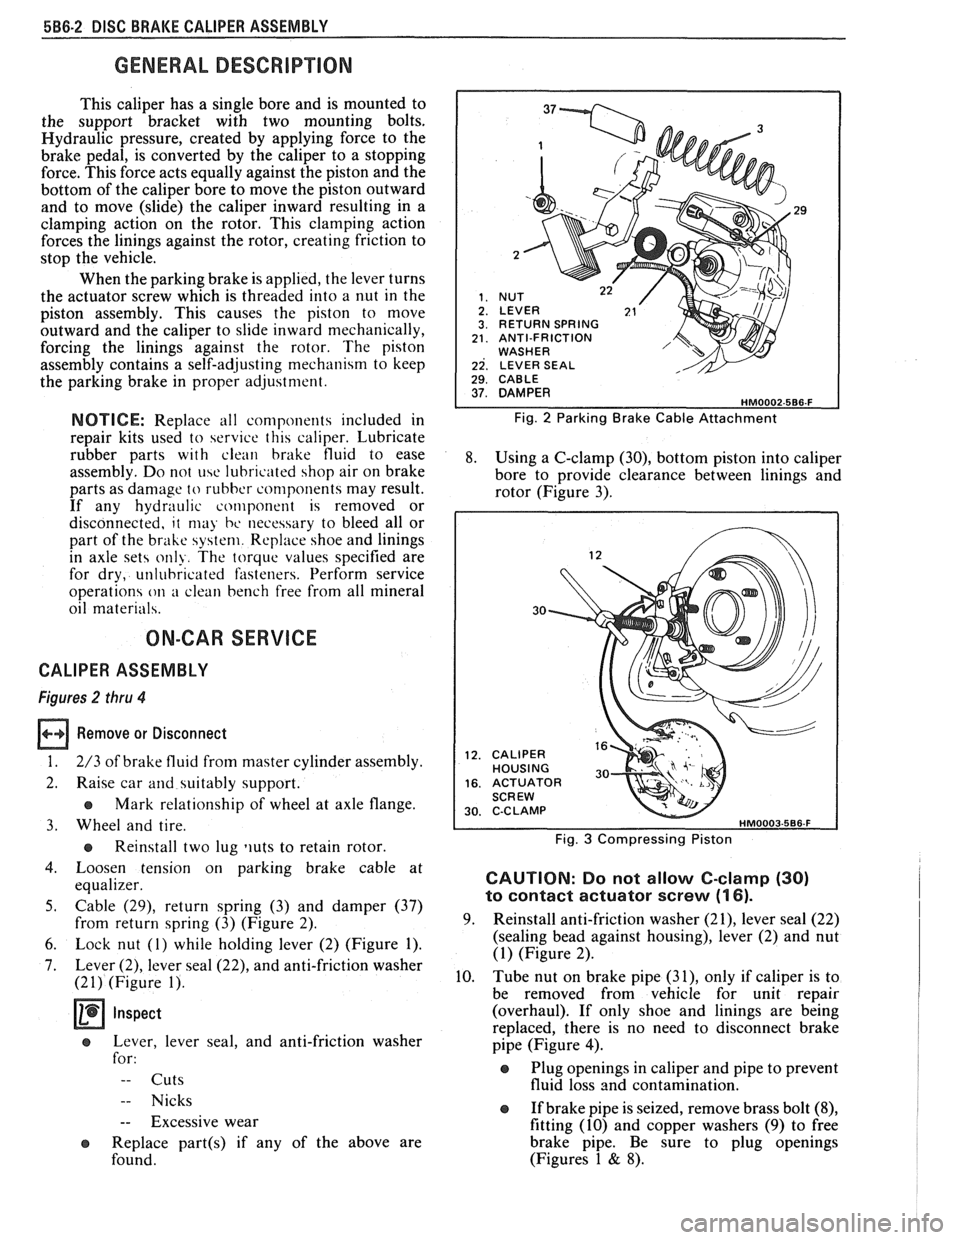
Figures 2 thru 4
Remove or Disconnect
1. 2/3 of brake fluid from master cylinder assembly.
2. Raise car and suitably support.
e Mark relationship of wheel at axle flange.
3. Wheel and tire.
e Reinstall two lug liuts to retain rotor.
4. Loosen tension on parking brake cable at
equalizer.
5. Cable (29), return spring (3) and damper (37)
from return spring (3) (Figure 2).
6. Lock nut (1) while holding lever (2) (Figure 1).
7. Lever (2), lever seal (22), and anti-friction washer
(21) (Figure 1).
Inspect
e Lever, lever seal, and anti-friction washer
for:
-- Cuts
-- Nicks
-- Excessive wear
e Replace part(s) if any of the above are
found.
29
RETURN SPRING ANTI-FRICTION WASHER LEVER SEAL 1 29. CABLE I
Fig. 2 Parking Brake Cable Attachment
8. Using a C-clamp (30), bottom piston into caliper
bore to provide clearance between linings and
rotor (Figure 3).
30
CALIPER HOUSING ACTUATOR SCREW C-C LAMP
Fig. 3 Compressing Piston
CAUTION: Do not allow C-clamp (30)
to contact actuator screw (1 6).
9. Reinstall anti-friction washer (21), lever seal (22)
(sealing bead against housing), lever (2) and nut
(1) (Figure 2).
10. Tube nut on brake pipe
(31), only if caliper is to
be removed from vehicle for unit repair
(overhaul). If only shoe and linings are being
replaced, there is no need to disconnect brake
pipe (Figure
4).
Plug openings in caliper and pipe to prevent
fluid loss and contamination.
If brake pipe is seized, remove brass bolt
(8),
fitting (10) and copper washers (9) to free
brake pipe. Be sure to plug openings
(Figures 1
& 8).
Page 324 of 1825
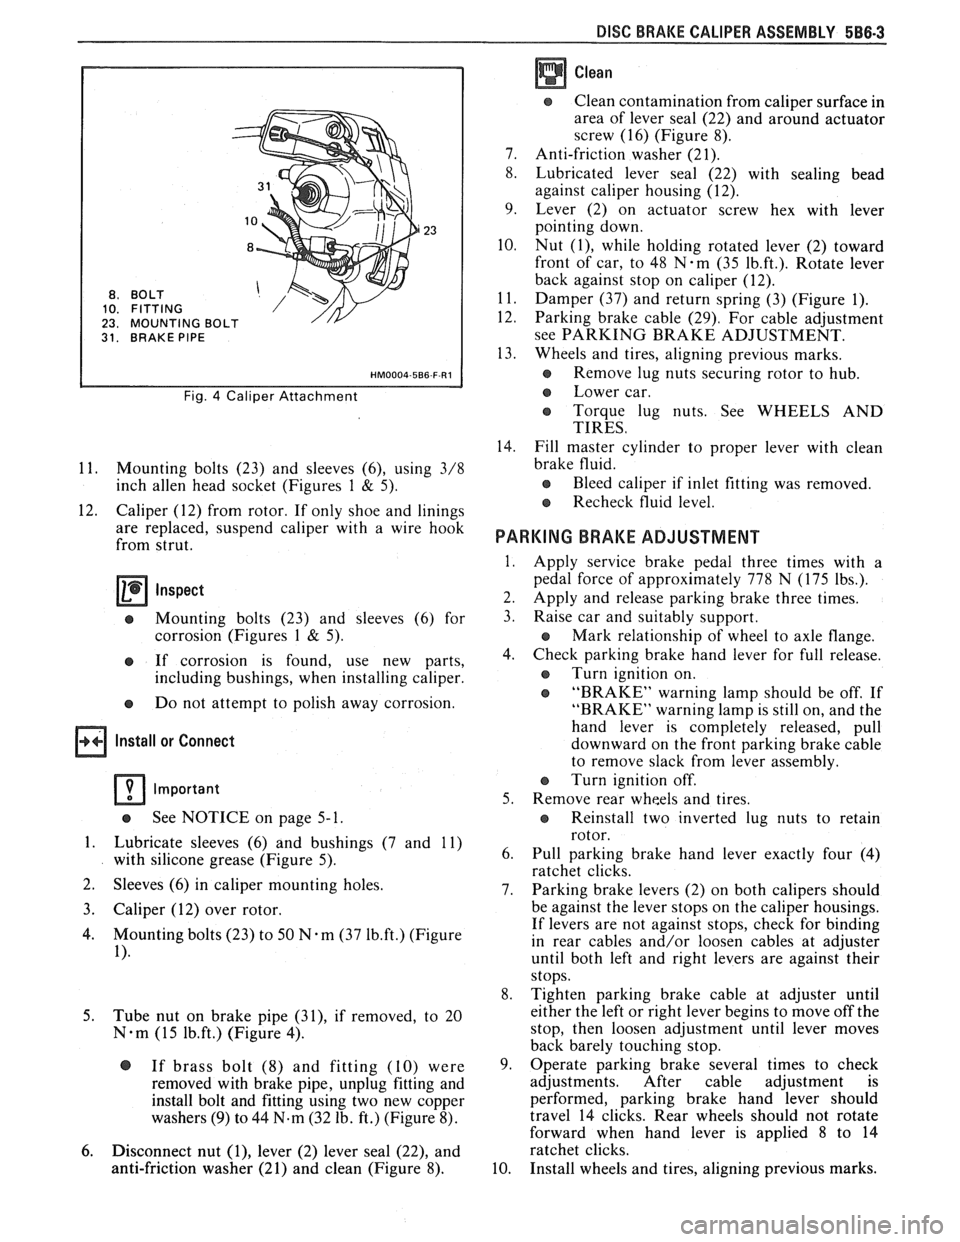
DISC BRAKE CALIPER ASSEMBLY 588-3
BO LT
FITTING
MOUNTING
31. BRAKE PIPE
Fig. 4 Caliper Attachment
11. Mounting bolts (23) and sleeves (6), using 3/8
inch
allen head socket (Figures 1 & 5).
12. Caliper (12) from rotor. If only shoe and linings
are replaced, suspend caliper with a wire hook
from strut.
Inspect
e Mounting bolts (23) and sleeves (6) for
corrosion (Figures
1 & 5).
e If corrosion is found, use new parts,
including bushings, when installing caliper.
e Do not attempt to polish away corrosion.
Install or Connect
Important
See NOTICE on page 5- 1.
1. Lubricate sleeves (6) and bushings (7 and 11)
with silicone grease (Figure 5).
2. Sleeves
(6) in caliper mounting holes.
3. Caliper (12) over rotor.
4. Mounting bolts (23) to 50 N-m (37 1b.ft.) (Figure
1).
5.
Tube nut on brake pipe (31), if removed, to 20
N-m (15 1b.ft.) (Figure 4).
@ If brass bolt (8) and fitting (10) were
removed with brake pipe, unplug fitting and
install bolt and fitting using two new copper
washers
(9) to 44 N.m (32 lb. ft.) (Figure 8).
6. Disconnect nut (I), lever (2) lever seal (22), and
anti-friction washer (21) and clean (Figure 8).
Clean
Clean contamination from caliper surface in
area of lever seal (22) and around actuator
screw (16) (Figure 8).
7. Anti-friction washer (21).
8. Lubricated lever seal (22) with sealing bead
against caliper housing (12).
9. Lever (2) on actuator screw hex with lever
pointing down.
10. Nut
(I), while holding rotated lever (2) toward
front of car, to 48
N-m (35 1b.ft.). Rotate lever
back against stop on caliper (12).
11. Damper (37) and return spring (3) (Figure 1).
12. Parking brake cable (29). For cable adjustment
see PARKING BRAKE ADJUSTMENT.
13. Wheels and tires, aligning previous marks.
s Remove lug nuts securing rotor to hub.
e Lower car.
e Torque lug nuts. See WHEELS AND
TIRES.
14. Fill master cylinder to proper lever with clean
brake fluid.
e Bleed caliper if inlet fitting was removed.
Recheck fluid level.
PARKING BRAKE ADJUSTMENT
Apply service brake pedal three times with a
pedal force of approximately 778 N (175 lbs.).
Apply and release parking brake three times.
Raise car and suitably support.
e Mark relationship of wheel to axle flange.
Check parking brake hand lever for full release.
e Turn ignition on.
e "BRAKE" warning lamp should be off. If
"BRAKE" warning lamp is still on, and the
hand lever is completely released, pull
downward on the front parking brake cable
to remove slack from lever assembly.
Turn ignition off.
Remove rear wheels and tires.
e Reinstall two inverted lug nuts to retain
rotor.
Pull parking brake hand lever exactly four (4)
ratchet clicks.
Parking brake levers (2) on both calipers should
be against the lever stops on the caliper housings.
If levers are not against stops, check for binding
in rear cables and/or loosen cables at adjuster
until both left and right levers are against their
stops.
Tighten parking brake cable at adjuster until
either the left or right lever begins to move off the
stop, then loosen adjustment until lever moves
back barely touching stop.
Operate parking brake several times to check
adjustments. After cable adjustment is
performed, parking brake hand lever should
travel 14 clicks. Rear wheels should not rotate
forward when hand lever is applied
8 to 14
ratchet clicks.
Install wheels and tires, aligning previous marks.
Page 325 of 1825

e Remove lug nuts securing rotor to hub.
e Lower car.
o Torque lug nuts. See WHEELS AND
TIRES.
SHOE AND LINING ASSEMBLIES
Figures 5 thru 8
Remove or Disconnect
1. Caliper as previously described.
2 Outboard shoe and lining (27) (Figure 5).
Install or Connect
1. Lubricated new bushings (7 and 11) (Figure 5).
2. Lubricated new two-way check valve (19) into
end of piston (18) (Figure 8).
3. Inboard shoe and lining (25). Slide edge of metal
shoe under ends of dampening spring (28) and
snap shoe into position against piston. Back of
shoe must lay flat against piston (Figure 6).
Fig. 6 Installing Inboard Shoe and Lining
26. WEAR SENSOR 25. INBOARD SHOE & 27. OUTBOARD SHOE & LINING
ASE (OR EQUIVALENT)
Fig. 5 Shoe & Linings Assemblies
3. Inboard shoe and lining (25) (Figure 6).
4. Bushings (7 and 11) from grooves in mounting
bolt holes (Figure 5).
5. Two-way check valve (19) from end of piston (18)
using small screwdriver (Figure 8). D-shaped
tab (33) on shoe must engage
D-shaped notch (32) in piston. If tab and
hole do not line up, turn piston with spanner
wrench
J 7624 or equivalent (Figure 6).
r, Wear sensor (26) should be at leading edge
of shoe during forward wheel rotation
(Figure 5).
4. Outboard
shoe and lining (27). Back of shoe must
lay flat against caliper (Figure
5).
5. Caliper as previously described.
6. Apply approximately 778
N (175 lb.) force three
times to brake pedal to seat linings.
7. Position
12-inch channel lock pliers over brake
shoe ears and bottom edge of caliper (12). While
holding moderate force
(50 lb.) on brake pedal,
clinch outboard shoe (27) (Figure 7).
NOTICE: If leakage is noted form piston hole
after check valve is removed, overhaul caliper as
specified.
Page 344 of 1825
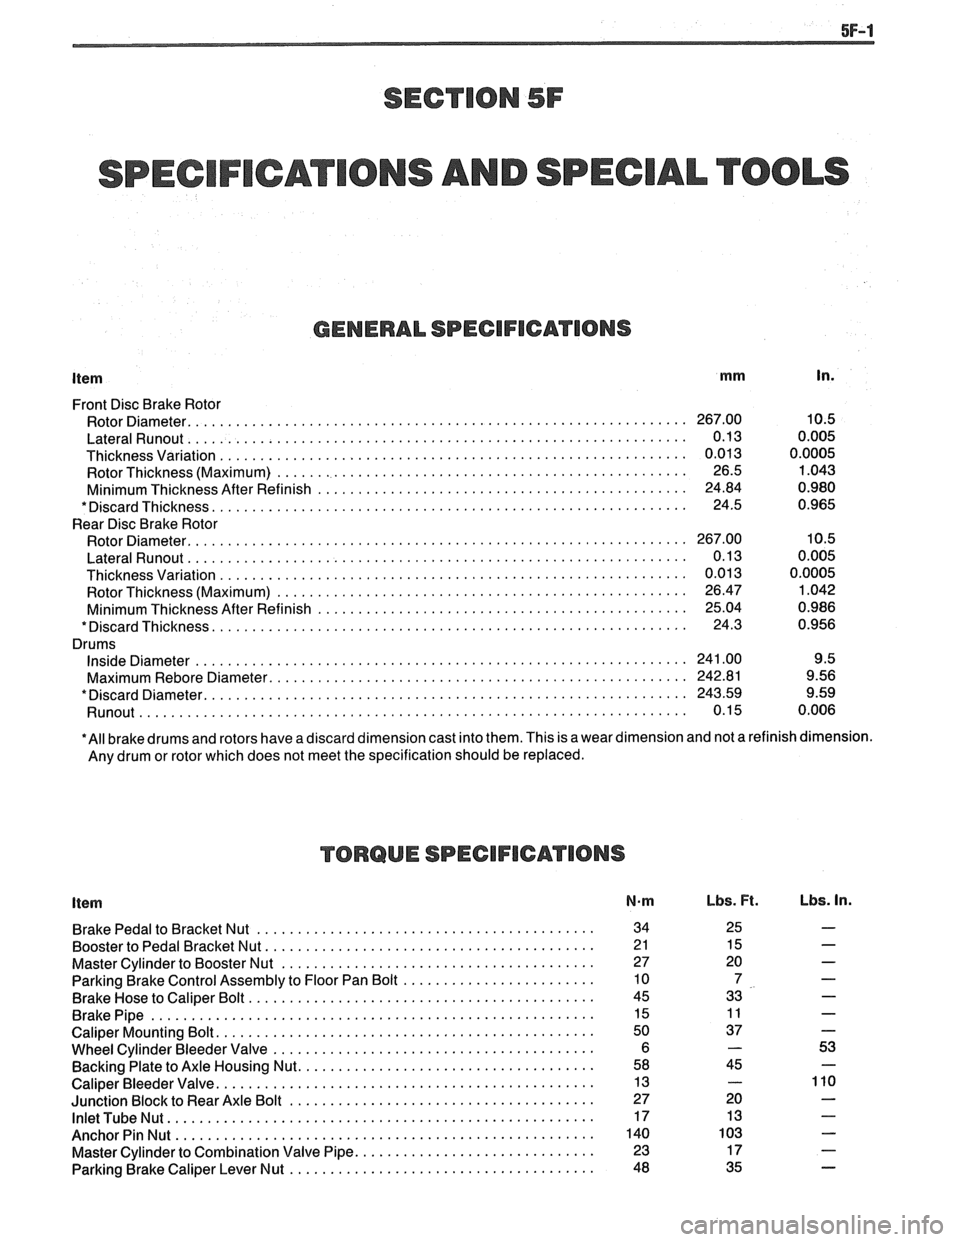
SPECIFICATIONS AND SPECIAL TOOLS
GENERAL SPECIFICATIONS
Item mm In.
Front Disc Brake Rotor
Rotor Diameter.
............................................................. 267.00 10.5
LateralRunout .............................................................. 0.13 0.005
Thicknessvariation .......................................................... 0.013 0.0005
Rotor Thickness (Maximum)
................................................... 26.5 1.043
Minimum Thickness After Refinish
.............................................. 24.84 0.980
*DiscardThickness ........................................................... 24.5 0.965
Rear Disc Brake Rotor
Rotor Diameter.
............................................................. 267.00 10.5
LateralRunout .............................................................. 0.13 0.005
Thickness Variation
.......................................................... 0.01 3 0.0005
Rotor Thickness (Maximum)
................................................... 26.47 1.042
Minimum Thickness After Refinish
.............................................. 25.04 0.986
*DiscardThickness ........................................................... 24.3 0.956
Drums
InsideDiameter ............................................................. 241.00 9.5
Maximum
Rebore Diameter. ................................................... 242.81 9.56
*Discard Diameter.
........................................................... 243.59 9.59
Runout ................................................................ 0.15 0.006
*All brake drums and rotors have a discard dimension cast into them. This is a wear dimension and not a refinish dimension.
Any drum or rotor which does not meet the specification should be replaced.
TORQUE SPECIFICATIONS
Item N-m
BrakePedaltoBracketNut .......................................... 34
Booster to Pedal Bracket Nut.
........................................ 2 1
Master Cylinder to Booster Nut
....................................... 27
Parking Brake Control Assembly to Floor Pan Bolt
........................ 10
Brake Hose to Caliper Bolt
........................................... 45
BrakePipe ....................................................... 15
Caliper Mounting Bolt.
.............................................. 50
Wheel Cylinder Bleeder Valve
........................................ 6
Backing Plate to Axle Housing Nut.
.................................... 58
Caliper Bleeder Valve.
.............................................. 13
Junction Block to Rear Axle Bolt
...................................... 27
InletTubeNut ..................................................... 17
AnchorPinNut .................................................... 140
Master Cylinder to Combination Valve Pipe.
............................. 23
Parking Brake Caliper Lever Nut
...................................... 48
Lbs. Ft. Lbs. In.