1988 PONTIAC FIERO oil
[x] Cancel search: oilPage 399 of 1825
6A3-20 V-8 ENGINE
PLASTIC GAGE
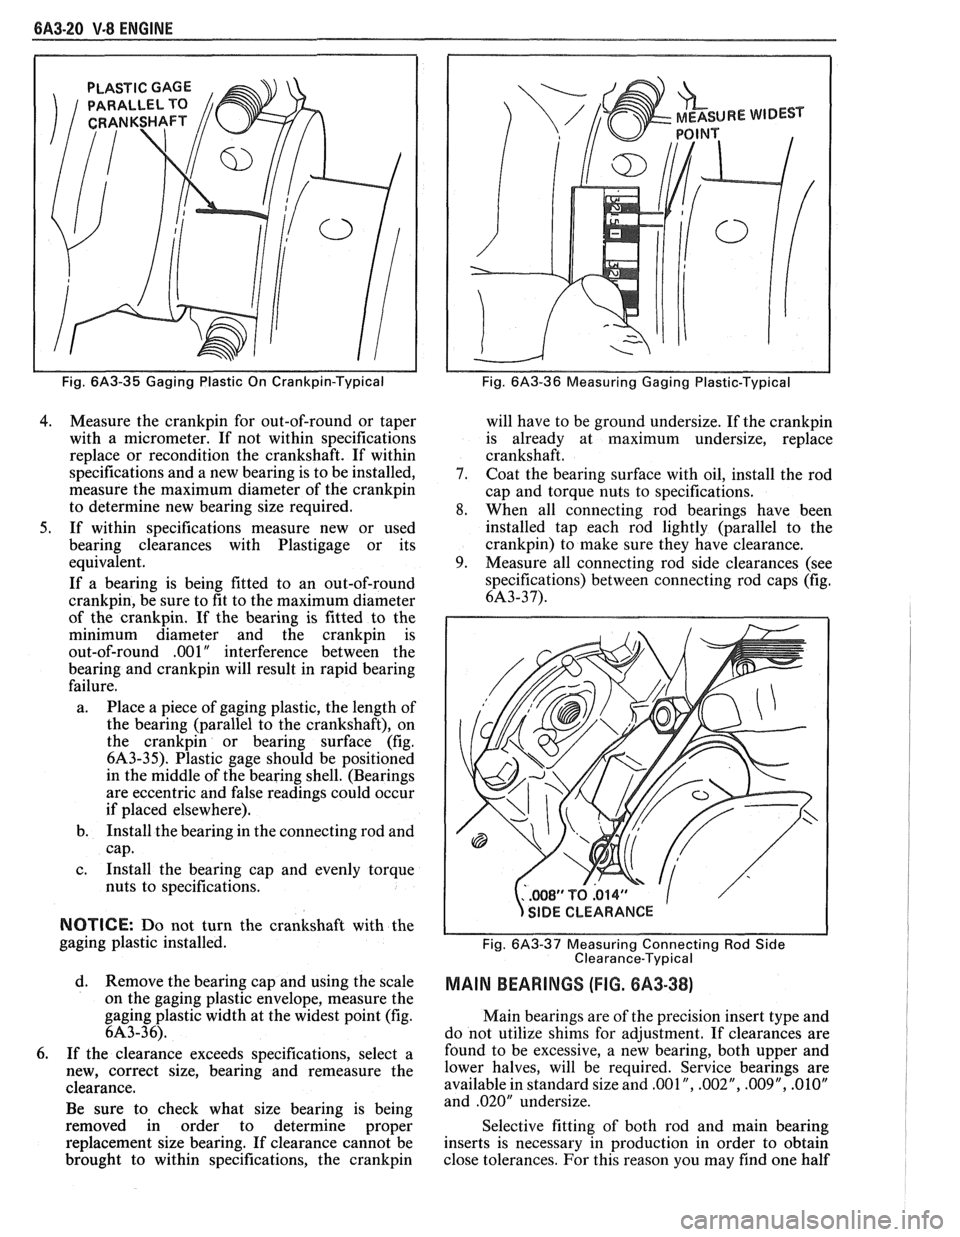
Fig. 6A3-35 Gaging Plastic On Crankpin-Typical
4. Measure the crankpin for out-of-round or taper
with a micrometer. If not within specifications
replace or recondition the crankshaft. If within
specifications and a new bearing is to be installed,
measure the maximum diameter of the
crankpin
to determine new bearing size required.
5. If within specifications measure new or used
bearing clearances with Plastigage or its
equivalent.
If a bearing is being fitted to an out-of-round
crankpin, be sure to fit to the maximum diameter
of the crankpin. If the bearing is fitted to the
minimum diameter and the
crankpin is
out-of-round .OO 1
" interference between the
bearing and
crankpin will result in rapid bearing
failure.
a. Place a piece of gaging plastic, the length of
the bearing (parallel to the crankshaft), on
the
crankpin or bearing surface (fig.
6A3-35). Plastic gage should be positioned
in the middle of the bearing shell. (Bearings
are eccentric and false readings could occur
if placed elsewhere).
b. Install the bearing in the connecting rod and
cap.
c. Install the bearing cap and evenly torque
nuts to specifications.
NOTICE: Do not turn the crankshaft with the
gaging plastic installed.
d. Remove the bearing cap and using the scale
on the gaging plastic envelope, measure the
gaging plastic width at the widest point (fig.
6A3-36).
6. If the clearance exceeds specifications, select a
new, correct size, bearing and remeasure the
clearance.
Be sure to check what size bearing is being
removed in order to determine proper
replacement size bearing. If clearance cannot be
brought to within specifications, the
crankpin
Fig. 6A3-36 Measuring Gaging Plastic-Typical
will have to be ground undersize. If the crankpin
is already at maximum undersize, replace
crankshaft.
7. Coat the bearing surface with oil, install the rod
cap and torque nuts to specifications.
8. When all connecting rod bearings have been
installed tap each rod lightly (parallel to the
crankpin) to make sure they have clearance.
9. Measure all connecting rod side clearances (see
specifications) between connecting rod caps (fig.
6A3-37).
..WS1'TQ.014" 1
s
/
SIDE CLEARANCE
Fig.
6A3-37 Measuring Connecting Rod Side
Clearance-Typical
MAIN BEARINGS (FIG. 8A3-38)
Main bearings are of the precision insert type and
do not utilize shims for adjustment. If clearances are
found to be excessive, a new bearing, both upper and
lower halves, will be required. Service bearings are
available in standard size and
,001 ", .002", .009", .01OV
and .020" undersize.
Selective fitting of both rod and main bearing
inserts is necessary in production in order to obtain
close tolerances. For this reason you may find one half
Page 400 of 1825
V-8 ENGINE 6A3-21
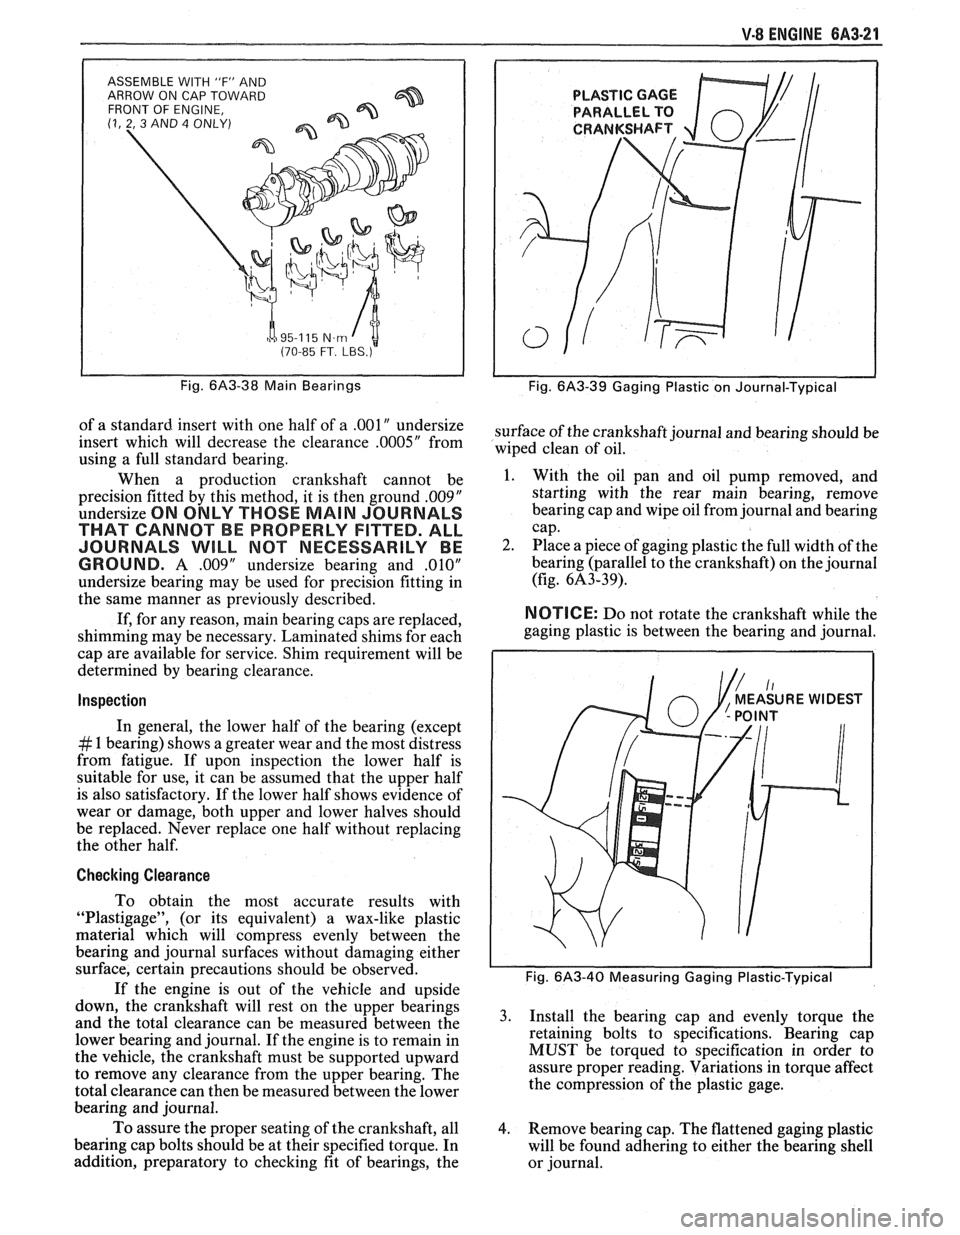
ASSEMBLE WITH 'IF" AND
ARROW ON CAP TOWARD
FRONT OF ENGINE,
(1, 2, 3 AND 4 ONLY)
h a 95-1 15 N.m I t (70-85 FT. LBS.)
Fig. 6A3-38 Main Bearings
of a standard insert with one half of a .00lU undersize
insert which will decrease the clearance
.0005" from
using a full standard bearing.
When a production crankshaft cannot be
precision fitted by this method, it is then ground
.00$"
undersize ON ONLY THOSE MAIN JOURNALS
THAT CANNOT BE PROPERLY FITTED. ALL
JOURNALS
WILL MOT NECESSARILY BE
GROUND.
A .009" undersize bearing and ,010"
undersize bearing may be used for precision fitting in
the same manner as previously described.
If, for any reason, main bearing caps are replaced,
shimming may be necessary. Laminated shims for each
cap are available for service. Shim requirement will be
determined by bearing clearance.
Inspection
In general, the lower half of the bearing (except
# 1 bearing) shows a greater wear and the most distress
from fatigue. If upon inspection the lower half is
suitable for use, it can be assumed that the upper half
is also satisfactory. If the lower half shows evidence of
wear or damage, both upper and lower halves should
be replaced. Never replace one half without replacing
the other half.
Checking Clearance
To obtain the most accurate results with
"Plastigage", (or its equivalent) a wax-like plastic
material which will compress evenly between the
bearing and journal surfaces without damaging either
surface, certain precautions should be observed.
If the engine is out of the vehicle and upside
down, the crankshaft will rest on the upper bearings
and the total clearance can be measured between the
lower bearing and journal. If the engine is to remain in
the vehicle, the crankshaft must be supported upward
to remove any clearance from the upper bearing. The
total clearance can then be measured between the lower
bearing and journal.
To assure the proper seating of the crankshaft, all
bearing cap bolts should be at their specified torque. In
addition, preparatory to checking fit of bearings, the
Fig. 6A3-39 Gaging Plastic on Journal-Typical
surface of the crankshaft journal and bearing should be
wiped clean of oil.
1. With the oil pan and oil pump removed, and
starting with the rear main bearing, remove
bearing cap and wipe oil from journal and bearing
cap.
2. Place a piece of gaging plastic the full width of the
bearing (parallel to the crankshaft) on the journal
(fig. 6A3-39).
NOTICE: Do not rotate the crankshaft while the
gaging plastic is between the bearing and journal.
Fig. 6A3-40 Measuring Gaging Plastic-Typical
3. Install the bearing cap and evenly torque the
retaining bolts to specifications. Bearing cap
MUST be torqued to specification in order to
assure proper reading. Variations in torque affect
the compression of the plastic gage.
4. Remove bearing cap. The flattened gaging plastic
will be found adhering to either the bearing shell
or journal.
Page 401 of 1825
BA3-22 V-8 ENGINE
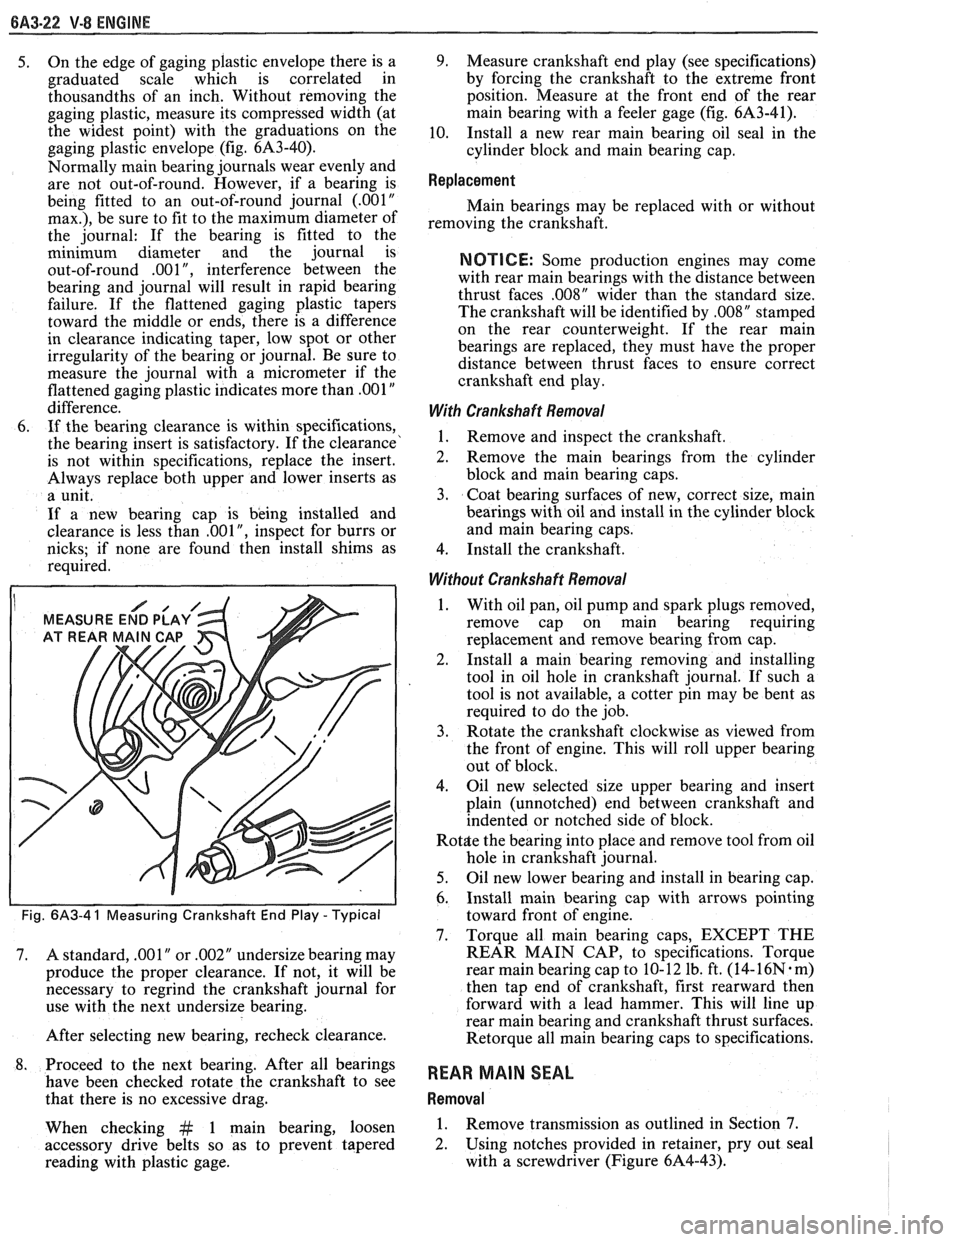
5. On the edge of gaging plastic envelope there is a
graduated scale which is correlated in
thousandths of an inch. Without removing the
gaging plastic, measure its compressed width (at
the widest point) with the graduations on the
gaging plastic envelope (fig. 6A3-40).
Normally main bearing journals wear evenly and
are not out-of-round. However, if a bearing is
being fitted to an out-of-round journal
(.00lU
max.), be sure to fit to the maximum diameter of
the journal: If the bearing is fitted to the
minimum diameter and the journal is
out-of-round
.001", interference between the
bearing and journal will result in rapid bearing
failure. If the flattened gaging plastic tapers
toward the middle or ends, there is a difference
in clearance indicating taper, low spot or other
irregularity of the bearing or journal. Be sure to
measure the journal with a micrometer if the
flattened gaging plastic indicates more than
.00lV
difference.
6. If the bearing clearance is within specifications,
the bearing insert is satisfactory. If the clearance'
is not within specifications, replace the insert.
Always replace both upper and lower inserts as
a unit.
If a new bearing cap is being installed and
clearance is less than
.00 1 ", inspect for burrs or
nicks; if none are found then install shims as
required.
I MEASURE END PLAY
Fig. 6A3-4 1 Measuring Crankshaft End Play - Typical
7. A standard, .001" or .002" undersize bearing may
produce the proper clearance. If not, it will be
necessary to regrind the crankshaft journal for
use with the next undersize bearing.
After selecting new bearing, recheck clearance.
8. Proceed to the next bearing. After all bearings
have been checked rotate the crankshaft to see
that there is no excessive drag.
When checking
&t 1 main bearing, loosen
accessory drive belts so as to prevent tapered
reading with plastic gage.
9. Measure crankshaft end play (see specifications)
by forcing the crankshaft to the extreme front
position. Measure at the front end of the rear
main bearing with a feeler gage (fig.
61\3-41),
10. Install a new rear main bearing oil seal in the
cylinder block and main bearing cap.
Replacement
Main bearings may be replaced with or without
removing the crankshaft.
NOTICE: Some production engines may come
with rear main bearings with the distance between
thrust faces
,008" wider than the standard size.
The crankshaft will be identified by
,008" stamped
on the rear counterweight. If the rear main
bearings are replaced, they must have the proper
distance between thrust faces to ensure correct
crankshaft end play.
With Crankshaft Removal
1. Remove and inspect the crankshaft.
2. Remove the main bearings from the cylinder
block and main bearing caps.
3. Coat bearing surfaces of new, correct size, main
bearings with oil and install in the cylinder block
and main bearing caps.
4. Install the crankshaft.
Without Crankshaft Removal
1. With oil pan, oil pump and spark plugs removed,
remove cap on main bearing requiring
replacement and remove bearing from cap.
2. Install a
main bearing removing and installing
tool in oil hole in crankshaft journal. If such a
tool is not available, a cotter pin may be bent as
required to do the job.
3. Rotate the crankshaft clockwise as viewed from
the front of engine. This will roll upper bearing
out of block.
4. Oil new selected size upper bearing and insert
plain (unnotched) end between crankshaft and
indented or notched side of block.
Rot$e the bearing into place and remove tool from oil
hole in crankshaft journal.
5. Oil new lower bearing and install in bearing cap.
6. Install main bearing cap with arrows pointing
toward front of engine.
7. Torque all main bearing caps, EXCEPT THE
REAR MAIN CAP, to specifications. Torque
rear main bearing cap to 10- 12 lb. ft. (14-
16N. m)
then tap end of crankshaft, first rearward then
forward with a lead hammer. This will line up
rear main bearing and crankshaft thrust surfaces.
Retorque all main bearing caps to specifications.
REAR MAIN SEAL
Removal
1. Remove transmission as outlined in Section 7.
2. Using notches provided
in retainer, pry out seal
with a screwdriver (Figure 6A4-43).
Page 402 of 1825
V-8 ENGINE 6A3-23
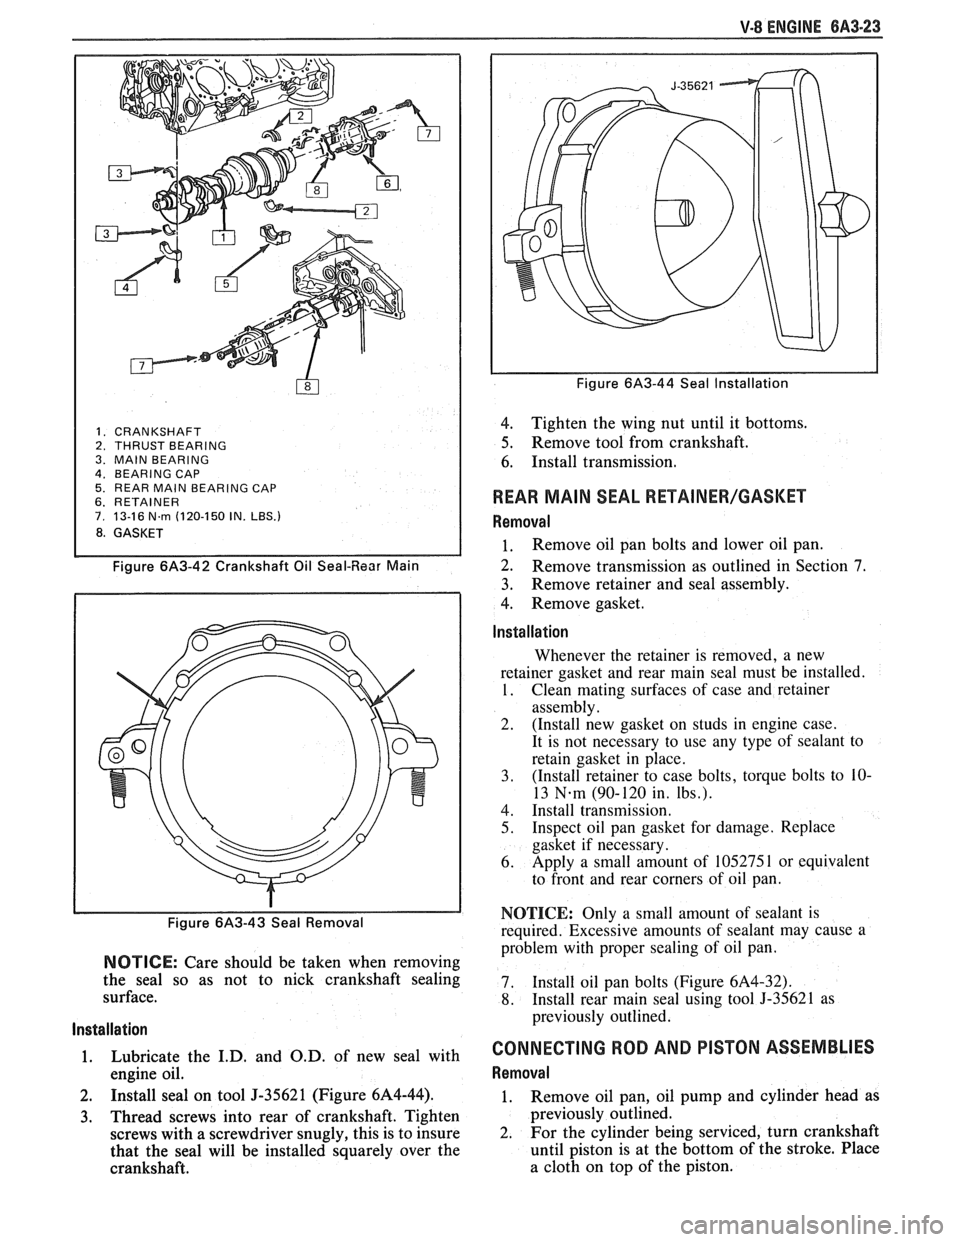
1. CRANKSHAFT 2. THRUST BEARING
3. MAlN BEARING
4. BEARING CAP 5. REAR MAlN BEARING CAP 6. RETAINER 7. 13-16 N.rn (120-150 IN. LBS.)
8. GASKET
Figure 6A3-42 Crankshaft Oil Seal-Rear Main
Figure 6/43-43 Seal Removal
NOTICE: Care should be taken when removing
the seal so as not to nick crankshaft sealing
surface.
Installation
1. Lubricate the I.D. and O.D. of new seal with
engine oil.
2. Install seal on tool J-35621 (Figure 6A4-44).
3. Thread screws into rear of crankshaft. Tighten
screws with a screwdriver snugly, this is to insure
that the seal will be installed squarely over the
crankshaft.
Figure 6A3-44 Seal Installation
4. Tighten the wing nut until it bottoms.
5. Remove tool from crankshaft.
6. Install transmission.
REAR MAlN SEAL RETAINER/GASKET
Removal
1. Remove oil pan bolts and lower oil pan.
2. Remove transmission as outlined in Section 7.
3. Remove retainer
and seal assembly.
4. Remove gasket.
lnstallation
Whenever the retainer is removed, a new
retainer gasket and rear main seal must be installed.
1. Clean mating surfaces of case and retainer
assembly.
2. (Install new gasket on studs in engine case.
It is not necessary to use any type of sealant to
retain gasket in place.
3. (Install retainer to case bolts, torque bolts
to
10-
13 N-m (90-120 in. Ibs.).
4. Install transmission.
5. Inspect oil pan gasket for damage. Replace
gasket if necessary.
6. Apply
a small amount of 105275
1 or equivalent
to front and rear corners of oil pan.
NOTICE: Only a small amount of sealant is
required. Excessive amounts of sealant may cause a
problem with proper sealing of oil pan.
7. Install oil
pan bolts (Figure
6A4-32).
8. Install rear main seal using tool 5-35621 as
previously outlined.
CONNECTING ROD AND PISTON ASSEMBLIES
Removal
1. Remove oil pan, oil pump and cylinder head as
previously outlined.
2. For
the cylinder being serviced, turn crankshaft
until piston is at the bottom of the stroke. Place
a cloth on top of the piston.
Page 403 of 1825
6A3-24 V.8 ENGINE
3. Use a ridge reamer to remove any ridge and/or
deposits from the upper end of the cylinder bore.
4. Turn crankshaft until piston is at top of stroke
and remove cloth and cuttings.
5. Remove connecting rod cap and install Tool
J-5239 (3/8") on studs. Push connecting rod and
piston assembly out of top of cylinder block. It
will be necessary to turn the crankshaft slightly
to disconnectt some of the connecting rod and
piston assemblies and push them out of the
cylinder.
Disassembly
1. Remove connecting rod bearings from
connecting rods and caps. If bearings are being
reused, place them in a rack so they may be
reinstalled in their original rod and cap.
2. Remove piston rings by expanding and sliding
them off the pistons.
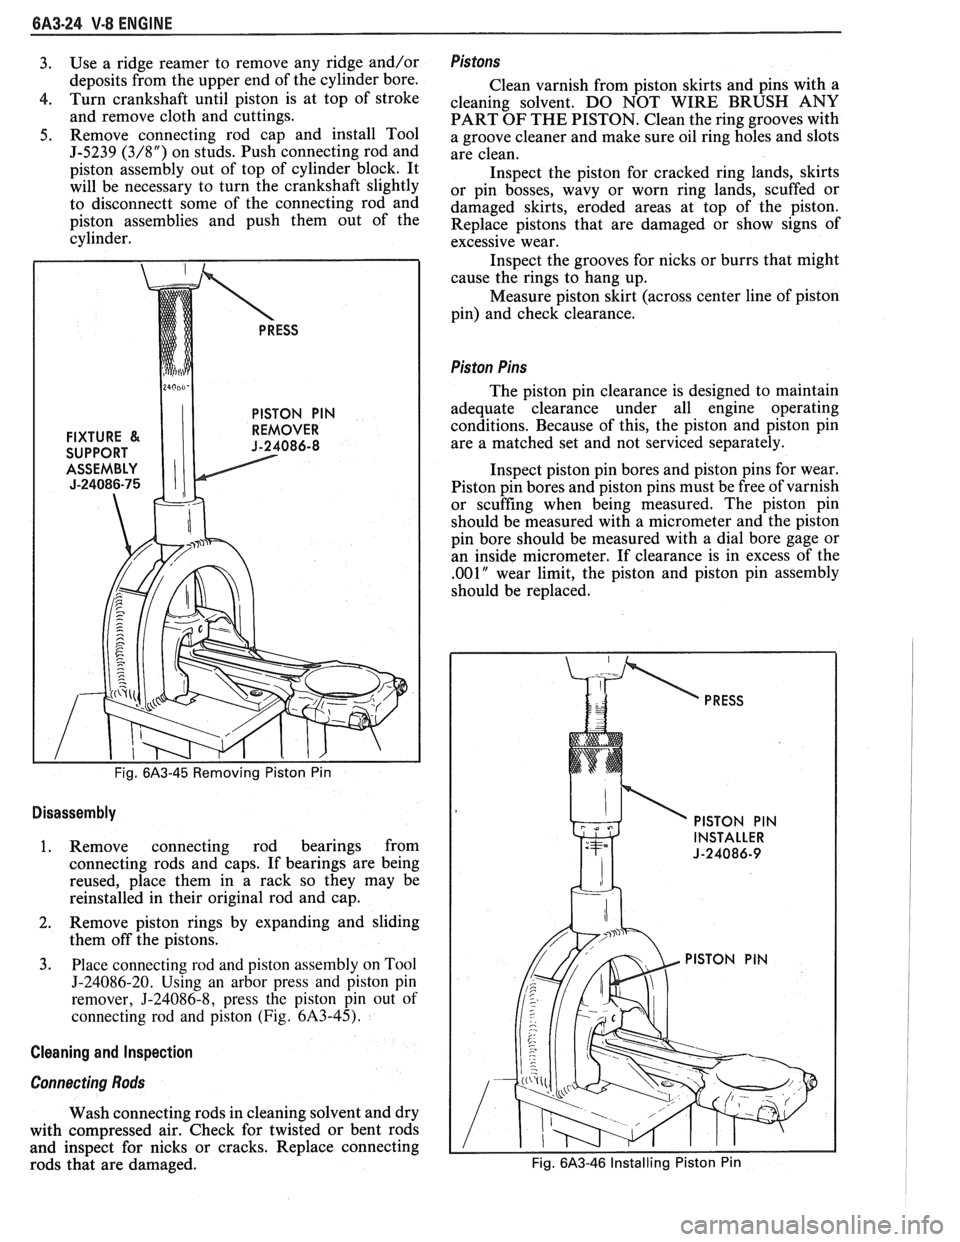
3. Piace connecting rod and piston assembly on Tool
J-24086-20. Using an arbor press and piston pin
remover,
5-24086-8, press the piston pin out of
connecting rod and piston (Fig. 6A3-45).
Cleaning and Inspection
Connecting Rods
Wash connecting rods in cleaning solvent and dry
with compressed air. Check for twisted or bent rods
and inspect for nicks or cracks. Replace connecting
rods that are damaged.
Pis tons
Clean varnish from piston skirts and pins with a
cleaning solvent. DO NOT WIRE BRUSH ANY
PART OF THE PISTON. Clean the ring grooves with
a groove cleaner and make sure oil ring holes and slots
are clean.
Inspect the piston for cracked ring lands, skirts
or pin bosses, wavy or worn ring lands, scuffed or
damaged skirts, eroded areas at top of the piston.
Replace pistons that are damaged or show signs of
excessive wear.
Inspect the grooves for nicks or burrs that might
cause the rings to hang up.
Measure piston skirt (across center line of piston
pin) and check clearance.
Pis ton Pins
The piston pin clearance is designed to maintain
adequate clearance under all engine operating
conditions. Because of this, the piston and piston pin
are a matched set and not serviced separately.
Inspect piston pin bores and piston pins for wear.
Piston pin bores and piston pins must be free of varnish
or scuffing when being measured. The piston pin
should be measured with a micrometer and the piston
pin bore should be measured with a dial bore gage or
an inside micrometer. If clearance is in excess of the
,001" wear limit, the piston and piston pin assembly
should be replaced.
PRESS
PISTON PIN
INSTALLER
J-24086-9
Fig. 6A3-46 Installing Piston Pin
Page 404 of 1825
V-8 ENGINE 6A3-25
Assembly
1. Lubricate piston pin holes in piston and
connecting rod to facilitate installation of pin.
2. Place connecting rod in piston and hold in place
with piston pin guide and piston pin. Place
assembly on fixture and support assembly.
3. Using piston pin installer, 5-24086-9, press the
piston pin into the piston and connecting rod (Fig.
6A3-46).
NOTICE: After installer hub bottoms on support
assembly, do not exceed
5000 psi pressure, as this
could cause structural damage to the tool.
4. Remove piston
and connecting rod assembly
from tool and check piston for freedom of
movement on piston pin.
Piston Rings
All compression rings are marked on the upper
side of the ring. When installing compression rings,
make sure the MARKED SIDE IS TOWARD THE
TOP
OF THE PISTON. The top ring is chrome faced,
or treated with molybdenum for maximum life. The
second compression ring is a tapered face acting as
both a compression and oil control ring.
The oil control rings are of three piece type,
consisting of two segments (rails) and a spacer.
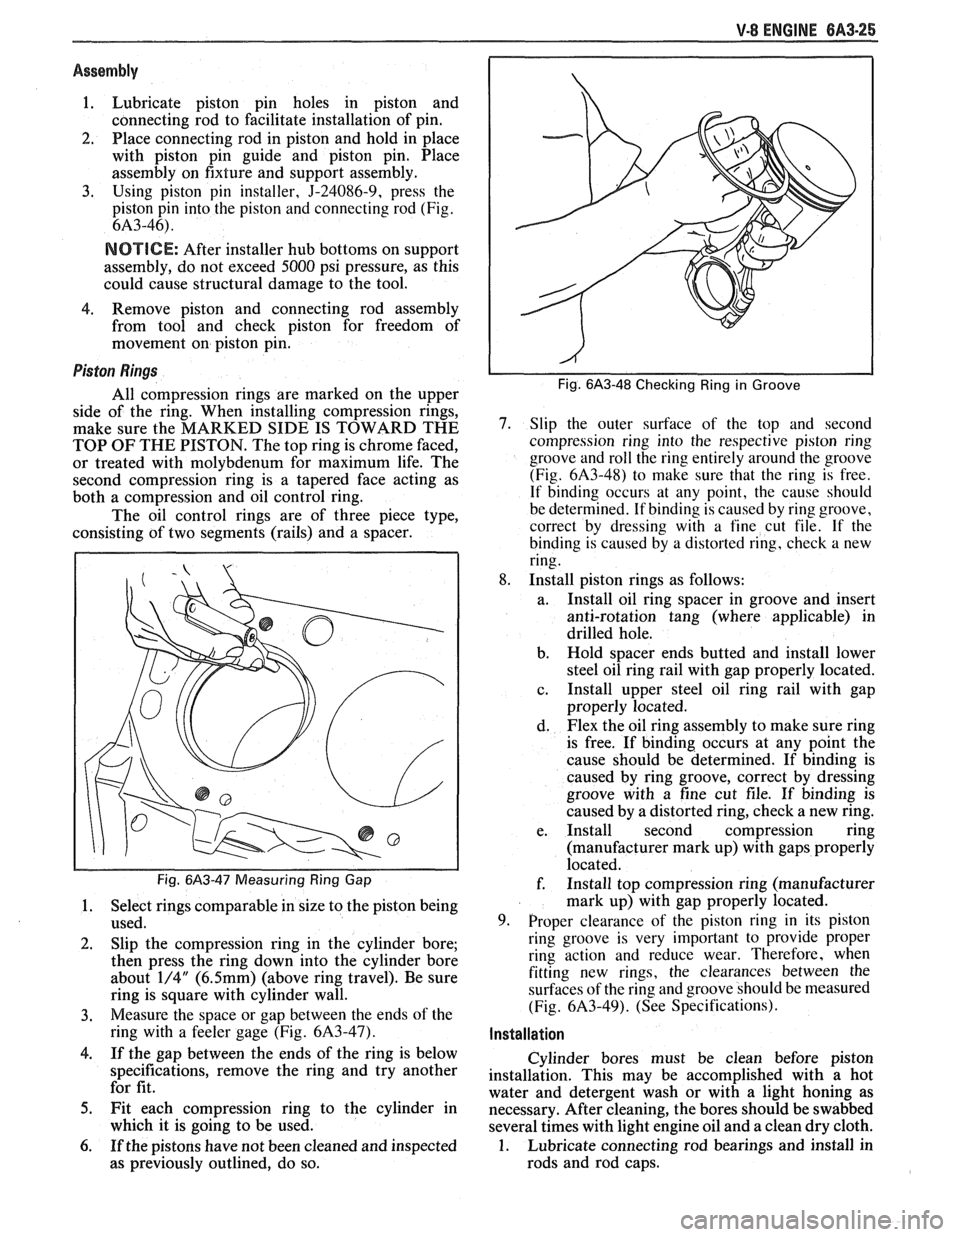
Fig. 6A3-47 Measuring Ring Gap
1. Select rings comparable in size to the piston being
used.
2. Slip the compression ring in the cylinder bore;
then press the ring down into the cylinder bore
about
1/4" (6.5mm) (above ring travel). Be sure
ring is square with cylinder wall.
3. Measure the space or gap between the ends of the
ring with a feeler gage (Fig.
6A3-47).
4. If the gap between the ends of the ring is below
specifications, remove the ring and try another
for fit.
5. Fit each compression ring to the cylinder in
which it is going to be used.
6. If the pistons have not been cleaned and inspected
as previously outlined, do so.
Fig. 6A3-48 Checking Ring in Groove
7. Slip the outer surface of the top and second
compression ring into the respective piston ring
groove and roll the ring entirely around the groove
(Fig.
6A3-48) to make sure that the ring is free.
If binding occurs at any point, the cause should
be determined. If binding is caused by ring groove,
correct by dressing with a fine cut file. If
the
binding is caused by a distorted ring, check a new
ring.
8. Install piston rings as follows:
a. Install oil ring spacer in groove and insert
anti-rotation tang (where applicable) in
drilled hole.
b. Hold spacer ends butted and install lower
steel oil ring rail with gap properly located.
c. Install
upper steel oil ring rail with gap
properly located.
d. Flex the oil ring assembly to make sure ring
is free. If binding occurs at any point the
cause should be determined. If binding is
caused by ring groove, correct by dressing
groove with a fine cut file. If binding is
caused by a distorted ring, check a new ring.
e. Install second compression ring
(manufacturer mark up) with gaps properly
located.
f. Install top compression ring (manufacturer
mark up) with gap properly located.
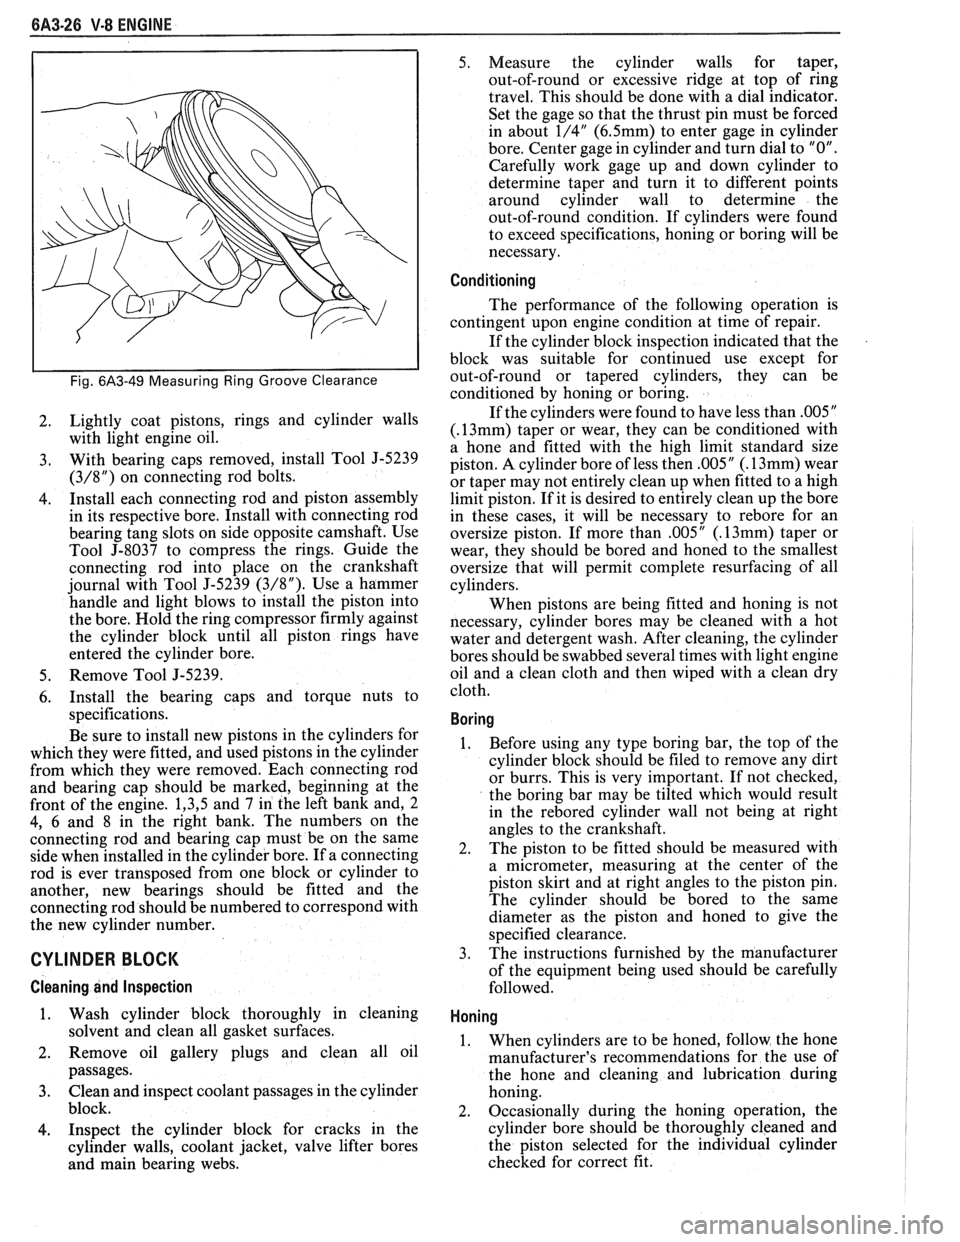
9. Proper clearance of the piston ring in its piston
ring groove is very important to provide proper
ring action and reduce wear. Therefore, when
fitting new rings, the clearances between the
surfaces of the ring and groove should be measured
(Fig.
6A3-49). (See Specifications).
Installation
Cylinder bores must be clean before piston
installation. This may be accomplished with a hot
water and detergent wash or with a light honing as
necessary. After cleaning, the bores should be swabbed
several times with light engine oil and a clean dry cloth.
1. Lubricate connecting rod bearings and install in
rods and rod caps.
Page 405 of 1825
6A3-26 V-8 ENGINE
Fig. 6A3-49 Measuring Ring Groove Clearance
2. Lightly coat pistons, rings
and cylinder walls
with light engine oil.
3. With bearing caps removed, install Tool J-5239
(3/8") on connecting rod bolts.
4. Install
each connecting rod and piston assembly
in its respective bore. Install with connecting rod
bearing tang slots on side opposite camshaft. Use
Tool
5-8037 to compress the rings. Guide the
connecting rod into place on the crankshaft
journal with Tool
5-5239 (3/8"). Use a hammer
handle and light blows to install the piston into
the bore. Hold the ring compressor firmly against
the cylinder block until all piston rings have
entered the cylinder bore.
5. Remove Tool J-5239.
6. Install the bearing caps and torque nuts to
specifications.
Be sure to install new pistons in the cylinders for
which they were fitted, and used pistons in the cylinder
from which they were removed. Each connecting rod
and bearing cap should be marked, beginning at the
front of the engine.
1,3,5 and 7 in the left bank and, 2
4, 6 and 8 in the right bank. The numbers on the
connecting rod and bearing cap must be on the same
side when installed in the cylinder bore. If a connecting
rod is ever transposed from one block or cylinder to
another, new bearings should be fitted and the
connecting rod should be numbered to correspond with
the new cylinder number.
CYLINDER BLOCK
Cleaning and Inspection
1. Wash cylinder block thoroughly in cleaning
solvent and clean all gasket surfaces.
2. Remove oil gallery plugs and clean all oil
passages.
3. Clean and inspect coolant passages in the cylinder
block.
4. Inspect the cylinder block for cracks in the
cylinder walls, coolant jacket, valve lifter bores
and main bearing webs. 5.
Measure the cylinder walls for taper,
out-of-round or excessive ridge at top of ring
travel. This should be done with a dial indicator.
Set the gage so that the thrust pin must be forced
in about
1/4" (6.5mm) to enter gage in cylinder
bore. Center gage in cylinder and turn dial to
"0".
Carefully work gage up and down cylinder to
determine taper and turn it to different points
around cylinder wall to determine the
out-of-round condition. If cylinders were found
to exceed specifications, honing or boring will be
necessary.
Conditioning
The performance of the following operation is
contingent upon engine condition at time of repair.
If the cylinder block inspection indicated that the
block was suitable for continued use except for
out-of-round or tapered cylinders, they can be
conditioned by honing or boring.
If the cylinders were found to have less than
.005"
(.13mm) taper or wear, they can be conditioned with
a hone and fitted with the high limit standard size
piston. A cylinder bore of less then
.005" (. 13mm) wear
or taper may not entirely clean up when fitted to a high
limit piston. If it is desired to entirely clean up the bore
in these cases, it will be necessary to
rebore for an
oversize piston. If more than
.005" (. 13mm) taper or
wear, they should be bored and honed to the smallest
oversize that will permit complete resurfacing of all
cylinders.
When pistons are being fitted and honing is not
necessary, cylinder bores may be cleaned with a hot
water and detergent wash. After cleaning, the cylinder
bores should be swabbed several times with light engine
oil and a clean cloth and then wiped with a clean dry
cloth.
Boring
1. Before using any type boring bar, the top of the
cylinder block should be filed to remove any dirt
or burrs. This is very important. If not checked,
the boring bar may be tilted which would result
in the
rebored cylinder wall not being at right
angles to the crankshaft.
2. The
piston to be fitted should be measured with
a micrometer, measuring at the center of the
piston skirt and at right angles to the piston pin.
The cylinder should be bored to the same
diameter as the piston and honed to give the
specified clearance.
3.
The instructions furnished by the manufacturer
of the equipment being used should be carefully
followed.
Honing
1. When cylinders are to be honed, follow the hone
manufacturer's recommendations for the use of
the hone and cleaning and lubrication during
honing.
2. Occasionally during the honing operation, the
cylinder bore should be thoroughly cleaned and
the piston selected for the individual cylinder
checked for correct fit.
Page 406 of 1825
V-8 ENGINE 6A3-27
3. When finish honing
a cylinder bore to fit a piston,
the hone should be moved up and down at a
sufficient speed to obtain very fine uniform
surface finish marks in a cross-hatch pattern of
approximately
45" to 65" included angle. The
finish marks should be clean but not sharp, free
from imbedded particles and torn or folded
metal.
4. Permanently mark
the piston for the cylinder to
which it has been fitted and proceed to hone
cylinders and fit the remaining pistons.
NOTICE: Handle the pistons with care and do not
attempt to force them through the cylinder until
the cylinder has been honed to correct size as this
type piston can be distorted through careless
handling.
5. Thoroughly
clean the bores with hot water and
detergent. Scrub well with a stiff bristle brush and
rinse thoroughly with hot water. It is extremely
essential that a good cleaning operation be
performed. If any of the abrasive material is
allowed to remain in the cylinder bores, it will
rapidly wear the new rings and cylinder bores in
addition to the bearings lubricated by the
contaminated oil, the bores should be swabbed
and then wiped with a clean dry cloth. Cylinder
should not be cleaned with kerosene or gasoline.
Clean the remainder of the cylinder block to
remove the excess material spread during the
honing operation.
Piston Selection
1. Check USED piston to cylinder bore clearance as
follows:
a. Measure
the "Cylinder Bore Diameter"
with a telescope gage
"2-1/2" (64mm) from
top of cylinder bore").
b. Measure
the
"Piston Diameter" (at skirt
across center line of piston pin).
c. Subtract
piston diameter from cylinder bore
diameter to determine "Piston to Bore
Clearance".
d. Determine if piston to bore clearance is in
the acceptable range.
2. If
used piston is not acceptable, check Piston Size
Chart and determine if a new piston can be
selected to fit cylinder bore within the acceptable
range.
3. If
cylinder bore must be reconditioned, measure
new piston diameter (across center line of piston
pin) then hone cylinder bore to correct clearance
(preferable range).
4. Mark the piston to identify the cylinder for which
it was fitted.
OIL FILTER BYPASS VALVE
Inspection and Replacement
With the oil filter removed, check the spring and
fibre valve for operation. Inspect for a cracked or
broken valve. If replacement is necessary, the oil filter
adapter and bypass valve assembly must be replaced as an
assembly. Clean valve chamber in cylinder block
thoroughly. Torque retaining screws to specifications.
ENGINE ASSEMBLY
Removal
1. Disconnect battery.
2. Remove air cleaner.
3. Remove hood.
4. Drain radiator.
5. Remove lower radiator hose.
6. Remove upper fan shroud.
7. Remove upper radiator hose and coolant
recovery hose.
8. Remove transmission cooler lines.
9. Remove radiator.
10. Remove fan assembly.
1 1. Remove heater hoses.
12. Disconnect
carburetor linkage, includes cruise
control detent cable.
13. Remove vacuum brake booster line.
14. Remove
distributor cap and lay wiring aside.
15. Disconnect necessary wires and hoses.
16. Remove power steering
pump and lay aside.
17. Raise vehicle.
18. Remove exhaust
pipes at exhaust manifold.
19. Remove dust cover.
20. Remove converter bolts.
2 1. Disconnect starter wires.
22. Remove bell housing bolts.
23. Remove
motor mount through bolts.
24. Disconnect fuel lines
at fuel pump.
25. Lower vehicle.
26. Support transmission.
27. Remove
A.I.R./Converter pipe bracket.
28. Remove engine, include removing wire
from
bracket at rear left of engine.
Installation
1. Position engine
assembly in vehicle.
2. Attach
motor mount to engine brackets and
lower engine in place.
3. Remove engine lifting device.
4. Remove transmission floor jack.
5. Raise vehicle on hoist.
6. Install mount "through" bolts. Torque to
specifications.
7. Install bell housing bolts. Torque to
specifications.
8. On vehicles with automatic transmissions, install
I
converter to flywheel attaching bolts. Torque to
specifications.
9. Install flywheel splash shield of converter
housing cover as applicable. Torque attaching
bolts to specifications.
I
10. Install starter wires.
1 1. Connect fuel lines.
12. Connect exhaust pipe at manifold.
13. Lower vehicle on hoist.
14. Reinstall power steering pump, if so equipped.
15. Connect necessary wires and hoses.