1988 OPEL CALIBRA spark plugs
[x] Cancel search: spark plugsPage 174 of 525
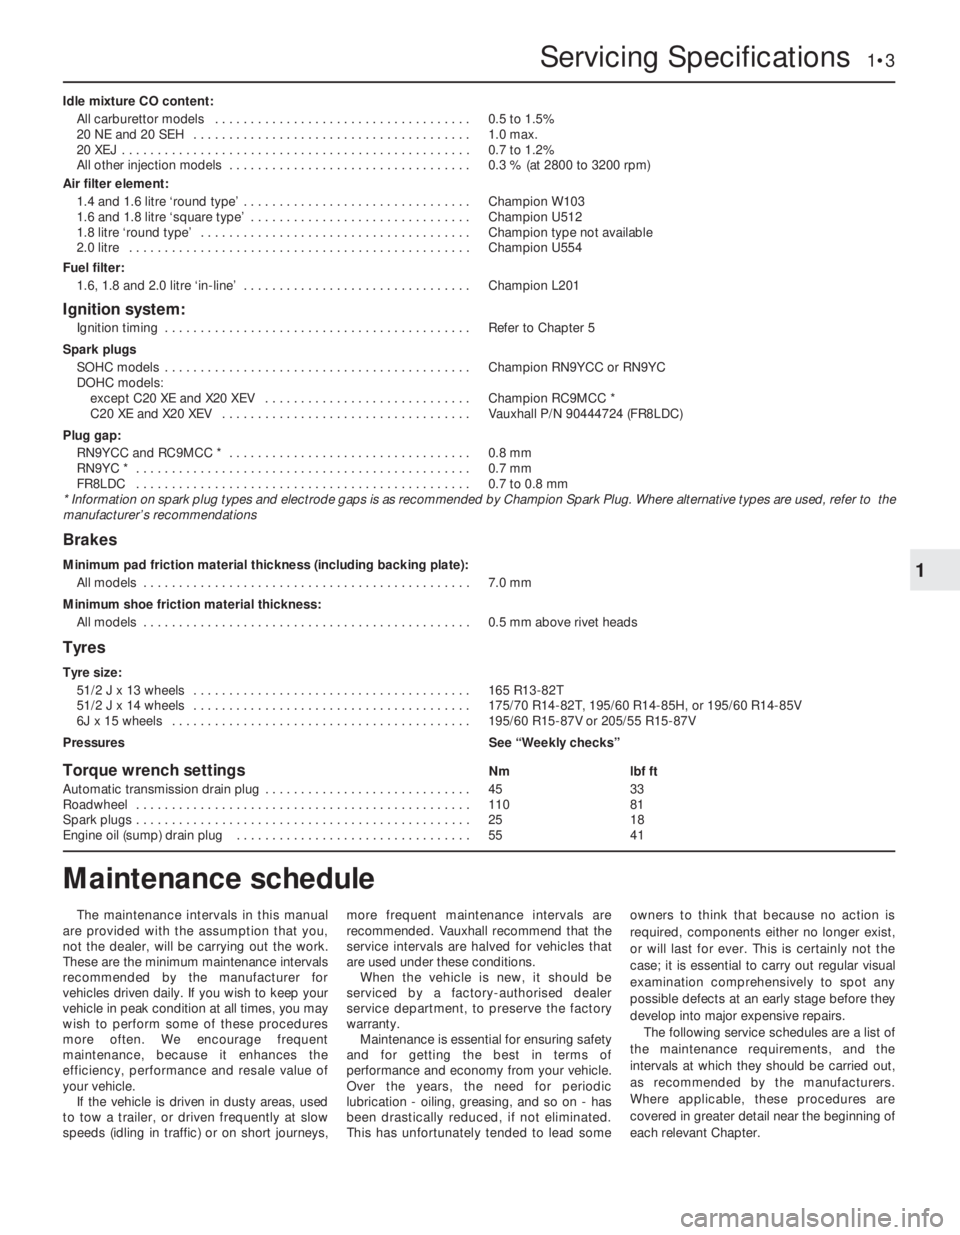
Idle mixture CO content:
All carburettor models . . . . . . . . . . . . . . . . . . . . . . . . . . . . . . . . . . . .0.5 to 1.5%
20 NE and 20 SEH . . . . . . . . . . . . . . . . . . . . . . . . . . . . . . . . . . . . . . .1.0 max.
20 XEJ . . . . . . . . . . . . . . . . . . . . . . . . . . . . . . . . . . . . . . . . . . . . . . . . .0.7 to 1.2%
All other injection models . . . . . . . . . . . . . . . . . . . . . . . . . . . . . . . . . .0.3 % (at 2800 to 3200 rpm)
Air filter element:
1.4 and 1.6 litre ‘round type’ . . . . . . . . . . . . . . . . . . . . . . . . . . . . . . . .Champion W103
1.6 and 1.8 litre ‘square type’ . . . . . . . . . . . . . . . . . . . . . . . . . . . . . . .Champion U512
1.8 litre ‘round type’ . . . . . . . . . . . . . . . . . . . . . . . . . . . . . . . . . . . . . .Champion type not available
2.0 litre . . . . . . . . . . . . . . . . . . . . . . . . . . . . . . . . . . . . . . . . . . . . . . . .Champion U554
Fuel filter:
1.6, 1.8 and 2.0 litre ‘in-line’ . . . . . . . . . . . . . . . . . . . . . . . . . . . . . . . .Champion L201
Ignition system:
Ignition timing . . . . . . . . . . . . . . . . . . . . . . . . . . . . . . . . . . . . . . . . . . .Refer to Chapter 5
Spark plugs
SOHC models . . . . . . . . . . . . . . . . . . . . . . . . . . . . . . . . . . . . . . . . . . .Champion RN9YCC or RN9YC
DOHC models:
except C20 XE and X20 XEV . . . . . . . . . . . . . . . . . . . . . . . . . . . . .Champion RC9MCC *
C20 XE and X20 XEV . . . . . . . . . . . . . . . . . . . . . . . . . . . . . . . . . . .Vauxhall P/N 90444724 (FR8LDC)
Plug gap:
RN9YCC and RC9MCC * . . . . . . . . . . . . . . . . . . . . . . . . . . . . . . . . . .0.8 mm
RN9YC * . . . . . . . . . . . . . . . . . . . . . . . . . . . . . . . . . . . . . . . . . . . . . . .0.7 mm
FR8LDC . . . . . . . . . . . . . . . . . . . . . . . . . . . . . . . . . . . . . . . . . . . . . . .0.7 to 0.8 mm
* Information on spark plug types and electrode gaps is as recommended by Champion Spark Plug. Where alternative types are used, refer to the
manufacturer’s recommendations
Brakes
Minimum pad friction material thickness (including backing plate):
All models . . . . . . . . . . . . . . . . . . . . . . . . . . . . . . . . . . . . . . . . . . . . . .7.0 mm
Minimum shoe friction material thickness:
All models . . . . . . . . . . . . . . . . . . . . . . . . . . . . . . . . . . . . . . . . . . . . . .0.5 mm above rivet heads
Tyres
Tyre size:
51/2 J x 13 wheels . . . . . . . . . . . . . . . . . . . . . . . . . . . . . . . . . . . . . . .165 R13-82T
51/2 J x 14 wheels . . . . . . . . . . . . . . . . . . . . . . . . . . . . . . . . . . . . . . .175/70 R14-82T, 195/60 R14-85H, or 195/60 R14-85V
6J x 15 wheels . . . . . . . . . . . . . . . . . . . . . . . . . . . . . . . . . . . . . . . . . .195/60 R15-87V or 205/55 R15-87V
PressuresSee “Weekly checks”
Torque wrench settingsNmlbf ft
Automatic transmission drain plug . . . . . . . . . . . . . . . . . . . . . . . . . . . . .4533
Roadwheel . . . . . . . . . . . . . . . . . . . . . . . . . . . . . . . . . . . . . . . . . . . . . . .11081
Spark plugs . . . . . . . . . . . . . . . . . . . . . . . . . . . . . . . . . . . . . . . . . . . . . . .2518
Engine oil (sump) drain plug . . . . . . . . . . . . . . . . . . . . . . . . . . . . . . . . .5541
Servicing Specifications 1•3
1
The maintenance intervals in this manual
are provided with the assumption that you,
not the dealer, will be carrying out the work.
These are the minimum maintenance intervals
recommended by the manufacturer for
vehicles driven daily. If you wish to keep your
vehicle in peak condition at all times, you may
wish to perform some of these procedures
more often. We encourage frequent
maintenance, because it enhances the
efficiency, performance and resale value of
your vehicle.
If the vehicle is driven in dusty areas, used
to tow a trailer, or driven frequently at slow
speeds (idling in traffic) or on short journeys,more frequent maintenance intervals are
recommended. Vauxhall recommend that the
service intervals are halved for vehicles that
are used under these conditions.
When the vehicle is new, it should be
serviced by a factory-authorised dealer
service department, to preserve the factory
warranty.
Maintenance is essential for ensuring safety
and for getting the best in terms of
performance and economy from your vehicle.
Over the years, the need for periodic
lubrication -oiling, greasing, and so on -has
been drastically reduced, if not eliminated.
This has unfortunately tended to lead someowners to think that because no action is
required, components either no longer exist,
or will last for ever. This is certainly not the
case; it is essential to carry out regular visual
examination comprehensively to spot any
possible defects at an early stage before they
develop into major expensive repairs.
The following service schedules are a list of
the maintenance requirements, and the
intervals at which they should be carried out,
as recommended by the manufacturers.
Where applicable, these procedures are
covered in greater detail near the beginning of
each relevant Chapter.
Maintenance schedule
Page 175 of 525
1•4Maintenance schedule
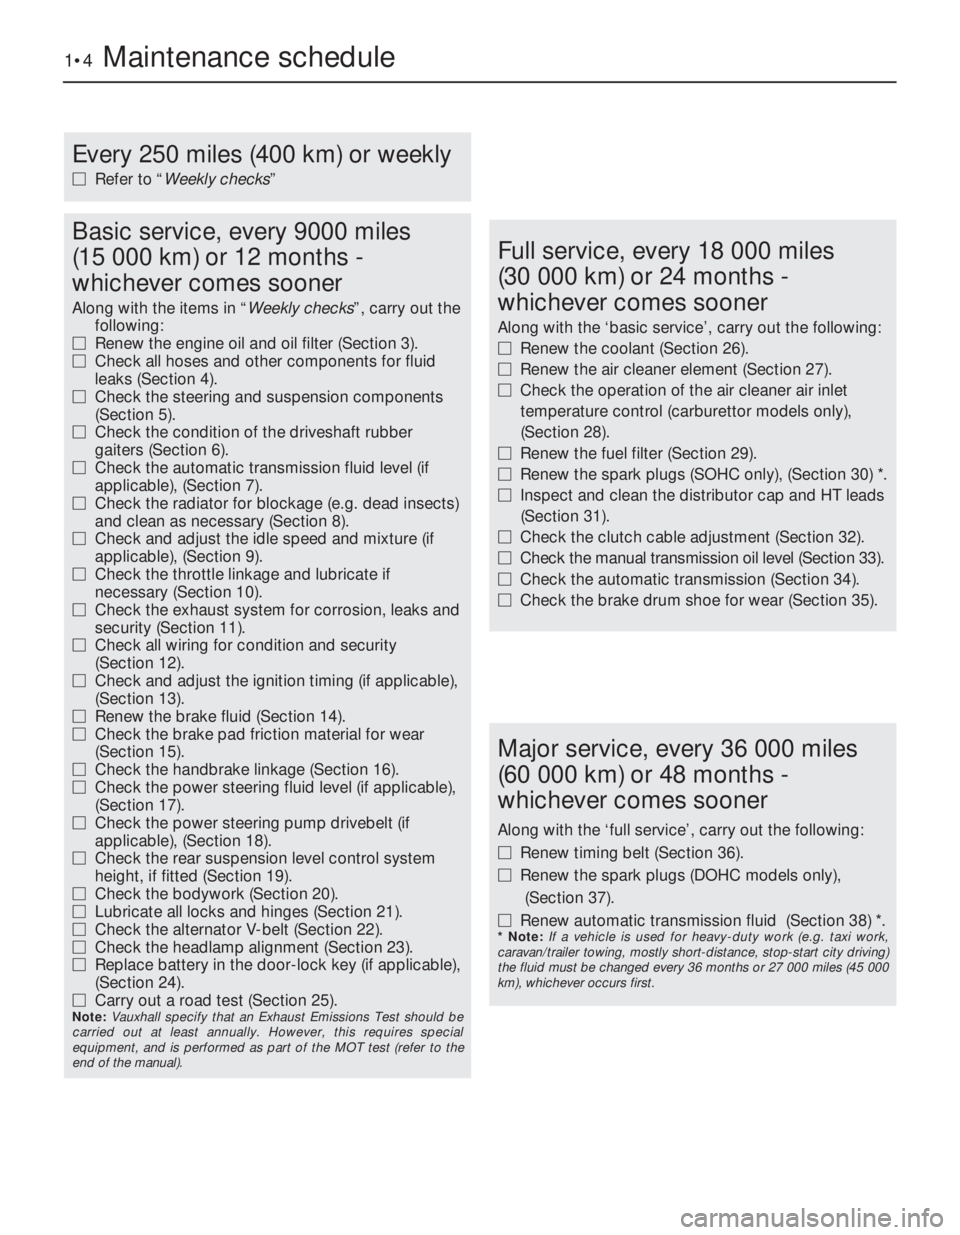
Every 250 miles (400 km) or weekly
MRefer to “Weekly checks”
Basic service, every 9000 miles
(15 000 km) or 12 months -
whichever comes sooner
Along with the items in “Weekly checks”, carry out the
following:
MRenew the engine oil and oil filter (Section 3).
MCheck all hoses and other components for fluid
leaks (Section 4).
MCheck the steering and suspension components
(Section 5).
MCheck the condition of the driveshaft rubber
gaiters (Section 6).
MCheck the automatic transmission fluid level (if
applicable), (Section 7).
MCheck the radiator for blockage (e.g. dead insects)
and clean as necessary (Section 8).
MCheck and adjust the idle speed and mixture (if
applicable), (Section 9).
MCheck the throttle linkage and lubricate if
necessary (Section 10).
MCheck the exhaust system for corrosion, leaks and
security (Section 11).
MCheck all wiring for condition and security
(Section 12).
MCheck and adjust the ignition timing (if applicable),
(Section 13).
MRenew the brake fluid (Section 14).
MCheck the brake pad friction material for wear
(Section 15).
MCheck the handbrake linkage (Section 16).
MCheck the power steering fluid level (if applicable),
(Section 17).
MCheck the power steering pump drivebelt (if
applicable), (Section 18).
MCheck the rear suspension level control system
height, if fitted (Section 19).
MCheck the bodywork (Section 20).
MLubricate all locks and hinges (Section 21).
MCheck the alternator V-belt (Section 22).
MCheck the headlamp alignment (Section 23).
MReplace battery in the door-lock key (if applicable),
(Section 24).
MCarry out a road test (Section 25).
Note: Vauxhall specify that an Exhaust Emissions Test should be
carried out at least annually. However, this requires special
equipment, and is performed as part of the MOT test (refer to the
end of the manual).
Full service, every 18 000 miles
(30 000 km) or 24 months -
whichever comes sooner
Along with the ‘basic service’, carry out the following:
MRenew the coolant (Section 26).
MRenew the air cleaner element (Section 27).
MCheck the operation of the air cleaner air inlet
temperature control (carburettor models only),
(Section 28).
MRenew the fuel filter (Section 29).
MRenew the spark plugs (SOHC only), (Section 30) *.
MInspect and clean the distributor cap and HT leads
(Section 31).
MCheck the clutch cable adjustment (Section 32).
MCheck the manual transmission oil level (Section 33).
MCheck the automatic transmission (Section 34).
MCheck the brake drum shoe for wear (Section 35).
Major service, every 36 000 miles
(60 000 km) or 48 months -
whichever comes sooner
Along with the ‘full service’, carry out the following:
MRenew timing belt (Section 36).
MRenew the spark plugs (DOHC models only),
(Section 37).
MRenew automatic transmission fluid (Section 38) *.
* Note: If a vehicle is used for heavy-duty work (e.g. taxi work,
caravan/trailer towing, mostly short-distance, stop-start city driving)
the fluid must be changed every 36 months or 27 000 miles (45 000
km), whichever occurs first.
Page 180 of 525
test (refer to Chapter 2A) will provide valuable
information regarding the overall performance
of the main internal components. Such a test
can be used as a basis to decide on the
extent of the work to be carried out. If, for
example, a compression test indicates serious
internal engine wear, conventional
maintenance as described in this Chapter will
not greatly improve the performance of the
engine. It may also prove a waste of time and
money, unless extensive overhaul work is
carried out first.
The following series of operations are those
most often required to improve the
performance of a generally poor-running
engine:Primary operations
a)Clean, inspect and test the battery (See
“Weekly Checks”)
b)Check all the engine related fluids (See
“Weekly Checks”)
c)Check the condition and tension of the
auxiliary drivebelt (Sections 18 and 22, as
appropriate).
d)Renew the spark plugs (Sections 30 and
37, as appropriate).
e)Inspect the distributor cap, rotor arm and
HT leads, as applicable (Section 31).
f)Check the condition of the air filter, and
renew if necessary (Section 27).
g)Check the fuel filter (Section 29).
h)Check the condition of all hoses, and
check for fluid leaks (Section 4).i)Check the idle speed and mixture
settings, as applicable (Section 9).
5If the above operations do not prove fully
effective, carry out the following secondary
operations:
Secondary operations
All items listed under “Primary operations”,
plus the following:
a)Check the charging system (Chapter 5).
b)Check the ignition system (Chapter 5).
c)Check the fuel system (Chapters 4A and
4B).
d)Renew the distributor cap and rotor arm
(Section 31).
e)Renew the ignition HT leads (Section 31).
3Engine oil and filter - renewal
2
1Ideally, the oil should be drained with the
engine hot, just after the vehicle has been
driven.
2On DOHC models, remove the engine
undershield to expose the sump drain plug
and the oil filter.
3Place a container beneath the oil drain plug
at the rear of the sump.
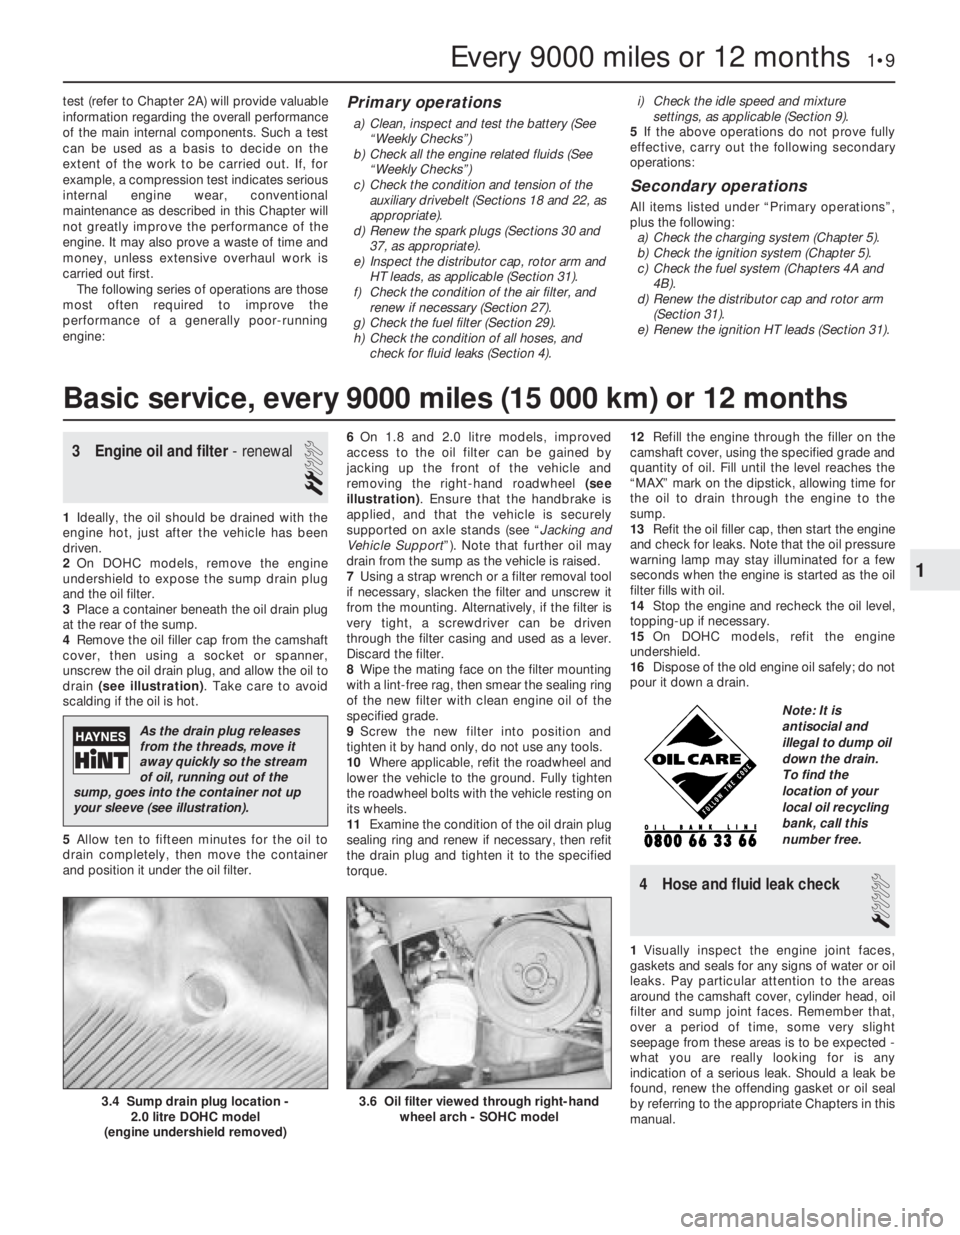
4Remove the oil filler cap from the camshaft
cover, then using a socket or spanner,
unscrew the oil drain plug, and allow the oil to
drain (see illustration). Take care to avoid
scalding if the oil is hot.
5Allow ten to fifteen minutes for the oil to
drain completely, then move the container
and position it under the oil filter.6On 1.8 and 2.0 litre models, improved
access to the oil filter can be gained by
jacking up the front of the vehicle and
removing the right-hand roadwheel (see
illustration). Ensure that the handbrake is
applied, and that the vehicle is securely
supported on axle stands (see “Jacking and
Vehicle Support”). Note that further oil may
drain from the sump as the vehicle is raised.
7Using a strap wrench or a filter removal tool
if necessary, slacken the filter and unscrew it
from the mounting. Alternatively, if the filter is
very tight, a screwdriver can be driven
through the filter casing and used as a lever.
Discard the filter.
8Wipe the mating face on the filter mounting
with a lint-free rag, then smear the sealing ring
of the new filter with clean engine oil of the
specified grade.
9Screw the new filter into position and
tighten it by hand only, do not use any tools.
10Where applicable, refit the roadwheel and
lower the vehicle to the ground. Fully tighten
the roadwheel bolts with the vehicle resting on
its wheels.
11Examine the condition of the oil drain plug
sealing ring and renew if necessary, then refit
the drain plug and tighten it to the specified
torque. 12Refill the engine through the filler on the
camshaft cover, using the specified grade and
quantity of oil. Fill until the level reaches the
“MAX” mark on the dipstick, allowing time for
the oil to drain through the engine to the
sump.
13Refit the oil filler cap, then start the engine
and check for leaks. Note that the oil pressure
warning lamp may stay illuminated for a few
seconds when the engine is started as the oil
filter fills with oil.
14Stop the engine and recheck the oil level,
topping-up if necessary.
15On DOHC models, refit the engine
undershield.
16Dispose of the old engine oil safely; do not
pour it down a drain.
4Hose and fluid leak check
1
1Visually inspect the engine joint faces,
gaskets and seals for any signs of water or oil
leaks. Pay particular attention to the areas
around the camshaft cover, cylinder head, oil
filter and sump joint faces. Remember that,
over a period of time, some very slight
seepage from these areas is to be expected -
what you are really looking for is any
indication of a serious leak. Should a leak be
found, renew the offending gasket or oil seal
by referring to the appropriate Chapters in this
manual.
Every 9000 miles or 12 months 1•9
3.6 Oil filter viewed through right-hand
wheel arch - SOHC model3.4 Sump drain plug location -
2.0 litre DOHC model
(engine undershield removed)
1
Basic service, every 9000 miles (15 000 km) or 12 months
As the drain plug releases
from the threads, move it
away quickly so the stream
of oil, running out of the
sump, goes into the container not up
your sleeve (see illustration).
Note: It is
antisocial and
illegal to dump oil
down the drain.
To find the
location of your
local oil recycling
bank, call this
number free.
Page 185 of 525
28Air inlet temperature control
check (carburettor models
only)
2
Refer to Chapter 4A for details.
29Fuel filter renewal
3
Fuel filters are fitted in various locations
throughout the range. Some may be ‘in-line’ in
the fuel tank itself, or fitted into the
carburettor.
Refer to Chapters 4A or 4B, as appropriate.
30Spark plug renewal (SOHC)
2
1The correct functioning of the spark plugs is
vital for the correct running and efficiency of
the engine. It is essential that the plugs fitted
are appropriate for the engine. Refer to the
specifications in Chapter 5. If this type is used
and the engine is in good condition, the spark
plugs should not need attention between
scheduled service replacement intervals.
Spark plug cleaning is rarely necessary and
should not be attempted unless specialised
equipment is available, as damage can easily
be caused to the firing ends.
2Identify each HT lead for position so that the
leads can be refitted to their correct cylinders.
Then disconnect the leads from the plugs by
pulling on the connectors, not the leads.
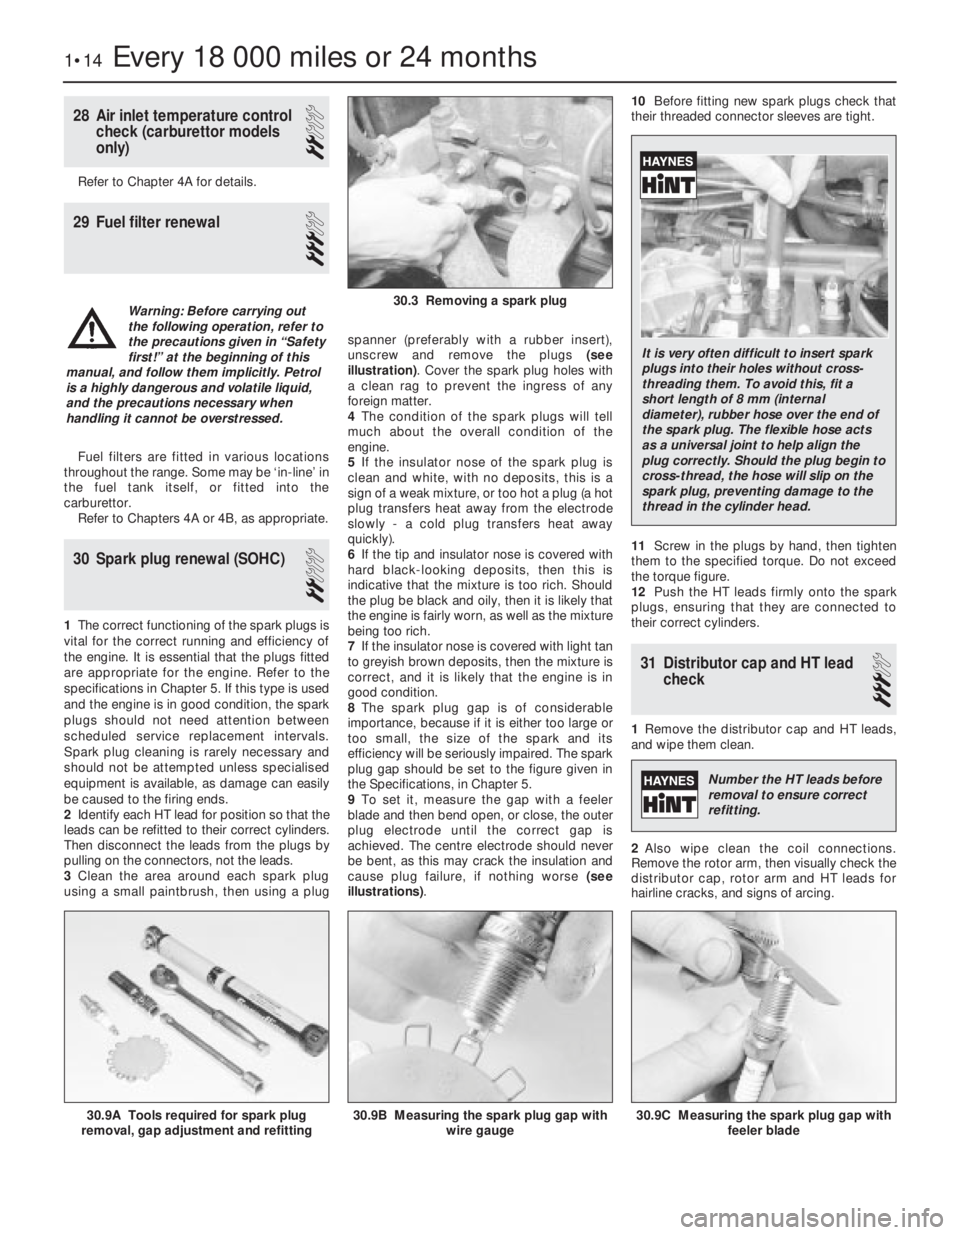
3Clean the area around each spark plug
using a small paintbrush, then using a plugspanner (preferably with a rubber insert),
unscrew and remove the plugs (see
illustration). Cover the spark plug holes with
a clean rag to prevent the ingress of any
foreign matter.
4The condition of the spark plugs will tell
much about the overall condition of the
engine.
5If the insulator nose of the spark plug is
clean and white, with no deposits, this is a
sign of a weak mixture, or too hot a plug (a hot
plug transfers heat away from the electrode
slowly -a cold plug transfers heat away
quickly).
6If the tip and insulator nose is covered with
hard black-looking deposits, then this is
indicative that the mixture is too rich. Should
the plug be black and oily, then it is likely that
the engine is fairly worn, as well as the mixture
being too rich.
7If the insulator nose is covered with light tan
to greyish brown deposits, then the mixture is
correct, and it is likely that the engine is in
good condition.
8The spark plug gap is of considerable
importance, because if it is either too large or
too small, the size of the spark and its
efficiency will be seriously impaired. The spark
plug gap should be set to the figure given in
the Specifications, in Chapter 5.
9To set it, measure the gap with a feeler
blade and then bend open, or close, the outer
plug electrode until the correct gap is
achieved. The centre electrode should never
be bent, as this may crack the insulation and
cause plug failure, if nothing worse (see
illustrations).10Before fitting new spark plugs check that
their threaded connector sleeves are tight.
11Screw in the plugs by hand, then tighten
them to the specified torque. Do not exceed
the torque figure.
12Push the HT leads firmly onto the spark
plugs, ensuring that they are connected to
their correct cylinders.
31Distributor cap and HT lead
check
3
1Remove the distributor cap and HT leads,
and wipe them clean.
2Also wipe clean the coil connections.
Remove the rotor arm, then visually check the
distributor cap, rotor arm and HT leads for
hairline cracks, and signs of arcing.
1•14Every 18 000 miles or 24 months
30.9A Tools required for spark plug
removal, gap adjustment and refitting30.9C Measuring the spark plug gap with
feeler blade30.9B Measuring the spark plug gap with
wire gauge
30.3 Removing a spark plugWarning: Before carrying out
the following operation, refer to
the precautions given in “Safety
first!” at the beginning of this
manual, and follow them implicitly. Petrol
is a highly dangerous and volatile liquid,
and the precautions necessary when
handling it cannot be overstressed.
It is very often difficult to insert spark
plugs into their holes without cross-
threading them. To avoid this, fit a
short length of 8 mm (internal
diameter), rubber hose over the end of
the spark plug. The flexible hose acts
as a universal joint to help align the
plug correctly. Should the plug begin to
cross-thread, the hose will slip on the
spark plug, preventing damage to the
thread in the cylinder head.
Number the HT leads before
removal to ensure correct
refitting.
Page 187 of 525
36Timing belt renewal
3
1To minimise risk of major damage to the
engine the timing belt (or cambelt, as it is
sometimes called), needs replacing at least,
on every major service.
2It is good practise however, not only to
renew the belt whenever major engine work is
carried out, but also if you buy a used car with
unclear service history.
3Some models are fitted with an inspection
cover to view the condition of the belt. Whilst
others involve a lot more work.
4Full details on checking and replacement
are shown in Chapters 2A or 2B, as
appropriate.
37Spark plug renewal (DOHC)
2
1This procedure is basically the same shown
in Section 30. However on these models, a
spark plug cover needs to be removed from
the camshaft cover before the plugs can be
removed.
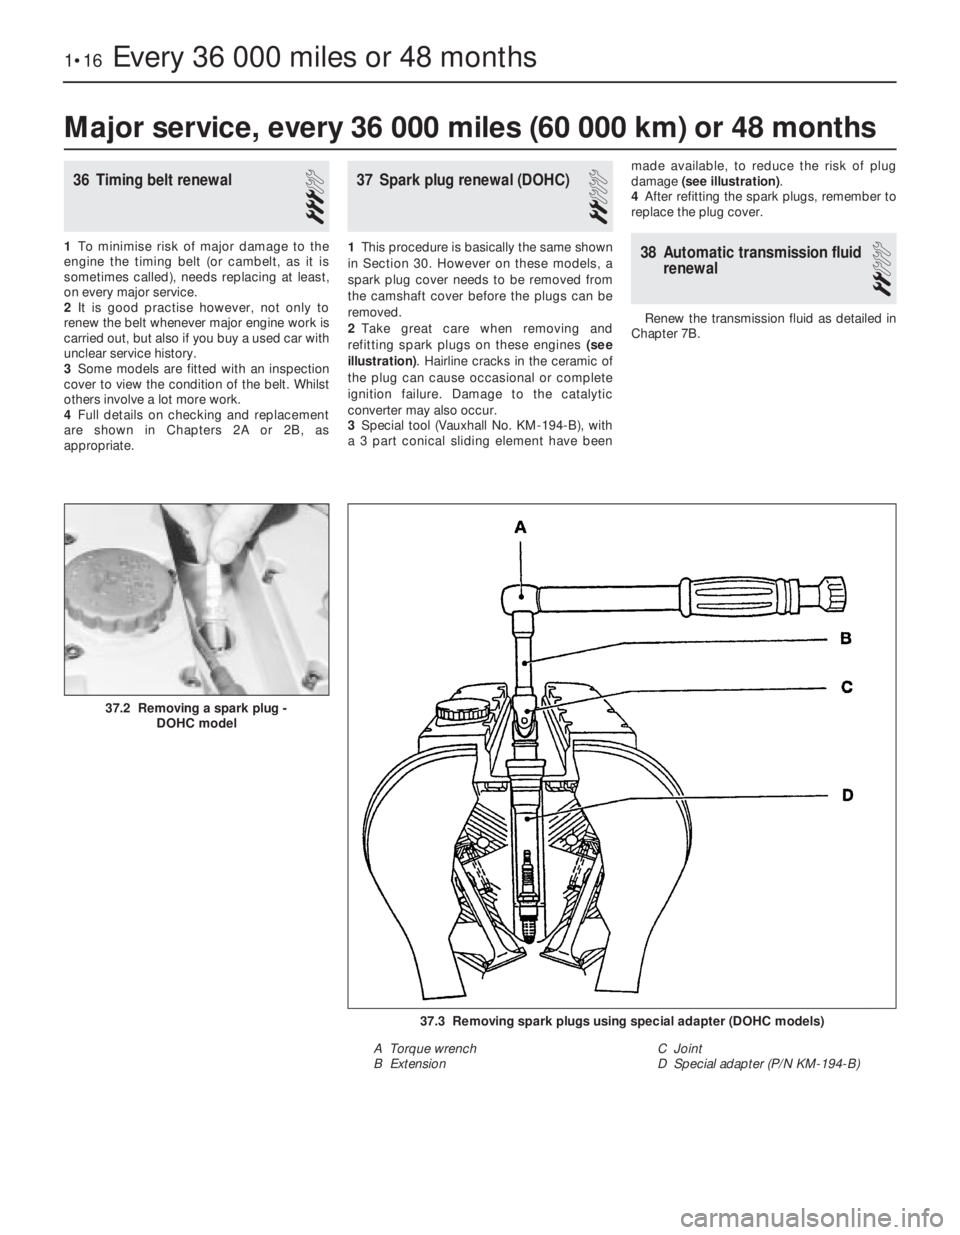
2Take great care when removing and
refitting spark plugs on these engines (see
illustration). Hairline cracks in the ceramic of
the plug can cause occasional or complete
ignition failure. Damage to the catalytic
converter may also occur.
3Special tool (Vauxhall No. KM-194-B), with
a 3 part conical sliding element have beenmade available, to reduce the risk of plug
damage (see illustration).
4After refitting the spark plugs, remember to
replace the plug cover.38Automatic transmission fluid
renewal
2
Renew the transmission fluid as detailed in
Chapter 7B.
1•16Every 36 000 miles or 48 months
37.3 Removing spark plugs using special adapter (DOHC models)
A Torque wrench
B ExtensionC Joint
D Special adapter (P/N KM-194-B)
37.2 Removing a spark plug -
DOHC model
Major service, every 36 000 miles (60 000 km) or 48 months
Page 191 of 525
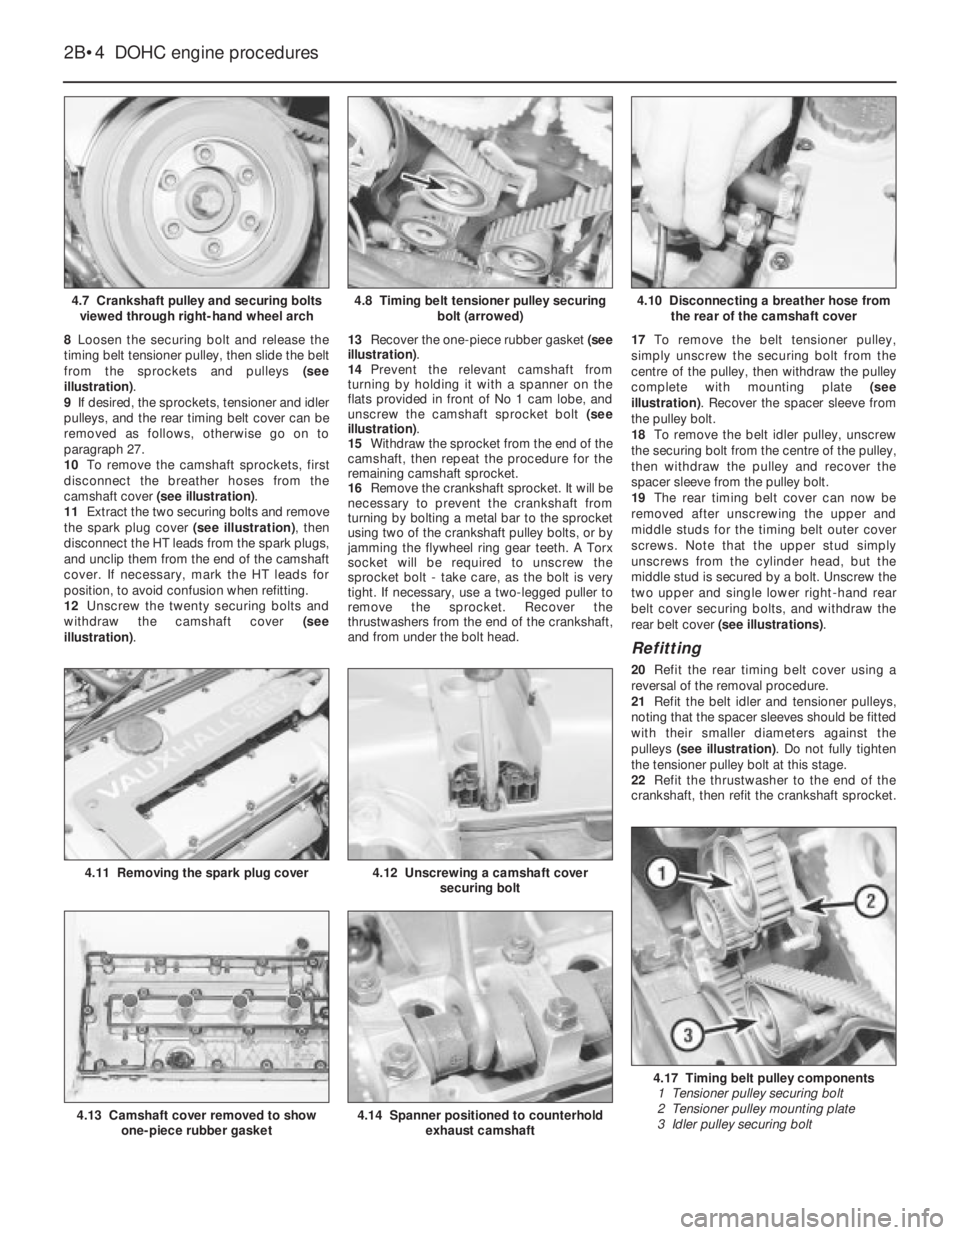
8Loosen the securing bolt and release the
timing belt tensioner pulley, then slide the belt
from the sprockets and pulleys (see
illustration).
9If desired, the sprockets, tensioner and idler
pulleys, and the rear timing belt cover can be
removed as follows, otherwise go on to
paragraph 27.
10To remove the camshaft sprockets, first
disconnect the breather hoses from the
camshaft cover (see illustration).
11Extract the two securing bolts and remove
the spark plug cover (see illustration), then
disconnect the HT leads from the spark plugs,
and unclip them from the end of the camshaft
cover. If necessary, mark the HT leads for
position, to avoid confusion when refitting.
12Unscrew the twenty securing bolts and
withdraw the camshaft cover (see
illustration).13Recover the one-piece rubber gasket (see
illustration).
14Prevent the relevant camshaft from
turning by holding it with a spanner on the
flats provided in front of No 1 cam lobe, and
unscrew the camshaft sprocket bolt (see
illustration).
15Withdraw the sprocket from the end of the
camshaft, then repeat the procedure for the
remaining camshaft sprocket.
16Remove the crankshaft sprocket. It will be
necessary to prevent the crankshaft from
turning by bolting a metal bar to the sprocket
using two of the crankshaft pulley bolts, or by
jamming the flywheel ring gear teeth. A Torx
socket will be required to unscrew the
sprocket bolt -take care, as the bolt is very
tight. If necessary, use a two-legged puller to
remove the sprocket. Recover the
thrustwashers from the end of the crankshaft,
and from under the bolt head.17To remove the belt tensioner pulley,
simply unscrew the securing bolt from the
centre of the pulley, then withdraw the pulley
complete with mounting plate (see
illustration). Recover the spacer sleeve from
the pulley bolt.
18To remove the belt idler pulley, unscrew
the securing bolt from the centre of the pulley,
then withdraw the pulley and recover the
spacer sleeve from the pulley bolt.
19The rear timing belt cover can now be
removed after unscrewing the upper and
middle studs for the timing belt outer cover
screws. Note that the upper stud simply
unscrews from the cylinder head, but the
middle stud is secured by a bolt. Unscrew the
two upper and single lower right-hand rear
belt cover securing bolts, and withdraw the
rear belt cover (see illustrations).
Refitting
20Refit the rear timing belt cover using a
reversal of the removal procedure.
21Refit the belt idler and tensioner pulleys,
noting that the spacer sleeves should be fitted
with their smaller diameters against the
pulleys (see illustration). Do not fully tighten
the tensioner pulley bolt at this stage.
22Refit the thrustwasher to the end of the
crankshaft, then refit the crankshaft sprocket.
2B•4DOHC engine procedures
4.7 Crankshaft pulley and securing bolts
viewed through right-hand wheel arch4.10 Disconnecting a breather hose from
the rear of the camshaft cover
4.17 Timing belt pulley components
1 Tensioner pulley securing bolt
2 Tensioner pulley mounting plate
3 Idler pulley securing bolt
4.14 Spanner positioned to counterhold
exhaust camshaft4.13 Camshaft cover removed to show
one-piece rubber gasket
4.12 Unscrewing a camshaft cover
securing bolt4.11 Removing the spark plug cover
4.8 Timing belt tensioner pulley securing
bolt (arrowed)
Page 192 of 525

Apply a little grease to the threads of the
securing bolt, and tighten it to the specified
torque in the two stages given in the Specifi-
cations. Ensure that the thrustwasher is in
place under the bolt head, and prevent the
crankshaft from turning as during removal.
23Refit the camshaft sprockets. Ensure that
the locating pins on the ends of the camshafts
engage with the holes in the sprockets and
with the sprocket timing marks facing
forwards. Then tighten the securing bolts to
the specified torque in the two stages given in
the Specifications. Prevent the camshafts
from turning as during removal.
24Check the condition of the camshaft
cover rubber gasket and renew if necessary,
then refit the camshaft cover and tighten the
securing bolts (see illustration).
25Refit the HT leads to the spark plugs
(ensuring that they are refitted to their correct
cylinders), then clip the leads to the end of the
camshaft cover. Refit the spark plug cover
and tighten the securing bolts.
26Reconnect the breather hose to the
camshaft cover.
27Temporarily refit the crankshaft pulley,
and ensure that the crankshaft pulley and
camshaft sprocket timing marks are still
aligned as described in paragraph 6. Then fit a
new timing belt around the sprockets and
pulleys, starting at the crankshaft sprocket.
28Refit the crankshaft pulley, and tighten the
securing bolts to the specified torque. If
necessary, prevent the crankshaft from
turning as during removal. 29Adjust the timing belt tension, as
described from paragraph 35 onwards.
30Refit the outer timing belt cover, ensuring
that the rubber grommets are in place in the
screw holes, and tighten the securing screws.
31Refit the alternator drivebelt and adjust
the drivebelt tension, as described in Chapter
5.
32Refit the power steering pump drivebelt
and adjust the drivebelt tension, as described
in Chapter 10.
33Refit the air cleaner components as
applicable, referring to Chapter 4B, if
necessary.
34Reconnect the battery negative lead.
Adjustment
Note: The manufacturers specify the use of
special adjustment wrench Vauxhall tool No
KM-666 for adjusting the timing belt tension. If
access to this tool cannot be obtained an
approximate adjustment can be achieved
using the method described in this Section.
However it is emphasised that the vehicle
should be taken to a dealer at the earliest
possible opportunity to have the tension
adjusted using the special tool. Do not drive
the vehicle over any long distance until the
belt tension has been adjusted by a dealer
Approximate adjustment
35No checking of timing belt adjustment is
specified, and the following adjustment
procedure applies to a newly fitted belt. The
adjustment must be carried out with the
engine cold.36With the timing belt cover removed and
the tensioner pulley bolt slackened, ensure
that the TDC marks on the camshaft
sprockets and the crankshaft pulley are
aligned as described in paragraph 6. If
necessary, turn the crankshaft to achieve
alignment.
37Have an assistant press the tensioner
pulley against the belt until the belt can just be
twisted through 45°, using moderate pressure
with the thumb and forefinger, on the longest
belt run between the exhaust camshaft
sprocket and the belt idler pulley.
38Have the assistant hold the tensioner
pulley in position, and tighten the tensioner
pulley bolt to the specified torque in the two
stages given in the Specifications.
39Turn the crankshaft clockwise through
two complete revolutions, and check that,
with the crankshaft pulley TDC mark aligned
with the pointer on the rear timing belt cover,
the TDC marks on the camshaft sprockets are
still aligned with the notches in the camshaft
cover.
40Proceed as described in paragraphs 30 to
34, inclusive.
41Have the belt tension adjusted by a
Vauxhall dealer using the manufacturer’s
special tool at the earliest opportunity.Adjustment using Vauxhall special
tool (KM-666)
42Proceed as described in paragraphs 35
and 36.
43Fit the special tool KM-666 to the belt
tensioner pulley mounting plate, in
accordance with the tool manufacturer’s
instructions.
44Working anti-clockwise from the TDC
mark on the exhaust camshaft sprocket, mark
the seventh tooth on the sprocket (see
illustration).
45Turn the crankshaft clockwise until this
tooth is aligned with the TDC notch in the
camshaft cover. The crankshaft must be
turned evenly and without jerking, to prevent
the timing belt from jumping off the sprockets
and pulleys.
46Tighten the tensioner pulley bolt to the
specified torque in the two stages given in the
Specifications.
47Remove the special tool.
DOHC engine procedures 2B•5
4.21 Belt tensioner pulley and spacer
sleeve. Note that smaller diameter of
spacer sleeve fits against pulley
4.44 Working anti-clockwise from the TDC
mark on the exhaust camshaft sprocket,
mark the seventh tooth on the sprocket4.24 Tightening a camshaft cover securing
bolt
4.19B Rear timing belt cover lower right-
hand securing bolt4.19A Timing belt outer cover screw upper
stud (1) and rear belt cover upper
securing bolts (2)
2B
Page 196 of 525
4Unscrew the bolt securing the crankcase
breather tube bracket to the end of the
cylinder head.
5Make a final check to ensure that all
relevant hoses, pipes and wires have been
disconnected.
6Continue as described in Section 8,
paragraphs 26 to 31.
Refitting
7Proceed as described in Section 8,
paragraphs 32 to 38 inclusive but in addition
note the following.
8On completion, check that all relevant
hoses, pipes and wires, etc., have been
reconnected.
10Cylinder head- dismantling
and reassembly
4
Dismantling
1With the cylinder head removed as
described in Section 8, clean away all external
dirt.
2If not already done, remove the thermostat
housing and thermostat as described in
Chapter 3, and remove the manifolds as
described in Chapters 4B and 4C.
3Remove the spark plugs (if not already
done), and remove the distributor with
reference to Chapter 5.
4Remove the camshafts as described in
Section 7.
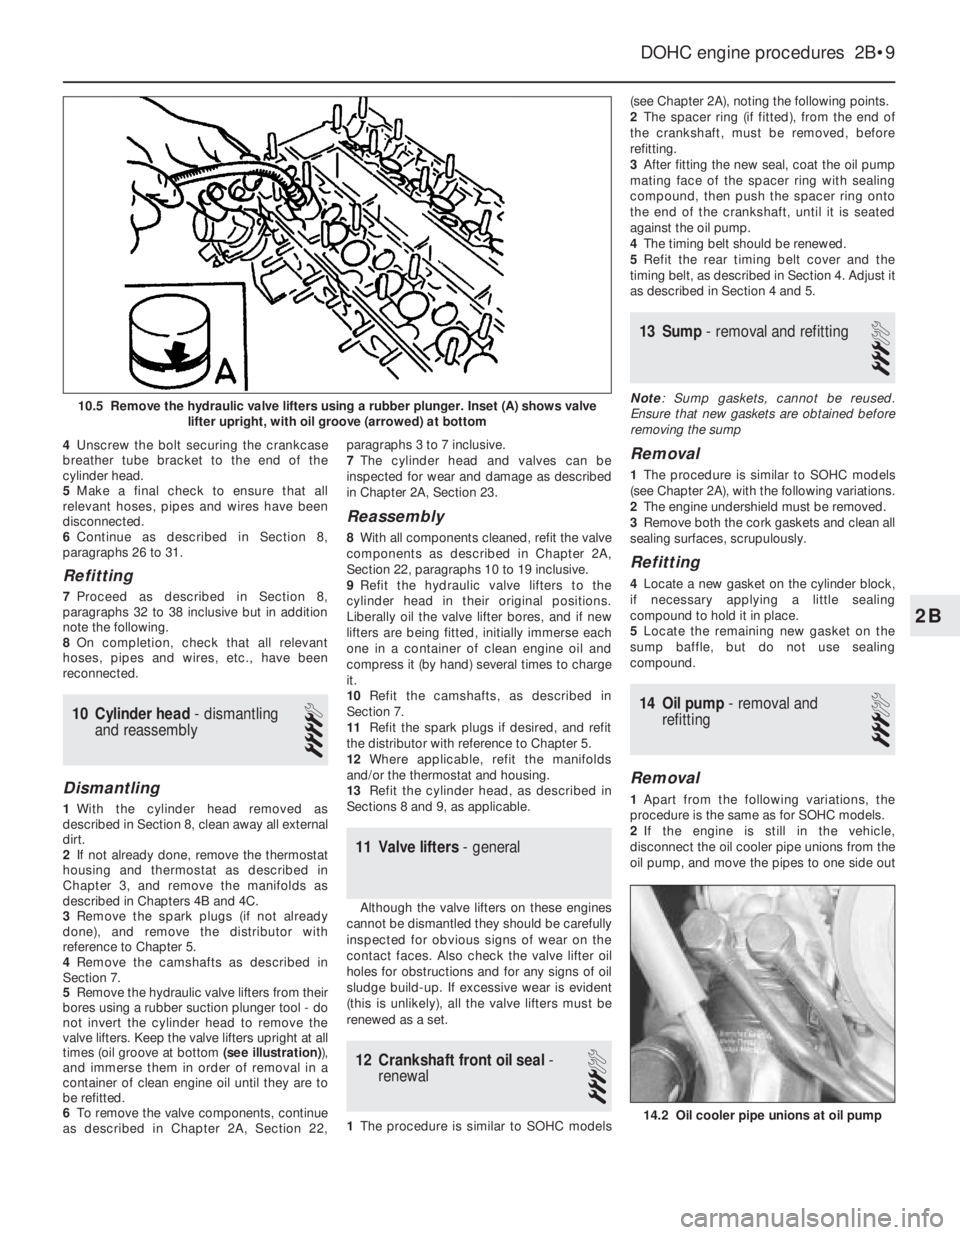
5Remove the hydraulic valve lifters from their
bores using a rubber suction plunger tool - do
not invert the cylinder head to remove the
valve lifters. Keep the valve lifters upright at all
times (oil groove at bottom (see illustration)),
and immerse them in order of removal in a
container of clean engine oil until they are to
be refitted.
6To remove the valve components, continue
as described in Chapter 2A, Section 22,paragraphs 3 to 7 inclusive.
7The cylinder head and valves can be
inspected for wear and damage as described
in Chapter 2A, Section 23.
Reassembly
8With all components cleaned, refit the valve
components as described in Chapter 2A,
Section 22, paragraphs 10 to 19 inclusive.
9Refit the hydraulic valve lifters to the
cylinder head in their original positions.
Liberally oil the valve lifter bores, and if new
lifters are being fitted, initially immerse each
one in a container of clean engine oil and
compress it (by hand) several times to charge
it.
10Refit the camshafts, as described in
Section 7.
11Refit the spark plugs if desired, and refit
the distributor with reference to Chapter 5.
12Where applicable, refit the manifolds
and/or the thermostat and housing.
13Refit the cylinder head, as described in
Sections 8 and 9, as applicable.
11Valve lifters- general
Although the valve lifters on these engines
cannot be dismantled they should be carefully
inspected for obvious signs of wear on the
contact faces. Also check the valve lifter oil
holes for obstructions and for any signs of oil
sludge build-up. If excessive wear is evident
(this is unlikely), all the valve lifters must be
renewed as a set.
12Crankshaft front oil seal -
renewal
3
1The procedure is similar to SOHC models(see Chapter 2A), noting the following points.
2The spacer ring (if fitted), from the end of
the crankshaft, must be removed, before
refitting.
3After fitting the new seal, coat the oil pump
mating face of the spacer ring with sealing
compound, then push the spacer ring onto
the end of the crankshaft, until it is seated
against the oil pump.
4The timing belt should be renewed.
5Refit the rear timing belt cover and the
timing belt, as described in Section 4. Adjust it
as described in Section 4 and 5.
13Sump - removal and refitting
3
Note: Sump gaskets, cannot be reused.
Ensure that new gaskets are obtained before
removing the sump
Removal
1The procedure is similar to SOHC models
(see Chapter 2A), with the following variations.
2The engine undershield must be removed.
3Remove both the cork gaskets and clean all
sealing surfaces, scrupulously.
Refitting
4Locate a new gasket on the cylinder block,
if necessary applying a little sealing
compound to hold it in place.
5Locate the remaining new gasket on the
sump baffle, but do not use sealing
compound.
14Oil pump - removal and
refitting
3
Removal
1Apart from the following variations, the
procedure is the same as for SOHC models.
2If the engine is still in the vehicle,
disconnect the oil cooler pipe unions from the
oil pump, and move the pipes to one side out
DOHC engine procedures 2B•9
14.2 Oil cooler pipe unions at oil pump
10.5 Remove the hydraulic valve lifters using a rubber plunger. Inset (A) shows valve
lifter upright, with oil groove (arrowed) at bottom
2B