1988 OPEL CALIBRA auxiliary battery
[x] Cancel search: auxiliary batteryPage 69 of 525

Wiring diagrams 12•55
12
Key to wiring diagrams for 1992 and later models
NoDescriptionTrackNoDescriptionTrack
E1Left parking lamp506
E2Left tail lamp507, 745
E3Licence plate lamp513
E4Right parking lamp509
E5Right tail lamp510, 746
E6Engine compartment lamp515
E7Left high beam 535
E8Right high beam536
E9Left low beam537, 747
E10Right low beam538, 748
E11Instrument lights728, 729
E12Selector lever lamp 498, 499
E13Boot lamp585
E14Passenger compartment lamp587
E15Glove box lamp677
E16Cigarette lighter lamp676
E17Left reversing lamp597
E18Right reversing lamp598
E19Heated back window652
E20Left fog lamp553
E21Right fog lamp554
E24Left rear fog lamp548
E25Left front heating mat660
E27Left rear reading lamp680, 681
E28Right rear reading lamp683, 684
E30Right front heating mat664
E32Clock lamp863
E37Left mirror make-up lamp686
E38Computer lamp854
E39Right rear foglamp549
E40Right mirror make-up lamp688
E41Passenger compartment delay lamp 588 to 590
E50Driver door lamp866
E51Passenger door lamp884
F1 onFusesVarious
F35Voltage stabilizer702
G1Battery101
G2Alternator114
G6Diesel alternator 402 to 405
H1Radio784 to 798
H3Turn signal lamp telltale716, 718
H4Oil pressure telltale710
H5Brake fluid telltale712
H6Telltale hazard warning system570
H7Charging indicator lamp710
H8High beam telltale722
H9Left stop lamp561, 749
H10Right stop lamp562, 750
H11Left front turn signal lamp572
H12Left rear turn signal lamp573
H13Right front turn signal lamp581
H14Right rear turn signal lamp582
H15Fuel telltale705, 706
H16Preheating time telltale715
H17Trailer turn signal lamp telltale717
H18Horn670
H19Headlamps on warning buzzer594, 595
H21Parking brake telltale713
H23Airbag telltale719
H25Heated back window & mirror telltale642, 765
H26ABS telltale721
H27Safety checking warning buzzer996 to 998
H28Seat belt warning telltale723
H30Engine telltale724H33Left auxiliary turn signal lamp576
H34Right auxiliary turn signal lamp578
H36Additional stop lamp563
H37Left front loudspeaker788 to 790
H38Right front loudspeaker794 to 796
H39Left rear loudspeaker788, 789
H40Right rear loudspeaker791, 792
H42Automatic program power telltale725
H45Four wheel drive telltale727
H46Catalytic converter temperature telltale729
H47Anti-theft warning unit horn838
H48Horn671
H51Traction control telltale720
H52Left front tweeter787 to 791
H53Right front tweeter793 to 797
K3Starter relay anti-theft warning unit109, 110
K5Fog lamps relay554 to 555
K6Air conditioning relay901, 902
K7Four stage air conditioning blower relay904, 905
K8Windshield wiper interval relay603 to 606
K9Headlamps washer unit relay619, 620
K10Flasher unit567 to 569
K20Ignition coil module149, 150, 171, 172, 241, 242, 302 to 305,
361 to 364, 1001 to 1005, 1055 to 1061
K22Coolant pump relay133, 134, 969, 970
K25Glow time relay440 to 443
K26Radiator blower relays972 to 974
K27Radiator blower relay137 to 139
K30Back window wiper interval relay613 to 615
K31Airbag control unit1191 to 1198
K34Radiator blower time delay relay356 to 358, 956 to 958
K35Heated back window & mirror time delay relay650 to 652
K37Central locking control unit805 to 812
K51Radiator blower relay430, 431, 942, 943, 956, 957
K52Radiator blower relay145 to 147, 433,435,
982 to 984, 960 to 962
K57Multec unit control211 to 230, 244 to 262
K58Fuel pump relay231, 232, 262, 263
K59Running light relay520 to 525
K60Compressor relay931,932
K61Motronic control unit270 to 294, 307 to 337,
366 to 396, 1007 to 1037, 1063 to 1096
K63Horn relay671, 672
K641 stage air conditioning blower relay913, 914
K67Radiator blower relay142, 143, 436, 437, 948,
949, 964, 965, 986, 987
K68Fuel injection unit relay295 to 299, 393 to 397,
334 to 338, 1093 to 1097, 1034 to 1038
K73High beam relay (Calibra)530, 531
K76Glow time control unit413 to 417
K77Glow plugs relay419, 420
K78Preresistor relay (70A)422, 423
K79Charge indicator relay406 to 408
K80Filter heating relay426, 427, 452, 453
K82Engine revolution relay447, 448
K83Four wheel drive unit control342 to 349
K84EZ Plus control unit155 to 166, 177 to 191
K85Automatic transmission control unit473 to 496
K86Check control unit736 to 752
K87Radiator blower relay945, 946, 953, 954, 977, 978
K88Catalytic converter temperature control unit462 to 464
K89Rear fog lamp relay543 to 545
K90Compressor relay (automatic transmission only)930, 931
K94Anti-theft warning unit control unit833 to 847
Page 180 of 525

test (refer to Chapter 2A) will provide valuable
information regarding the overall performance
of the main internal components. Such a test
can be used as a basis to decide on the
extent of the work to be carried out. If, for
example, a compression test indicates serious
internal engine wear, conventional
maintenance as described in this Chapter will
not greatly improve the performance of the
engine. It may also prove a waste of time and
money, unless extensive overhaul work is
carried out first.
The following series of operations are those
most often required to improve the
performance of a generally poor-running
engine:Primary operations
a)Clean, inspect and test the battery (See
“Weekly Checks”)
b)Check all the engine related fluids (See
“Weekly Checks”)
c)Check the condition and tension of the
auxiliary drivebelt (Sections 18 and 22, as
appropriate).
d)Renew the spark plugs (Sections 30 and
37, as appropriate).
e)Inspect the distributor cap, rotor arm and
HT leads, as applicable (Section 31).
f)Check the condition of the air filter, and
renew if necessary (Section 27).
g)Check the fuel filter (Section 29).
h)Check the condition of all hoses, and
check for fluid leaks (Section 4).i)Check the idle speed and mixture
settings, as applicable (Section 9).
5If the above operations do not prove fully
effective, carry out the following secondary
operations:
Secondary operations
All items listed under “Primary operations”,
plus the following:
a)Check the charging system (Chapter 5).
b)Check the ignition system (Chapter 5).
c)Check the fuel system (Chapters 4A and
4B).
d)Renew the distributor cap and rotor arm
(Section 31).
e)Renew the ignition HT leads (Section 31).
3Engine oil and filter - renewal
2
1Ideally, the oil should be drained with the
engine hot, just after the vehicle has been
driven.
2On DOHC models, remove the engine
undershield to expose the sump drain plug
and the oil filter.
3Place a container beneath the oil drain plug
at the rear of the sump.
4Remove the oil filler cap from the camshaft
cover, then using a socket or spanner,
unscrew the oil drain plug, and allow the oil to
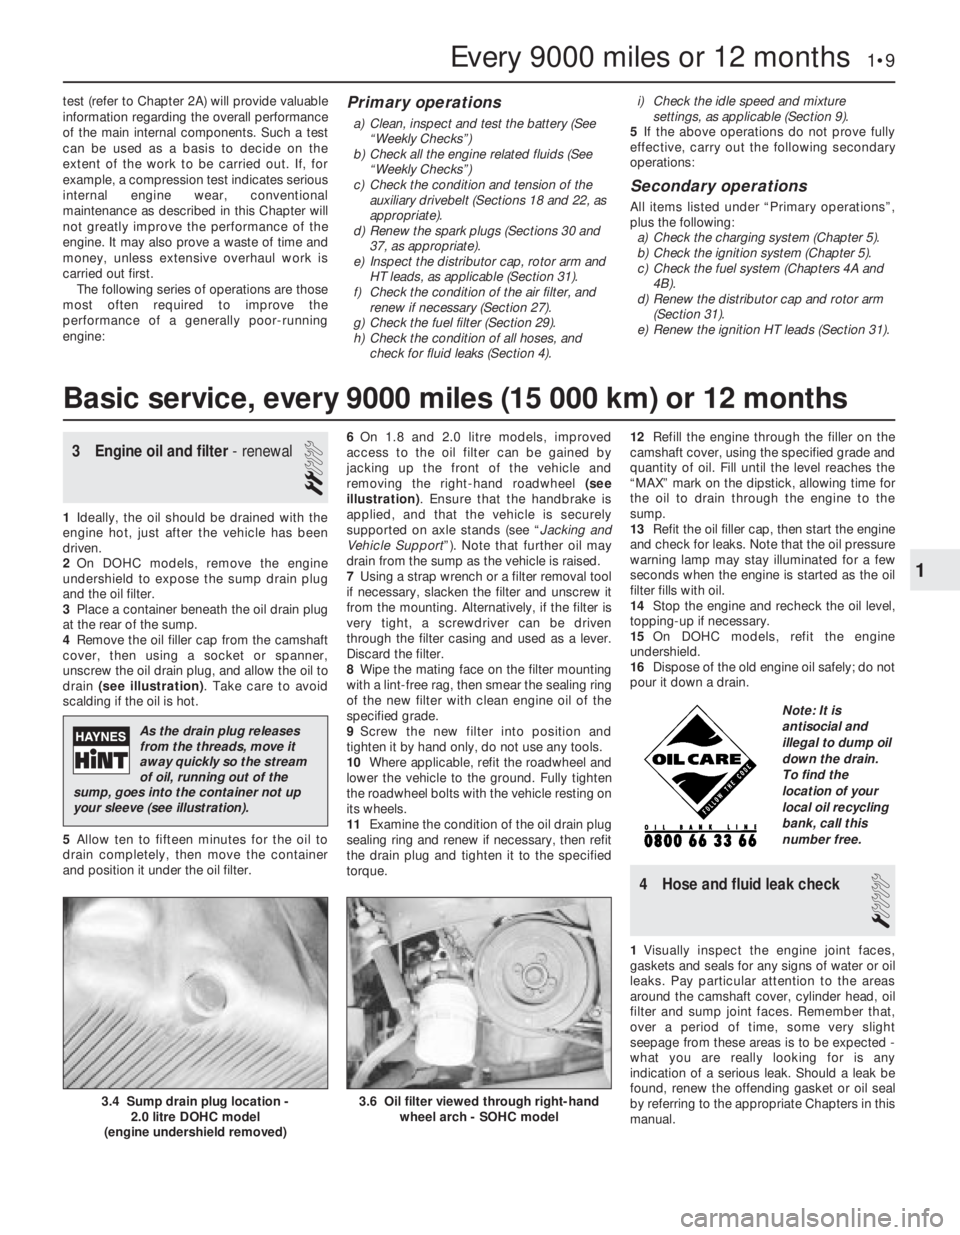
drain (see illustration). Take care to avoid
scalding if the oil is hot.
5Allow ten to fifteen minutes for the oil to
drain completely, then move the container
and position it under the oil filter.6On 1.8 and 2.0 litre models, improved
access to the oil filter can be gained by
jacking up the front of the vehicle and
removing the right-hand roadwheel (see
illustration). Ensure that the handbrake is
applied, and that the vehicle is securely
supported on axle stands (see “Jacking and
Vehicle Support”). Note that further oil may
drain from the sump as the vehicle is raised.
7Using a strap wrench or a filter removal tool
if necessary, slacken the filter and unscrew it
from the mounting. Alternatively, if the filter is
very tight, a screwdriver can be driven
through the filter casing and used as a lever.
Discard the filter.
8Wipe the mating face on the filter mounting
with a lint-free rag, then smear the sealing ring
of the new filter with clean engine oil of the
specified grade.
9Screw the new filter into position and
tighten it by hand only, do not use any tools.
10Where applicable, refit the roadwheel and
lower the vehicle to the ground. Fully tighten
the roadwheel bolts with the vehicle resting on
its wheels.
11Examine the condition of the oil drain plug
sealing ring and renew if necessary, then refit
the drain plug and tighten it to the specified
torque. 12Refill the engine through the filler on the
camshaft cover, using the specified grade and
quantity of oil. Fill until the level reaches the
“MAX” mark on the dipstick, allowing time for
the oil to drain through the engine to the
sump.
13Refit the oil filler cap, then start the engine
and check for leaks. Note that the oil pressure
warning lamp may stay illuminated for a few
seconds when the engine is started as the oil
filter fills with oil.
14Stop the engine and recheck the oil level,
topping-up if necessary.
15On DOHC models, refit the engine
undershield.
16Dispose of the old engine oil safely; do not
pour it down a drain.
4Hose and fluid leak check
1
1Visually inspect the engine joint faces,
gaskets and seals for any signs of water or oil
leaks. Pay particular attention to the areas
around the camshaft cover, cylinder head, oil
filter and sump joint faces. Remember that,
over a period of time, some very slight
seepage from these areas is to be expected -
what you are really looking for is any
indication of a serious leak. Should a leak be
found, renew the offending gasket or oil seal
by referring to the appropriate Chapters in this
manual.
Every 9000 miles or 12 months 1•9
3.6 Oil filter viewed through right-hand
wheel arch - SOHC model3.4 Sump drain plug location -
2.0 litre DOHC model
(engine undershield removed)
1
Basic service, every 9000 miles (15 000 km) or 12 months
As the drain plug releases
from the threads, move it
away quickly so the stream
of oil, running out of the
sump, goes into the container not up
your sleeve (see illustration).
Note: It is
antisocial and
illegal to dump oil
down the drain.
To find the
location of your
local oil recycling
bank, call this
number free.
Page 257 of 525

Note:For problems associated with the starting system, refer to the
faults listed under “Engine” earlier in this Section.
Battery will not hold a charge for more than a few
days
MBattery defective internally (Chapter 5).
MBattery terminal connections loose or corroded (Chapter 1).
MAuxiliary drivebelt worn or incorrectly adjusted (Chapter 1).
MAlternator not charging at correct output (Chapter 5).
MAlternator or voltage regulator faulty (Chapter 5).
MShort-circuit causing continual battery drain (Chapters 5 and 12).
Ignition/no-charge warning light remains
illuminated with engine running
MAuxiliary drivebelt broken, worn, or incorrectly adjusted (Chapter 1).
MAlternator brushes worn, sticking, or dirty (Chapter 5).
MAlternator brush springs weak or broken (Chapter 5).
MInternal fault in alternator or voltage regulator (Chapter 5).
MBroken, disconnected, or loose wiring in charging circuit
(Chapter 5).
Ignition/no-charge warning light fails to come on
MWarning light bulb blown (Chapter 12).
MBroken, disconnected, or loose wiring in warning light circuit
(Chapter 12).
MAlternator faulty (Chapter 5).
Lights inoperative
MBulb blown (Chapter 12).
MCorrosion of bulb or bulbholder contacts (Chapter 12).
MBlown fuse (Chapter 12).
MFaulty relay (Chapter 12).
MBroken, loose, or disconnected wiring (Chapter 12).
MFaulty switch (Chapter 12).
Instrument readings inaccurate or erratic
Instrument readings increase with engine speed
MFaulty voltage regulator (Chapter 12).
Fuel or temperature gauges give no reading
MFaulty gauge sender unit (Chapters 3, 4A and 4B).
MWiring open-circuit (Chapter 12).
MFaulty gauge (Chapter 12).
Fuel or temperature gauges give continuous maximum
reading
MFaulty gauge sender unit (Chapters 3, 4A and 4B).
MWiring short-circuit (Chapter 12).
MFaulty gauge (Chapter 12). MIncorrect front wheel alignment (Chapter 10).
MSteering rack or column bent or damaged (Chapter 10).
Excessive play in steering
MWorn steering column intermediate shaft universal joint
(Chapter 10).
MWorn steering track rod end balljoints (Chapters 1 and 10).
MWorn rack-and-pinion steering gear (Chapter 10).
MWorn steering or suspension joints, bushes or components
(Chapters 1 and 10).
Lack of power assistance
MBroken or incorrectly adjusted auxiliary drivebelt (Chapter 1).
MIncorrect power steering fluid level (Chapter 1).
MRestriction in power steering fluid hoses (Chapter 1).
MFaulty power steering pump (Chapter 10).
MFaulty rack-and-pinion steering gear (Chapter 10).
Tyre wear excessive
Tyres worn on inside or outside edges
MTyres under-inflated (wear on both edges), (Chapter 1).
MIncorrect camber or castor angles (wear on one edge only),
(Chapter 10).
MWorn steering or suspension joints, bushes or components
(Chapters 1 and 10).
MExcessively hard cornering.
MAccident damage.
Tyre treads exhibit feathered edges
MIncorrect toe setting (Chapter 10).
Tyres worn in centre of tread
MTyres over-inflated (Chapter 1).
Tyres worn on inside and outside edges
MTyres under-inflated (Chapter 1).
Tyres worn unevenly
MTyres/wheels out of balance (Chapter 1).
MExcessive wheel or tyre run-out (Chapter 1).
MWorn shock absorbers (Chapters 1 and 10).
MFaulty tyre (Chapter 1).
REF•18Fault Finding
Electrical system
Suspension and steering (continued)