1987 PORSCHE 944 run flat
[x] Cancel search: run flatPage 21 of 66

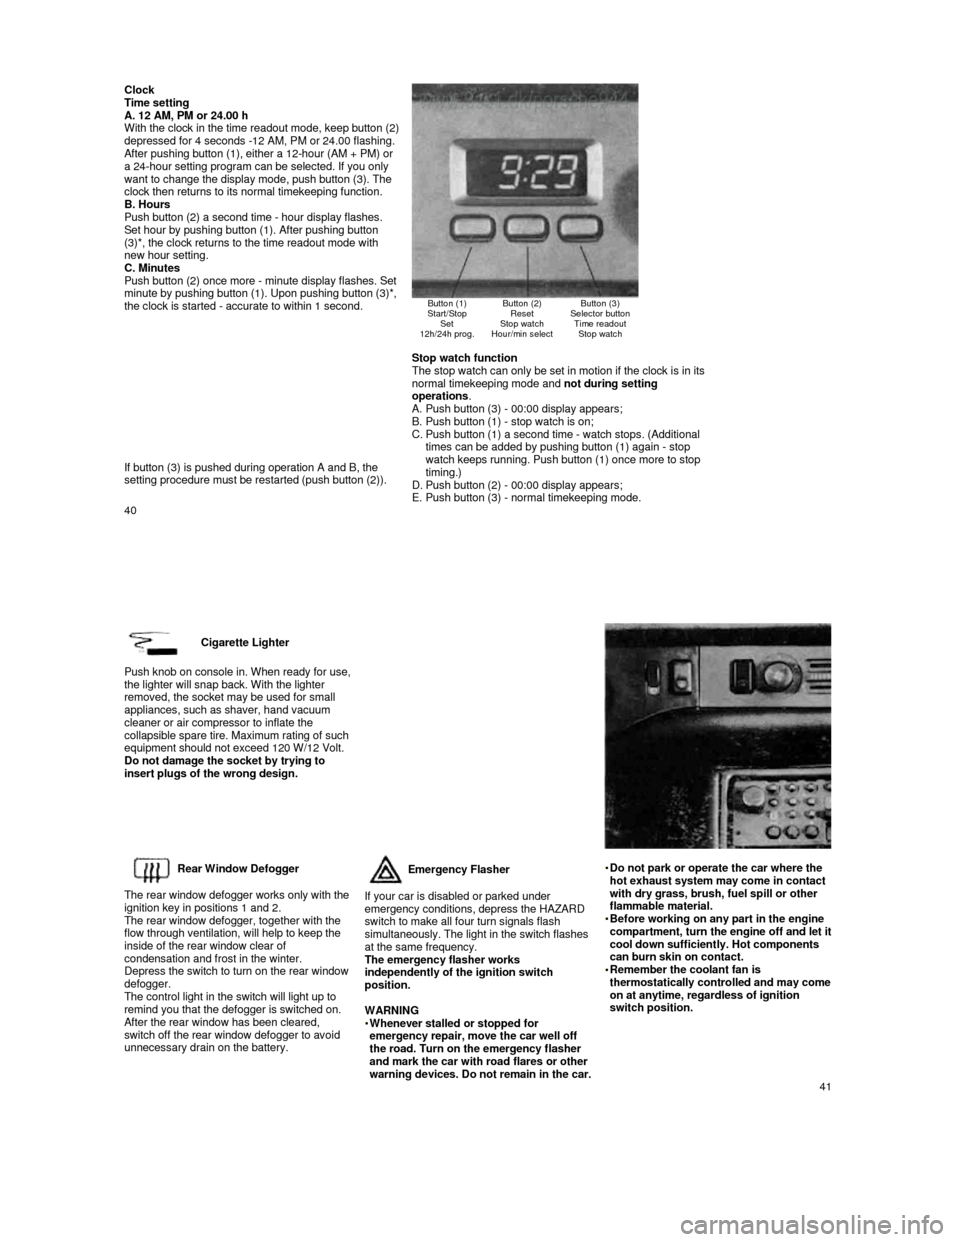
Clock Time setting
A. 12 AM, PM or 24.00 h
With the clock in the time readout mode, keep butto n (2) depressed for 4 seconds -12 AM, PM or 24.00 flashin g. After pushing button (1), either a 12-hour (AM + PM) or
a 24-hour setting program can be selected. If you o nly
want to change the display mode, push button (3). The
clock then returns to its normal timekeeping functi on.
B. Hours
Push button (2) a second time - hour display flashe s.
Set hour by pushing button (1). After pushing butto n
(3)*, the clock returns to the time readout mode wi th
new hour setting.
C. Minutes
Push button (2) once more -
minute display flashes. Set minute by pushing button (1). Upon pushing button ( 3)*, the clock is started - accurate to within 1 second.
Button (1)
Start/Stop Set
12h/24h prog.
Button (2) Reset
Stop watch
Hour/min select
Button (3)
Selector button Time readout Stop watch
If button (3) is pushed during operation A and B, t he
setting procedure must be restarted (push button (2 )).
Stop watch function
The stop watch can only be set in motion if the clo ck is in its
normal timekeeping mode and not during setting
operations .
A. Push button (3) - 00:00 display appears;
B. Push button (1) - stop watch is on;
C. Push button (1) a second time - watch stops. (Addit ional
times can be added by pushing button (1) again - st op
watch keeps running. Push button (1) once more to s top timing.)
D. Push button (2) - 00:00 display appears;
E. Push button (3) - normal timekeeping mode.
40
Cigarette Lighter
Push knob on console in. When ready for use, the lighter will snap back. With the lighter
removed, the socket may be used for small
appliances, such as shaver, hand vacuum
cleaner or air compressor to inflate the
collapsible spare tire. Maximum rating of such
equipment should not exceed 120 W/12 Volt.
Do not damage the socket by trying to
insert plugs of the wrong design.
Rear Window Defogger
The rear window defogger works only with the
ignition key in positions 1 and 2.
The rear window defogger, together with the
flow through ventilation, will help to keep the
inside of the rear window clear of
condensation and frost in the winter.
Depress the switch to turn on the rear window
defogger.
The control light in the switch will light up to
remind you that the defogger is switched on.
After the rear window has been cleared, switch off the rear window defogger to avoid
unnecessary drain on the battery.
Emergency Flasher
If your car is disabled or parked under
emergency conditions, depress the HAZARD
switch to make all four turn signals flash
simultaneously. The light in the switch flashes
at the same frequency.
The emergency flasher works
independently of the ignition switch
position.
WARNING
Whenever stalled or stopped for emergency repair, move the car well off
the road. Turn on the emergency flasher
and mark the car with road flares or other
warning devices. Do not remain in the car.
Do not park or operate the car where the hot exhaust system may come in contact
with dry grass, brush, fuel spill or other
flammable material.
Before working on any part in the engine compartment, turn the engine off and let it cool down sufficiently. Hot components
can burn skin on contact.
Remember the coolant fan is thermostatically controlled and may come on at anytime, regardless of ignition
switch position.
41
Page 43 of 66

may not always be due to improper wheel
alignment. It can be the result of individual
driving habits such as cornering at high
speeds. If the tire pressure is not checked and adjusted regularly, abnormal tire wear can
also occur.
Tire care
WARNING
Avoid damaging tires and wheel rims. If you must drive over a curb or other obstacle,
drive slowly and at an obtuse angle.
Frequently check tires for uneven wear and
damage.
Remove imbedded material. Replace worn or damaged tires immediately. Replace missing valve dust caps. Keep oil, fuel, brake fluid, etc. away from
tires.
Keep tires inflated correctly.
Tire replacement
In the interest of maximum safety and best
all-around car handling, always buy
replacement tires that have the same
specifications with regard to tire size,
design, load carrying capacity, tread
pattern, tread depth etc. This also applies
to Porsche recommended alternate
replacement tires. If you do not use a
Porsche recommended replacement tire,
make sure that you purchase your new
tires from a reputable
tire specially dealer and that the dealer complies with all manufacturers warnings
for those tires.
In case of tire damage where it is uncertain
whether there is a break in the ply with all its consequences or, tire damage caused by
thermal or mechanical overloading due to a
loss of pressure or any other prior damage,
we recommend that the tire be replaced for safety reasons.
If one faulty tire on an axle is replaced it
should be noted that the difference in tread
depth on one axle must not be more than
30%.
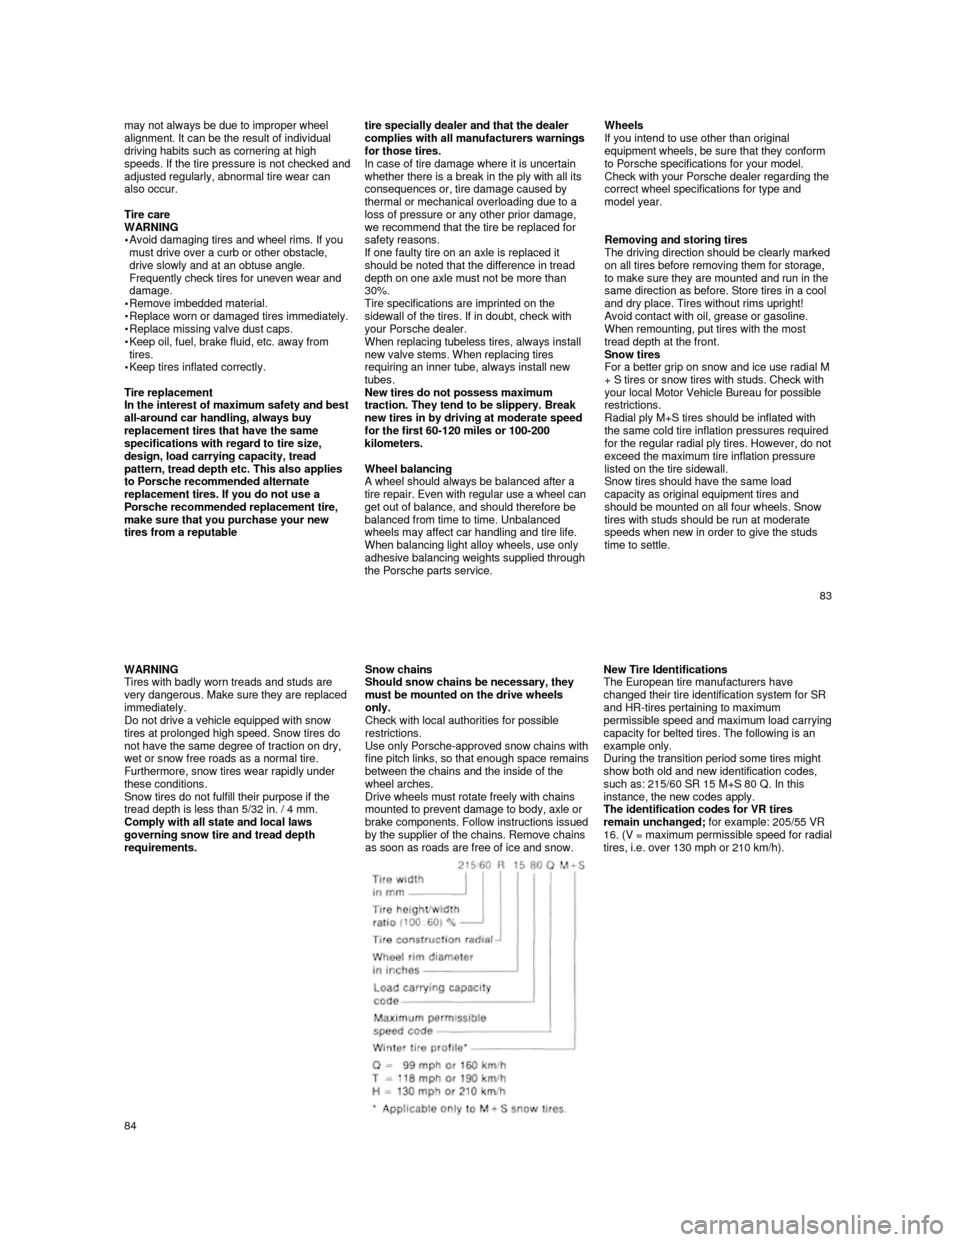
Tire specifications are imprinted on the
sidewall of the tires. If in doubt, check with
your Porsche dealer.
When replacing tubeless tires, always install
new valve stems. When replacing tires
requiring an inner tube, always install new
tubes.
New tires do not possess maximum
traction. They tend to be slippery. Break
new tires in by driving at moderate speed
for the first 60-120 miles or 100-200
kilometers.
Wheel balancing
A wheel should always be balanced after a tire repair. Even with regular use a wheel can
get out of balance, and should therefore be
balanced from time to time. Unbalanced
wheels may affect car handling and tire life.
When balancing light alloy wheels, use only
adhesive balancing weights supplied through
the Porsche parts service.
Wheels
If you intend to use other than original
equipment wheels, be sure that they conform
to Porsche specifications for your model.
Check with your Porsche dealer regarding the
correct wheel specifications for type and
model year.
Removing and storing tires
The driving direction should be clearly marked on all tires before removing them for storage,
to make sure they are mounted and run in the
same direction as before. Store tires in a cool
and dry place. Tires without rims upright!
Avoid contact with oil, grease or gasoline. When remounting, put tires with the most
tread depth at the front.
Snow tires
For a better grip on snow and ice use radial M + S tires or snow tires with studs. Check with
your local Motor Vehicle Bureau for possible
restrictions.
Radial ply M+S tires should be inflated with
the same cold tire inflation pressures required
for the regular radial ply tires. However, do not exceed the maximum tire inflation pressure
listed on the tire sidewall.
Snow tires should have the same load
capacity as original equipment tires and
should be mounted on all four wheels. Snow
tires with studs should be run at moderate
speeds when new in order to give the studs
time to settle.
83
WARNING
Tires with badly worn treads and studs are
very dangerous. Make sure they are replaced
immediately.
Do not drive a vehicle equipped with snow
tires at prolonged high speed. Snow tires do
not have the same degree of traction on dry,
wet or snow free roads as a normal tire. Furthermore, snow tires wear rapidly under
these conditions.
Snow tires do not fulfill their purpose if the
tread depth is less than 5/32 in. / 4 mm.
Comply with all state and local laws
governing snow tire and tread depth
requirements.
Snow chains Should snow chains be necessary, they
must be mounted on the drive wheels
only.
Check with local authorities for possible
restrictions.
Use only Porsche-approved snow chains with
fine pitch links, so that enough
space remains between the chains and the inside of the wheel arches.
Drive wheels must rotate freely with chains
mounted to prevent damage to body, axle or
brake components. Follow instructions issued
by the supplier of the chains. Remove chains
as soon as roads are free of ice and snow.
New Tire Identifications
The European tire manufacturers have
changed their tire identification system for SR
and HR-tires pertaining to maximum
permissible speed and maximum load carrying capacity for belted tires. The following is an
example only.
During the transition period some tires might
show both old and new identification codes,
such as: 215/60 SR 15 M+S 80 Q. In this
instance, the new codes apply.
The identification codes for VR tires
remain unchanged; for example: 205/55 VR
16. (V = maximum permissible speed for radial tires, i.e. over 130 mph or 210 km/h).
84