1987 PORSCHE 944 spare wheel
[x] Cancel search: spare wheelPage 3 of 66

INDEX
A
ABS Acceleration diagram Accelerator pedal Air Bag System Air - cleaner
- conditioner
- filter
Alternator warning light Antifreeze Antilock, Brake system Anti-theft alarm Ashtray Automatic- garage door
- speed control
- transmission
- transmission fluid B
Battery
Boost pressure gauge
Brake - booster
- fluid
- fluid warning light
- pads
- parking
- pedal
- system
- warning light
Break-in hints
Bulb replacing
Buzzer 28,39
118-129
55
20, 21, 38, 3980, 8144-4680,81 39
74,75,11028, 39
11
42, 98
25
29
53-55
78,110,128
90-9234
27
39,79,11039
27,37,47,79,80 26
26, 27
26,27,11537
47
93-98
10,18,24,30
C/D
CASIS
Capacities
Car care instructions
Casis
Catalytic Converter
Cautions
Central locking
Central warning light
Cigarette lighter
Cleaning
Clock
Clutch pedal
Collapsible spare tire
Control warning light system
Coolant Temperature Gauge
Cooling system
Corrosion prevention
Dashboard
Defogging/defrosting
Dimensions
Doors
Driving hints
E/F
Electrical system
Emergency- flasher
- starting
Emission Control System
Engine - cooling
- exhaust
- hood
- number
- oil checking & changing
- oil
-speed, max 35
110
61-66
35
50,10267
13
37
41
61-66 40
27
85
36-39 36
74-77
65-66
24
44-46 114
12,138-9, 48, 49
89-92
41
92
100-103 74-77
48
586
69-72
69,110,111,128
34,47,52,106-
108
Fan control switch knob
Fan, radiator
Filling capacities
Fog lights
Fuel - economy
- evaporation control
- gauge
- recommendation
- tank
Fuses and relays
G/H
Gas Station Information
Gasohol
Gasoline
Gear ratio diagram
Gearshift lever
Glove compartment
Hatchback
Headlights
Headlight- dimmer
- flasher
- switch
- washing system
Heater/ventilation controls
Hood - front
- rear
Horn
I/J
Ignition/steering lock
Instrument illumination
Instruments
Interior ligh 44
36, 74 110
30, 96, 97
49
103 37
50, 51
50,110
89,126
126-129 51
50,51
122-125 52-55
42
56
30,95,99 30
30
30
31,32,81,11044-4658
56,57
21,24
24
30
33-40
43, 98
4
Jack
- supports
K/L
Keys
Kickdown
Lane changer
Leather
License plate light
Light switch
Lights - ashtray
- fog
- interior
- license plate
- parking
- turn signal
Locks - doors, wheels
Loudspeakers
Lubricants
Luggage compartment
M/O
Manual transmission
- oil
Mirrors
Oil- change
- consumption
- filter changing
- pressure gauge
- pressure warning light
Octane rating
Oxygen Sensor
P/R
Paint code number 68
87, 88, 129
10-11,86 55
30
65
98
30
98
30, 96, 97
43, 9898
30, 37, 93, 94
30,93,94
10-13, 86 89
110,111 57
52,122-125 77,11022,43
71,72
47, 69
71, 72 38
38
50, 51,106-108 101,102
7
Parking- brake
- lights
Performance
Power assisted steering
Power train
Power windows
Prop-up roof
Radiator fan
Rear - hood
- view mirrors
- window defogger
- wiper
Recirculation Switch
Refrigerant
Relays
Rims
Roof racks
Roof, removable S
Safe driving hints
Safetybelts
Safety belt warning light
Safety compliance sticker
Seat heating System
Seats
Sekuriflex windshield
Shift indicator
Shift points
Side marker lights
Ski racks
Snow- chains
- tires
Spare tire, collapsible
Spark plugs
Specifications, engine
26, 3730,37,93,94116731091259, 6036, 7456,572241424446,11089,12664,112,11357,11459, 60
8-9
17-21,6518,3771514-1631, 63, 643552-559457,11483, 84,112,113
83,84, 111,113
85106-108106-109
Speedometer
Starting procedures
Sun visors
T/U
Tachometer
Technical data
Tirepressure
Tires
Tool kit
Trip odometer
Transmission oil
Trunk
Turn signal lights
Undercoating
Unleaded fuel
V/W
Vehicle identification
Ventilation
Voltmeter
Warning/indicator lights
Washer reservoir
Washing
Water temperature gauge
Weatherstrips
Weights
Wheel alignment
Wheel nuts, lockable
Wheels
Wheel changing
Windows
Windshield- washer reservoir
- wiper/washer lever 3324, 2543
34, 35105-12582,112,113,12947,82-87,112,113683377, 78,11056,5730, 37, 93, 9465, 66,10050, 51,106-108,110
6-744-463835-4081,11061-6636641141158647,64,82-87,11285-8812,63,6481,11031
5
Page 38 of 66
Power Assisted Steering
The hydraulic assistance system allows
effortless steering under all driving conditions.
Slight hissing or squeaking sounds during
sharp turns (turning steering wheel from lock
to lock) are normal and do not indicate a
defective steering mechanism.
If the engine is not running, po
wer assisted steering is no longer effective. You can
continue to steer the car but more effort
will be required to turn the steering wheel.
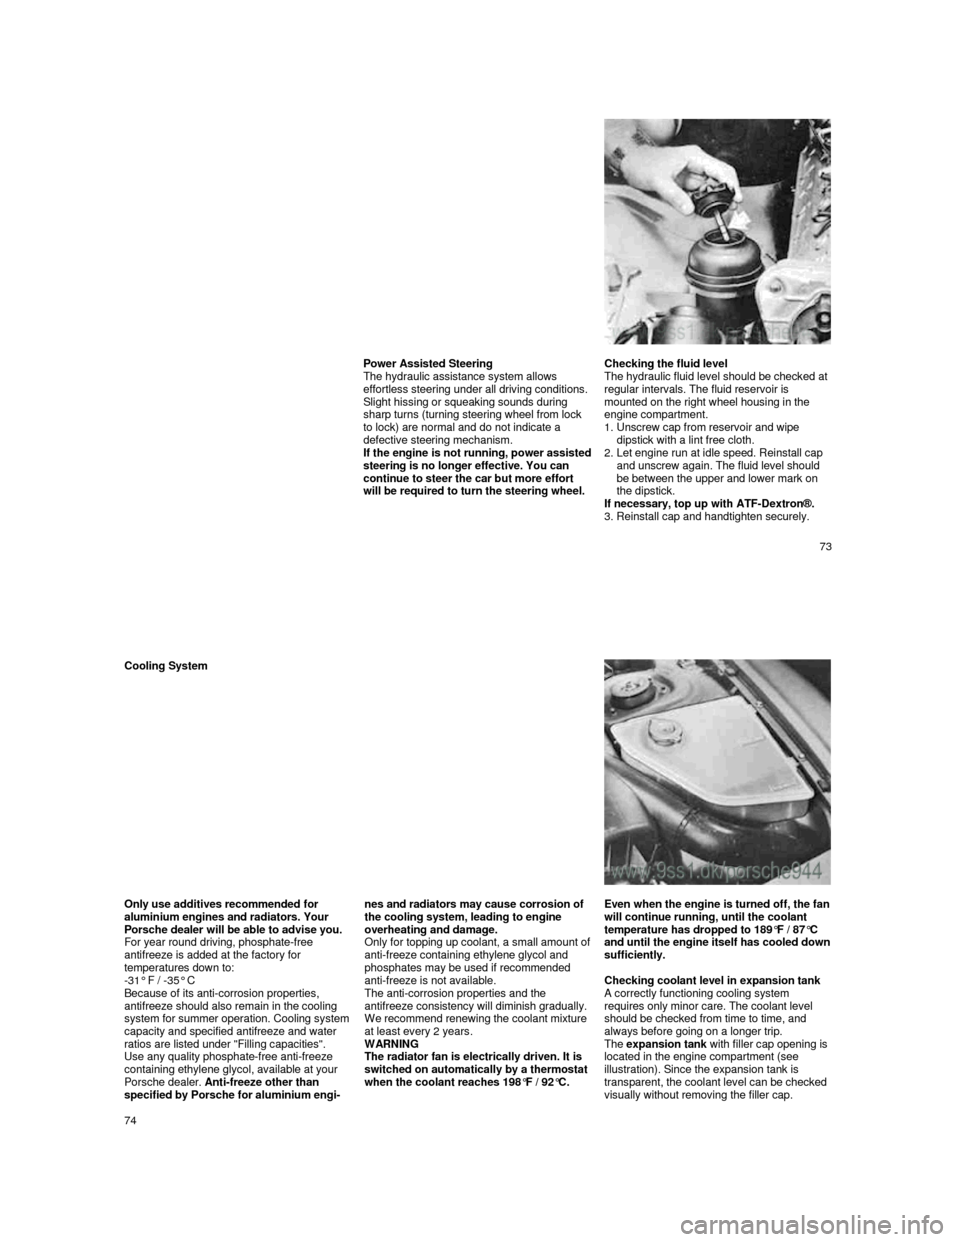
Checking the fluid level
The hydraulic fluid level should be checked at
regular intervals. The fluid reservoir is
mounted on the right wheel housing in the
engine compartment.
1.
Unscrew cap from reservoir and wipe
dipstick with a lint free cloth.
2.
Let engine run at idle speed. Reinstall cap
and unscrew again. The fluid level should
be between the upper and lower mark on
the dipstick.
If necessary, top up with ATF-Dextron®.
3. Reinstall cap and handtighten securely.
73
Cooling System
Only use additives recommended for
aluminium engines and radiators. Your
Porsche dealer will be able to advise you.
For year round driving, phosphate-free
antifreeze is added at the factory for
temperatures down to:
-31° F / -35° C
Because of its anti-corrosion properties,
antifreeze should also remain in the cooling
system for summer operation. Cooling system capacity and specified antifreeze and water
ratios are listed under "Filling capacities".
Use any quality phosphate-free anti-freeze
containing ethylene glycol, available at your
Porsche dealer. Anti-freeze other than
specified by Porsche for aluminium engi-
nes and radiators may cause corrosion of
the cooling system, leading to engine
overheating and damage.
Only
for topping up coolant, a small amount of anti-freeze containing ethylene glycol and
phosphates may be used if recommended
anti-freeze is not available.
The anti-corrosion properties and the
antifreeze consistency will diminish gradually.
We recommend renewing the coolant mixture
at least every 2 years.
WARNING
The radiator fan is electrically driven. It is
switched on automatically by a thermostat
when the coolant reaches 198°F / 92°C.
Even when the engine is turned off, the fan will continue running, until the coolant
temperature has dropped to 189°F / 87°C
and until the engine itself has cooled down sufficiently.
Checking coolant level in expansion tank
A correctly functioning cooling system requires only minor care. The coolant level
should be checked from time to time, and
always before going on a longer trip.
The
expansion tank with filler cap opening is
located in the engine compartment (see
illustration). Since the expansion tank is
transparent, the coolant level can be checked
visually without removing the filler cap.
74
Page 41 of 66
Brake Fluid Reservoir
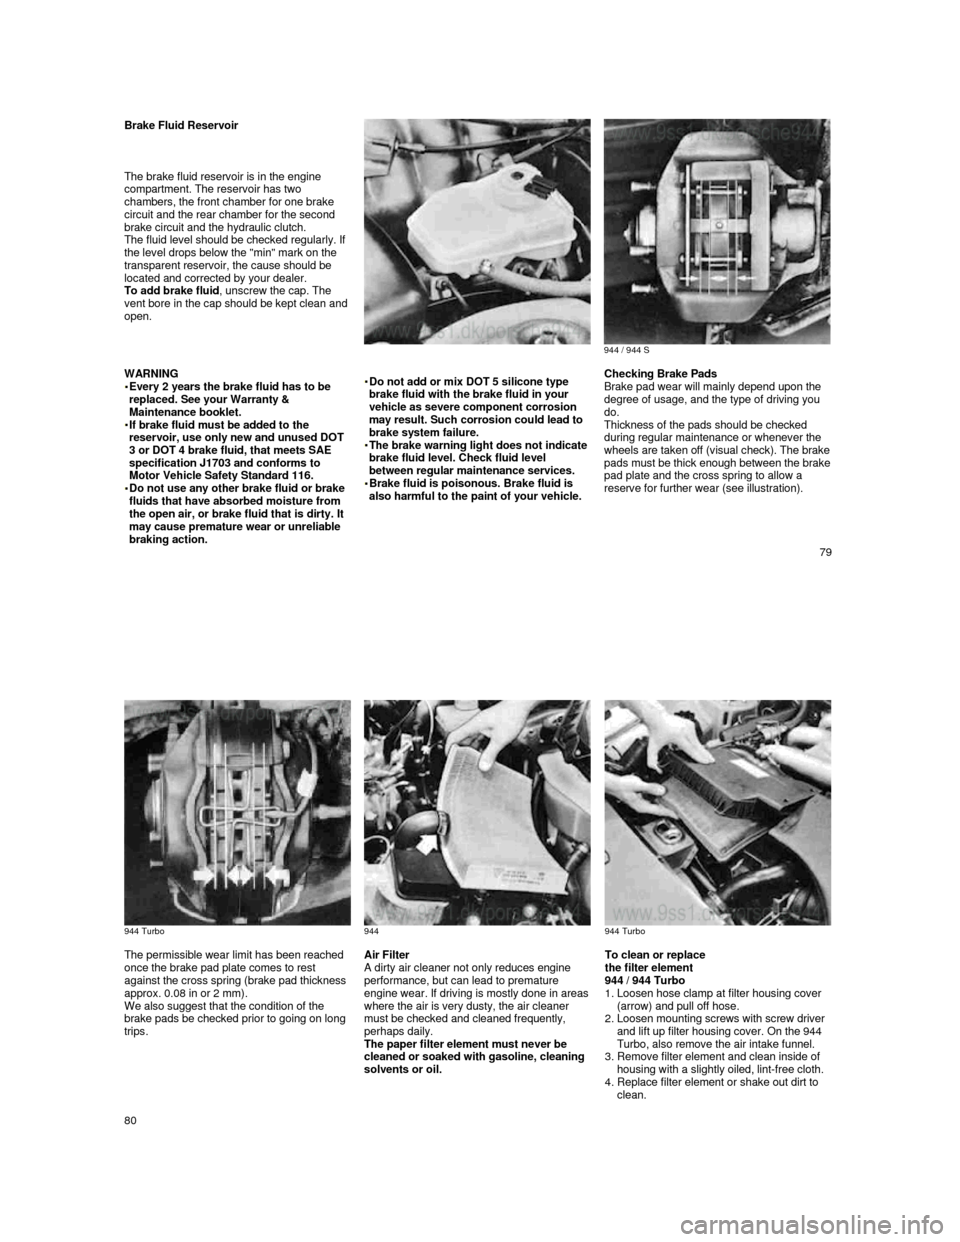
The brake fluid reservoir is in the engine
compartment. The reservoir has two
chambers, the front chamber for one brake
circuit and the rear chamber for the second
brake circuit and the hydraulic clutch.
The fluid level should be checked regularly. If
the level drops below the "min" mark on the
transparent reservoir, the cause should be
located and corrected by your dealer.
To add brake fluid , unscrew the cap. The
vent bore in the cap should be kept clean and
open.
944 / 944 S WARNING
Every 2 years the brake fluid has to be replaced. See your Warranty &
Maintenance booklet.
If brake fluid must be added to the reservoir, use only new and unused DOT
3 or DOT 4 brake fluid, that meets SAE
specification J1703 and conforms to
Motor Vehicle Safety Standard 116.
Do not use any other brake fluid or brake fluids that have absorbed moisture from
the open air, or brake fluid that is dirty. It
may cause premature wear or unreliable
braking action.
Do not add or mix DOT 5 silicone type brake fluid with the brake fluid in your
vehicle as severe component corrosion
may result. Such corrosion could lead to
brake system failure.
The brake warning light does not indicate brake fluid level. Check fluid level
between regular maintenance services.
Brake fluid is poisonous. Brake fluid is also harmful to the paint of your vehicle.
Checking Brake Pads
Brake pad wear will mainly depend upon the
degree of usage, and the type of driving you
do.
Thickness of the pads should be checked
during regular maintenance or whenever the
wheels are taken off (visual check). The brake pads must be thick enough between the brake pad plate and the cross spring to allow a
reserve for further wear (see illustration).
79
944 Turbo
944
944 Turbo
The permissible wear limit has been reached
once the brake pad plate comes to rest
against the cross spring (brake pad thickness
approx. 0.08 in or 2 mm).
We also suggest that the condition of the
brake pads be checked prior to going on long
trips. Air Filter
A dirty air cleaner not only reduces engine performance, but can lead to premature
engine wear. If driving is mostly done in areas
where the air is very dusty, the air cleaner must be checked and cleaned frequently,
perhaps daily.
The paper filter element must never be
cleaned or soaked with gasoline, cleaning
solvents or oil.
To clean or replace
the filter element
944 / 944 Turbo
1. Loosen hose clamp at filter housing cover (arrow) and pull off hose.
2.
Loosen mounting screws with screw driver
and lift up filter housing cover. On the 944
Turbo, also remove the air intake funnel.
3.
Remove filter element and clean inside of
housing with a slightly oiled, lint-free cloth.
4.
Replace filter element or shake out dirt to
clean.
80
Page 42 of 66
944
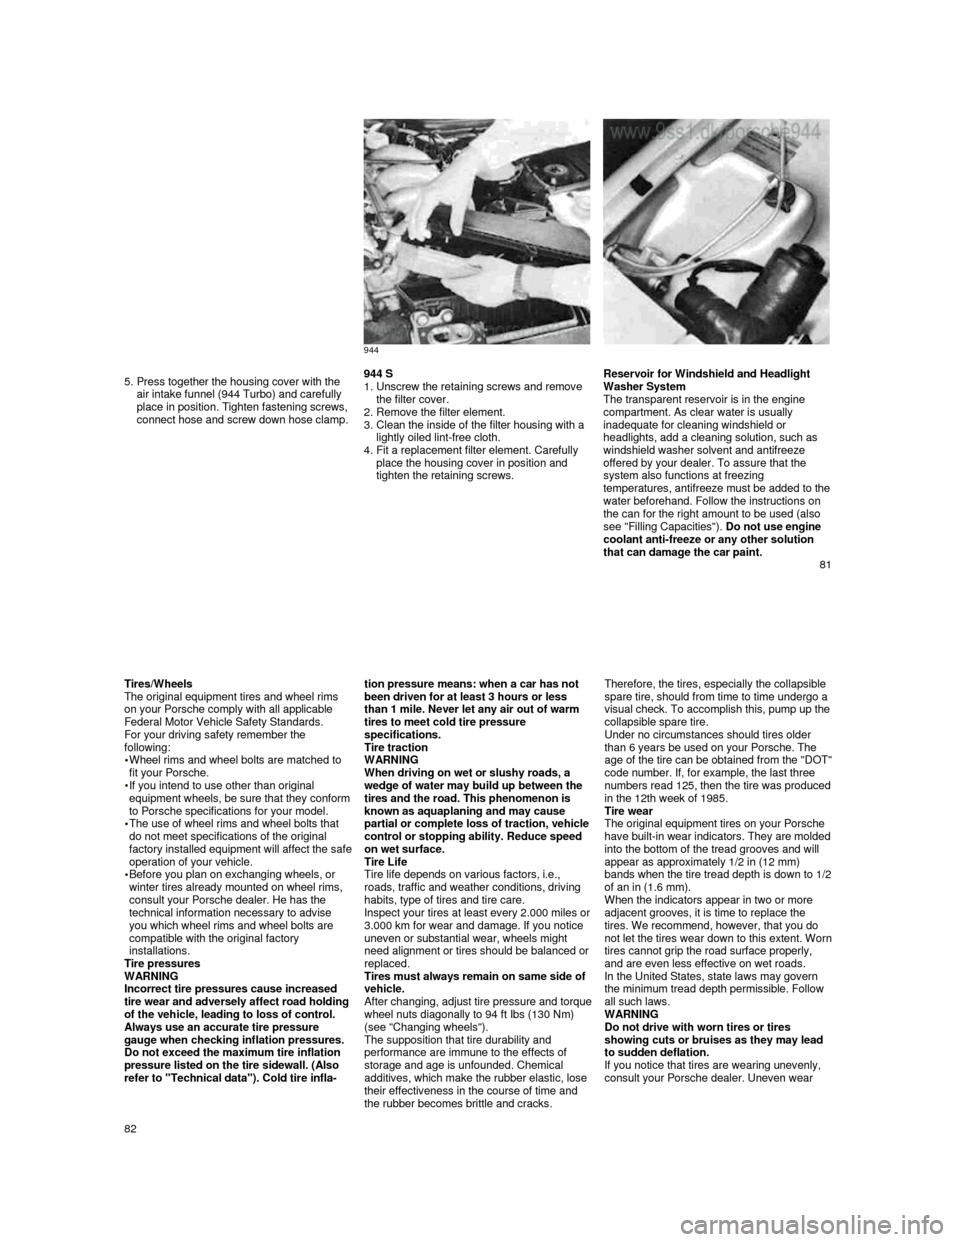
5. Press together the housing cover with the air intake funnel (944 Turbo) and carefully
place in position. Tighten fastening screws,
connect hose and screw down hose clamp.
944 S
1. Unscrew the retaining screws and remove
the filter cover.
2.
Remove the filter element.
3. Clean the inside of the filter housing with a
lightly oiled lint-free cloth.
4.
Fit a replacement filter element. Carefully
place the housing cover in position and
tighten the retaining screws.
Reservoir for Windshield and Headlight
Washer System
The transparent reservoir is in the engine
compartment. As clear water is usually
inadequate for cleaning windshield or
headlights, add a cleaning solution, such as
windshield washer solvent and antifreeze offered by your dealer. To assure that the
system also functions at freezing
temperatures, antifreeze must be added to the water beforehand. Follow the instructions on the can for the right amount to be used (also
see "Filling Capacities"). Do not use engine
coolant anti-freeze or any other solution
that can damage the car paint.
81
Tires/Wheels
The original equipment tires and wheel rims
on your Porsche comply with all applicable
Federal Motor Vehicle Safety Standards.
For your driving safety remember the
following:
Wheel rims and wheel bolts are matched to
fit your Porsche.
If you intend to use other than original equipment wheels, be sure that they conform to Porsche specifications for your model. The use of wheel rims and wheel bolts that
do not meet specifications of the original
factory installed equipment will affect the safe operation of your vehicle. Before you plan on exchanging wheels, or winter tires already mounted on wheel rims, consult your Porsche dealer. He has the
technical information necessary to advise
you which wheel rims and wheel bolts are
compatible with the original factory
installations.
Tire pressures
WARNING
Incorrect tire pressures cause increased
tire wear and adversely affect road holding of the vehicle, leading to loss of control.
Always use an accurate tire pressure
gauge when checking inflation pressures.
Do not exceed the maximum tire inflation
pressure listed on the tire sidewall. (Also
refer to "Technical data"). Cold tire infla-
tion pressure means: when a car has not been driven for at least 3 hours or less
than 1 mile. Never let any air out of warm
tires to meet cold tire pressure
specifications.
Tire traction
WARNING
When driving on wet or slushy roads, a
wedge of water may build up between the
tires and the road. This phenomenon is
known as aquaplaning and may cause
partial or com
plete loss of traction, vehicle control or stopping ability. Reduce speed
on wet surface.
Tire Life
Tire life depends on various factors, i.e.,
roads, traffic and weather conditions, driving
habits, type of tires and tire care.
Inspect your tires at least
every 2.000 miles or 3.000 km for wear and damage. If you notice
uneven or substantial wear, wheels might
need alignment or tires should be balanced or
replaced.
Tires must always remain on same side of
vehicle.
After changing, adjust tire pressure and torque wheel nuts diagonally to 94 ft Ibs (130 Nm) (see "Changing wheels").
The supposition that tire durability and
performance are immune to the effects of
storage and age is unfounded. Chemical
additives, which make the rubber elastic, lose
their effectiveness in the course of time and
the rubber becomes brittle and cracks.
Therefore, the tires, especially the collapsible
spare tire, should from time to time undergo a
visual check. To accomplish this,
pump up the collapsible spare tire.
Under no circumstances should tires older
than 6 years be used on your Porsche. The
age of the tire can be obtained from the "DOT" code number. If, for example, the last three
numbers read 125, then the tire was produced in the 12th week of 1985.
Tire wear
The original equipment tires on your Porsche
have built-
in wear indicators. They are molded into the bottom of the tread grooves and will
appear as approximately 1/2 in (12 mm)
bands when the tire tread depth is down to
1/2 of an in (1.6 mm).
When the indicators appear in two or more
adjacent grooves, it is time to replace the
tires. We recommend, however, that you do
not let the tires wear down to this extent. Worn tires cannot grip the road surface properly,
and are even less effective on wet roads.
In the United States, state laws may govern
the minimum tread depth permissible. Follow
all such laws.
WARNING
Do not drive with worn tires or tires
showing cuts or bruises as they may lead
to sudden deflation.
If you notice that tires are wearing unevenly,
consult your Porsche dealer. Uneven wear
82
Page 44 of 66
Collapsible Spare Tire
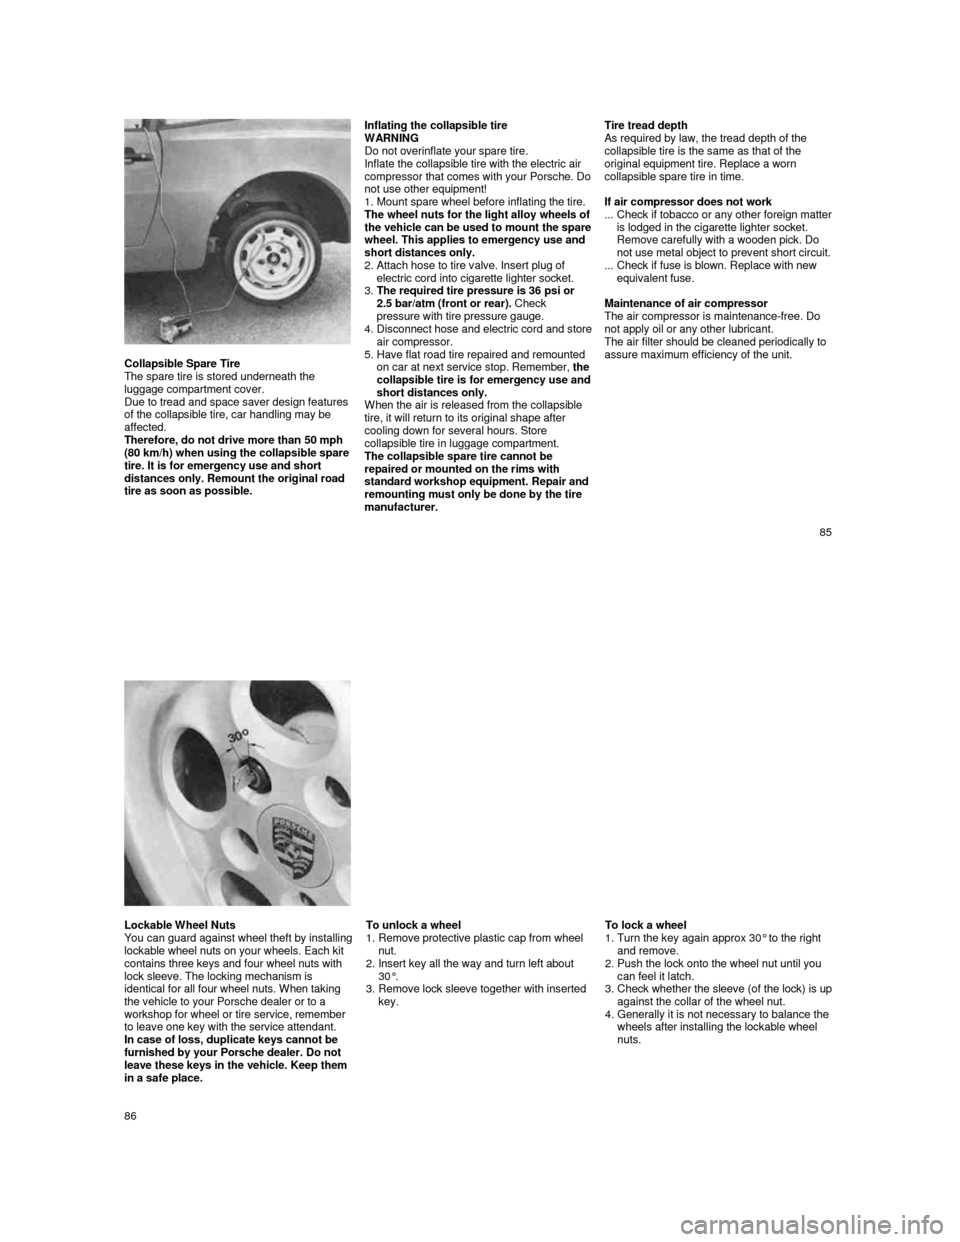
The spare tire is stored underneath the
luggage compartment cover.
Due to tread and space saver design features
of the collapsible tire, car handling may be
affected.
Therefore, do not drive more than 50 mph
(80 km/h) when using the collapsible spare tire. It is for emergency use and short
distances only. Remount the original road
tire as soon as possible.
Inflating the collapsible tire WARNING
Do not overinflate your spare tire.
Inflate the collapsible tire with the electric air
compressor that comes with your Porsche. Do not use other equipment!
1. Mount spare wheel before inflating the tire.The wheel nuts for the light alloy wheels of the vehicle can be used to mount the spare wheel. This applies to emergency use and
short distances only.
2.
Attach hose to tire valve. Insert plug of electric cord into cigarette lighter socket.
3. The required tire pressure is 36 psi or 2.5 bar/atm (front or rear). Check
pressure with tire pressure gauge.
4.
Disconnect hose and electric cord and store air compressor.
5. Have flat road tire repaired and remounted
on car at next service stop. Remember, the collapsible tire is for emergency use and short distances only.
When the air is released from the collapsible
tire, it will return to its original shape after
cooling down for several hours. Store
collapsible tire in luggage compartment.
The collapsible spare tire cannot be
repaired or mounted on the rims with
standard workshop equipment. Repair and
remounting must only be done by the tire
manufacturer.
Tire tread depth As required by law, the tread depth of the collapsible tire is the same as that of the
original equipment tire. Replace a worn
collapsible spare tire in time.
If air compressor does not work
...
Check if tobacco or any other foreign matter is lodged in the cigarette lighter socket.
Remove carefully with a wooden pick. Do
not use metal object to prevent short circuit.
... Check if fuse is blown. Replace with new
equivalent fuse.
Maintenance of air compressor
The air compressor is maintenance-free. Do
not apply oil or any other lubricant.
The air filter should be cleaned periodically to
assure maximum efficiency of the unit.
85
Lockable Wheel Nuts You can guard against wheel theft by installing lockable wheel nuts on your wheels. Each kit
contains three keys and four wheel nuts with
lock sleeve. The locking mechanism is
identical for all four wheel nuts. When taking
the vehicle to your Porsche dealer or to a
workshop for wheel or tire service, remember to leave one key with the service attendant.
In case of loss, duplicate keys cannot be
furnished by your Porsche dealer. Do not
leave these keys in the vehicle. Keep them
in a safe place.
To unlock a wheel
1. Remove protective plastic cap from wheel
nut.
2.
Insert key all the way and turn left about
30°.
3.
Remove lock sleeve together with inserted
key.
To lock a wheel
1. Turn the key again approx 30° to the right and remove.
2.
Push the lock onto the wheel nut until you
can feel it latch.
3.
Check whether the sleeve (of the lock) is up against the collar of the wheel nut.
4. Generally it is not necessary to balance the wheels after installing the lockable wheel nuts.
86
Page 45 of 66
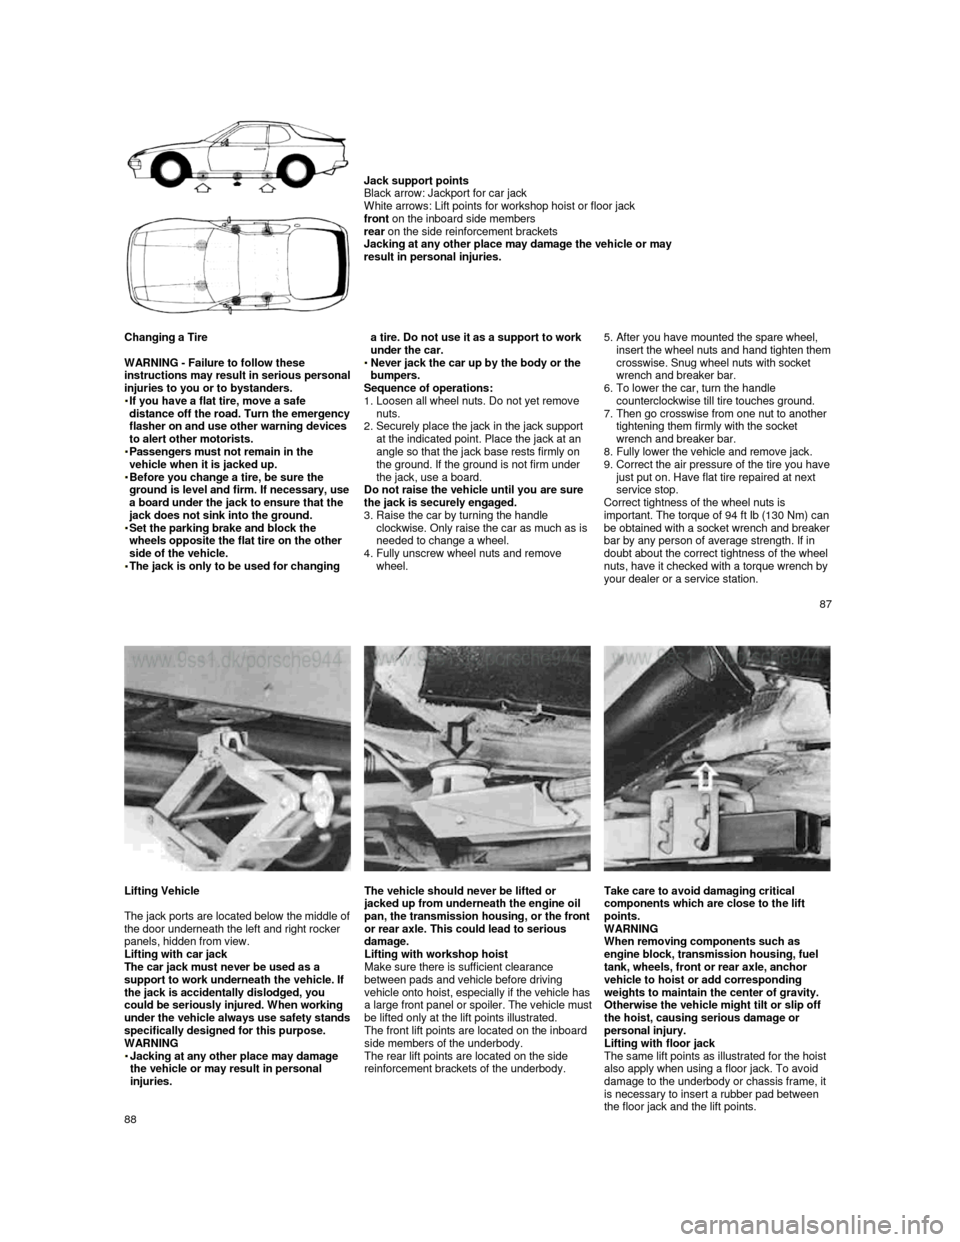
Jack support points
Black arrow: Jackport for car jack
White arrows: Lift points for workshop hoist or flo or jack
front on the inboard side members
rear on the side reinforcement brackets
Jacking at any other place may damage the vehicle o r may
result in personal injuries.
Changing a Tire
WARNING - Failure to follow these
instructions may result in serious personal injuries to you or to bystanders.
If you have a flat tire, move a safe distance off the road. Turn the emergency flasher on and use other warning devices
to alert other motorists.
Passengers must not remain in the vehicle when it is jacked up. Before you change a tire, be sure the ground is level and firm. If necessary, use a board under the jack to ensure that the jack does not sink into the ground. Set the parking brake and block the wheels opposite the flat tire on the other
side of the vehicle.
The jack is only to be used for changing
a tire. Do not use it as a support to work
under the car.
Never jack the car up by the body or the bumpers.
Sequence of operations:
1.
Loosen all wheel nuts. Do not yet remove
nuts.
2.
Securely place the jack in the jack support
at the indicated point. Place the jack at an
angle so that the jack base rests firmly on
the ground. If the ground is not firm under
the jack, use a board.
Do not raise the vehicle until you are sure
the jack is securely engaged.
3.
Raise the car by turning the handle
clockwise. Only raise the car as much as is
needed to change a wheel.
4.
Fully unscrew wheel nuts and remove wheel.
5. After you have mounted the spare wheel, insert the wheel nuts and hand tighten them crosswise. Snug wheel nuts with socket wrench and breaker bar.
6. To lower the car, turn the handle
counterclockwise till tire touches ground.
7.
Then go crosswise from one nut to another
tightening them firmly with the socket
wrench and breaker bar.
8. Fully lower the vehicle and remove jack.
9. Correct the air pressure of the tire you have just put on. Have flat tire repaired at next service stop.
Correct tightness of the wheel nuts is
important. The torque of 94 ft Ib (130 Nm) can
be obtained with a socket wrenc
h and breaker bar by any person of average strength. If in
doubt about the correct tightness of the wheel
nuts, have it checked with a torque wrench by
your dealer or a service station.
87
Lifting Vehicle
The jack ports are located below the middle of the door underneath the left and right rocker
panels, hidden from view.
Lifting with car jack
The car jack must never be used as a
support to work underneath the vehicle. If
the jack is accidentally dislodged, you
could be seriously injured. When working
under the vehicle always use safety stands specifically designed for this purpose.
WARNING
Jacking at any other place may damage the vehicle or may result in personal injuries.
The vehicle should never be lifted or jacked up from underneath the engine oil pan, the transmission housing, or the front or rear axle. This could lead to serious
damage.
Lifting with workshop hoist
Make sure there is sufficient clearance
between pads and vehicle before driving
vehicle onto hoist, especially if the vehicle
has a large front panel or spoiler. The vehicle must be lifted only at the lift points illustrated.
The front lift points are located on the inboard
side members of the underbody.
The rear lift points are located on the side
reinforcement brackets of the underbody.
Take care to avoid damaging critical
components which are close to the lift
points.
WARNING
When removing components such as
engine block, transmission housing, fuel
tank, wheels, front or rear axle, anchor
vehicle to hoist or add corresponding
weights to maintain the center of gravity.
Otherwise the vehicle might tilt or slip off
the hoist, causing serious damage or
personal injury.
Lifting with floor jack
The same lift points as illustrated for the hoist
also apply when using a floor jack. To avoid
damage to the underbody or chassis frame, it
is necessary to insert a rubber pad between
the floor jack and the lift points.
88
Page 57 of 66
Engine Oils
Use only engine oils which meet the
specifications designated by PORSCHE. Your Porsche dealer will be glad to advise you on
the correct type of oil for your engine.
All current engine oils are compatible with each other, i. e. when making an oil change it
is not necessary to flush the engine if you
wish to use a different brand or grade of oil. Since, however, each brand of oil has a
special composition, you should, if possible,
use the same oil brand if it becomes
necessary to top up between oil changes.
PORSCHE engines have long intervals
between oil changes. You can make best use
of these long oil change intervals by using
multigrade oils since these are largely
independent of seasonal fluctuations in
temperature.
If your vehicle is used frequently in stop-and-
go traffic in winter, the engine will not always
be properly warmed up. Condensation from
products of combustion may accumulate in
the oil. In this case, it is advisable to change
the oil in spring so that your engine once
again has a 100% efficient engine oil.
Engine oil performance class
Engine oil is not only a lubricant, but also
serves to keep the engine clean, to neutralize
the dirt which penetrates into the engine
through combustion and to protect the engine
against corrosion. To perform these functions, the oil is provided with additives which have
been specially developed for these functions.
So-called mineral oils are produced directly
from crude oil. The oils can be further refined
(hydrocrack oils) or totally converted through a number of chemical processes (synthetic oils). These oils are structurally more efficient and
require fewer additives than simple mineral
oils.
The efficiency of an oil is expressed, for
example, by the API classifications which are
divided into categories "S" and "C". The
degrees of quality are expressed by final
letters in alphabetical order: The requirements for PORSCHE engines are API class SE/CC
to SF/CD.
Viscosity
Like all liquids, engine oil is viscous when
cold, and thin-bodied when warm.
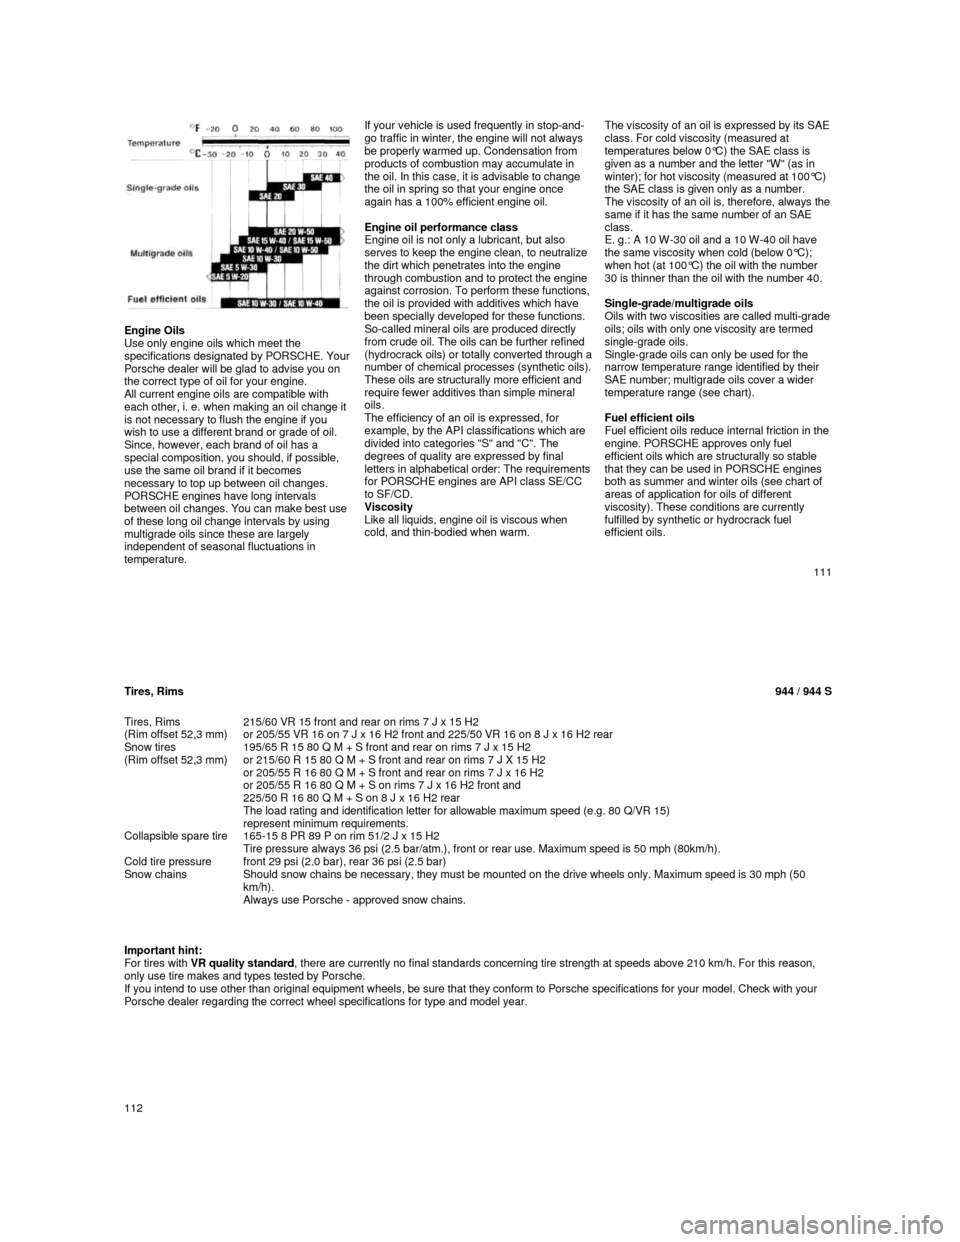
The viscosity of an oil is expressed by its SAE class. For cold viscosity (measured at
temperatures below 0°C) the SAE class is
given as a number and the letter "W" (as in
winter); for hot viscosity (measured at 100°C) the SAE class is given only as a number. The viscosity of an oil is, therefore, always the same if it has the same number of an SAE
class.
E. g.: A 10 W -30 oil and a 10 W-40 oil have
the same viscosity when cold (below 0°C);
when hot (at 100°C) the oil with the number 30 is thinner than the oil with the number 40.
Single-grade/multigrade oils
Oils with two viscosities are called multi-g
rade oils; oils with only one viscosity are termed
single-grade oils.
Single-grade oils can only be used for the
narrow temperature range identified by their
SAE number; multigrade oils cover a wider
temperature range (see chart).
Fuel efficient oils
Fuel efficient oils reduce internal friction in the
engine. PORSCHE approves only fuel
efficient oils which are structurally so stable
that they can be used in PORSCHE engines
both as summer and winter oils (see chart of
areas of application for oils of different
viscosity). These conditions are currently
fulfilled by synthetic or hydrocrack fuel
efficient oils.
111
Tires, Rims 944 / 944 S
Tires, Rims
(Rim offset 52,3 mm) 215/60 VR 15 front and rear on rims 7 J x 15 H2
or 205/55 VR 16 on 7 J x 16 H2 front and 225/50 VR
16 on 8 J x 16 H2 rear
Snow tires
(Rim offset 52,3 mm) 195/65 R 15 80 Q M + S front and rear on rims 7 J x
15 H2
or 215/60 R 15 80 Q M + S front and rear on rims 7 J X 15 H2
or 205/55 R 16 80 Q M + S front and rear on rims 7 J x 16 H2
or 205/55 R 16 80 Q M + S on rims 7 J x 16 H2 front and
225/50 R 16 80 Q M + S on 8 J x 16 H2 rear
The load rating and identification letter for allow able maximum speed (e.g. 80 Q/VR 15)
represent minimum requirements.
Collapsible spare tire 165-15 8 PR 89 P on rim 51/2 J x 15 H2
Tire pressure always 36 psi (2.5 bar/atm.), front o r rear use. Maximum speed is 50 mph (80km/h).
Cold tire pressure front 29 psi (2.0 bar), rear 36 psi (2.5 bar)
Snow chains Should snow chains be necessary, they m ust be mounted on the drive wheels only. Maximum speed is 30 mph (50
km/h).
Always use Porsche - approved snow chains.
Important hint:
For tires with VR quality standard , there are currently no final standards concerning tire strength at speeds above 210 km/h. For this r eason,
only use tire makes and types tested by Porsche.
If you intend to use other than original equipment wheels, be sure that they conform to Porsche specif ications for your model. Check with your
Porsche dealer regarding the correct wheel specific ations for type and model year.
112
Page 58 of 66

Tires, Rims 944 Turbo
Tires, Rims
(Rim offset 52,3 mm) 205/55 VR 16 on rims 7 J x 16 H2 front and 225/50 V
R 16 on rims 8 J x 16 H2 rear
Snow tires
(Rim offset 52,3 mm) 205/55 R 16 82 Q M+S on rims 7 J x 16 H2 front and
rear
or 205/55 R 16 82 Q M + S on rims 7 J x 16 H2 front and
225/50 R 16 82 Q M + S on rims 8 J x 16 H2 rear
The load rating and identification letter for allow able maximum speed (e.g. 82 Q/VR 16)
represent minimum requirements.
Collapsible spare tire 165-15 8 PR 89 P on rim 51/2 J x 15 H2
Tire pressure always 36 psi (2.5 bar/atm.), front o r rear use. Maximum speed is 50 mph (80 km/h).
Cold tire pressure front and rear 36 psi (2.5 bar)
Snow chains Should snow chains be necessary, they m ust be mounted on the drive wheels only. Maximum
speed is 30 mph (50 km/h). Always use Porsche - app roved snow chains.
Important hint:
For tires with VR quality standard , there are currently no final standards concerning tire strength at speeds above 210 km/h. For this r eason,
only use tire makes and types tested by Porsche.
If you intend to use other than original equipment wheels, be sure that they conform to Porsche specif ications for your model. Check with your
Porsche dealer regarding the correct wheel specific ations for type and model year.
113
Dimensions
Length
Width
Height
Wheel base
Wheel track, front
Wheel track, rear
Ground clearance*
Tuning circle (curb to curb)
Tuning circle (wall to wall)
Overhang angle, front*
Overhang angle, rear*
944 / 944 S
168.90 in. / 4290 mm 68.31 in. / 1735 mm
50.20 in. / 1275 mm
94.49 in. / 2400 mm
58.15 in. / 1477 mm
57.13 in. / 1451 mm
4.72 in. / 120 mm
31.17 ft. / 9.5 m
33.80 ft./ 10.3 m
14°
15°
944 Turbo
168.90 in. / 4290 mm
68.31 in. / 1735 mm
50.20 in. / 1275 mm
94.49 in. / 2400 mm
58.15 in. / 1477 mm
57.13 in. / 1451 mm
4.72 in. / 120 mm
31.17 ft. / 9.5 m
33.80 ft./ 10.3 m
12,5°
15°
Weights
Curb weight
Maximum load capacity
Total permissible weight
Maximum axle load, front**
Maximum axle load, rear**
Permissible rack load**/***
944
2778 Ibs. / 1260kg
661 Ibs. / 300 kg
3439 Ibs. / 1560kg
1587 Ibs. / 720kg
1984 Ibs. / 900kg
165 Ibs. / 75kg 944 S
2866 Ibs. / 1300 kg
661 Ibs. / 300 kg
3527 Ibs. / 1600 kg
1609 Ibs. / 730kg
1984 Ibs. / 900 kg
165 Ibs. / 75kg 944 Turbo 2998 Ibs. / 1360 kg650 Ibs. / 285 kg 3626 Ibs. / 1645 kg1675 Ibs./ 760kg
2028 Ibs. / 920 kg 165 Ibs. / 75kg
* At total permissible weight. ** Do not exceed tot al permissible weight.
*** Applies only if the basic rack of the original Porsche Roof Transport System is used. If old type Porsche ski and luggage racks are used the
permissible roof weight is 35 kg (77 Ibs.).
The vehicle capacity weight (max. load), the Gross Vehicle Weight Rating (GVWR) and the Gross Axle Wei ght Ratings (GAWR) for front and
rear, are listed on the sticker on the left upper s ide member in the engine compartment.
The gross vehicle weight rating includes the weight of the basic vehicle plus full tank, oil and coolant, plus max. load which combines passenger
(150 pounds / 68 kg per designated position) and lu ggage weight. Luggage weight is not increased by th e use of roof, ski or luggage racks,
unless passenger capacity is reducted accordingly.
114