Page 1755 of 1865

1 5 AUTO ADJUSTING SUSPENSION (AAS)
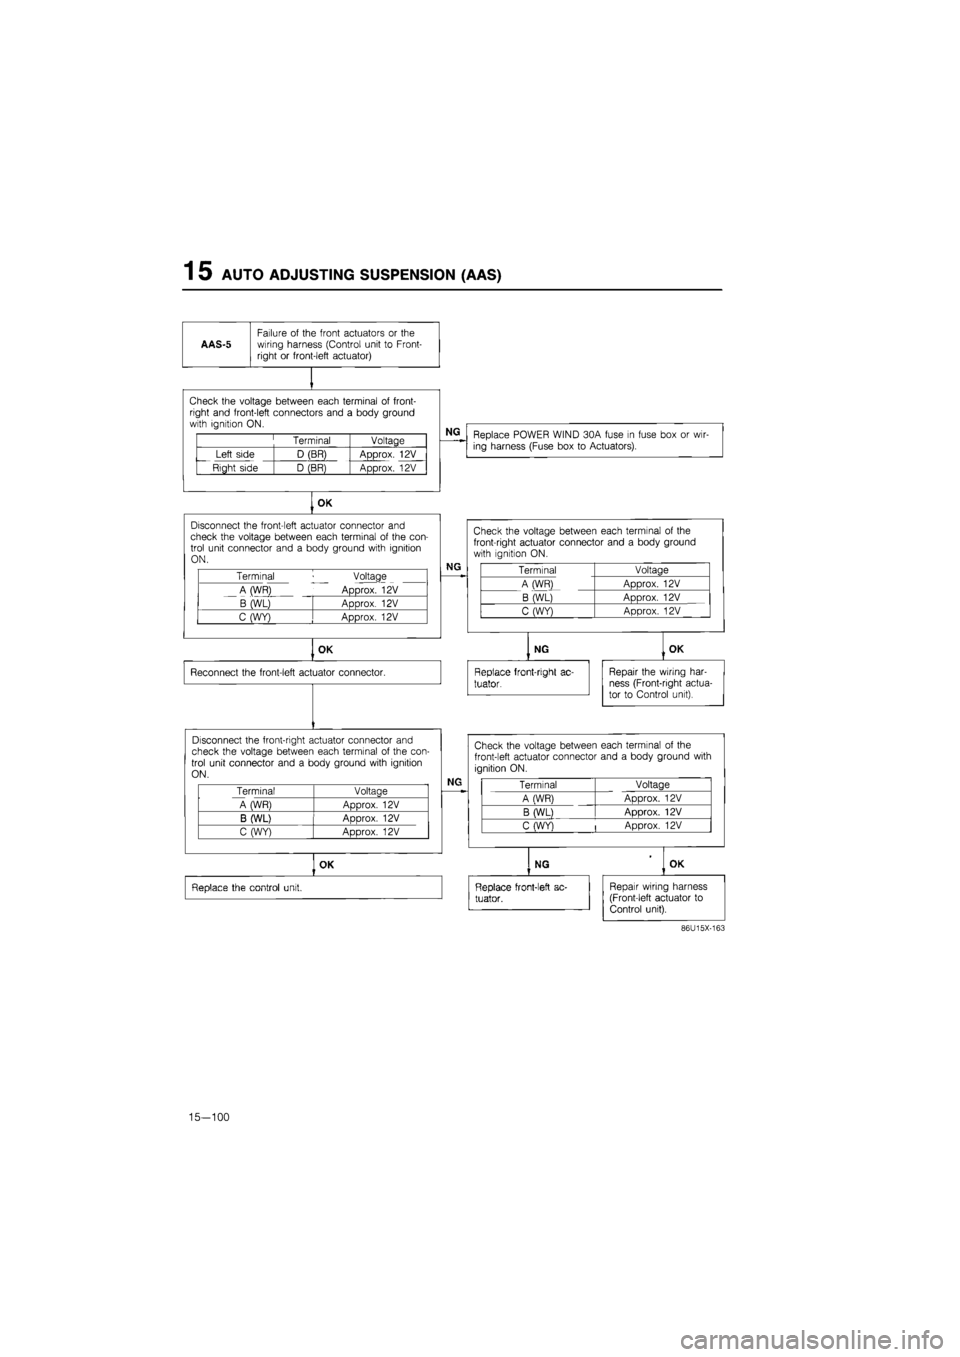
AAS-5
Failure
of
the front actuators
or the
wiring harness (Control unit
to
Front-right
or
front-left actuator)
Check the voltage between each terminal
of
front-right and front-left connectors and
a
body ground with ignition ON.
Terminal Voltage
Left side D (BR) Approx.
12V
Right side D (BR) Approx.
12V
NG
Replace POWER WIND 30A fuse
in
fuse box
or
wir-ing harness (Fuse box
to
Actuators).
OK
Disconnect the front-left actuator connector
and
check the voltage between each terminal
of
the con-trol unit connector and
a
body ground with ignition ON.
Terminal Voltage
A (WR) Approx.
12V
B (WL) Approx.
12V
C (WY) Approx.
12V
NG
OK
Reconnect the front-left actuator connector.
Disconnect the front-right actuator connector and check the voltage between each terminal
of
the con-trol unit connector and
a
body ground with ignition ON.
Terminal Voltage
A WR) Aoorox.
12V
B (WL) ADDrox.
12V
C (WY) Approx.
12V
Check the voltage between each terminal
of the
front-right actuator connector and
a
body ground with ignition
ON.
Terminal Voltage
A (WR) Approx.
12V
B (WL) Approx.
12V
C (WY) Approx.
12V
NG
Replace front-right
ac-
tuator.
OK
Repair the wiring har-ness (Front-right actua-tor
to
Control unit).
NG
Check the voltage between each terminal
of
the
front-left actuator connector and
a
body ground with
ignition ON.
Terminal Voltage
A (WR) Approx.
12V
B (WL) Approx.
12V
C (WY)
|
Approx.
12V
OK
Replace the control unit.
NG OK
Replace front-left
ac-
tuator.
Repair wiring harness (Front-left actuator
to
Control unit).
86U15X-163
15-100
Page 1756 of 1865

AUTO ADJUSTING SUSPENSION (AAS) 1 5
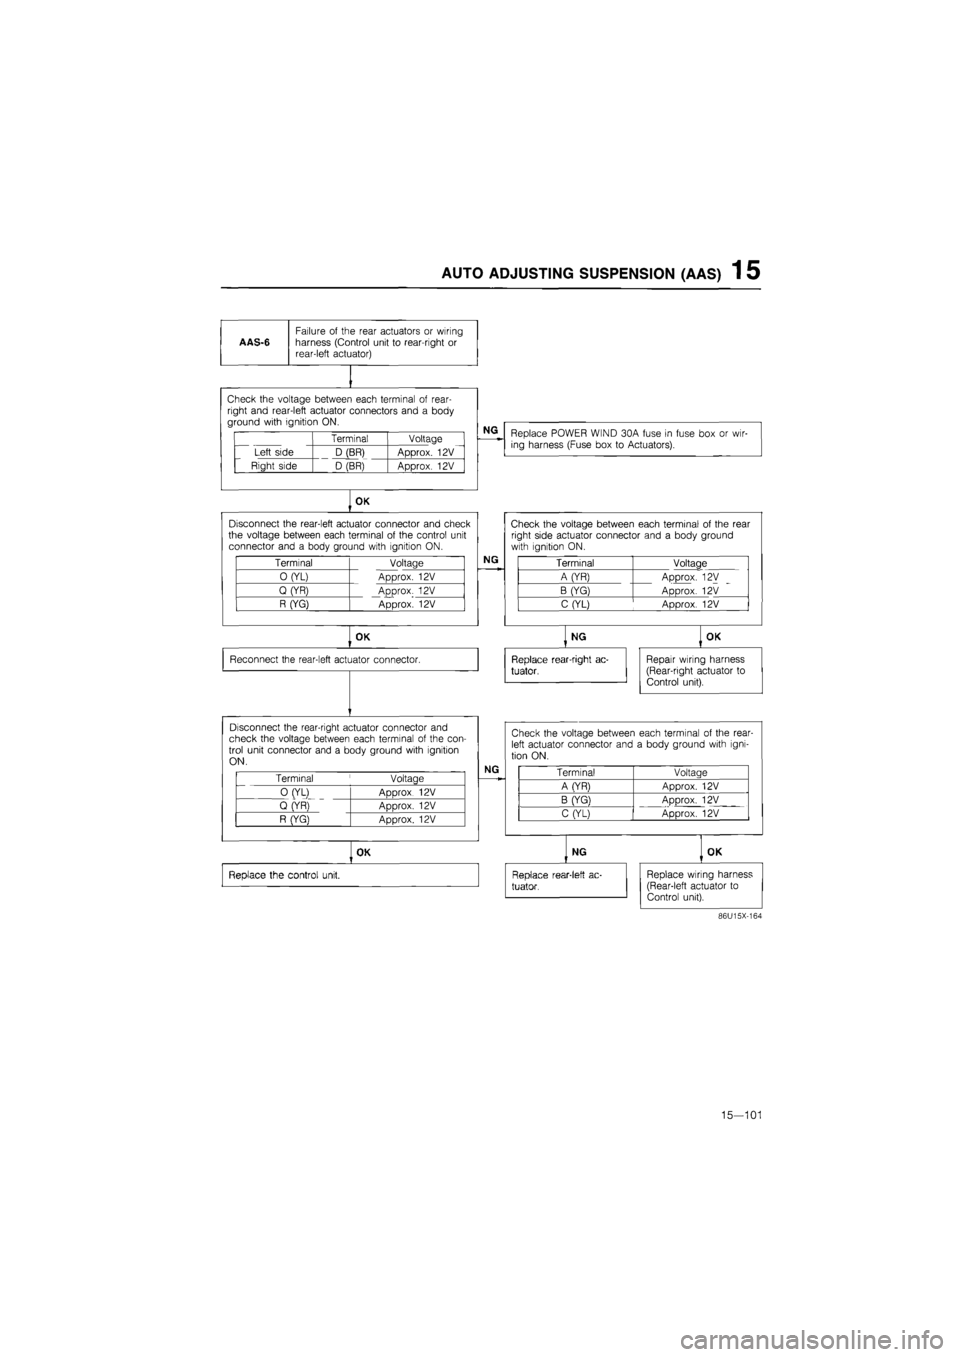
AAS-6
Failure
of
the rear actuators
or
wiring harness (Control unit
to
rear-right
or
rear-left actuator)
vi i11 1vuuuyu tw/v^ii I^CI^I i id i i in I«I wi i
right and rear-left actuator connectors and
a
body ground with ignition ON.
Terminal Voltage
Left side D (BR) Approx.
12V
Right side D (BR) Approx.
12V
NG
Replace POWER WIND 30A fuse
in
fuse box
or
wir-ing harness (Fuse box
to
Actuators).
OK
Disconnect the rear-left actuator connector and check the voltage between each terminal
of
the control unit connector and
a
body ground with ignition ON.
Terminal Voltage
0 (YL) Approx.
12V
Q (YR) Approx.
12V
R (YG) Approx.
12V
NG
OK
Reconnect the rear-left actuator connector.
Disconnect the rear-right actuator connector and check the voltage between each terminal
of
the con-trol unit connector and
a
body ground with ignition ON.
Terminal
'
Voltage
0 (YL)
ADDrox 12V
Q (YR)
ADDrox. 12V
R (YG} Approx.
12V
NG
OK
Replace the control unit.
Check the voltage between each terminal
of
the rear right side actuator connector and
a
body ground with ignition ON.
Terminal Voltage
A (YR) Approx.
12V
B (YG) Approx.
12V
C (YL) Approx.
12V
NG
Replace rear-right ac-
tuator,
OK
Repair wiring harness (Rear-right actuator
to
Control unit).
Check the voltage between each terminal
of
the rear-left actuator connector and
a
body ground with igni-tion ON.
Terminal Voltaae
A (YR) Approx.
12V
B (YG) ADDrox.
12V
C (YL) Approx.
12V
NG
Replace rear-1 eft
ac-
tuator.
OK
Replace wiring harness (Rear-left actuator
to
Control unit).
86U15X-164
15—101
Page 1757 of 1865

1 5 AUTO ADJUSTING SUSPENSION
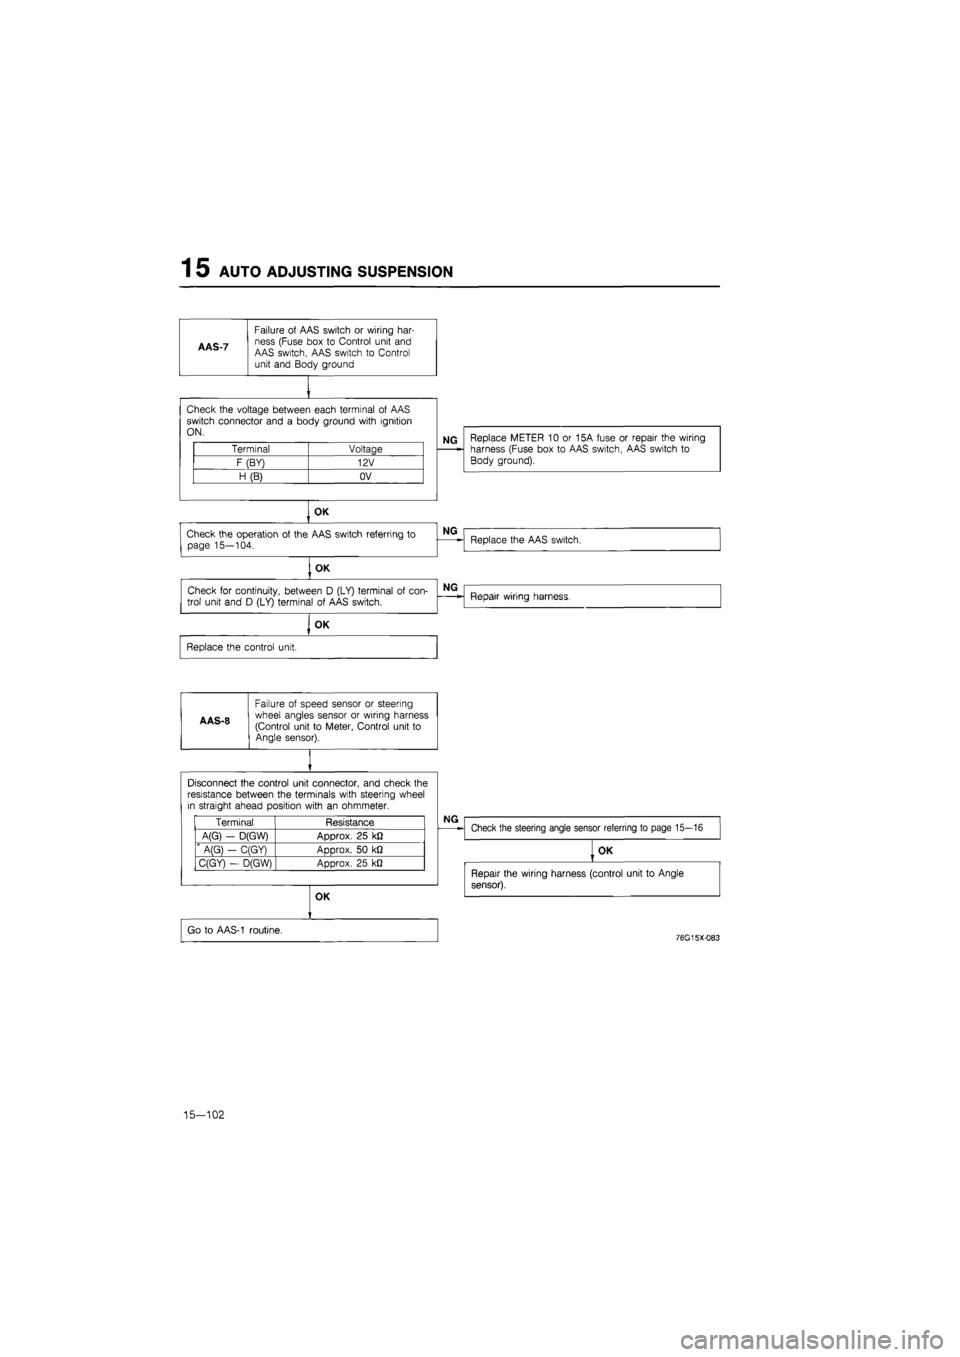
AAS-7
Failure
of
AAS switch
or
wiring har-ness (Fuse box
to
Control unit and AAS switch, AAS switch
to
Control unit and Body ground
Check the voltage between each terminal
of
AAS switch connector and
a
body ground with ignition ON.
Terminal Voltage
F (BY) 12V
H (B) OV
NG Replace METER
10 or
15A fuse
or
repair the wiring harness (Fuse box
to
AAS switch, AAS switch
to
Body ground).
OK
Check the operation
of
the AAS switch referring
to
page 15—104.
, OK
Check
for
continuity, between
D
(LY) terminal
of
con-
trol unit and
D
(LY) terminal
of
AAS switch.
OK
Replace the control unit.
A AS-8
Failure
of
speed sensor
or
steering wheel angles sensor
or
wiring harness (Control unit
to
Meter, Control unit
to
Angle sensor).
NG
Replace the AAS switch.
NG
Repair wiring harness.
Disconnect the control unit connector, and check the resistance between the terminals with steering wheel in straight ahead position with
an
ohmmeter.
Terminal Resistance
A(G)
-
D(GW) Approx.
25
k£2
' A(G}
-
C(GY) Approx.
50 kfl
C(GY)
-
D(GW) Approx.
25
kJ2
NG
Check the steering angle sensor referring
to
page 15—16
OK
Go
to
AAS-1 routine.
OK
Repair the wiring harness (control unit
to
Angle
sensor).
76G15X-083
15-102
Page 1758 of 1865
AUTO ADJUSTING SUSPENSION 1 5
AAS-9
Failure of speed sensor or wiring har-ness (Control unit to Meter, Fuse box to Control unit, Control unit to Body ground)
Replace METER 10 or 15A fuse or repair the wiring harness (Fuse box to Control unit, Control unit to Body ground).
Check the voltage between each terminal of control
unit connector and a body ground with ignition ON.
Terminal Voltage
G (B) OV
J (B) OV
K (BY) Approx. 12V
OK
Go to AAS-1 routine.
76G15X-084
15—103
Page 1759 of 1865
1 5 AUTO ADJUSTING SUSPENSION
Actuator
Inspection
1. Turn the ignition switch ON.
2. Alternately switch ON the "NORMAL" and
"SPORT" switches. Check whether the shaft of the
actuator installed on the front and rear damper
operates. (Visual inspection)
86U15X-167
86U15X-168
76G15X-095
3. If the actuator does not operate, disconnect the ac-
tuator connector and check for a few ohms resis-
tance between the terminals.
Terminal Resistance
A(WR) - D(BR)
Front B(WL) - D(BR)
C(WR) - D(BR) 2-8 (fi) A(YR) - D(BR) 2-8 (fi)
Rear B(YG) - D(BR)
C(YL)— D(BR)
AAS Switch
Inspection
1. Use an ohmmeter to check continuity of the termi-
nals of the switch.
2. If continuity is not as specified, replace the switch.
Position Terminal
SOFT
NORMAL
SPORT
O
o—o
-o
o
o
o
o
g
-o
-o -o
O
O: Indicates continuity
Steering Wheel Angle Sensor
Inspection
See page 15—16
Vehicle Speed Sensor
Inspection
See page 15—88
76G15X-085
15—104
Page 1769 of 1865
1 5 AUDIO SYSTEM
ADJUSTMENT (MTR)
Antenna adjustment
Use the following adjustment procedure to obtain op-
timum antenna and radio reception sensitivity.
1. Extend the antenna fully.
2. Set the ignition key to ACC.
3. Turn on the radio, and set it to AM reception.
4. Tune in a distant station with a weak signal at
around 1400 kHz. If such a station cannot be
found, use static to make the adjustment.
5. Turn the antenna trimmer adjustment screw to the
left and right to find the maximum sensitivity (of ei-
ther the broadcast or the static).
Note
If there is no change in the sensitivity, either
the tuned signal is too strong, or there is an
antenna malfunction or broken wire.
POWER ANTENNA
STRUCTURAL VIEW
1. Antenna motor
2. Antenna
FM M >08 ST ' I' tl -3-lx
0
[ AM s» TO too"I30"IM
J
A
FM | FM
B
I FH | fH
M FM
III
56G15X-106
15-114
Page 1770 of 1865
AUDIO SYSTEM 1 5
Power Antenna Circuit
86U15X-194
inspection Of Power Antenna Relay
1. Check the voltage at each terminal of the relay con-
nector harness side with each condition.
Terminal Condition Voltage
LW Ignition switch ACC 12V
BY Ignition switch
ON
12V
LgW Ignition switch ACC and radio
power switch
ON
OV
LR Any time 12V
76G15X-096
86U15X-196
If not, repair the harness.
2. Turn the ignition switch on, and check the opera-
tion of the power antenna with each condition.
Condition Antenna operation
GW wire
is
connected
to a
body ground Rises
GW wire
is
not connected to
a
body ground Goes down
If the power antenna does not operate, replace the
power antenna relay or power antenna motor.
15—115
Page 1837 of 1865

TECHNICAL DATA 30
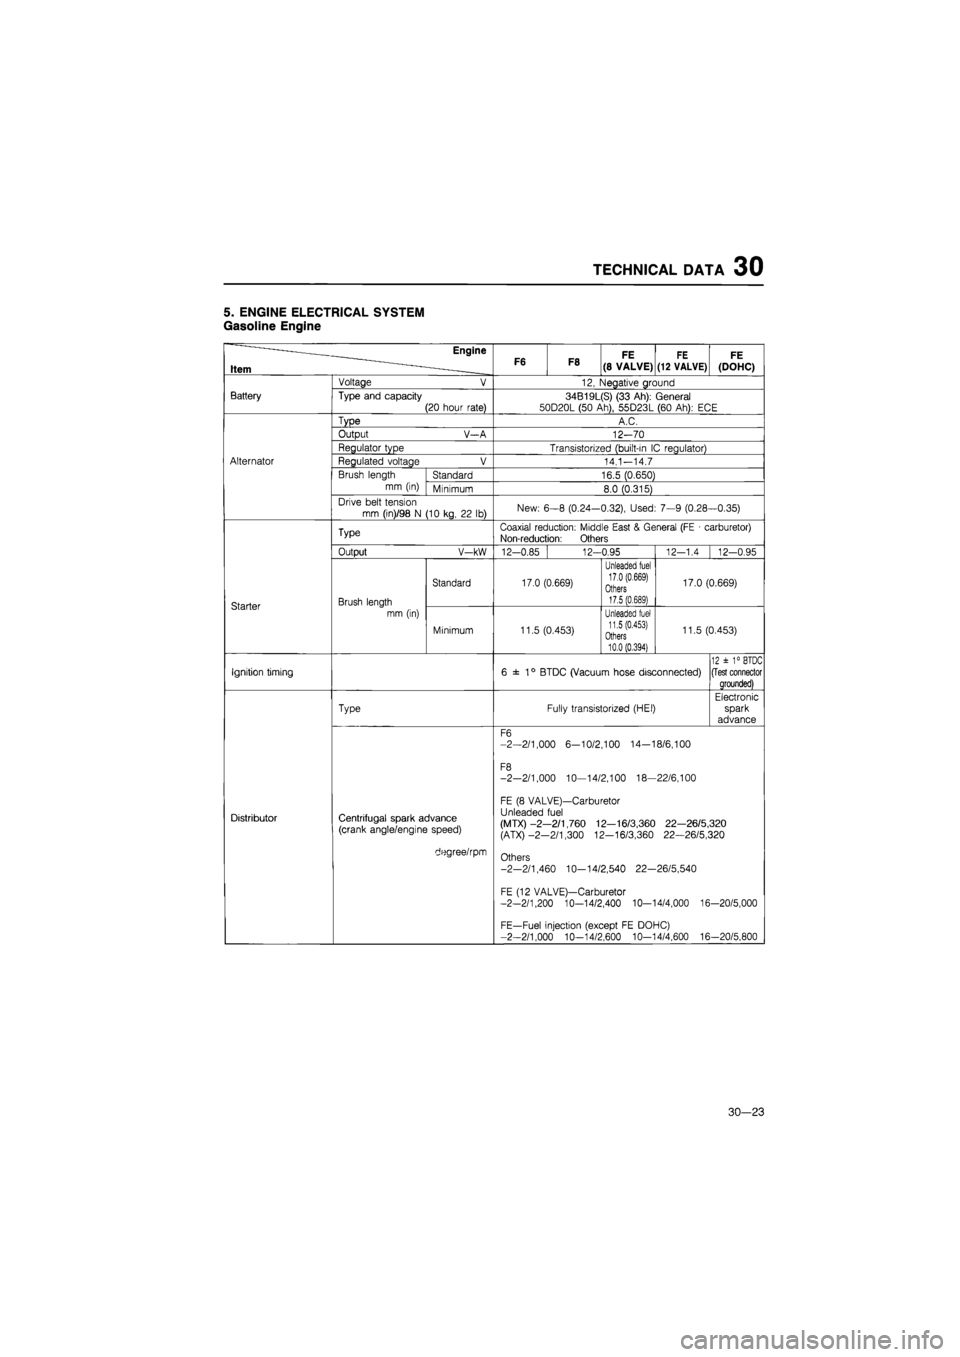
5. ENGINE ELECTRICAL SYSTEM
Gasoline Engine
——— Engine
F6 F8 FE FE FE
Item ____ F6 F8 (8 VALVE) (12 VALVE) (DOHC)
Battery
Voltage
Type and capacity
12, Negative ground
(20 hour rate) 34B19L(S) (33 Ah): General 50D20L (50 Ah), 55D23L (60 Ah):
ECE
Alternator
Type A.C.
Output V-A 12-70
Regulator type Transistorized (built-in
IC
regulator)
Regulated voltage 14.1-14.7
Brush length
mm (in) Standard 16.5 (0.650)
Minimum 8.0 (0.315)
Drive belt tension
mm (in)/98
N (10
kg,
22 lb)
New:
6-8
(0.24-0.32), Used:
7-9
(0.28—0.35)
Starter
Type Coaxial reduction: Middle East
&
General (FE
•
carburetor)
Non-reduction: Others
Output V-kW 12-0.85
Brush length mm (in)
12-0.95
Standard 17.0 (0.669)
Minimum 11.5 (0.453)
Unleaded fuel
17,0 (0.669)
Others
17.5 (0.689)
Unleaded fuel
11.5 (0.453)
Others
10.0 (0.394)
12-1.4 12-0.95
17.0 (0.669)
11.5 (0.453)
Ignition timing 6
±
1
°
BTDC (Vacuum hose disconnected) 12
±
1° BTDC
(Test connector
grounded)
Distributor
Type Fully transistorized (HEI)
Electronic spark advance
Centrifugal spark advance
(crank angle/engine speed)
degree/rpm
F6
-2-2/1,000 6-10/2,100 14-18/6,100
F8 -2-2/1,000 10—14/2,100 18-22/6,100
FE
(8
VALVE)—Carburetor Unleaded fuel
(MTX)-2—2/1,760 12—16/3,360 22—26/5,320 (ATX)-2-2/1,300 12-16/3,360 22-26/5,320
Others
-2-2/1,460 10-14/2,540 22-26/5,540
FE (12 VALVE)—Carburetor -2-2/1,200 10-14/2,400 10-14/4,000 16-20/5,000
FE—Fuel injection (except
FE
DOHC)
-2-2/1,000 10-14/2,600 10-14/4,600 16-20/5,800
30—23