Page 1662 of 1865
LOCATION OF UNIT, RELAY AND SWITCH 1 5
LOCATION OF
UNIT,
RELAY AND SWITCH
STRUCTURAL VIEW
Door SW
Power window SW
AAS control unit
Cruise control unit
Relay box
(EGI and Diesel model)
Engine control unit
Brake fluid level sensor
Main fuse block
(EGI model)
Main fuse block
(Carburetor model) | \ Relay box
Main fuse block Relay box
(Diesel model) (Carburetor model)
Power window SW
Door SW
Door lock SW
AAS control SW
CPU and joint box
86U15X-002
15-7
Page 1663 of 1865
1 5 LOCATION OF UNIT, RELAY AND SWITCH
STRUCTURAL VIEW
Hatchback
Light and turn switch
Rear wiper switch
Rear washer switch
Front wiper and washer
switch, and cruise control switch
/ Hazard switch (Except RHD model)
Rear def. switch (Except ECE)
Rear fog light switch (For ECE)
AAS switch
Headlight cleaner switch
Remote control mirror switch
Heater control switch
Driving mode selector switch
Cruise control main switch
Coupe/MX-6 and Sedan
-nr
J
nu
iTPD'i
Rear def, switch (Except ECE) Hazarc
Rear fog light switch (For ECE)
switch (Except RHD model)
15-8
86U15X-003
Page 1674 of 1865

CLUSTER SWITCH 15
e a
frtum
Illumination light
b
f
e -Q-
f d b d I f
Indicator light
76G15X-088
86U15X-018
g
TTTT
h f d b
from f „
IG SW
from a def. relay^
from ~ TWS unit
15 minules timer
To ground
h To panel
"controller
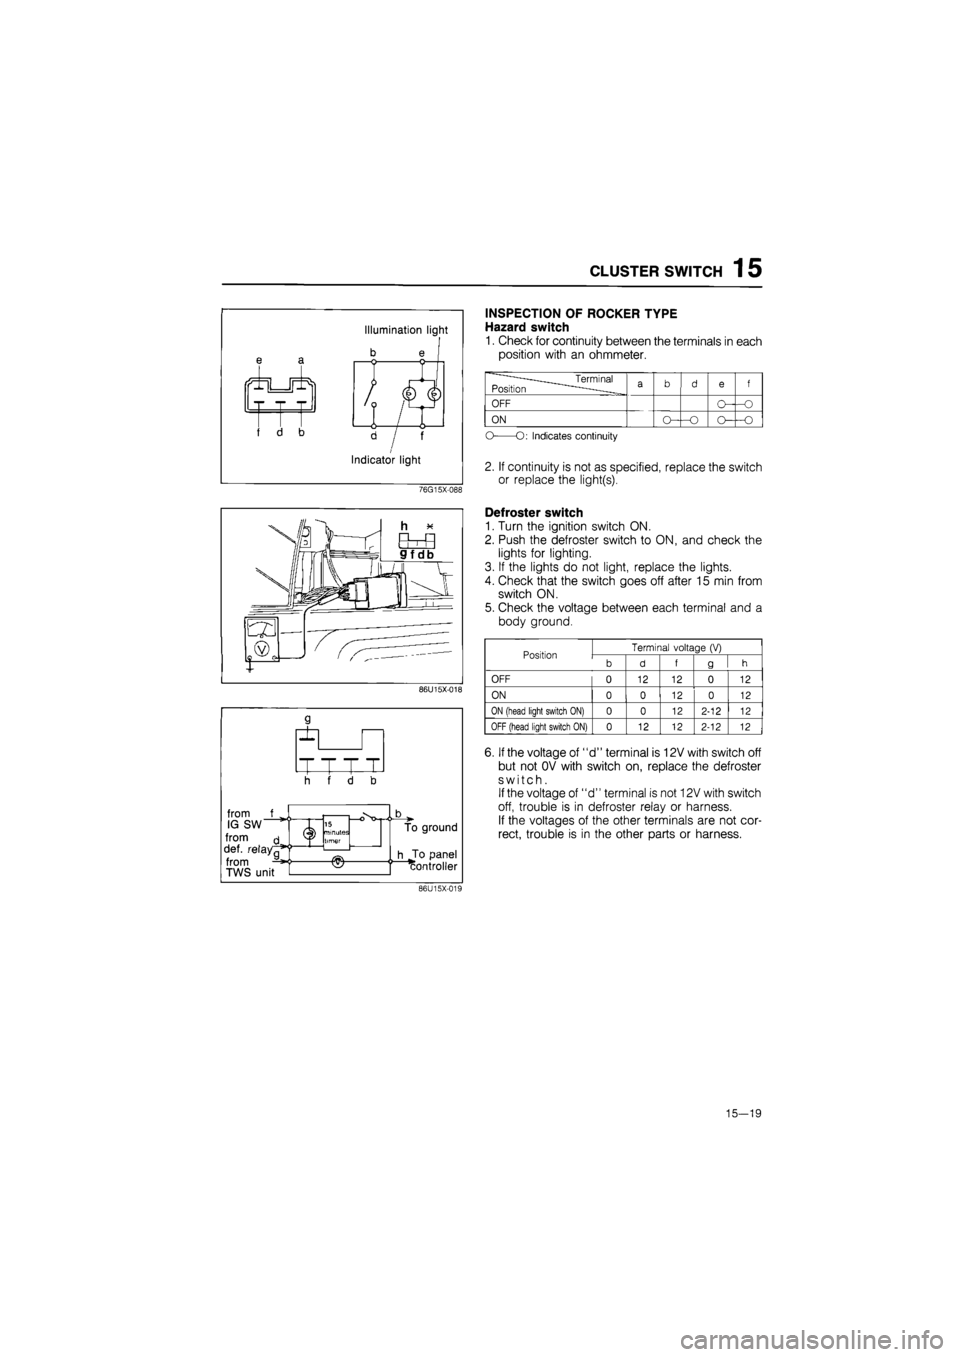
INSPECTION OF ROCKER TYPE
Hazard switch
1. Check for continuity between the terminals in each
position with an ohmmeter.
——____Terminal Position
^
a
b d
e
f
OFF
ON
-o
O
O:
Indicates continuity
2. If continuity is not as specified, replace the switch
or replace the light(s).
Defroster switch
1. Turn the ignition switch ON.
2. Push the defroster switch to ON, and check the
lights for lighting.
3. If the lights do not light, replace the lights.
4. Check that the switch goes off after 15 min from
switch ON.
5. Check the voltage between each terminal and a
body ground.
Position Terminal voltage
(V)
Position
b d f g h
OFF 0 12 12 0 12
ON 0 0 12 0 12
ON
(head light switch
ON) 0 0 12 2-12 12
OFF (head light switch
ON) 0 12 12 2-12 12
6. If the voltage of "d" terminal is 12V with switch off
but not OV with switch on, replace the defroster
switch.
If the voltage of "d" terminal is not 12V with switch
off, trouble is in defroster relay or harness.
If the voltages of the other terminals are not cor-
rect, trouble is in the other parts or harness.
86U15X-019
15—19
Page 1675 of 1865

15 CLUSTER SWITCH
86U15X-020
86U15X-021
A itt
TTTT h f
from f IG SW
from 9
def. relay
•>o-15 min. timer _To ground
86U15X-022
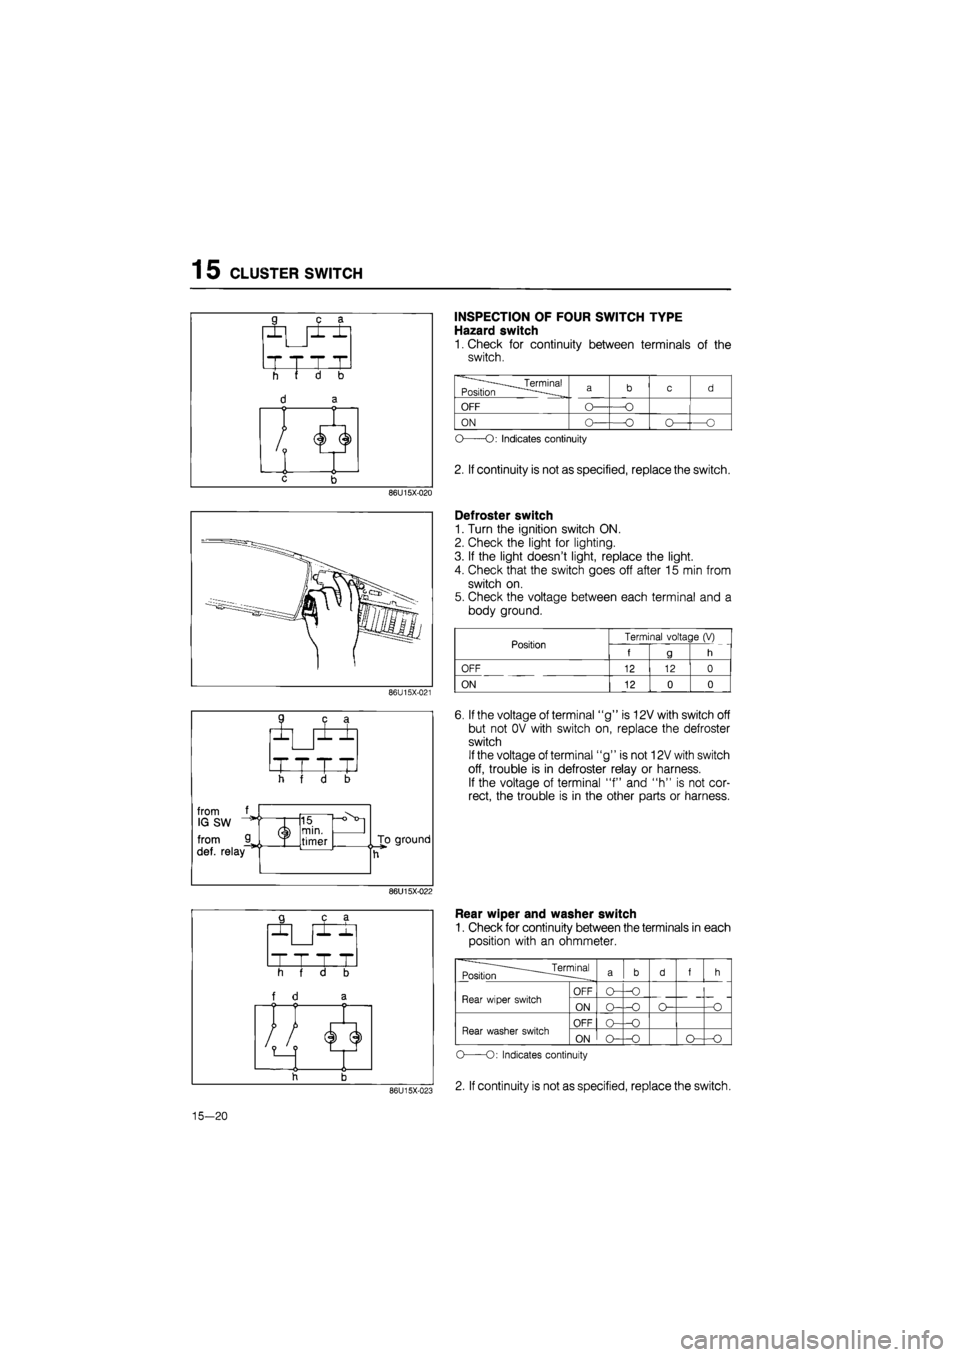
INSPECTION OF FOUR SWITCH TYPE
Hazard switch
1. Check for continuity between terminals of the
switch.
Position a b
C
d
OFF O— —0
ON
pi Pi Pl
ON
u
O O:
Indicates continuity
2. If continuity is not as specified, replace the switch.
Defroster switch
1. Turn the ignition switch ON.
2. Check the light for lighting.
3. If the light doesn't light, replace the light.
4. Check that the switch goes off after 15 min from
switch on.
5. Check the voltage between each terminal and a
body ground.
Position Terminal voltage
(V)
Position
f g h
OFF
12 12 0
ON
12 0 0
6. If the voltage of terminal "g" is 12V with switch off
but not OV with switch on, replace the defroster
switch
If the voltage of terminal "g" is not 12V with switch
off, trouble is in defroster relay or harness.
If the voltage of terminal "f" and "h" is not cor-
rect, the trouble is in the other parts or harness.
Rear wiper and washer switch
1. Check for continuity between the terminals in each
position with an ohmmeter.
1———___Terminal Position
"——
a b d f h
Rear wiper switch OFF CK -0
—O Rear wiper switch ON
o--0
O-—O
Rear washer switch OFF Rear washer switch ON
o-
-O O-
—o
86U15X-023
O O:
Indicates continuity
2. If continuity is not as specified, replace the switch.
15—20
Page 1708 of 1865
HORN 15
TROUBLESHOOTING
Horn does not sound.
< >...For West Germany
OK
76G15X-052
INSPECTION
Horn Relay
Check for continuity between terminals of the relay.
Connectina
to
Terminal
12V Ground a b c d
— —
—O
a
b 0— —0
O—O: indicates continuity
86U15X-092
15—53
Page 1710 of 1865
HEADLIGHT 15
Unleaded fuel model
OK
Check
for
12V
at
"RB" wire (when low and/or "RW" wire (when high)
of
combination switch
6
pin con-nector
NG
Check
for
12V
at
"RB" wire (when low and/or "RW" wire (when high)
of
combination switch
6
pin con-nector
NG
Replace combination switch
Check
for
12V
at
"RB" wire (when low and/or "RW" wire (when high)
of
combination switch
6
pin con-nector
OK
Check the voltage between each terminal
of
the headlihgt relay and
a
body ground.
Terminal Voltage
a (RW) 12V
c(R) 12V
NQ Repair harness
(a
terminal
—
combination switch
to
headlight relay,
c
terminal
—
main fuse
to
headlight relay)
OK
OK —
Replace the bulb(s)
76G15X-053
INSPECTION
Headlight Relay
Check for continuity between terminals of the relay.
Connecting
to
Terminal
12V Ground a b c d
— —
O— —O
a b O— —-O
O—O: indicates continuity
76G15X-054
15—55
Page 1713 of 1865
1 5 REAR WINDOW DEFROSTER
REAR WINDOW DEFROSTER
STRUCTURAL VIEW
Rear window defroster relay
Rear window
defroster SW
86U15X-101
CIRCUIT DIAGRAM
86U15X-102
15-58
Page 1715 of 1865

15 REAR WINDOW DEFROSTER
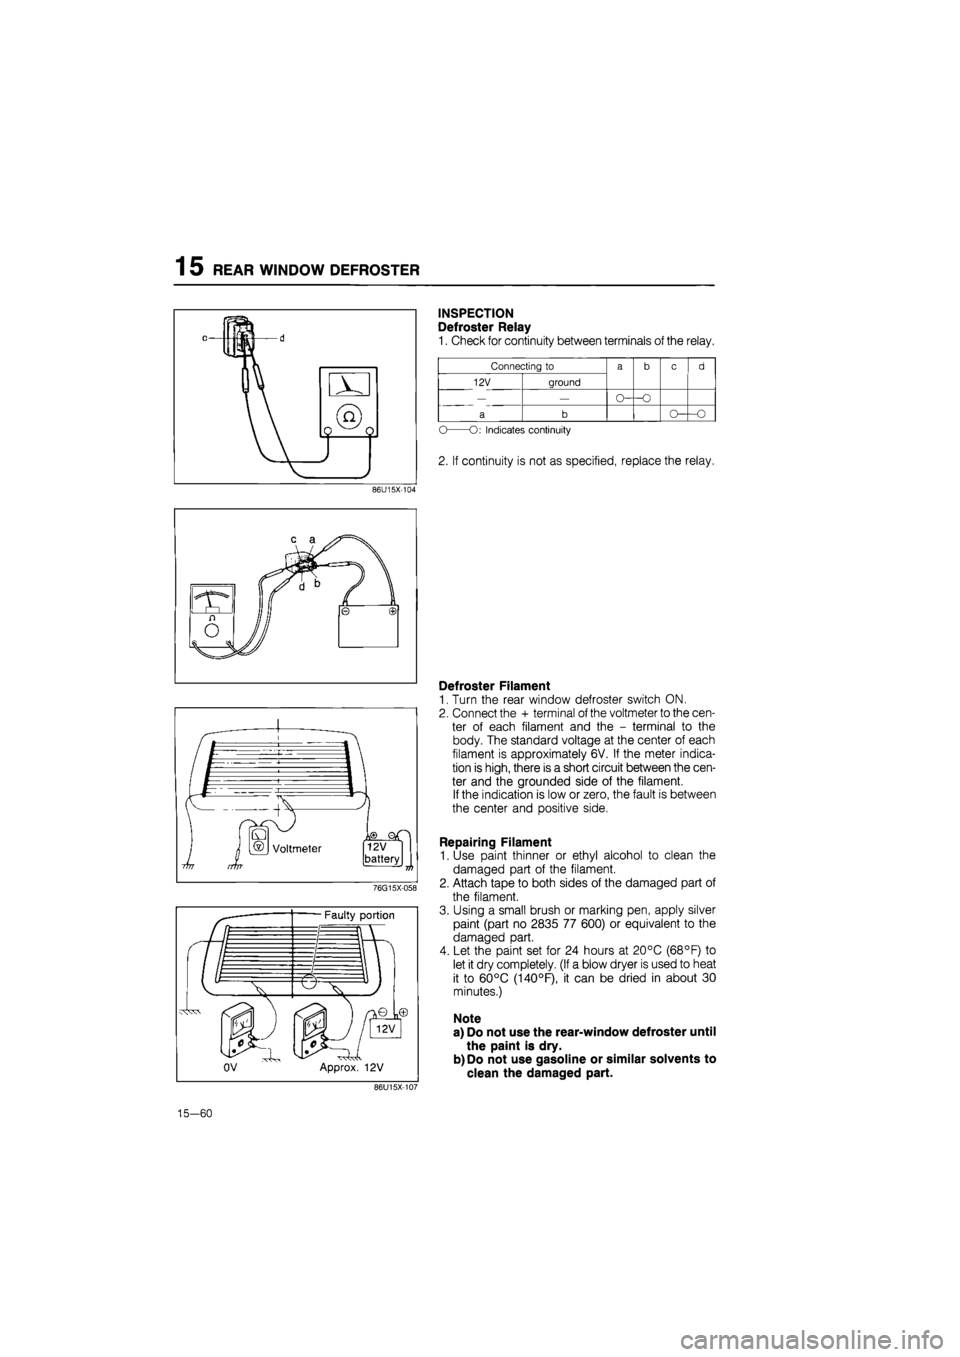
INSPECTION
Defroster Relay
1. Check for continuity between terminals of the relay.
Connecting
to
a b c d
12V ground
a b c d
— —
a b -O
O
O:
Indicates continuity
2. If continuity is not as specified, replace the relay.
86U15X-104
15-60
Defroster Filament
1. Turn the rear window defroster switch ON.
2. Connect the + terminal of the voltmeter to the cen-
ter of each filament and the - terminal to the
body. The standard voltage at the center of each
filament is approximately 6V. If the meter indica-
tion is high, there is a short circuit between the cen-
ter and the grounded side of the filament.
If the indication is low or zero, the fault is between
the center and positive side.
Repairing Filament
1. Use paint thinner or ethyl alcohol to clean the
damaged part of the filament.
2. Attach tape to both sides of the damaged part of
the filament.
3. Using a small brush or marking pen, apply silver
paint (part no 2835 77 600) or equivalent to the
damaged part.
4. Let the paint set for 24 hours at 20°C (68°F) to
let it dry completely. (If a blow dryer is used to heat
it to 60°C (140°F), it can be dried in about 30
minutes.)
Note
a) Do not use the rear-window defroster until
the paint is dry.
b) Do not use gasoline or similar solvents to
clean the damaged part.