Page 1 of 878
TURBOCHARGER SYSTEM (2JZ±GTE)
PREPARATION
SST (SPECIAL SERVICE TOOLS)
09992±00241 Turbocharger Pressure Gauge
EQUIPMENT
����������������������� �
���������������������� �����������������������
Dial indicator������������� �
������������ �������������
Impeller wheel
����������������������� �
���������������������� �����������������������
Torque wrench������������� �
������������ �������������
COOLANT
�������������� ��������������Item������������ ������������Capacity����������� �����������Classification
�������������� �
������������� ��������������Engine coolant (w/ Heater) M/T
A/T������������ �
����������� ������������ 9.5 liters (10.0 US qts. 8.4 lmp. qts)
9.4 liters (9.9 US qts, 8.3 lmp. qts)����������� �
���������� �����������Ethylene±glycol base
EG±140± ENGINETURBOCHARGER SYSTEM (2JZ±GTE)
Page 12 of 878
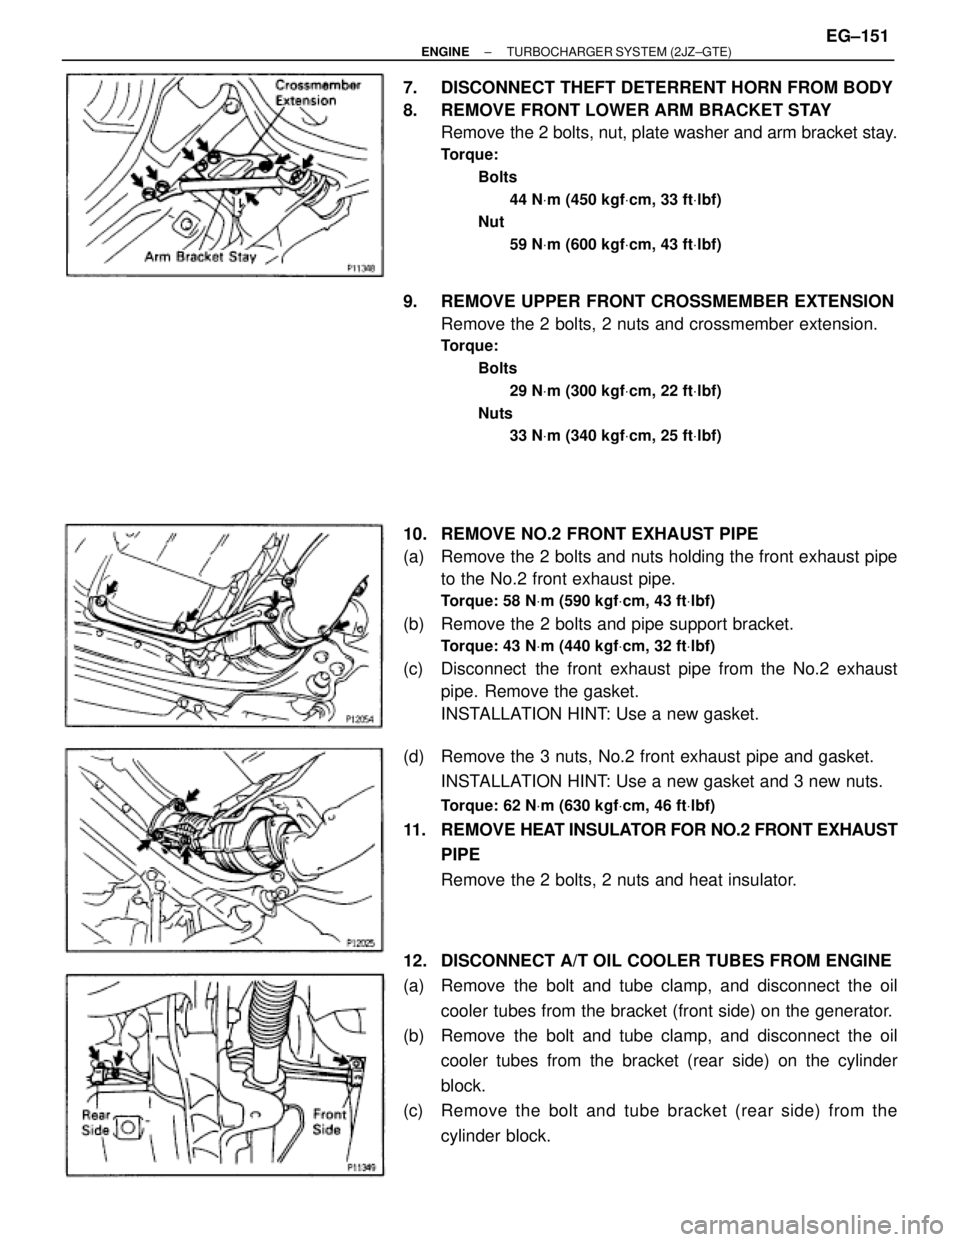
7. DISCONNECT THEFT DETERRENT HORN FROM BODY
8. REMOVE FRONT LOWER ARM BRACKET STAY
Remove the 2 bolts, nut, plate washer and arm bracket stay.
Torque:
Bolts
44 NVm (450 kgfVcm, 33 ftVlbf)
Nut
59 NVm (600 kgfVcm, 43 ftVlbf)
9. REMOVE UPPER FRONT CROSSMEMBER EXTENSION
Remove the 2 bolts, 2 nuts and crossmember extension.
Torque:
Bolts
29 NVm (300 kgfVcm, 22 ftVlbf)
Nuts
33 NVm (340 kgfVcm, 25 ftVlbf)
10. REMOVE NO.2 FRONT EXHAUST PIPE
(a) Remove the 2 bolts and nuts holding the front exhaust pipe
to the No.2 front exhaust pipe.
Torque: 58 NVm (590 kgfVcm, 43 ftVlbf)
(b) Remove the 2 bolts and pipe support bracket.
Torque: 43 NVm (440 kgfVcm, 32 ftVlbf)
(c) Disconnect the front exhaust pipe from the No.2 exhaust
pipe. Remove the gasket.
INSTALLATION HINT: Use a new gasket.
(d) Remove the 3 nuts, No.2 front exhaust pipe and gasket.
INSTALLATION HINT: Use a new gasket and 3 new nuts.
Torque: 62 NVm (630 kgfVcm, 46 ftVlbf)
11. REMOVE HEAT INSULATOR FOR NO.2 FRONT EXHAUST
PIPE
Remove the 2 bolts, 2 nuts and heat insulator.
12. DISCONNECT A/T OIL COOLER TUBES FROM ENGINE
(a) Remove the bolt and tube clamp, and disconnect the oil
cooler tubes from the bracket (front side) on the generator.
(b) Remove the bolt and tube clamp, and disconnect the oil
cooler tubes from the bracket (rear side) on the cylinder
block.
(c) Remove the bolt and tube bracket (rear side) from the
cylinder block.
± ENGINETURBOCHARGER SYSTEM (2JZ±GTE)EG±151
Page 14 of 878
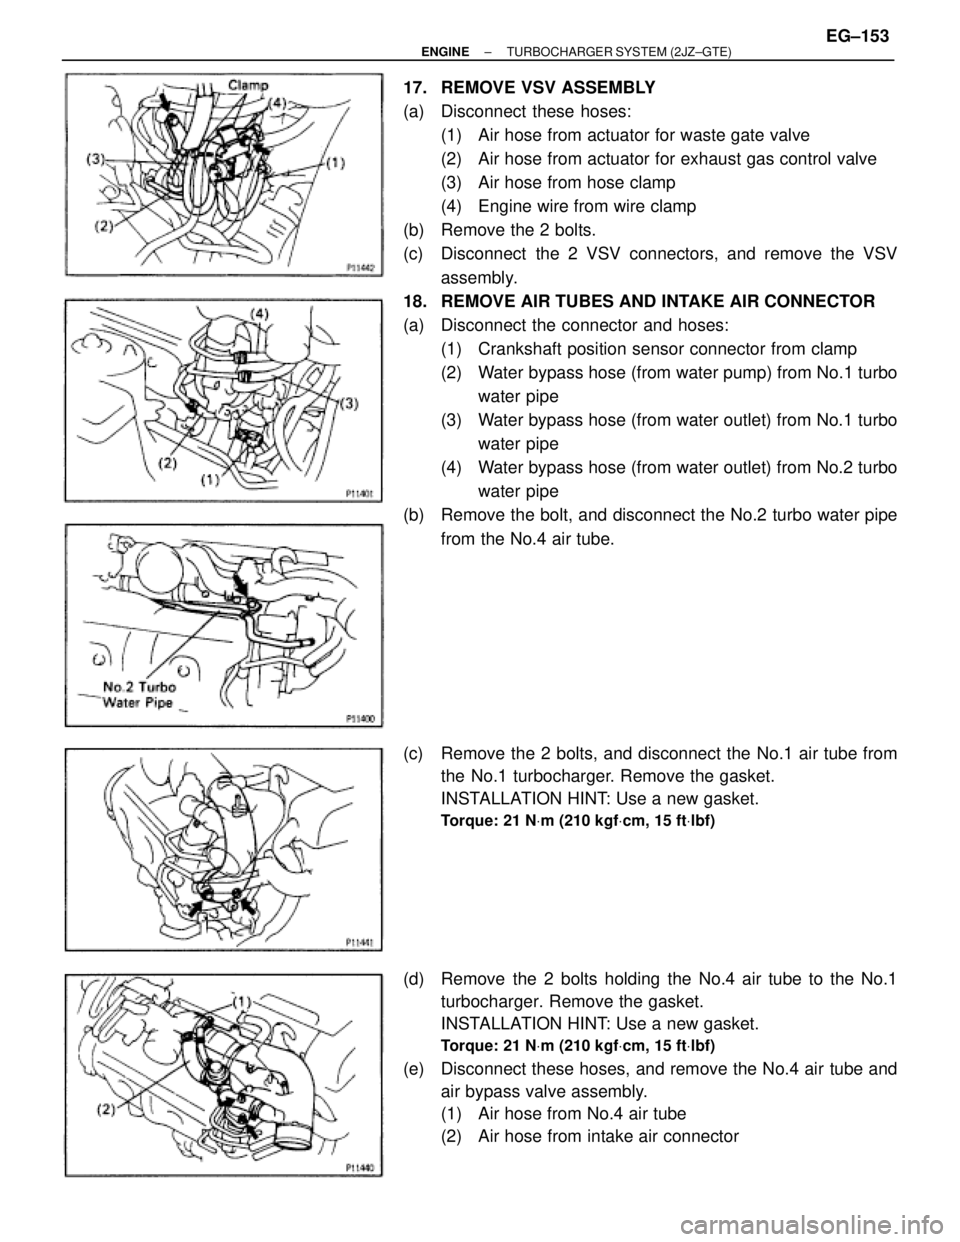
17. REMOVE VSV ASSEMBLY
(a) Disconnect these hoses:
(1) Air hose from actuator for waste gate valve
(2) Air hose from actuator for exhaust gas control valve
(3) Air hose from hose clamp
(4) Engine wire from wire clamp
(b) Remove the 2 bolts.
(c) Disconnect the 2 VSV connectors, and remove the VSV
assembly.
18. REMOVE AIR TUBES AND INTAKE AIR CONNECTOR
(a) Disconnect the connector and hoses:
(1) Crankshaft position sensor connector from clamp
(2) Water bypass hose (from water pump) from No.1 turbo
water pipe
(3) Water bypass hose (from water outlet) from No.1 turbo
water pipe
(4) Water bypass hose (from water outlet) from No.2 turbo
water pipe
(b) Remove the bolt, and disconnect the No.2 turbo water pipe
from the No.4 air tube.
(c) Remove the 2 bolts, and disconnect the No.1 air tube from
the No.1 turbocharger. Remove the gasket.
INSTALLATION HINT: Use a new gasket.
Torque: 21 NVm (210 kgfVcm, 15 ftVlbf)
(d) Remove the 2 bolts holding the No.4 air tube to the No.1
turbocharger. Remove the gasket.
INSTALLATION HINT: Use a new gasket.
Torque: 21 NVm (210 kgfVcm, 15 ftVlbf)
(e) Disconnect these hoses, and remove the No.4 air tube and
air bypass valve assembly.
(1) Air hose from No.4 air tube
(2) Air hose from intake air connector
± ENGINETURBOCHARGER SYSTEM (2JZ±GTE)EG±153
Page 15 of 878
(f) Remove the 2 nuts, intake air control valve and gasket.
INSTALLATION HINT: Use a new gasket.
Torque: 21 NVm (210 kgfVcm, 15 ftVlbf)
(g) D i s connect these hoses, and remove the intake air
connector and No.1 air tube assembly.
(1) Air hose from No.2 air tube
(2) PCV hose from No.2 cylinder head cover
19. REMOVE AIR INLET DUCT
Remove the bolt, 2 nuts, cable bracket and air inlet duct.
20. REMOVE HEAT INSULATOR FOR TURBOCHARGER
Remove the 4 bolts and heat insulator.
21. REMOVE EXHAUST BYPASS PIPE
Remove the 4 nuts, bypass pipe and 2 gaskets.
INSTALLATION HINT: Use 2 new gaskets and 4 new nuts.
Torque: 25 NVm (250 kgfVcm, 18 ftVlbf)
22. REMOVE EXHAUST GAS CONTROL VALVE STAY
Remove the bolt, nut and valve stay.
Torque: 43 NVm (440 kgfVcm, 32 ftVlbf)
EG±154± ENGINETURBOCHARGER SYSTEM (2JZ±GTE)
Page 16 of 878
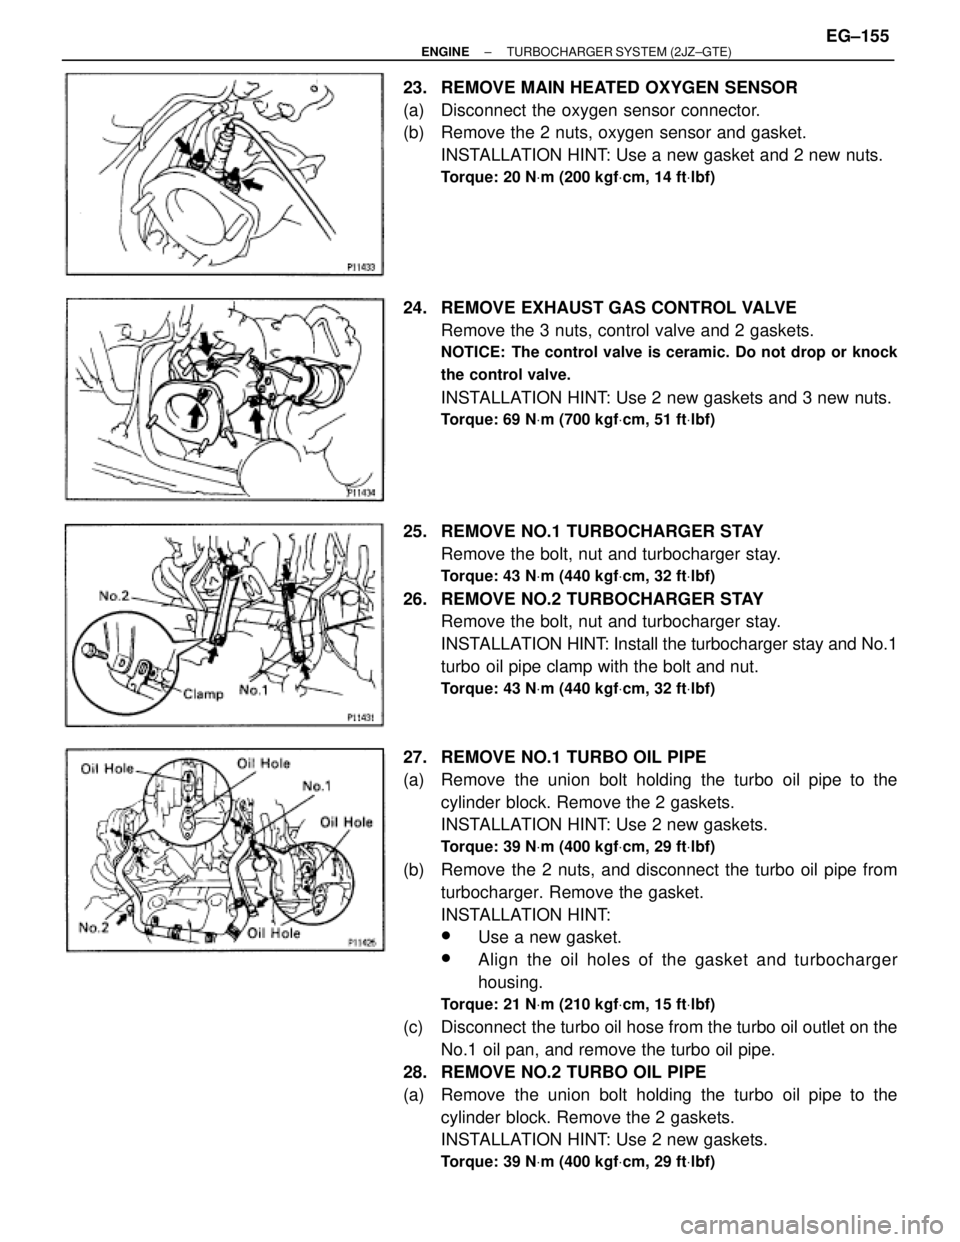
23. REMOVE MAIN HEATED OXYGEN SENSOR
(a) Disconnect the oxygen sensor connector.
(b) Remove the 2 nuts, oxygen sensor and gasket.
INSTALLATION HINT: Use a new gasket and 2 new nuts.
Torque: 20 NVm (200 kgfVcm, 14 ftVlbf)
24. REMOVE EXHAUST GAS CONTROL VALVE
Remove the 3 nuts, control valve and 2 gaskets.
NOTICE: The control valve is ceramic. Do not drop or knock
the control valve.
INSTALLATION HINT: Use 2 new gaskets and 3 new nuts.
Torque: 69 NVm (700 kgfVcm, 51 ftVlbf)
25. REMOVE NO.1 TURBOCHARGER STAY
Remove the bolt, nut and turbocharger stay.
Torque: 43 NVm (440 kgfVcm, 32 ftVlbf)
26. REMOVE NO.2 TURBOCHARGER STAY
Remove the bolt, nut and turbocharger stay.
INSTALLATION HINT: Install the turbocharger stay and No.1
turbo oil pipe clamp with the bolt and nut.
Torque: 43 NVm (440 kgfVcm, 32 ftVlbf)
27. REMOVE NO.1 TURBO OIL PIPE
(a) Remove the union bolt holding the turbo oil pipe to the
cylinder block. Remove the 2 gaskets.
INSTALLATION HINT: Use 2 new gaskets.
Torque: 39 NVm (400 kgfVcm, 29 ftVlbf)
(b) Remove the 2 nuts, and disconnect the turbo oil pipe from
turbocharger. Remove the gasket.
INSTALLATION HINT:
wUse a new gasket.
wAlign the oil holes of the gasket and turbocharger
housing.
Torque: 21 NVm (210 kgfVcm, 15 ftVlbf)
(c) Disconnect the turbo oil hose from the turbo oil outlet on the
No.1 oil pan, and remove the turbo oil pipe.
28. REMOVE NO.2 TURBO OIL PIPE
(a) Remove the union bolt holding the turbo oil pipe to the
cylinder block. Remove the 2 gaskets.
INSTALLATION HINT: Use 2 new gaskets.
Torque: 39 NVm (400 kgfVcm, 29 ftVlbf)
± ENGINETURBOCHARGER SYSTEM (2JZ±GTE)EG±155
Page 17 of 878
(b) Remove the 2 nuts, and disconnect the turbo oil pipe from
turbocharger. Remove the gasket.
INSTALLATION HINT:
wUse a new gasket.
wAlign the oil holes of the gasket and turbocharger
housing.
Torque: 21 NVm (210 kgfVcm, 15 ftVlbf)
(c) Disconnect the turbo oil hose from the turbo oil outlet on the
No.1 oil pan, and remove the turbo oil pipe.
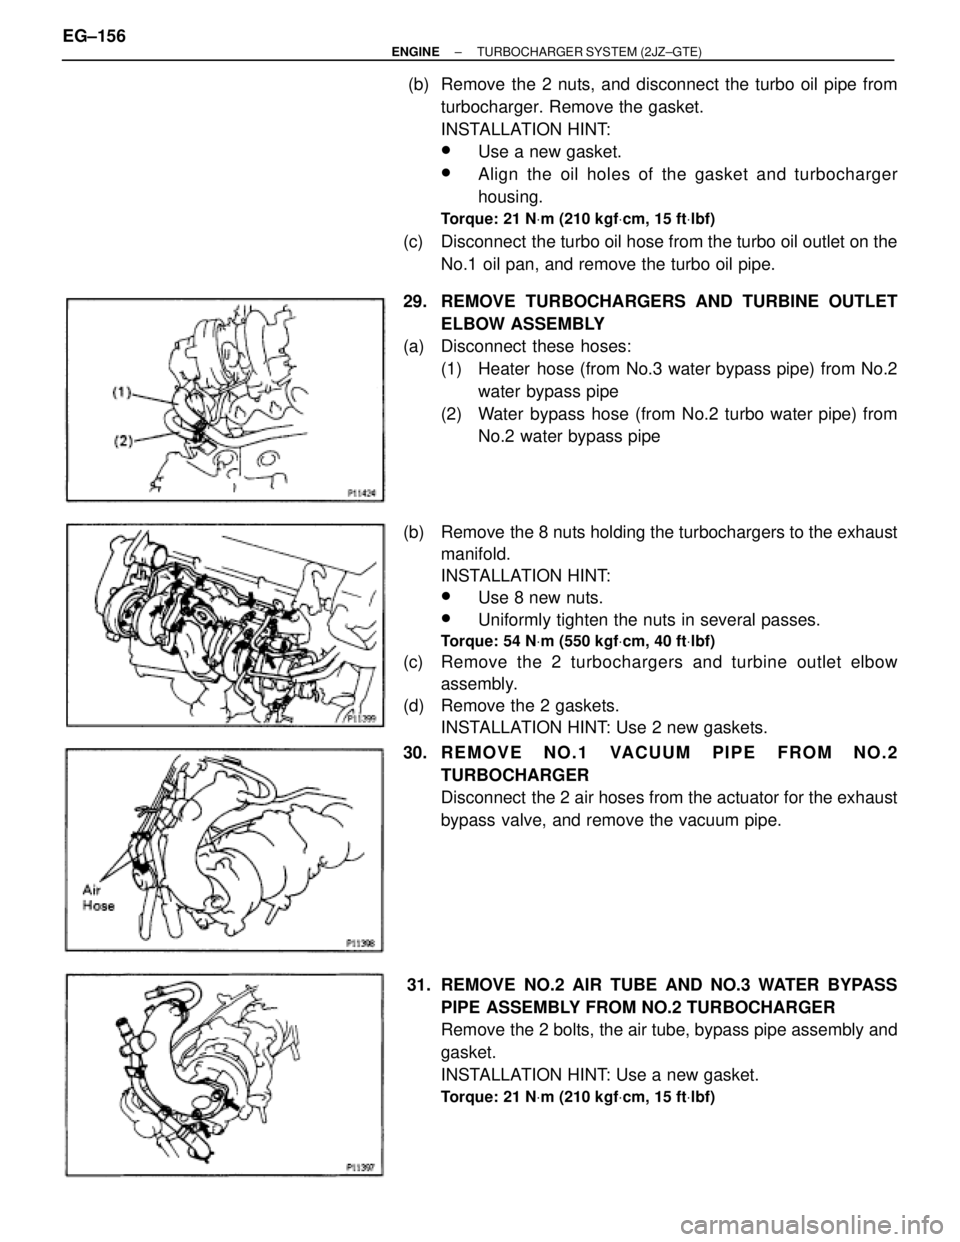
29. REMOVE TURBOCHARGERS AND TURBINE OUTLET
ELBOW ASSEMBLY
(a) Disconnect these hoses:
(1) Heater hose (from No.3 water bypass pipe) from No.2
water bypass pipe
(2) Water bypass hose (from No.2 turbo water pipe) from
No.2 water bypass pipe
(b) Remove the 8 nuts holding the turbochargers to the exhaust
manifold.
INSTALLATION HINT:
wUse 8 new nuts.
wUniformly tighten the nuts in several passes.
Torque: 54 NVm (550 kgfVcm, 40 ftVlbf)
(c) Remove the 2 turbochargers and turbine outlet elbow
assembly.
(d) Remove the 2 gaskets.
INSTALLATION HINT: Use 2 new gaskets.
30. R E M O V E N O . 1 VACUUM PIPE FROM NO.2
TURBOCHARGER
Disconnect the 2 air hoses from the actuator for the exhaust
bypass valve, and remove the vacuum pipe.
31. REMOVE NO.2 AIR TUBE AND NO.3 WATER BYPASS
PIPE ASSEMBLY FROM NO.2 TURBOCHARGER
Remove the 2 bolts, the air tube, bypass pipe assembly and
gasket.
INSTALLATION HINT: Use a new gasket.
Torque: 21 NVm (210 kgfVcm, 15 ftVlbf)
EG±156± ENGINETURBOCHARGER SYSTEM (2JZ±GTE)
Page 18 of 878
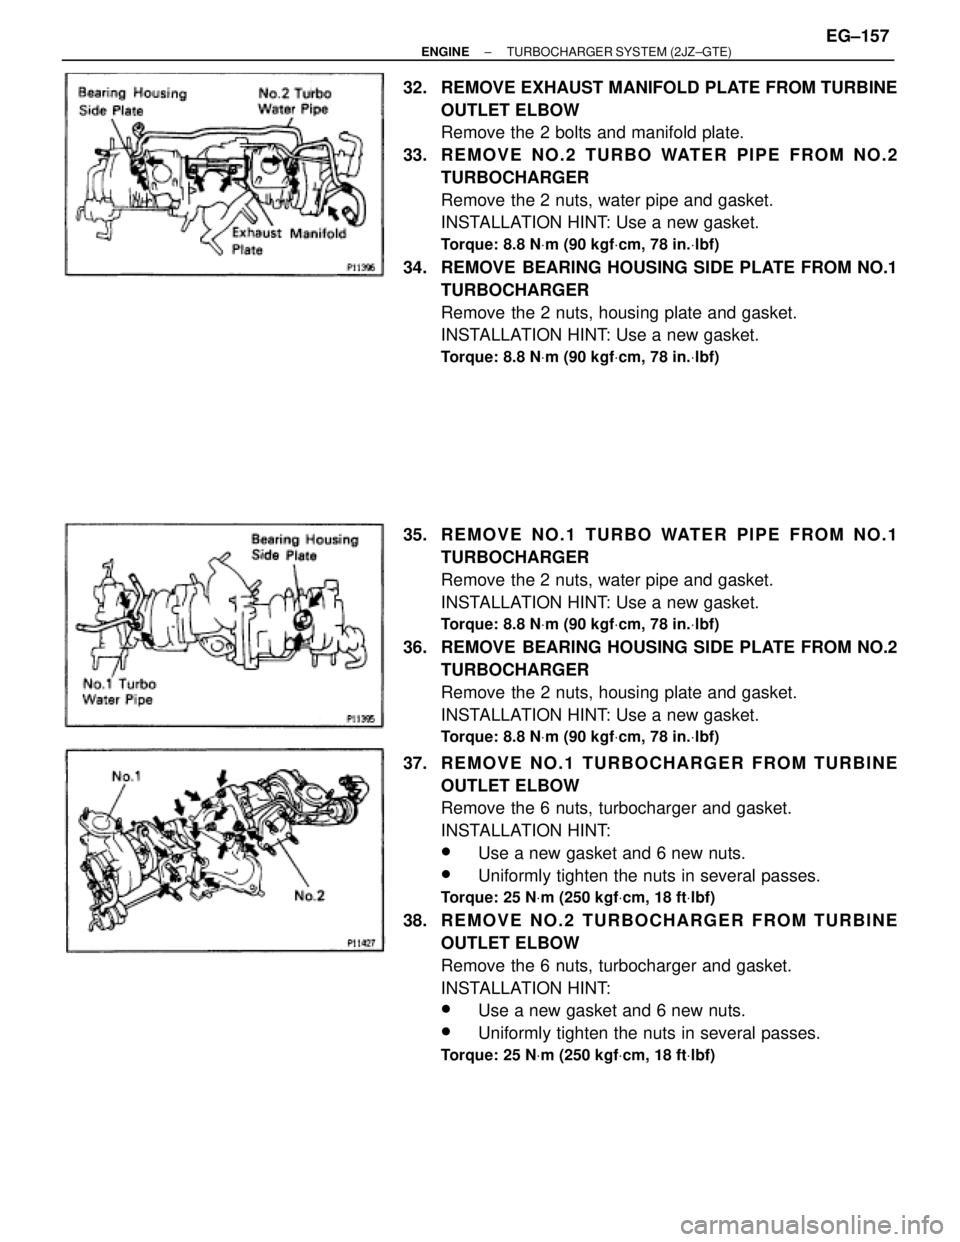
32. REMOVE EXHAUST MANIFOLD PLATE FROM TURBINE
OUTLET ELBOW
Remove the 2 bolts and manifold plate.
33. R E M O V E N O . 2 TURBO WATER PIPE FROM NO.2
TURBOCHARGER
Remove the 2 nuts, water pipe and gasket.
INSTALLATION HINT: Use a new gasket.
Torque: 8.8 NVm (90 kgfVcm, 78 in.Vlbf)
34. REMOVE BEARING HOUSING SIDE PLATE FROM NO.1
TURBOCHARGER
Remove the 2 nuts, housing plate and gasket.
INSTALLATION HINT: Use a new gasket.
Torque: 8.8 NVm (90 kgfVcm, 78 in.Vlbf)
35. R E M O V E N O . 1 TURBO WATER PIPE FROM NO.1
TURBOCHARGER
Remove the 2 nuts, water pipe and gasket.
INSTALLATION HINT: Use a new gasket.
Torque: 8.8 NVm (90 kgfVcm, 78 in.Vlbf)
36. REMOVE BEARING HOUSING SIDE PLATE FROM NO.2
TURBOCHARGER
Remove the 2 nuts, housing plate and gasket.
INSTALLATION HINT: Use a new gasket.
Torque: 8.8 NVm (90 kgfVcm, 78 in.Vlbf)
37. R E M O V E N O . 1 TURBOCHARGER FROM TURBINE
OUTLET ELBOW
Remove the 6 nuts, turbocharger and gasket.
INSTALLATION HINT:
wUse a new gasket and 6 new nuts.
wUniformly tighten the nuts in several passes.
Torque: 25 NVm (250 kgfVcm, 18 ftVlbf)
38. R E M O V E N O . 2 TURBOCHARGER FROM TURBINE
OUTLET ELBOW
Remove the 6 nuts, turbocharger and gasket.
INSTALLATION HINT:
wUse a new gasket and 6 new nuts.
wUniformly tighten the nuts in several passes.
Torque: 25 NVm (250 kgfVcm, 18 ftVlbf)
± ENGINETURBOCHARGER SYSTEM (2JZ±GTE)EG±157
Page 22 of 878
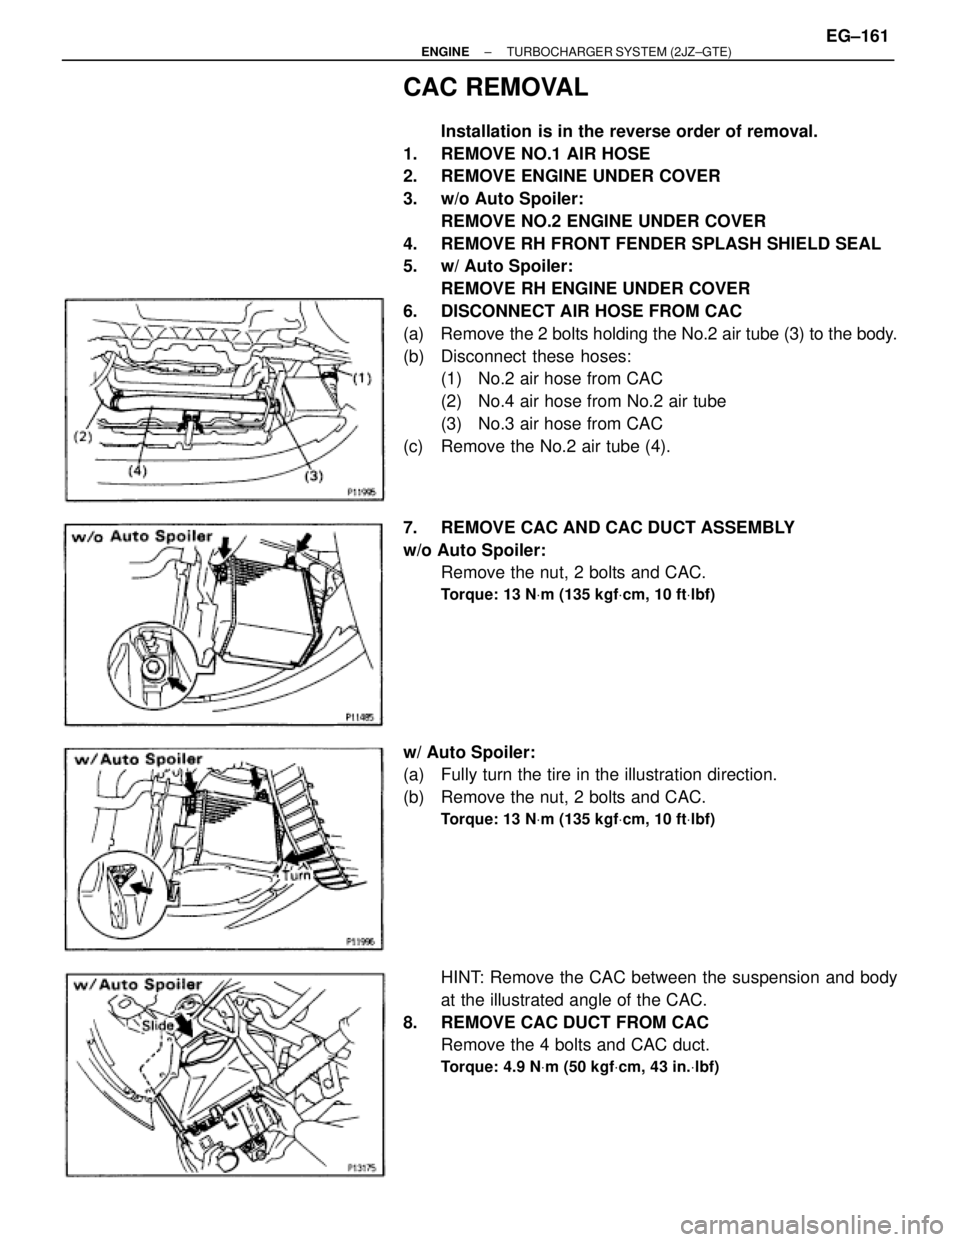
CAC REMOVAL
Installation is in the reverse order of removal.
1. REMOVE NO.1 AIR HOSE
2. REMOVE ENGINE UNDER COVER
3. w/o Auto Spoiler:
REMOVE NO.2 ENGINE UNDER COVER
4. REMOVE RH FRONT FENDER SPLASH SHIELD SEAL
5. w/ Auto Spoiler:
REMOVE RH ENGINE UNDER COVER
6. DISCONNECT AIR HOSE FROM CAC
(a) Remove the 2 bolts holding the No.2 air tube (3) to the body.
(b) Disconnect these hoses:
(1) No.2 air hose from CAC
(2) No.4 air hose from No.2 air tube
(3) No.3 air hose from CAC
(c) Remove the No.2 air tube (4).
7. REMOVE CAC AND CAC DUCT ASSEMBLY
w/o Auto Spoiler:
Remove the nut, 2 bolts and CAC.
Torque: 13 NVm (135 kgfVcm, 10 ftVlbf)
w/ Auto Spoiler:
(a) Fully turn the tire in the illustration direction.
(b) Remove the nut, 2 bolts and CAC.
Torque: 13 NVm (135 kgfVcm, 10 ftVlbf)
HINT: Remove the CAC between the suspension and body
at the illustrated angle of the CAC.
8. REMOVE CAC DUCT FROM CAC
Remove the 4 bolts and CAC duct.
Torque: 4.9 NVm (50 kgfVcm, 43 in.Vlbf)
± ENGINETURBOCHARGER SYSTEM (2JZ±GTE)EG±161