1986 TOYOTA CAMRY V20 ECU
[x] Cancel search: ECUPage 980 of 2389
INSPECTION OF MASTER CYLINDER
HINT: Clean the disassembled parts with compressed air.
1. INSPECT MASTER CYLINDER BORE FOR SCORING
OR CORROSION
If a problem is found, clean or replace the cylinder.
2. INSPECT PISTON AND CUPS FOR WEAR, SCORING,
CRACKS OR SWELLING
If either one requires replacement, use the parts from the
cylinder kit.
3. INSPECT PUSH ROD FOR WEAR OR DAMAGE
If necessary, replace the push rod.
ASSEMBLY OF MASTER CYLINDER
(See page CL±5)
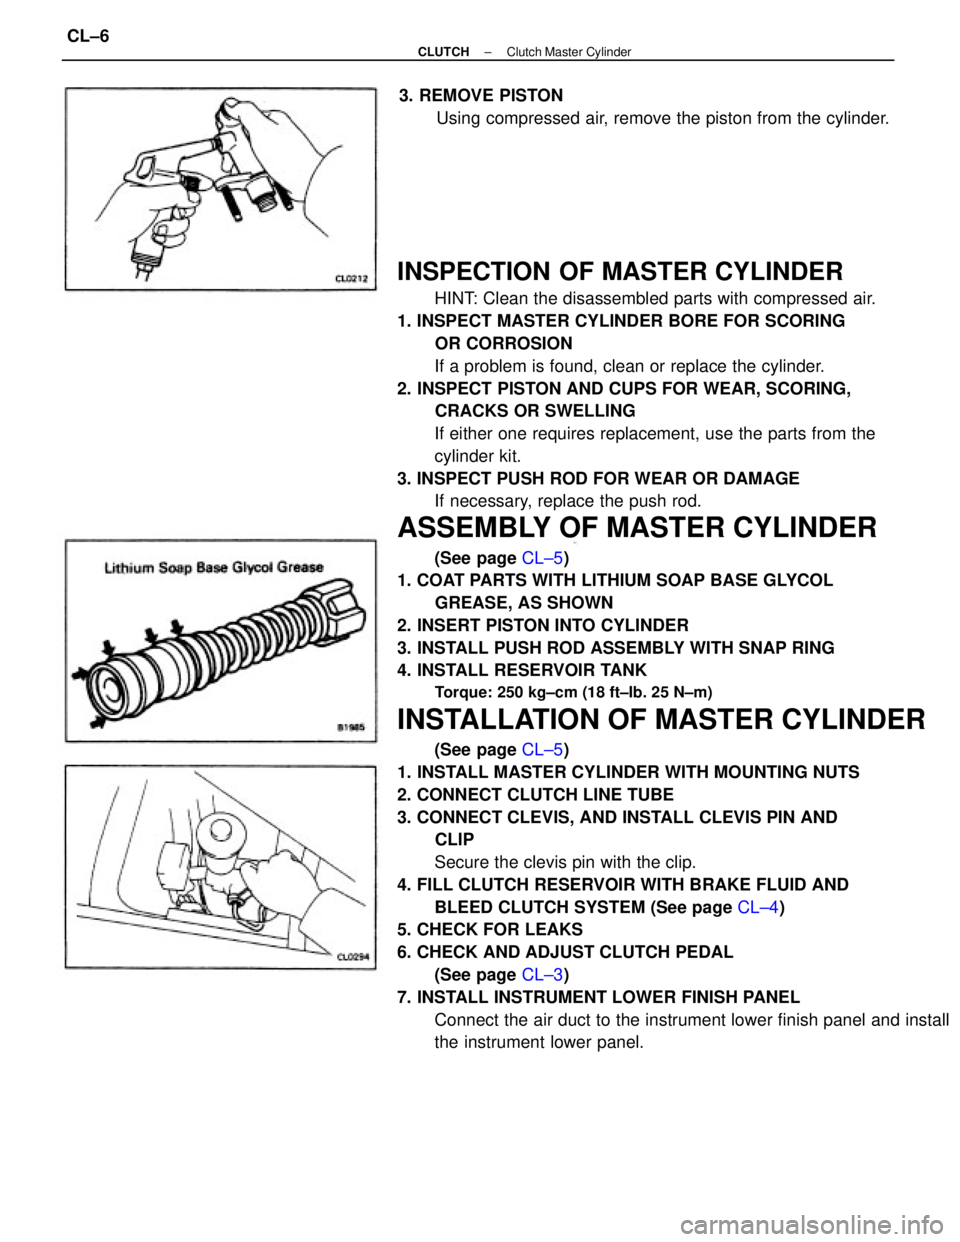
1. COAT PARTS WITH LITHIUM SOAP BASE GLYCOL
GREASE, AS SHOWN
2. INSERT PISTON INTO CYLINDER
3. INSTALL PUSH ROD ASSEMBLY WITH SNAP RING
4. INSTALL RESERVOIR TANK
Torque: 250 kg±cm (18 ft±Ib. 25 N±m)
INSTALLATION OF MASTER CYLINDER
(See page CL±5)
1. INSTALL MASTER CYLINDER WITH MOUNTING NUTS
2. CONNECT CLUTCH LINE TUBE
3. CONNECT CLEVIS, AND INSTALL CLEVIS PIN AND
CLIP
Secure the clevis pin with the clip.
4. FILL CLUTCH RESERVOIR WITH BRAKE FLUID AND
BLEED CLUTCH SYSTEM (See page CL±4)
5. CHECK FOR LEAKS
6. CHECK AND ADJUST CLUTCH PEDAL
(See page CL±3)
7. INSTALL INSTRUMENT LOWER FINISH PANEL
Connect the air duct to the instrument lower finish panel and install
the instrument lower panel. 3. REMOVE PISTON
Using compressed air, remove the piston from the cylinder.
± CLUTCHClutch Master CylinderCL±6
Page 1011 of 2389
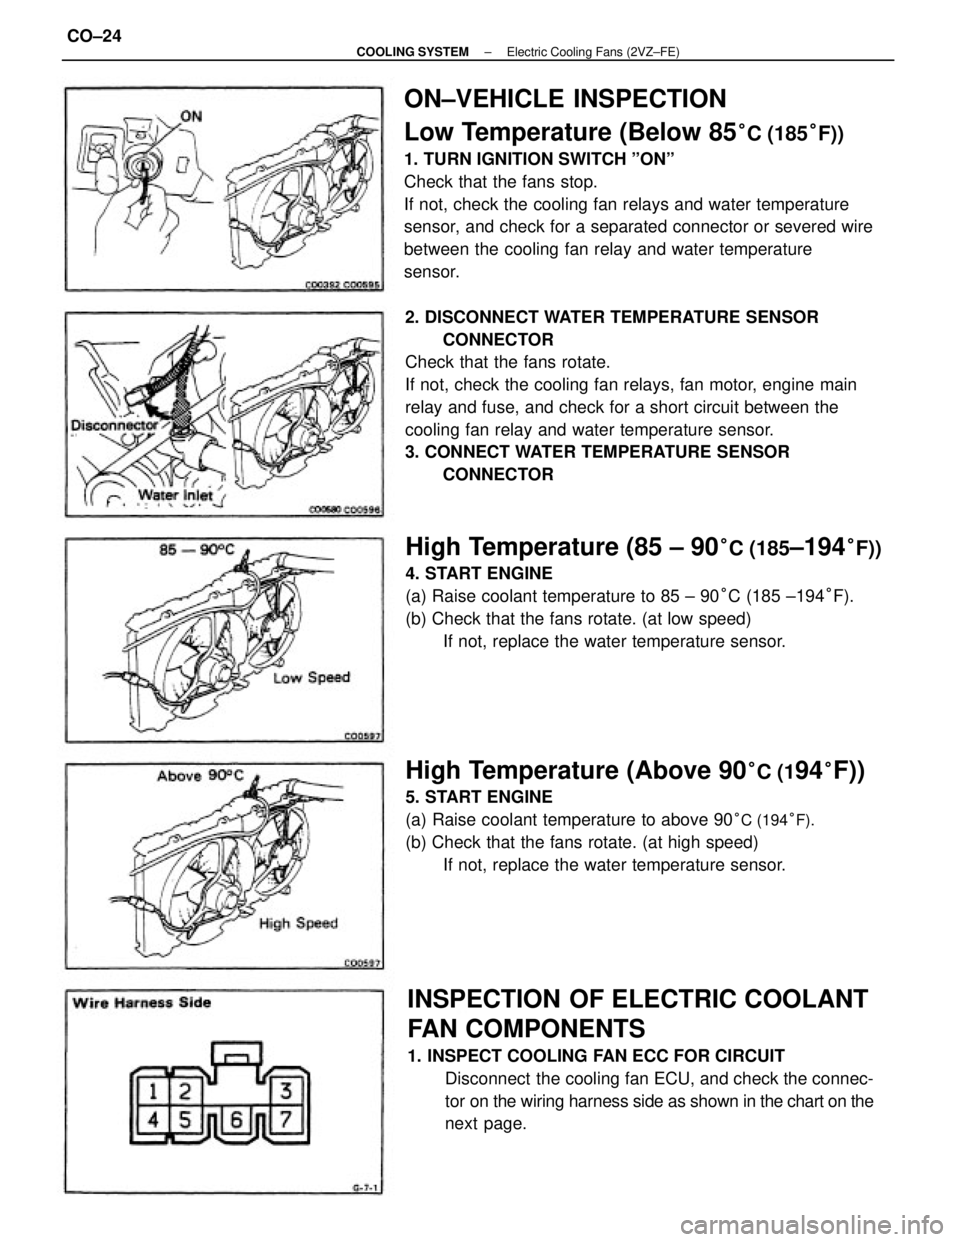
ON±VEHICLE INSPECTION
Low Temperature (Below 85
°C (185°F))
1. TURN IGNITION SWITCH ºONº
Check that the fans stop.
If not, check the cooling fan relays and water temperature
sensor, and check for a separated connector or severed wire
between the cooling fan relay and water temperature
sensor.
2. DISCONNECT WATER TEMPERATURE SENSOR
CONNECTOR
Check that the fans rotate.
If not, check the cooling fan relays, fan motor, engine main
relay and fuse, and check for a short circuit between the
cooling fan relay and water temperature sensor.
3. CONNECT WATER TEMPERATURE SENSOR
CONNECTOR
INSPECTION OF ELECTRIC COOLANT
FAN COMPONENTS
1. INSPECT COOLING FAN ECC FOR CIRCUIT
Disconnect the cooling fan ECU, and check the connec-
tor on the wiring harness side as shown in the chart on the
next page.
High Temperature (85 ± 90°C (185±194°F))
4. START ENGINE
(a) Raise coolant temperature to 85 ± 90°C (185 ±194°F).
(b) Check that the fans rotate. (at low speed)
If not, replace the water temperature sensor.
High Temperature (Above 90°C (194°F))
5. START ENGINE
(a) Raise coolant temperature to above 90
°C (194°F).
(b) Check that the fans rotate. (at high speed)
If not, replace the water temperature sensor.
± COOLING SYSTEMElectric Cooling Fans (2VZ±FE)CO±24
Page 1017 of 2389
The ER system is composed of there basic sub±systems: Fuel, Air Induction and Electronic Control Systems.
FUEL SYSTEM
Fuel is supplied under constant pressure to the EFI injectors by an electric fuel pump. The injectors inject a
metered quantity of fuel into the intake manifold in a accordance with signals from the ECU (Electronic Control
Unit).
AIR INDUCTION SYSTEM
The air induction system provides sufficient air for engine operation.
ELECTRONIC CONTROL SYSTEM
The Camry 3S±FE and 2V1±FE engines are equipped with a Toyota Computer Control System (TCCS) which
centrally controls the EFI, ESA, ISC, Diagnosis systems etc. by means of an Electronic Control Unit (ECU±
formerly ER computer) employing a microcomputer.
By means of the ECU, the TCCS controls the following functions:
1. Electronic Fuel Injection (EFI)
The ECU receives signals from various sensors indicating changing engine operation conditions such as:
Intake air volume
Intake air temperature
Coolant temperature
Engine rpm
Acceleration/deceleration
Exhaust oxygen content etc.
The signals are utilized by the ECU to determine the injection duration necessary for an optimum air±fuel ratio.
2. Electronic Spark Advance (ESA)
The ECU is programmed with data for optimum ignition timing under any and all operating conditions.
Using data provided by sensors which monitor various engine functions (rpm, coolant temperature, etc.), the
microcomputer (ECU) triggers the spark at precisely the right instant. (See IG section)
3. Idle Speed Control (ISC)
The ECU is programmed with target idling speed values to respond to different engine conditions (coolant
temperature, air conditioner ON/OFF, etc.). Sensors transmit signals to the ECU which control the flow of air
through the by±pass of the throttle valve and adjust idle speed to the target value. (See page FI±45,115
or 62, 117)
4. Diagnosis
The ECU detects any malfunctions or abnormalities in the sensor network and lights a ºCHECKº engine warn-
ing light on the instrument panel. At the same time, the trouble is identified and a diagnosis code is recorded
by the ECU. The diagnosis code can be read by the number of blinks of the ºCHECKº engine warning light
when terminals TE1 and E1 are connected. The diagnostic codes are refer to the later page.
(See page FI±25 or 27)
5. Fail±safe Function
In the event of the sensor malfunctioning, a back±up circuit will take over to provide minimal drivability, and
the ºCHECKº engine warning light.
± EFI SYSTEMSystem DescriptionFI±4
Page 1018 of 2389
PRECAUTIONS
1. Before working the fuel system, disconnect the cable
from negative (±) terminal of the battery.
HINT: Any diagnostic code retained by the computer will be erased
when the battery terminal is removed. Therefore, if necessary, read
the diagnosis before removing the battery terminal.
2. Do not smoke or work open flame when working the fuel system.
3. Keep gasoline off rubber or leather parts.
INSPECTION PRECAUTIONS
MAINTENANCE PRECAUTIONS
1. CHECK CORRECT ENGINE TUNE±UP
(See page EM±8)
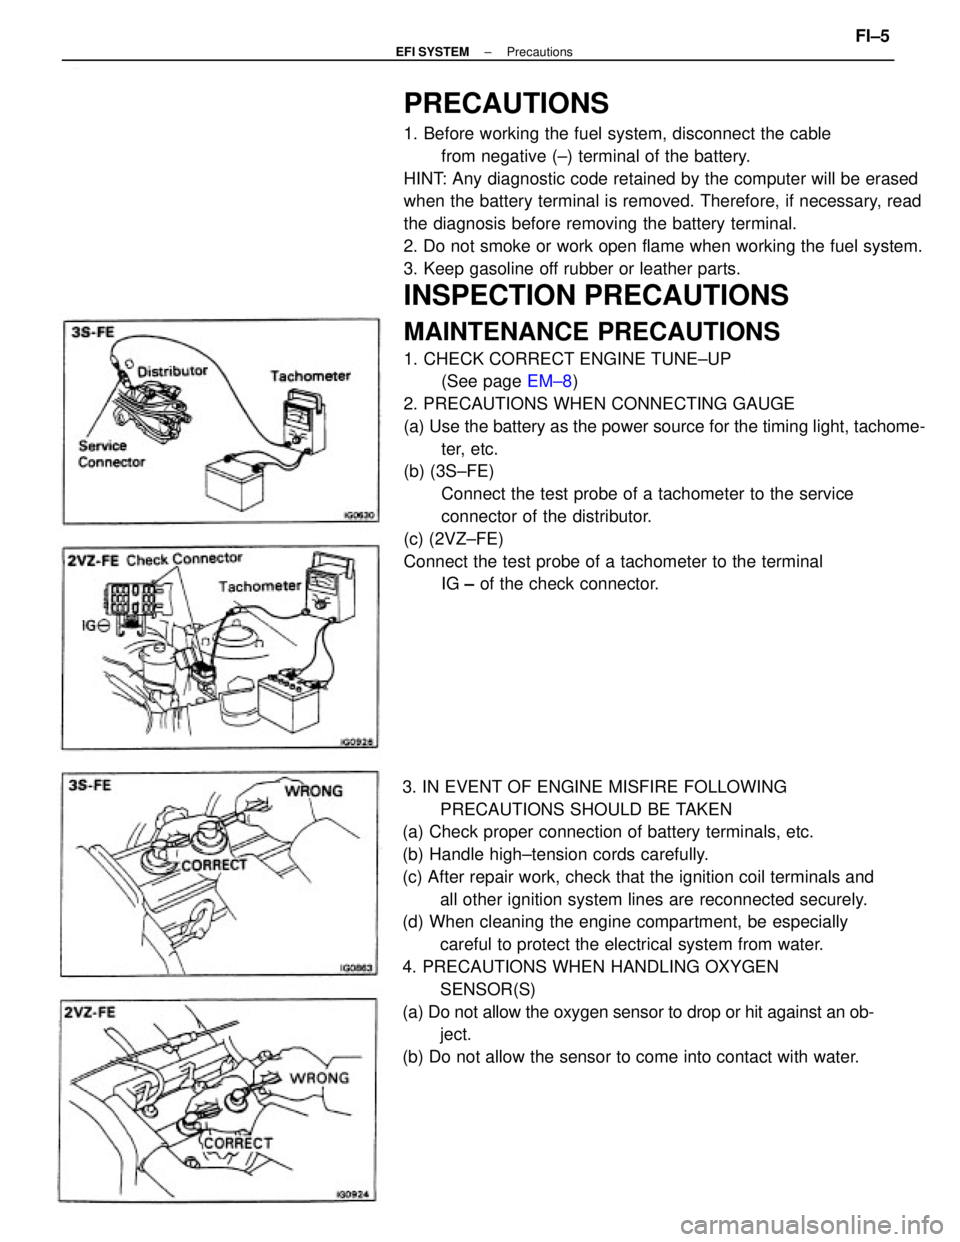
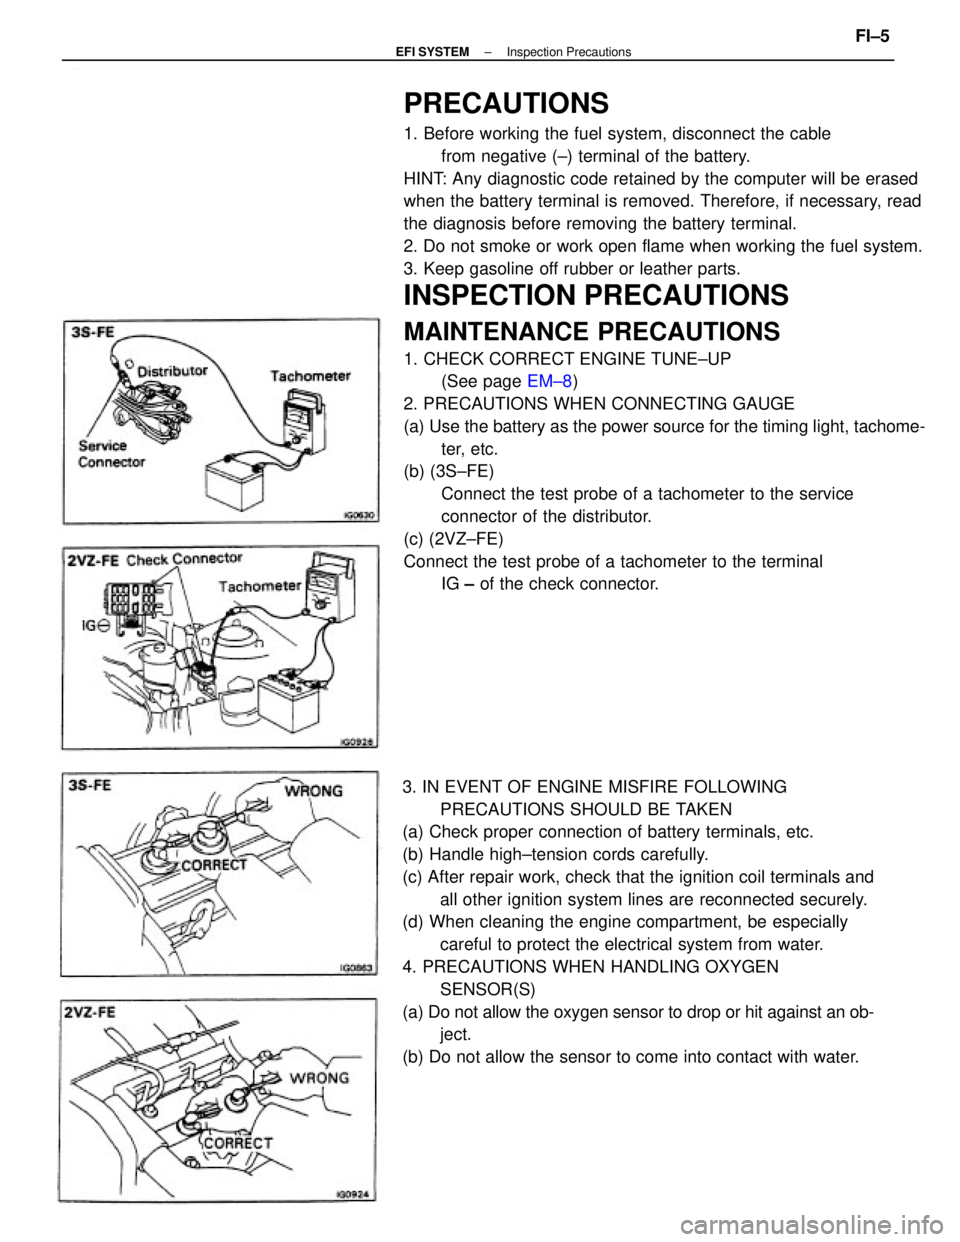
2. PRECAUTIONS WHEN CONNECTING GAUGE
(a) Use the battery as the power source for the timing light, tachome-
ter, etc.
(b) (3S±FE)
Connect the test probe of a tachometer to the service
connector of the distributor.
(c) (2VZ±FE)
Connect the test probe of a tachometer to the terminal
IG ± of the check connector.
3. IN EVENT OF ENGINE MISFIRE FOLLOWING
PRECAUTIONS SHOULD BE TAKEN
(a) Check proper connection of battery terminals, etc.
(b) Handle high±tension cords carefully.
(c) After repair work, check that the ignition coil terminals and
all other ignition system lines are reconnected securely.
(d) When cleaning the engine compartment, be especially
careful to protect the electrical system from water.
4. PRECAUTIONS WHEN HANDLING OXYGEN
SENSOR(S)
(a) Do not allow the oxygen sensor to drop or hit against an ob-
ject.
(b) Do not allow the sensor to come into contact with water.
± EFI SYSTEMPrecautionsFI±5
Page 1019 of 2389
PRECAUTIONS
1. Before working the fuel system, disconnect the cable
from negative (±) terminal of the battery.
HINT: Any diagnostic code retained by the computer will be erased
when the battery terminal is removed. Therefore, if necessary, read
the diagnosis before removing the battery terminal.
2. Do not smoke or work open flame when working the fuel system.
3. Keep gasoline off rubber or leather parts.
INSPECTION PRECAUTIONS
MAINTENANCE PRECAUTIONS
1. CHECK CORRECT ENGINE TUNE±UP
(See page EM±8)
2. PRECAUTIONS WHEN CONNECTING GAUGE
(a) Use the battery as the power source for the timing light, tachome-
ter, etc.
(b) (3S±FE)
Connect the test probe of a tachometer to the service
connector of the distributor.
(c) (2VZ±FE)
Connect the test probe of a tachometer to the terminal
IG ± of the check connector.
3. IN EVENT OF ENGINE MISFIRE FOLLOWING
PRECAUTIONS SHOULD BE TAKEN
(a) Check proper connection of battery terminals, etc.
(b) Handle high±tension cords carefully.
(c) After repair work, check that the ignition coil terminals and
all other ignition system lines are reconnected securely.
(d) When cleaning the engine compartment, be especially
careful to protect the electrical system from water.
4. PRECAUTIONS WHEN HANDLING OXYGEN
SENSOR(S)
(a) Do not allow the oxygen sensor to drop or hit against an ob-
ject.
(b) Do not allow the sensor to come into contact with water.
± EFI SYSTEMInspection PrecautionsFI±5
Page 1020 of 2389
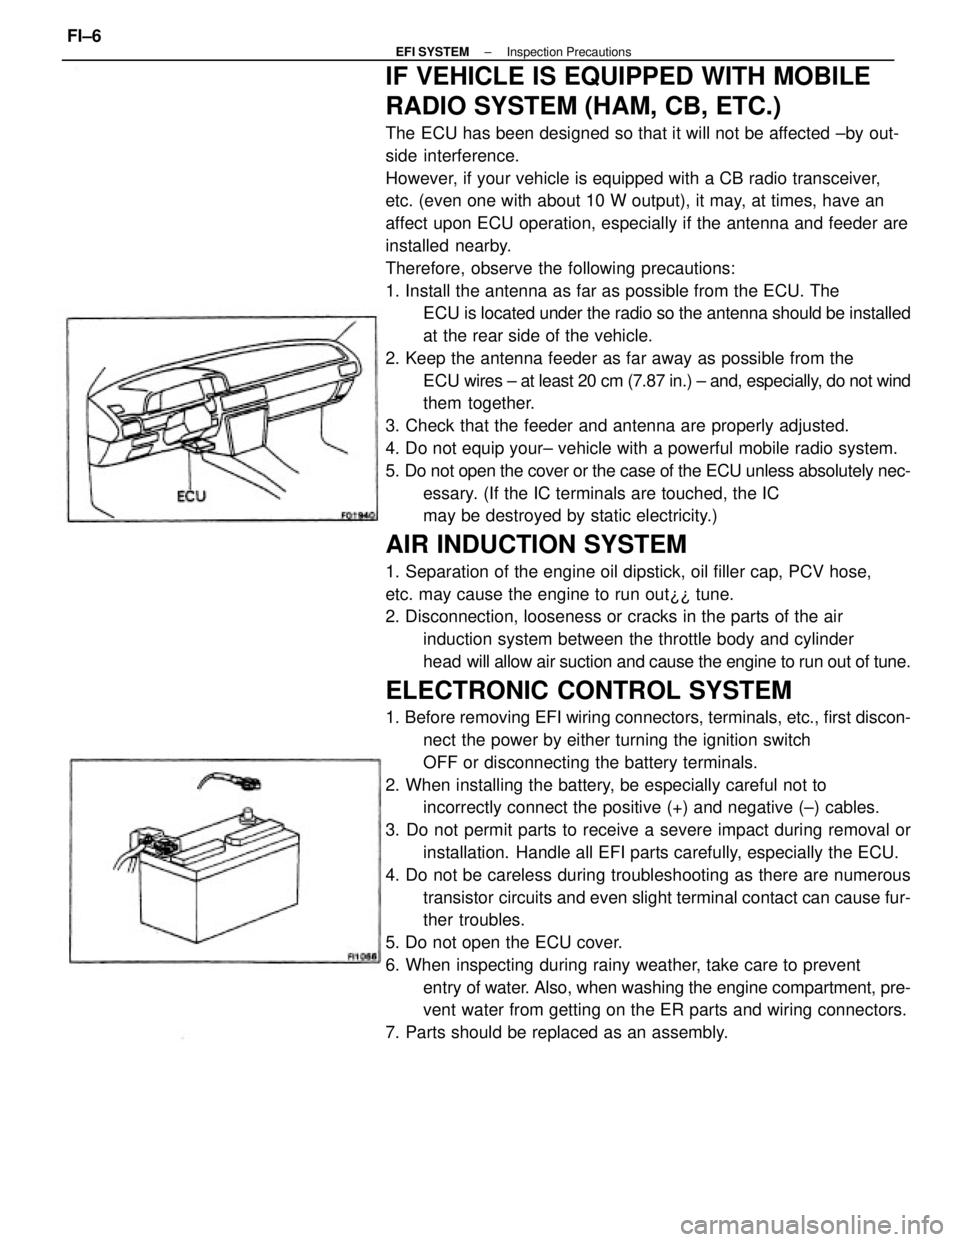
IF VEHICLE IS EQUIPPED WITH MOBILE
RADIO SYSTEM (HAM, CB, ETC.)
The ECU has been designed so that it will not be affected ±by out-
side interference.
However, if your vehicle is equipped with a CB radio transceiver,
etc. (even one with about 10 W output), it may, at times, have an
affect upon ECU operation, especially if the antenna and feeder are
installed nearby.
Therefore, observe the following precautions:
1. Install the antenna as far as possible from the ECU. The
ECU is located under the radio so the antenna should be installed
at the rear side of the vehicle.
2. Keep the antenna feeder as far away as possible from the
ECU wires ± at least 20 cm (7.87 in.) ± and, especially, do not wind
them together.
3. Check that the feeder and antenna are properly adjusted.
4. Do not equip your± vehicle with a powerful mobile radio system.
5. Do not open the cover or the case of the ECU unless absolutely nec-
essary. (If the IC terminals are touched, the IC
may be destroyed by static electricity.)
AIR INDUCTION SYSTEM
1. Separation of the engine oil dipstick, oil filler cap, PCV hose,
etc. may cause the engine to run out¿¿ tune.
2. Disconnection, looseness or cracks in the parts of the air
induction system between the throttle body and cylinder
head will allow air suction and cause the engine to run out of tune.
ELECTRONIC CONTROL SYSTEM
1. Before removing EFI wiring connectors, terminals, etc., first discon-
nect the power by either turning the ignition switch
OFF or disconnecting the battery terminals.
2. When installing the battery, be especially careful not to
incorrectly connect the positive (+) and negative (±) cables.
3. Do not permit parts to receive a severe impact during removal or
installation. Handle all EFI parts carefully, especially the ECU.
4. Do not be careless during troubleshooting as there are numerous
transistor circuits and even slight terminal contact can cause fur-
ther troubles.
5. Do not open the ECU cover.
6. When inspecting during rainy weather, take care to prevent
entry of water. Also, when washing the engine compartment, pre-
vent water from getting on the ER parts and wiring connectors.
7. Parts should be replaced as an assembly.
± EFI SYSTEMInspection PrecautionsFI±6
Page 1021 of 2389
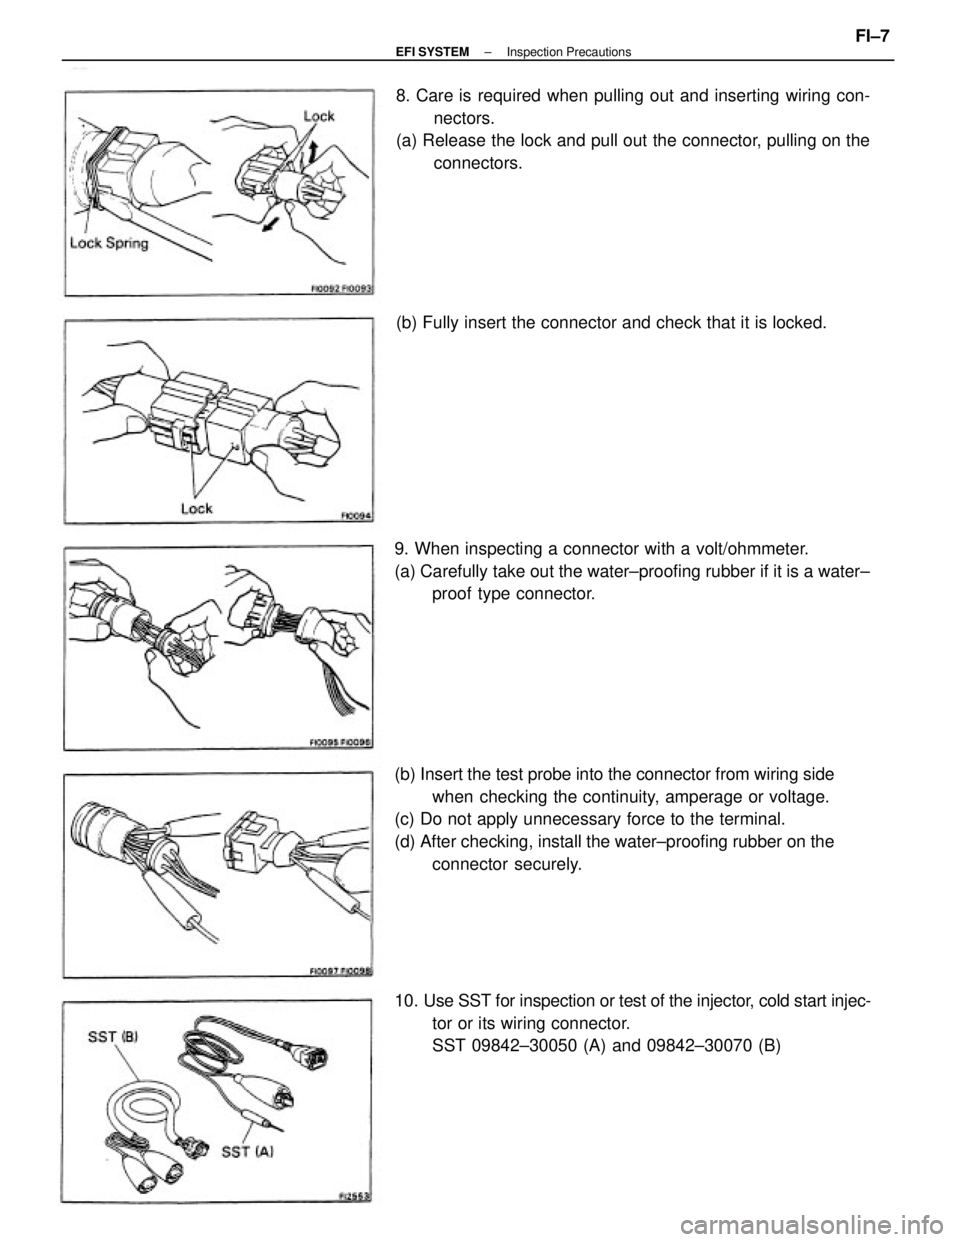
(b) Insert the test probe into the connector from wiring side
when checking the continuity, amperage or voltage.
(c) Do not apply unnecessary force to the terminal.
(d) After checking, install the water±proofing rubber on the
connector securely. 8. Care is required when pulling out and inserting wiring con-
nectors.
(a) Release the lock and pull out the connector, pulling on the
connectors.
10. Use SST for inspection or test of the injector, cold start injec-
tor or its wiring connector.
SST 09842±30050 (A) and 09842±30070 (B) 9. When inspecting a connector with a volt/ohmmeter.
(a) Carefully take out the water±proofing rubber if it is a water±
proof type connector. (b) Fully insert the connector and check that it is locked.
± EFI SYSTEMInspection PrecautionsFI±7
Page 1024 of 2389
TROUBLESHOOTING
TROUBLESHOOTING HINTS
1. Engine troubles is usually not caused by the EFI system.
When troubleshooting, always first check the condition of
the other systems.
(a) Electronic source
wBattery
wFusible links
wFuses
(b) Body ground
(e) Fuel supply
wFuel leakage
wFuel filter
wFuel pump
(d) Ignition system
wSpark plugs
wHigh±tension cords
wDistributor
wIgnition coil
wIgniter
(e) Air induction system
wVacuum leaks
(f) Emission control system
wPCV system
wEGR system
(g) Others
wIgnition timing (ESA system)
wdle speed (ISC system)
wetc.
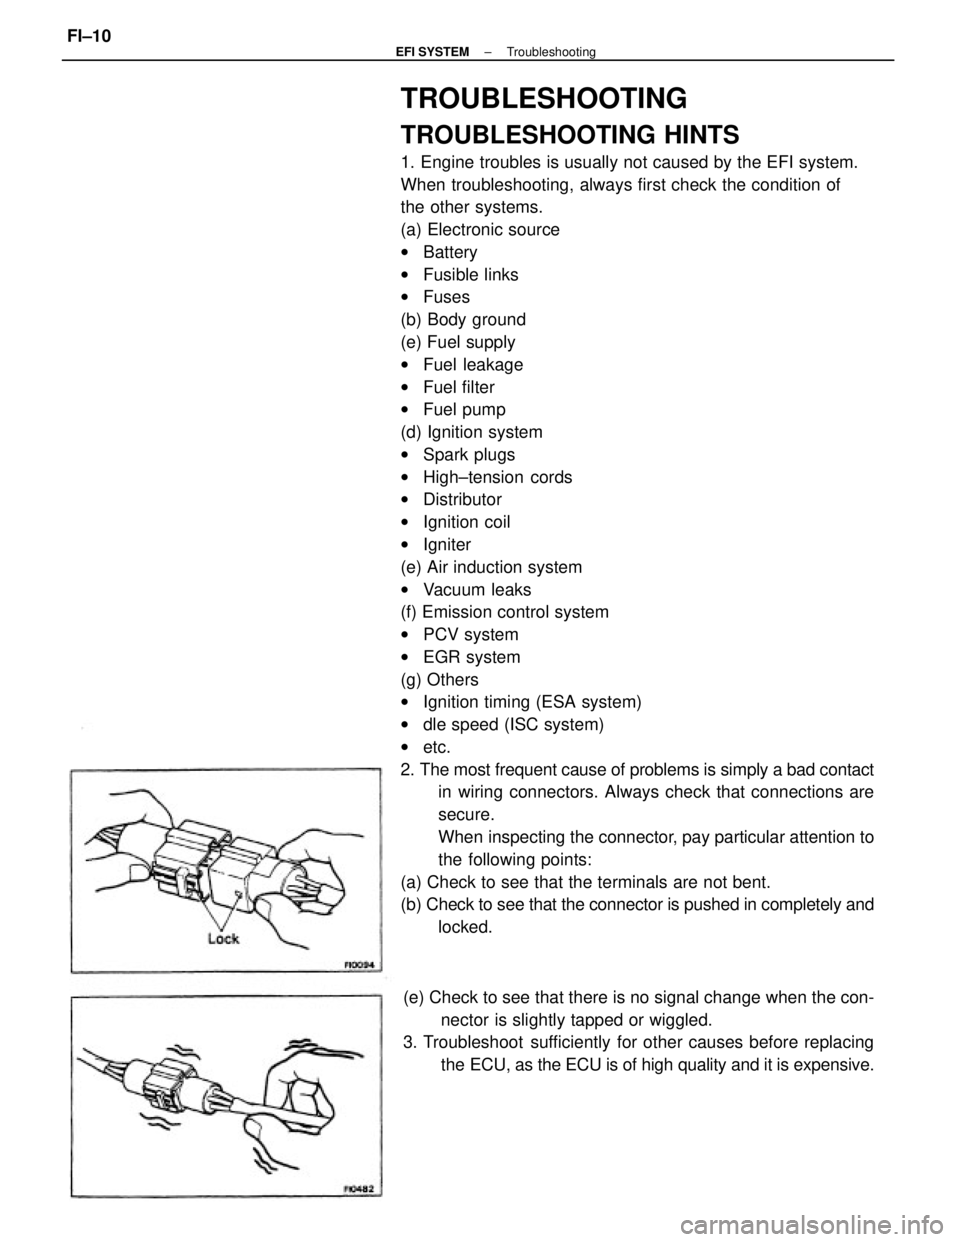
2. The most frequent cause of problems is simply a bad contact
in wiring connectors. Always check that connections are
secure.
When inspecting the connector, pay particular attention to
the following points:
(a) Check to see that the terminals are not bent.
(b) Check to see that the connector is pushed in completely and
locked.
(e) Check to see that there is no signal change when the con-
nector is slightly tapped or wiggled.
3. Troubleshoot sufficiently for other causes before replacing
the ECU, as the ECU is of high quality and it is expensive.
± EFI SYSTEMTroubleshootingFI±10