Page 767 of 2389

Integration Relay
INSPECTION OF RELAY
INSPECT RELAY CIRCUIT
Disconnect the relay connector and inspect the connector
on the wire harness side as shown in the chart.
Passenger's side and rear door courtesy switches OFF
(Door closed)
Passenger's side or rear door courtesy switch ON
(Door opened)
Turn headlight dimmer switch to low beam or high beamDriver's side door courtesy switch ON (Door opened)Driver's side door courtesy switch OFF (Door closed)
Turn light control switch to OFF or TAIL
Turn light control switch TAIL or HEADTurn headlight dimmer switch to FlashTurn ignition switch to OFF or ACC
Turn light control switch to HEAD
Turn light control switch OFF
(w/o Fade Out System)
Turn ignition switch ON
Tester
connectionSpecified value
Battery voltageBattery voltageBattery voltage Battery voltage
Battery voltageNo continuity
No continuityNo continuity Condition
No voltageContinuity
No voltageNo voltage
ContinuityContinuityContinuity
Continuity
Continuity Check for
VoltageVoltage
Voltage
AlwaysAlways
± BODY ELECTRICAL SYSTEMLightingBE±21
Page 768 of 2389

Room Light Retainer Switch
INSPECTION OF SWITCH
INSPECT SWITCH CONTINUITY
(a) Check that there is no continuity between terminals
with the switch OFF (Door outside handle released).
(b) Check that there is continuity between terminals with
the switch ON (Door outside handle pulled).
If continuity is not as specified, replace the switch.
Passenger's side and rear door courtesy switches OFF
(Door closed)
Passenger's side or rear door courtesy switch ON
(Door opened)Door room light retainer switch ON
(Door outside handle pulled up on driver's side)
Door room light retainer switch OFF
(Door outside handle released on driver's side)
Turn headlight dimmer switch to low beam or high beamDriver's side door courtesy switch ON (Door opened) Driver's side door courtesy switch OFF (Door closed)
If circuit is as specified, replace the relay.
Turn light control switch to OFF or TAIL
Turn light control switch TAIL or HEADTurn headlight dimmer switch to FlashTurn ignition switch to OFF or ACC
Turn light control switch to HEAD
Turn light control switch OFF
(w/ Fade Out System)
Condition
Turn ignition switch ON Tester
connectionSpecified value
Battery voltage
Battery voltageBattery voltage
Battery voltageBattery voltage
Battery voltageNo continuity
No continuity
No continuityNo continuity
No voltage
No voltageNo voltage
ContinuityContinuity
Continuity ContinuityContinuity
Continuity Continuity
ContinuityContinuity Always . Check for
Voltage
VoltageVoltage
Voltage
Always
AlwaysAlways
± BODY ELECTRICAL SYSTEMLightingBE±22
Page 769 of 2389

Current is led from the battery to terminal 12 of the running light relay.
Operation examples of the switch are shown below.
1. IGNITION SWITCH ºONº AND LIGHT CONTROL SWITCH ºOFFº
When the switches are set, current is led from the battery to terminal 1 of the running light relay. Also,
because continuity is made between terminal 3 and the body ground, and 5 and the body ground of
the running light relay, the taillight control relay and headlight control relay are turned on.
Then the taillights and headlights light up.
HINT: Because terminal 14 of the running light relay is not grounded at all times, the headlight dimmer
relay is off, so that the headlights light up at the low beam.
2. LIGHT CONTROL SWITCH IN ºHEADº
When the switch is set, continuity is made between terminal 4 and the body ground, and 2 and the body
ground of the running light relay. Also, because the continuity is made between terminal 5 and the body
ground, and 3 and the body ground of the running light relay at all times, the taillights and headlights
light up.
HINT: When the headlight dimmer switch is set to ºHIGHº, continuity is made between terminal 13 of
the running light relay and the body ground. Also, because continuity is made between terminal 14 of
the running light relay and the body ground, the headlight dimmer relay is turned on. Then the head-
lights go on at the high beam.
3. HEADLIGHT DIMMER SWITCH IN ºFLASHº
When the switch is set, continuity is made between terminal 6 and the body ground, and 13 and the
body ground of the running light relay. Also, because the continuity is made between terminal 5 and
the body ground, and 14 and the body ground of the running light relay, the headlights flash.
4. ENGINE STOPS (IGNITION SWITCH ºONº)
When the engine is stopped, because the continuity between terminal 5 and terminal 10 of the running
light relay remains, so the running lights also remain.
HINT: If ignition switch is turned to ºOFFº, running lights will go off because the continuity between termi-
nal 5 and terminal 10 of the running light relay is cut off.
Light Control Rheostat
INSPECTION OF RHEOSTAT
INSPECT RHEOSTAT OPERATION
(a) Connect the positive (+) lead from the battery to
terminal 1 and the negative (±) lead to terminal 2.
(b) Connect the terminals 1 and 3 through a 3.4 W test bulb.
(c) Gradually turn the rheostat knob from the bright side to
dark side, check that the test bulb brightness changes
from bright to dark.
If operation is not as specified, replace the rheostat.
Daytime Running Light System
(CANADA)
DESCRIPTION
± BODY ELECTRICAL SYSTEMLightingBE±23
Page 770 of 2389
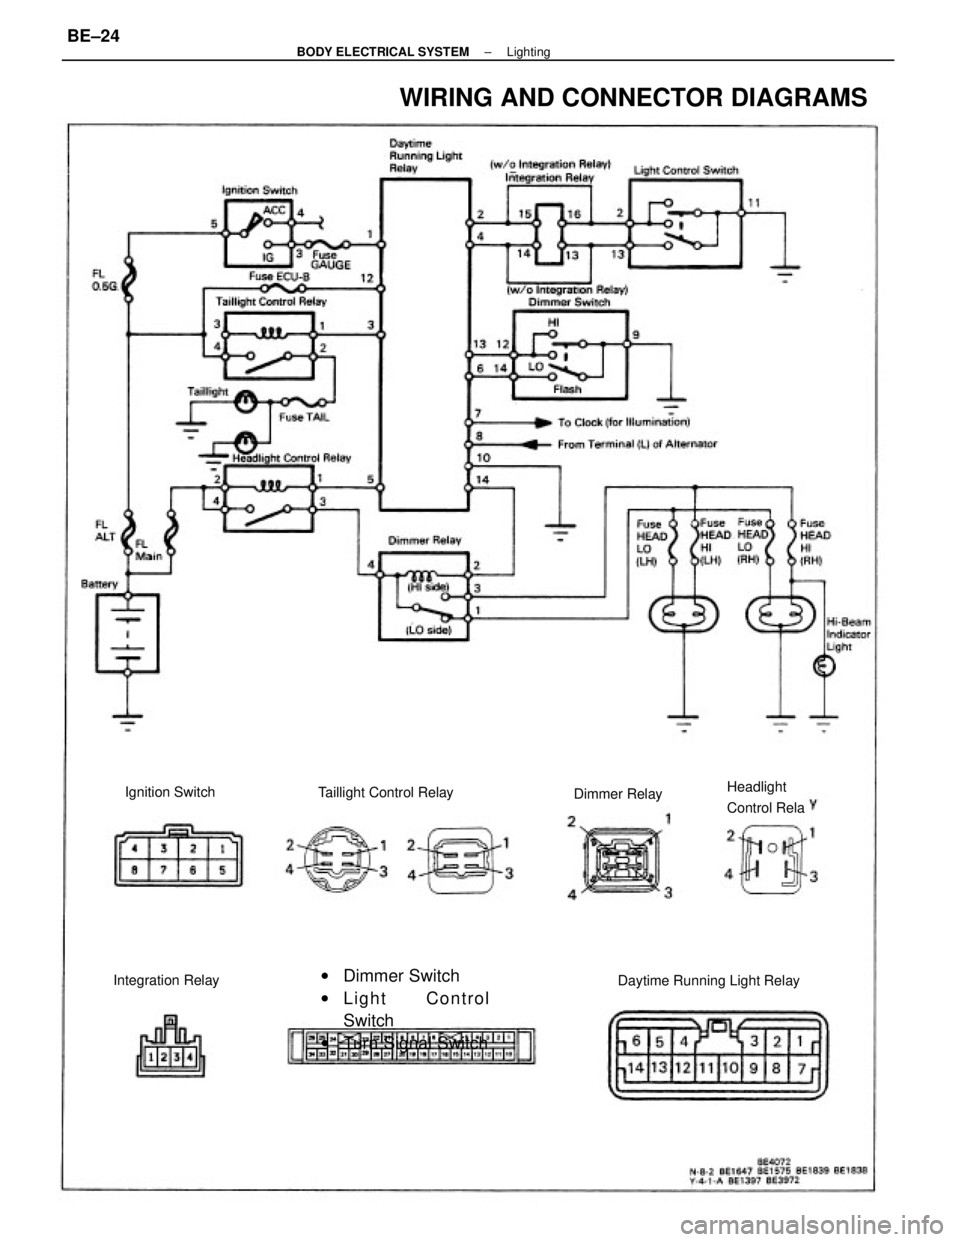
WIRING AND CONNECTOR DIAGRAMS
wDimmer Switch
wLight Control
Switch
wTurn Signal SwitchDaytime Running Light Relay Taillight Control RelayHeadlight
Control Rela
Integration RelayIgnition Switch
Dimmer Relay
± BODY ELECTRICAL SYSTEMLightingBE±24
Page 771 of 2389

(Relay Operation)
(a) Connect the positive (+) lead from the voltmeter to ter-
minal 7 and negative (±) lead to terminal 10.
(b) Check that there is battery voltage with light control
switch is turned on.
If operation is not as specified, replace the relay.If continuity is not as specified, replace the relay.
2. INSPECT DAYTIME RUNNING LIGHT RELAY
(Relay Circuit)
Disconnect the connector from the relay and inspect the
connector on the wire harness side as shown in the chart.
INSPECTION OF RELAY
1. INSPECT DIMMER RELAY (Continuity)
If circuit is as specified, inspect relay operation.
Apply battery voltage to
terminals 2 and 4.
Light control switch
position
Light control switch
position
Headlight dimmer
switch positionHeadlight dimmer
switch positionLow beam or High beam
Ignition switch
position 7 ± Ground
10 ± Ground
High beam or Flash 13 ± Ground
3 ± Ground
5 ± Ground
Tester connection
Ground terminal 5
Specified value
Battery voltageBattery voltageBattery voltage
Battery voltage Battery voltageNo continuity
No continuity TAIL or HEADNo continuity
No continuity
14 ± Ground12 ± GroundON or STARTLOCK or ACC
1 ± GroundOFF or TAIL
8 ± Ground2 ± Ground
6 ± Ground4 ± Ground
No voltage
No voltage
No voltageContinuity
Continuity Continuity
Continuity
ContinuityContinuity
Condition
Check for
Low beam Condition
Running
Terminal
Constant
Constant
Constant
Constant
Constant Voltage
EngineHEAD
Flash
StopOFF
± BODY ELECTRICAL SYSTEMLightingBE±25
Page 782 of 2389

Fuel Gauge
INSPECTION OF GAUGE
1. INSPECT RECEIVER GAUGE OPERATION
(a) Disconnect the connector from the sender gauge.
(b) Turn the ignition switch ON, check that the receiver
gauge needle moves to EMPTY.
(e) Connect the terminals 3 and 4 on the wire harness
side connector through a 3.4W test bulb, check that
the bulb lights and receiver gauge needle moves to-
wards the full side.
HINT: Because of the silicon oil in the gauge, it will take
a short time for the needle to stabilize.
If operation is not as specified, test the receiver gauge.
Tachometer
INSPECTION OF TACHOMETER
INSPECT TACHOMETER OPERATION (ON±VEHICLE)
(a) Connect a tune±up test tachometer, and start the en-
gine.
NOTICE:
wRemoving the connection of the tachometer will
damage the transistors and diodes inside.
wWhen removing or installing the tachometer, be
careful not to drop or subject it to heavy shocks.
(b) Compare the tester and tachometer indications.
If error is excessive, replace the tachometer.
Standard indication
(rpm)Allowable range
(rpm) DC 13.5 V 25°C (77°F)
± BODY ELECTRICAL SYSTEMCombination MeterBE±36
Page 783 of 2389

Fuel Level Warning
INSPECTION OF LEVEL WARNING
1. INSPECT WARNING LIGHT OPERATION
(a) Disconnect the connector from the sender gauge.
(b) Connect terminals 1 and 2 on the wire harness side-
connector.
(e) Turn the ignition switch ON, check that the warning
light lights.
If the warning light does not light, test the bulb.
2. INSPECT WARNING SWITCH OPERATION
(a) Apply battery voltage to terminals 1 and 2 through a
3.4W test bulb, check that the bulb lights.
HINT: It will take a short time for the bulb to light.If resistance value is not as specified, replace the receiver
gauge.
3. INSPECT SENDER GAUGE OPERATION
(a) Connect a series of three 1.5V dry cell batterys.
(b) Connect the positive (+) lead from the dry cell batter-
ys to terminal 3 through a 3.4W test bulb and the neg-
ative (±) lead to terminal 4.
(c) Check that the voltage rises between terminals 3 and
4 as the float is moved from the top to bottom posi-
tion. 2. MEASURE RECEIVER GAUGE RESISTANCE
Measure the resistance between terminals.
(d) Measure the resistance between terminals 3 and 4
for each float position.
If operation is not as specified, replace the sender
gauge.
Between terminals
Resistance (W)
Resistance (W)
All±Trac/4WD Float position
mm (in.)
FWD
± BODY ELECTRICAL SYSTEMCombination MeterBE±37
Page 784 of 2389
Water Temperature Gauge
INSPECTION OF GAUGE
1. INSPECT RECEIVER GAUGE OPERATION
(a) Disconnect the connector from the sender gauge.
(b) Turn the ignition switch ON, check that the receiver
gauge needle moves to COOL.
(c) Ground the terminal on the wire harness side con-
nector through a 3.4W test bulb.
(d) Turn the ignition switch ON, check that the bulb lights
and the receiver gauge needle moves to the hot side.
If operation is not as specified, measure the receiver
gauge resistance. (b) Submerge the switch in fuel, check that the bulb goes
out.
If operation is not as specified, replace the sender gauge.
2. MEASURE RECEIVER GAUGE RESISTANCE
Measure the resistance between terminals.
If resistance value is not as specified, replace the re-
ceiver gauge.
Negative (±) lead
from ohmmeterResistance (�)
Positive (+) lead
from ohmmeter Between terminals
± BODY ELECTRICAL SYSTEMCombination MeterBE±38