Page 465 of 2389
5. P RANGE TEST
Stop the vehicle on a gradient (more than 51 and after
shifting into the P range, release the parking brake.
Then check to see that the parking lock pawl holds the
vehicle in place.(b) While running in the L range, release the acceler-
ator pedal and check the engine braking effect.
EVALUATION
If there is no engine braking effect:
wFirst and reverse brake is defective 3. L RANGE. TEST
(a) While running in the L range, check to see that there
is no up±shift to 2nd gear.
4. R RANGE TEST
Shift into the R range and, while starting at full throttle,
check for slipping.(c) Check for abnormal noise during acceleration and
deceleration.
± AUTOMATIC TRANSAXLETroubleshooting (Mechanical System Tests) (A540E and
A540H)AT±229
Page 479 of 2389

3. INSPECT EACH UP±SHIFT POSITION
(a) Warm up the engine.
Coolant temperature: 176
°F (80°)
(b) Turn the O/D switch to ºONº.
(c) Place the pattern select switch in ºNormalº and the shift
lever into the D range.
(d) During a road test (above 10 km/h or 6 mph) check that volt-
age at the Tt terminal is as indicated below for each up±
shift position.
If the voltage rises from 0V to 7V in the sequence shown,
the control system is okay.
The chart on the left shows the voltmeter reading and cor-
responding gears.
HINT: Determine the gear position by a fight shock or
change in engine rpm when shifting. The lock±up clutch will
turn ON only infrequently during normal 2nd and 3rd gear
operation. To trigger this action, press the accelerator pedal
to 50% or more of its stroke. At less than 50%, the voltage
may change in the sequence 2v ± 4V ± 6V ± 7V. 2. INSPECT BRAKE SIGNAL
(a) Depress the accelerator pedal until the Tt terminal indi-
cates 8V.
(b) Depress the brake pedal and check the voltage read-
ing from the Tt terminal.
Brake pedal depressed ...... 0V
Brake pedal released . . . . . . . . 8V
If not as indicated, there is a malfunction in either the
stop light switch or circuit.
INSPECTION OF ECT OR Tt TERMINAL
VOLTAGE
1. INSPECT THROTTLE POSITION SENSOR SIGNAL
(a) Turn the ignition switch to ON. Do not start the engine.
(b) Connect a voltmeter to terminals Tt and E1.
(c)while slowly depressing the accelerator pedal, check
that Tt terminal voltage rises in sequence.
If the voltage does not change in proportion to the
throttle opening angle, there is a malfunction in the
throttle position sensor or circuit.
± AUTOMATIC TRANSAXLETroubleshooting (Electronic Control System) (A540E and
A540H)AT±215
Page 486 of 2389

INSTALLATION OF THROTTLE CABLE
1. INSTALL CABLE INTO TRANSMISSION CASE
2. INSTALL VALVE BODY
3. IF THROTTLE CABLE IS NEW, STAKE STOPPER OR
PAINT MARK ON INNER CABLE
HINT: New cable do not have a cable stopper staked.
(a) Bend the cable so there is a radius of about 200 mm(7.87 in.).
(b) Pull the inner cable lightly until a slight resistance is felt, and hold
it.
(e) Stake the stopper, 0.8 ± 1.5 mm (0.031 ± 0.059 in.)
from the end of outer cable.
4. CONNECT THROTTLE CABLE TO ENGINE
5. ADJUST THROTTLE CABLE (See page AT±201)
6. INSTALL AND ADJUST NEUTRAL START SWITCH
7. TEST DRIVE VEHICLE
Throttle Cable
REMOVAL OF THROTTLE CABLE
1. DISCONNECT THROTTLE CABLE FROM ENGINE
2. REMOVE NEUTRAL START SWITCH
3. REMOVE VALVE BODY
4. REMOVE THROTTLE CABLE
ON±VEHICLE REPAIR
HINT: The components mentioned below can be replaced on the vehicle without any necessity for
removal of the transaxle. For the respective operating procedures refer to the following pages:
Speedometer driven gear oil
seal
Extension housing oil
seal Side gear
shaft oil sealAT±232 and AT±233 AT±242 to AT±244
Throttle cable
Only A540H Components
Valve bodyInstallation
RemovalRemarks
AT±231AT±231
AT±233AT±232
AT±233AT±232
AT±232
± AUTOMATIC TRANSAXLEOn±Vehicle Repair (A540E and A540H)AT±231
Page 720 of 2389
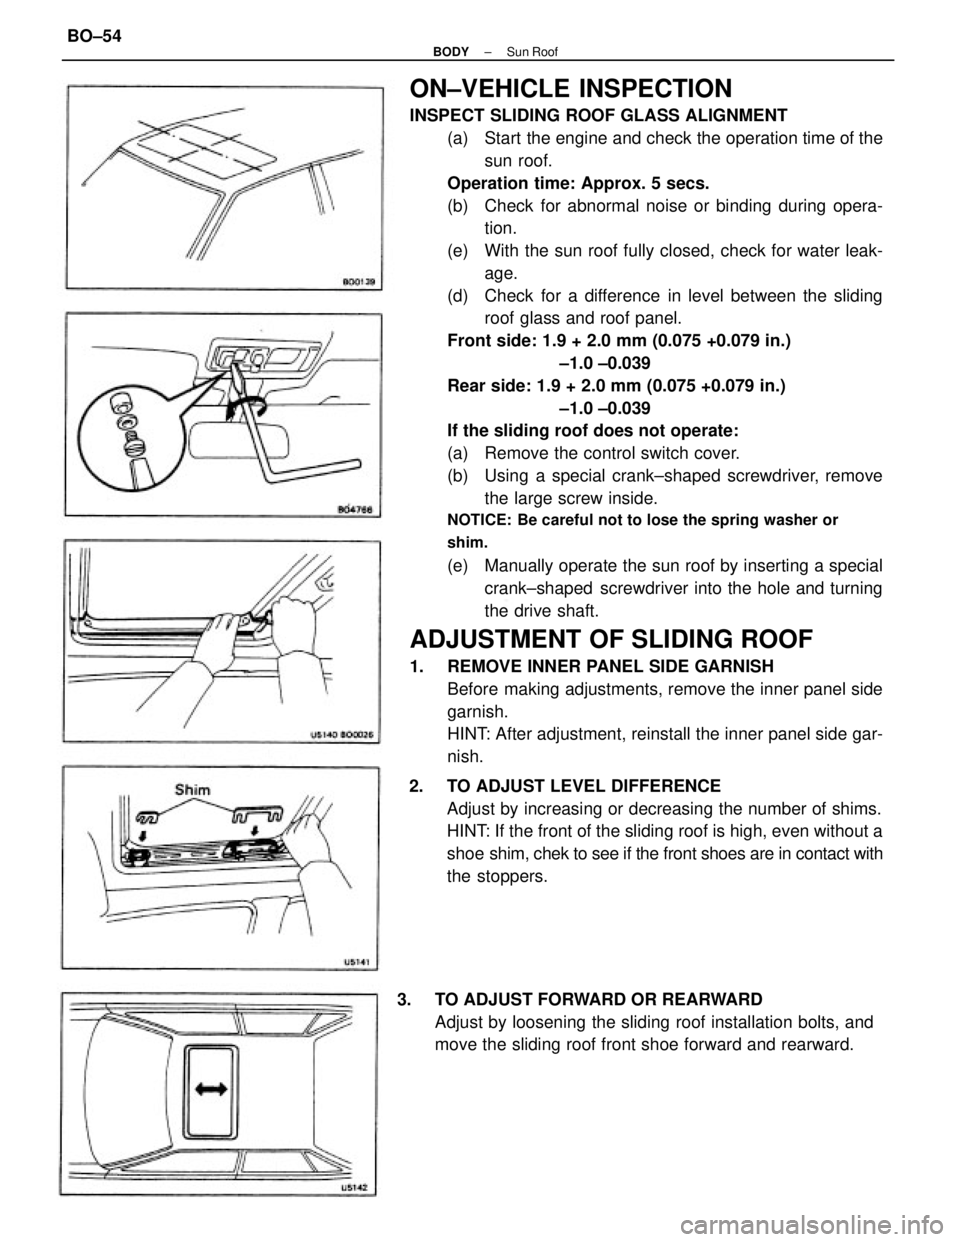
ON±VEHICLE INSPECTION
INSPECT SLIDING ROOF GLASS ALIGNMENT
(a) Start the engine and check the operation time of the
sun roof.
Operation time: Approx. 5 secs.
(b) Check for abnormal noise or binding during opera-
tion.
(e) With the sun roof fully closed, check for water leak-
age.
(d) Check for a difference in level between the sliding
roof glass and roof panel.
Front side: 1.9 + 2.0 mm (0.075 +0.079 in.)
±1.0 ±0.039
Rear side: 1.9 + 2.0 mm (0.075 +0.079 in.)
±1.0 ±0.039
If the sliding roof does not operate:
(a) Remove the control switch cover.
(b) Using a special crank±shaped screwdriver, remove
the large screw inside.
NOTICE: Be careful not to lose the spring washer or
shim.
(e) Manually operate the sun roof by inserting a special
crank±shaped screwdriver into the hole and turning
the drive shaft.
ADJUSTMENT OF SLIDING ROOF
1. REMOVE INNER PANEL SIDE GARNISH
Before making adjustments, remove the inner panel side
garnish.
HINT: After adjustment, reinstall the inner panel side gar-
nish.
2. TO ADJUST LEVEL DIFFERENCE
Adjust by increasing or decreasing the number of shims.
HINT: If the front of the sliding roof is high, even without a
shoe shim, chek to see if the front shoes are in contact with
the stoppers.
3. TO ADJUST FORWARD OR REARWARD
Adjust by loosening the sliding roof installation bolts, and
move the sliding roof front shoe forward and rearward.
± BODYSun RoofBO±54
Page 771 of 2389

(Relay Operation)
(a) Connect the positive (+) lead from the voltmeter to ter-
minal 7 and negative (±) lead to terminal 10.
(b) Check that there is battery voltage with light control
switch is turned on.
If operation is not as specified, replace the relay.If continuity is not as specified, replace the relay.
2. INSPECT DAYTIME RUNNING LIGHT RELAY
(Relay Circuit)
Disconnect the connector from the relay and inspect the
connector on the wire harness side as shown in the chart.
INSPECTION OF RELAY
1. INSPECT DIMMER RELAY (Continuity)
If circuit is as specified, inspect relay operation.
Apply battery voltage to
terminals 2 and 4.
Light control switch
position
Light control switch
position
Headlight dimmer
switch positionHeadlight dimmer
switch positionLow beam or High beam
Ignition switch
position 7 ± Ground
10 ± Ground
High beam or Flash 13 ± Ground
3 ± Ground
5 ± Ground
Tester connection
Ground terminal 5
Specified value
Battery voltageBattery voltageBattery voltage
Battery voltage Battery voltageNo continuity
No continuity TAIL or HEADNo continuity
No continuity
14 ± Ground12 ± GroundON or STARTLOCK or ACC
1 ± GroundOFF or TAIL
8 ± Ground2 ± Ground
6 ± Ground4 ± Ground
No voltage
No voltage
No voltageContinuity
Continuity Continuity
Continuity
ContinuityContinuity
Condition
Check for
Low beam Condition
Running
Terminal
Constant
Constant
Constant
Constant
Constant Voltage
EngineHEAD
Flash
StopOFF
± BODY ELECTRICAL SYSTEMLightingBE±25
Page 775 of 2389

Rear Wiper Motor and Relay
INSPECTION OF MOTOR AND RELAY
1. INSPECT RELAY AND MOTOR OPERATES
(a) Connect the positive (+) lead from the battery to terminal
1 and negative (±) leads to both terminal 3 and
motor body.
(b) Check that the motor operates.
2. INSPECT INTERMITTENT OPERATION OF RELAY
(a) Connect the positive 1+y lead from the battery to ter-
minal 1 and negative t±) leads to both terminal 2 and
motor body.
(b) Check that the motor operates intermittently for 9
15 seconds.
If operation is not as specified, replace the relay.
3. INSPECT MOTOR OPERATES, STOPPING AT STOP
POSITION
(a) Start motor operation by connecting the positive (+j
lead from the battery to terminal 1 and the negative (±
lead to both terminal 3 and motor body.
Rear Wiper and Washer Switch
INSPECTION OF SWITCH
INSPECT SWITCH CONTINUITY
Inspect the switch continuity between terminals.
If continuity is not as specified, replace the switch.
Switch position
Terminal
Wash ll
Wash IOFF INT
± BODY ELECTRICAL SYSTEMWipers and WashersBE±29
Page 828 of 2389
Vacuum Switch
(w/ A.B.S.) (w/o A.B.S.)ECT Computer
Wire Harness Side
Alternator
Wire Harness SideBrake Fluid Level
Warning Switch
Connectors
Cruise Control Computer
Neutral Start SwitchStop Light Switch
Parking Brake SW
Vacuum PumpSpeed SensorControl SW
Clutch SW Main SW
Actuator
± BODY ELECTRICAL SYSTEMCruise Control SystemBE±70
Page 829 of 2389

Diagnosis System
OUTPUT OF DIAGNOSTIC CODES
1. READ TYPE A CODE
(a) Turn the ignition switch on.
(b) Turn the set/coast switch on, and keep it on.
(e) Push the main switch on.
(d) Turn the set/coast switch oft.
(e) Meet the conditions listed below.
(f) Read the diagnostic code on the main switch indica-
tor.
HINT:
wTo save time performing the next test, do not turn off the
ignition switch when steps (a) ± (f) are completed.
wChecking of No. 4 code is done with the vehicle jacked
up and the engine idling.
wIf there is no indication code, perform diagnosis ±and
inspection. (See page Be±74)
Each cancel switch on (Stop light switch,
Parking brake switch, Clutch switch,
Neutral start switch)Each cancel switch circuit is
normal.Set/coast switch circuit is
normal.
Vacuum switch circuit is
normal.Resume/ accel switch
circuit is normal.
Speed sensor circuit is
normal.Speed sensor circuit is
normal.
Drive 30 km/h 0 9 mph) or belowDrive 40 km/h (25 mph) or overResume/accel switch on Set/coast switch on
Vacuum switch on
Indication code ConditionsDiagnosisNo.
± BODY ELECTRICAL SYSTEMCruise Control SystemBE±71

