1985 FORD GRANADA heater
[x] Cancel search: heaterPage 93 of 255
towards the engine and remove the old
drivebelt.
5Fit the new drivebelt, position the
compressor to achieve the correct belt tension
and tighten the strap and pivot bolts.
6Refit and secure the fan, when applicable,
and reconnect the battery.
7Recheck the belt tension after it has run for
at least 10 minutes under load.
Condenser fan and motor
8Disconnect the battery earth lead and
remove the radiator grille.
9Disconnect the fan wiring connector at the
right-hand side of the condenser.
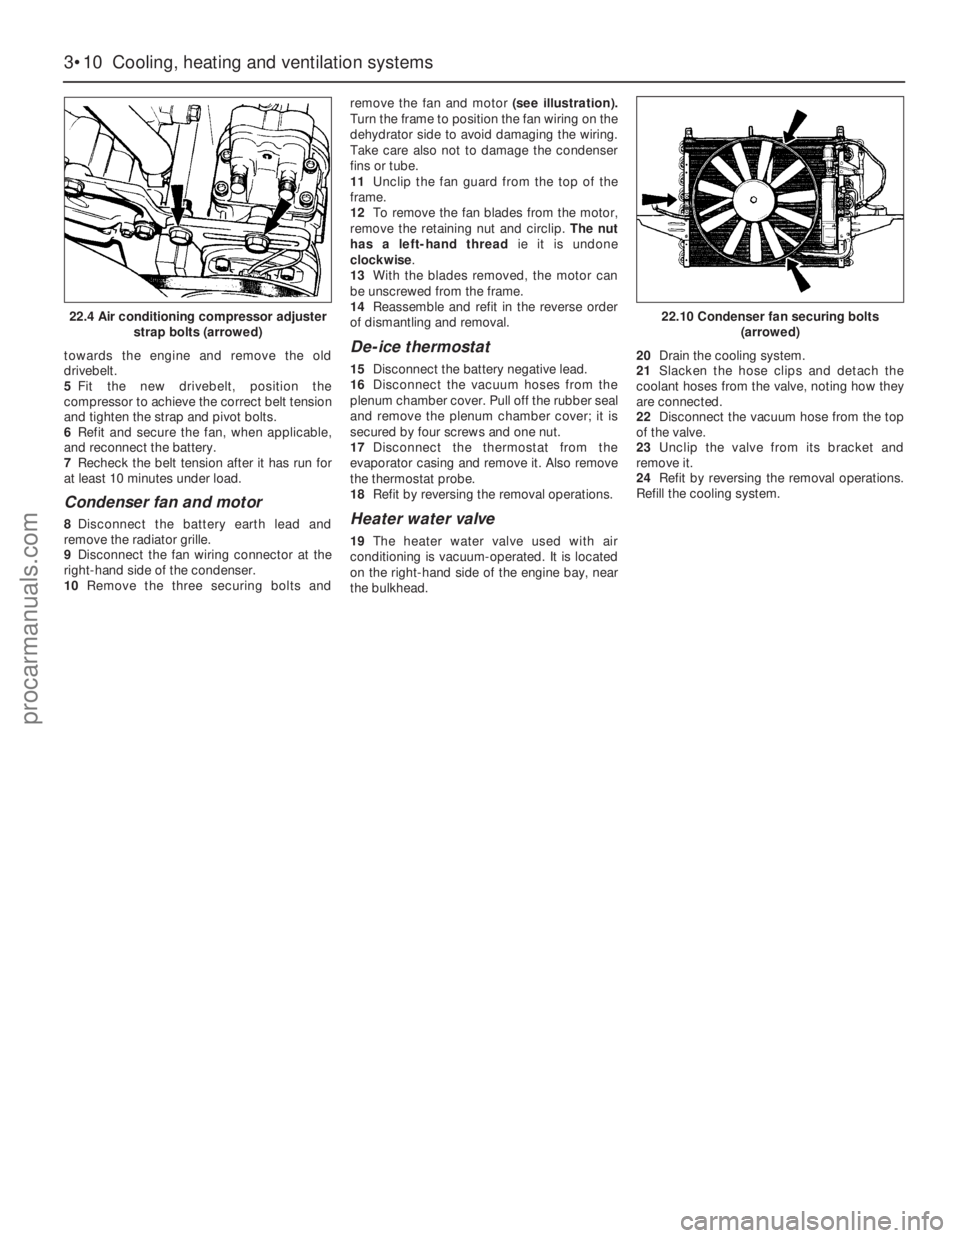
10Remove the three securing bolts andremove the fan and motor(see illustration).
Turn the frame to position the fan wiring on the
dehydrator side to avoid damaging the wiring.
Take care also not to damage the condenser
fins or tube.
11Unclip the fan guard from the top of the
frame.
12To remove the fan blades from the motor,
remove the retaining nut and circlip. The nut
has a left-hand threadie it is undone
clockwise.
13With the blades removed, the motor can
be unscrewed from the frame.
14Reassemble and refit in the reverse order
of dismantling and removal.
De-ice thermostat
15Disconnect the battery negative lead.
16Disconnect the vacuum hoses from the
plenum chamber cover. Pull off the rubber seal
and remove the plenum chamber cover; it is
secured by four screws and one nut.
17Disconnect the thermostat from the
evaporator casing and remove it. Also remove
the thermostat probe.
18Refit by reversing the removal operations.
Heater water valve
19The heater water valve used with air
conditioning is vacuum-operated. It is located
on the right-hand side of the engine bay, near
the bulkhead. 20Drain the cooling system.
21Slacken the hose clips and detach the
coolant hoses from the valve, noting how they
are connected.
22Disconnect the vacuum hose from the top
of the valve.
23Unclip the valve from its bracket and
remove it.
24Refit by reversing the removal operations.
Refill the cooling system.
3•10Cooling, heating and ventilation systems
22.4 Air conditioning compressor adjuster
strap bolts (arrowed)22.10 Condenser fan securing bolts
(arrowed)
procarmanuals.com
Page 104 of 255
8Remove the drill and the rubber band.
9Refit the heat shield, making sure it is
properly located.
10Refit the bi-metal housing, engaging the
end of the spring with the choke valve lever.
Fit the three screws, position the housing in its
original alignment (paragraph 4) and tighten
the screws.
11If the bi-metal housing alignment has been
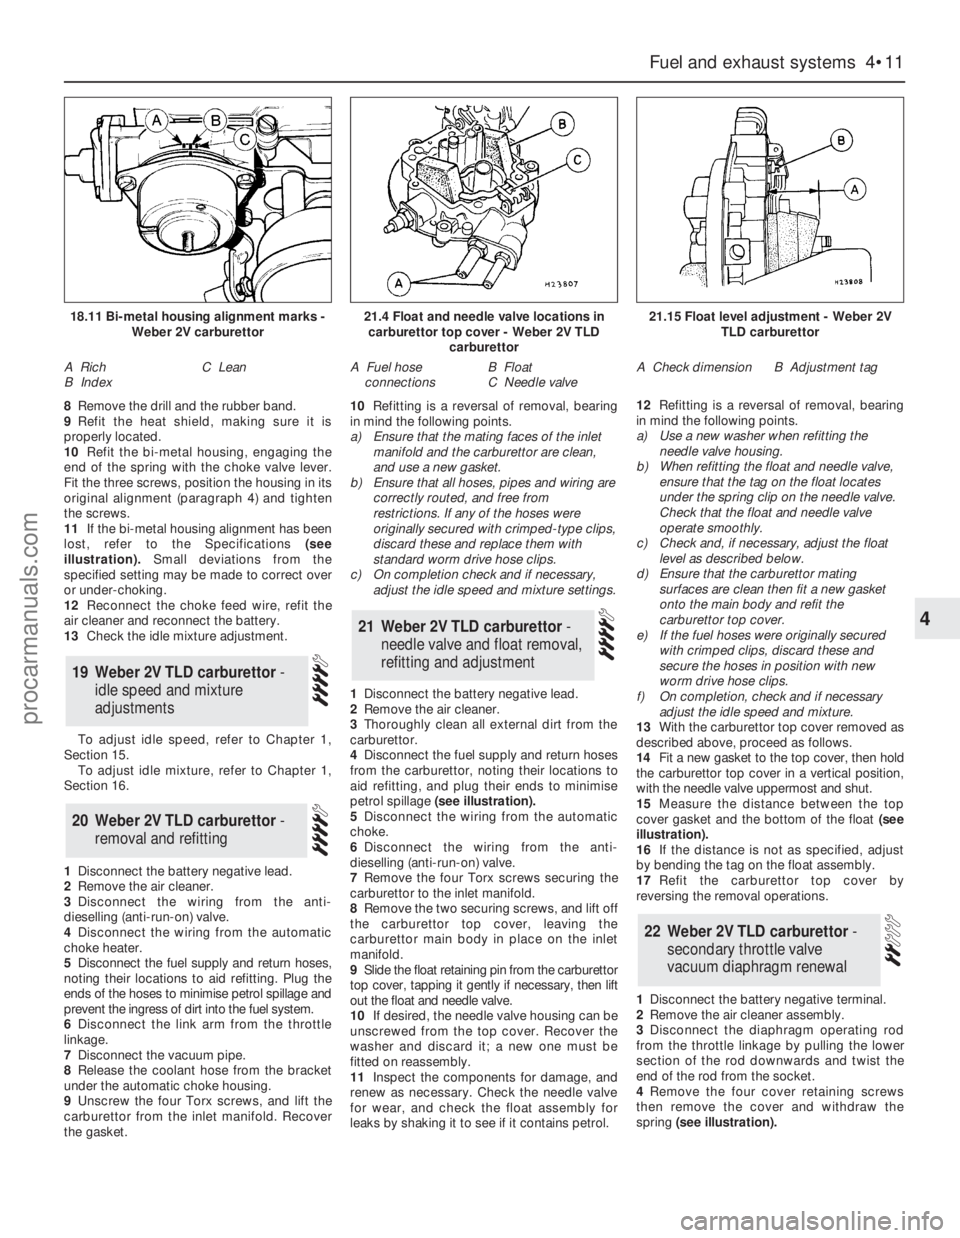
lost, refer to the Specifications(see
illustration).Small deviations from the
specified setting may be made to correct over
or under-choking.
12Reconnect the choke feed wire, refit the
air cleaner and reconnect the battery.
13Check the idle mixture adjustment.
To adjust idle speed, refer to Chapter 1,
Section 15.
To adjust idle mixture, refer to Chapter 1,
Section 16.
1Disconnect the battery negative lead.
2Remove the air cleaner.
3Disconnect the wiring from the anti-
dieselling (anti-run-on) valve.
4Disconnect the wiring from the automatic
choke heater.
5Disconnect the fuel supply and return hoses,
noting their locations to aid refitting. Plug the
ends of the hoses to minimise petrol spillage and
prevent the ingress of dirt into the fuel system.
6Disconnect the link arm from the throttle
linkage.
7Disconnect the vacuum pipe.
8Release the coolant hose from the bracket
under the automatic choke housing.
9Unscrew the four Torx screws, and lift the
carburettor from the inlet manifold. Recover
the gasket.10Refitting is a reversal of removal, bearing
in mind the following points.
a)Ensure that the mating faces of the inlet
manifold and the carburettor are clean,
and use a new gasket.
b)Ensure that all hoses, pipes and wiring are
correctly routed, and free from
restrictions. If any of the hoses were
originally secured with crimped-type clips,
discard these and replace them with
standard worm drive hose clips.
c)On completion check and if necessary,
adjust the idle speed and mixture settings.
1Disconnect the battery negative lead.
2Remove the air cleaner.
3Thoroughly clean all external dirt from the
carburettor.
4Disconnect the fuel supply and return hoses
from the carburettor, noting their locations to
aid refitting, and plug their ends to minimise
petrol spillage (see illustration).
5Disconnect the wiring from the automatic
choke.
6Disconnect the wiring from the anti-
dieselling (anti-run-on) valve.
7Remove the four Torx screws securing the
carburettor to the inlet manifold.
8Remove the two securing screws, and lift off
the carburettor top cover, leaving the
carburettor main body in place on the inlet
manifold.
9Slide the float retaining pin from the carburettor
top cover, tapping it gently if necessary, then lift
out the float and needle valve.
10If desired, the needle valve housing can be
unscrewed from the top cover. Recover the
washer and discard it; a new one must be
fitted on reassembly.
11Inspect the components for damage, and
renew as necessary. Check the needle valve
for wear, and check the float assembly for
leaks by shaking it to see if it contains petrol.12Refitting is a reversal of removal, bearing
in mind the following points.
a)Use a new washer when refitting the
needle valve housing.
b)When refitting the float and needle valve,
ensure that the tag on the float locates
under the spring clip on the needle valve.
Check that the float and needle valve
operate smoothly.
c)Check and, if necessary, adjust the float
level as described below.
d)Ensure that the carburettor mating
surfaces are clean then fit a new gasket
onto the main body and refit the
carburettor top cover.
e)If the fuel hoses were originally secured
with crimped clips, discard these and
secure the hoses in position with new
worm drive hose clips.
f)On completion, check and if necessary
adjust the idle speed and mixture.
13With the carburettor top cover removed as
described above, proceed as follows.
14Fit a new gasket to the top cover, then hold
the carburettor top cover in a vertical position,
with the needle valve uppermost and shut.
15Measure the distance between the top
cover gasket and the bottom of the float(see
illustration).
16If the distance is not as specified, adjust
by bending the tag on the float assembly.
17Refit the carburettor top cover by
reversing the removal operations.
1Disconnect the battery negative terminal.
2Remove the air cleaner assembly.
3Disconnect the diaphragm operating rod
from the throttle linkage by pulling the lower
section of the rod downwards and twist the
end of the rod from the socket.
4Remove the four cover retaining screws
then remove the cover and withdraw the
spring (see illustration).
22Weber 2V TLD carburettor -
secondary throttle valve
vacuum diaphragm renewal
21Weber 2V TLD carburettor -
needle valve and float removal,
refitting and adjustment
20Weber 2V TLD carburettor -
removal and refitting
19Weber 2V TLD carburettor -
idle speed and mixture
adjustments
Fuel and exhaust systems 4•11
4
18.11 Bi-metal housing alignment marks -
Weber 2V carburettor
A Rich
B IndexC Lean
21.4 Float and needle valve locations in
carburettor top cover - Weber 2V TLD
carburettor
A Fuel hose
connectionsB Float
C Needle valve
21.15 Float level adjustment - Weber 2V
TLD carburettor
A Check dimensionB Adjustment tag
procarmanuals.com
Page 107 of 255
16Start the engine and note the engine
speed (rpm). The engine speed should
increase above the normal idle speed, and
should be as given in the Specifications.
17If the engine speed is not as specified,
remove the tamperproof plug from the top of
the throttle kicker housing, and turn the
adjustment screw to give the specified speed.
18On completion of adjustment, fit a new
tamperproof cap.
19Disconnect the tubing from the inlet
manifold, and reconnect the throttle kicker
vacuum hose.
20Refit the plastic shield and the air cleaner.
On 2.4 & 2.9 litre V6 models especially,
residual pressure will remain in the fuel lines
long after the vehicle was last used therefore
the fuel system must be depressurised before
any hose is disconnected; the system is
depressurised via the vent valve on the fuel
rail, noting that it may be necessary to depress
the valve several times before the pressure is
fully released. As an added precaution place a
rag over the valve as it is depressed to catch
any fuel which is forcibly expelled. Before
carrying out any operation on the fuel system
refer to the precautions given in Safety first! at
the beginning of this Manual and follow them
implicitly. Petrol is a highly dangerous and
volatile liquid and the precautions necessary
when handling it cannot be overstressed.
Access to the relays is obtained by
removing the facia top cover (crash pad).
The relays are located on the passenger
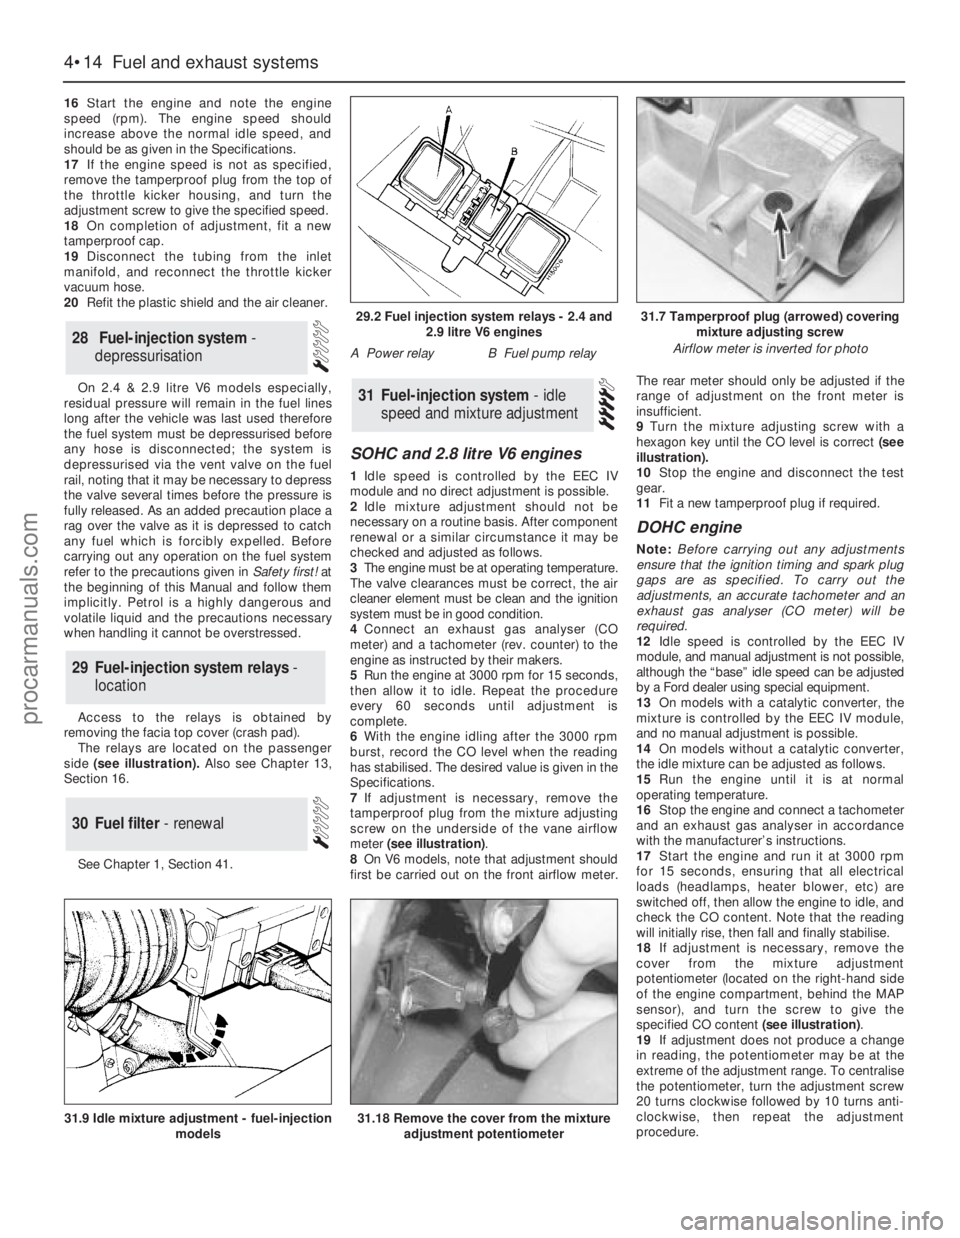
side(see illustration). Also see Chapter 13,
Section 16.
See Chapter 1, Section 41.
SOHC and 2.8 litre V6 engines
1Idle speed is controlled by the EEC IV
module and no direct adjustment is possible.
2Idle mixture adjustment should not be
necessary on a routine basis. After component
renewal or a similar circumstance it may be
checked and adjusted as follows.
3The engine must be at operating temperature.
The valve clearances must be correct, the air
cleaner element must be clean and the ignition
system must be in good condition.
4Connect an exhaust gas analyser (CO
meter) and a tachometer (rev. counter) to the
engine as instructed by their makers.
5Run the engine at 3000 rpm for 15 seconds,
then allow it to idle. Repeat the procedure
every 60 seconds until adjustment is
complete.
6With the engine idling after the 3000 rpm
burst, record the CO level when the reading
has stabilised. The desired value is given in the
Specifications.
7If adjustment is necessary, remove the
tamperproof plug from the mixture adjusting
screw on the underside of the vane airflow
meter (see illustration).
8On V6 models, note that adjustment should
first be carried out on the front airflow meter.The rear meter should only be adjusted if the
range of adjustment on the front meter is
insufficient.
9Turn the mixture adjusting screw with a
hexagon key until the CO level is correct (see
illustration).
10Stop the engine and disconnect the test
gear.
11Fit a new tamperproof plug if required.
DOHC engine
Note: Before carrying out any adjustments
ensure that the ignition timing and spark plug
gaps are as specified. To carry out the
adjustments, an accurate tachometer and an
exhaust gas analyser (CO meter) will be
required.
12Idle speed is controlled by the EEC IV
module, and manual adjustment is not possible,
although the “base” idle speed can be adjusted
by a Ford dealer using special equipment.
13On models with a catalytic converter, the
mixture is controlled by the EEC IV module,
and no manual adjustment is possible.
14On models without a catalytic converter,
the idle mixture can be adjusted as follows.
15Run the engine until it is at normal
operating temperature.
16Stop the engine and connect a tachometer
and an exhaust gas analyser in accordance
with the manufacturer’s instructions.
17Start the engine and run it at 3000 rpm
for 15 seconds, ensuring that all electrical
loads (headlamps, heater blower, etc) are
switched off, then allow the engine to idle, and
check the CO content. Note that the reading
will initially rise, then fall and finally stabilise.
18If adjustment is necessary, remove the
cover from the mixture adjustment
potentiometer (located on the right-hand side
of the engine compartment, behind the MAP
sensor), and turn the screw to give the
specified CO content (see illustration).
19If adjustment does not produce a change
in reading, the potentiometer may be at the
extreme of the adjustment range. To centralise
the potentiometer, turn the adjustment screw
20 turns clockwise followed by 10 turns anti-
clockwise, then repeat the adjustment
procedure.
31Fuel-injection system - idle
speed and mixture adjustment
30Fuel filter - renewal
29Fuel-injection system relays -
location
28Fuel-injection system -
depressurisation
4•14Fuel and exhaust systems
31.18 Remove the cover from the mixture
adjustment potentiometer31.9 Idle mixture adjustment - fuel-injection
models
29.2 Fuel injection system relays - 2.4 and
2.9 litre V6 engines
A Power relayB Fuel pump relay
31.7 Tamperproof plug (arrowed) covering
mixture adjusting screw
Airflow meter is inverted for photo
procarmanuals.com
Page 108 of 255
20Checking and adjustment should be
completed within 30 seconds of the meter
readings stabilising. If this has not been
possible, run the engine at 3000 rpm for 15
seconds, then allow the engine to idle. Re-
check the CO content and carry out further
adjustments if necessary.
21On completion of adjustment, stop the
engine and disconnect the tachometer and the
exhaust gas analyser. Refit the cover to the
adjustment screw.
2.4 & 2.9 litre V6 engines
22As with the 2.8 V6, idle speed is
electronically controlled. Basic idle speed
adjustment can only be carried out by a Ford
dealer using special equipment.
23On models not equipped with a catalytic
converter, mixture adjustment can be carried
out as described above.
24On models equipped with a catalytic
converter, the mixture is controlled by the EEC IV
module and no manual adjustment is possible.
SOHC and V6 engines
1Disconnect the battery negative lead.
2Free the throttle position sensor multi-plug
from its clip. On the OHCmodels this is below
the idle speed control valve, on the underside
of the inlet manifold; on V6 engines it is
located below the throttle valve housing.
3Relieve the locktabs and unbolt the throttle
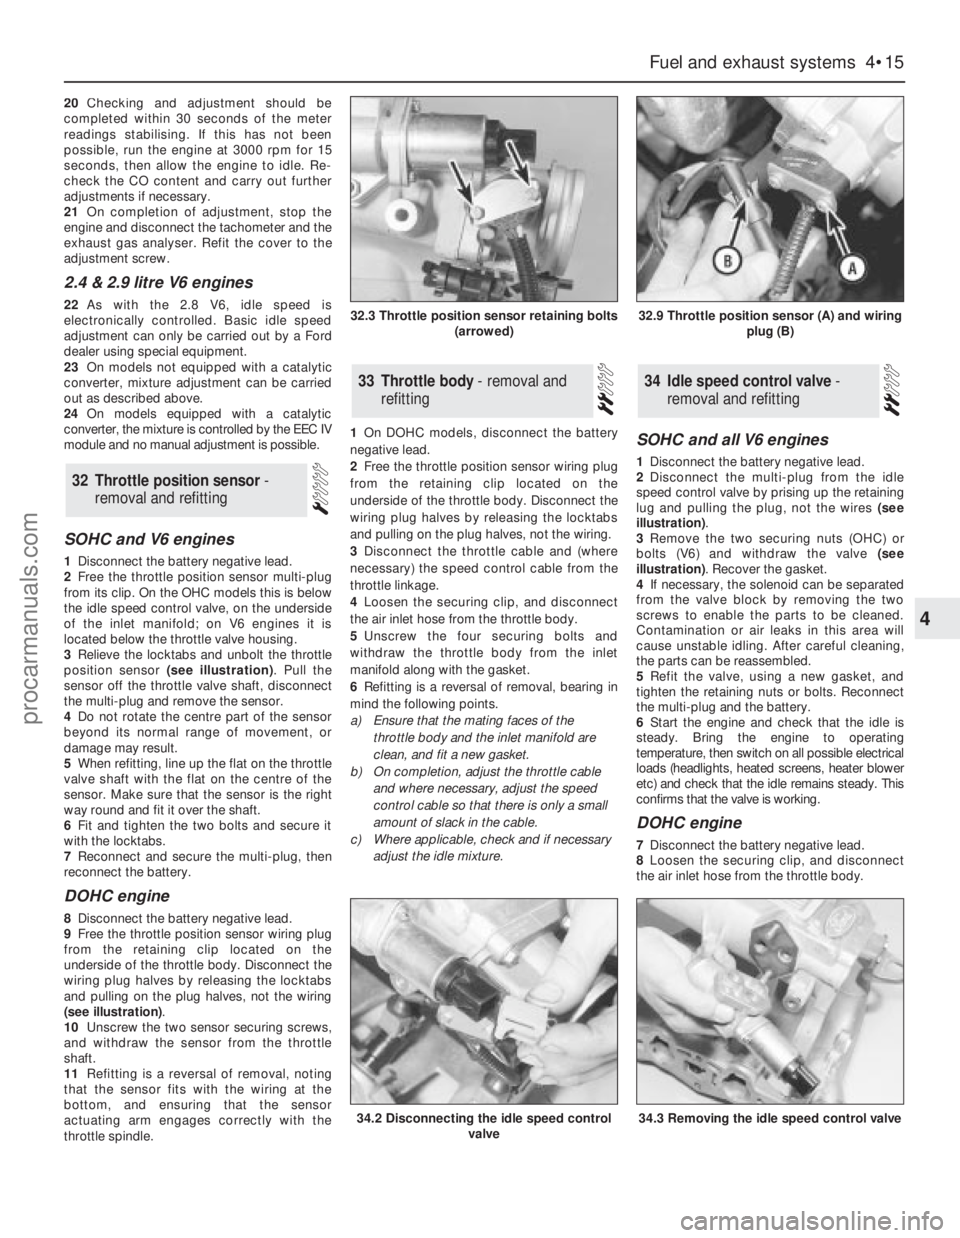
position sensor (see illustration). Pull the
sensor off the throttle valve shaft, disconnect
the multi-plug and remove the sensor.
4Do not rotate the centre part of the sensor
beyond its normal range of movement, or
damage may result.
5When refitting, line up the flat on the throttle
valve shaft with the flat on the centre of the
sensor. Make sure that the sensor is the right
way round and fit it over the shaft.
6Fit and tighten the two bolts and secure it
with the locktabs.
7Reconnect and secure the multi-plug, then
reconnect the battery.
DOHC engine
8Disconnect the battery negative lead.
9Free the throttle position sensor wiring plug
from the retaining clip located on the
underside of the throttle body. Disconnect the
wiring plug halves by releasing the locktabs
and pulling on the plug halves, not the wiring
(see illustration).
10Unscrew the two sensor securing screws,
and withdraw the sensor from the throttle
shaft.
11Refitting is a reversal of removal, noting
that the sensor fits with the wiring at the
bottom, and ensuring that the sensor
actuating arm engages correctly with the
throttle spindle.1On DOHC models, disconnect the battery
negative lead.
2Free the throttle position sensor wiring plug
from the retaining clip located on the
underside of the throttle body. Disconnect the
wiring plug halves by releasing the locktabs
and pulling on the plug halves, not the wiring.
3Disconnect the throttle cable and (where
necessary) the speed control cable from the
throttle linkage.
4Loosen the securing clip, and disconnect
the air inlet hose from the throttle body.
5Unscrew the four securing bolts and
withdraw the throttle body from the inlet
manifold along with the gasket.
6Refitting is a reversal of removal, bearing in
mind the following points.
a)Ensure that the mating faces of the
throttle body and the inlet manifold are
clean, and fit a new gasket.
b)On completion, adjust the throttle cable
and where necessary, adjust the speed
control cable so that there is only a small
amount of slack in the cable.
c)Where applicable, check and if necessary
adjust the idle mixture.
SOHC and all V6 engines
1Disconnect the battery negative lead.
2Disconnect the multi-plug from the idle
speed control valve by prising up the retaining
lug and pulling the plug, not the wires (see
illustration).
3Remove the two securing nuts (OHC) or
bolts (V6) and withdraw the valve (see
illustration). Recover the gasket.
4If necessary, the solenoid can be separated
from the valve block by removing the two
screws to enable the parts to be cleaned.
Contamination or air leaks in this area will
cause unstable idling. After careful cleaning,
the parts can be reassembled.
5Refit the valve, using a new gasket, and
tighten the retaining nuts or bolts. Reconnect
the multi-plug and the battery.
6Start the engine and check that the idle is
steady. Bring the engine to operating
temperature, then switch on all possible electrical
loads (headlights, heated screens, heater blower
etc) and check that the idle remains steady. This
confirms that the valve is working.
DOHC engine
7Disconnect the battery negative lead.
8Loosen the securing clip, and disconnect
the air inlet hose from the throttle body.
34Idle speed control valve -
removal and refitting33Throttle body - removal and
refitting
32Throttle position sensor -
removal and refitting
Fuel and exhaust systems 4•15
4
32.3 Throttle position sensor retaining bolts
(arrowed)32.9 Throttle position sensor (A) and wiring
plug (B)
34.2 Disconnecting the idle speed control
valve34.3 Removing the idle speed control valve
procarmanuals.com
Page 112 of 255
24Unbolt and remove the regulator from the
fuel rail. Remove the sealing O-ring and
discard it; a new one must be used on
refitting.
25Refitting is a reverse of the removal
procedure applying a smear of clean engine oil
to the new regulator O-ring. On models
equipped with a late level regulator, ensure
that the return pipe is securely held in position
by the retaining collar.
26On completion, switch the ignition on and
off five times without cranking the engine to
pressurise the fuel system.
27With the system pressurised check all
disturbed fuel unions for signs of leakage.
1The potentiometer is located on the right-
hand side of the engine compartment, behind
the MAP sensor.
2Disconnect the battery negative lead.
3Remove the securing screw, then withdraw
the potentiometer and disconnect the wiring
plug.
4Refitting is a reversal of removal. On
completion adjust the idle mixture.1On 2.4 & 2.9 litre V6 engines, disconnect the
battery.
2Disconnect the switch wiring connector.
3Slacken and remove the switch from the
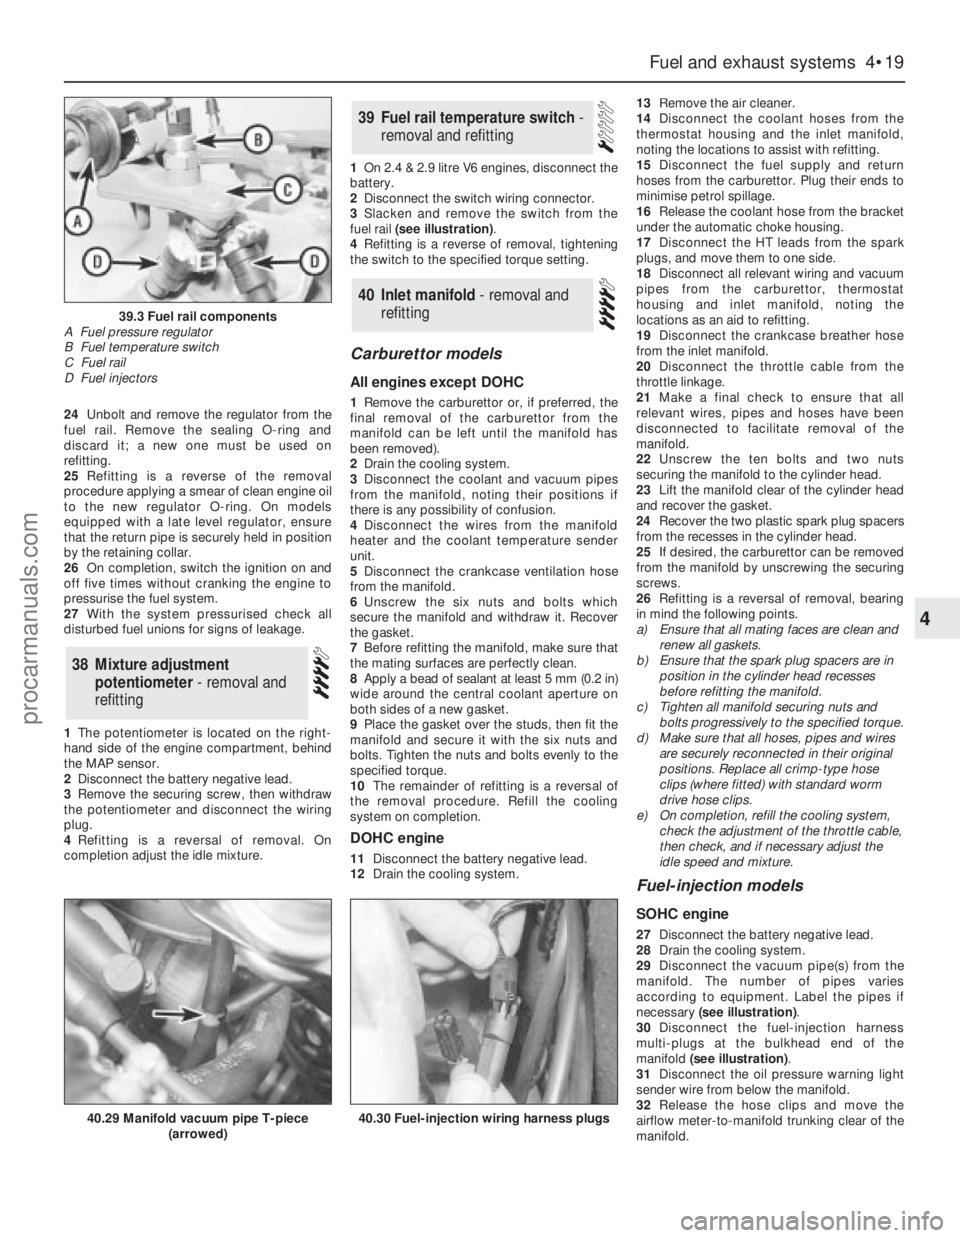
fuel rail (see illustration).
4Refitting is a reverse of removal, tightening
the switch to the specified torque setting.
Carburettor models
All engines except DOHC
1Remove the carburettor or, if preferred, the
final removal of the carburettor from the
manifold can be left until the manifold has
been removed).
2Drain the cooling system.
3Disconnect the coolant and vacuum pipes
from the manifold, noting their positions if
there is any possibility of confusion.
4Disconnect the wires from the manifold
heater and the coolant temperature sender
unit.
5Disconnect the crankcase ventilation hose
from the manifold.
6Unscrew the six nuts and bolts which
secure the manifold and withdraw it. Recover
the gasket.
7Before refitting the manifold, make sure that
the mating surfaces are perfectly clean.
8Apply a bead of sealant at least 5 mm (0.2 in)
wide around the central coolant aperture on
both sides of a new gasket.
9Place the gasket over the studs, then fit the
manifold and secure it with the six nuts and
bolts. Tighten the nuts and bolts evenly to the
specified torque.
10The remainder of refitting is a reversal of
the removal procedure. Refill the cooling
system on completion.
DOHC engine
11Disconnect the battery negative lead.
12Drain the cooling system.13Remove the air cleaner.
14Disconnect the coolant hoses from the
thermostat housing and the inlet manifold,
noting the locations to assist with refitting.
15Disconnect the fuel supply and return
hoses from the carburettor. Plug their ends to
minimise petrol spillage.
16Release the coolant hose from the bracket
under the automatic choke housing.
17Disconnect the HT leads from the spark
plugs, and move them to one side.
18Disconnect all relevant wiring and vacuum
pipes from the carburettor, thermostat
housing and inlet manifold, noting the
locations as an aid to refitting.
19Disconnect the crankcase breather hose
from the inlet manifold.
20Disconnect the throttle cable from the
throttle linkage.
21Make a final check to ensure that all
relevant wires, pipes and hoses have been
disconnected to facilitate removal of the
manifold.
22Unscrew the ten bolts and two nuts
securing the manifold to the cylinder head.
23Lift the manifold clear of the cylinder head
and recover the gasket.
24Recover the two plastic spark plug spacers
from the recesses in the cylinder head.
25If desired, the carburettor can be removed
from the manifold by unscrewing the securing
screws.
26Refitting is a reversal of removal, bearing
in mind the following points.
a)Ensure that all mating faces are clean and
renew all gaskets.
b)Ensure that the spark plug spacers are in
position in the cylinder head recesses
before refitting the manifold.
c)Tighten all manifold securing nuts and
bolts progressively to the specified torque.
d)Make sure that all hoses, pipes and wires
are securely reconnected in their original
positions. Replace all crimp-type hose
clips (where fitted) with standard worm
drive hose clips.
e)On completion, refill the cooling system,
check the adjustment of the throttle cable,
then check, and if necessary adjust the
idle speed and mixture.
Fuel-injection models
SOHC engine
27Disconnect the battery negative lead.
28Drain the cooling system.
29Disconnect the vacuum pipe(s) from the
manifold. The number of pipes varies
according to equipment. Label the pipes if
necessary (see illustration).
30Disconnect the fuel-injection harness
multi-plugs at the bulkhead end of the
manifold (see illustration).
31Disconnect the oil pressure warning light
sender wire from below the manifold.
32Release the hose clips and move the
airflow meter-to-manifold trunking clear of the
manifold.
40Inlet manifold - removal and
refitting
39Fuel rail temperature switch -
removal and refitting
38Mixture adjustment
potentiometer - removal and
refitting
Fuel and exhaust systems 4•19
4
39.3 Fuel rail components
A Fuel pressure regulator
B Fuel temperature switch
C Fuel rail
D Fuel injectors
40.29 Manifold vacuum pipe T-piece
(arrowed)40.30 Fuel-injection wiring harness plugs
procarmanuals.com
Page 114 of 255
55Release the throttle position sensor wiring
connector from the clip under the throttle
body, and separate the two halves of the
connector.
56Remove the fuel-injectors.
57Check that all relevant wiring, hoses and
pipes have been disconnected to facilitate
removal of the manifold.
58Unscrew the ten bolts and two nuts
securing the inlet manifold to the cylinder
head, and carefully withdraw the manifold.
Recover the gasket.
59Recover the two plastic spark plug
spacers from the recesses in the cylinder head
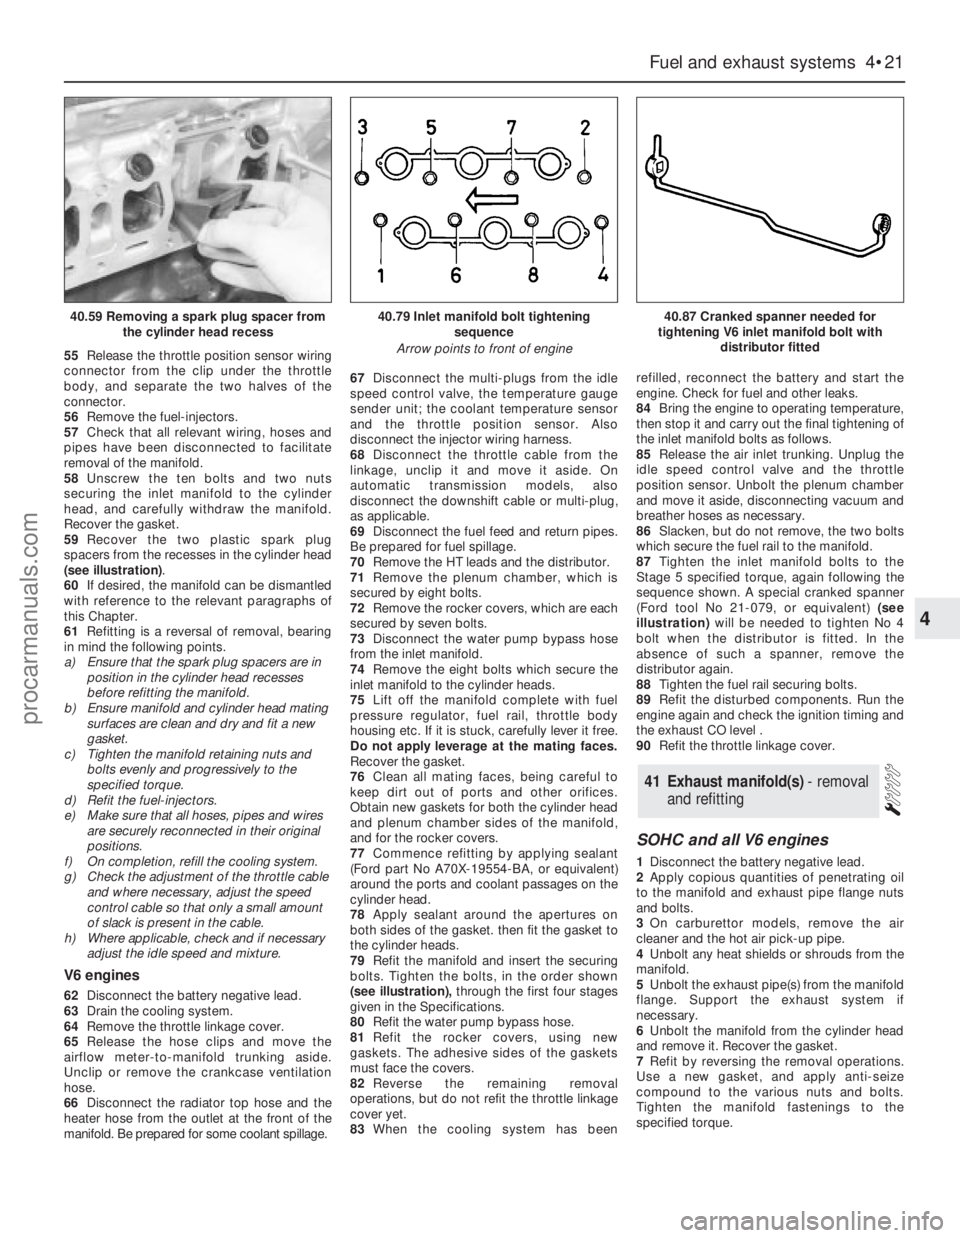
(see illustration).
60If desired, the manifold can be dismantled
with reference to the relevant paragraphs of
this Chapter.
61Refitting is a reversal of removal, bearing
in mind the following points.
a)Ensure that the spark plug spacers are in
position in the cylinder head recesses
before refitting the manifold.
b)Ensure manifold and cylinder head mating
surfaces are clean and dry and fit a new
gasket.
c)Tighten the manifold retaining nuts and
bolts evenly and progressively to the
specified torque.
d)Refit the fuel-injectors.
e)Make sure that all hoses, pipes and wires
are securely reconnected in their original
positions.
f)On completion, refill the cooling system.
g)Check the adjustment of the throttle cable
and where necessary, adjust the speed
control cable so that only a small amount
of slack is present in the cable.
h)Where applicable, check and if necessary
adjust the idle speed and mixture.
V6 engines
62Disconnect the battery negative lead.
63Drain the cooling system.
64Remove the throttle linkage cover.
65Release the hose clips and move the
airflow meter-to-manifold trunking aside.
Unclip or remove the crankcase ventilation
hose.
66Disconnect the radiator top hose and the
heater hose from the outlet at the front of the
manifold. Be prepared for some coolant spillage.67Disconnect the multi-plugs from the idle
speed control valve, the temperature gauge
sender unit; the coolant temperature sensor
and the throttle position sensor. Also
disconnect the injector wiring harness.
68Disconnect the throttle cable from the
linkage, unclip it and move it aside. On
automatic transmission models, also
disconnect the downshift cable or multi-plug,
as applicable.
69Disconnect the fuel feed and return pipes.
Be prepared for fuel spillage.
70Remove the HT leads and the distributor.
71Remove the plenum chamber, which is
secured by eight bolts.
72Remove the rocker covers, which are each
secured by seven bolts.
73Disconnect the water pump bypass hose
from the inlet manifold.
74Remove the eight bolts which secure the
inlet manifold to the cylinder heads.
75Lift off the manifold complete with fuel
pressure regulator, fuel rail, throttle body
housing etc. If it is stuck, carefully lever it free.
Do not apply leverage at the mating faces.
Recover the gasket.
76Clean all mating faces, being careful to
keep dirt out of ports and other orifices.
Obtain new gaskets for both the cylinder head
and plenum chamber sides of the manifold,
and for the rocker covers.
77Commence refitting by applying sealant
(Ford part No A70X-19554-BA, or equivalent)
around the ports and coolant passages on the
cylinder head.
78Apply sealant around the apertures on
both sides of the gasket. then fit the gasket to
the cylinder heads.
79Refit the manifold and insert the securing
bolts. Tighten the bolts, in the order shown
(see illustration),through the first four stages
given in the Specifications.
80Refit the water pump bypass hose.
81Refit the rocker covers, using new
gaskets. The adhesive sides of the gaskets
must face the covers.
82Reverse the remaining removal
operations, but do not refit the throttle linkage
cover yet.
83When the cooling system has beenrefilled, reconnect the battery and start the
engine. Check for fuel and other leaks.
84Bring the engine to operating temperature,
then stop it and carry out the final tightening of
the inlet manifold bolts as follows.
85Release the air inlet trunking. Unplug the
idle speed control valve and the throttle
position sensor. Unbolt the plenum chamber
and move it aside, disconnecting vacuum and
breather hoses as necessary.
86Slacken, but do not remove, the two bolts
which secure the fuel rail to the manifold.
87Tighten the inlet manifold bolts to the
Stage 5 specified torque, again following the
sequence shown. A special cranked spanner
(Ford tool No 21-079, or equivalent)(see
illustration)will be needed to tighten No 4
bolt when the distributor is fitted. In the
absence of such a spanner, remove the
distributor again.
88Tighten the fuel rail securing bolts.
89Refit the disturbed components. Run the
engine again and check the ignition timing and
the exhaust CO level .
90Refit the throttle linkage cover.
SOHC and all V6 engines
1Disconnect the battery negative lead.
2Apply copious quantities of penetrating oil
to the manifold and exhaust pipe flange nuts
and bolts.
3On carburettor models, remove the air
cleaner and the hot air pick-up pipe.
4Unbolt any heat shields or shrouds from the
manifold.
5Unbolt the exhaust pipe(s) from the manifold
flange. Support the exhaust system if
necessary.
6Unbolt the manifold from the cylinder head
and remove it. Recover the gasket.
7Refit by reversing the removal operations.
Use a new gasket, and apply anti-seize
compound to the various nuts and bolts.
Tighten the manifold fastenings to the
specified torque.
41Exhaust manifold(s) - removal
and refitting
Fuel and exhaust systems 4•21
4
40.59 Removing a spark plug spacer from
the cylinder head recess40.79 Inlet manifold bolt tightening
sequence
Arrow points to front of engine40.87 Cranked spanner needed for
tightening V6 inlet manifold bolt with
distributor fitted
procarmanuals.com
Page 118 of 255
Chapter 5
Engine electrical systems
Air charge temperature sensor - removal and refitting . . . . . . . . . .25
Alternator - brush renewal . . . . . . . . . . . . . . . . . . . . . . . . . . . . . . . . .7
Alternator - removal and refitting . . . . . . . . . . . . . . . . . . . . . . . . . . . .6
Alternator - testing on the vehicle . . . . . . . . . . . . . . . . . . . . . . . . . . .5
Battery - charging . . . . . . . . . . . . . . . . . . . . . . . . . . . . . . . . . . . . . . . .3
Battery - removal and refitting . . . . . . . . . . . . . . . . . . . . . . . . . . . . . .4
Carburettor stepper motor (2.0 litre models) - removal, refitting and
adjustment . . . . . . . . . . . . . . . . . . . . . . . . . . . . . . . . . . . . . . . . . .19
Coolant temperature sensor - removal and refitting . . . . . . . . . . . .20
Crankshaft speed/position sensor - removal and refitting . . . . . . . .24
Distributor - removal and refitting . . . . . . . . . . . . . . . . . . . . . . . . . .13
Electrical fault-finding - general information . . . . . . . . . . . . . . . . . . .2
Engine management control module - removal and refitting . . . . . .18
Engine management system relays - testing . . . . . . . . . . . . . . . . . .22
Fuel temperature sensor - removal and refitting . . . . . . . . . . . . . . .26Fuel trap (carburettor models) - removal and refitting . . . . . . . . . . .17
General information and precautions . . . . . . . . . . . . . . . . . . . . . . . . .1
HT leads, distributor cap and rotor arm - removal, inspection and
refitting . . . . . . . . . . . . . . . . . . . . . . . . . . . . . . . . . . . . . . . . . . . . .12
Ignition coil - testing, removal and refitting . . . . . . . . . . . . . . . . . . .16
Ignition module (fuel-injection models) - removal and refitting . . . .15
Ignition timing - checking . . . . . . . . . . . . . . . . . . . . . . . . . . . . . . . . .14
Ignition timing and idle speed adjustments . . . . . . . . . . . . . . . . . . . 23
Manifold absolute pressure (MAP) sensor - removal and refitting . .28
Manifold heater (carburettor models) - removal and refitting . . . . . .21
Spark plugs - removal, inspection and refitting . . . . . . . . . . . . . . . .11
Starter motor - brush renewal . . . . . . . . . . . . . . . . . . . . . . . . . . . . .10
Starter motor - removal and refitting . . . . . . . . . . . . . . . . . . . . . . . . .9
Starter motor - testing on the vehicle . . . . . . . . . . . . . . . . . . . . . . . . .8
Vehicle speed sensor - removal and refitting . . . . . . . . . . . . . . . . . .27
General
Electrical system type . . . . . . . . . . . . . . . . . . . . . . . . . . . . . . . . . . . . . . . 12 volt, negative earth
Ignition system type: . . . . . . . . . . . . . . . . . . . . . . . . . . . . . . . . . . . . . . . . Breakerless, Hall effect, with electronic control of advance
Carburettor models . . . . . . . . . . . . . . . . . . . . . . . . . . . . . . . . . . . . . . . ESC II system
Fuel-injection models . . . . . . . . . . . . . . . . . . . . . . . . . . . . . . . . . . . . . EEC IV system
Firing order:
OHC . . . . . . . . . . . . . . . . . . . . . . . . . . . . . . . . . . . . . . . . . . . . . . . . . . 1-3-4-2 (No 1 at pulley end)
V6 . . . . . . . . . . . . . . . . . . . . . . . . . . . . . . . . . . . . . . . . . . . . . . . . . . . . 1-4-2-5-3-6 (No 1 at front of right-hand bank)
Alternator
Make and type . . . . . . . . . . . . . . . . . . . . . . . . . . . . . . . . . . . . . . . . . . . . Bosch KI-55A, NI-70A or NI-90A
Rated output at 13.5 volts and 6000 engine rpm . . . . . . . . . . . . . . . . . . 55, 70 or 90 amps
Rotor winding resistance at 20°C (68°F):
KI-55A . . . . . . . . . . . . . . . . . . . . . . . . . . . . . . . . . . . . . . . . . . . . . . . . . 3.4 to 3.7 ohms
NI-70A and NI-90A . . . . . . . . . . . . . . . . . . . . . . . . . . . . . . . . . . . . . . . 2.8 to 3.1 ohms
Brush wear limit . . . . . . . . . . . . . . . . . . . . . . . . . . . . . . . . . . . . . . . . . . . 5 mm (0.2 in)
Regulated voltage at 4000 engine rpm and 3 to 7 amp load . . . . . . . . . 13.7 to 14.6 volts
Voltage regulator type . . . . . . . . . . . . . . . . . . . . . . . . . . . . . . . . . . . . . . . Solid state, integral
Starter motor
Make and type . . . . . . . . . . . . . . . . . . . . . . . . . . . . . . . . . . . . . . . . . . . . Bosch short frame, long frame or reduction gear
Rating:
Short frame . . . . . . . . . . . . . . . . . . . . . . . . . . . . . . . . . . . . . . . . . . . . . 0.85 or 0.95 kW
Long frame . . . . . . . . . . . . . . . . . . . . . . . . . . . . . . . . . . . . . . . . . . . . . 1.1 kW
Reduction gear . . . . . . . . . . . . . . . . . . . . . . . . . . . . . . . . . . . . . . . . . . 1.4 kW
Brush wear limit:
Short frame and reduction gear . . . . . . . . . . . . . . . . . . . . . . . . . . . . . 8 mm (0.32 in)
Long frame . . . . . . . . . . . . . . . . . . . . . . . . . . . . . . . . . . . . . . . . . . . . . 10 mm (0.39 in)
Commutator minimum diameter . . . . . . . . . . . . . . . . . . . . . . . . . . . . . . . 32.8 mm (1.29 in)
Armature endfloat . . . . . . . . . . . . . . . . . . . . . . . . . . . . . . . . . . . . . . . . . . 0.3 mm (0.012 in)
5•1
Easy,suitable for
novice with little
experienceFairly easy,suitable
for beginner with
some experienceFairly difficult,
suitable for competent
DIY mechanicDifficult,suitable for
experienced DIY
mechanicVery difficult,
suitable for expert
DIY or professional
Degrees of difficulty
Specifications Contents
5
procarmanuals.com
Page 121 of 255
1Disconnect the battery negative (earth) lead.
2Disconnect the battery positive leads. These
may be protected by a plastic cover. Do not
allow the spanner to bridge the positive and
negative terminals.
3Release the battery hold-down clamp. Lift
out the battery. Keep it upright and be careful
not to drop it - it is heavy.
4Commence by placing the battery in its tray,
making sure it is the right way round. Secure it
with the hold-down clamp.
5Clean the battery terminals if necessary
then reconnect them. Connect the positive
lead first, then the negative lead.
1Should it appear that the alternator is not
charging the battery, check first that the
drivebelt is intact and in good condition and
that its tension is correct. Also check the
condition and security of the alternator
electrical connections and the battery leads.
2Accurate assessment of alternator output
requires special equipment and a degree of
skill. A rough idea of whether output is
adequate can be gained by using a voltmeter
(range 0 to 15 or 0 to 20 volts) as follows.
3Connect the voltmeter across the battery
terminals. Switch on the headlights and note
the voltage reading: it should be between 12
and 13 volts.
4Start the engine and run it at a fast idle
(approx 1500 rpm). Read the voltmeter: it
should indicate 13 to 14 volts.
5With the engine still running at a fast idle,
switch on as many electrical consumers as
possible (heated rear window, heater blower
etc). The voltage at the battery should be
maintained at 13 to 14 volts. Increase the
engine speed slightly if necessary to keep the
voltage up.
6If alternator output is low or zero, check the
brushes. If the brushes are OK, seek expert
advice.7Occasionally the condition may arise where
the alternator output is excessive. Clues to this
condition are constantly blowing bulbs;
brightness of lights vary considerably with
engine speed; overheating of alternator and
battery, possible with steam or fumes coming
from the battery. This condition is almost
certainly due to a defective voltage regulator,
but expert advice should be sought.
8Note that the alternator voltage regulator
can be renewed without removing the
alternator from the vehicle. The procedure is
part of brush renewal.
1Disconnect the battery negative lead.
2Disconnect the multi-plug from the rear of
the alternator. It may be secured by a wire clip.
3Slacken the alternator adjusting and pivot
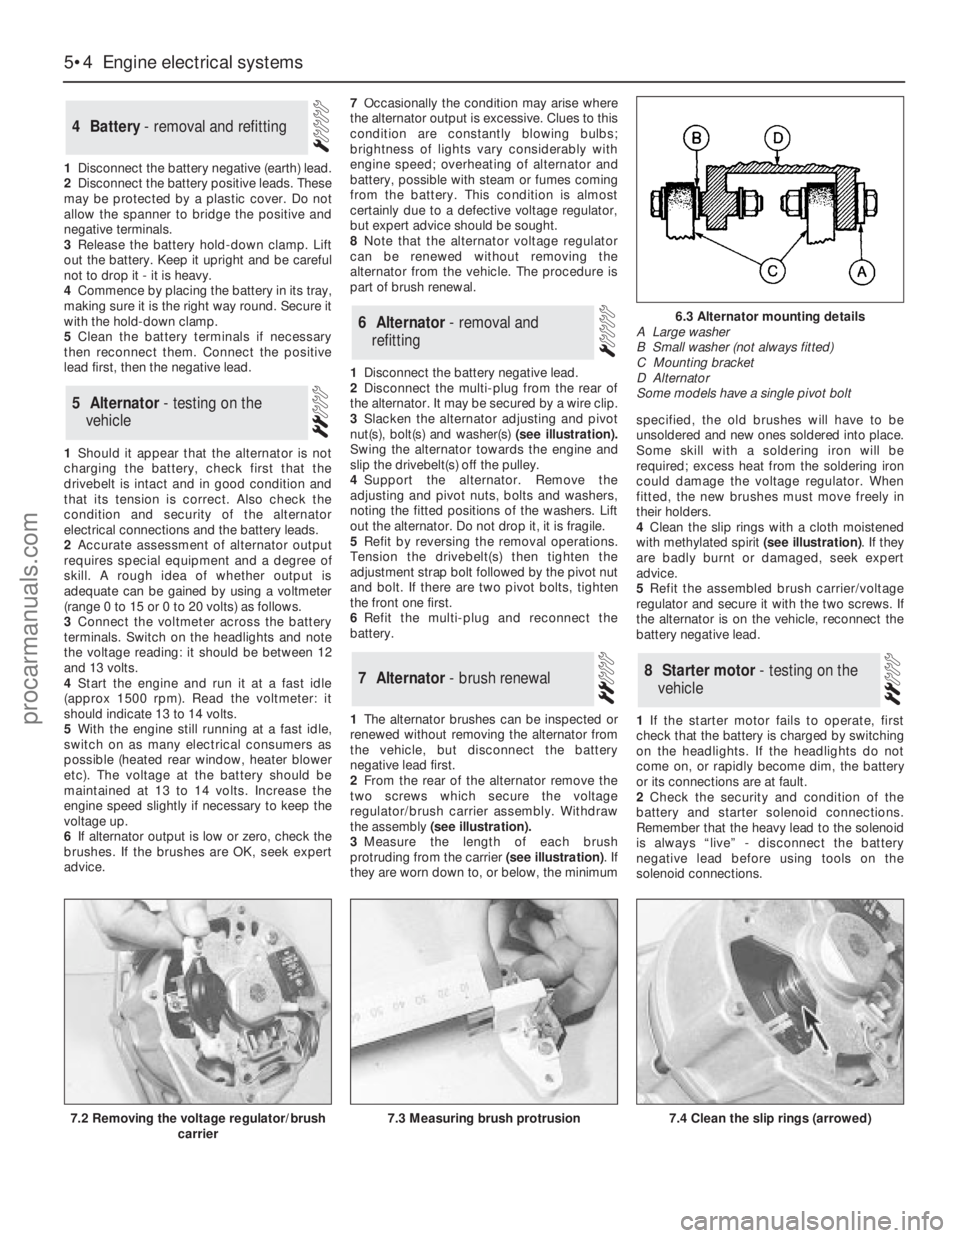
nut(s), bolt(s)and washer(s)(see illustration).
Swing the alternator towards the engine and
slip the drivebelt(s) off the pulley.
4Support the alternator. Remove the
adjusting and pivot nuts, bolts and washers,
noting the fitted positions of the washers. Lift
out the alternator. Do not drop it, it is fragile.
5Refit by reversing the removal operations.
Tension the drivebelt(s) then tighten the
adjustment strap bolt followed by the pivot nut
and bolt. If there are two pivot bolts, tighten
the front one first.
6Refit the multi-plug and reconnect the
battery.
1The alternator brushes can be inspected or
renewed without removing the alternator from
the vehicle, but disconnect the battery
negative lead first.
2From the rear of the alternator remove the
two screws which secure the voltage
regulator/brush carrier assembly. Withdraw
the assembly (see illustration).
3Measure the length of each brush
protruding from the carrier (see illustration). If
they are worn down to, or below, the minimumspecified, the old brushes will have to be
unsoldered and new ones soldered into place.
Some skill with a soldering iron will be
required; excess heat from the soldering iron
could damage the voltage regulator. When
fitted, the new brushes must move freely in
their holders.
4Clean the slip rings with a cloth moistened
with methylated spirit (see illustration). If they
are badly burnt or damaged, seek expert
advice.
5Refit the assembled brush carrier/voltage
regulator and secure it with the two screws. If
the alternator is on the vehicle, reconnect the
battery negative lead.
1If the starter motor fails to operate, first
check that the battery is charged by switching
on the headlights. If the headlights do not
come on, or rapidly become dim, the battery
or its connections are at fault.
2Check the security and condition of the
battery and starter solenoid connections.
Remember that the heavy lead to the solenoid
is always “live” - disconnect the battery
negative lead before using tools on the
solenoid connections.
8Starter motor - testing on the
vehicle7Alternator - brush renewal
6Alternator - removal and
refitting
5Alternator - testing on the
vehicle
4Battery - removal and refitting
5•4Engine electrical systems
7.3 Measuring brush protrusion7.4 Clean the slip rings (arrowed)
6.3 Alternator mounting details
A Large washer
B Small washer (not always fitted)
C Mounting bracket
D Alternator
Some models have a single pivot bolt
7.2 Removing the voltage regulator/brush
carrier
procarmanuals.com