1985 FORD GRANADA oil level
[x] Cancel search: oil levelPage 16 of 255
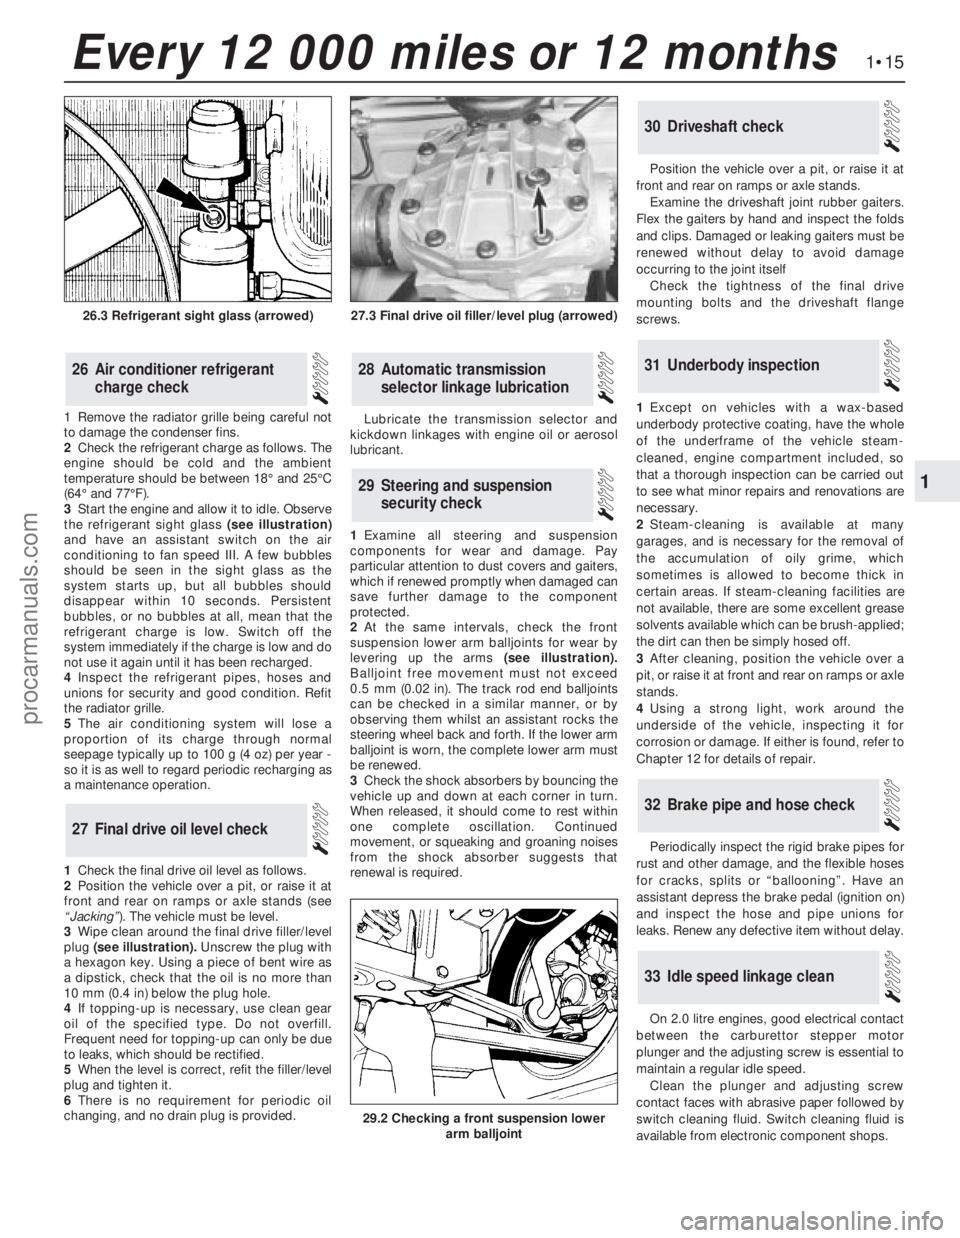
1Remove the radiator grille being careful not
to damage the condenser fins.
2Check the refrigerant charge as follows. The
engine should be cold and the ambient
temperature should be between 18°and 25°C
(64°and 77°F).
3Start the engine and allow it to idle. Observe
the refrigerant sight glass(see illustration)
and have an assistant switch on the air
conditioning to fan speed III. A few bubbles
should be seen in the sight glass as the
system starts up, but all bubbles should
disappear within 10 seconds. Persistent
bubbles, or no bubbles at all, mean that the
refrigerant charge is low. Switch off the
system immediately if the charge is low and do
not use it again until it has been recharged.
4Inspect the refrigerant pipes, hoses and
unions for security and good condition. Refit
the radiator grille.
5The air conditioning system will lose a
proportion of its charge through normal
seepage typically up to 100 g (4 oz) per year -
so it is as well to regard periodic recharging as
a maintenance operation.
1Check the final drive oil level as follows.
2Position the vehicle over a pit, or raise it at
front and rear on ramps or axle stands (see
“Jacking”). The vehicle must be level.
3Wipe clean around the final drive filler/level
plug (see illustration).Unscrew the plug with
a hexagon key. Using a piece of bent wire as
a dipstick, check that the oil is no more than
10 mm (0.4 in) below the plug hole.
4If topping-up is necessary, use clean gear
oil of the specified type. Do not overfill.
Frequent need for topping-up can only be due
to leaks, which should be rectified.
5When the level is correct, refit the filler/level
plug and tighten it.
6There is no requirement for periodic oil
changing, and no drain plug is provided. Lubricate the transmission selector and
kickdown linkages with engine oil or aerosol
lubricant.
1Examine all steering and suspension
components for wear and damage. Pay
particular attention to dust covers and gaiters,
which if renewed promptly when damaged can
save further damage to the component
protected.
2At the same intervals, check the front
suspension lower arm balljoints for wear by
levering up the arms(see illustration).
Balljoint free movement must not exceed
0.5 mm (0.02 in). The track rod end balljoints
can be checked in a similar manner, or by
observing them whilst an assistant rocks the
steering wheel back and forth. If the lower arm
balljoint is worn, the complete lower arm must
be renewed.
3Check the shock absorbers by bouncing the
vehicle up and down at each corner in turn.
When released, it should come to rest within
one complete oscillation. Continued
movement, or squeaking and groaning noises
from the shock absorber suggests that
renewal is required.Position the vehicle over a pit, or raise it at
front and rear on ramps or axle stands.
Examine the driveshaft joint rubber gaiters.
Flex the gaiters by hand and inspect the folds
and clips. Damaged or leaking gaiters must be
renewed without delay to avoid damage
occurring to the joint itself
Check the tightness of the final drive
mounting bolts and the driveshaft flange
screws.
1Except on vehicles with a wax-based
underbody protective coating, have the whole
of the underframe of the vehicle steam-
cleaned, engine compartment included, so
that a thorough inspection can be carried out
to see what minor repairs and renovations are
necessary.
2Steam-cleaning is available at many
garages, and is necessary for the removal of
the accumulation of oily grime, which
sometimes is allowed to become thick in
certain areas. If steam-cleaning facilities are
not available, there are some excellent grease
solvents available which can be brush-applied;
the dirt can then be simply hosed off.
3After cleaning, position the vehicle over a
pit, or raise it at front and rear on ramps or axle
stands.
4Using a strong light, work around the
underside of the vehicle, inspecting it for
corrosion or damage. If either is found, refer to
Chapter 12 for details of repair.
Periodically inspect the rigid brake pipes for
rust and other damage, and the flexible hoses
for cracks, splits or “ballooning”. Have an
assistant depress the brake pedal (ignition on)
and inspect the hose and pipe unions for
leaks. Renew any defective item without delay.
On 2.0 litre engines, good electrical contact
between the carburettor stepper motor
plunger and the adjusting screw is essential to
maintain a regular idle speed.
Clean the plunger and adjusting screw
contact faces with abrasive paper followed by
switch cleaning fluid. Switch cleaning fluid is
available from electronic component shops.
33Idle speed linkage clean
32Brake pipe and hose check
31Underbody inspection
30Driveshaft check
29Steering and suspension
security check
28Automatic transmission
selector linkage lubrication
27Final drive oil level check
26Air conditioner refrigerant
charge check
1•15
1
Every 12 000 miles or 12 months
27.3 Final drive oil filler/level plug (arrowed)
29.2 Checking a front suspension lower
arm balljoint
26.3 Refrigerant sight glass (arrowed)
procarmanuals.com
Page 20 of 255
the previous sub Section.
27Refitting is a reversal of removal, ensuring
that the rotor arm is pushed fully home on the
rotor shaft. Make sure that the HT leads are
fitted to their correct cylinders. Note that the
rotor arm will only fit in one position.
Note: A brake band torque wrench - Ford tool
No 17-005, or equivalent - will be required for
this job.
1Raise and support the front of the vehicle.
2Disconnect the downshift (kickdown) cable
from the transmission when so equipped.
3Release the locknuts on the two brake band
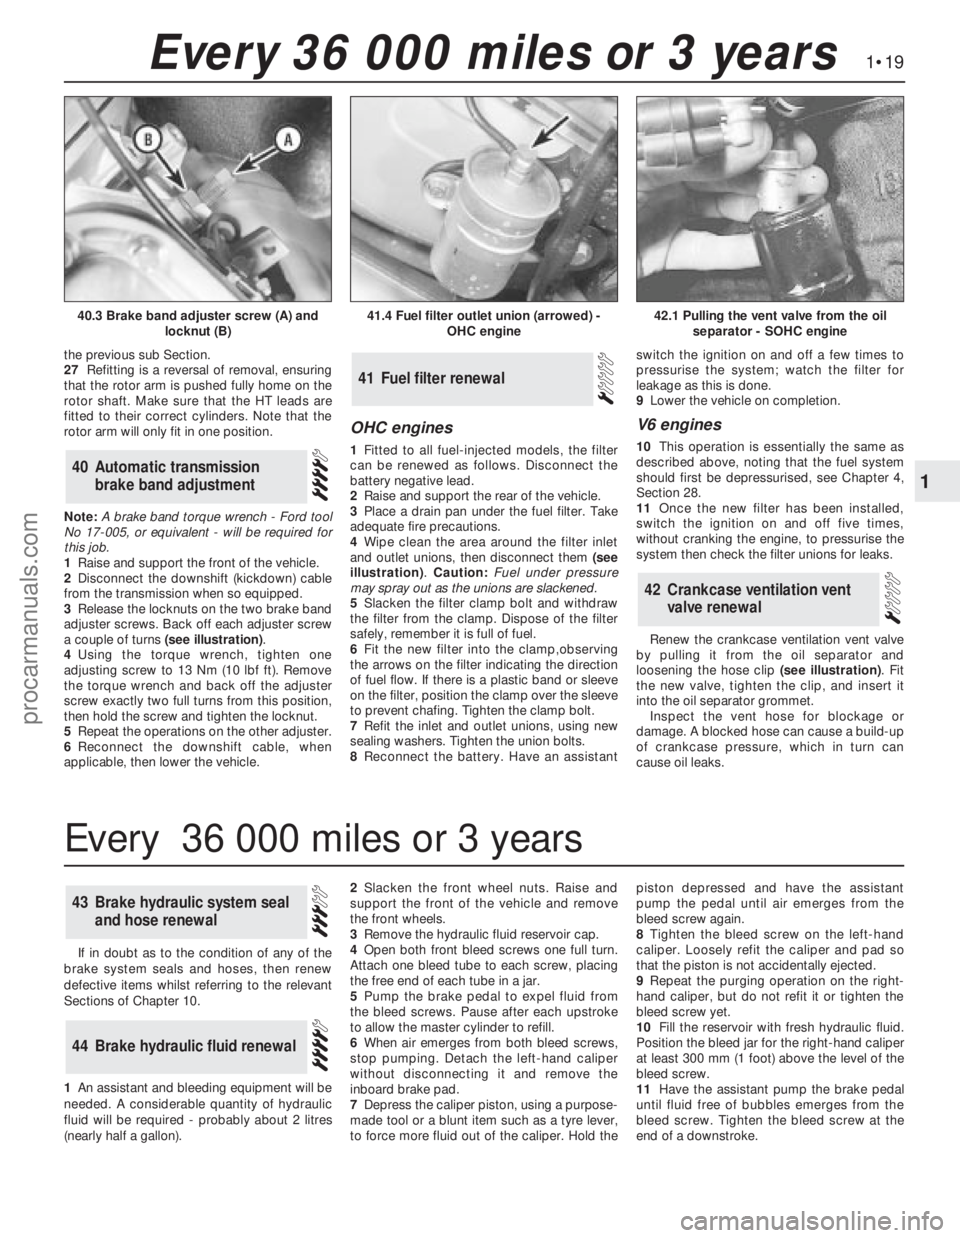
adjuster screws. Back off each adjuster screw
a couple of turns (see illustration).
4Using the torque wrench, tighten one
adjusting screw to 13 Nm (10 lbf ft). Remove
the torque wrench and back off the adjuster
screw exactly two full turns from this position,
then hold the screw and tighten the locknut.
5Repeat the operations on the other adjuster.
6Reconnect the downshift cable, when
applicable, then lower the vehicle.
OHC engines
1Fitted to all fuel-injected models, the filter
can be renewed as follows. Disconnect the
battery negative lead.
2Raise and support the rear of the vehicle.
3Place a drain pan under the fuel filter. Take
adequate fire precautions.
4Wipe clean the area around the filter inlet
and outlet unions, then disconnect them (see
illustration). Caution: Fuel under pressure
may spray out as the unions are slackened.
5Slacken the filter clamp bolt and withdraw
the filter from the clamp. Dispose of the filter
safely, remember it is full of fuel.
6Fit the new filter into the clamp,observing
the arrows on the filter indicating the direction
of fuel flow. If there is a plastic band or sleeve
on the filter, position the clamp over the sleeve
to prevent chafing. Tighten the clamp bolt.
7Refit the inlet and outlet unions, using new
sealing washers. Tighten the union bolts.
8Reconnect the battery. Have an assistantswitch the ignition on and off a few times to
pressurise the system; watch the filter for
leakage as this is done.
9Lower the vehicle on completion.
V6 engines
10This operation is essentially the same as
described above, noting that the fuel system
should first be depressurised, see Chapter 4,
Section 28.
11Once the new filter has been installed,
switch the ignition on and off five times,
without cranking the engine, to pressurise the
system then check the filter unions for leaks.
Renew the crankcase ventilation vent valve
by pulling it from the oil separator and
loosening the hose clip (see illustration). Fit
the new valve, tighten the clip, and insert it
into the oil separator grommet.
Inspect the vent hose for blockage or
damage. A blocked hose can cause a build-up
of crankcase pressure, which in turn can
cause oil leaks.
42Crankcase ventilation vent
valve renewal
41Fuel filter renewal
40Automatic transmission
brake band adjustment
1•19
1
Every 36 000 miles or 3 years
41.4 Fuel filter outlet union (arrowed) -
OHC engine42.1 Pulling the vent valve from the oil
separator - SOHC engine40.3 Brake band adjuster screw (A) and
locknut (B)
If in doubt as to the condition of any of the
brake system seals and hoses, then renew
defective items whilst referring to the relevant
Sections of Chapter 10.
1An assistant andbleeding equipment will be
needed. A considerable quantity of hydraulic
fluid will be required - probably about 2 litres
(nearly half a gallon).2Slacken the front wheel nuts. Raise and
support the front of the vehicle andremove
the front wheels.
3Remove the hydraulic fluid reservoir cap.
4Open both front bleed screws one full turn.
Attach one bleed tube to each screw, placing
the free end of each tube in a jar.
5Pump the brake pedal to expel fluid from
the bleed screws. Pause after each upstroke
to allow the master cylinder to refill.
6When air emerges from both bleed screws,
stop pumping. Detach the left-hand caliper
without disconnecting it and remove the
inboard brake pad.
7Depress the caliper piston, using a purpose-
made tool or a blunt item such as a tyre lever,
to force more fluid out of the caliper. Hold thepiston depressed and have the assistant
pump the pedal until air emerges from the
bleed screw again.
8Tighten the bleed screw on the left-hand
caliper. Loosely refit the caliper and pad so
that the piston is not accidentally ejected.
9Repeat the purging operation on the right-
hand caliper, but do not refit it or tighten the
bleed screw yet.
10Fill the reservoir with fresh hydraulic fluid.
Position the bleed jar for the right-hand caliper
at least 300 mm (1 foot) above the level of the
bleed screw.
11Have the assistant pump the brake pedal
until fluid free of bubbles emerges from the
bleed screw. Tighten the bleed screw at the
end of a downstroke.
44Brake hydraulic fluid renewal
43Brake hydraulic system seal
and hose renewal
Every 36 000 miles or 3 years
procarmanuals.com
Page 22 of 255
Engine
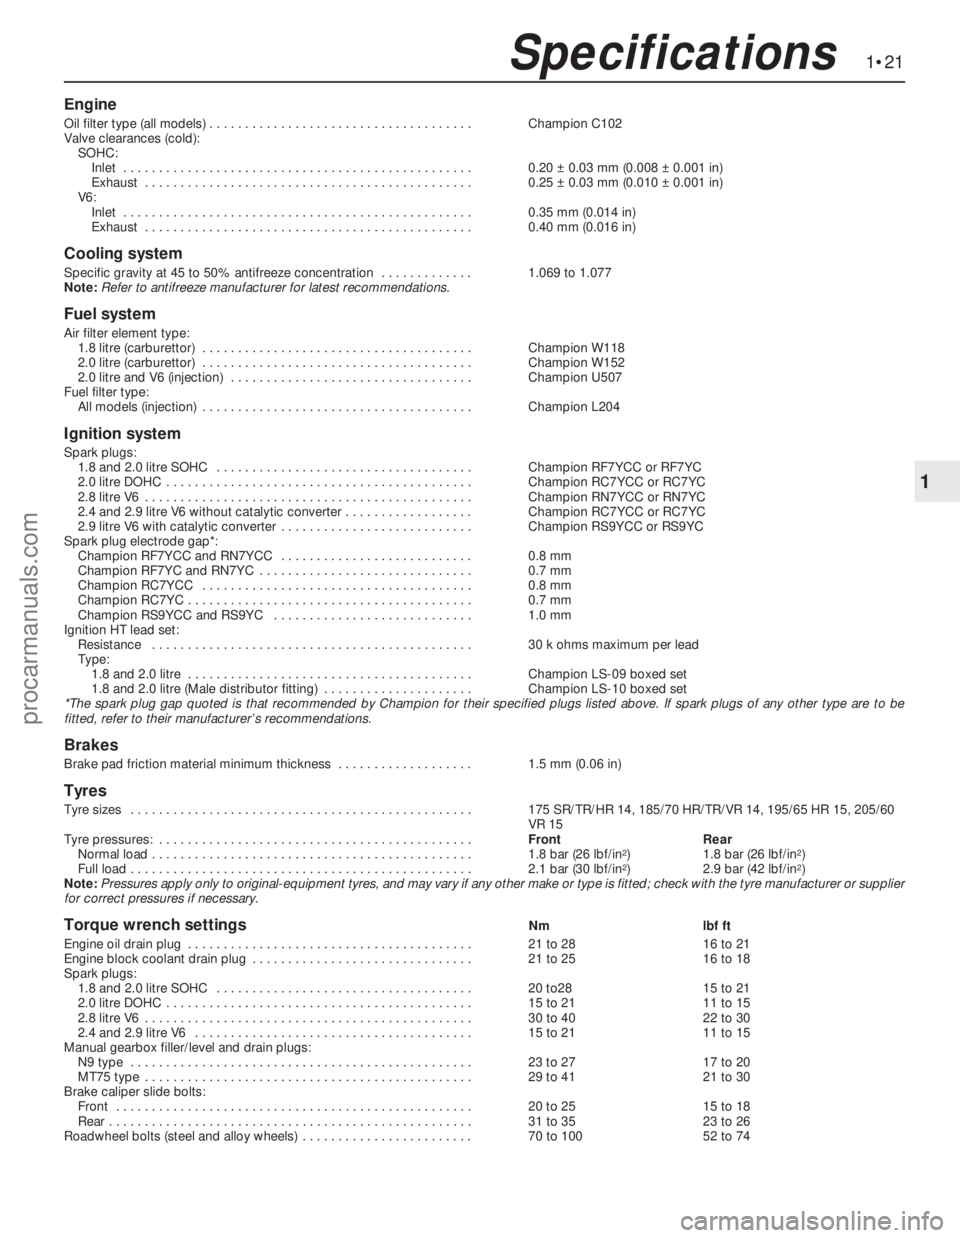
Oil filter type (all models) . . . . . . . . . . . . . . . . . . . . . . . . . . . . . . . . . . . . .Champion C102
Valve clearances (cold):
SOHC:
Inlet . . . . . . . . . . . . . . . . . . . . . . . . . . . . . . . . . . . . . . . . . . . . . . . . .0.20 ±0.03 mm (0.008 ±0.001 in)
Exhaust . . . . . . . . . . . . . . . . . . . . . . . . . . . . . . . . . . . . . . . . . . . . . .0.25 ±0.03 mm (0.010 ±0.001 in)
V6:
Inlet . . . . . . . . . . . . . . . . . . . . . . . . . . . . . . . . . . . . . . . . . . . . . . . . .0.35 mm (0.014 in)
Exhaust . . . . . . . . . . . . . . . . . . . . . . . . . . . . . . . . . . . . . . . . . . . . . .0.40 mm (0.016 in)
Cooling system
Specific gravity at 45 to 50% antifreeze concentration . . . . . . . . . . . . .1.069 to 1.077
Note:Refer to antifreeze manufacturer for latest recommendations.
Fuel system
Air filter element type:
1.8 litre (carburettor) . . . . . . . . . . . . . . . . . . . . . . . . . . . . . . . . . . . . . .Champion W118
2.0 litre (carburettor) . . . . . . . . . . . . . . . . . . . . . . . . . . . . . . . . . . . . . .Champion W152
2.0 litre and V6 (injection) . . . . . . . . . . . . . . . . . . . . . . . . . . . . . . . . . .Champion U507
Fuel filter type:
All models (injection) . . . . . . . . . . . . . . . . . . . . . . . . . . . . . . . . . . . . . .Champion L204
Ignition system
Spark plugs:
1.8 and 2.0 litre SOHC . . . . . . . . . . . . . . . . . . . . . . . . . . . . . . . . . . . .Champion RF7YCC or RF7YC
2.0 litre DOHC . . . . . . . . . . . . . . . . . . . . . . . . . . . . . . . . . . . . . . . . . . .Champion RC7YCC or RC7YC
2.8 litre V6 . . . . . . . . . . . . . . . . . . . . . . . . . . . . . . . . . . . . . . . . . . . . . .Champion RN7YCC or RN7YC
2.4 and 2.9 litre V6 without catalytic converter . . . . . . . . . . . . . . . . . .Champion RC7YCC or RC7YC
2.9 litre V6 with catalytic converter . . . . . . . . . . . . . . . . . . . . . . . . . . .Champion RS9YCC or RS9YC
Spark plug electrode gap*:
Champion RF7YCC and RN7YCC . . . . . . . . . . . . . . . . . . . . . . . . . . .0.8 mm
Champion RF7YC and RN7YC . . . . . . . . . . . . . . . . . . . . . . . . . . . . . .0.7 mm
Champion RC7YCC . . . . . . . . . . . . . . . . . . . . . . . . . . . . . . . . . . . . . .0.8 mm
Champion RC7YC . . . . . . . . . . . . . . . . . . . . . . . . . . . . . . . . . . . . . . . .0.7 mm
Champion RS9YCC and RS9YC . . . . . . . . . . . . . . . . . . . . . . . . . . . .1.0 mm
Ignition HT lead set:
Resistance . . . . . . . . . . . . . . . . . . . . . . . . . . . . . . . . . . . . . . . . . . . . .30 k ohms maximum per lead
Type:
1.8 and 2.0 litre . . . . . . . . . . . . . . . . . . . . . . . . . . . . . . . . . . . . . . . .Champion LS-09 boxed set
1.8 and 2.0 litre (Male distributor fitting) . . . . . . . . . . . . . . . . . . . . .Champion LS-10 boxed set
*The spark plug gap quoted is that recommended by Champion for their specified plugs listed above. If spark plugs of any other type are to be
fitted, refer to their manufacturer’s recommendations.
Brakes
Brake pad friction material minimum thickness . . . . . . . . . . . . . . . . . . .1.5 mm (0.06 in)
Tyres
Tyre sizes . . . . . . . . . . . . . . . . . . . . . . . . . . . . . . . . . . . . . . . . . . . . . . . .175 SR/TR/HR 14, 185/70 HR/TR/VR 14,195/65 HR 15, 205/60
VR 15
Tyre pressures: . . . . . . . . . . . . . . . . . . . . . . . . . . . . . . . . . . . . . . . . . . . .FrontRear
Normal load . . . . . . . . . . . . . . . . . . . . . . . . . . . . . . . . . . . . . . . . . . . . .1.8 bar (26 lbf/in
2)1.8 bar (26 lbf/in2)
Full load . . . . . . . . . . . . . . . . . . . . . . . . . . . . . . . . . . . . . . . . . . . . . . . .2.1 bar (30 lbf/in2)2.9 bar (42 lbf/in2)
Note:Pressures apply only to original-equipment tyres, and may vary if any other make or type is fitted; check with the tyre manufacturer or supplier
for correct pressures if necessary.
Torque wrench settingsNmlbf ft
Engine oil drain plug . . . . . . . . . . . . . . . . . . . . . . . . . . . . . . . . . . . . . . . .21 to 2816 to 21
Engine block coolant drain plug . . . . . . . . . . . . . . . . . . . . . . . . . . . . . . .21 to 2516 to 18
Spark plugs:
1.8 and 2.0 litre SOHC . . . . . . . . . . . . . . . . . . . . . . . . . . . . . . . . . . . .20 to2815 to 21
2.0 litre DOHC . . . . . . . . . . . . . . . . . . . . . . . . . . . . . . . . . . . . . . . . . . .15 to 2111 to 15
2.8 litre V6 . . . . . . . . . . . . . . . . . . . . . . . . . . . . . . . . . . . . . . . . . . . . . .30 to 4022 to 30
2.4 and 2.9 litre V6 . . . . . . . . . . . . . . . . . . . . . . . . . . . . . . . . . . . . . . .15 to 2111 to 15
Manual gearbox filler/level and drain plugs:
N9 type . . . . . . . . . . . . . . . . . . . . . . . . . . . . . . . . . . . . . . . . . . . . . . . .23 to 2717 to 20
MT75 type . . . . . . . . . . . . . . . . . . . . . . . . . . . . . . . . . . . . . . . . . . . . . .29 to 4121 to 30
Brake caliper slide bolts:
Front . . . . . . . . . . . . . . . . . . . . . . . . . . . . . . . . . . . . . . . . . . . . . . . . . .20 to 2515 to 18
Rear . . . . . . . . . . . . . . . . . . . . . . . . . . . . . . . . . . . . . . . . . . . . . . . . . . .31 to 3523 to 26
Roadwheel bolts (steel and alloy wheels) . . . . . . . . . . . . . . . . . . . . . . . .70 to 10052 to 74
1•21
1
Specifications
procarmanuals.com
Page 28 of 255
The cylinder head is of crossflow design
with the inlet manifold mounted on the left-
hand side and the exhaust manifold mounted
on the right-hand side.
Lubrication is by means of a bi-rotor pump
which draws oil through a strainer located
inside the sump, and forces it through a full-
flow filter into the engine oil galleries where it
is distributed to the crankshaft, camshaft and
auxiliary shaft. The big-end bearings are
supplied with oil via internal drillings in the
crankshaft.The undersides of the pistons are
supplied with oil from drillings in the big-ends.
The distributor shaft is intermittently supplied
with oil from the drilled auxiliary shaft. The
camshaft and cam followers are supplied with
oil via a drilled spray tube from the centre
camshaft bearing.
A semi-closed crankcase ventilation system
is employed whereby piston blow-by gases
are drawn into the inlet manifold via an oil
separator and on carburettor models a control
valve.
The following operations can be carried out
without removing the engine, although the
work may be easier and quicker with the
engine removed:
a)Removal and refitting of the cylinder head
b)Removal and refitting of the camshaft
(after removing the cylinder head)
c)Removal and refitting of the timing belt
and sprockets
d)Removal and refitting of the sump and oil
pump
e)Removal and refitting of the pistons,
connecting rods and big-end bearings
f)Renewal of the engine mountings
g)Renewal of the crankshaft oil seals
h)Removal and refitting of the auxiliary shaft
j)Removal and refitting of the flywheel
The engine must be removed from the
vehicle for the following operations:
a)Renewal of the crankshaft main bearings
b)Removal and refitting of the crankshaft
The engine may be lifted out either on its
own or together with the gearbox. Unless work
is also necessary on the gearbox it is
recommended that the engine is removed on
its own. Where automatic transmission is
fitted, the engine should be removed on its
own owing to the additional weight. If the
engine and gearbox are removed together,
they will have to be tilted at a very steep angle;
make sure that the range of the lifting tackle is
adequate.1Disconnect the battery negative lead.
2Remove the bonnet.
3On carburettor models, remove the air
cleaner. On fuel-injection models, remove the
air cleaner cover, vane airflow meter and air
inlet trunking.
4If a splash guard is fitted, remove it.
5Release the securing clips and bolts and
remove the upper half of the fan shroud. On
carburettor models remove the lower half of
the shroud too.
6Drain the cooling system.
7Disconnect the radiator top and bottom
hoses from the thermostat housing and water
pump. Disconnect the top hose spur from the
expansion tank and unclip it.
8Disconnect the heater hoses from the water
pump and from the inlet manifold or automatic
choke housing. Unclip the hoses.
9On models with power steering, remove the
steering pump.
10Disconnect the vacuum pipe(s) from the
inlet manifold, labelling them if there is any
possibility of confusion.
11Disconnect the following wiring, as
applicable:
a)Alternator
b)Temperature gauge sender
c)Engine management temperature sensor
d)Distributor
e)Oil pressure switch
f)Automatic choke and thermo-switch
g)Carburettor stepper motor
h)Fuel-injection system sub-harness
j)Inlet manifold heater
12Disconnect the HT lead from the coil.
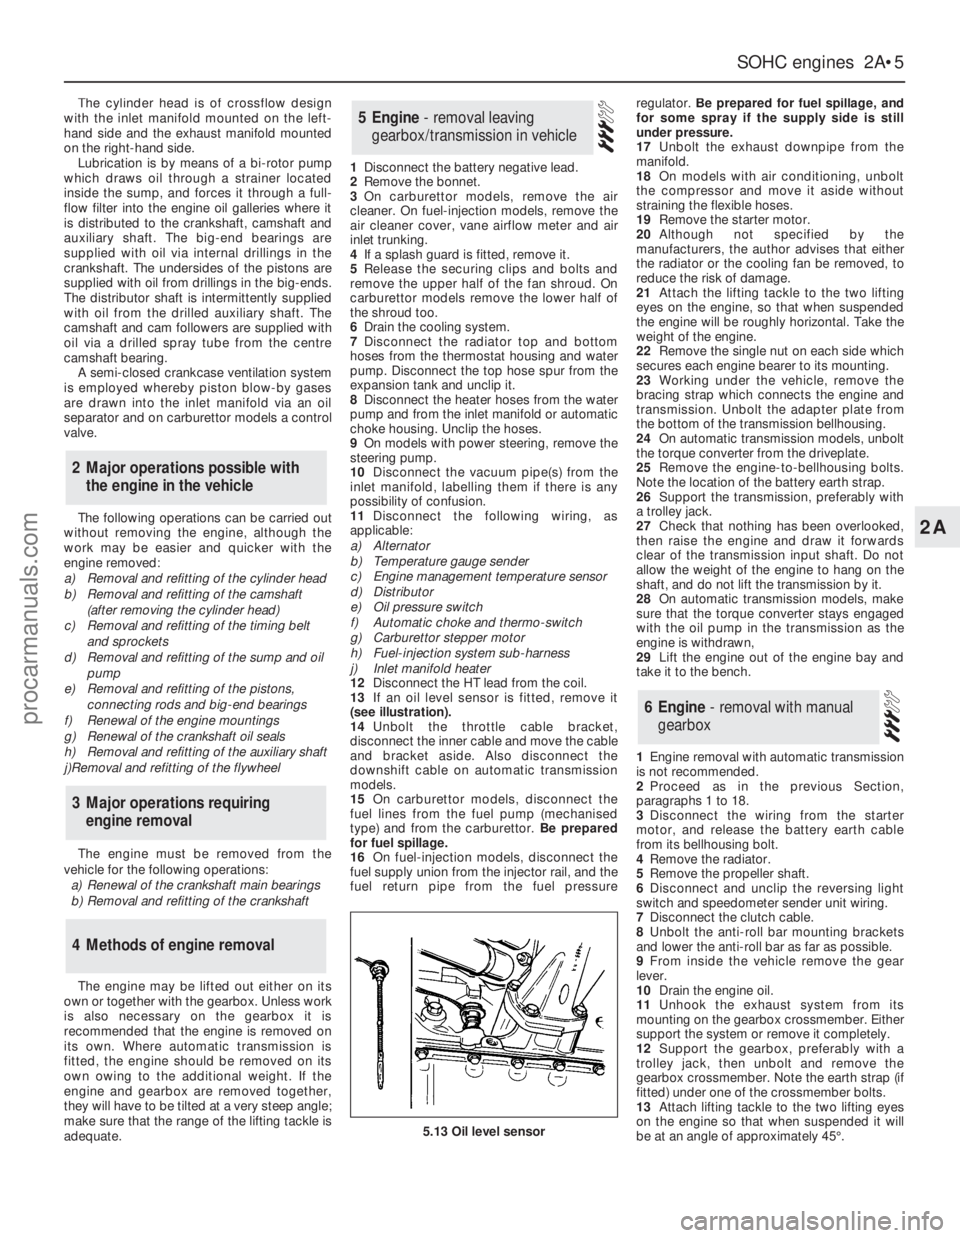
13If an oil level sensor is fitted, remove it
(see illustration).
14Unbolt the throttle cable bracket,
disconnect the inner cable and move the cable
and bracket aside. Also disconnect the
downshift cable on automatic transmission
models.
15On carburettor models, disconnect the
fuel lines from the fuel pump (mechanised
type) and from the carburettor. Be prepared
for fuel spillage.
16On fuel-injection models, disconnect the
fuel supply union from the injector rail, and the
fuel return pipe from the fuel pressureregulator. Be prepared for fuel spillage, and
for some spray if the supply side is still
under pressure.
17Unbolt the exhaust downpipe from the
manifold.
18On models with air conditioning, unbolt
the compressor and move it aside without
straining the flexible hoses.
19Remove the starter motor.
20Although not specified by the
manufacturers, the author advises that either
the radiator or the cooling fan be removed, to
reduce the risk of damage.
21Attach the lifting tackle to the two lifting
eyes on the engine, so that when suspended
the engine will be roughly horizontal. Take the
weight of the engine.
22Remove the single nut on each side which
secures each engine bearer to its mounting.
23Working under the vehicle, remove the
bracing strap which connects the engine and
transmission. Unbolt the adapter plate from
the bottom of the transmission bellhousing.
24On automatic transmission models, unbolt
the torque converter from the driveplate.
25Remove the engine-to-bellhousing bolts.
Note the location of the battery earth strap.
26Support the transmission, preferably with
a trolley jack.
27Check that nothing has been overlooked,
then raise the engine and draw it forwards
clear of the transmission input shaft. Do not
allow the weight of the engine to hang on the
shaft, and do not lift the transmission by it.
28On automatic transmission models, make
sure that the torque converter stays engaged
with the oil pump in the transmission as the
engine is withdrawn,
29Lift the engine out of the engine bay and
take it to the bench.
1Engine removal with automatic transmission
is not recommended.
2Proceed as in the previous Section,
paragraphs 1 to 18.
3Disconnect the wiring from the starter
motor, and release the battery earth cable
from its bellhousing bolt.
4Remove the radiator.
5Remove the propeller shaft.
6Disconnect and unclip the reversing light
switch and speedometer sender unit wiring.
7Disconnect the clutch cable.
8Unbolt the anti-roll bar mounting brackets
and lower the anti-roll bar as far as possible.
9From inside the vehicle remove the gear
lever.
10Drain the engine oil.
11Unhook the exhaust system from its
mounting on the gearbox crossmember. Either
support the system or remove it completely.
12Support the gearbox, preferably with a
trolley jack, then unbolt and remove the
gearbox crossmember. Note the earth strap (if
fitted) under one of the crossmember bolts.
13Attach lifting tackle to the two lifting eyes
on the engine so that when suspended it will
be at an angle of approximately 45°.
6Engine - removal with manual
gearbox
5Engine - removal leaving
gearbox/transmission in vehicle
4Methods of engine removal
3Major operations requiring
engine removal
2Major operations possible with
the engine in the vehicle
SOHCengines 2A•5
2A
5.13 Oil level sensor
procarmanuals.com
Page 42 of 255
If the crankcase ventilation oil separator was
removed, apply a liquid locking agent to its
tube before pressing it into the cylinder block.
1Make sure that the clutch is centred.
2Apply a smear of grease or anti-seize
compound to the gearbox input shaft splines.
3With the aid of an assistant, offer the
gearbox to the engine. If the input shaft is
reluctant to enter the clutch, rock the gearbox
slightly or turn the crankshaft back and forth.
Support the gearbox until it is engaged with
the dowels on the engine - do not leave it
hanging on the input shaft.4Refit the engine-to-bellhousing bolts, the
bracing strap and the starter motor.
1Sling the engine/gearbox unit so that it
hangs at an angle of approximately 45°.
2Lower the unit into the engine bay, at the
same time moving it towards the rear of the
vehicle. Have an assistant watch as the unit is
lowered to check that no pipes, wires etc are
fouled or trapped.
3Raise the gearbox as the engine is lowered
until the unit takes up its correct position.
Secure the engine bearers to the mountings
and refit the gearbox crossmember.
4The remainder of refitting is a reversal of the
removal procedure. Refer to Section 6. Also
refer to Section 49, paragraph 9.
5Before starting the engine, refer to Section 51.
1On manual gearbox models, check that the
clutch is centred correctly. Apply a smear of
grease or anti-seize compound to the gearbox
input shaft.
2On automatic transmission models, check
that the torque converter is fully engaged with
the transmission oil pump.
3Sling the engine so that it is roughly horizontal.Lift it and position it over the engine bay.
4Lower the engine into place. Have an
assistant watch as the unit is lowered to check
that no pipes, wires etc are fouled or trapped.
5Guide the engine onto the transmission,
raising or lowering the transmission slightly if
necessary. Do not place any weight on the
transmission input shaft. With manual gearbox
models, rock the engine gently from side to
side to encourage the input shaft to enter the
clutch.
6When the engine and transmission are fully
engaged, refit the engine-to-bellhousing bolts.
Do not overlook the earth strap.
7Lower the engine so that the engine bearers
engage with the mountings. Fit the mounting
nuts and remove the lifting tackle.
8On automatic transmission models, bolt the
torque converter to the driveplate.
9The remainder of refitting is a reversal of the
removal procedure. Note the following
additional points:
a)Refill the engine with oil
b)Check the transmission oil level if
necessary
c)Adjust the tension of the accessory
drivebelts
d)Adjust the throttle cable
e)Adjust the downshift cable when
applicable
f)Refill the cooling system
10Before starting the engine, see Section 51
49Engine - refitting without
gearbox/transmission
48Engine - refitting with manual
gearbox
47Engine and gearbox -
reconnection
SOHCengines 2A•19
2A
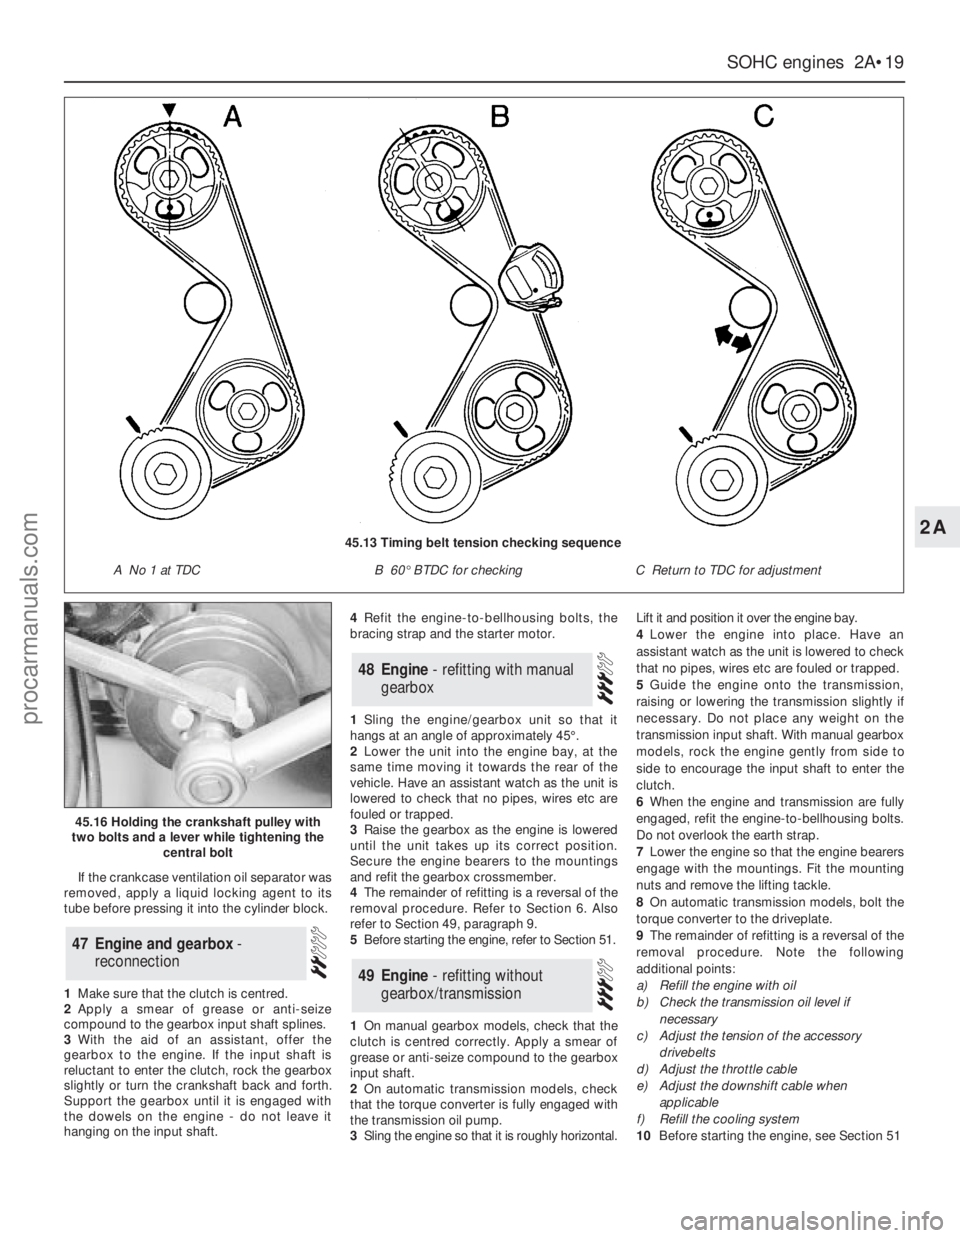
45.16 Holding the crankshaft pulley with
two bolts and a lever while tightening the
central bolt
45.13 Timing belt tension checking sequence
A No 1 at TDCB 60°BTDC for checkingC Return to TDC for adjustment
procarmanuals.com
Page 43 of 255
See Chapter 1, Section 23.
1Make a final check to ensure that everything
has been reconnected to the engine and that no
rags or tools have been left in the engine bay.
2Check that oil and coolant levels are
correct.
3Start the engine. This may take a little longer
than usual as fuel is pumped up to the engine.
4Check that the oil pressure light goes out
when the engine starts.
5Run the engine at a fast tickover and check
for leaks of oil, fuel and coolant. Also check
power steering and transmission fluid cooler
unions, when applicable. Some smoke and
odd smells may be experienced as assembly
lubricant burns off the exhaust manifold and
other components.6Bring the engine to operating temperature.
Check the ignition timing then adjust the idle
speed (if applicable) and mixture.
7Stop the engine and allow it to cool, then re-
check the oil and coolant levels.
8If new bearings, pistons etc have been
fitted, the engine should be run in at reduced
speeds and loads for the first 500 miles (800
km) or so. It is beneficial to change the engine
oil and filter after this mileage.
1When engine performance is down, or if
misfiring occurs which cannot be attributed to
the ignition or fuel system, a compression test
can provide diagnostic clues. If the test is
performed regularly it can give warning of
trouble before any other symptoms become
apparent.
2The engine must be at operating
temperature, the battery must be fully charged
and the spark plugs must be removed. The
services of an assistant will also be required.
3Disable the ignition system by dismantlingthe coil LT feed. Fit the compression tester to
No 1 spark plug hole. (The type of tester which
screws into the spark plug hole is to be
preferred.)
4Have the assistant hold the throttle wide
open and crank the engine on the starter.
Record the highest reading obtained on the
compression tester.
5Repeat the test on the remaining cylinders,
recording the pressure developed in each.
6Desired pressures are given in the
Specifications. If the pressure in any cylinder
is low, introduce a teaspoonful of clean engine
oil into the spark plug hole and repeat the test.
7If the addition of oil temporarily improves
the compression pressure, this indicates that
bore or piston wear was responsible for the
pressure loss. No improvement suggests that
leaking or burnt valves, or a blown head
gasket, may be to blame.
8A low reading from two adjacent cylinders is
almost certainly due to the head gasket
between them having blown.
9On completion of the test, refit the spark
plugs and reconnect the coil LT feed.
52Compression test -
description and interpretation
51Initial start-up after overhaul
or major repair
50Valve clearances - checking
and adjustment
2A•20SOHCengines
procarmanuals.com
Page 50 of 255
21Working through the starter motor
aperture, unscrew the four torque converter-
to-driveplate nuts. It will be necessary to turn
the crankshaft using a spanner on the
crankshaft pulley bolt in order to gain access
to each nut in turn through the aperture.
22Where applicable, remove the bolt
securing the transmission fluid dipstick tube to
the left-hand side of the cylinder block.
23Unscrew the engine-to-transmission bolts,
noting the locations of the bolts, and the
positions of the earth strap and any wiring
clips attached to the bolts. Recover any shims
fitted between the sump and the transmission
when removing the lower engine-to-
transmission bolts.
24Unscrew the bolt from the engine adapter
plate and, where applicable, pull the blanking
plug from the adapter plate.
25Pull the engine and the transmission apart,
ensuring that the torque converter is held firmly
in place in the transmission housing, otherwise
it could fall out resulting in fluid spillage and
possible damage. It may be necessary to rock
the units slightly to separate them.
1Reverse the procedure described in
paragraphs 1 to 40 ofSection 5, noting the
following points.
2Before attempting to refit the engine, check
that the clutch friction disc is centralised.
3Check that the clutch release arm and
bearing are correctly fitted, and lightly grease
the input shaft splines.
4Check that the engine adapter plate is
correctly positioned on the locating dowels. If
necessary, a cable-tie can be used to
temporarily secure the adapter plate in
position on the cylinder block using one of the
engine-to-gearbox bolt holes.
5If shims were fitted between the sump and
the gearbox, refit them in their original
locations when mating the engine to the
gearbox. If the engine has been overhauled,
where applicable fit the relevant shims as
calculated during engine reassembly .
6Reconnect the clutch cable to the release arm,
ensuring that it is routed as noted during removal.
7Ensure that the roadwheels and the steering
wheel are in the straight-ahead position then
align the marks made on removal and reconnect
the intermediate shaft to the steering gearing.
Tighten the clamp bolt to the specified torque.
8Refit the exhaust downpipe.
9Fill the engine with the correct grade and
quantity of oil.
10Check the throttle cable adjustment. Where
necessary, also adjust the speed control cable
in the same way so that there is only a small
amount of slack present in the cable.
11Reconnect the coolant hoses to the water
pump housing.
12Fill the cooling system .
13Tighten all fixings to the specified torque,
where applicable.1Reverse the procedure described in Section 6,
noting the following points.
2Check that the engine adapter plate is
correctly positioned on the locating dowels. If
necessary, a cable-tie can be used to
temporarily secure the adapter plate in
position on the cylinder block using one of the
engine-to-transmission bolt holes.
3As the torque converter is only loosely
engaged in the transmission, care must be taken
to prevent the torque converter from falling out
forwards. When the torque converter hub is fully
engaged with the fluid pump drivegear in the
transmission, distance A (see illustration 2.20 in
Chapter 7B)must be as specified. Incorrect
installation of the torque converter will result in
damageto the transmission.
4If shims were fitted between the sump and
the transmission, refit them in their original
locations when mating the engine to the
transmission. If the engine has been
overhauled, where applicable fit the relevant
shims as calculated during engine reassembly.
5As the engine is installed, guide the torque
converter studs through the holes in the
driveplate. When the engine is positioned flush
with the engine adapter plate and the
transmission housing, check that the torque
converter is free to move axially a small
amount before refitting and tightening the
engine-to-transmission bolts.
6Do not tighten the torque converter-to-
driveplate nuts until the lower engine-to-
transmission bolts have been fitted and
tightened.
7Ensure that the roadwheels and the steering
wheel are in the straight-ahead position then
align the marks made on removal and
reconnect the intermediate shaft to the
steering gearing. Tighten the clamp bolt to the
specified torque.
8Refit the exhaust downpipe.
9Fill the engine with the correct grade and
quantity of oil.
10Check the throttle cable adjustment. Where
necessary, also adjust the speed control cable
in the same way so that there is only a small
amount of slack present in the cable.
11Reconnect the coolant hoses to the water
pump housing.
12Fill the cooling system.
13Tighten all fixings to the specified torque,
where applicable.
1Reverse the procedure described in Section 7,
noting the following points.
2Before attempting to reconnect the engine
to the gearbox, check that the clutch friction
disc is centralised.
3Check that the clutch release arm andbearing are correctly fitted, and lightly grease
the input shaft splines.
4Check that the engine adapter plate is
correctly positioned on the locating dowels. If
necessary, a cable-tie can be used to
temporarily secure the adapter plate in
position on the cylinder block using one of the
engine-to-gearbox bolt holes.
5If shims were fitted between the sump and
the gearbox, refit them in their original
locations when mating the engine to the
gearbox. If the engine has been overhauled,
where applicable fit the relevant shims as
calculated during engine reassembly.
6Ensure that the roadwheels and the steering
wheel are in the straight-ahead position then
align the marks made on removal and
reconnect the intermediate shaft to the
steering gearing. Tighten the clamp bolt to the
specified torque.
7Reconnect the clutch cable to the release
arm, ensuring that it is routed as noted during
removal.
8Refit the propeller shaft.
9Refit the exhaust system.
10Fill the engine with the correct grade and
quantity of oil.
11Check the throttle cable adjustment. Where
necessary, also adjust the speed control cable
in the same way so that there is only a small
amount of slack present in the cable.
12Reconnect the coolant hoses to the water
pump housing.
13Fill the cooling system.
14Check and if necessary top-up the
gearbox oil level.
15Tighten all fixings to the specified torque,
where applicable.
1Reverse the procedure described in Section 8,
noting the following points.
2Check that the engine adapter plate is
correctly positioned on the locating dowels. If
necessary, a cable-tie can be used to
temporarily secure the adapter plate in
position on the cylinder block using one of the
engine-to-transmission bolt holes.
3As the torque converter is only loosely
engaged in the transmission, care must be taken
to prevent the torque converter from falling out
forwards. When the torque converter hub is fully
engaged with the fluid pump drivegear in the
transmission, distance A (see illustration 2.20 in
Chapter 7B)must be as specified. Incorrect
installation of the torque converter will result in
damage to the transmission.
4If shims were fitted between the sump and
the transmission, refit them in their original
locations when mating the engine to the
transmission. If the engine has been
overhauled, where applicable fit the relevant
shims as calculated during engine reassembly.
5As the engine and transmission are mated
12Engine/automatic
transmission assembly -
reconnection and refitting
11Engine/manual gearbox
assembly - reconnection and
refitting
10Engine - refitting (automatic
transmission in vehicle)
9Engine - refitting (manual
gearbox in vehicle)
DOHCengine 2B•7
2B
procarmanuals.com
Page 51 of 255
together, guide the torque converter studs
through the holes in the driveplate. When the
engine is positioned flush with the engine
adapter plate and the transmission housing,
check that the torque converter is free to move
axially a small amount before refitting and
tightening the engine-to-transmission bolts.
6Do not tighten the torque converter-to-
driveplate nuts until the lower engine-to-
transmission bolts have been fitted and
tightened.
7Ensure that the roadwheels and the steering
wheel are in the straight-ahead position then
align the marks made on removal and
reconnect the intermediate shaft to the
steering gearing. Tighten the clamp bolt to the
specified torque.
8Reconnect the selector rod and adjust as
described in Chapter 7, PartB.
9Refit the propeller shaft.
10Refit the exhaust system.
11Fill the engine with the correct grade and
quantity of oil.
12Check the throttle cable adjustment. Where
necessary, also adjust the speed control cable
in the same way so that there is only a small
amount of slack present in the cable.
13Reconnect the coolant hoses to the water
pump housing.
14Fill the cooling system.
15Check and if necessary top-up the
transmission fluid level.
16Tighten all fixings to the specified torque,
where applicable.
Proceed as described in Part A, Section 23
of this Chapter but note that on certain
models, it may be necessary to unbolt the
engine mounting brackets from the cylinder
block to allow sufficient clearance to remove
the mountings.
1Refer to Part A, Section 8 of this Chapter,
paragraphs 1 to 8 inclusive.
2A selection of splined and Torx sockets will
be required to remove many of the bolts when
dismantling the engine.
3Before dismantling the main engine
components, the following externally mounted
ancillary components can be removed.
a)Inlet manifold (and carburettor, where
applicable).
b)Exhaust manifold.
c)Alternator.
d)Water pump, and thermostat.
e)Water pump/alternator drivebelt tensioner.
f)Distributor cap, HT leads and spark plugs.
g)Oil pressure warning lamp switch.
h)Crankshaft speed/position sensor.
i)Oil filter.
j)Dipstick.
k)Engine mounting brackets (if not already
done).
l)Crankcase ventilation pipe and hoses.m)Clutch.
n)Alternator mounting bracket.
o)Air conditioning compressor mounting
bracket (where applicable).
p)Engine lifting brackets.
Note: A puller will be required to remove the
crankshaft pulley. A new crankshaft pulley bolt,
a new timing chain tensioner plunger
assembly, new upper and lower timing chain
cover gaskets and a new camshaft cover
gasket and reinforcing sleeve sealing rings
must be used on refitting.
1If the engine is in the car, carry out thefollowing operations.
a)Disconnect the battery negative lead.
b)To improve access, remove the radiator. It
will be difficult to remove the crankshaft
pulley with the radiator in place.
c)On carburettor models, remove the air
cleaner.
d)On fuel-injection models, remove the air
inlet hose, plenum chamber and air
cleaner lid as an assembly.
e)Disconnect the breather hose from the
camshaft cover.
f)Remove the distributor cap and HT leads,
and the rotor arm and housing.
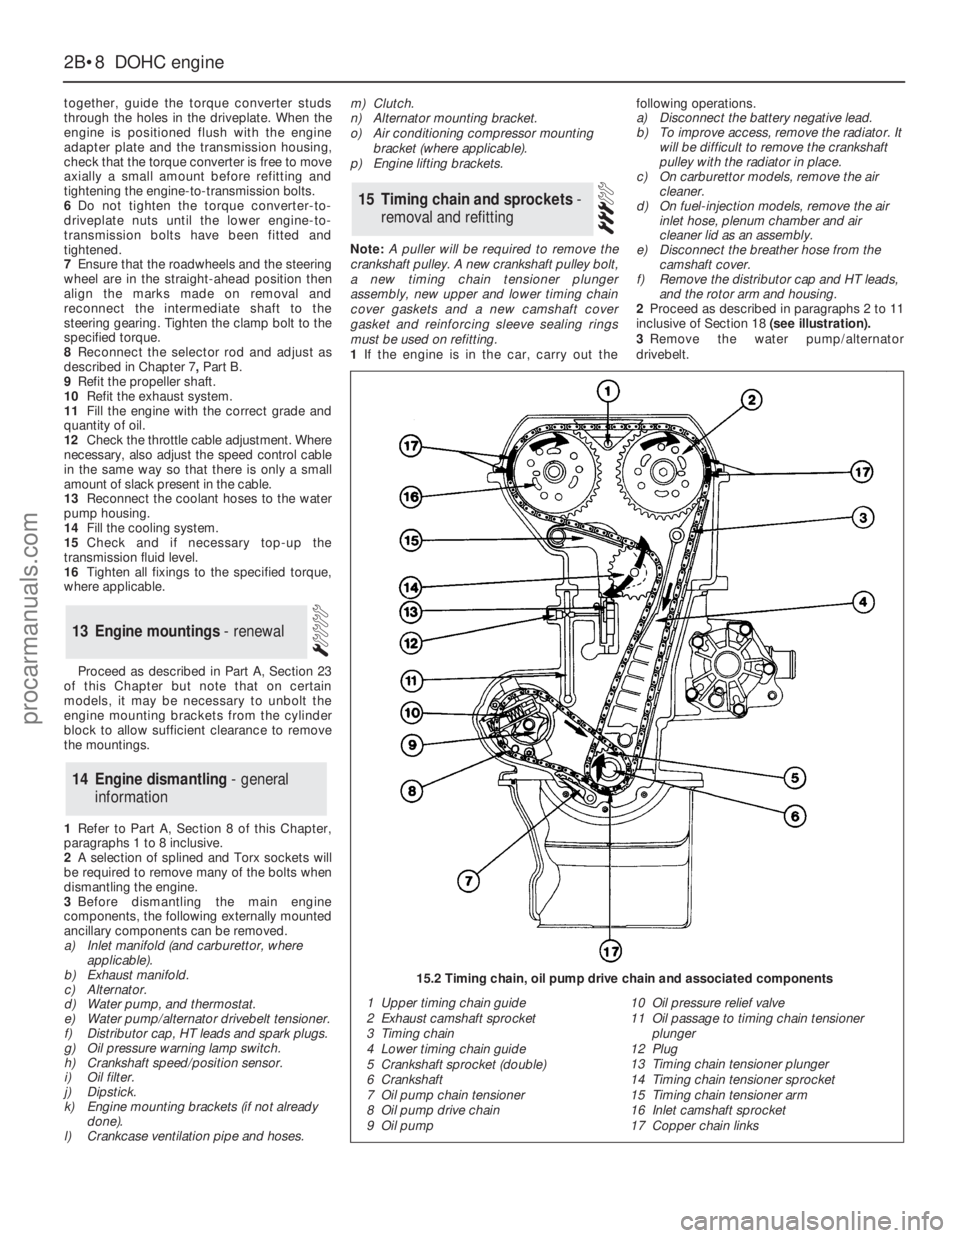
2Proceed as described in paragraphs 2 to 11
inclusive of Section 18 (see illustration).
3Remove the water pump/alternator
drivebelt.
15Timing chain and sprockets -
removal and refitting
14Engine dismantling - general
information
13Engine mountings - renewal
2B•8DOHCengine
1 Upper timing chain guide
2 Exhaust camshaft sprocket
3 Timing chain
4 Lower timing chain guide
5 Crankshaft sprocket (double)
6 Crankshaft
7 Oil pump chain tensioner
8 Oil pump drive chain
9 Oil pump10 Oil pressure relief valve
11 Oil passage to timing chain tensioner
plunger
12 Plug
13 Timing chain tensioner plunger
14 Timing chain tensioner sprocket
15 Timing chain tensioner arm
16 Inlet camshaft sprocket
17 Copper chain links
15.2 Timing chain, oil pump drive chain and associated components
procarmanuals.com