Page 57 of 77
SEAT BELT
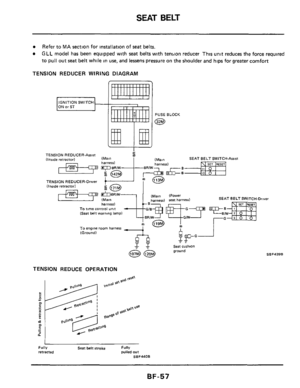
Refer to MA section for installation of seat belts.
GLL model has been equipped with seat belts with tension reducer This unit reduces the force required
to pull out seat belt while in use, and lessens pressure on the shoulder and hips for greater comfort
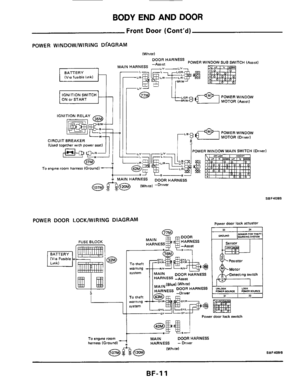
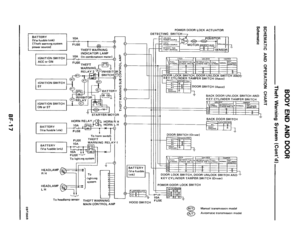
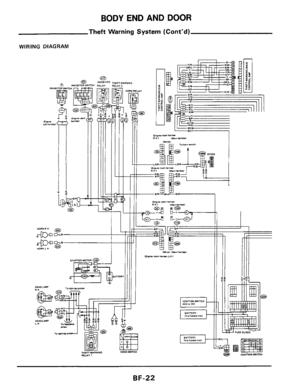
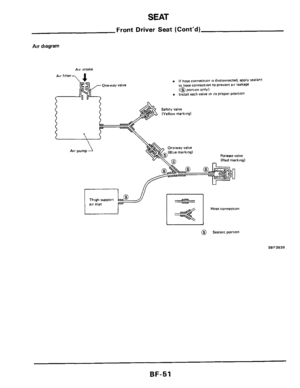
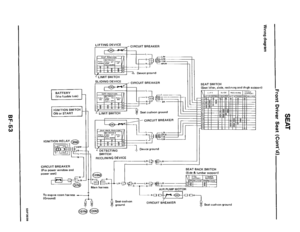
TENSION REDUCER WIRING DIAGRAM
IGNITION SWITCH I ON or ST
TENSION REDUCER-Assist
FUSE BLOCK
@
U
SEAT BELT SWITCH-Assist Iinrjde retractor1 (Main harness1
TENSION REDUCER-Driver (Inside retractor)
SEAT BELT SWITCH-Drwer IM~I~ IPower
harness1 To rime control unit (Seat belt warning lamp1
To engine room harness (Ground)
__ seat cushion ground
TENSION REDUCE OPERATION
SBF439B
Fully Seat belt stroke Fully retraned pulled out SBFMOE
Page 58 of 77
TRIM AND MOLDING
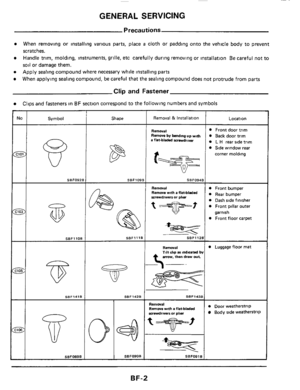
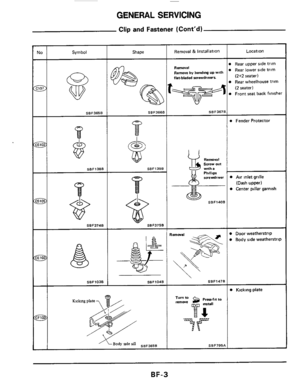
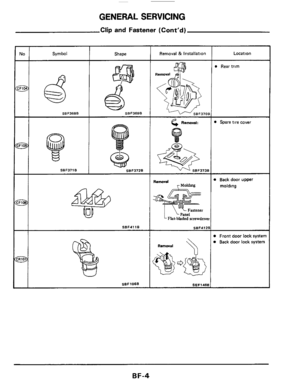
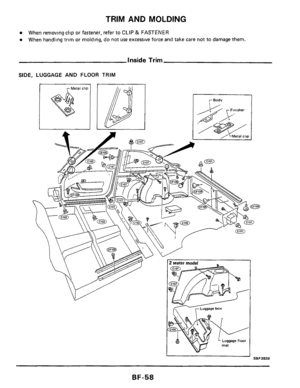
When removlng clip or fastener, refer to CLIP & FASTENER
When handllng trim or molding, do not use excessive force and take care not to damage them.
inside Trim
SIDE, LUGGAGE AND FLOOR TRIM
1
BF-58
Page 59 of 77
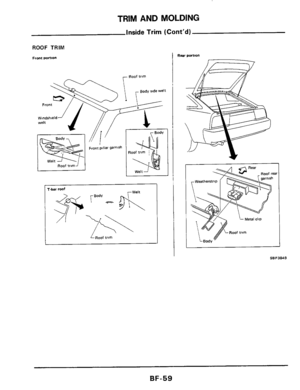
TRIM AND MOLDING
Inside Trim (Cont’d)
ROOF TRIM
Front portion
I LRmf trim
Rear portion
BF-59
Page 60 of 77
TRIM AND MOLDING
Exterior
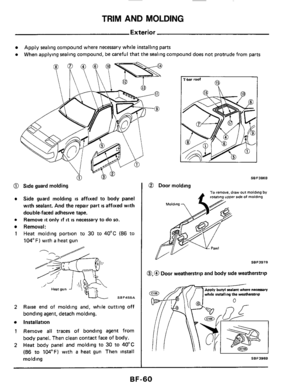
Apply sealing compound where necessary while installing parts
When applying sealing compound, be careful that the sealing compound does not protrude from parts
@ Side guard molding
Side guard molding is affixed to body panel
with sealant. And
the repair part is affixed with
double-faced adhesive tape.
Remove
it only if it is necessary to do so. e
1
Remova I :
Heat molding portion to 30 to 40°C (86 to
104'F) with
a heat gun
SBF455A
2
Installation
1 Remove all traces of bonding agent from
body panel. Then clean contact face
of body.
2 Heat body panel and molding to 30 to 40°C
(86 to 104°F) with a heat gun Then install
molding
Raise end of molding and, while cutting off
bonding agent, detach molding.
0 T-bar roof
SBF386B
@ Door molding
ve, draw out molding by upper ride of molding
SBF397B
0.0 Door weatherstrip and body side weatherstrip
while inslalling the weathemrip
SBF398B
BF-60
Page 61 of 77
TRIM AND MOLDING
Exterioi
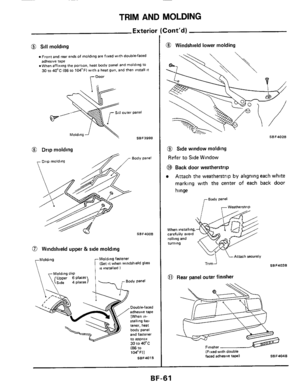
@ Sill molding
Front and rear ends of molding are fixed with double-faced
.When affixing the portion, heat body panel and moldlng
to adhesive tape
30 to 40'C I86 to 104'FI with a heat gun, and then innall gt
8 Drip molding
Body panel
SBF400B
0 Windshield upper & side molding
Molding fastener
(Set It when windshield glass IS installed I
Double-faced
adherive tape
[When
in-
tener, heat
body Panel
and fastener Otalllng far-
SBF401B
:ont'd)
@ Windshield lower molding
SBF402B
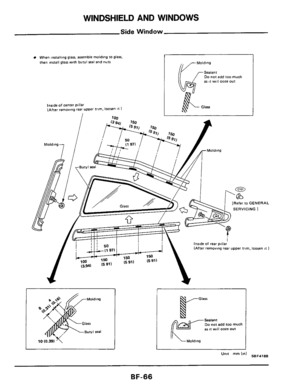
@ Side window molding
Refer to Side Window
@ Back door weatherstrip
Attach the weatherstrip by aligning each white
marking with the center of each back door
hinge
rsodv panel
Weatherstrip
When mstalltng.
carefully avoid
rolling and
-1 LAttach securely
Trim
SBF403B
0 Rear panel outer finisher
(Fwed wth double faced adhesive tape) SBF404B
BF-61
Page 62 of 77
TRIM AND MOLDING
Exterio
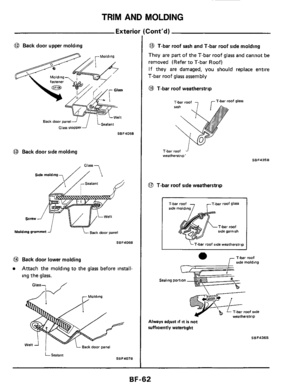
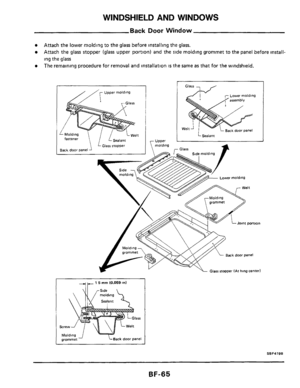
@ Back door upper molding
Back door panel
SBF405B
0 Back door side molding
, Glass-
Sidemolding // 1
Screw
Molding gromrne? J Back door panel
SBF406B
@ Back door lower molding
Attach the molding to the glass before install-
ing the glass.
Glass, /
SBF4078 Sealant
Cont'd)
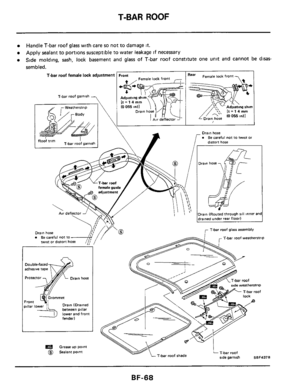
@ T-bar roof sash and T-bar roof side molding
They are part of the T-bar roof glass and cannot be
removed (Refer to T-bar
Roof)
If they
are damaged, you should replace entire
T-bar roof glass assembly
@I T-bar roof weatherstrip
T-bar roof glass T-bar roof 7
T-bar roof ' weatherstrlp'
0 T-bar roof side weatherstrip
T-bar roof glaSS
T-bar roof side weatherstrq
- T-bar roof
T-bar roof ride
weatherstrip
Always adjust if it is not
sufficiently watertight
SBF436B
BF-62
Page 63 of 77

WINDSHIELD AND WINDOWS
Windshield
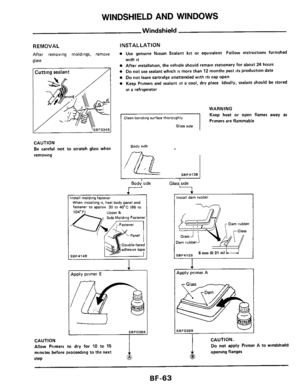
REMOVAL
After removing moldings. remove
glass
I Cutting sealant /I
CAUTION Be careful not to scratch glass when
removing
INSTAL LATl ON
Use genuine Nissan Sealant kit or equivalent Follow instructions furnished
with it
After installation, the vehicle should remain stationary for about 24 hours
Do not use sealant which is more than 12 months past its production date
Do not leave cartridge unattended with its cap open
Keep Primers and sealant in a cool, dry place Ideally, sealant should be stored
in a refrigerator
WARNING
Keep heat or open flames away as Clean banding surface thoroughly -1 Primers are flammable
I Glass side
Body stde
,m SEF4136
i-- Bod; side Glass'side
-- 4 nstall molding fastener When inrtalling it. heat body panel and
fastener to approx 30 to 40'C (86 to
Side Molding Fastener
SBF414B
I - .
Apply primer E
S E F038 B
Allow Primers to dry for 10 to 15
minutes before proceeding to the next
CAUTION
step
T Install dam rubber
8 mrn 10 31 in) 5EF415B
I
Apply primer A
&&$P& 11111
SEFO39B I
CAUTION.
Do not apply Primer A to windshield
I opening flanges
@
BF-63
Page 64 of 77
WINDSHIELD AND WINDOWS
Windshield (Cont'd)
Relative humidity
90 50
Temperature OC (OF)
I v
lnstall spacers to panel wlth double-faced tape
surfaces until sealant has properly
25 vulcanized
Vehde center
3oo 111 Unit rnm (in1 SBF416E
Apply sealant evenly
Approximately
8 10 311
L Glass L Approximately
11 1043) Untt rnm (in1 SBF417B
I CAUTION
Windshield glass should be installed
within 15 minutes of applying sealnt
sealant starts
to harden 15 minutes
after
it is applied
Set glass in position and
. press glass lightly and evenly
1
Set moldings
k-J
Check for water leakage
Install molding
25 (77) I 16 I 29 1 61
BF-64


ROOF TRIM
Front portion
I LRmf trim
Rear portion
BF-59")


Relative humidity
90 50
Temperature OC (OF)
I v
lnstall spacers to panel wlth double-faced tape
surfaces until sealant has properly
25 vulcanized")