1984 CHEVROLET CAVALIER ESP
[x] Cancel search: ESPPage 15 of 105
Downloaded from www.Manualslib.com manuals search engine 4. To lengthen the center seat lap belt, place the latch plate at a right angle
to the belt webbing and pull on the latch plate; the belt should then slide
easily.
Rear Seat Shoulder Belts (Dealer-Installed Accessory)
Except Convertible
When properly worn with a lap bell, a shoulder belt (available for rear outboard
seats) can give riders added protection. It can prevent or reduce impact with the inside of the vehicle by restraining the upper body in a collision, especially
in a frontal impact.
1 . To use the detachable
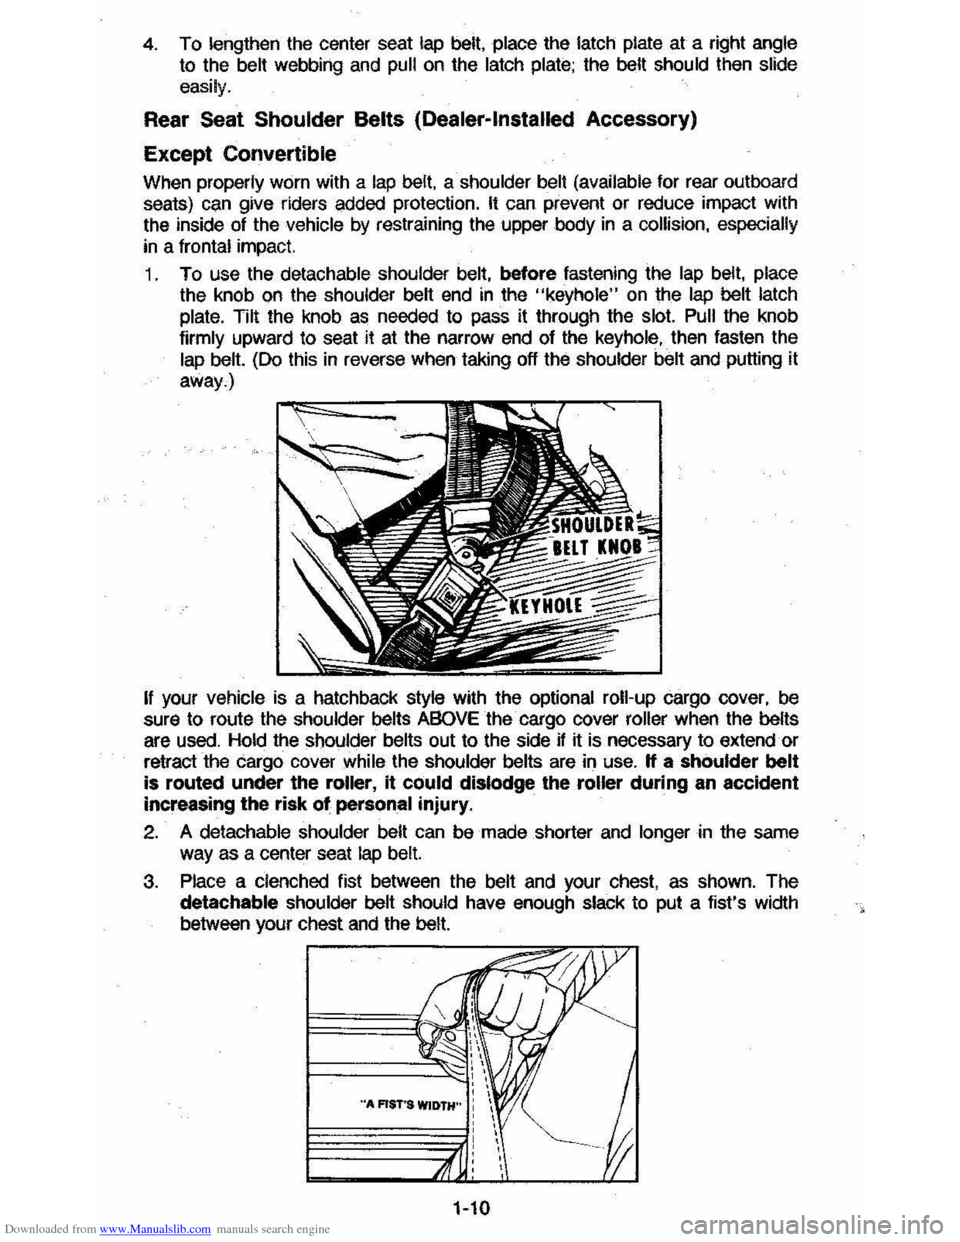
shoulder belt, before fastening the lap belt, place the knob on the shoulder belt end in the "keyhole" on the lap bell latch
plate. Tilt
the knob as needed to pass it through the slot. Pull the knob
firmly upward to seat it at the narrow end of the keyhole, then fasten the lap belt. (Do this in reverse when taking off the shoulder belt and putting it
away.)
If your vehicle is a hatchback style with the optional roll-up cargo cover, be
sure to route the shoulder belts ABOVE the cargo cover roller when the belts are used. Hold the Shoulder belts out to the side if it is necessary to extend or
retract the cargo cover
while the shoulder belts are in use. If a shoulder belt
is routed under the roller, it eQuid dislodge the roller during an accident
increasing
the risk of personal injury.
2. A detachable shoulder belt can be made shorter and longer in the same way as a center seat lap belt.
3. Place a clenched fist between the belt and your chest, as shown. The
detachable shoulder belt should have enough slack to put a fist's width
between your chest
and the belt.
1-10
Page 16 of 105
Downloaded from www.Manualslib.com manuals search engine Keep any shoulder belt slack to a minimum. Too much belt slack could
reduce the amount of protection in an accident because the belt is too loose to restrain you properly_
Seat Belt Inspection
Now and Ihen check that belts. buckles, latch plates, retractors, reminder
systems and guide
loops work properly; look for loose parts or damage that
could keep the restraint system from doing its job. Replace a
belt if the
webbing has been cut or otherwise damaged. Replace belts in use during all
but a minor collision; if there is any question, replace the belt.
SEAT BELT LIGHT/BUZZER REMINDER
When the key is turned to "Run" or "Start," a light will come on for four to
eight seconds to remind people to fasten their· seat belts. Unless the driver's
seat
belt is buckled, a buzzer will sound at the same time.
If the seat belt or reminder system does not work as described, see your dealer
for service.
CHILD RESTRAINT
All vehicle occupants and especially children should be restrained
whenever riding
in vehicles. Holding a child in your arms is NOT a substitute for a child restraint system. In an accident, a child held in a person's arms can
be struck or crushed by any unrestrained- rider. An unrestrained child could
also be injured by striking the interior, or by being ejected from the vehicle
during a sudden maneuver or impact. A child restraint system can help
protect a child in a vehicle.
In convertibles, a top-strap-equipped child restraint can only be used in
the Iront seat because there is no appropriate place to aUach a top strap
anchor bracket behind the rear seat in this vehicle. Installing a top strap
anchor bracket behind the rear seat may expose the child to hazards if the top
is raised or lowered with the child restraint occupied,
and, the bracket itself
may damage the convertible top.
In using any child restraint system, be sure to read and follow all instructions on installation and use that come with the system.
Riding Without A Child Restraint
For the best protection in an accident or sudden maneuver, children
small enough lor child restraint systems should be restrained that way.
However, the
following may provide some degree of protection for such children if a child restraint is not used.
• Place an infant who cannot sit up in a baby carrier, preferably covered and
padded. Put it crossways on the vehicle seat and securely restrain it with the vehicle's seat belts. Or, if that is not possible, place it crossways on the floor behind the driver's seat.
• Children who can sit up by themselves should be restrained with a lap belt
when riding in a rear seat. In the front seat a child should wear both lap
and shoulder belt. If the shoulder belt irritates the neck or face move the
child
closer to the center of the vehicle or to the rear seat. Never let a child stand or kneel on any seat. If unusual conditions prevent the use of
restraints, the
child should stand on the floor behind the driver's seat.
1-11
Page 18 of 105
Downloaded from www.Manualslib.com manuals search engine Driving with the trunk lid, hatchback or liftgate on station wagon models open is not recommended. Under some conditions, exhaust gases may be drawn
into the vehicle. If the trunk lid, hatchback or liftback must remain open for
some reason while moving, or if electrical wiring or other cable connections to a trailer must pass through the seal between the trunk lid, hatchback or liftback
and the body, follow these precautions:
• Close all windows.
• Adjust the heating or cooling system to force outside air into the vehicle as
described abcve, but set the fan to high speed.
• On vehicles with outside air vents in or under the instrument panel, open the vents fully.
NEW VEHICLE "BREAK-IN" PERIOD
You can drive your new vehicle from its very first mile/kilometer without
following a formal "break-in" schedule. However, there are things you can do during the first few hundred miles/kilometers of driving that will add to the
future performance and economy of your vehicle.
We recommend you limit your speed during the first 500 miles (800 kilometers)
to a maximum of 55 mph (90 km/h); but do not drive for long periods at any
one constant speed, either fast or slow. During this time, avoid full throttle
starts and, if possible, avoid hard stops especially during the first 200 miles (320 kilometers) of driving.
Always drive at moderate speed until the engine has completely warmed up.
I! you plan to use your new vehicle for trailer towing, see the following.
TRAILER TOWING
This car is designed and intended to be used mainly to carry people. Towing a
trailer
will affect handling, durability and economy. Your safety and satisfaction
depend upon proper use of correct equipment. Also, you should avoid
overloads and other abusive use.
The maximum loaded trailer weight you can pull with your vehicle depends on
your intended use
and what special equipment has been installed on it.
Information on trailer towing ability, special equipment required, and optional
equipment available should be obtained from your dealer. Ask for the trailering brochure. Or, write: Consumer Relations Department, Chevrolet Motor
Division, Warren, Michigan 48090.
(In Canada, write to General Motors of
Canada Limited, Customer Services Department, Oshawa, Ontario L lJ 5Z6.)
Tires
When towing trailers, be sure your tires are properly inflated to the inflation pressure shown on the Tire Placard on the driver's door.
The allowable passenger and cargo load for this vehicle, also shown on the
Tire
Placard, is reduced by the trailer tongue weight whenever the trailer is
attached to the vehicle. See "Service and Maintenance," Section 5 for more tire information.
Maintenance
More frequent service is required when using your vehicle to pull a trailer. See
the Maintenance Schedule folder for Automatic Transaxle Fluid and Engine Oil change requirements for trailering.
2-2
Page 21 of 105
Downloaded from www.Manualslib.com manuals search engine FUEL REQUIREMENTS
Your engine is designed to use Only unleaded gasoline. Unleaded gasoline
must be used for the emission control system to operate properly. Its use will
also reduce spark plug fouling, exhaust system corrosion and engine oil deterioration.
Using leaded gasoline can damage the emission control system and could result in loss of emission warranty coverage. The effectiveness of the catalyst in the catalytic converter decreases after use of as little as one tank of leaded
gasoline. Also, your vehicle may have the "Computer Command Control"
system, which includes an oxygen sensor. Leaded gasoline will damage the sensor, and deteriorate emission control. (For more information, see
"Computer Command Control System" in "Service and Maintenance," Section 5 of this manual).
Federal
regulations require that pumps delivering unleaded gasoline be labeled with the word UNLEADED. Only these pumps have nozzles which fit the filler neck of your vehicle's gasoline tank.
In the United States, Federal law also requires that gasoline octane ratings be
posted on the pumps. The octane rating shown is an average of Research (A)
octane number and Motor (M) octane number. In most parts of the United
States, you should use unleaded gasoline with an octane rating of at least 87. However, you may use unleaded gasoline with an octane fating as low as 85 in these high-altitude areas: Colorado, Montana, New Mexico, Utah, Wyoming,
northeastern Nevada, southern
Idaho, western South Dakota, and that part of
Texas which
is directly south of New Mexico.
Using
unleaded gasoline with an octane rating lower than stated above can
cause persistent, heavy "spark knock."
("Spark knock" is a metallic rapping
noise.) If severe, this can lead to engine damage. If you detect heavy spark
knock even when using gasoline of the recommended octane rating, or if you hear steady spark knock while holding a steady speed on level roads, have
your
dealer correct the problem. Failure to take steps to stop such knocking is misuse of the vehicle, for which Chevrolet is not responsible.
However, now and then you may notice light spark knock for a short time while
accelerating or driving up hills. This'is no cause for concern, becauseyou,,~et the greatest fuel economy benefit from the gasoline's octane rating when there
is occasional light spark knock. Using gasoline with a higher octane rating than
that which allows occasional spark knock is an unnecessary expense.
Gasoline/Ethanol Blends
Blends of unleaded gasoline and ethanol (grain alcohol) sometimes known as gasohol are available in some areas. You may use these blends in your
vehicle, if they are no more than 10 percent ethanol, without jeopardizing the New Vehicle and Emission Warranties. Be sure the gasoline-ethanol blend has
octane ratings no lower than those recommended for unleaded gasoline. Most
drivers
will not notice operating differences with blends of up to 1 0 percent
ethanol, but some may. In that case, your authorized dealer can make certain
adjustments, provided they
do not violate the Federal Emission Standards. If you are still not satisfied with ethanol-gasoline blend performance, you may
prefer
to use unleaded gasoline.
2-5
Page 22 of 105
Downloaded from www.Manualslib.com manuals search engine Other Gasolinel Alcohol Blends
Some fuel suppliers sell gasoline containing alcohol without advertising the
presence of
alcohol or giving it a special name such as gasohol. " you are not
sure whether there is alcohol in the gasoline you buy, check with the service
station operator.
DO NOT USE gasolines containing methanol (methyl or wood alcohol) that do
not
also contain cosolvents and corrosion inhibitors for methanol. Also, DO NOT USE gasolines that contain more than 5 percent methanol even if they
contain
cosolvents and corrosion inhib~ors. Fuel system damage or vehicle performance problems resuHing from the use of such fuels is not the
responsibility
of Chevrolet and may not be covered under the new vehicle
warranties.
Mhough gasolines containing 5 percent or less methanol and appropriate
cosolvents and inhibitors for methanol may be suitable for use in your vehicle,
evidence of their suitability is as yet incomplete; therefore, Chevrolet cannot, at
this time, endorse their use.
NOTICE: Take care to not spill gasoline during refueling. Guolines containing alcohol can cause paint damage, whiCh may notba covered under the New Vehicle Warranty.
OPERATION IN FOREIGN COUNTRIES
All models are specifically bum to comply with United States Federal Regulations regarding environmental quality. To comply, unleaded fuel of
sufficient octane rating must be used. These
fuels may not be available in
other countries. "you intend to take your vehicle outside the U.S. or Canada,
contact the GM Overseas Service Section at the
following address, to find out
what you must
do in order to operate your vehicles in other countries, or for
additional information and a. copy of the applicable maintenance schedule.
General Motors Corporation, Overseas Service Section, 2-128 General Motors
Building,
Detroij, Michigan 48202, (313) 556-4862.
When
writing, please include:
•
the Vehicle Identification Number and
• the countries in which yOu plan to travel.
Before taking your vehicle to a foreign country, check to see if the proper fuel
is available. Most major oil companies or domestic auto clubs should have this
information. Foreign offices of major oil
COmpanies or auto clubs may also be
of
help.
Be aware that, use of leaded gasoline or use of fuel that has a lower octane
rating than is required by your
vehicle, will cause the emission control system to lose its effectiveness and can cause ,engine knock or serious engine
damage. Ne~her GM Overseas nor Chevrolet will be responsible for damage to
your
vehicle as a result of not USing the proper fuel.
IMPORTANT FACTS YOU SHOULD KNOW ABOUT FUEL
ECONOMY AND HOW
TO IMPROVE IT
How you drive, where you drive, and when you drive all affect how many
miles/kilometers you can get from a galion/liter of fuel. You can save fuel if
you avoid
"Jackrabbit" starts, maintain as constant a throttle position as traffic
conditions
allow once you have reached cruising speed, and avoid sudden
stops which waste energy in the form of heat generated in braking.
2-6
Page 31 of 105
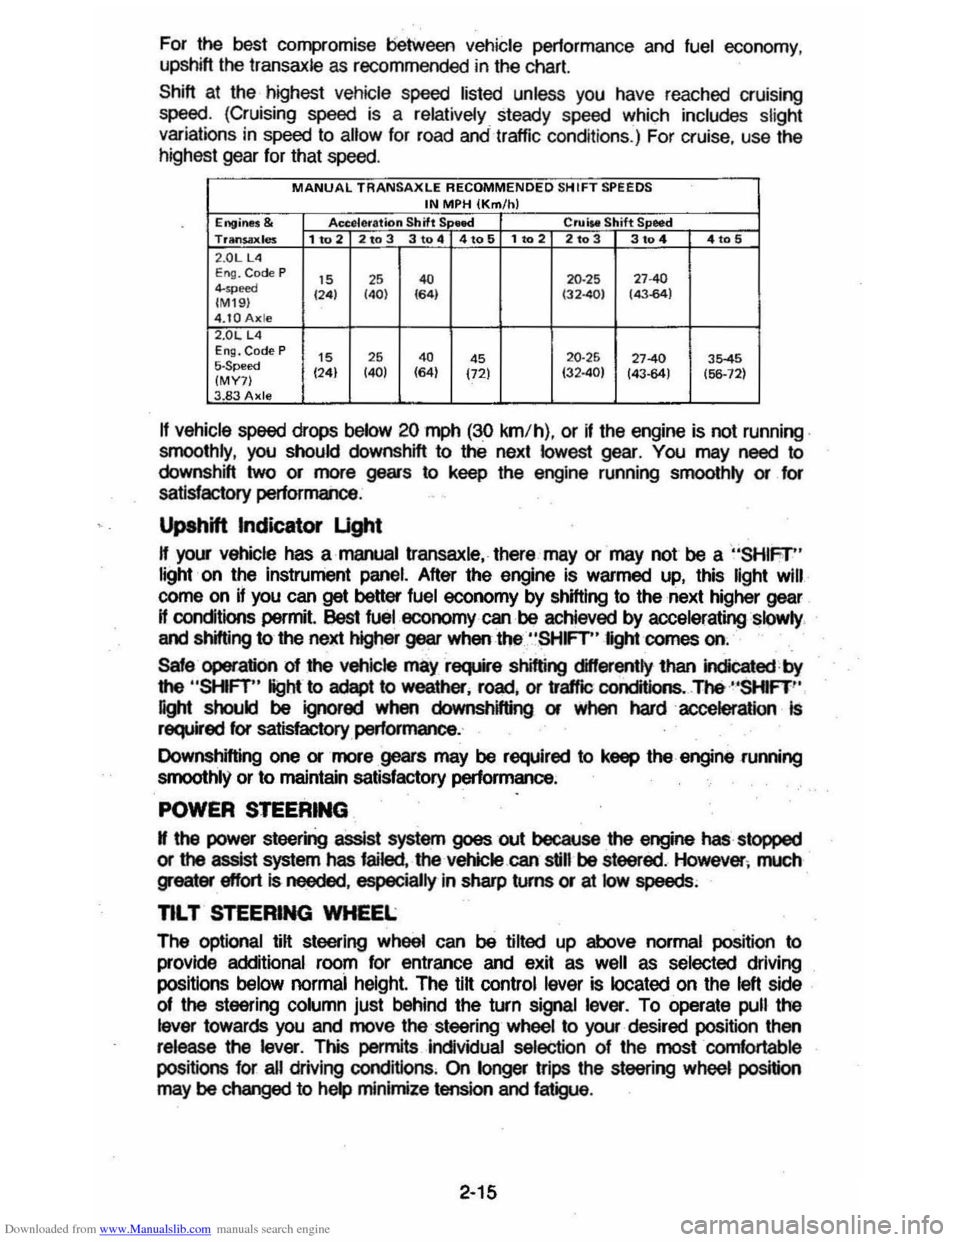
Downloaded from www.Manualslib.com manuals search engine For the best compromise between vehicle pertormance and fuel economy ,
upshift the transaxle as recommended in the chart.
Shift at the highest vehicle speed listed unless you have reached cruising
speed. (Cruising speed is a relatively steady speed whi ch includes slight variations in speed to allow for road andtrattic conditions.) For cruise , use the
highest gear for that speed.
MANUAL TRANSAXLE RECOMMENDED SH IFT SPEEDS IN MPH (Km/h) Engine$ & Accelera tion Shift S lllee! Crl.liM Shift S eed Trltn$ilxles 1 to 2 2to 3 3 to 4 4to 5 1102 2103 3104 4105 2 .0LUI E ng. Code P IS ,S 4. 20 ·25 "40 4-",,,", 124) (40) 164) (32401 (43.64) (M I9 ) 4.tOAxle 2.0L L4 EI1Q. Code P IS 26 4. 4S 20·25 27-40 35-45 5-Speed (24) (40) (64)
(72) 132·40) 143-64) (56-12) (MY7) 3.83 Axle
If vehicle speed drops below 20 mph (30 km/h) , or if the engine is not running .
smoothly , you should downshift to thE. next lowest gear. You may need to
downshift two or more gears to keep the engine running smoolhly or for
satisfactory performance .
Upshift Indicator Ught
H your vehicle has a manual transaxle. there may or may not be a "SHIFr" light · on the instrument panel. After the engine is warmed up, this light Will
corne on if you can get better fuel economy by shifting to the next higher gear
H conditions permit. !)est fuel economy can be achieved by acceleratingslQwly .
and shifting to the next higher gear when the "SHFT" light comes on.
Sale operation 01 the vehicle mayrsquire shifting differently lhan indicated by
the
"SHFT" light to adept to weather. rDild . or
affle conditions .. The ·"SHIFT '·
light should be ignored when downshifting or when hardaccelerallon Is required for satisfactory performance.
Downshifting one or more gears may be required to keep the engine .running
smoothly or
to maintain satisfactory performance ;
POWER STEERING
N the power steering assist system goes out because the engine has stopped
or the assist system has failed. the vehicle.can still be steered . However ; much greater effort Is needed . especially in sharp turns or at low speeds;
nL T STEERING WHEEL
The optional lilt steering wheel can be tilted up above normal position to
provide additional roorn for entrance and exit as
well as selected driving
positions
below normai height. The tilt control lever is located on the left side
of the steering column just behind the turn signal lever. To operate pull the
lever towards you and move the steering wheel to your· desired position then release the lever. This permits individual selection of Ihe mostcornfortable
positions for all driving cond itions . On longer trips the steering wheel position may be changed to help minimize tension and fatigue.
2-15
Page 37 of 105
Downloaded from www.Manualslib.com manuals search engine • Amount of fuel required for fill-up may not exactly correspond to gage.
• Needle may not move away from FULL until some time after fill-up.
• Needle may move during turns; stops and accelerations.
When the ignition switch is turned to the OFF position, the needle will not
necessarily return
all the way to the EMPTY mark.
Oil Pressure Light
When the ignition is turned to "Run," the "Oil" warning light appears until the
engine is started. Thereafter, the light should be off unless there is insufficient
oil pressure or engine idle speed is below normal. If the light should come on
at any time while driving (other than momentarily at idle speed or after a
sudden stop), stop immediately and investigate the cause of
low oil pressure.
This could possibly be caused by low oil level in the crankcase. Engine
operation with low oil pressure will 9ause damage to the engine.
Engine Coolant Temperature Light
This light is located in the instrument cluster and is designed to come on to warn the driver that the engine coolant has overheated and immediate
action is required to correct the condition. As a check that the bulb and its
circuit are working, the light will come on during engine starting; if it does not,
have it repaired
promptly. If the light comes on at any other time, see "Engine
Cooling System Overheating" in "In Case of Emergency," Section 3 of this manual.
CAUTION: It the Engine Coolant Temperature Light shows an overheat condition or you have other reason to suspect the engine may be overheating, continued operation of the engine EVEN FOR A SHORT TIME may result in a fire and the risk of personal injury and/or severe vehicle damage. Take immediate action as outlined under "Engine Cooling System Overheating" in "In Case of Emergency," Section 3.
Generator Indicator Light
The VOLT light is designed to come on when the ignition key is in the "RUN" position, but before the engine is started. After the engine starts, the light
should go out and remain out. If the light remains· on when engine is running,
have your authorized
dealer locate and correct the trouble as soon as possible.
Shift Indicator Light
The Shift Indicator Light is covered in the "Manual Transaxle" information in
this section.
"Check Engine" Light
Most gasoline engine vehicles sold in the Unijed States (and some vehicles
sold
in Canada) have the Computer Command Control system.
Vehicles with the Computer Command Control system include a "CHECK
ENGINE" light
on the instrument panel designed to indicate the need for
system service. It will come on during engine starting to let you know the bulb
is working. (The light will stay on a short time after the engine starts.)
2-21
Page 40 of 105
Downloaded from www.Manualslib.com manuals search engine Engine Coolant Temperature Gage
This optional gage is located in the instrument cluster. If the gage shows that
an overheat condition exists-as indicated by pointer moving beyond the
center of the band immediate action by the driver is required. If an overheat
condition is shown, see "Engine
Cooling System Overheating" in "In Case of
Emergency,"
Section 3 of this manual. The coolant temperature indication will VaIY with air temperature and operating conditions. The ignition must be in
"Run" for accurate readings. Prolonged driving or idling in very hot weather
may cause the pointer to move beyond the center of the gage. Make a practice
of scanning this and other gages
while driving, especially in hot weather and!
or when the
vehicle is under load.
CAUTION: II the Engine Coolant Temperature Gage shows an overheat condition or you have other reason to suspect the engine may be overheating, continued operation of the engine EVEN FOR A SHORT TIME may result in a fire and the risk of personal injury and/or severe vehicle damage. Take immediate action as outlined under "Engine Cooling System Overheating" in "In Case of Emergency," Section 3.
Oil Pressure Gage
The oil pressure gage indicates the pressure at which oil is being delivered to
the vaIiOUS paIls of the engine requiring lubrication. Pressures registered by
the gage may
vBIY according to outside air temperatures or weight of oil being
used. Oil pressure of a cold engine being operated at a given speed will be
somewhat higher than when the engine is at normal operating temperature at
the
SaIne speed. Prolonged high speed operation on a hot day at the given
speed will
resuH in somewhatlower oil pressure readings. Readings of 205 to
275 kPa
(30 to 40 psi) may be considered normal during moderate road
speeds of 35 to 40 mph (55 to 60 km!h) with the engine at proper operating
temperature. Gage readings which are consistently high
or low under these conditions may indicate lubrication system and/ or engine malfunction.
Light Switch
The three· position light switch controls the headlights, taillights, paIking lights,
sidemaIker lights,
instrument lights and dome lights.
Instrument light intensity can be varied by turning knob clockwise or
counterclockwise. Full counterclockwise position turns on interior light.
The headlight circuit is protected by a circuit breaker in the
light switch. An overload on the breaker will cause the lights to "flicker" on and off. If this
condition
develops, have your headlight wiring checked immediately. The
headlight beaIn changer is located in the Turn Signal Lever; for operation see
Section 2 under heading "Turn Signal and Muiji-Function Lever."·
Headlight High Beam Indicator Light
The headlights of your vehicle have. high and low beams to provide you with
proper nighttime visibility for most driving conditions. The
"low" beams are
used during most city driving. The
"high" beams are especially useful when
driving on daIk roads since they provide long range illumination. The headlight
beam indicator light (located on the speedometer face) will be ON whenever
the high beams or "brights" are in use. The turn
signal lever controls the
headlight beaIns and is described in "Steering Column Controls."
2-24