1983 FIAT UNO oil type
[x] Cancel search: oil typePage 219 of 303
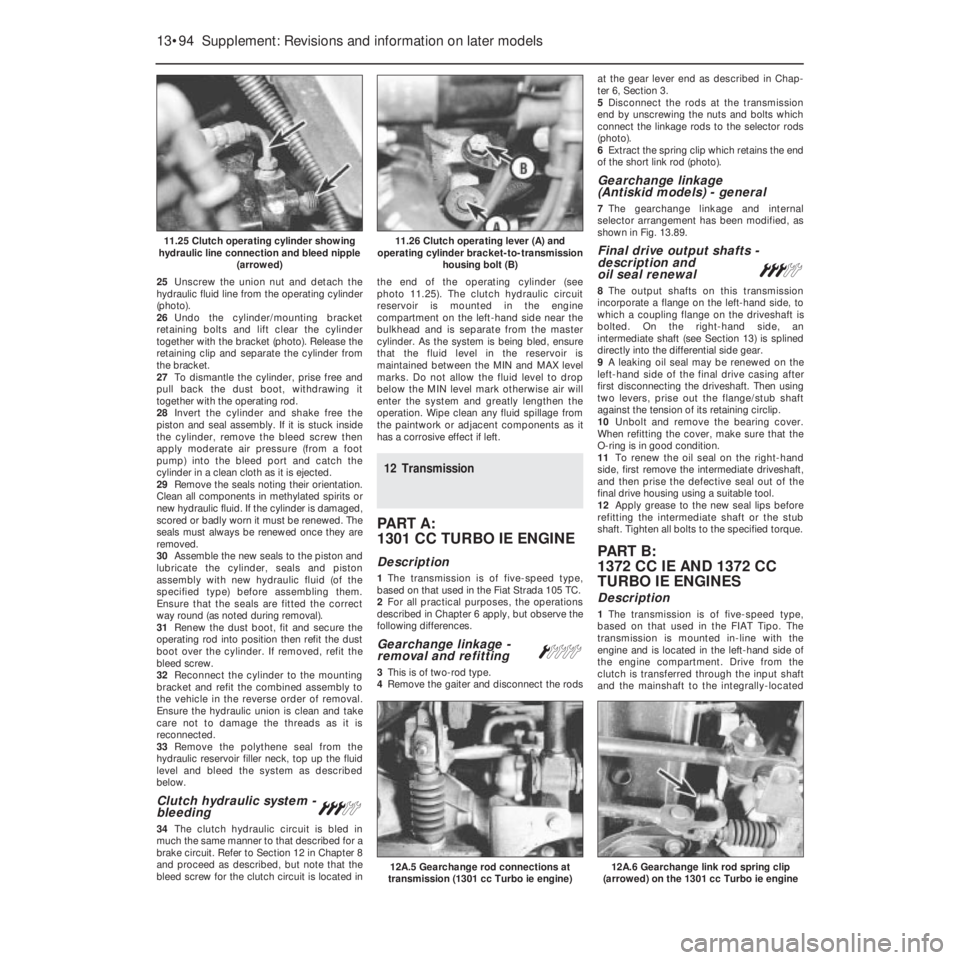
25Unscrew the union nut and detach the
hydraulic fluid line from the operating cylinder
(photo).
26Undo the cylinder/mounting bracket
retaining bolts and lift clear the cylinder
together with the bracket (photo). Release the
retaining clip and separate the cylinder from
the bracket.
27To dismantle the cylinder, prise free and
pull back the dust boot, withdrawing it
together with the operating rod.
28Invert the cylinder and shake free the
piston and seal assembly. If it is stuck inside
the cylinder, remove the bleed screw then
apply moderate air pressure (from a foot
pump) into the bleed port and catch the
cylinder in a clean cloth as it is ejected.
29Remove the seals noting their orientation.
Clean all components in methylated spirits or
new hydraulic fluid. If the cylinder is damaged,
scored or badly worn it must be renewed. The
seals must always be renewed once they are
removed.
30Assemble the new seals to the piston and
lubricate the cylinder, seals and piston
assembly with new hydraulic fluid (of the
specified type) before assembling them.
Ensure that the seals are fitted the correct
way round (as noted during removal).
31Renew the dust boot, fit and secure the
operating rod into position then refit the dust
boot over the cylinder. If removed, refit the
bleed screw.
32Reconnect the cylinder to the mounting
bracket and refit the combined assembly to
the vehicle in the reverse order of removal.
Ensure the hydraulic union is clean and take
care not to damage the threads as it is
reconnected.
33Remove the polythene seal from the
hydraulic reservoir filler neck, top up the fluid
level and bleed the system as described
below.
Clutch hydraulic system -
bleeding#
34The clutch hydraulic circuit is bled in
much the same manner to that described for a
brake circuit. Refer to Section 12 in Chapter 8
and proceed as described, but note that the
bleed screw for the clutch circuit is located inthe end of the operating cylinder (see
photo 11.25). The clutch hydraulic circuit
reservoir is mounted in the engine
compartment on the left-hand side near the
bulkhead and is separate from the master
cylinder. As the system is being bled, ensure
that the fluid level in the reservoir is
maintained between the MIN and MAX level
marks. Do not allow the fluid level to drop
below the MIN level mark otherwise air will
enter the system and greatly lengthen the
operation. Wipe clean any fluid spillage from
the paintwork or adjacent components as it
has a corrosive effect if left.
12 Transmission
PART A:
1301 CC TURBO IE ENGINE
Description
1The transmission is of five-speed type,
based on that used in the Fiat Strada 105 TC.
2For all practical purposes, the operations
described in Chapter 6 apply, but observe the
following differences.
Gearchange linkage -
removal and refitting Á
3This is of two-rod type.
4Remove the gaiter and disconnect the rodsat the gear lever end as described in Chap-
ter 6, Section 3.
5Disconnect the rods at the transmission
end by unscrewing the nuts and bolts which
connect the linkage rods to the selector rods
(photo).
6Extract the spring clip which retains the end
of the short link rod (photo).
Gearchange linkage
(Antiskid models) - general
7The gearchange linkage and internal
selector arrangement has been modified, as
shown in Fig. 13.89.
Final drive output shafts -
description and
oil seal renewal
#
8The output shafts on this transmission
incorporate a flange on the left-hand side, to
which a coupling flange on the driveshaft is
bolted. On the right-hand side, an
intermediate shaft (see Section 13) is splined
directly into the differential side gear.
9A leaking oil seal may be renewed on the
left-hand side of the final drive casing after
first disconnecting the driveshaft. Then using
two levers, prise out the flange/stub shaft
against the tension of its retaining circlip.
10Unbolt and remove the bearing cover.
When refitting the cover, make sure that the
O-ring is in good condition.
11To renew the oil seal on the right-hand
side, first remove the intermediate driveshaft,
and then prise the defective seal out of the
final drive housing using a suitable tool.
12Apply grease to the new seal lips before
refitting the intermediate shaft or the stub
shaft. Tighten all bolts to the specified torque.
PART B:
1372 CC IE AND 1372 CC
TURBO IE ENGINES
Description
1The transmission is of five-speed type,
based on that used in the FIAT Tipo. The
transmission is mounted in-line with the
engine and is located in the left-hand side of
the engine compartment. Drive from the
clutch is transferred through the input shaft
and the mainshaft to the integrally-located
13•94 Supplement: Revisions and information on later models
12A.6 Gearchange link rod spring clip
(arrowed) on the 1301 cc Turbo ie engine12A.5 Gearchange rod connections at
transmission (1301 cc Turbo ie engine)
11.26 Clutch operating lever (A) and
operating cylinder bracket-to-transmission
housing bolt (B)11.25 Clutch operating cylinder showing
hydraulic line connection and bleed nipple
(arrowed)
Page 222 of 303
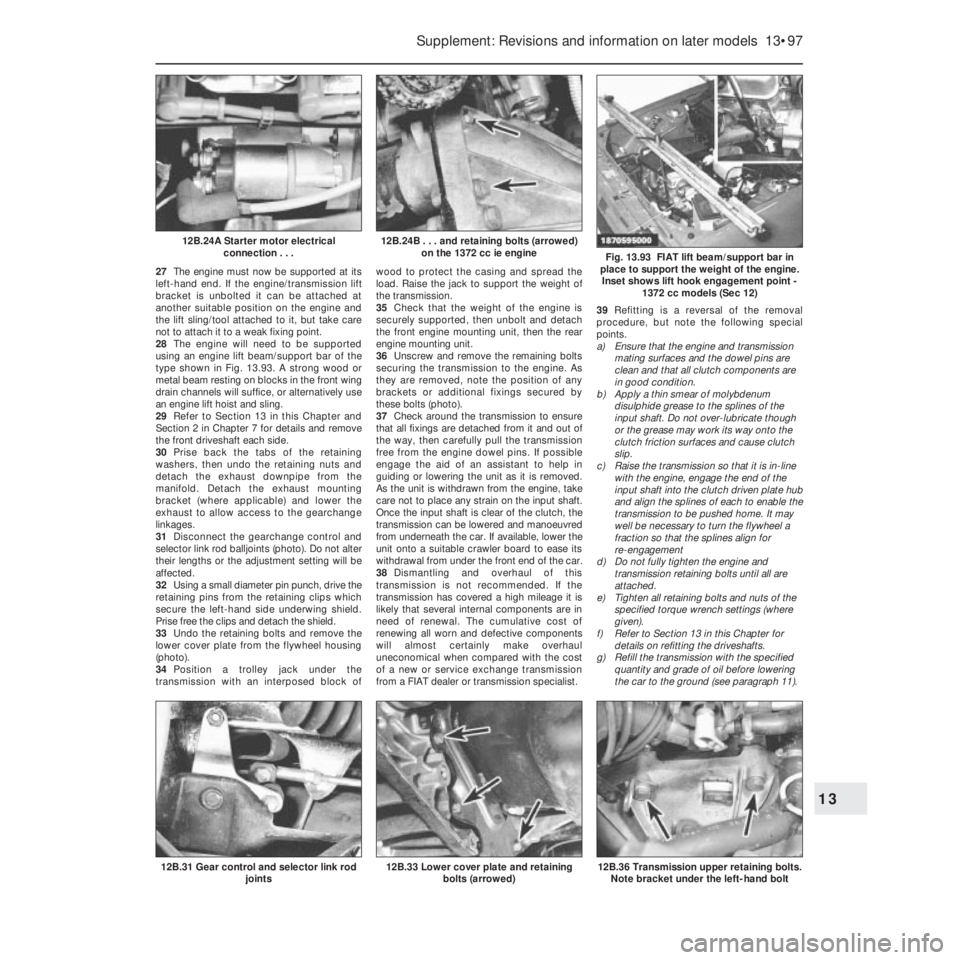
27The engine must now be supported at its
left-hand end. If the engine/transmission lift
bracket is unbolted it can be attached at
another suitable position on the engine and
the lift sling/tool attached to it, but take care
not to attach it to a weak fixing point.
28The engine will need to be supported
using an engine lift beam/support bar of the
type shown in Fig. 13.93. A strong wood or
metal beam resting on blocks in the front wing
drain channels will suffice, or alternatively use
an engine lift hoist and sling.
29Refer to Section 13 in this Chapter and
Section 2 in Chapter 7 for details and remove
the front driveshaft each side.
30Prise back the tabs of the retaining
washers, then undo the retaining nuts and
detach the exhaust downpipe from the
manifold. Detach the exhaust mounting
bracket (where applicable) and lower the
exhaust to allow access to the gearchange
linkages.
31Disconnect the gearchange control and
selector link rod balljoints (photo). Do not alter
their lengths or the adjustment setting will be
affected.
32Using a small diameter pin punch, drive the
retaining pins from the retaining clips which
secure the left-hand side underwing shield.
Prise free the clips and detach the shield.
33Undo the retaining bolts and remove the
lower cover plate from the flywheel housing
(photo).
34Position a trolley jack under the
transmission with an interposed block ofwood to protect the casing and spread the
load. Raise the jack to support the weight of
the transmission.
35Check that the weight of the engine is
securely supported, then unbolt and detach
the front engine mounting unit, then the rear
engine mounting unit.
36Unscrew and remove the remaining bolts
securing the transmission to the engine. As
they are removed, note the position of any
brackets or additional fixings secured by
these bolts (photo).
37Check around the transmission to ensure
that all fixings are detached from it and out of
the way, then carefully pull the transmission
free from the engine dowel pins. If possible
engage the aid of an assistant to help in
guiding or lowering the unit as it is removed.
As the unit is withdrawn from the engine, take
care not to place any strain on the input shaft.
Once the input shaft is clear of the clutch, the
transmission can be lowered and manoeuvred
from underneath the car. If available, lower the
unit onto a suitable crawler board to ease its
withdrawal from under the front end of the car.
38Dismantling and overhaul of this
transmission is not recommended. If the
transmission has covered a high mileage it is
likely that several internal components are in
need of renewal. The cumulative cost of
renewing all worn and defective components
will almost certainly make overhaul
uneconomical when compared with the cost
of a new or service exchange transmission
from a FIAT dealer or transmission specialist.39Refitting is a reversal of the removal
procedure, but note the following special
points.
a) Ensure that the engine and transmission
mating surfaces and the dowel pins are
clean and that all clutch components are
in good condition.
b) Apply a thin smear of molybdenum
disulphide grease to the splines of the
input shaft. Do not over-lubricate though
or the grease may work its way onto the
clutch friction surfaces and cause clutch
slip.
c) Raise the transmission so that it is in-line
with the engine, engage the end of the
input shaft into the clutch driven plate hub
and align the splines of each to enable the
transmission to be pushed home. It may
well be necessary to turn the flywheel a
fraction so that the splines align for
re-engagement
d) Do not fully tighten the engine and
transmission retaining bolts until all are
attached.
e) Tighten all retaining bolts and nuts of the
specified torque wrench settings (where
given).
f) Refer to Section 13 in this Chapter for
details on refitting the driveshafts.
g) Refill the transmission with the specified
quantity and grade of oil before lowering
the car to the ground (see paragraph 11).
Supplement: Revisions and information on later models 13•97
Fig. 13.93 FIAT lift beam/support bar in
place to support the weight of the engine.
Inset shows lift hook engagement point -
1372 cc models (Sec 12)
12B.24B . . . and retaining bolts (arrowed)
on the 1372 cc ie engine12B.24A Starter motor electrical
connection . . .
12B.36 Transmission upper retaining bolts.
Note bracket under the left-hand bolt12B.33 Lower cover plate and retaining
bolts (arrowed)12B.31 Gear control and selector link rod
joints
13
Page 235 of 303

As it is lifted, invert it and detach the washer
hose from the washer nozzle (photos).
97Where applicable, detach and remove the
washer reservoir from the recess in the front
of the windscreen to allow access to the wiper
motor.
98Unscrew and remove the two wiper motor
retaining screws. Lower and withdraw the
unit, then detach the cover from the motor.
Disconnect the wiring from the wiper motor
and withdraw it from the car (photos).
99Refit in the reverse order of removal.
Check for satisfactory operation of the wiper
and washer on completion.
Windscreen washer reservoir
(Turbo ie models) -
removal and refitting
Á
100Disconnect the battery negative lead.
101Remove the bonnet as described in
Chapter 12.
102Remove the wiper arm and blade as
described in Chapter 9, then unscrew and
remove the pivot nut.
103Undo the air inlet grille retaining screws
noting that two are not fitted with washers.
Where applicable, remove the washer
reservoir filler cap from the reservoir neck
protruding through the grille. Carefully prise
free and lift the air inlet grille clear of the body.
As it is lifted, invert it and detach the washer
hose from the washer nozzle.
104Syphon any remaining washer fluid from
the reservoir, then disconnect it and partiallywithdraw it from the recess in front of the
windscreen so that the wiring connection and
the washer supply hoses (to the windscreen
washer and the rear screen washer nozzles)
can be detached from the pump unit. Remove
the reservoir from the vehicle.
105Refit in the reverse order of removal. If the
washer pump unit was detached from the
reservoir, use a new seal washer when refitting
it. Top up the reservoir and check the screen
washers for satisfactory operation before
refitting the grille panel and the wiper arm/blade.
Tailgate wiper motor
(later models) -
removal and refitting
Á
106Although the tailgate wiper motor differs
in appearance, its removal and refitting
procedures are much the same as those
described for the earlier models in Section 27
of Chapter 9 (photo).
Radio
107All later models are now equipped with
power supply and speaker leads for radio
installation.
108Installation of the standard FIAT aerial
mounted on the windscreen pillar is shown
(photos).
Check control system sensors -
description
109The locations of the sensors referred to in
Chapter 9, Section 34 are given in the
following paragraphs, and their construction
differs according to their individual function.
Brake fluid level sensor
110This is mounted in the master cylinder
fluid reservoir cap, and comprises a pair of
reed switches in a glass bulb, and a magnet at
the end of a float.
111When the fluid level is correct, the
magnetic flux closes the switches. In the
event of a leak in the system, the magnet
moves away, the switches open and the
warning lamp comes on.
Brake disc pad wear sensor
112This is basically a circuit wire embedded
in the pad friction material. As the pad wears,
the wire is eventually exposed and contacts
the disc, whereupon the warning lamp comes
on to indicate that pad renewal is necessary.
Coolant level sensor
113This is located in the cooling system
expansion tank, and is of the reed switch
type, which operates in a similar way to that
described for the brake fluid sensor.
Engine oil level sensor
114This is located at the end of the dipstick,
and comprises a pair of switches at the end of a
bi-metallic strip, heated by electrical resistance.
115The heat is dissipated by the immersion
of the dipstick in the engine oil, so preventing
the bi-metallic strip from curving so much that
the switches would open.
116If the oil level drops, the heat is no longer
dissipated, the switches open, and the
warning lamp comes on.
13•110 Supplement: Revisions and information on later models
15.108B Pillar lower screw for aerial15.108A Pillar upper screws for aerial15.106 Tailgate wiper motor - later model
15.98C . . . and detach the wiring
connector15.98B . . . separate the wiper motor from
its cover . . .15.98A Remove the wiper motor retaining
screws . . .
Page 236 of 303

Door closure sensor
117The sensor consists of a microswitch
within the lock. The switch actuates the
warning lamp according to whether the lock is
in the open or closed mode.
Check control system sensors -
testing
Brake fluid level sensor
118With the fluid level correct, switch on the
ignition and depress the centre of the
reservoir cap. If the sensor switches are
working correctly, then “FAULT” should be
indicated on the check panel.
Coolant level sensor
119With the coolant level in the expansion
tank correct, switch on the ignition and then
pull the wiring plug from the sensor. “FAULT”
should be indicated on the check panel. If it is
not, then it is the panel which is faulty.
120An ohmmeter should be used to check
for continuity, holding the float in both the full
and low level positions.
Engine oil level sensor
121With the oil level correct, disconnect the
wiring plug from the dipstick, and then bridge
the plug terminals (not dipstick side) with a 12
ohm resistor. Switch on the ignition.
122If the red light on the check panel goes
out, then the fault is due to the sensor.
123If the light stays on, then it is the check
panel module which is faulty.
Door closure sensor
124Any fault in the lock microswitch can best
be detected using an ohmmeter.
16 Suspension
Front anti-roll bar -
removal and refittingª
1A front anti-roll bar is fitted to the 1301 cc,
1372 cc ie and 1372 cc Turbo ie engined
models. Removal of the bar on all models isas follows. Firstly loosen off the front
roadwheel bolts, then raise the front of the
car, securely support it on axle stands and
remove the front roadwheels.
2Disconnect the two gearchange rods from
the transmission.
3Unbolt and disconnect the anti-roll bar
insulating clamps from the floorpan (photo).
4Unbolt the end links from the track control
arms and withdraw the anti-roll bar (photo).
5Refitting is a reversal of removal, but only
tighten the nuts and bolts to the specified
torque with the car parked on level ground,
with four passengers and 40 kg of luggage
inside.
Suspension strut - later models
6The suspension strut upper mounting nuts
on later models also secure the brackets for
the mounting of ancillary components such as
the fuel filter, fuel system relays and fuses,
etc. (depending on model).
7When removing the suspension strut units,
it will therefore be necessary to detach and
support these brackets and their fittings
(photo).
17 Bodywork
Plastic components
1With the use of more and more plastic
body components by the vehicle
manufacturers (e.g. bumpers, spoilers, and in
some cases major body panels), rectification
of more serious damage to such items has
become a matter of either entrusting repair
work to a specialist in this field, or renewing
complete components. Repair of such
damage by the DIY owner is not really
feasible owing to the cost of the equipment
and materials required for effecting such
repairs. The basic technique involves making
a groove along the line of the crack in the
plastic using a rotary burr in a power drill. The
damaged part is then welded back togetherby using a hot air gun to heat up and fuse a
plastic filler rod into the groove. Any excess
plastic is then removed and the area rubbed
down to a smooth finish. It is important that a
filler rod of the correct plastic is used, as
body components can be made of a variety
of different types (e.g. polycarbonate, ABS,
polypropylene). Damage of a less serious
nature (abrasions, minor cracks, etc.) can be
repaired by the DIY owner using a two-part
epoxy filler repair material. Once mixed in
equal proportions, this is used in similar
fashion to the bodywork filler used on metal
panels. The filler is usually cured in twenty to
thirty minutes, ready for sanding and
painting.
2If the owner is renewing a complete
component himself, or if he has repaired it
with epoxy filler, he will be left with the
problem of finding a suitable paint for
finishing which is compatible with the type of
plastic used. At one time the use of a
universal paint was not possible owing to the
complex range of plastics encountered in
body component applications. Standard
paints, generally speaking, will not bond to
plastic or rubber satisfactorily. However, it is
now possible to obtain a plastic body parts
finishing kit which consists of a pre-primer
treatment, a primer and coloured top coat.
Full instructions are normally supplied with a
kit, but basically the method of use is to first
apply the pre-primer to the component
concerned and allow it to dry for up to
30 minutes. Then the primer is applied and
left to dry for about an hour before finally
applying the special coloured top coat. The
result is a correctly coloured component
where the paint will flex with the plastic or
rubber, a property that standard paint does
not normally possess.
Rear view mirrors Á
Interior
3The mirror is of safety type, “breaking” off
its ball fixing upon impact from a front seat
occupant.
4To remove the mirror, grip the head and
Supplement: Revisions and information on later models 13•111
16.7 Suspension strut upper mounting
nuts, showing bracket and cable clip on
the 1372 cc ie model16.4 Anti-roll bar fixing nuts (arrowed)16.3 Anti-roll bar clamp
13
Page 237 of 303
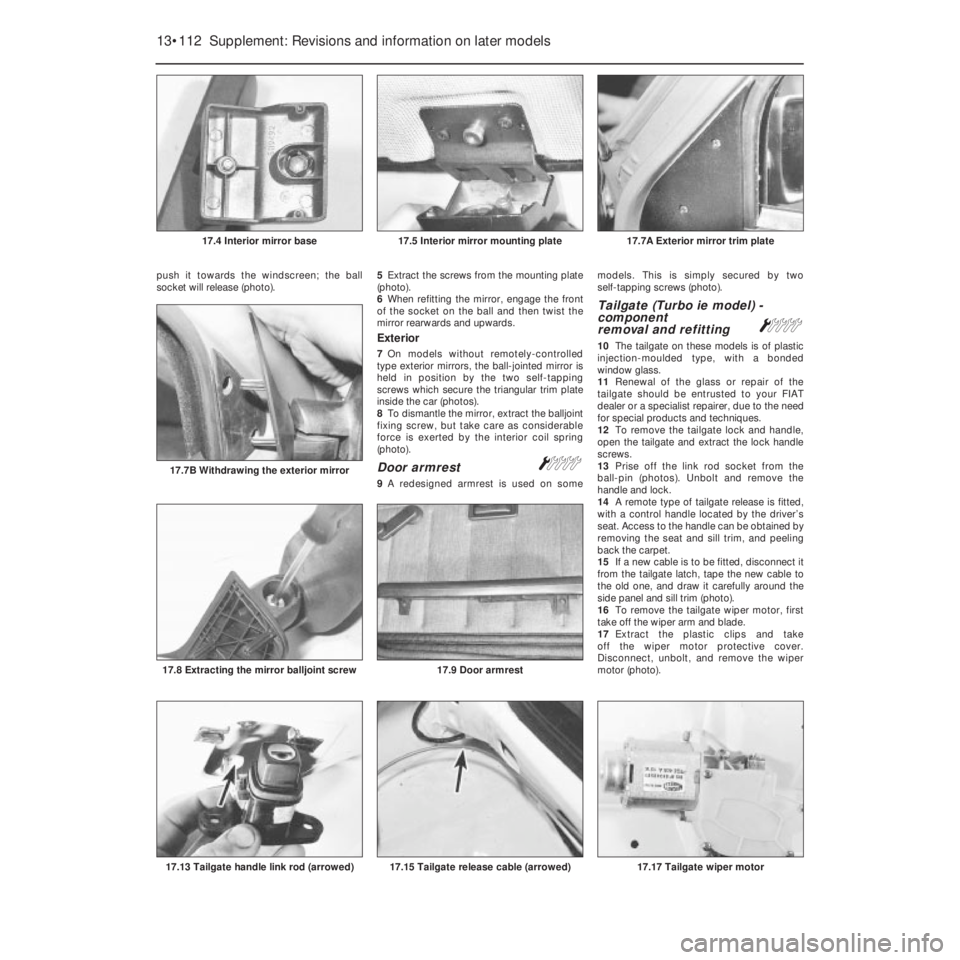
push it towards the windscreen; the ball
socket will release (photo).5Extract the screws from the mounting plate
(photo).
6When refitting the mirror, engage the front
of the socket on the ball and then twist the
mirror rearwards and upwards.
Exterior
7On models without remotely-controlled
type exterior mirrors, the ball-jointed mirror is
held in position by the two self-tapping
screws which secure the triangular trim plate
inside the car (photos).
8To dismantle the mirror, extract the balljoint
fixing screw, but take care as considerable
force is exerted by the interior coil spring
(photo).
Door armrestÁ
9A redesigned armrest is used on somemodels. This is simply secured by two
self-tapping screws (photo).
Tailgate (Turbo ie model) -
component
removal and refitting
Á
10The tailgate on these models is of plastic
injection-moulded type, with a bonded
window glass.
11Renewal of the glass or repair of the
tailgate should be entrusted to your FIAT
dealer or a specialist repairer, due to the need
for special products and techniques.
12To remove the tailgate lock and handle,
open the tailgate and extract the lock handle
screws.
13Prise off the link rod socket from the
ball-pin (photos). Unbolt and remove the
handle and lock.
14A remote type of tailgate release is fitted,
with a control handle located by the driver’s
seat. Access to the handle can be obtained by
removing the seat and sill trim, and peeling
back the carpet.
15If a new cable is to be fitted, disconnect it
from the tailgate latch, tape the new cable to
the old one, and draw it carefully around the
side panel and sill trim (photo).
16To remove the tailgate wiper motor, first
take off the wiper arm and blade.
17Extract the plastic clips and take
off the wiper motor protective cover.
Disconnect, unbolt, and remove the wiper
motor (photo).
13•112 Supplement: Revisions and information on later models
17.17 Tailgate wiper motor17.15 Tailgate release cable (arrowed)17.13 Tailgate handle link rod (arrowed)
17.9 Door armrest17.8 Extracting the mirror balljoint screw
17.7B Withdrawing the exterior mirror
17.7A Exterior mirror trim plate17.5 Interior mirror mounting plate17.4 Interior mirror base
Page 238 of 303
18Refitting of all components is a reversal of
removal.
Radiator grille (1301 cc
Turbo ie model) -
removal and refitting
Á
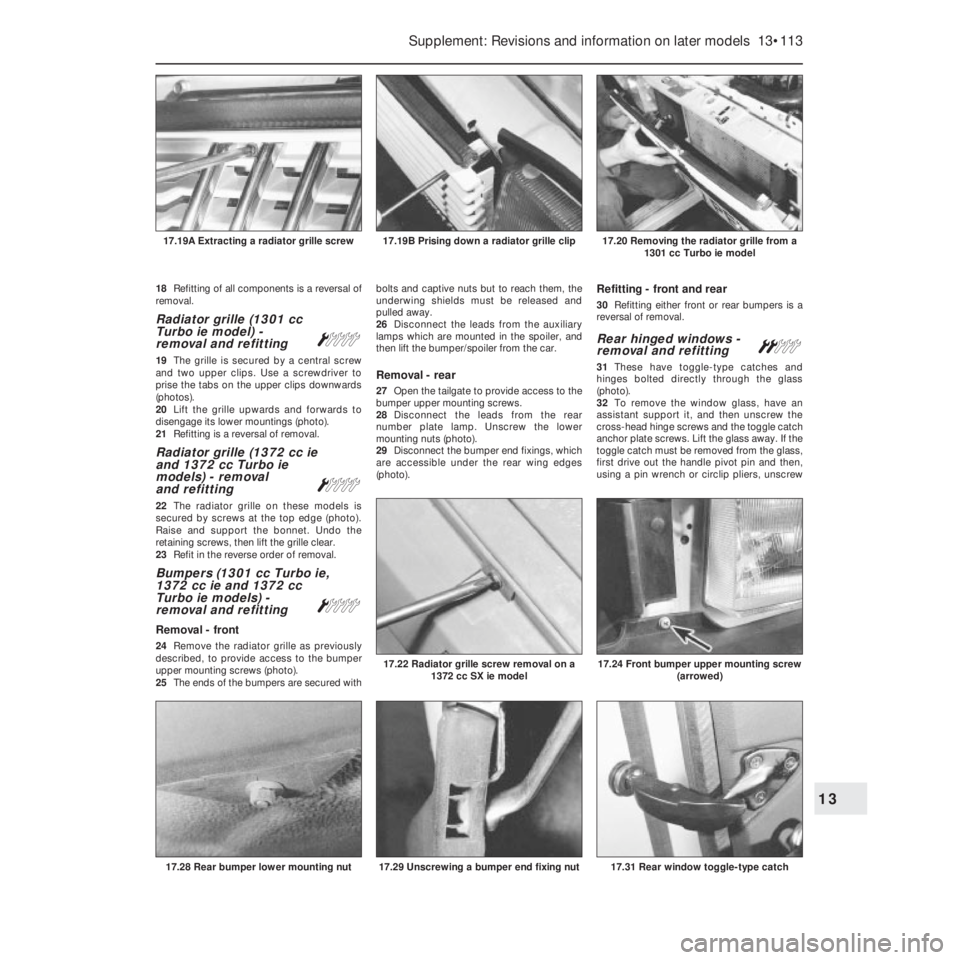
19The grille is secured by a central screw
and two upper clips. Use a screwdriver to
prise the tabs on the upper clips downwards
(photos).
20Lift the grille upwards and forwards to
disengage its lower mountings (photo).
21Refitting is a reversal of removal.
Radiator grille (1372 cc ie
and 1372 cc Turbo ie
models) - removal
and refitting
Á
22The radiator grille on these models is
secured by screws at the top edge (photo).
Raise and support the bonnet. Undo the
retaining screws, then lift the grille clear.
23Refit in the reverse order of removal.
Bumpers (1301 cc Turbo ie,
1372 cc ie and 1372 cc
Turbo ie models) -
removal and refitting
Á
Removal - front
24Remove the radiator grille as previously
described, to provide access to the bumper
upper mounting screws (photo).
25The ends of the bumpers are secured withbolts and captive nuts but to reach them, the
underwing shields must be released and
pulled away.
26Disconnect the leads from the auxiliary
lamps which are mounted in the spoiler, and
then lift the bumper/spoiler from the car.
Removal - rear
27Open the tailgate to provide access to the
bumper upper mounting screws.
28Disconnect the leads from the rear
number plate lamp. Unscrew the lower
mounting nuts (photo).
29Disconnect the bumper end fixings, which
are accessible under the rear wing edges
(photo).
Refitting - front and rear
30Refitting either front or rear bumpers is a
reversal of removal.
Rear hinged windows -
removal and refittingª
31These have toggle-type catches and
hinges bolted directly through the glass
(photo).
32To remove the window glass, have an
assistant support it, and then unscrew the
cross-head hinge screws and the toggle catch
anchor plate screws. Lift the glass away. If the
toggle catch must be removed from the glass,
first drive out the handle pivot pin and then,
using a pin wrench or circlip pliers, unscrew
Supplement: Revisions and information on later models 13•113
17.20 Removing the radiator grille from a
1301 cc Turbo ie model17.19B Prising down a radiator grille clip17.19A Extracting a radiator grille screw
17.31 Rear window toggle-type catch17.29 Unscrewing a bumper end fixing nut
17.24 Front bumper upper mounting screw
(arrowed)17.22 Radiator grille screw removal on a
1372 cc SX ie model
17.28 Rear bumper lower mounting nut
13
Page 286 of 303
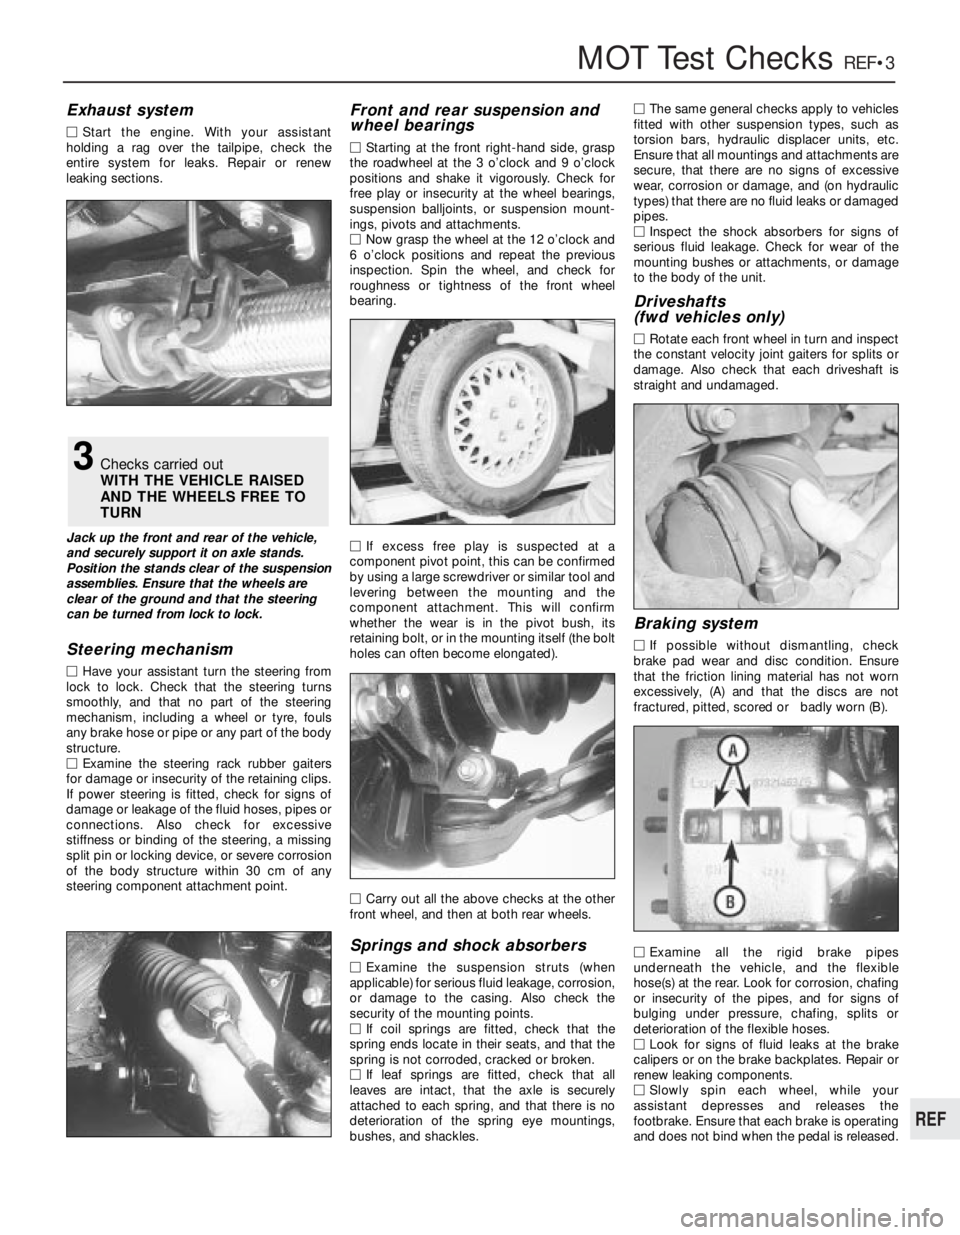
MOT Test ChecksREF•3
REF
Exhaust system
MStart the engine. With your assistant
holding a rag over the tailpipe, check the
entire system for leaks. Repair or renew
leaking sections.
Jack up the front and rear of the vehicle,
and securely support it on axle stands.
Position the stands clear of the suspension
assemblies. Ensure that the wheels are
clear of the ground and that the steering
can be turned from lock to lock.
Steering mechanism
MHave your assistant turn the steering from
lock to lock. Check that the steering turns
smoothly, and that no part of the steering
mechanism, including a wheel or tyre, fouls
any brake hose or pipe or any part of the body
structure.
MExamine the steering rack rubber gaiters
for damage or insecurity of the retaining clips.
If power steering is fitted, check for signs of
damage or leakage of the fluid hoses, pipes or
connections. Also check for excessive
stiffness or binding of the steering, a missing
split pin or locking device, or severe corrosion
of the body structure within 30 cm of any
steering component attachment point.
Front and rear suspension and
wheel bearings
MStarting at the front right-hand side, grasp
the roadwheel at the 3 o’clock and 9 o’clock
positions and shake it vigorously. Check for
free play or insecurity at the wheel bearings,
suspension balljoints, or suspension mount-
ings, pivots and attachments.
MNow grasp the wheel at the 12 o’clock and
6 o’clock positions and repeat the previous
inspection. Spin the wheel, and check for
roughness or tightness of the front wheel
bearing.
MIf excess free play is suspected at a
component pivot point, this can be confirmed
by using a large screwdriver or similar tool and
levering between the mounting and the
component attachment. This will confirm
whether the wear is in the pivot bush, its
retaining bolt, or in the mounting itself (the bolt
holes can often become elongated).
MCarry out all the above checks at the other
front wheel, and then at both rear wheels.
Springs and shock absorbers
MExamine the suspension struts (when
applicable) for serious fluid leakage, corrosion,
or damage to the casing. Also check the
security of the mounting points.
MIf coil springs are fitted, check that the
spring ends locate in their seats, and that the
spring is not corroded, cracked or broken.
MIf leaf springs are fitted, check that all
leaves are intact, that the axle is securely
attached to each spring, and that there is no
deterioration of the spring eye mountings,
bushes, and shackles.MThe same general checks apply to vehicles
fitted with other suspension types, such as
torsion bars, hydraulic displacer units, etc.
Ensure that all mountings and attachments are
secure, that there are no signs of excessive
wear, corrosion or damage, and (on hydraulic
types) that there are no fluid leaks or damaged
pipes.
MInspect the shock absorbers for signs of
serious fluid leakage. Check for wear of the
mounting bushes or attachments, or damage
to the body of the unit.
Driveshafts
(fwd vehicles only)
MRotate each front wheel in turn and inspect
the constant velocity joint gaiters for splits or
damage. Also check that each driveshaft is
straight and undamaged.
Braking system
MIf possible without dismantling, check
brake pad wear and disc condition. Ensure
that the friction lining material has not worn
excessively, (A) and that the discs are not
fractured, pitted, scored or badly worn (B).
MExamine all the rigid brake pipes
underneath the vehicle, and the flexible
hose(s) at the rear. Look for corrosion, chafing
or insecurity of the pipes, and for signs of
bulging under pressure, chafing, splits or
deterioration of the flexible hoses.
MLook for signs of fluid leaks at the brake
calipers or on the brake backplates. Repair or
renew leaking components.
MSlowly spin each wheel, while your
assistant depresses and releases the
footbrake. Ensure that each brake is operating
and does not bind when the pedal is released.
3Checks carried out
WITH THE VEHICLE RAISED
AND THE WHEELS FREE TO
TURN
Page 287 of 303
REF•4MOT Test Checks
MExamine the handbrake mechanism,
checking for frayed or broken cables,
excessive corrosion, or wear or insecurity of
the linkage. Check that the mechanism works
on each relevant wheel, and releases fully,
without binding.
MIt is not possible to test brake efficiency
without special equipment, but a road test can
be carried out later to check that the vehicle
pulls up in a straight line.
Fuel and exhaust systems
MInspect the fuel tank (including the filler
cap), fuel pipes, hoses and unions. All
components must be secure and free from
leaks.
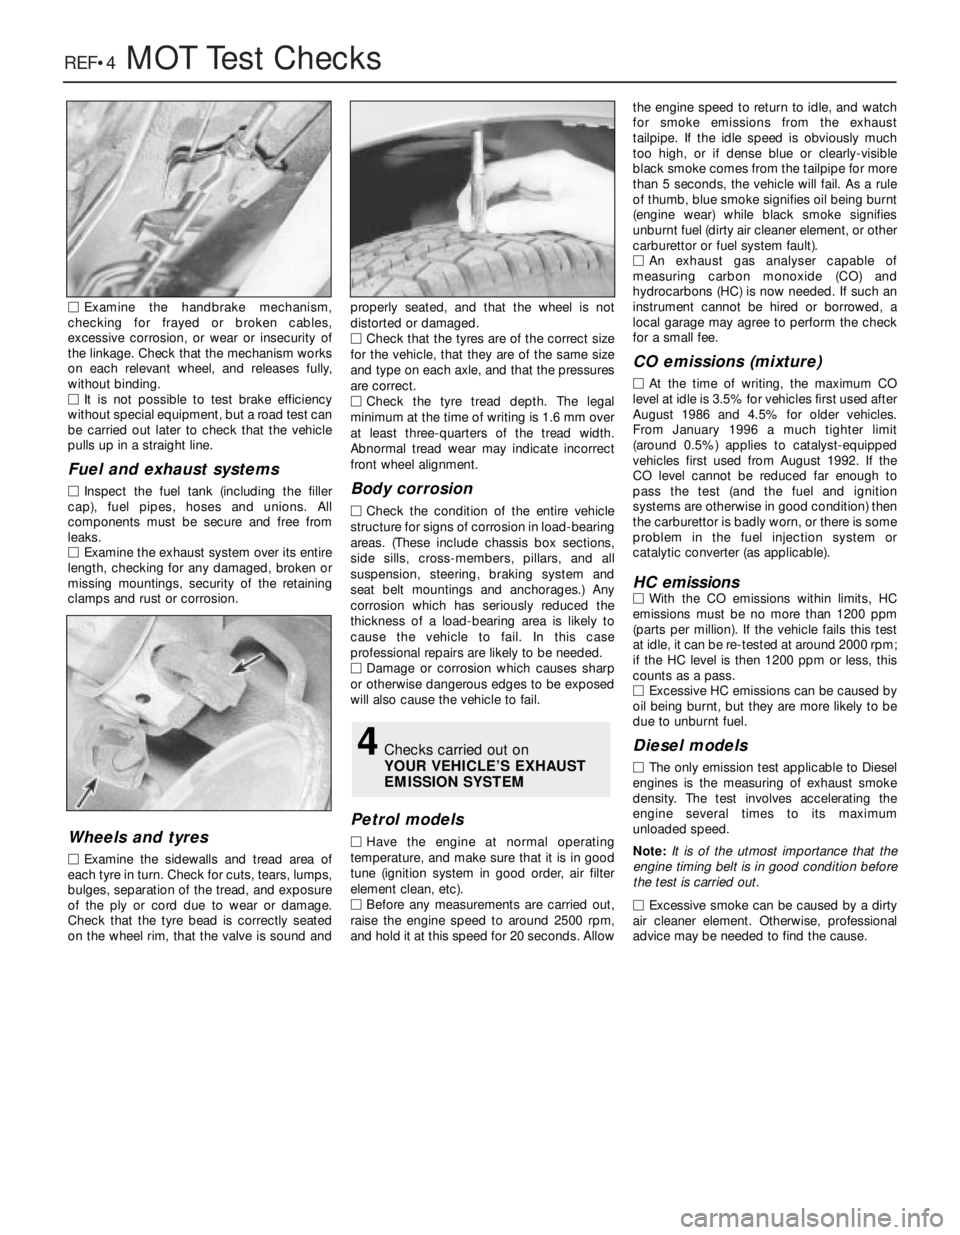
MExamine the exhaust system over its entire
length, checking for any damaged, broken or
missing mountings, security of the retaining
clamps and rust or corrosion.
Wheels and tyres
MExamine the sidewalls and tread area of
each tyre in turn. Check for cuts, tears, lumps,
bulges, separation of the tread, and exposure
of the ply or cord due to wear or damage.
Check that the tyre bead is correctly seated
on the wheel rim, that the valve is sound andproperly seated, and that the wheel is not
distorted or damaged.
MCheck that the tyres are of the correct size
for the vehicle, that they are of the same size
and type on each axle, and that the pressures
are correct.
MCheck the tyre tread depth. The legal
minimum at the time of writing is 1.6 mm over
at least three-quarters of the tread width.
Abnormal tread wear may indicate incorrect
front wheel alignment.
Body corrosion
MCheck the condition of the entire vehicle
structure for signs of corrosion in load-bearing
areas. (These include chassis box sections,
side sills, cross-members, pillars, and all
suspension, steering, braking system and
seat belt mountings and anchorages.) Any
corrosion which has seriously reduced the
thickness of a load-bearing area is likely to
cause the vehicle to fail. In this case
professional repairs are likely to be needed.
MDamage or corrosion which causes sharp
or otherwise dangerous edges to be exposed
will also cause the vehicle to fail.
Petrol models
MHave the engine at normal operating
temperature, and make sure that it is in good
tune (ignition system in good order, air filter
element clean, etc).
MBefore any measurements are carried out,
raise the engine speed to around 2500 rpm,
and hold it at this speed for 20 seconds. Allowthe engine speed to return to idle, and watch
for smoke emissions from the exhaust
tailpipe. If the idle speed is obviously much
too high, or if dense blue or clearly-visible
black smoke comes from the tailpipe for more
than 5 seconds, the vehicle will fail. As a rule
of thumb, blue smoke signifies oil being burnt
(engine wear) while black smoke signifies
unburnt fuel (dirty air cleaner element, or other
carburettor or fuel system fault).
MAn exhaust gas analyser capable of
measuring carbon monoxide (CO) and
hydrocarbons (HC) is now needed. If such an
instrument cannot be hired or borrowed, a
local garage may agree to perform the check
for a small fee.
CO emissions (mixture)
MAt the time of writing, the maximum CO
level at idle is 3.5% for vehicles first used after
August 1986 and 4.5% for older vehicles.
From January 1996 a much tighter limit
(around 0.5%) applies to catalyst-equipped
vehicles first used from August 1992. If the
CO level cannot be reduced far enough to
pass the test (and the fuel and ignition
systems are otherwise in good condition) then
the carburettor is badly worn, or there is some
problem in the fuel injection system or
catalytic converter (as applicable).
HC emissionsMWith the CO emissions within limits, HC
emissions must be no more than 1200 ppm
(parts per million). If the vehicle fails this test
at idle, it can be re-tested at around 2000 rpm;
if the HC level is then 1200 ppm or less, this
counts as a pass.
MExcessive HC emissions can be caused by
oil being burnt, but they are more likely to be
due to unburnt fuel.
Diesel models
MThe only emission test applicable to Diesel
engines is the measuring of exhaust smoke
density. The test involves accelerating the
engine several times to its maximum
unloaded speed.
Note: It is of the utmost importance that the
engine timing belt is in good condition before
the test is carried out.
M
Excessive smoke can be caused by a dirty
air cleaner element. Otherwise, professional
advice may be needed to find the cause.
4Checks carried out on
YOUR VEHICLE’S EXHAUST
EMISSION SYSTEM