1982 CHEVROLET CAMARO transmission
[x] Cancel search: transmissionPage 659 of 875

GM – CAMARO 1982-1992 – Repair Guide (Checked by WxMax) 659
VALVE LASH
All models utilize a hydraulic valve lifter system to obtain zero lash. No periodic
adjustment is necessary. An initial adjustm
ent is required anytime that the lifters
are removed or the valve tr ain is disturbed. This procedure is covered in Engine
& Engine Overhaul .
IDLE SPEED AND MIXTURE ADJUSTMENTS
Mixture adjustments are factory set and sealed; no adjustment attempt should
be made, except by an aut horized GM dealer or reputable shop equipped with
the necessary equipment.
IDLE SPEED
2-BBL CARBURETOR
WITHOUT AIR CONDITIONING
The engine must be running in "Closed Loop" mode (engine fully warmed) when
making all idle speed adjustments. In this mode, the oxygen sensor affects
control of the fuel delivery.
1. Refer to the emission label on the vehicle and prepare the engine for
adjustments (set the timing). Remove the air cleaner and set the parking
brake. Connect a tachometer to the distributor connector.
2. Place the transmission in DRIVE for automatic transmission, or
NEUTRAL for manual transmission; make sure that the solenoid is
energized.
3. Open the throttle slightly to allow the solenoid plunger to extend. Adjust
the curb idle speed to the specified rpm by turning the solenoid screw.
4. De-energize the solenoid by disconnecting the electrical lead.
5. Set the basic idle speed rpm by turning the idle speed screw. After
adjustment, reconnect the solenoid electrical lead.
6. Remove the tachometer and install the air cleaner.
Page 660 of 875

GM – CAMARO 1982-1992 – Repair Guide (Checked by WxMax) 660
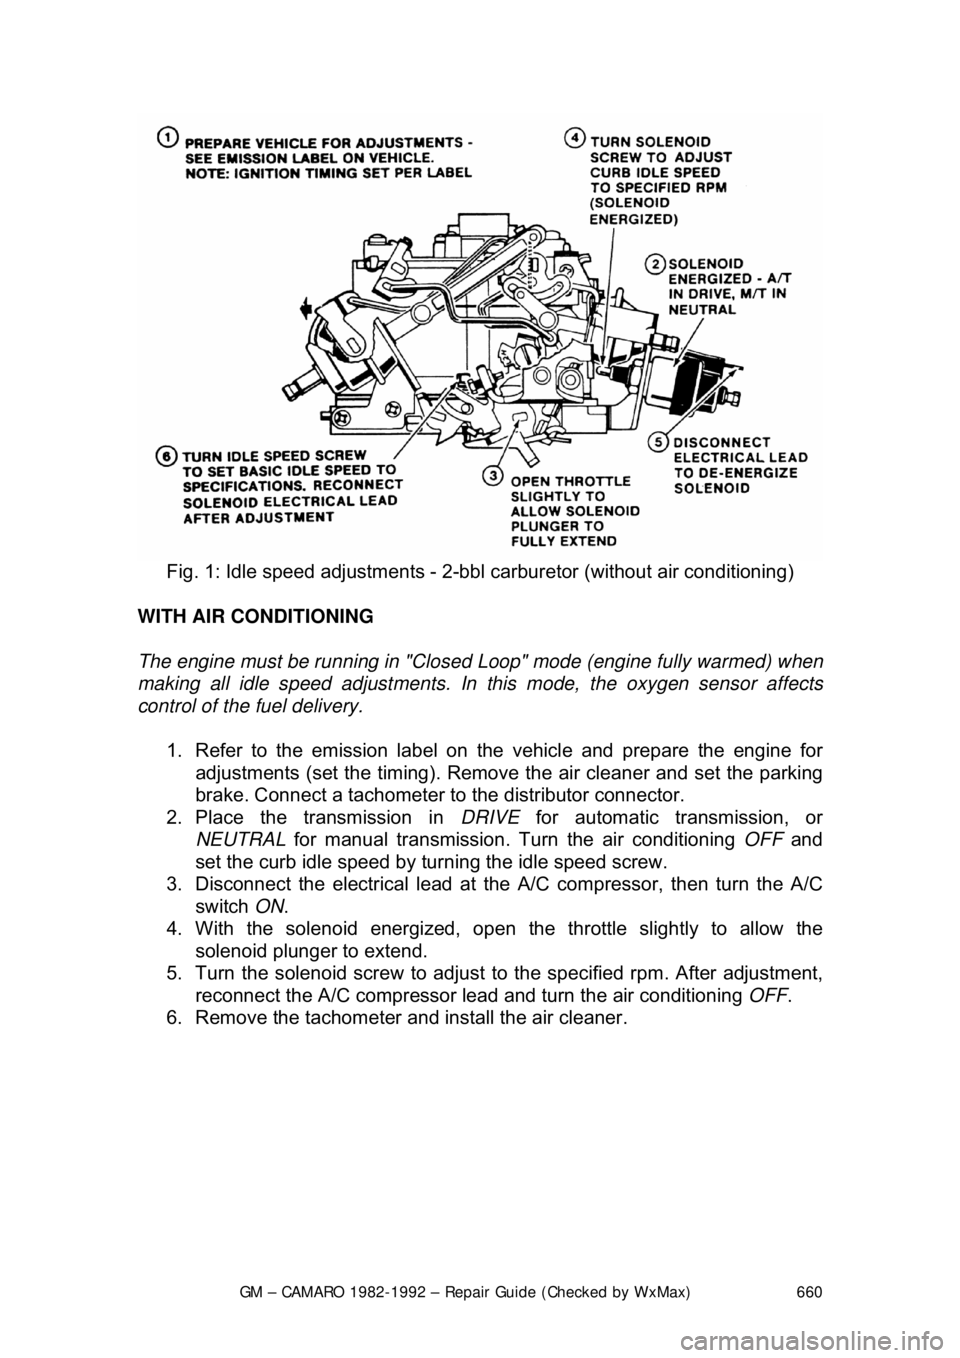
Fig. 1: Idle speed adjustm ents - 2-bbl carburetor (without air conditioning)
WITH AIR CONDITIONING
The engine must be running in "Closed Loop" mode (engine fully warmed) when
making all idle speed adjustments. In this mode, the oxygen sensor affects
control of the fuel delivery.
1. Refer to the emission label on the vehicle and prepare the engine for
adjustments (set the timing). Remove the air cleaner and set the parking
brake. Connect a tachometer to the distributor connector.
2. Place the transmission in DRIVE for automatic transmission, or
NEUTRAL for manual transmission. Tu rn the air conditioning OFF and
set the curb idle speed by turning the idle speed screw.
3. Disconnect the electrical lead at the A/C compressor, then turn the A/C
switch ON.
4. With the solenoid e nergized, open the throttle slightly to allow the
solenoid plunger to extend.
5. Turn the solenoid screw to adjust to the specified rpm. After adjustment,
reconnect the A/C compressor lead and turn the air conditioning OFF.
6. Remove the tachometer and install the air cleaner.
Page 661 of 875

GM – CAMARO 1982-1992 – Repair Guide (Checked by WxMax) 661
Fig. 2: Idle speed adjustm ents - 2-bbl carburetor (with air conditioning)
4-BBL CARBURETOR
WITHOUT AIR CONDITIONING
The engine must be running in "Closed Loop" mode (engine fully warmed) when
making all idle speed adjustments. In this mode, the oxygen sensor affects
control of the fuel delivery.
1. Refer to the emission label on the vehicle and prepare the engine for
adjustments (set the timing). Se t the parking brake. Connect a
tachometer to the dist ributor connector.
2. Place the transmission in DRIVE for automatic transmission, or
NEUTRAL for manual transmission.
3. De-energize the idle speed solenoid by disconnecting the electrical lead.
4. Set the basic idle speed rpm by turning the idle speed screw.
5. Connect a jumper wire from a 12-vo lt power supply to the solenoid.
6. Open the throttle partially to ensure that the solenoid plunger is fully
extended, and allow the throttle lever to close on the plunger.
7. Turn the solenoid plunger to adj ust to the specified rpm. After
adjustment, disconnect the jumper wire and reconnect the solenoid
electrical lead.
8. Remove the tachometer and install the air cleaner.
Page 662 of 875

GM – CAMARO 1982-1992 – Repair Guide (Checked by WxMax) 662
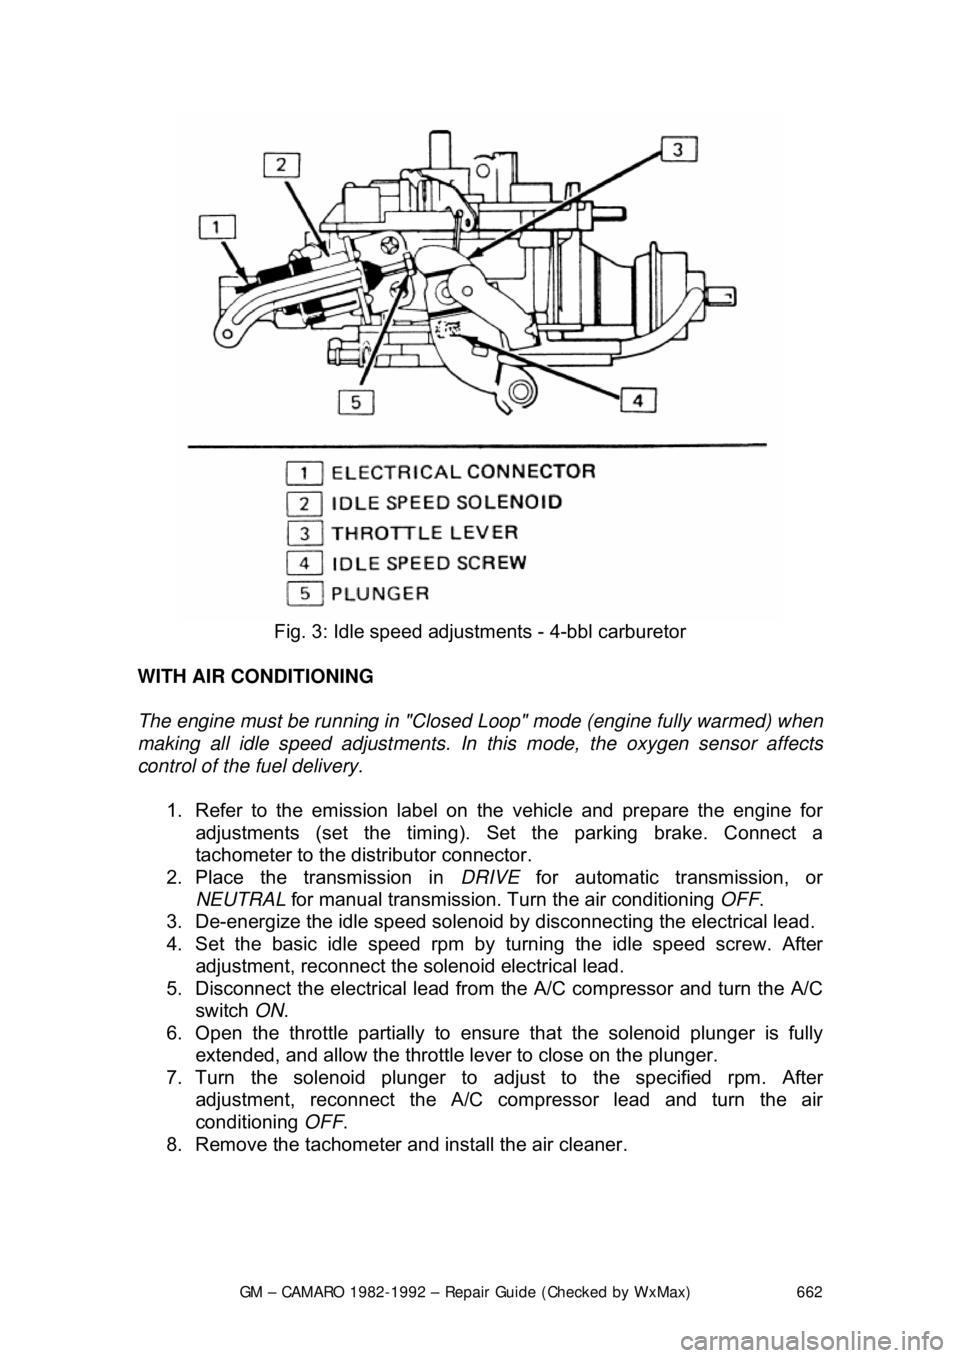
Fig. 3: Idle speed adjustm ents - 4-bbl carburetor
WITH AIR CONDITIONING
The engine must be running in "Closed Loop" mode (engine fully warmed) when
making all idle speed adjustments. In this mode, the oxygen sensor affects
control of the fuel delivery.
1. Refer to the emission label on the vehicle and prepare the engine for
adjustments (set the timing). Se t the parking brake. Connect a
tachometer to the dist ributor connector.
2. Place the transmission in DRIVE for automatic transmission, or
NEUTRAL for manual transmission. Tu rn the air conditioning OFF.
3. De-energize the idle speed solenoid by disconnecting the electrical lead.
4. Set the basic idle speed rpm by turning the idle speed screw. After
adjustment, reconnect the solenoid electrical lead.
5. Disconnect the electrical lead from the A/C compressor and turn the A/C
switch ON.
6. Open the throttle partially to ensure that the solenoid plunger is fully
extended, and allow the throttle lever to close on the plunger.
7. Turn the solenoid plunger to adj ust to the specified rpm. After
adjustment, reconnect the A/C co mpressor lead and turn the air
conditioning OFF.
8. Remove the tachometer and install the air cleaner.
Page 692 of 875

GM – CAMARO 1982-1992 – Repair Guide (Checked by WxMax) 692
IDLE AIR VALVE
A cover is in place over t
he idle air bleed valve. Also , the access holes to the
idle mixture needles are s ealed with hardened plugs. This is done to seal the
factory settings, during original equipment production. These items are NOT to
be removed unless required for cleaning, part replacement, improper dwell
readings or if the System Performance Check indicates the carburetor is the
cause of the trouble.
ROCHESTER E4ME AND E4MC
1. With engine OFF, cover the internal bowl vents and inlet to bleed valve
and the carburetor air intakes with maski ng tape. This is done to prevent
metal chips from entering.
2. Carefully drill rivet head of idle air bleed cover, with 0.110 in. (2.8mm) drill bit.
3. Remove rivet head and all pieces of rivet.
4. Lift cover off air bleed valve and bl ow out any metal shavings, or use a
magnet to remove excess metal.
CAUTION - Always wear eye protection when using compressed air.
5. Remove masking tape.
6. Start engine and allow it to reac h normal operating temperature.
7. Disconnect the vacuum hose from t he canister purge valve and plug it.
8. While idling in D for automatic transmission or N for manual
transmission, slowly turn the valve c ounterclockwise or clockwise, until
the dwell reading varies within the 25-35 degree range, attempting to be
as close to 30 degrees as possible.
Perform this step carefully. The air bleed valve is very sensitive and should be
turned in
1/8 turn increments only.
9. If the dwell reading d oes not vary and is not within the 25-35 degree
range, it will be necessary to remove the plugs and to adjust the idle
mixture needles.
Page 696 of 875

GM – CAMARO 1982-1992 – Repair Guide (Checked by WxMax) 696
Fig. 28: Lean mixture and idle mixture screw adjustment
E4MC CARBURETOR (HOT AIR CHOKE) 1. Using tool J-29030-B, BT-7610-B, or equivalent, turn each idle mixture
needle clockwise until lightly seated, then turn each mixture needle
counterclockwise 3 turns.
2. Reinstall carburetor on engine, using a new flange mounting gasket, but
do not install air cleaner or gasket at this time.
3. Disconnect vacuum hose to c anister purge valve and plug it.
4. Connect the positive lead of a dwell me ter to the mixture control solenoid
test lead (green connector). Connect the other lead to ground. Set the
meter to the 6 cylinder position.
5. Start engine and allow it to reac h normal operating temperature.
6. While idling in D ( N for manual transmission), adjust both mixture
needles equally, in
1/8 turn increments, until dwell reading varies within
the 25-35 degree range, attempting to be as close to 30 degrees as
possible.
7. If reading is too low, turn mixtur e needles counterclockwise. If reading is
too high, turn mixture needl es clockwise. Allow time for dwell reading to
stabilize after each adjustment.
After adjustments are complete, seal t he idle mixture needle openings in the
throttle body, using silicone sealant, RTV rubber, or equivalent. The sealer is
required to discourage unnece ssary readjustment of the setting and prevent fuel
vapor loss in that area.
8. On vehicles without a carburetor -mounted Idle Load Compensator (ILC) ,
adjust curb idle speed if necessary.
Page 698 of 875

GM – CAMARO 1982-1992 – Repair Guide (Checked by WxMax) 698
5. Disconnect and plug hose to canister purge port.
6. Disconnect and plug hose to idle load compensator.
7. Back out idle stop screw
on carburetor 3 turns.
8. Turn air conditioning OFF.
9. Block drive wheels, set parki ng brake, place transmission in P, start and
warm engine to normal operating temperature. Make certain choke is
OPEN .
10. With engine RUNNING place transmission in D and idle load
compensator fully extended (no vacuum applied). Using tool J-29607, or
equivalent, adjust plunger to obtain 650-750 rpm. Locknut on plunger
must be held with a wrench to prevent damage to guide tabs.
11. Measure distance from the locknut to tip of the plunger. This distance
must not exceed 1 in. (25mm). If it does check for low idle condition.
12. Reconnect vacuum hose to idle load compensator and observe idle
speed.
13. Idle speed should be between 425-475 rpm in D.
14. If idle speed is correct no further adjustment is necessary, proceed to the
next step. If idle speed is still incorrect continue as follows:
It may be necessary to remove the idle load compensator from the engine
unless a hex key wrench is m odified to clear obstructions.
a. Stop engine, remove rubber cap from the center outlet tube.
b. Using a 0.90 in. (23mm) hex wrench, insert through open center tube to
engage idle speed adjusting screw.
c. If idle speed was low, turn t he adjusting screw counterclockwise
approximately 1 turn for every 85 rpm low. If idle speed was high turn
screw 1 turn for every 85 rpm high.
15. Disconnect and plug vacuum hose to the idle load compensator.
16. Using a hand pump, apply vacuum to the idle load compensator until fully
retracted.
17. Adjust the idle stop screw on carburetor float bowl to obtain 450 rpm in
D .
18. Place transmission in P and stop engine.
19. Reconnect the idle load compensator.
20. Reconnect all vacuum hoses.
21. Install air cleaner and gasket. Remove wheel blocks.
Page 707 of 875

GM – CAMARO 1982-1992 – Repair Guide (Checked by WxMax) 707
Fig. 43: The adjustment specifications on the emission control information label
must always be followed
ROCHESTER E4ME AND E4MC 1. Disconnect the battery and remove the air cleaner.
2. Disconnect the accelerator linkage.
3. Disconnect the transmission detent cable.
4. If equipped, remove the cr uise control cable.
5. Tag and detach all of the necessa ry vacuum lines and electrical
connections.
6. Disconnect the fuel line at the carburetor inlet.
7. Remove the attaching bolts and remove the carburetor.
To install: 8. Position the carburetor onto the manifold and install the attaching bolts.
9. Connect the fuel line at the carburetor inlet.
10. Attach all of the vacuum lines and electrical connections, as tagged
during removal.
11. If equipped, install the cruise control.
12. Connect the transmission detent cable.
13. Connect the accelerator linkage.
14. Install the air cleaner and connect the battery.
OVERHAUL
Carburetor overhaul kits are reco mmended for each overhaul. These kits
contain all gaskets and new parts to re place those which deteriorate most