Page 505 of 537

3
Piping
Flared
section
of
high
pressure
and
low
pressure
flexible
hose
Pipe
connections
rvice
valve
4
Evaporator
housing
Jnlet
and
outlet
pipe
connections
Expansionvalve
ELECTRIC
LEAK
DETECTOR
for
the
operational
procedures
refer
to
the
instructions
furnished
with
each
electric
leak
detector
Amount
of
refrigerant
Air
Conditioning
REFRIGERANT
LEVEL
CHECK
SIGHT
GLASS
Sight
glass
is
provided
at
the
top
of
receiver
dryer
One
guide
for
whether
there
is
enough
refrigerant
in
system
is
given
by
observing
refrigerant
flow
through
sight
glass
However
this
method
is
unsuitable
for
judging
the
amount
of
refrigerant
The
correct
refrigerant
level
can
be
judged
by
measuring
t
e
system
pressures
in
ac
cordance
with
the
procedures
de
scribed
Performance
Test
I
Start
the
engine
and
hold
engine
speed
at
1
500
rpm
Almost
no
reftigerant
Check
item
Temperature
of
high
pressure
and
low
pressure
pipes
Almost
no
difference
between
high
pressure
and
low
pressure
side
temperature
Bubbles
flow
continu
ousty
Bubbles
will
disappeu
a
nd
some
thing
like
mist
will
now
when
rerrigeran
is
nearly
gone
State
insightglass
A
I
I
AC256
Pressure
of
system
High
pressure
side
is
abnormally
loW
Repa
ir
Stop
compressor
and
conduct
an
overall
check
Insufficient
High
pressure
side
is
warOl
and
low
pressure
side
is
fairly
cold
The
bubbles
are
seen
at
intervals
of
1
2
seconds
A
r
I
AC257
Both
pressures
on
high
and
low
preS
ure
sides
are
slightly
low
Check
for
gas
leakage
repair
as
required
re
plenish
and
charge
system
AC
16
2
Set
temperature
control
lever
to
maximum
position
3
Set
blower
to
maximum
speed
4
Check
sight
gla
after
the
lapse
of
about
five
minutes
Judge
according
to
the
following
table
AC741
Fig
AC
26
Temperature
control
lever
Suitable
Too
much
refri
crant
High
pressure
side
is
hot
and
low
pressure
side
is
cold
High
pressure
side
is
abnormally
hot
Almost
transparent
Bubbles
may
appear
when
engine
speed
is
raised
and
lowered
No
bubbles
can
be
seen
No
clear
difference
exists
between
these
two
conditions
M
II
I
AC258
Both
pressures
on
high
and
low
pressure
sides
are
normal
Both
pressures
on
high
and
low
pressure
sides
are
abnormally
high
Discharge
reft
gerant
from
service
valve
of
10
11
pressure
side
Page 506 of 537

Notes
a
The
bubbles
seen
through
the
sight
glass
are
influenced
by
the
ambient
temperature
Since
the
bubbles
are
hard
to
show
up
in
comparatively
low
temperatures
below
200C
6S0
F
it
is
possible
that
a
slightly
larger
amount
of
refrigerant
would
be
filled
if
supplied
according
to
the
sight
glass
Be
sure
to
recheck
the
amount
when
it
exceeds
200C
680F
In
higher
temperature
the
bubbles
are
easy
to
show
up
b
When
the
screen
in
the
receiver
dryer
is
clogged
the
bubbles
will
appear
even
if
the
amount
of
refrig
erant
is
normal
In
this
case
the
outlet
side
pipe
of
the
receiver
dryer
becomes
considerably
cold
PERFORMANCE
TEST
Check
for
the
amount
of
refrigerant
in
the
system
can
be
made
by
meas
uring
pressure
on
discharge
side
The
correct
amount
of
refrigerant
is
in
the
system
if
pressure
on
the
discharge
side
is
within
the
specified
range
For
details
refer
to
Perform
ance
Test
described
later
Overcharging
will
show
up
in
higher
pressure
on
discharge
side
COMPRESSOR
OIL
LEVEL
CHECK
The
oil
used
to
lubricate
compres
sor
circulates
into
system
from
the
oil
sump
while
c9mpressor
is
operating
The
efore
to
correctly
measure
com
pressor
oil
the
amount
of
oil
flowing
to
system
must
be
considered
If
a
considerable
amount
of
leakage
of
refrigerant
gas
happens
the
leakage
of
compressor
oil
is
also
considered
There
will
be
no
compressor
oil
leak
age
from
a
completely
sealed
system
When
system
operates
under
satisfying
condition
the
compressor
oil
level
check
is
unnecessary
When
checking
the
level
of
com
pressor
oil
or
when
replacing
any
component
part
of
the
system
use
the
following
service
procedure
This
fa
cilitates
to
return
oil
to
compressor
I
Operate
compressor
at
engine
idling
speed
1
000
rpm
or
below
with
controls
set
for
maximum
cooling
Air
Conditionin
j
and
high
blower
speed
for
10
to
15
minutes
in
order
to
return
compressor
oil
to
compressor
2
Stop
the
engine
and
discharge
refrigerant
of
system
and
then
remove
compressor
from
the
vehicle
3
Remove
compressor
fIller
plug
Drain
compressor
oil
from
compres
sor
oil
sump
and
measure
the
amount
4
Compressor
oil
is
satisfactory
if
the
following
amount
of
oil
remains
in
the
compressor
Residual
oil
S5
to
128
gr
3
to
4
oz
5
Check
the
cleanliness
of
the
oil
If
the
oil
contains
chips
or
other
foreign
material
clean
oil
5ump
with
new
oil
6
Discard
the
used
oil
and
fili
with
the
same
amount
of
new
oil
Add
oil
if
found
less
than
above
amount
Fig
AC
27
Filler
plug
If
compressor
is
inoperative
due
to
faulty
compressor
or
heavy
loss
of
refrigerant
remove
compressor
and
repair
as
necessary
Then
pour
oil
up
to
correct
level
and
install
on
engine
After
above
steps
have
been
complet
ed
recheck
oil
level
drain
oil
to
correct
level
if
level
is
excessively
high
PERFORMANCE
TEST
The
cooling
performance
of
the
air
conditioner
changes
considerably
with
changes
in
surrounding
conditions
Testing
must
be
performed
using
the
correct
method
This
test
is
used
to
judge
whether
system
is
operating
cor
rectly
and
can
also
be
used
as
a
guide
in
checking
for
problems
I
Park
the
vehicle
indoors
or
in
the
shade
AC
17
2
Open
all
the
windows
of
the
vehicle
fully
However
close
the
doors
3
Open
the
hood
4
Connect
manifold
gauge
to
high
and
low
side
service
valves
of
the
system
Refer
to
Handling
Manifold
Ga
uge
5
Set
fan
control
lever
to
maxi
mum
6
Set
temperature
control
lever
to
max
cool
position
7
Start
the
engine
and
hold
engine
speed
at
1
500
rpm
S
After
the
air
conditioner
has
been
operated
for
about
10
minutes
measure
system
pressures
at
high
pres
sure
discharge
side
and
low
pressure
suction
side
9
Measure
the
temperature
of
dis
charge
air
at
outlet
grille
10
Measure
the
temperature
of
capin
11
Measure
ambient
temperature
and
humidity
one
meter
3
3
ft
away
from
condenser
front
Be
careful
not
to
expose
dry
buib
and
wet
bulb
to
direct
sunlight
12
Check
for
any
abnormalities
by
comparing
the
test
results
with
stand
ard
pressure
in
Performance
Chart
Notes
a
The
pressure
will
change
in
the
followi
g
manner
with
changes
in
conditions
When
blower
speed
is
low
dis
charge
pressure
will
drop
When
the
relative
humidity
of
in
take
air
is
low
discharge
pressure
will
drop
b
The
temperature
will
change
in
the
following
manner
with
changes
in
conditions
When
the
ambient
air
temperature
is
low
the
outlet
air
temperature
will
become
low
If
the
test
reveals
that
there
is
any
abnormality
in
system
pressure
isolate
the
cause
and
repair
by
reference
to
the
Trouble
Diagnoses
and
Cor
rections
Page 507 of 537

REFRIGERANT
LEAKS
If
leaks
are
noticeable
leaky
parts
should
be
repaired
Then
system
should
be
filled
with
refrigerant
Do
not
operate
compressor
with
refriger
ant
level
e
cessively
low
If
this
caution
is
neglected
a
burnt
compressor
will
result
since
heavy
loss
of
refrigerant
usually
indicates
heavy
loss
of
compressor
oil
If
system
has
been
exposed
to
atmosphere
for
an
extended
period
of
Air
Condition
ing
time
receiver
dryer
must
be
replaced
If
leaks
are
slight
and
no
air
is
present
in
system
add
refrigerant
as
necessary
To
detect
leaks
refer
to
relative
topics
under
Checking
for
Leaks
Here
is
how
leaks
are
stopped
I
Check
torque
on
the
connection
fitting
and
if
too
loose
tighten
to
the
proper
torque
Check
for
gas
leakage
with
a
leak
detector
2
If
leakage
continues
even
after
AC
18
the
fitting
has
been
retightened
dis
charge
refrigerant
from
system
discon
nect
the
fittings
and
check
its
seating
face
for
damage
Always
replace
even
if
damage
is
slight
3
Check
compressor
oil
and
add
oil
if
required
4
Charge
refrigerant
and
recheck
for
gas
leaks
If
no
leaks
are
found
evacuate
and
charge
system
Page 508 of 537
Air
Conditioning
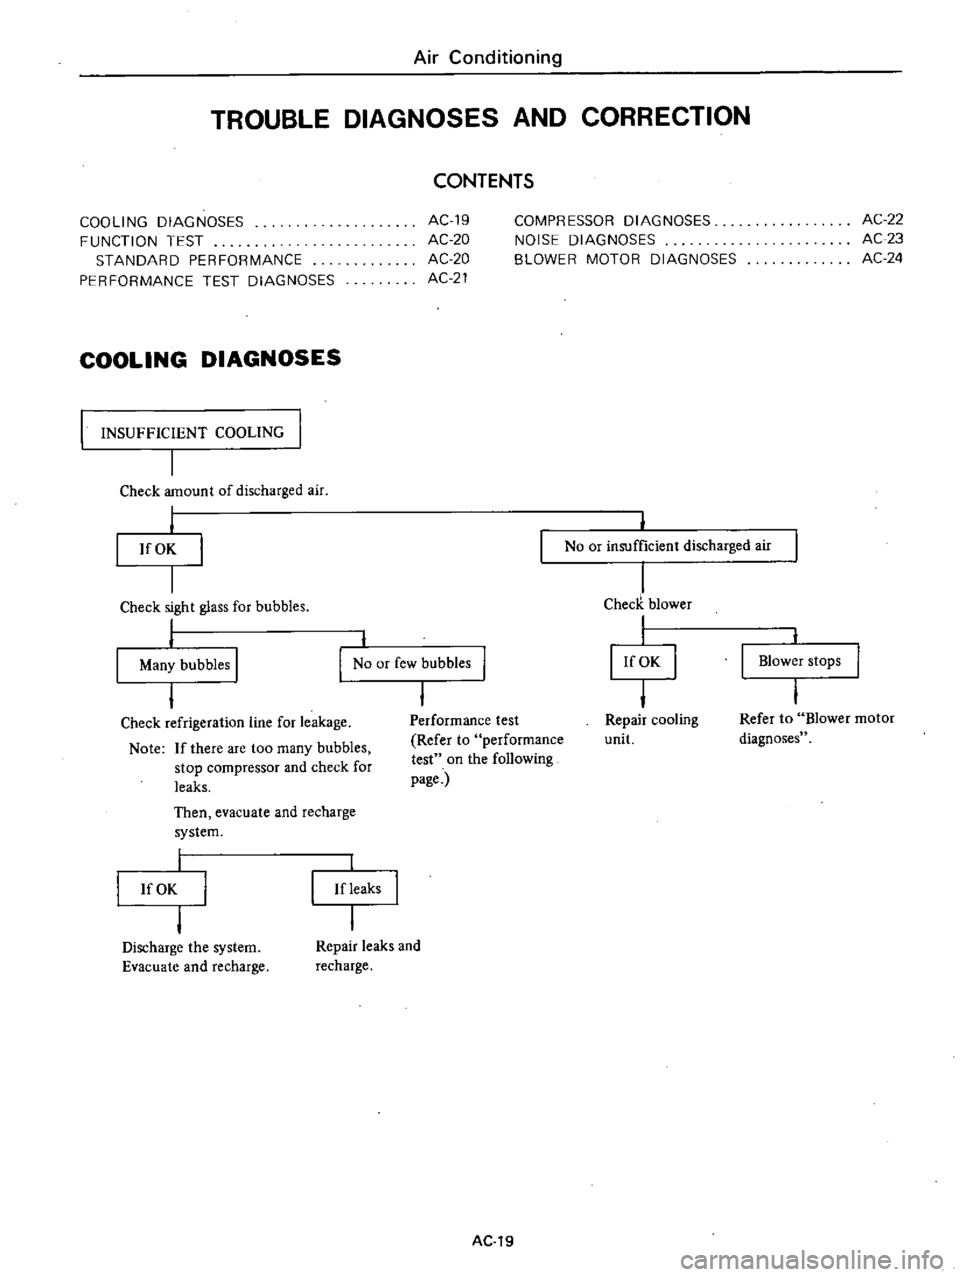
TROUBLE
DIAGNOSES
AND
CORRECTION
CONTENTS
COOLING
DIAGNOSES
FUNCTION
TEST
STANDARD
PERFORMANCE
PERFORMANCE
TEST
DIAGNOSES
AC19
AC
20
AC
20
AC21
COMPRESSOR
DIAGNOSES
NOISE
DIAGNOSES
BLOWER
MOTOR
DIAGNOSES
AC
22
AC23
AC24
COOLING
DIAGNOSES
INSUFFICIENT
COOLING
I
I
Check
amount
of
discharged
air
j
If
OK
No
or
insufficient
discharged
air
Performance
test
Refer
to
performance
test
on
the
following
page
1
ChecK
blower
I
I
I
If
OK
I
I
Repair
cooling
unit
Blower
stops
Check
sight
glass
for
bubbles
I
I
Many
bubbles
I
I
No
or
few
bubbles
Check
refrigeration
line
for
leakage
Note
If
there
are
too
many
bubbles
stop
compressor
and
check
for
leaks
Then
evacuate
and
recharge
system
Refer
to
Blower
motor
diagnoses
I
If
OK
lfleaks
Discharge
the
system
Evacuate
and
recharge
Repair
leaks
and
recharge
AC
19
Page 509 of 537
FUNCTION
TEST
STANDARD
PERFORMANCE
The
air
conditioner
on
the
model
620
has
the
below
performance
char
acteristics
when
all
systems
are
in
good
condition
Compressor
pressure
is
also
indicated
below
N
E
24
j
23
22
21
20
19
18
17
16
15
14
13
I
12
u
0
6
0
5
0
4
0
3
0
2
0
1
0
20
25
30
35
40
45
Temperature
of
outside
air
ENGINE
FAN
TEMP
1
500
rpm
MAX
Fun
Cotd
20
15
10
5
0
Oc
Temperature
of
dischuge
air
Air
Conditioning
TEMPERATURE
Intake
In
the
cabin
Discharged
air
Pressure
160C
61
OF
30C
37OF
12
kg
cm2
170
psi
ISoC
64OF
50C
4IOF
13
kg
cm2
185
psi
220C
72OF
70C
45OF
15
kg
cm2
213
psi
270C
SIOF
100C
SOOF
IS
kg
cm2
256
psi
Note
Engine
FAN
TEMP
1
500
rpm
3
position
Cold
Max
REFRIGERANT
PRESSURE
Temperature
outside
Pressure
discharge
0
a
250C
77OF
18
kg
cm2
256
psi
Oc
35
300C
S6OF
15
kg
cm2
213
psi
u
Co
S
13
kg
cm2
IS5
psi
30
350C
95OF
25
400C
J05OF
J2
kg
cm2
170
psi
Pressure
suction
1
0
kg
cm2
14
psi
1
2
kg
cm2
17
psi
1
4
kg
cm2
20
psi
1
6
kg
cm2
21
psi
20
IS
AC
20
Page 510 of 537

Air
Conditioning
PERFORMANCE
TEST
DIAGNOSES
Condition
Discharge
air
too
warm
a
Both
discharge
and
suction
pres
sure
too
high
b
Both
discharge
and
suction
pres
sure
too
low
c
Discharge
pressure
too
high
and
suction
pressure
too
low
d
Suction
pressure
too
high
and
discharge
pressure
too
low
e
Discharge
pressure
normal
and
suction
pressure
too
high
t
Discharge
pressure
normal
and
luction
pressure
too
low
g
Suction
pressure
normal
and
discharge
pressure
too
high
h
Both
discharge
and
suction
pres
sure
normal
Air
conditioning
is
operating
properly
Discharge
air
normal
or
too
cold
a
Discharge
pressure
normal
and
suction
pressure
too
low
Probable
cause
Air
mixed
with
refrigerant
in
system
Overcharge
of
refrigerant
Loose
fan
belt
or
engine
over
heating
Obstructed
or
dirty
condenser
fins
Insufficient
refrigerant
charge
Over
filling
of
compressor
oil
Damaged
compressor
valve
or
pack
ing
Loose
compressor
drive
belt
Clutch
slippage
Faulty
expansion
valve
Clogged
expansion
valve
strainer
Water
has
frozen
at
expansion
valve
Faulty
expansion
valve
Faults
of
both
a
and
h
exist
Air
leaks
from
engine
com
partment
Restricted
air
flow
through
evapo
ratof
Slow
blower
motor
speed
AC
21
Corrective
action
Evacuate
and
charge
system
Discharge
some
of
refrigerant
to
correct
level
Adjust
fan
belt
or
check
cooling
system
Clean
exterior
surface
with
water
Add
refrigerant
Drain
oil
and
correct
oil
level
Refer
to
Compressor
oil
level
check
Repair
or
replace
compressor
Refer
to
Compressor
Adjust
Repair
Refer
to
Compressor
Reinstall
sensing
bulb
correctly
to
keep
it
tight
to
pipe
Replace
Clean
strainer
Evacuate
and
charge
system
Replace
Correct
sealing
Clean
evaporator
fins
Check
and
repair
blower
motor
and
wiring
Page 511 of 537
Air
Conditioning
COMPRESSOR
DIAGNOSES
I
COMPRESSOR
TROUBLE
Turn
the
compressor
dutch
wheel
by
hand
I
I
If
OK
j
Will
not
turn
Apply
12V
direct
current
to
compressor
clutch
Then
check
clutch
engagement
I
j
If
OK
I
Internal
problem
in
compressor
cylinder
Repair
or
replace
compressor
Check
voltage
oflead
wire
for
compressor
on
cooler
cable
I
I
If
OK
I
Clutch
does
not
engage
I
Clutch
is
damaged
Repair
or
replace
dutch
assembly
No
voltage
I
Internal
problem
in
compressor
Repair
or
replace
compressor
Check
or
repair
wiring
system
for
compressor
clutch
AC
22
Page 512 of 537
Air
Conditioning
NOISE
DIAGNOSES
NOISY
I
I
I
Set
fan
switch
on
2
Change
the
engine
rpm
frequently
Detect
the
source
of
noise
I
From
engine
compartment
From
cabin
Cooling
unit
j
Check
the
resonant
sound
when
the
engine
rpm
is
changed
I
I
No
resonant
sound
Compressor
itself
makes
noise
j
Blower
motor
makes
noise
Replace
or
repair
blower
Resonant
sound
Repeat
compressor
clutch
ON
and
OFF
This
checking
can
be
performed
by
changing
engine
rpm
while
fan
switch
is
set
at
ON
Retighten
compressor
bracket
bolt
If
piping
is
resonating
add
clip
Noisy
only
when
clutch
is
engaged
Noisy
when
clutch
is
not
engaged
I
Check
drive
belt
for
slackness
Check
for
loose
compressor
mounting
bolts
I
I
Remove
compressor
belt
then
turn
compressor
pulley
by
hand
If
noise
is
heard
repair
com
pressor
clutch
If
OK
If
loose
Compressor
itself
makes
noise
Repair
or
replace
compressor
Retighten
or
adjust
Nl1