1976 CHEVROLET MONTE CARLO mirror
[x] Cancel search: mirrorPage 3 of 102

Downloaded from www.Manualslib.com manuals search engine ,
BEFORE DRIVING YOUR CHEVROLET
DRIVER CHECKLIST
Before Entering Car
1. See that windows ; mirrors and
lights are clean.
2. Visually note inJIation condition
of tires.
3. Check that area to rear is clear
if about to back up.
Before Driving Off
1. Lock all doors.
2. Position seat, jmd adjust head
restraints, if
so ¢quipped.
3. Adjus!insidean'd outside mirrors.
4. Fasten seat belts.
5. Check that warning bulbs light
when key
is turned to start
position. .
6. Release parking brake ( and see
that brake warning light turns
off). ,
7. Be sure you understand your car
and how
to 'operate it safely.
Keys
Two separate keys are provided
for your car. Each key has a
differ
ent cross section so that it can be
inserted only in certain locks.
• Key with s qua r e hell d
(stamped "e") -for ignition
switch only.
• Key with oval head (stamped
"O")-for all other locks.
,
The code number of each key is
All OTHeR LOCKS
1-1
stamped on the "knock out" plug
in the '
key-bead. Your Chevrolet
dealer removed these plugs
and,.
placed them with the spare set of
keys in the special key envelope
. that was given to you at time of
delivery.
For your protection:
• Record the numbers on the key
envdope and discard the key
plugs.
• Keep the key envelope in a safe
place such
as YOII! wallet, NOT
IN THE CAR.
In the event
the original keys are
lost,
dl!plicates can be made by
your dealer or a locksmith using the
key code information.
Be sure to lock the Klove box
or console
90mpartment and re~
move the key from the car whenever
it is necessary to leave the ignition
key with
an attendant.
Page 5 of 102

Downloaded from www.Manualslib.com manuals search engine Front Seat Back ... ~'""\ ..
Front seat backs on two-door
styles are equipped with a self-lock
ing mechanism to
.• keep the seat
back locked in
phlge while in the
up position. The lock release lever
is located on the upper outboard
portion of the
s~at back.
To tilt the
sell,t back forward,
rotate the levertearward and tilt
the seat back
f?rward. When the
seat back
is r¢turned to the up
position,
• the se~t back will auto
matically 'lock.
Keep
belt re~traints.and buckles
clear of mechanism when tilting
folding seats
forward or backwards,
to help prevent damage
to these
belt systems.
Power Operated Front Seats
The six-way power seat control switch
is located
on the driver's seat
left side panel.
The seat can be operated
as
follows:
I. The front control provides up
and down movement of the
frontof the seat.
2. The center control provides
forward and backward move
ment and up and down move
ment of the entire front seat.
3. The provides up
and of the
Power Windows ,
Power windows have an ignition
interlock
so the windows cannot be
operated unless the ignition switch
is in the "on" position.
1-3
REMINDER: Remove the ignition
key when the vehicle
is not at
tended by a responsible person. A
master control for all windows
is
provided at the driver's position,
Individual switches are provided
under each window for passenger
use.
Inside Rearview Mirrors
Switch mirror to night position
to reduce glare from following
headlights. To raise or lower
mir
ror to achieve desired field of.view,
grasp mirror and exert sufficient
pressure by pushing or pulling up,
down or sideways.
Page 33 of 102

Downloaded from www.Manualslib.com manuals search engine Heater
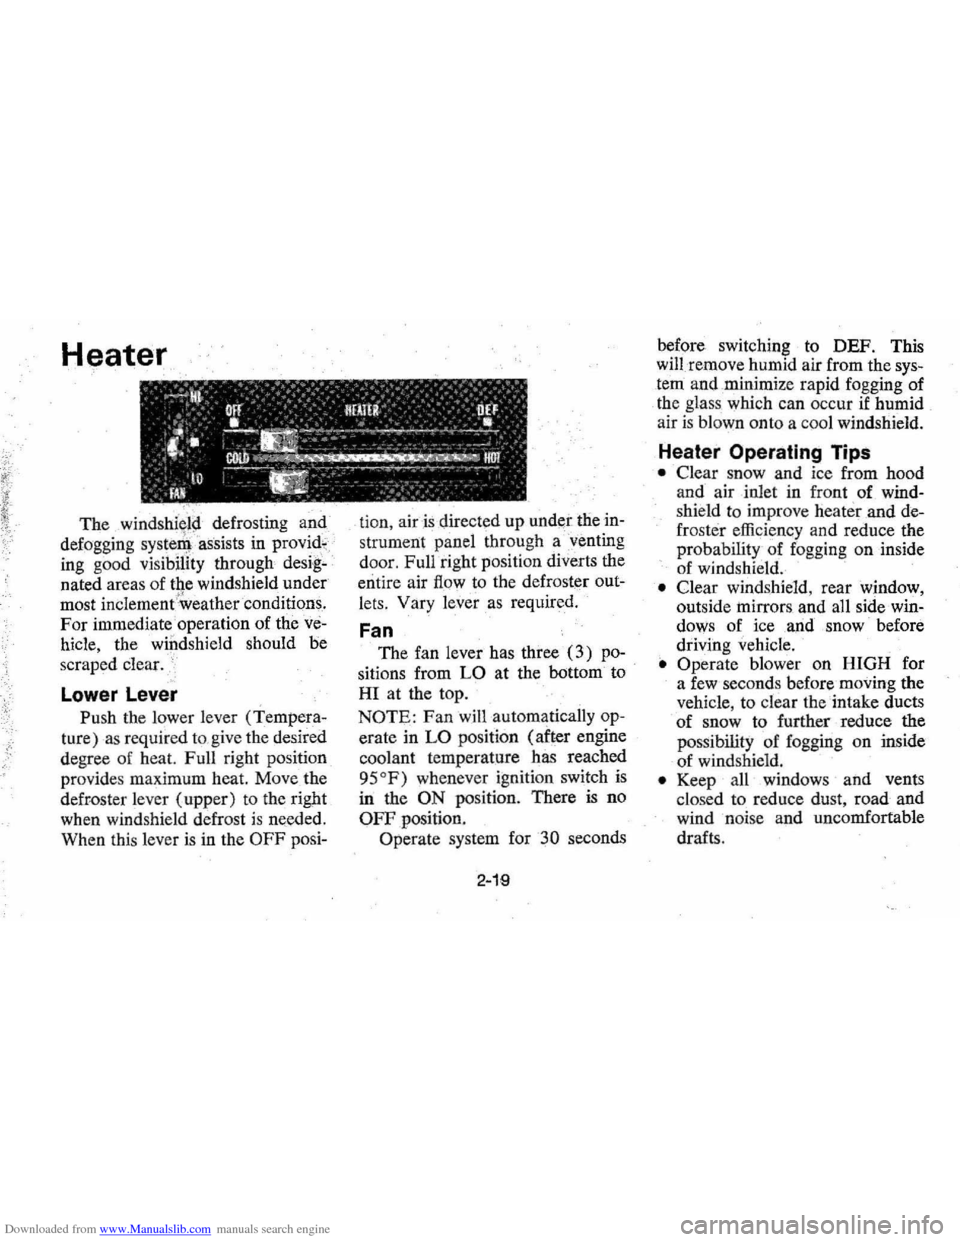
The defrosting and
defogging
systenl assists in provid,
ing good visibility through desig
nated areas of the windshield under
most
inClement'Weather conditions.
For immediate operation of the ve
hicle, the windshield should be
scraped clear.
'
Lower Lever
Push the lower lever (Tempera
ture) as required to,give the desired
degree of heat. Full right position
provides maximum heat.
Move the
defroster lever (upper) to the right
when windshield defrost
is needed.
When this lever
is in the OFF posi- tion,
air is directed
up under the in
strument panel through a'venting
door, Full right position diverts the
entire air
flow to the defroster out
lets, Vary
lever as required.
Fan
The fan lever has three (3) po
sitions from LO at the bottom to
HI at the top.
NOTE: Fan will automatically op
erate in LO position (after engine
coolant temperature has reached
95
OF) whenever ignition switch is
in the ON position. There is no
OFF position.
Operate system for
30 seconds
2-19
before switching to DEF. This
will remove humid air from the
sys
tem and ,minimize rapid fogging of
the glass which can occur
if humid
air is blown onto a coo l windshield.
Heater Operating Tips
• Clear snow and ice from hood
and air inlet in front
of wind
shie ld to improve heater and de
frost er efficiency and reduce the
probability of fogging on inside
of windshield.
• Clear windshield, rear window,
outside
mirrors , and all side win
dows of ice ,and snow before
driving vehicle.
• Operate blower on HIGH for
a few seconds before moving the
vehicle, to clear the intake ducts
of snow to further reduce the
pos sibili
ty of fogging on inside
of windshield.
• Keep all windows and vents
clo sed to reduce dust, road and
wind noise and uncomfortable
drafts .
Page 58 of 102

Downloaded from www.Manualslib.com manuals search engine IntE)rior Glass Surface
.. The interior glass surface . should
j;)e cleaned on a periodic basis for
continued good
visil;Jility. A com
mercial household . glass cleaning
agent containing ammonia
will re
move normal tobacco smoke and
dust
films sometimes caused by inc
gredients used in' vinyls , plastics or
other interior trim materials.
EXTERIOR APPEARANCE
Your car is finished with General
Motors "Magic";Mirror" acrylic lac'
quer. Tllis is a .· finish qf maximull)
beauty which,.in depth of color,
gloss retention and durability is
superior to conventiona l lacquer
finishes.
Washing Your Car
The best way to pres erve the
finish and maintain original beauty
of appearance
is to keep it clean. Wash
the car in lukewarm or cold
water . Never use stro
ng soap or
chemical detergents. Cleaning
agents should be quickl y flushed
from the surfaces .
Polishing and Waxing
Your Car
Although acrylic paint on your
car
is durable , you may wish to
wax or polish for added protection.
Your Chevrolet Dealer offers many
polishes and waxes now available
which have
proven of real value in
maintaining a good paint
finish.
When using a tar and road oil
remover, be certain it is safe for
use on acrylic painted surfaces.
Protection of Exterior
Bright
Metal Parts
Bright metal parts should he
cleaned regularly to maintain
luster. Washing with water is all
th at is usually required. However,
G.M. Chro
me Polish may be used
4-5
on CHROME or .STAINLESS
STEEL trim if necessary.
Use special care with ALU
MINUM . tr im . Never use auto
or chrome .polish , steam or any
caustic soap
to clean aluminum.
A coating of wax, rubbed to a
high polish,
is recommenlled for
all
bright · metal parts. .. ..
CIE)aning White Sidewall
TirE)s
Use a tire clea ner which will not
harm aluminum trim. A stiff brush
may be used with tile cleaner to
remove road grime and dirt from
white sidewall tires.
Cleaning thE) Optional
Vinyl
Top
The top should be washed fre
quently with neutral soap suds,
lukewarm water and a brush with
soft bristles. Rinse top with
suffi
cient quantities of clear water to
remove all traces of soap.
Page 94 of 102

Downloaded from www.Manualslib.com manuals search engine Glove Box ......................... 1·1 Harness, Safety (See Seat Belts) Hazard Wa rning Flasher. . . . . . . . . . . .. 3· t H ead lamp Flickering (Circuit Breaker) ........ 6-3 High Beam Dimmer Switch ..... _. .. 2 ·9 H igh Beam Indicator.... .. .. ...... 2· 13 Ught and Instrument Panel Switch....... .. .. .. .. .. .. . ... .. 2·13 Head Restraints. . . . . . . . . . . . . . . . . . .. 1·7 Heate r Operation .... , ........•...... 2·19 High Speed Operation During Break·In... .... ....... .... ii Tires ............................ 5·14 Hit ches, Trail er ..................... 1·10 Hood latch Maintenance ..•............. 5·12 Release .............. Inside Back Cove r Horn .............................. 2·7
"HOT" Light (See Engine
Temperature Light)
H ow
To Improve Your Gas Mileage Tips ..... ' ................ 5~21 Hub Caps, Replacing.... . . . . . . . . . . .. 3A Hydroplan ing ......... , ... ....• , , .. 5·18 Identificatio n Numbers Body ........................•.... 6-1 Engine ...................... , ... 6-1 Vehicle. . . . . . . • . • . . . • . • • . . . . . . . .. (j. 1 Ignition
Key s .... , .......... , ...• ...... 1-1, 2~2 Lock.. ........ .. .. .. .. .. .. .... .. 2·2 In Case Of Emerg ency ........... , , .. 3·1 Indic ator Lights
Brake .............. , .... , ....... 2-12
Electrical Charging (Gene rator) ..... 2-12
Engine Temperature ............ , .. 2- J 2 Oil Pressure.. . . . . . . . . . . . . . . . . . ... 2-11
In fant Restraining Methods .......... 1·8 Infant Safety Carrier ..... , ... , . • . . .. J·8 Inflation Pressure, Tires. . . .. . . . . . . . .. 5·14 Inle ts, Ventilation System ......•... ,. 2·17 Inside Rearview Mirro r ........•• ,. " 1·3 Instrume m Panel. . . . . . . . . . . . . • . . . .. 2-10
I nterior Appearance Care ......•..... 41 Jack Operation ...... ;." ., .. .. .. .. .... 3-4
Storage .... , . , . , , , , . , . . . . . . . . . . .. 3-5 Jump Starting With Booster Battery. .. 3-2 Key, Buzzer System ... , ... , ... , , . . . .. 2-2 Keys .............................. 1·1 Knocking Engine (See Fuel
Recommendation s)
Lacquer, Acrylic
Care .... , ........ ,' 4-5 Lane Change r and Turn Signal. . . . . .. 2·5 Lap and Shoulder Belts .. , . . . . . . . . . .. 1·6 Latches Door ............................ 1-2 Foldi ng Seat Back .. , ....•........ 1-3
Hood ................. ,..... . ... 5·1 2 Lig hter, Cigarette. .........•.. ... ... 2-15 Lights......... ........ .... ........ 6-3 Backup.......... .. .. .......... .. 6-3 Brake Warning. _, ..... , ....... " .. 2-1 2 Bright Beam Indicator. , . , , ...•. , .. 2· 13 Bright Beam Switch ... ".......... 2-9 Bulb Chart ............ , .......... &.3 Courtesy ....... : . . . . . . . . . . . . . . . .. 6-3 Engine Temperature Indicator. . . . .. 2-12 Generator Indicator ... , . . . . . . . . . .. 2-12 Hazard Flasher ... ..... , .... , . , . .. 3·1 Head lamp Circuit Breaker. . . . . . . .. 6-3 Headlamps ..... " ... , .. , . ,'. . . . . . 6-3 Headlamp warning buzzer. . . . . . . .. 2-15 Maintenanc e ...... ~ ....... , . . . . . . 6-2
Oi l Pressur e Ind icator .. , .... , . , , .. 2-11
6-10
r'
Sidemarker ... , .. .. , , . , , , •• •... ,. (j.3 Switch ........... , .... , ..••.... ,. 2-13
T ail and Brake ......... , . • . . . . . .. &.3 Turn Signal Indicator ......... , . .. 2-5 Thm Signals .............. , . . . . .. 2-5
Lin ings, Brake, . . . . . . . . . . . . . . . . . . .. 2-8 Liquid Tire Chain .................. 3-1 Load, Full Rated (S ee Tire s) Locks DOM ... ,., ........ , .. , ...... , ... 1-2 GI~v.e Box ... , ..... , .. ,.... .... .. 1-1 IgnItion ..... , .. , . . . . . . • • . . . . . . .. 2·2
Powe r Door ...... , . . . . . . . . . . . . . .. 2-27
St ee rin g Column ................ ,. 2-2
l ow -Lead Fue ls ................ , . .. 5-1 Luggage Compartment , Driv ing
Whi le Open ........... , " . ... ,.,. 2-1 Luggage Carrie r, Roof ............. , 2-27
Maintenanc e
Appearance
Care ............ , . . .. 4.'1 Master Cylinder, Brake ... , .......... 5-11 Meta l Cleaners. , , . . . . . . . . . . . . . . . . .. 4-5
M ethods Of Restraining Children .. ". 1-8 Mirrors, Rear View ...... , ...... "., 1-3 Mountainous Terrain
Driving Down Grades.. . ...... .. .. 2-4
Transmissio n Flu id Change Interva l. 5-5 New Car Break-In ........ ,. .. .. .. .. it Oi l In for mati on .................... 5-2 Operation in Foreign Countries ...... , 1-12 Operation of Station Wagon Seats .. , 2-29 Other Controls and Features. . . • • . . .. 2-27 Outside
Air Vents ........... ,. , .......... 2-17 Ove rheated Engine
Indicator Light. ........ " ... .... ,. 2-12 What To Do ........... " .• " .. .. 2-12
O verseas Operation ..........••. , ... 1-12