1974 FORD CAPRI checking oil
[x] Cancel search: checking oilPage 10 of 205

General repair procedures
Whenever scrvie,,,U. repair or overhaul work ,$ c;nric
Joinl mating ftlces ,7l1d gaskets Where 1'1 gasket IS lIsed tmlwl:CIl the ",,,,ill\1 [
Make SUfi) lh,,[ tnppcd holes nrc ciedncd WIth il pI pc clcilncr, and kcep thcm flcc 01 101l1llng compound If tillS IS helll\) used unless
speCIfIcally Instructed otherWIse Ensure that "II ollfrtes. (:hannels 0 1 pIpes ,lie Clt'ill ilnd blow thlough Ihelll. p,eleriluly llsing compressed ill(
ai/ seal s
Wheneve, nn od sCill is removed flom its wOlkll1\1 10Ciliion, eIther mdlvidu"lly or "s p"rt of iln assemhly, It should be lencwcd The very finc sc"lIng IIp of the sei'll IS e"slly dama\Jcd and WIll not seal If the surface it COI11<1(:15 IS not completely c lean and free frOlll
SCHl\ches, nicks 0' grooves. If the o'iginal scaling surfi'lce of the COlnponern cannOI he restorCd, Ihe component shoul d he renewed, PrOlect lhe lips of the scal from any surlace which mi'lY damage them in the course of fmlng. Usc wpe or a conical sleeve where POSSIble, LUb ricate the senl lips WIth 011 befole fruing and, on dual lipped se"ls, fill the space be twcen the hps With grease. Unless otherwise stated. all seills must be hlled with then sealing hps toward the lubricilrH to he seillcd Use iI\ubuli'l' <111ft 01 block 01 wood 01 the npploprime sIze to II1sta ll
) I he scal ilnd, lithe sCi,1 housing IS ~houldeleu. drive the seill down to the shoulue,. If the scal hOUSIng is unshouldcred, the seal Should be fItted with its lace flush W ith the hou$lIlg top face,
Screw IhrCiU/s and lasleoings Always cnsurc that a blind t"pped hole is completely free from orl. U
reilSe,
wilte, or other flUId hcfore instatllng the hott a' stud. Fililu'e 10 do tillS could C,luse thc housm\) to c"lck due to the hydrilulic <1ction of the bolt or slud ilS It IS sc,ewed '" When tluhtenlllU ,1 cilswllilled nut to ilCCCpt iI spht pin, tIghten the nut to the speCIfIed torque, whele ilpphcilh le, and then lIghten furthe, to the next split pin hole Ncver slilckenlhe nulla "lrgn a spirt pin hole unless ~t
SOllle Inswnces, where no a lterniltlve IS poss ible. II hilS been necessary 10 resort to the use of a manufilclurer"S tool and thIS has been done for reilsons of safety as well as Ihe eHlcien! completion of the repair
operation. Unless you are highly Skilled ilnd hilve a thorough unde,standlng of the procedure desc(lbed, neve, " tWlllpl to bypass the use of any specl,,1 tool when the procedure descrIbed specllies ils use, Not only IS I here a ve,y great risk of pe,sonal Injury, but expensive dillllage could be causJd 10 Ihe components involved
procarmanuals.com
Page 21 of 205

a
20 Fault diagnosis
Carrying a lew spares eM) :\l1VO you a lono walk!
WHhou t 100 ,ulIeh trouhle in the event o f il hrC
DrHII/mim [(JIm, (:lIlIdulI.~VI IIlId C""Ii":II"'HI~'." I'omls (;'s ;,/I/lII(.','I/)/e
IJllv/.'lmll(s) ,.'/I11:II/VJlCY IYl't' m"y suffu;t, SlIill!! {(I,ft'S S •. '/ of //111//:'/1,,1 "ylll bill/,S 1/1/ 0/ ",dlll/Ol 5<:;,11:, ,mil IlOst: '>,md.1UI! t"~II;III.1'1 /),111(1I1!IC Roll OlllllilJIMlt/y IIIl'l' Lf>llylll of sulillflll WIIC Lc"yllt of ci.:cIIlC,llllt·.
rUiC" Of mSIICC/IQIII;III'11 (eilllliot/blt' ;,S II.'S( I;IIIJIJ) OMlt'IY 111111/1 Il'mls Tow" Q/IC Iym(/Oll WJiClllloo/lllY ,ow/osol Llfll! 01 c"Yllle Oil SeMcI I eMI olltyr/wlIll(: /f",d Emeif/CoCY WII/({SCIt'ell W(JIm ({live cl'II$ Tube 01 Idlel IJ,1S((;
II Sllilro IU(l 1 IS Cil",c< I .• 1 Ciln dcs'Ollod for th(l pu'pose should hc uscd 10 m"l",l(~e rrsks of le
WhiCh, evon 'f you cnnnOi III thcm yowscll, could snve hav'"(J 10 Willi wh,le p
One of Ihe 111010llng 0'ganlSilll0ns w
Ellgillc taits 10 ((IIf) W/IL'II slilrlc r ()p vra le d 1' 1;11 h~lll.'ry (.ud,;,,!!,!, u~.., rlmlll'uolds, 01 push Sl.1rt) nnllclY 1(:rnllll.,ls Ions!! 01 cntlod,!d BaltelY ll.1,tll to hody dd"cl'vu Enwnc e(utll S I,,1)) 100Sll 01 broken Sl.1rtel 1II0lO r (or so lulloid) "",,,ng loose or IJroken
l\ulOn1 ;II,e II1!11srllr~s,()" seleClor ,n W'OIlIl pos",on, or Inhd)!' sW/lcli fHur,y '11""'Oll/SI (lr lu, sw,'ch folUllY
M i'ror mech:u"C.11 ,,,,lure (Se'lUre)
Sli"!~1 Or sole"ord 'ntorrloll rilul! (seo Chaplllr 12)
A
simple les t lamp is useful fot checking electrical fault s
procarmanuals.com
Page 39 of 205

i12.
38 Chapter 1 Engine
20.6A Mil,kIl1H S 011 the reverse 01 ,1 hl!1 ClI,t tlP.ilrnlH sh ell (, .... owed) 20.GEl ·S1.1n
2 BCilrll1!j shells 111 (lootl condItIon h,IVC 1)C"fU'O surfaces wllh il smooth. (lyen m.m s,tvcr /u,ey coloUI .111 ave._ Wam hCillln!IS wIll show piuches 01 il d,t(clcnt colour when the hctlring mottll h
I,,~t>(:ct Iho !)(:
hl~l)t";t Ihe lIywheel lor danln!Je and ch"ck Ih(: ling tical 10.
,1nd d.llll,I!IC 2 If th'l .1I1!1 IIC'" IS h,utiy worn Of has IllISSIl1!J It!clh II shaul. ,e!lew,·d Til" old 11111.1 call ho 'emoved Ironl tile lIywhecl by CU1\1 1l0 lc h 1I.·lwc"n two leeth With
23 Oil "ump -distl1;l!llling. cxarninntion nnd reassembly
II 011 [lU'''1> w~," IS slIspecw(l il is pOSSlhle 1 0 OOIJIIl n 'CpJII Check fVI W("" 11151 li S desc!lbed IlIte! in IhlS Sec llon ilnd II conlun vhlain ,III IIVCI "(lui kil O' il new pump_ The twO f O tors
20.7B Cil.d U
Page 47 of 205

46 Chapter 1 Engine
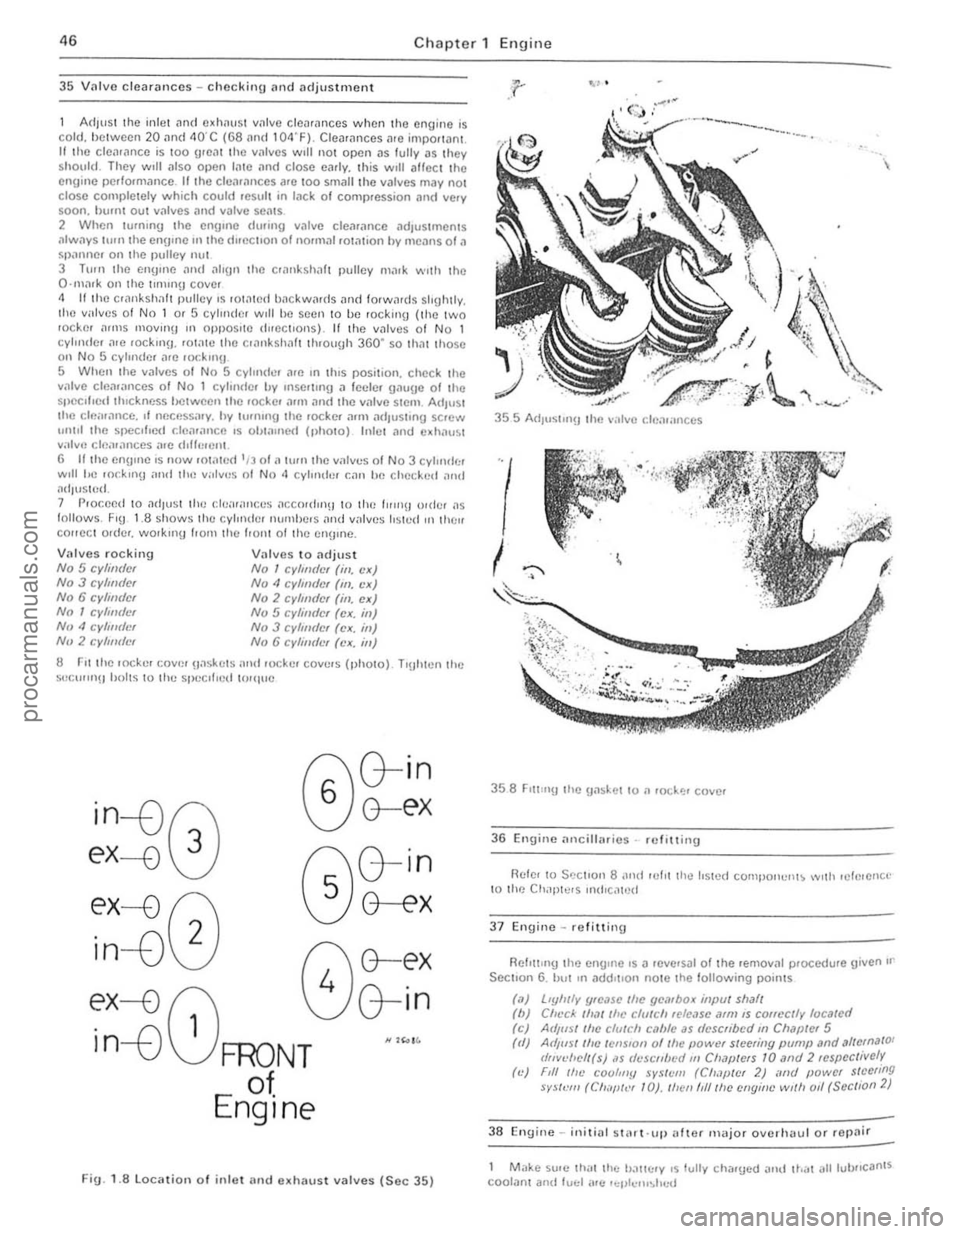
35 Vnlvo clearances -checking lind adjustment
Adll'S 1 the inle t Jnd c~h"ust villvc clcnrnnce s when lho engine is cold, he lween 20
S llcclfled thickness hetween Ihe lock e ' ,'1111 :lnri the vnlve stem. ArlluSt the cl("II:lncc. It necess,"Y. hy hlmong the lOCkCf null ndJushn!,l screw 1011111 the speCified cfenlnnce IS obtained (1Ih010) Inle t nnd edlo1u~t v;,lv'~ cle;IIances a.e rh(/.!.ell\. 6 II the engine IS now IOt,~tcrl '/301 II hun the v.1lv .... s 01 N o 3 cvlll"l!":r w,1I he rockul~J ,111<1 the v;olv"s 01 No ,I CVlll,!s,!r r..1I' he checked ,lnd I1dJus t()d .
7 Proceed to ;"Idlust Ihe cf":II:II'CCS .1I:COrdrn\1 1 0 th" '''rnO o!(ler ;"IS lollows. F,U 1 .8 shows the cvlOildel IHHllhe.s "nd valves Irsl .... d OIl tllell eou eer o.rlcr. wo,k",U Ilorn Ihe llOlIt 01 the engone .
Valves rocking No 5 Cldimler No 3 cylm(lcr No 6 cylmticr No 1 cylll/tier Nu 4 CylllltilH Nil 2 cylll/tie,
Villves to ndjust No 1 cyltll(lef (ill. ,'x) No" cyllmler (III. ,'x) No 2 cylm(lcr (ill. ex) No 5 cylilltier (cx. ill) No 3 cylmdcr (ex. IiI) No 6 cylimft'r (ex, ;n)
8 r-11 the rock er COV~!' U,1skcIS ;IIHI rockc. covers (photo). T 'Uh ten the S(!C'''rI1 !) holts to Ihe speCi fied twqllc
~:j?0
ex-0
(;\G-in
~G-E'X
r:\G-in
0G-E'X
ex---{) 8 4 G-in
. n 1
in--v FRONT "'""
of
Engine
Fig. 1.8localio n of inlet
l
I
36 Engine anciIiMies·· ref itting
Rcle' 10 SCClrOIl 8 "ud rul,t the Irsted COllllJor""'t~ \Vllh rele,erlce to Ihe Chaple,s mtl'C,lh)(!
37 Engino -refitting
Rcf,wn!) the cngrne '$ D reve,sDI 01 the ,emoval procedure given or Section 6 . hili III Ddd,uon note Ihe lol/owing pOin ls
(,l) (b) ,oj (II)
(c)
Llyfuly (frc,lSC fhc yembox illfml shaft Ch~'ck 111,11 /h,· clulch rcle,'se ,11m IS correctly loca/cd AdIIlS/ Ihe CfffU;h C,l"'C as (Iescfibed til Chilpler 5
Ad,US/ Ifle tcnSfo n of Ihe powef sleell;IY pump ilnd ,,1/emilIO ' "nvd1ell(s) ,IS (/eSt'nlwtilll CII,lplefS 10 alld 2 respcc/ively Fill Ille COQIIIUI sySlem (Ch.lp/er 2) "1/(1 powcr stecling SYS/VIII (ell"!!I,.:, 1 0). Illen I,II/lic Cflgine w,III 011 (Scc/ioil 2)
38 Engine -in,t;"l stMt 'lIl) ,,/ter major overhaul or rcpnir
M"ke su,e thai th.:: h:l1tc1y ,$ fuliV cha,u.::O '!IId Ib,"" alliub rrcafl tS coolant and lucl ,lie '''III''''',sl,..,,,
.... ~ __________ .................................. r
procarmanuals.com
Page 56 of 205

7
Chapter 1 Engine
Fig . 1.1 8 R ear oil sen I ilnd ildaptcr pliltc (Sec 84)
84 Renr oil se;1i ,,,,(I lIywheel - rc fitti"u
1 I'll the ()n!J"I(~ .r,," ,,(1"1'10' pla1<:1 and s(:clIre ,I wllh 'I S IIv(: holls. 2 Smenr en\J1ne (ld OlltO the CI,mkshah '''". Smear 0,1 on the lip 01 the sea l tlnd pos(( lon tlon ';".11 on th e cran hha ll. 3 Align the seil l c;""er holos wllh Ihose 011 the cylrnd(:, hlock . Insell the loul bolts and 11!lhlCll Ihem 10 the SpeCifIed 10lqUfl 4 F it the flywher.:l . or dllveplalc on au lOlllallC lwnsrnis sion Illodels.
InSerll h e six holl S ;",d u\llole rllhem 10 Ihe 10 lque w rench sell"'U Uiven in lhe Speclllcm'olls
8 5 Sump -rciiuill!)
En~",,, lh;ol Ill" ru,rI "'!) ',u.l,u :e s 01 hoth IllI.! Slimp a"d t h e c(,1nkcilsc ,lie cl ea" ,mol IIi,1I n", '.""I",!) SlIrJ ,u;e 01 the Sli mp IS not d'S lo lte d. 2 Apply IO" ,I,,,!! c"'''pollnd 1 0 the pOUltS wllel(~ Ihe l"llllll) cover ablilS lhu ,;yir r"lr" 1,Io ck .lIId where Ihe rea' 001 $u,,1 carr.(:r "dIOIllS II 3 Pln ce tloo \J,,~k"l '" fJo~.t.on, lIt tlo" SlIm l} ,'Ild IIlS(). 1 lhe r0Io1111il1l)
bolts ImUO I tl!lhl 4 PrO!lres~lvely 1I!llIt,," llw sump holt s 011 opposIte I'ilr ts lIllt,1 all 0 1
t
hem ,H" il l tl", ~ 1"":lllI"d IOlllUU , 5 FII ,1 now w;,~h", 10 Ihe ~Ul1lp II"'UI pili!) , IIlscrl lhe dl,lIll pllll) and
t ,uhlen ,t
8 6 Cylinder h e"ds re;rssernbly
L~y the cylrnd" r h",.\! on .IS s Ide. luhrrcnt e cvcry valve Uu ide with eng;l1(! oil. ,lilt! ,"~,,"t the valves 11110 the \Ju, dc Irom whIch lh ey wele remov(:d 2 To ,WOld d
lhero.s dilnlJC' oltl1<.: ~I""IU rcW""C' dillllil\)IIlU tllC villve SHlm 011 sen l
G Ahcr "lsert")!J tit" ~pllt collets. r eleilSo the spllny compressor (111(1
rcmove II 7 C hcc k th"t lh..: ~pl'l cull":IS hilve seilled properly and t
Fi g. 1.1 9 Tightening sequenc e for cylinde r head bolts on the 3.0 litre enuine (Sec 8 7)
a Repe"l liln pruccdwn orven III p;ua!Jrnphs 1 to 7 o n the (CmJlnlllU
v,llv"s
87 Cylinder heads - re fitt;nu
11 the tappels w ere rcmoved. luiJricnle lhe lilppets nnd I heu hores wnh enoine orl nnd insor t thOlll wilh lhc;, d Ished cnds uppermost Ensule lha l every tappet ,s rclltlcd Into lhe hore hom whIch II wns
t nkcl1
2 Mak e sure tha t Ihe rna t"'!1 surlaccs o f lhe cylinder block. cyl lndor henrJs ;Uld 1111,,1 Ill,lIlIlold ;lIe de;"l. then plnce new cyhndcr head \Ja~kets ove, the Wildes un thn cylrmh" block. Tho cyirnder head \I,,~k ~IS beilr thO malkln\! TOP f:nON T ilnd nced to h e pOSII,oned
cOII(:ct ly .
3 Low ul Ille cyl ""lcr he,1ds ov"r the" posl tlonrngst u(!s, Although t he cyhlld\~r headS ,"0 Id entlc;,I, they should h,lVe been Illtlrke d when remuved ilnd should be lehllUd III thcrr ()IIUinal positions t1 Inse rt the cyirndcf 11I)"d boilS f"'!I(:r t.!Jh l then tIghten lhelll prUglC SSlv(: ty OIl the olde, shown III r,U I l!J and III llle stnucs",s U iven
m the SpcelirC;lt'OnS
88 Rocker arms and cover
s -refiUing
Ensure Ihm "II Ihe puslllOlls ,lie ,nselwd I!ltO the" p'llpor placos ;II1
)olt S nntl lighten them t o the spec ,f led torque.
89 Valve clearnnees -checking nnd adjustment
R eier
to SeC!lon 3 5
90 Engine ancillaries -refitting
R eier 10 Sec tIon 46 and ref, t lhe I. ste d componenlS w,th refercnce
to th e Chaptels ind,cilte(f
procarmanuals.com
Page 73 of 205

72 Chapter 3 Fuel and exhaust systems
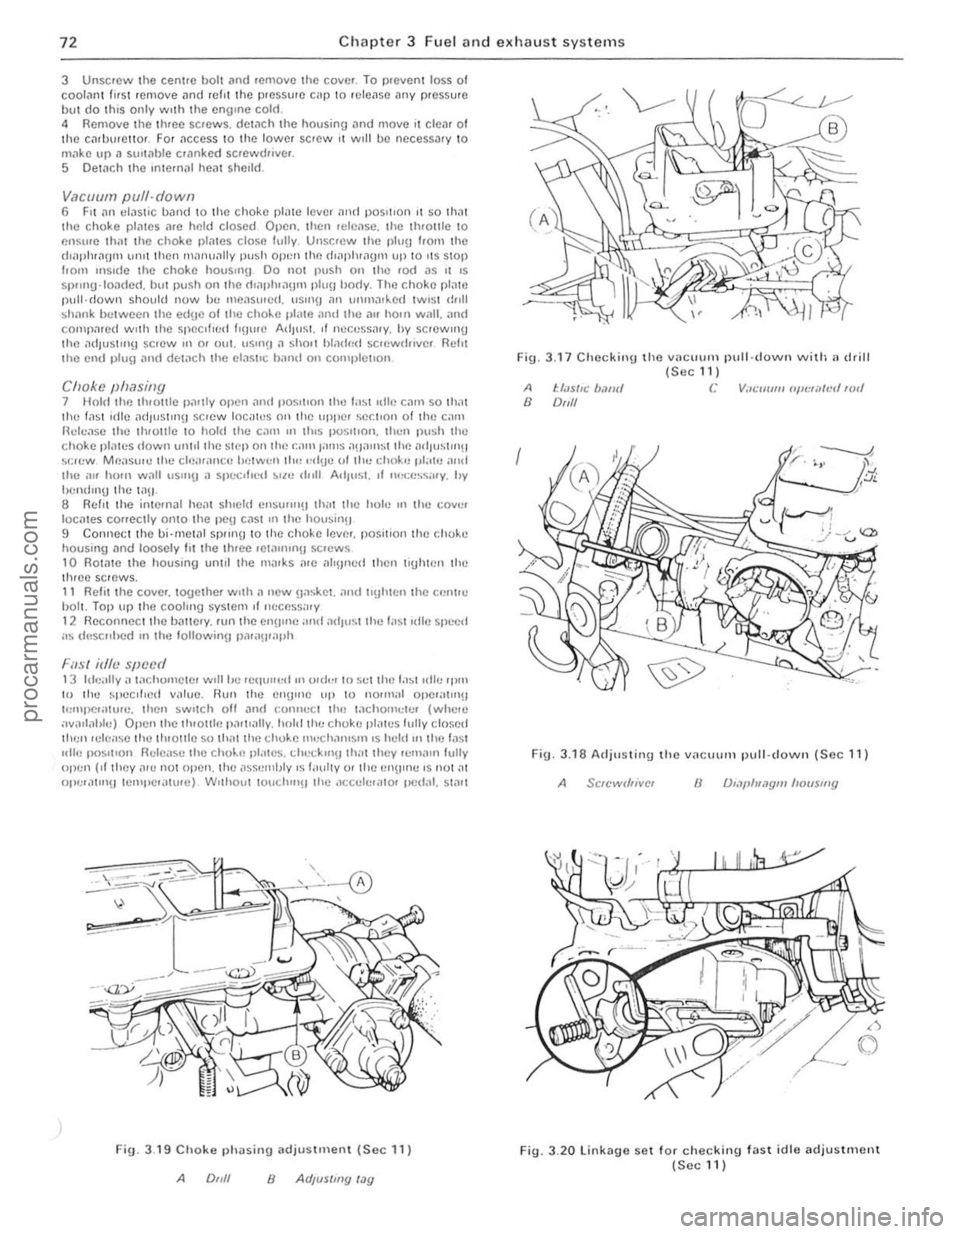
3 Unsc.cw the cenlle bolt and .emovc the cove •. T o p
locmes COrfeclly 01110 Ihe t :le\] C
Filsl idlv speL'd 1 3 hlc;IlIy" tachomcte. wlIII,c .eq,,"ed !lllmlc. 10 sellhu t,'~1111l1! 'P'" 10 lhe ~peclllncl v.1Iuc . nUll lhc CnnUlc lip to no.,,,al opc.at"I!1 t,:'Upe."lu,e. then ~wO\ch oil ;Jml COllllect Ihn tachomete. (whe.e .wn"a"h,) OpCl1t he Iluollie pal\lally. hnhllhc chokc pl.1\(.)5 lully closed tI'"" 'ele,lse tht.! th,ollie $0 Ih.111he cho~e 1""ch.1111$I11 IS held 'n the fast "II" fK151\10" Relc"$c the cho~1"l pl.ltCS . d" . .:ckllll! lh;lllhcy .cmaln lully olwn (II they ".c not open. Ihe ,lsse rnlJly IS I"ully 01 Ihe cnU"lc ' S 1101 al 01Ie .,11111IJ len'I/C,,'lurc) Wlthoul louchl"H the ;lc c"le."to. ved"I. Sliltl
, ,
~A
Fig. 3.1 9 Choke phasing adjuSlme'lI (Sec 11)
A 0,,/1 8 AUjus/my'"y
Fig. 3 .17 Checking the Vllc .. "m pull·down with l' drill {Scc 111
A t:lils/lc Im",' C V;//:1I11111 ('I'~'f,~lmllull B DIJII
Fig. 3.18 AdjtlslinU the vacullm pull- down (Sec 11)
A 8
Fig. 3 .20 linkage SCI fo r checking fast idle adjustment (Secl1)
procarmanuals.com
Page 97 of 205

,6 Chapter 4 Ignition system
9 The spark plug gaf} is 01 conside rable impor1~e. as. if it is too lilrge or too small. the size of the spark ilnd its efficiency will be seriously impilired. The spilrk plug should be set to the ligure given in thl} Specifications ill the beginning of this Chapter; IOTa sel it, measure the gilp with a/cere, gauge. and then bend open. or close. the outer plug electrode untillhe correct gap is achieved. The centre electrode should never be benl as this may crack the insulation ilnd cause plug fAilure if nothing worse. 11 Relit the plugs, and re/ilthe leads from the distr ibu tor in the correct I"ing order. which is given in the Specifications. Screw the plugs in by hilnd initiilily then tighten them to the specified torque using the plug spilnnel.
12 Fault diagnosis -ignition system
By lar (he nlo1jori (y 01 brCJkdown and running troubles ilre caused by InUits In the igrlOlron system er(her in (he low (enSlon or high tens ion circuns There
Engine fails 10 staft 1 If the engine falls to StM( and t he cal was IIJnning norll1t1l1y when.t wns IJst used, first check ther e is fuel in the petrol wnk. If (he engille tums ovel normally on (he starter 1I10tor and the bilHery is evidently well chmged. then the lault mny be in either the high or low tension circuits. Firs( check Ihe HT circuit. Note: If lire hal/cry is known 10 hI! {(Illy ch,}lged, Ihe ignilion liglll cOllies on, ,1I)d Ihe s/arler 1II010r {,lils /() tum IIIe ongine check the tightness o f the le'lds on the biltlely terillinilis ,1I)d <1Iso (lte seCUIIHWSS oflhe e,l,th leold (0 irs cOllllec/ion 10 tire body It is qui(e common for tlie le,1(ls /0 Ii,}ve wOlked loose. l.'vc'1I If Ihey look ,1n(/ lecl seclI,e. /I one 01 the boll/my ((:{minM {Josts [11.'1.1' vC'IV liot wi".." (Iyiny (0 wOlk Ihe s/mler 1II0tOl (his is ;/ sUie IIId'C,7/IUI/ 0/ ;/ I;wlty COllllel;('On 1(1 1h.11Ie"lIillal. 2 One of tile commonest rOilsons lor bad stmtln!J IS wet or d;UllP sp,uk plug lead~ and dlstribu(or. Hemove (he distllblltor cap. H "JOdenSil(Ion is v iSIble IIlte!llillly dry the CJp With il rag and also wIpe ;lCf the leads nelu the cap_ 3 If (he enUiue sull fmls 1 0 St.l.t. check that cunent IS reachlllg (he JUS, by dlscounectln!1 ench plug le,l<1 in turn ilt the sp1Hk plllU end, .. ,ld holdlllg Ihe end olthe callie about 5 mm (0.2 Ill) aWilY from the cylillder block. Spin the enu'ne all the sta rter motor. 1 Spa,klllg between the end of the cable ilnd Ihe block should he fa"ly strong With J strong leuulm blue spark_ (Hold (he lead WI(h wbber to ilvold elec(IIc shocks) If Clluelll is reilching (he plugs. then rel110Ve them and clean and reg,lp them. Tho engine should now SWrt 5 If there is no spilrk ilt the plug leilds. wke of! the HT lead from the cenlre of the d'sltibutor C
Engine misfires 10 If the enOlnr. mlsfues re!Julariy. run It ilt a f~st irllrng speed. Pull off eilch 01 the plu(! C,lpS III hUll nnd hsten t o (he note 01 the engrne. Hold the phl(J cnp In il dry cloth or with a rubber g love
(,J) The cOllm.lV be {,lufly giving ,111 iniNmil/elll mislile (b) Thele limy he ,1 (/iJmiJged wile or loose cOrlflee/ioll in till! low (eflsion circuil (c) The condensel /II,lY I;e shOll circuiling (i{ filled) (d) There nwy be a meehanic,lllolUI! IiI Ihe dis/flbll/or (bfOken dliving spindle or eOlllac/bleaker spring. if filled)
17 If the ignition (iming is too far reto1lded, it should be noted thallhe engine will tend to overheat. and there will he a quite no(iceable drop in powel. If the engine is overheating and Ihe power is down, and Ihe ,oni(ion tim in!) is correct. then Ihe carburenor or fuel injection should be checked, i1S ,I is likely that this is where the Iilult lies.
procarmanuals.com
Page 126 of 205

Chapter 6 Manual gearbox and automatic transmission 125
18 Carefully ~ove the lrilnsmission reilrwards ilnd downwmds, and
away from the car. Make sur e that lhe torque conver ter rema ins fully in
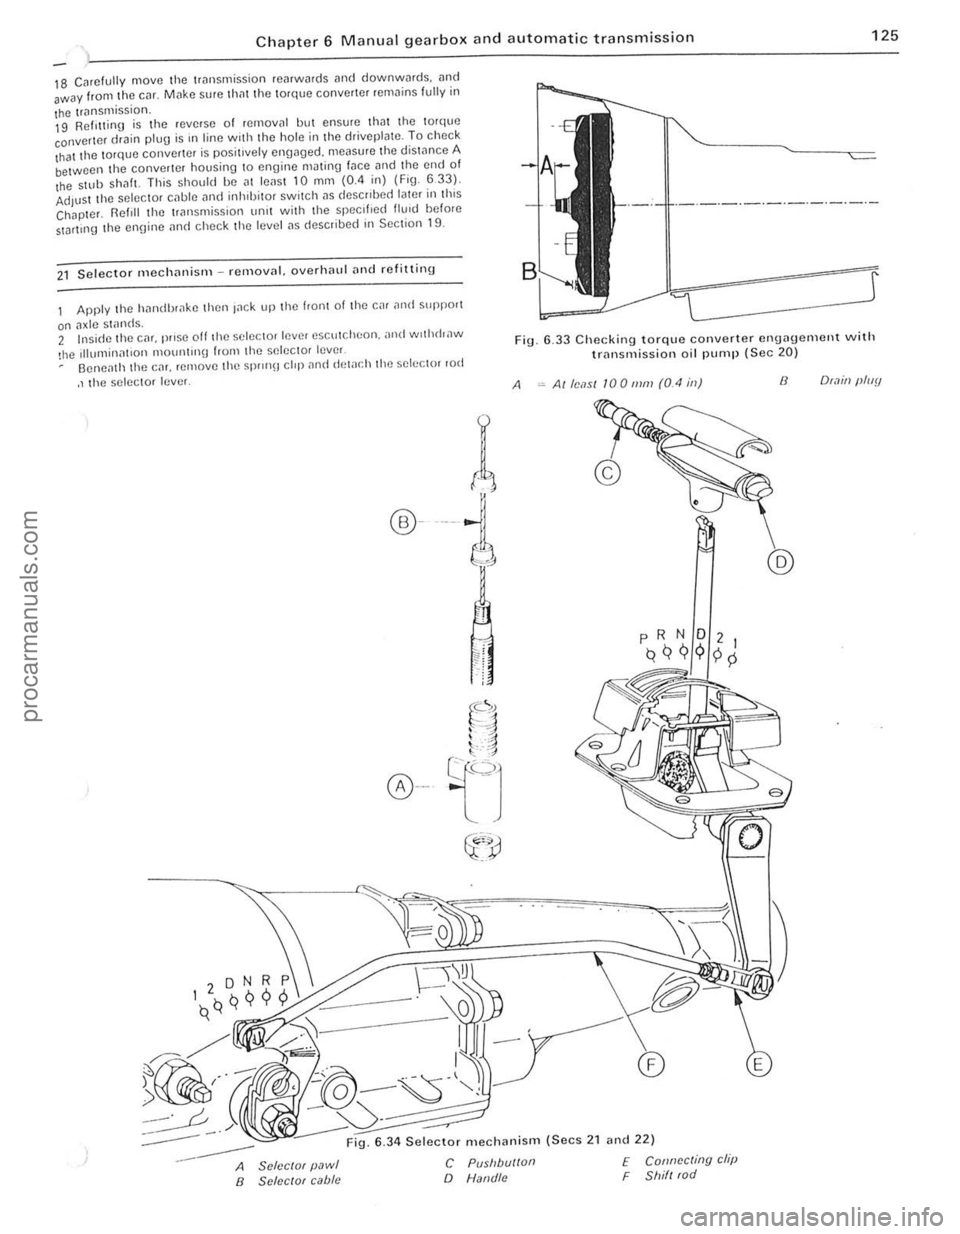
the transmission. 19 Refilling is the reverse of remova l but ensure that the torque converter drain plug is In line wIth the hole in the driveplate . To check
that the torque converter is positively engaged. measure the distance A between the converter housing to engine mJting fJce and the end of the $llIb ShilfL This should be al leilsl 10 mm (0.4 in) (Fig. 633). Adjust the selector cilble i1nd inhlbilOr switch i1S deSCribed later ill this Chapter. Reftll the 1riln smission unit with lhe specified flu,d before StDrlll1g the ennine i1nd check lhe level i1S describe(f in Section 19.
21 Selecto r mechililism -removnl. overhnlll ilud refitting
Apply the hnndbr,lke then Inek up the front of the car ilntl suppo'1
on ilxle stands. 2 Insi(fe the cm. prose off th e selector lever escutcheon. ,md wothrhaw
!he Illumillnt,on 1ll0U1l1l1l\J from the selec tor lever Oeneilth the CM. remove the Spr
r(
®---i
A
6 .33 Checking torque converter engagement with trnnsmission oil pump (Sec 20)
Alle,1S1 100111111 (0.4 ill) 8 O(.1ill (lluy
:-----
--
6 .34 Selector mechanism (Secs 2 1 and 22)
A SclcclOf pawl B SClccrof cabie
C Pusllbu/loll
o Natld/c
f Connccting clip F Shill (od
.'
. 1 , ;
I
procarmanuals.com