1974 CHEVROLET CAMARO flat tire
[x] Cancel search: flat tirePage 6 of 85

Downloaded from www.Manualslib.com manuals search engine BEFORE DRIVING YOUR CAMAR 0
DRIVER CHECKLIST
Before Entering Car
1. See that windows, mirrors and
lights are clean.
2. Visually note inflation condition
of tires.
3. Check that area to rear is clear
if about to back up.
Before Driving Off
1. Lock all doors.
2. Position seat.
3 . Adjust inside and outside mirrors.
4. Fasten seat belts.
5. Check that warning bulbs light
when key
is turned to start
position.
6. Release parking brake (and see
that brake warning light turns
off) .
7. Be sure you understand your car
and how to operate it safely.
Keys
Two separate keys are provided
for your car. Each key has a differ
ent" cross section so that it can be
inserted only in certain locks.
• Key with square head
(stamped "J") -for ignition
switch only.
• Key with oval head (stamped
"K")-for all other locks.
fIiJJ
~===(iD
ALlOTHER~ LOCKS
3
The code number of each key is
stamped on the "knock out" plug
in the key head. Your Chevrolet
dealer removed these plugs and
placed them with the spare set of
keys in the special key envelope
that was given to 'you at time of
delivery.
For your protection:
• Record the numbers on the key
envelope and discard the key
plugs.
• Keep the key envelope in a safe
place such
as your wallet, Not
In The Car.
In the event the original keys are
lost, duplicates can be made by
your dealer
or a locksmith using
the key code information.
Be sure to lock the glove box or
console compartments and remove
the key from the car whenever it
is
necessary to leave the ignition key
with
an attendant.
Page 14 of 85
Downloaded from www.Manualslib.com manuals search engine erly when riding. However, if
unusual conditions prohibit use
of restraints
and require that a
Trailer Hauling
Since passenger cars are designed
and intended to be used primarily
as passenger conveyances, towing
a trailer will affect handling,
dura
bility and economy. Maximum
safety and satisfaction depends
upon proper use of correct
equip
ment and avoiding overloads and
other abusive operation.
The maximum loaded trailer
weight which you
can pull with your
Camaro depends on what special
equipment has been installed on
your car. Chevrolet does not
rec
ommend towing any trailer unless
the
car is properly equipped. Infor
mation on trailer hauling capabili
ties, special equipment required,
and optional equipment offered by child
must stand,
he should
stand
on the floor directly be
hind the front seat. This will
Chevrolet
is available from your
Chevrolet Dealer
or by writing:
Chevrolet
Motor Division, Detroit,
Michigan
48202 (or in Canada
by writing to General Motors of
Canada Limited, Owner Relations
Department,
Oshawa, Ontario).
To assist in attaining good han
dling of the car-trailer combina
tion, it is important that the trailer
tongue load be maintained
at ap
proximately 10% of the loaded
trailer weight. Tongue loads
can be
adjusted by proper distribution of
the load in the trailer,
and can be
checked by weighing separately the
loaded trailer and then the tongue.
When towing trailers, tires should
be inflated to the highest
infla
tion pressures shown on the placard
affixed to the left front door. The
11
help minimize the possibility of
injury from frontal impacts in
the event of an accident.
allowable passenger
and cargo
load, also shown
on the same plac
ard, is reduced by an amount equal
to the trailer tongue load on the
trailer hitch.
Maintenance
More frequent vehicle mainte
nance is required when using your
car to pull a trailer. Change the:
• Automatic transmission fluid
each
12,000 miles,
• Rear axle fluid each 12,000
miles,
• Engine oil each 60 days or 3,000
miles, whichever occurs first,
• Positive crankcase ventilation
valve each 12 months
or 12,000
miles, whichever occurs first.
• See index for important informa
tion on belts, cooling system care
and automatic brake adjustment.
Page 42 of 85
Downloaded from www.Manualslib.com manuals search engine tive terminal (black color, "-" Engine Coolant
or "N") of the battery in the other
vehicle, and
THEN the other
end of the same cable to the nega
tive terminal of your battery in
this car. Take care that clamps
from one cable do not inadver
tently touch the clamps on the
other cable. Do not lean over the
battery when making this con
nection.
5. Start the engine in the vehicle
that
is providing the jump start
(if it
was not running). Let run
a
few minutes, then start the en-
gine in the car with the dis-
Jacking Instructions
charged battery.
6. Reverse the above sequence ex
actly when removing the jumper
cables. Reinstall vent caps and
dispose in a safe manner of any
cloths used to cover vent wells,
as
the cloths may have corrosive
acid on them.
39
Preparation
• Park on level surface and set
parking brake firmly.
• Set automatic transmission in
park. (Manual transmission in
reverse).
• Activate hazard warning flasher.
Instructions
1. After removing spare wheel
and tire, jack, jack
base,and
jack handle (wheel nut wrench),
proceed with changing the
wheel
as follows:
2. Remove hub cap
or wheel
cover with flat end of wheel
nut wrench and loosen, but do
not remove nuts, by turning
counterclockwise.
3. With column assembly seated
in base and lever in
"UP" posi
tion,
insert jack hook in
bumper slot.
Page 43 of 85
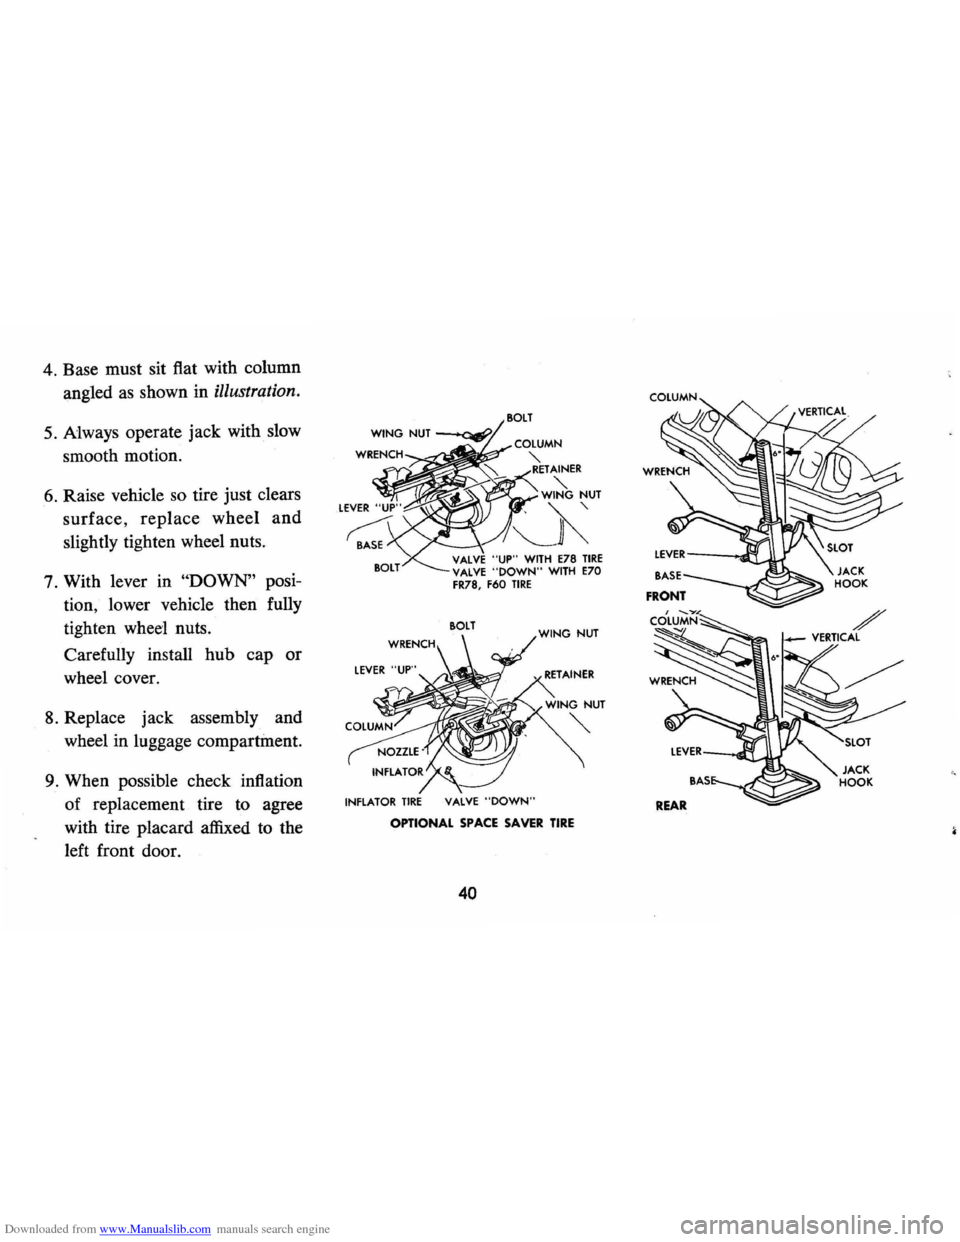
Downloaded from www.Manualslib.com manuals search engine 4. Base must sit flat with column
angled
as shown in illustration.
5. Always operate jack with slow
smooth motion.
6. Raise vehicle so tire just clears
surface,
replace wheel and
slightly tighten wheel nuts.
7. With lever in
"DOWN" posi
tion, lower vehicle then fully
tighten
wheel nuts.
Carefully install hub cap or
wheel cover.
8. Replace jack assembly and
wheel in luggage compartment.
9. When possible check inflation
of replacement tire to agree
with tire placard affixed to the
left front door.
COlUMN
;:>;;;Om~r?' ';;ErAINER
"'-WING NUT
~~
VALVE "UP" WITH E78 TIRE VALVE "DOWN" WITH E70 FR78, F60 TIRE
SOLT
INFLAT07
INFLATOR TIRE VALVE "DOWN"
OPTIONAL SPACE SAVER TIRE
40
COLUMN
JACK
HOOK
Page 60 of 85
Downloaded from www.Manualslib.com manuals search engine The factory installed tires on
your car as shown in the Tire Usage
chart
on page 56 are designed
to provide the best all around
performance for normal vehicle op
eration. When inflated as recom
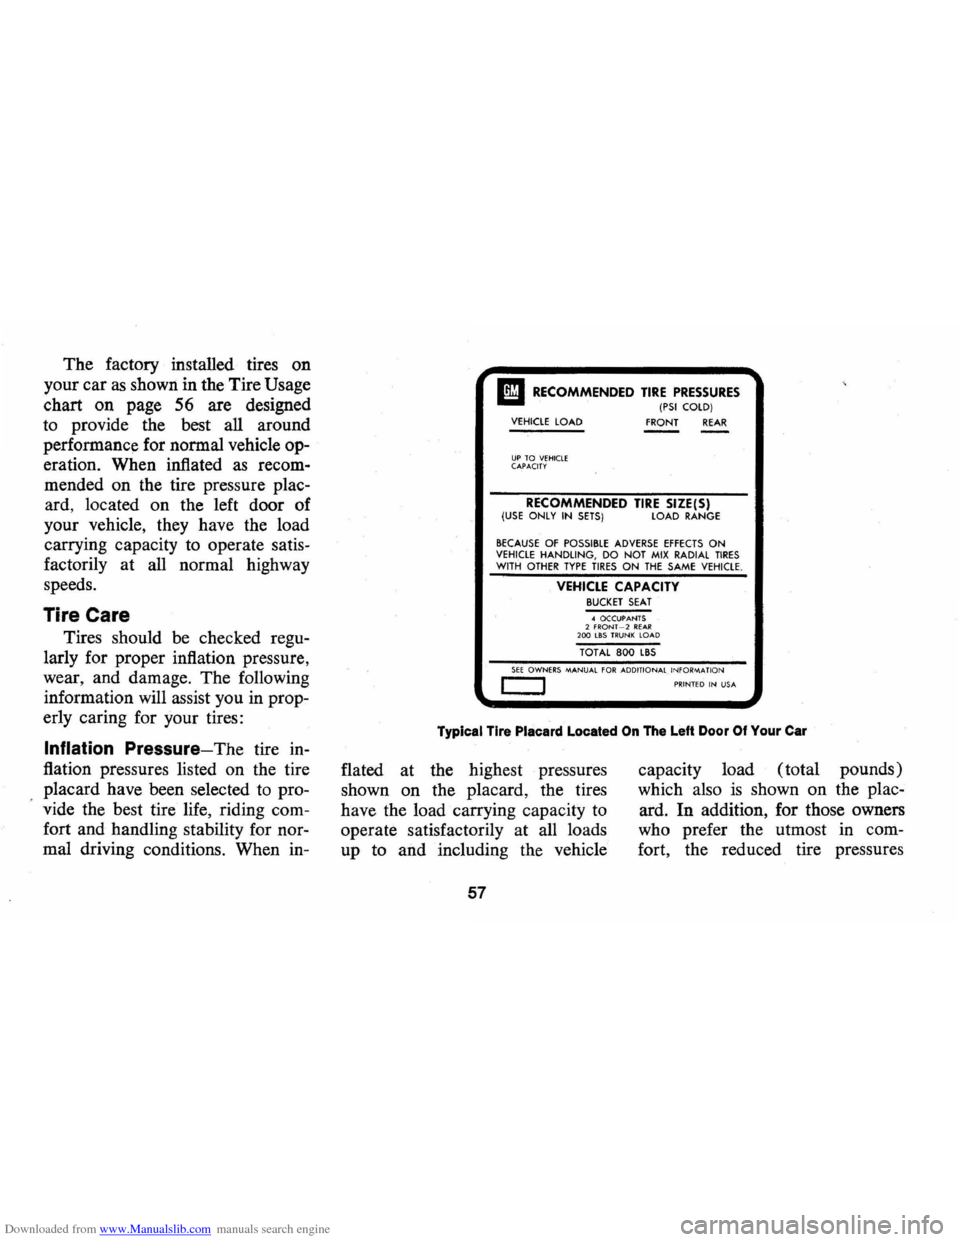
mended on the tire pressure plac
ard, located
on the left door of
your vehicle, they have the load
carrying capacity to operate satis
factorily at all normal highway
speeds.
Tire Care
Tires should be checked regu
larly for proper inflation pressure,
wear, and damage. The following
information will assist you in prop
erly caring for your tires:
Inflation Pressure-The tire in
flation pressures listed on the tire
placard have been selected to pro
vide the best tire life, riding com
fort and handling stability for nor
mal driving conditions. When in-
I! RECOMMENDED TIRE PRESSURES (PSI COlD) VEHICLE LOAD
FRONT REAR
UP TO VEHiClE CAPACITY
RECOMMENDED TIRE SIZE(S) (USE ONLY IN SETS) LOAD RANGE
BECAUSE OF POSSIBLE ADVERSE EFFECTS ON VEHICLE HANDLING, DO NOT MIX RADIAL TIRES WITH OTHER TYPE TIRES ON THE SAME VEHICLE.
VEHICLE CAPACITY BUCKET SEAT .. OCCUPANTS 2 fRONf -2 Rf.A.R 200 LBS TRUNK LOAD
TOT AL 800 L8S
SEE OWNERS MANUAL FOR ADDITIONAL INFORM-A nON c:::::J PRINTED IN USA
Typical Tire Placard Located On The Left Door Of Your Car
flated at the highest pressures
shown
on the placard, the tires
have the load carrying capacity to
operate satisfactorily at all loads
up to and including the vehicle
57
capacity load (total pounds)
which also
is shown on the plac
ard.
In addition, for those owners
who prefer the utmost in com
fort, the reduced tire pressures
Page 61 of 85
Downloaded from www.Manualslib.com manuals search engine listed on the placard may be used
when loads of
4 occupants or less
are carried.
The use of improper tire
infla
tion pressures can adversely affect
tire life and vehicle performance:
• Too little air pressure can result
in excessive tire heat, abnormal
tire wear, adverse handling and
reduced fuel economy.
• Too much air pressure can re
sult in abnormal tire wear, ad
verse vehicle ride and handling,
and increased susceptibility to
damage by road impacts.
Tire pressures should be
checked when the tires are "cold"
at least once a month (and pref
erably oftener) or before long
trips or when heavily loaded. The
following points should
be ob
served when checking and setting
tire pressures:
1. Cold tire pressure ratings are applicable when a vehicle has been Inoperative for 3 hours or more, or driven less
than 1 mile.
2. Tire Inflation pressure may Increase as
much as 6 pounds per square inch (psi)
when hot (aHer vehicle has been driven
10 miles or at speeds of more than 60 miles per hour). Do not "bleed" or reduce pressures when tires are hot from
driving.
3. For continuous high speed operation
(over 75 mph), Increase tire inflation
pressure 4 psi above the recommended
pressures up
to a maximum of 32 psi
cold pressure for load range B tires, 36
psi for load range C tires, or 40 psi for D load range tires. Sustained speeds
above 75 mph are not recommended
when the 4 psi adjustment would require pressures greater than the above
maximum pressures.
4. Always use a tire pressure gauge when
checking pressures as the appearance
of a tire can be deceiving. For example,
radial ply fires, In comparison with bias
ply tires at the same pressure, may have
the appearance of being under-inflated.
Vehicle Loading -Do not load
your vehicle beyond the vehicle
capacity (total pounds) shown on
the tire placard. This figure
repre
sents the design capacity of the ve
hicle, not merely of the tires.
58
When towmg trailers, the allow
able pasenger and cargo load
must be reduced by an amount
equal to the trailer tongue load on
the trailer hitch.
(See "Trailer
Hauling"
in Section 1 of this man
ual.) Station wagon loads should
be distributed
as far forward as
possible. Vehicles equipped with
luggage racks do not have a
ve
hicle load capacity greater than
specified on the tire placard.
Tire Wear and Rotation -Un
even or abnormal tire wear is usu
ally the result of incorrect inflation
pressure, improper wheel
align
ment, wheels being out-of-balance,
or poor driving habits.
Underin
flation, incorrect toe or camber
and fast cornering produce
differ
ent types of abnormal wear which
can be diagnosed by your dealer.
The original equipment tires
in
corporate built-in tread wear in
dicators to assist you in determin-
Page 62 of 85
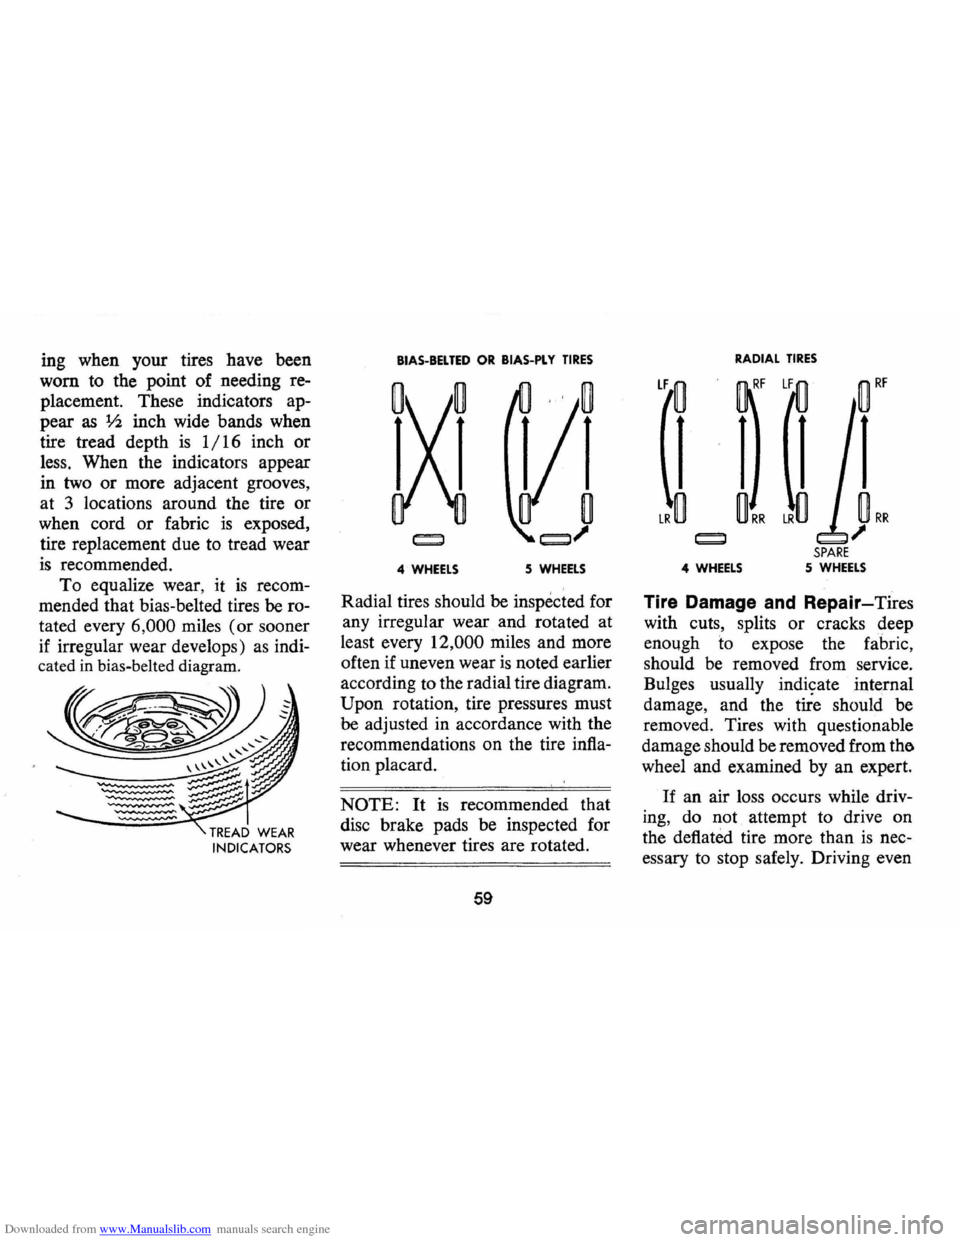
Downloaded from www.Manualslib.com manuals search engine ing when your tires have been
worn to the point of needing re
placement. These indicators ap
pear as
lh inch wide bands when
tire tread depth
is 1/16 inch or
less. When the indicators appear
in two
or more adjacent grooves,
at 3 locations around the tire
or
when cord or fabric is exposed,
tire replacement due to tread wear
is recommended.
To equalize wear, it is recom
mended that bias-belted tires be ro
tated every
6,000 miles (or sooner
if irregular wear develops) as indi
cated in bias-belted diagram.
BIAS-BEL TED OR BIAS-PlY TIRES
4· WHEELS 5 WHEELS
Radial tires should be inspected for
any irregular wear
and rotated at
least every
12,000 miles and more
often if uneven wear
is noted earlier
according to the radial tire diagram.
Upon rotation, tire pressures must
be adjusted in accordance with the
recommendations
on the tire infla
tion placard.
NOTE: It is recommended that
disc brake pads be inspected for
wear whenever tires are rotated.
59
RADIAL TIRES
SPARE 4 WHEELS 5 WHEELS
Tire Damage and Repair-Tires
with cuts, splits or cracks deep
enough to expose the fabric,
should be removed from service.
Bulges usually
indi~ate internal
damage, and the tire should be
removed. Tires with questionable
damage should be removed from
the.
wheel and examined by an expert.
If an air loss occurs while driv
ing, do not attempt to drive on
the deflated tire more than
is nec
essary to stop safely. Driving even
Page 63 of 85
Downloaded from www.Manualslib.com manuals search engine a short distance can damage a tire
beyond repair.
Temporary repairs, such
as
"blowout" patches or any repair
made from the outside of the tire
should not be made except in
emergencies.
Such "stop-gap" de
vices
as plugs and aerosol-type
sealants are good for no more than
100 miles of driving at speeds not
over
50 mph. A permanent vul
canized repair, plug or patch ap
plied from inside the tire, should
be made
as soon as possible. Also,
the installation of an inner tube in
a damaged tubeless tire
is not a
recommended repair procedure.
Replacement Tires
When replacing tires, only the
size, load range, and construction
type (bias, bias-belted,
or radial)
originally installed on your vehi
cle are recommended. Use of any
other tire size or type tire may seriously
affect ride, handling,
speedometer/odometer calibration
vehicle ground clearance and tire
clearance to the body and chassis.
The following also should be con
sidered when replacing tires:
• To achieve best all around ve
hicle performance, belted-bias
tires and bias tires should not
be mixed on the same car.
• Because of possible adverse ef
fects on vehicle handling, do
not mix radial ply tires with
other type tires on the same
vehicle (such as bias
or bias
belted snow tires).
• It is recommended that new
tires be installed in pairs on the
same axle.
• When replacing only one tire, it
should be paired with the tire
having the least wear, to equal
ize braking traction.
• When replacing original tires
with an optional recommended
60
size of different diameter, the
speedometer must be recali
brated by installing the correct
speedometer driven gear.
Snow Tires
If you equip your vehicle with
snow tires, they should be inflated
4 psi above the recommended
pressures shown on the tire pla
card up to a maximum of 32 psi
( cold) for load range B tires and
40 psi for load range D tires. It is
recommended that vehicle speeds
be limited to a maximum of 75
mph if snow tires are installed.
If
your car is equipped with radial
tires, use only radial snow tires.
Replacement Wheels
When replacing wheels for any
reason, care should be taken to in
sure that the wheels are equiva
lent to those removed in diameter,
rim width and off-set.