1974 CHEVROLET CAMARO seats
[x] Cancel search: seatsPage 7 of 85

Downloaded from www.Manualslib.com manuals search engine Door Locks
Front side doors can be locked
from the inside by depressing the
passenger guard door lock buttons
located on the upper door panel.
All doors can be locked from the
outside by first depressing the door
lock button and closing the door.
The front doors can also be
locked by using the key.
All models have as a standard
safety feature overriding door locks.
When the doors are locked, the
door latch mechanism
is inopera
tive, preventing inadvertent open
ing of the door
by movement of the
inside handle.
REMINDER: Avoid hanging ob
jects on the right hand coat hook
in such a way that you block the
driver's vision to the right rear
quarter.
"
REMINDER: Always lock the
doors when driving, for greater
security in the event of an accident,
to help keep children from opening
door, and for greater security
against entry
by unwelcome per
sons while momentarily stopped.
Front Seat Backlocks
Front seat backs are equipped
with a
self, locking mechanism to
keep the seat back locked in place
while
in the up position. The lock
release lever
is located at the lower
4
rear of the seat back nearest the
door. To tilt the seat back forward,
lift the lock release lever and tilt
the seat back forward. When the
seat back
is returned to the up
position, the seat back will auto
matically lock.
Keep seat belts and buckles clear
of mechanism when tilting folding
seats forward or backwards, to pre
vent damage to these belt restraints.
Page 8 of 85

Downloaded from www.Manualslib.com manuals search engine Manually Operated
Front
Seats
The front seats may be adjusted
forward or rearward by moving the
control lever at the front of the
seat to the right. Move control
lever to the right to release the
locking
mechanism; then exert
slight body pressure to move seat
to desired position. · Release con
trol lever to lock seat in desired
position.
Inside Rearview Mirrors
Switc.h mirror to night position
to reduce glare from following
, headlights.
To raise or lower mir
ror
to achieve desired field of view, grasp
mirror and exert sufficient
pressure by pushing or pulling up,
down or sideways.
Occupant Restraint Belts
Lap and shoulder belts provide
added. security and comfort for you
and your passengers. Proper
use
and care of these belts will assure
continuance of this security.
Seat Belt Restraint System
This vehicle is equipped with a
belt system, starter interlock, and
a light-buzzer
reminder system
which
is designed to prevent · start-
5
ing the car until front seat occu
pants are buckled in.
NOTE: 1974 model General
Motors passenger cars sold in
CANADA have a light-buzzer re
minder system which reminds occu
pants when the driver's and any
front passenger's seat belts are not
fastened. Operation of this
"SEAT
BELT BUZZER/LIGHT RE
MINDER" is explained under that
heading in this manual.
However, these cars do
NOT
have a seat belt starter interlock sys
tem-a system which prevents start
ing the car until the driver and the
right front passenger are buckled
up.
Therefore, the information
about the seat belt starter interlock
system under the heading
"TO
START CAR"
in this manual does
not apply, nor do any other refer
ences in this manual to the seat belt
starter interlock system apply to this
new car sold in Canada.
Page 9 of 85

Downloaded from www.Manualslib.com manuals search engine To Start Car:
• Seat belts must be properly
buckled around each outboard
front seat occupant , after getting
in the car, before the starter will
operate.
• The reminder buzzer and light
are designed to
go on if seat
belts are unbuckled at occupied
front seats while the vehicle
is
underway (the engine will con
tinue to
run).
• The engine may be restarted
after a stall without interlock in
terference if the driver remains
seated.
If Starter Will Not Operate:
• Remove any objects from un
occupied front seats.
• Re-buckle front seat belts.
NOTE: Front seating positions
contain a weight detector which is
, designed to activate the starter in
terlock
or the buzzer and light ni-
minder whenever a nominal weight
is placed on the seat and belts are
not buckled. The weight detector
cannot distinguish between a pas
senger and any object on the seat,
therefore, such items should be
stowed elsewhere in the vehicle.
Leaving something on the front
seat and leaving the front
seat belts
fastened while the
car is parked
creates a current drain which could
result in a discharged battery after
a period of time, which will vary
depending on battery and weather
conditions.
IfStarterSti IIWi II NotOperate:
• Set parking brake firmly, move
transmission lever to
"Park" (re
verse for manual transmission
cars) .
• TURN IGNITION KEY TO
"ON" ("RUN").
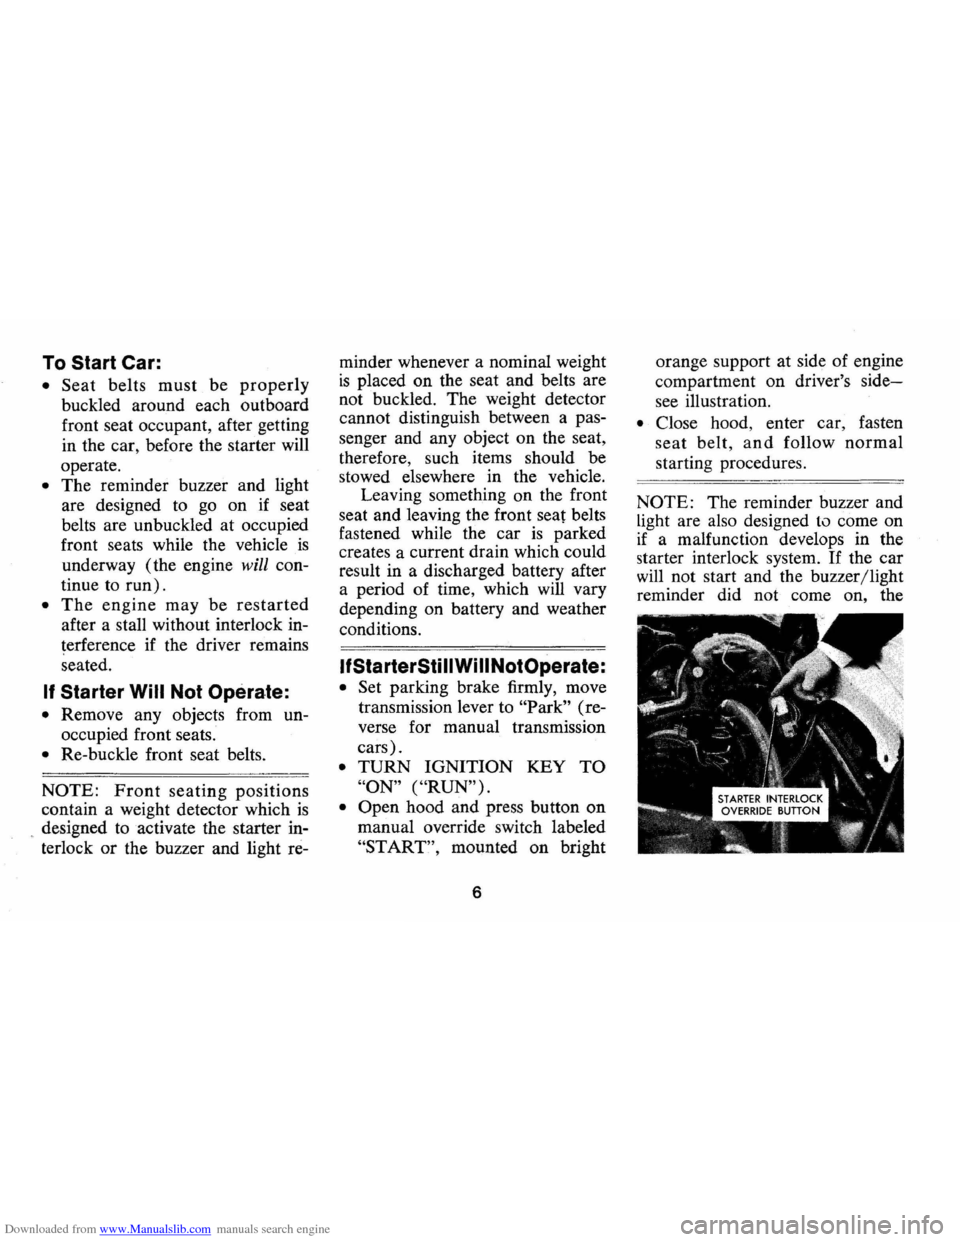
• Open hood and press button on
manual override switch labeled
"START", mounted on bright
6
orange support at side of engine
compartment
on driver's side
see illustration.
• Close hood, enter car, fasten
seat belt, and follow normal
starting procedures.
NOTE: The reminder buzzer and
Light are also designed to come on
if a malfunction develops in the
starter interlock system.
If the car
will not start and the buzzer/light
reminder did
not come on, the
Page 53 of 85

Downloaded from www.Manualslib.com manuals search engine first, check lubricant level and add
lubricant, if necessary, to
fill to
level of filler plug hole.
Use SAE
80
or SAE 90 GL-S Gear Lubri
cant.
(For vehicles normally 0per
ated in Canada use SAE 80 GL-S
Gear Lubricant.)
Positraction -Drain and refill
after the first
12,000 miles then
maintain same
as standard axle but
use only the special positraction
lubricanf
available from your
Chevrolet Dealer.
Manual Transmissions
3-Speed and 4-Speed -Every
6,000 miles or 4 months-Check
at operating temperature and
fill
as necessary to level of filler plug
hole with
SAE 80 or SAE 90 GL
S Gear Lubricant.
(For vehicles
normally operated in Canada use
SAE 80 GL-S Gear Lubricant.)
If temperatures of below 32°F.
are expected, use SAE 80 GL-S Gear
Lubricant only.
Clutch Cross-Shaft -Every
36,000 miles or sooner if neces
sary -Remove the plug, install a
lubrication fitting and lubricate
with water resistant
EP Chassis
Lubricant which meets GM
Speci
fication 6031 M.
Automatic Transmission
Fluid Recommendations
Use only automatic transmis
sion fluids identified with the
mark
DEXRON@ II or DEX
RON®. These fluids have been spe
cially formulated and tested for use
in your automatic transmission,
and are available from your Chev
rolet dealer or local service station.
Check the fluid level at each
engine oil change period. To make
an accurate fluid level check:
Check the fluid level at each en
gine oil change period.
To make an
accurate fluid level check:
50
1. Drive car several miles, making
frequent starts and stops, to
bring transmission up to normal
operating temperature (approxi
mately
180-190° F.).
2. Park car on a level surface.
3. Place selector level in "Park"
and leave engine running.
4. Remove dipstick and wipe clean.
S . Reinsert dipstick until
cap seats.
6. Remove dipstick and note read
ing.
If fluid level is at or below the
ADD mark, add sufficient fluid to
raise the level to the
FULL mark.
One pint raises the level from ADD
to FULL.
Do not overfill.
Under normal driving condi
tions, the transmission fluid should
be changed every 24,000 miles. If
your car is driven extensively in
heavy city traffic during hot weather,
or
is used to pull a trailer , change
fluid every
12,000 miles. Likewise,
operators of cars in commercial use