1971 CHEVROLET CAMARO recommended oil
[x] Cancel search: recommended oilPage 57 of 88
Downloaded from www.Manualslib.com manuals search engine Recommended Viscosity
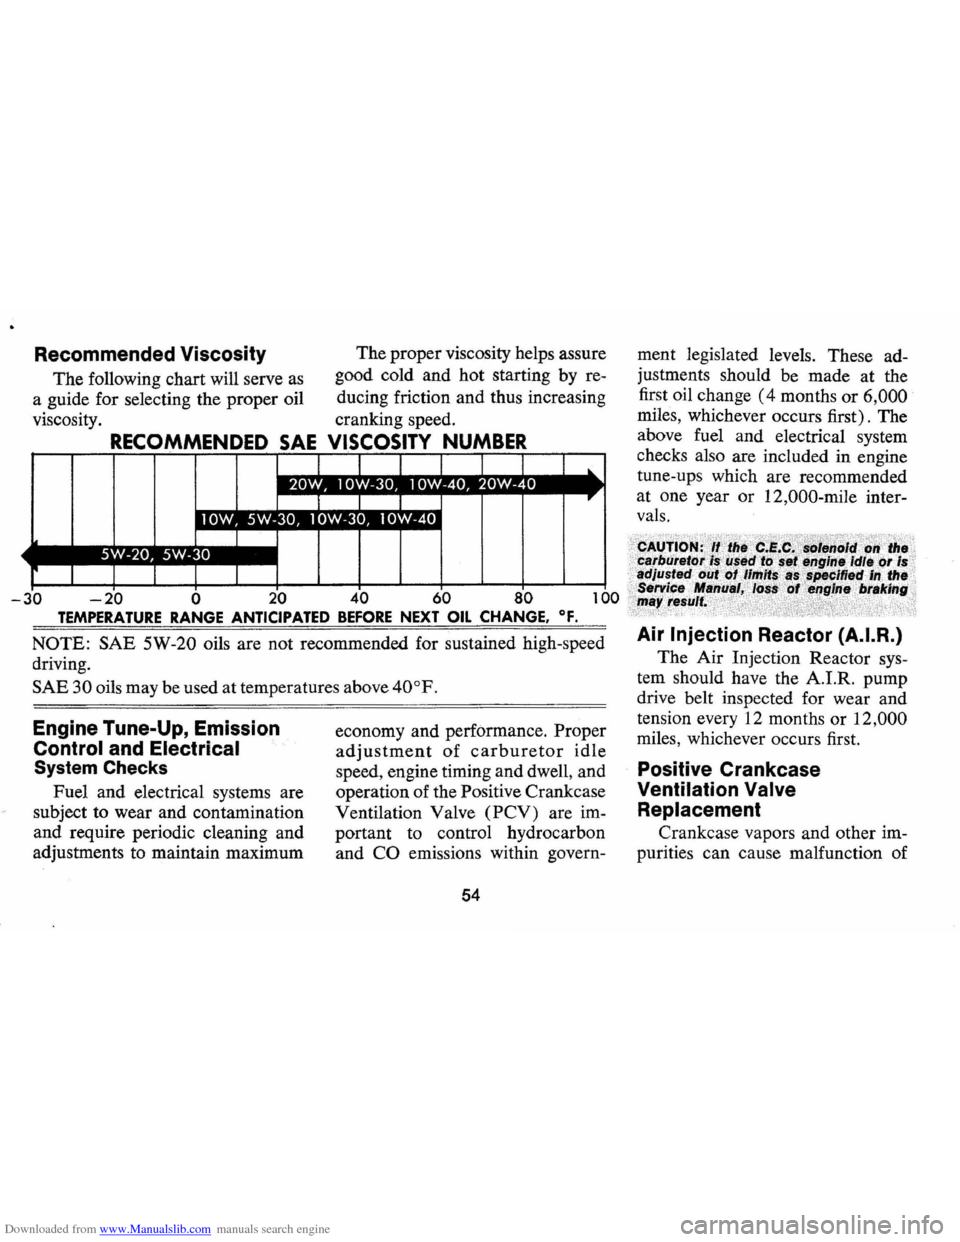
The following chart will serve as
a guide for selecting the proper oil
viscosity. The
proper viscosity helps assure
good cold and hot starting by re
ducing friction and thus increasing
cranking speed.
OSITY NUMBER
-20 0 20 60 0
TEMPERATURE RANGE ANTICIPATED BEFORE NEXT OIL CHANGE. OF.
NOTE: SAE 5W-20 oils are not recommended for sustained high-speed
driving.
SAE 30 oils may be used at temperatures above 40°F.
Engine Tune-Up, Emission
Control and Electrical
System Checks
Fuel and electrical systems are
subject to wear and contamination
and require periodic cleaning and
adjustments to maintain maximum economy
and performance. Proper
adjustment of carburetor idle
speed, engine timing and dwell, and
operation of the Positive Crankcase
Ventilation Valve
(PCV) are im
portant to control hydrocarbon
and
CO emissions within govern-
54
ment legislated levels. These ad
justments should be made at the
first oil change
(4 months or 6,000
miles, whichever occurs first). The
above fuel and electrical system
checks also are included in engine
tune-ups which are recommended
at one year or 12,000-mile inter
vals.
Air Injection Reactor (A.I.R.)
The Air Injection Reactor sys
tem should have the A.I.R. pump
drive belt inspected for wear and
tension every 12 months or
12,000
miles, whichever occurs first.
Positive Crankcase
Ventilation
Valve
Replacement
Crankcase vapors and other im
purities can cause malfunction of
Page 58 of 88
Downloaded from www.Manualslib.com manuals search engine the crankcase ventilation valve.
Regular replacement of the PCV
Valve
is recommended at 24-month
or
24,000-mile intervals.
G.M. Evaporation
Control SYltem
The Evaporation Control System
requires only periodic canister filter
servicing.
Every 12 months
or 12,000
miles, whichever occurs first, (more
often under dusty conditions) the
filter in the base of the canister
must be replaced and the canister
inspected.
Drive Beltl
Every 6,000 miles or 4 months
inspect drive belts for wear, fray
ing, cracking, and tension. Belts
which are in poor condition should
be replaced immediately.
Check tension by applying
mod
erate thumb pressure midway be
tween pUlleys. If the center-to
center distance between pulleys
is
13 to 16 inches, the belt should
deflect
lh inch. If the center-to
center distance
is 7 to 10 inches,
the belt should deflect
1;4 inch.
Loose belts should be retensioned
to give the correct deflection.
Air Cleaner
Paper Ellment Type -First
12,000 miles, inspect element for
dust leaks, holes
or other damage,
replace
if necessary. If satisfac
tory, rotate element
1800 from
originally installed position.
Re
place element at 24,000, miles.
Element must not be washed,
oiled, tapped or cleaned with an
air hose.
Crankca.e Ventilation Filter
(located within Air Cleaner)
If so equipped, inspect at every oil
change and replace if necessary.
Replace at least every
24,000
miles; more often under dusty
driving conditions.
Flame Arrester -Every 12,000
55
miles-Clean the arrester (located
in the base of the air cleaner) with
kerosene
or a suitable solvent. Dry
with compressed air.
The engine air cleaner should
be installed at all times unless
temporary removal
is necessary
during repair or maintenance of
the vehicle, because in the absence
of the air cleaner backfiring could
cause
fire in the engine compart
ment.
For maximum protection spe
cify an AC Acron air filter ele
ment.
Fuel Filter
Replace carburetor inlet filter
element every 12 months or
12,000 miles, whichever occurs
first or, if an in-line filter
is also
used, every
24,000 miles.
Replace in-line filter every
24,000 miles.
When replacement
is necessary,
always insist on AC Acron filters.
Page 59 of 88
Downloaded from www.Manualslib.com manuals search engine Distributor Cam Lubricator
6 Cylinder Engine -Rotate cam
lubricator
1800 at 12,000 mile in
tervals -Replace at
24,000 mile
intervals.
8 Cylinder Engine-Change cam
lubricator end for end at
12,000
mile intervals-Replace at 24,000
mile intervals.
Rear Axle
Standard -Every 4 months or
6,000 miles, whichever occurs
first, check lubricant level and add
lubricant, if necessary, to
fill to
level of filler plug hole.
Use SAE
80 or SAE 90 GL-5 Gear Lubri
cant.
Positraction -Same as standard
axle
but use only the special posi
traction lubricant available from
your Chevrolet Dealer.
Manual Transmissions
3-Speed and 4-Speed -Every
6,000 miles or 4 months-Check
at operating temperature and fill
as necessary to level of filler plug
hole with SAE
80 or SAE 90 GL-
5 Gear Lubricant.
Clutch Cross-Shaft -Every
36,000 miles or sooner if neces
sary -Remove the plug, install a
lubrication fitting
and lubricate
with water resistant
EP Chassis
Lubricant which meets
GM Speci
fication 6031M.
Automatic Transmission
Fluid Recommendations
General Motors DEXRON®
Automatic Transmission Fluid,
part no. 1050568 and United
Delco DEXRON® Automatic
Transmission Fluid, part no. 301-
RD, which have been especially
formulated and tested for use in
your automatic transmission are
recommended.
Other automatic
transmission fluids identified with
the
mark DEXRON@ are also
recommended.
56
Check the fluid level at each
engine oil change period.
To make
an accurate fluid level check:
1. Drive car several miles, making
frequent starts and stops, to
bring transmission up to normal
operating temperature (ap
proximately 180-190 OF) .
2.
Park car on a level surface.
3. Place selector lever
in "Park"
and leave engine running.
4. Remove dipstick and
WIpe
clean.
5. Reinsert dipstick until cap seats.
6. Remove dipstick and note read
ing.
If oil level is at or below the
"ADD" mark on the dipstick, oil
should be added as necessary.
One pint raises the level from ADD
to FULL.
Do not overfill.
Under normal driving condi
tions, the transmission fluid should
Page 69 of 88
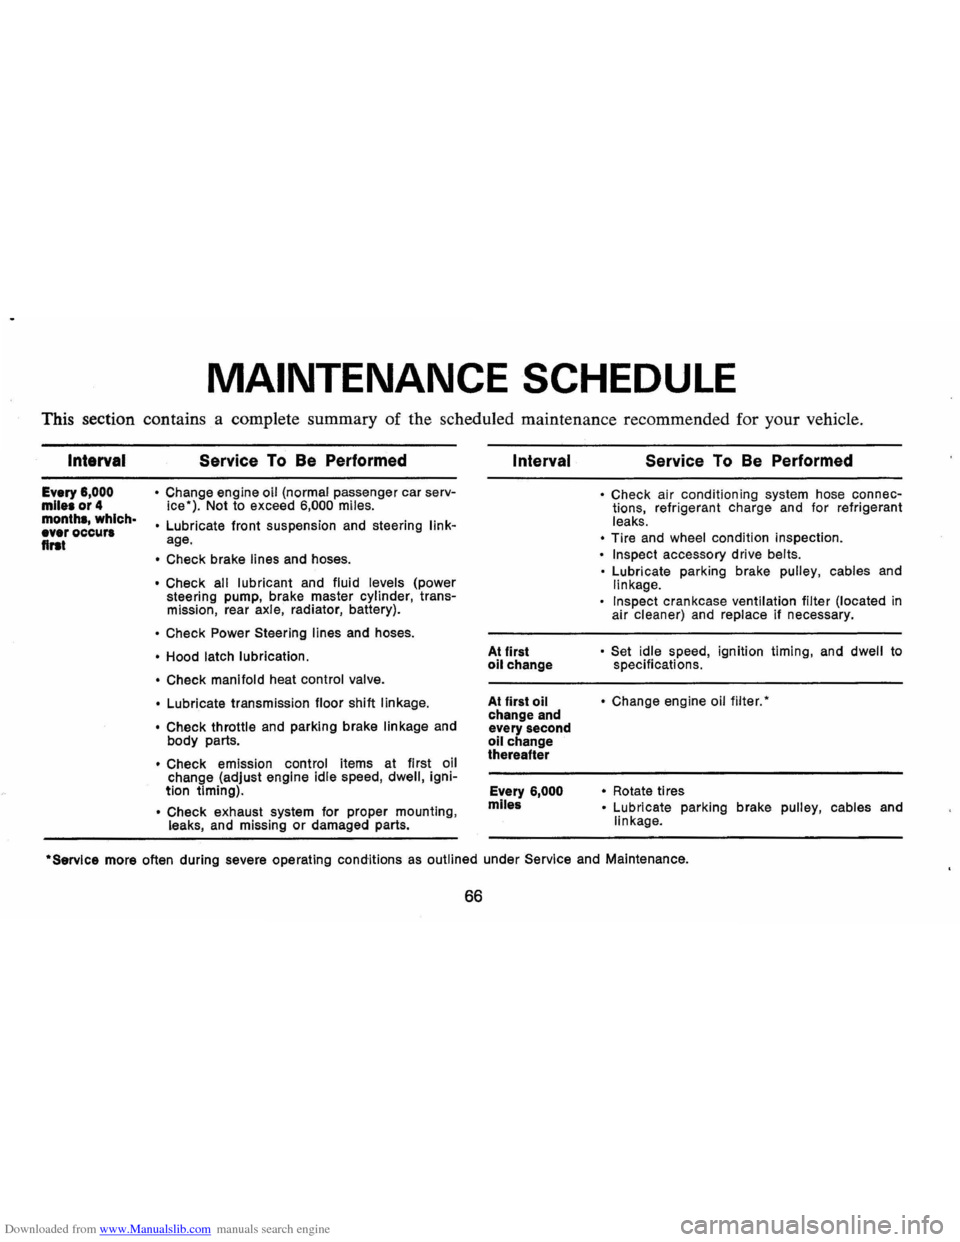
Downloaded from www.Manualslib.com manuals search engine MAINTENANCE SCHEDULE
This section contains a complete summary of the scheduled maintenance recommended for your vehicle.
Intarval
Every 6,000 mile. or 4 month., which· ever occur. flrat
Service To Be Performed
• Change engine oil (normal passenger car serv
ice"). Not to exceed 6,000 miles.
•
Lubricate front suspension and steering linkage.
• Check brake lines and hoses.
• Check all lubricant and fluid levels (power
steering pump, brake master cylinder, transmission, rear axle, radiator, battery).
• Check Power Steering lines and hoses.
• Hood latch lubrication.
• Check manifold
heat control valve.
•
Lubricate transmission floor shift linkage.
• Check
throttle and parking brake linkage and
body parts.
• Check emission control items at first oil
change (adjust engine idle speed, dwell, ignition timing) .
• Check exhaust system for proper mounting , leaks, and missing or damaged parts.
Interval
At first oil change
At first
oil change and
every second
oil change
thereafter
Every
6,000
mlle&
Service To Be Performed
• Check air conditioning system hose connections, refrigerant charge and for refrigerant
leaks.
• Tire and wheel condition inspection.
• Inspect accessory drive belts.
•
Lubricate parking brake pulley, cables and linkage.
Inspect crankcase ventilation filter (located in
air cleaner) and replace if necessary.
• Set idle speed , ignition timing, and dwell to
specifications.
• Change engine oil filter."
•
Rotate ti res • Lubricate parking brake pulley, cables and
linkage .
·Servlce more often during severe operating conditions as outlined under Service and Maintenance.
66
Page 73 of 88

Downloaded from www.Manualslib.com manuals search engine (E) If the car will start but stalls when hot or has a rough idle, you can suspect a faulty IDLE ADJUSTMENT, a malfunctioning AUTOMATIC CHOKE or an extremely dirty and blocked AIR CLEANER ELEMENT. Replace paper element air cleaner if necessary. Idle adjustment or automatic choke service (other than that outlined in paragraph D above) should be performed by your Chevrolet Dealer.
If the above Fuel System checks and the checks suggested under the Electrical System following do not correct the malfunction, it is recommended that you return to your Authorized Chevrolet Dealer for further checks, adjustments or repairs.
ELECTRICAL SYSTEM
If, when the ignition key is turned to "Start", the engine will not
turn over, you have good reason to suspect electrical trouble.
NOTE: Never remove Delcotron bat lead without first disconnecting battery ground cable.
(F) When there is no response at all to attempts to start the car, check the obvious-your AUTOMATIC TRANSMISSION SELECTOR LEVER must be in Neutral or Park position before the engine can be started. Turning the IGNITION SWITCH rapidly back and forth several times will sometimes correct a poor internal switch contact.
(G) The BATIERY may be discharged. If so, lights will be dim and the horn will have a poor tone if it will blow at all.
Usually
a garage recharge will be necessary to return the battery to operation. Occasionally, however, a long drive will recharge the battery.
NOTE: If the battery is determined to be dead, and for no apparent reason, have your Authorized Chevrolet Dealer check the
battery, the GENERATOR and the VOLTAGE REGULATOR. GENERATOR trouble should already have been indicated by the gene~ator indicator light on the instrument panel.
70
POOR BATIERY CONNECTIONS may be suspected if the car has operated properly a short time before and now not even the horn will operate. Check both ends of both battery cables. If the con
nections are corroded, a car may sometimes be restored to operation by removing all cable ends, scraping all contacting surfaces clean with a pen knife, and reassembling. If the cables are broken,
they must be replaced. The power supply should now be restored unless the battery is dead.
(H) If, however, the lights and horn work properly but the starter will still not turn over, check the STARTER connections. A "click" from the starter solenoid indicates that the wiring to the starter is properly installed. If the wiring seems to be clean and tightly installed, the trouble is probably in the starter itself and should be referred to your Authorized Chevrolet Dealer.
When the engine will "turn over" but will not start, the following items may be checked along with the Fuel Systems Checks listed
previously.
(I) With a clean dry cloth, wipe the ceramic portions of the spark plugs dry. In particularly damp or rainy weather dampness may be the cause of not starting, especially when the engine is cold.
(J) Check the cables at the top of the distributor and coil as well as each spark plug cable for tightness.
(K) If the car will still not start, check for spark at the spark plugs in the following manner:
Pull one of the spark plug wires off its spark plug. Insert a
short piece of bare wire (such as Distributor and Coil Cables
Page 79 of 88
Downloaded from www.Manualslib.com manuals search engine FUSES AND CIRCUIT BREAKER:
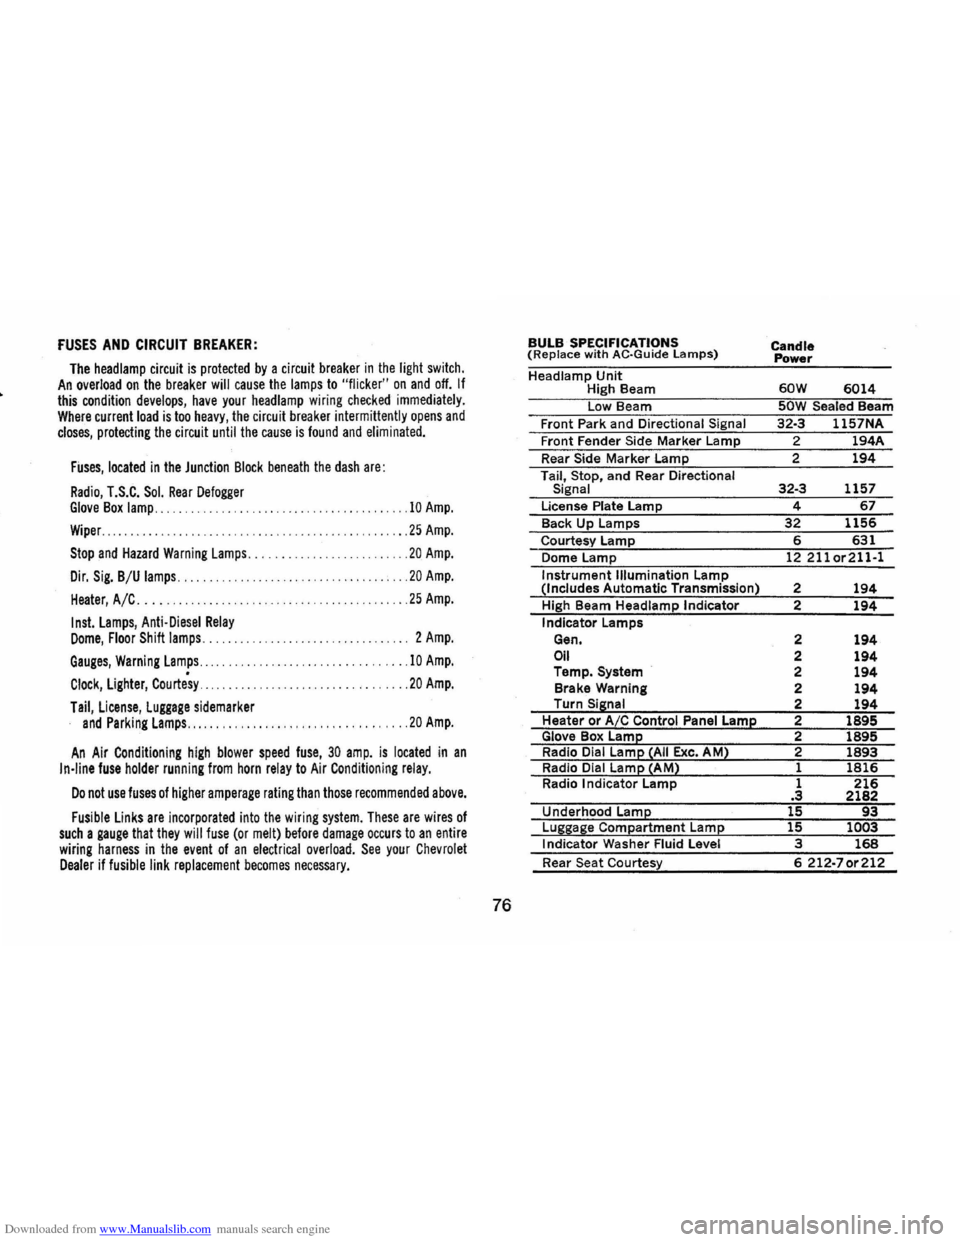
The headlamp circuit is protected by a circuit breaker in the light switch. An overload on the breaker will cause the lamps to "flicker" on and off. If this condition develops, have your headlamp wiring checked immediately. Where current load is too heavy, the circuit breaker intermittently opens and closes, protecting the circuit until the cause is found and eliminated.
Fuses, located in the Junction Block beneath the dash are:
Radio, T.S.C. Sol. Rear Defogger Glove Box lamp .... .. ............. 10 Amp.
Wiper .................... . . . ............... 25 Amp.
Stop and Hazard Warning Lamps .. ...... ... .. ... ... ... .. . 20 Amp.
Dir. Sig. B/U lamps .. ......... . .
.. .. .. ....... 20 Amp.
Heater, A /C. . . . . . .. .. .. .. .. .. . .. .. . .. .. . .......... . . 25 Amp.
Inst. Lamps, Anti·Diesel Relay Dome, Floor Shift lamps ............. ..................... 2 Amp.
Gauges, Warning Lamps .... ................... ........... 10 Amp.
Clock, Lighter, Courtesy ......................... .... .. .. 20 Amp.
Tail, License, Luggage sidemarker and Parking Lamps ............... .................... 20 Amp.
An Air Conditioning high blower speed fuse, 30 amp. is located in an In·line fuse holder running from horn relay to Air Conditioning relay.
Do not use fuses of higher amperage rating than those recommended above.
Fusible Links are incorporated into the wiring system. These are wires of such a gauge that they will fuse (or melt) before damage occurs to an entire wiring harness in the event of an electrical overload. See your Chevrolet Dealer if fusible link replacement becomes necessary.
76
BULB SPECIFICATIONS (Replace with AC·Guide lamps)
Headlamp Unit High Beam
Low Beam
Front Park and Directional Signal
Front Fender Side Marker Lamp
Rear Side Marker Lamp
Tail, Stop, and Rear Directional
Signal
License Plate Lamp
Back Up Lamps
Courtesy Lamp
Dome Lamp
Instrument Illumination Lamp (Includes Automatic Transmission)
High Beam Headlamp Indicator
Indicator Lamps
Gen.
Oil Temp. System
Brake Warning
Turn
Sisnal Heater or A/C Control Panel Lame Glove Box Lame Radio Dial Lame ~AII Exc. AM2 Radio Dial Lame ~AM2 Radio Indicator Lamp
Underhood
Lame
Luggase Compartment Lame Indicator Washer Fluid Level
Rear Seat Courtesy Candle
Power
60W 6014 50W Sealed Beam
32·3 1157NA
2 194A
2
194
32·3 1157
4 67
32 1156
6 631 12211or211·1
2 194 2 194
2 194 2 194 2 194 2 194 2 194 2 1895 2 1895 2
1893
1 1816 1 216 .3 2182 15 93 15 1003 3 168
6 212·70r212