1971 CHEVROLET CAMARO fuel
[x] Cancel search: fuelPage 54 of 88
Downloaded from www.Manualslib.com manuals search engine SERVICE AND MAINTENANCE
The time or mileage intervals on
the following pages are intended
as
a guide for establishing regular
maintenance and lubrication
periods for your car. Sustained
Fuel
Requirements
Your Camaro is designed to
operate efficiently on fuel of
ap
proximately 91 Research Octane
Number or higher, commonly sold
in the United
States and Canada.
Use of a fuel which is too low in
anti-knock quality will result in
"spark knock" and/or "after-run."
Since
the anti-knock quality of all
gasoline
is not the same and factors
such
as altitude, terrain, and air
temperature affect operating
effi-
heavy duty or high speed operations
or operation under adverse condi
tions may necessitate more frequent
servicing. To determine specific
recommendations for conditions
ciency, knocking
and/or after-run
may result even though you are
using the fuel recommended.
If
these conditions persist consult
your authorized Chevrolet Dealer.
In any case, continuous or
ex
cessive knocking may result in en
gine damage and constitutes mis
use of the engine for which Chev
rolet Division is not responsible
under the terms of the New Vehicle
Warranty.
NOTE: Read page 42 regarding
the importance
of using unleaded
or
low lead gasolines.
51
under which you use your car, con
sult your Authorized Chevrolet
Dealer.
Gas Cap-The fuel tank filler cap
has a new two-step removal and
installation procedure plus a
pres
sure-vacuum safety relief valve. It
is equipped with a double set of
locking tangs.
To remove:
• Rotate cap one-half turn coun
terclockwise to clear the first set
of tangs from the slots inside the
filler neck. This will allow any
residual pressure to escape.
• Pull the cap outward and rotate
one-quarter turn counterclock
wise to clear second set of tangs
and remove the cap.
• To install, reverse this procedure.
Page 55 of 88
Downloaded from www.Manualslib.com manuals search engine NOTE: If this cap requires a re
placement, only· a cap with these
same features should be used. Fail
ure to use the correct cap can re
sult in a serious malfunction of the
system. Correct replacement caps
may
be obtained from your Au
thorized Chevrolet Dealer.
Engine Oil
Recommendations
Use only engine oil which meets
oil quality standard GM 6041-M.
High quality oils which are in
tended for service
MS and pass car
makers' tests are
of this quality.
The oil change interval (see para
graph entitled
"Engine Oil Change
Interval") and the new vehicle
warranty are based on the use of
oils that meet these requirements.
NOTE: Non-detergent and other
low quality oils are specifically not
recommended. The use of proper
engine oils and oil change intervals are
your best assurance of contin
ued reliability and performance
from your Camaro engine.
Checking Oil Level
The engine oil should be main
tained at proper level. The best
time to check it
is before operating
the engine or as
the last step in a
fuel stop. This will allow the oil ac
cumulation in the engine to drain
back in the crankcase .
To check
the evel, remove the oil gauge rod
(dip stick), wipe it clean and rein
sert it firmly for an accurate read
ing. The oil gauge rod
is marked
"FULL" and "ADD." The oil level
should be maintained in the safety
margin, neither going above the
"FULL" line nor below the "ADD"
line. Reseat the gauge firmly after
taking the reading.
NOTE: The oil gauge rod is also
marked
"Use GM 6041-M Quality
MS Oil" as a reminder to use only
52
high quality oils as prescribed
under "Engine Oil Recommenda
tions."
Supplemental Engine Oil
Additives
The regular use of supplemental
additives
is specifically not recom
mended and will increase operat
ing costs. However, in cases of spe
cific problems which may arise
under certain conditions, additive
supplements are available that can
effectively and economically solve
these problems without causing
other difficulties.
For example, if
higher detergency
is required to re
duce varnish and sludge deposits
resulting from some unusual opera
tional difficulty, a thoroughly tested
and approved concentrate -
"En
gine Oil Supplement"-is available
at your Chevrolet dealer.
It is sug
gested that, in the event of
an oper
ational problem, you consult your
dealer for advice.
Page 57 of 88
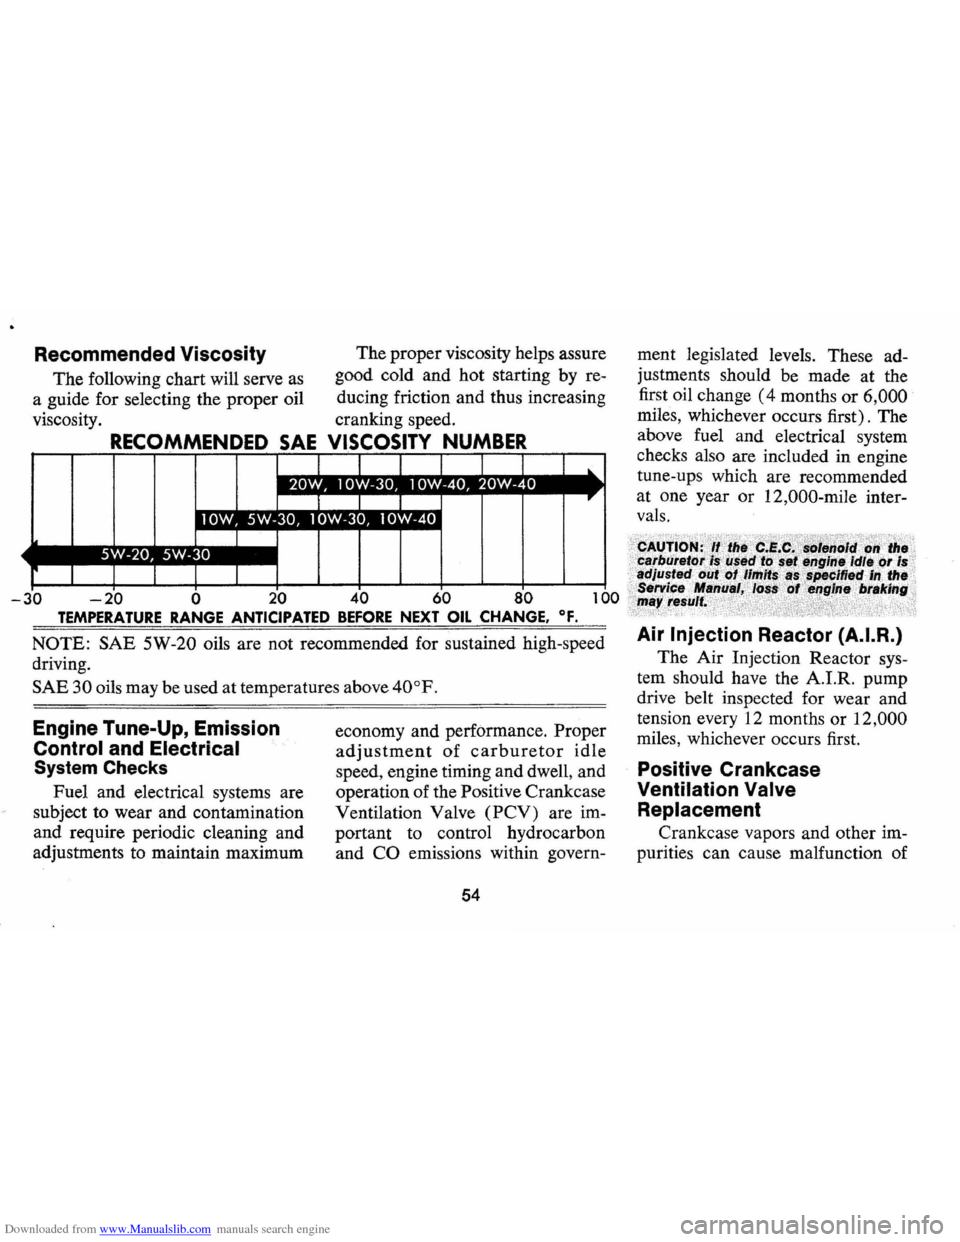
Downloaded from www.Manualslib.com manuals search engine Recommended Viscosity
The following chart will serve as
a guide for selecting the proper oil
viscosity. The
proper viscosity helps assure
good cold and hot starting by re
ducing friction and thus increasing
cranking speed.
OSITY NUMBER
-20 0 20 60 0
TEMPERATURE RANGE ANTICIPATED BEFORE NEXT OIL CHANGE. OF.
NOTE: SAE 5W-20 oils are not recommended for sustained high-speed
driving.
SAE 30 oils may be used at temperatures above 40°F.
Engine Tune-Up, Emission
Control and Electrical
System Checks
Fuel and electrical systems are
subject to wear and contamination
and require periodic cleaning and
adjustments to maintain maximum economy
and performance. Proper
adjustment of carburetor idle
speed, engine timing and dwell, and
operation of the Positive Crankcase
Ventilation Valve
(PCV) are im
portant to control hydrocarbon
and
CO emissions within govern-
54
ment legislated levels. These ad
justments should be made at the
first oil change
(4 months or 6,000
miles, whichever occurs first). The
above fuel and electrical system
checks also are included in engine
tune-ups which are recommended
at one year or 12,000-mile inter
vals.
Air Injection Reactor (A.I.R.)
The Air Injection Reactor sys
tem should have the A.I.R. pump
drive belt inspected for wear and
tension every 12 months or
12,000
miles, whichever occurs first.
Positive Crankcase
Ventilation
Valve
Replacement
Crankcase vapors and other im
purities can cause malfunction of
Page 58 of 88
Downloaded from www.Manualslib.com manuals search engine the crankcase ventilation valve.
Regular replacement of the PCV
Valve
is recommended at 24-month
or
24,000-mile intervals.
G.M. Evaporation
Control SYltem
The Evaporation Control System
requires only periodic canister filter
servicing.
Every 12 months
or 12,000
miles, whichever occurs first, (more
often under dusty conditions) the
filter in the base of the canister
must be replaced and the canister
inspected.
Drive Beltl
Every 6,000 miles or 4 months
inspect drive belts for wear, fray
ing, cracking, and tension. Belts
which are in poor condition should
be replaced immediately.
Check tension by applying
mod
erate thumb pressure midway be
tween pUlleys. If the center-to
center distance between pulleys
is
13 to 16 inches, the belt should
deflect
lh inch. If the center-to
center distance
is 7 to 10 inches,
the belt should deflect
1;4 inch.
Loose belts should be retensioned
to give the correct deflection.
Air Cleaner
Paper Ellment Type -First
12,000 miles, inspect element for
dust leaks, holes
or other damage,
replace
if necessary. If satisfac
tory, rotate element
1800 from
originally installed position.
Re
place element at 24,000, miles.
Element must not be washed,
oiled, tapped or cleaned with an
air hose.
Crankca.e Ventilation Filter
(located within Air Cleaner)
If so equipped, inspect at every oil
change and replace if necessary.
Replace at least every
24,000
miles; more often under dusty
driving conditions.
Flame Arrester -Every 12,000
55
miles-Clean the arrester (located
in the base of the air cleaner) with
kerosene
or a suitable solvent. Dry
with compressed air.
The engine air cleaner should
be installed at all times unless
temporary removal
is necessary
during repair or maintenance of
the vehicle, because in the absence
of the air cleaner backfiring could
cause
fire in the engine compart
ment.
For maximum protection spe
cify an AC Acron air filter ele
ment.
Fuel Filter
Replace carburetor inlet filter
element every 12 months or
12,000 miles, whichever occurs
first or, if an in-line filter
is also
used, every
24,000 miles.
Replace in-line filter every
24,000 miles.
When replacement
is necessary,
always insist on AC Acron filters.
Page 68 of 88

Downloaded from www.Manualslib.com manuals search engine Operation in Foreign Countries
If you plan to operate your Camaro
outside the continental limits of
the United States or Canada, there
is a possibility
that the best fuels
available
are so low in anti-knock
quality
that excessive knocking and
serious engine damage may result
from their use.
To minimize this
possibility, write to Chevrolet
Motor Division, Service Depart
ment, Detroit, Michigan 48202,
giving:
• The compression ratio and cubic inch
displacement of the engine
(See page 74 or obtain from
your
Dealer.)
• The vehicle identification num
ber (on plate on instrument
panel
ahead of the steering
wheel
and visible through the
windshield ,
or from the regis
tration slip
or title) .
• The country or countries in
which you
plan to travel.
You will be furnished details of
65 adjustments
or modifi
cations which
should be
made to your engine at
your Chevrolet Dealership prior to
your departure.
Failure to make
the necessary changes to your car
and subsequent operation under
conditions of continuous
or exces
s ive knocking constitutes misuse of
the engine for which the Chevrolet
Division is
not responsible under
the terms of the Chevrolet New
Vehicle Warranty.
After arriving
in a foreign country, determine
and use the best fuels available.
Page 70 of 88

Downloaded from www.Manualslib.com manuals search engine Interval
First 12,000 miles Every 12
months
or 12,000 miles
Every
24,000 miles
Service To Be Performed
• Rotate distributor cam lubricator. See 24,000 mile recommendation.
• Insp .ect air cleaner element, if satisfactory
rotate 1800 from original position and reinstall. See 24,000 mile recommendation.
• Inspect brake linings and check system for
leaks
• Inspect parking brake and throttle linkage. • Engine tune-up.
Replace carburetor 'Inlet fuel filter element. • Check emission control items. • Inspect AIR drive belt.
Evaporation Control System-Replace filter in
base of canister and inspect canister. • Check headlamp aiming.
• Repack front wheel bearings.
• Replace distributor cam lubricator. • Drain automatic transmission sump and add
fresh fluid (normal passenger car service).' Adjust Powerglide low band at first fluid
change.
• Replace crankcase ventilation filter (located
within air cleaner).
• Replace Turbo Hydra-Matic sump filter.
Interval Service To Be Performed
Every 2 years • Drain radiator coolant, flush and refill system.
Every
24 months· Replace PCV Valve. Inspect all hoses and or 24,(100 miles fittings.
Every
36,000 • Check steering gear for seal leakage (actual
miles solid grease-not just oily film).
• Lubricate clutch cross shaft (sooner if necessary), remove plug and install lube fittIng.
During Winter
• Check operation of air conditioning system.
months
Periodically • Check battery liquid leve/.
• Inspect seat belts, buckles, retractors and
anchors.
• Check all lights for proper operation.
As Required
• Check wheel alignment and balancing.
'Service more often during severe operating conditions as outlined under Service and Maintenance.
67
Page 72 of 88
Downloaded from www.Manualslib.com manuals search engine The chart on the previous page, and the information on the pages
which
follow, contains information designed to aid the average
driver to discover, and possibly correct, conditions resulting in minor
mechanical
difficulties in his car. The chart, designed to point out
possible solutions to several of the most common automotive mal
functions and point out a logical checking sequence, will lead step
by step to the most likely causes and corrective procedures. If, after
making the checks and adjustments suggested, the source of the
trouble has not been found and corrected, it is strongly recom
mended that an Authorized Chevrolet Dealer inspect the vehicle and
make whatever repairs
or adjustments are necessary.
FUEL SYSTEM AND ENGINE
If the ignition switch will cause the engine to "turn over" or
"crank" but the car will not start, check Steps A through D below.
NOTE:
If continual "Rooding" of the carburetor is evidenced by a
carbur.tor wet with
fuel or black exhaust smoke, perform the
operation suggested in paragraph D only.
(A) The first and most obvious,
and one of the most frequently overlooked, items to check when
you have difficulty in sta rting you r car is the amount . of fuel in the
tank. Make it a habit to check the FUEL GAUGE regularly and most especially at a time when the engine will "turn over" but will not
start.
(8)
If the fuel tank is noi empty,
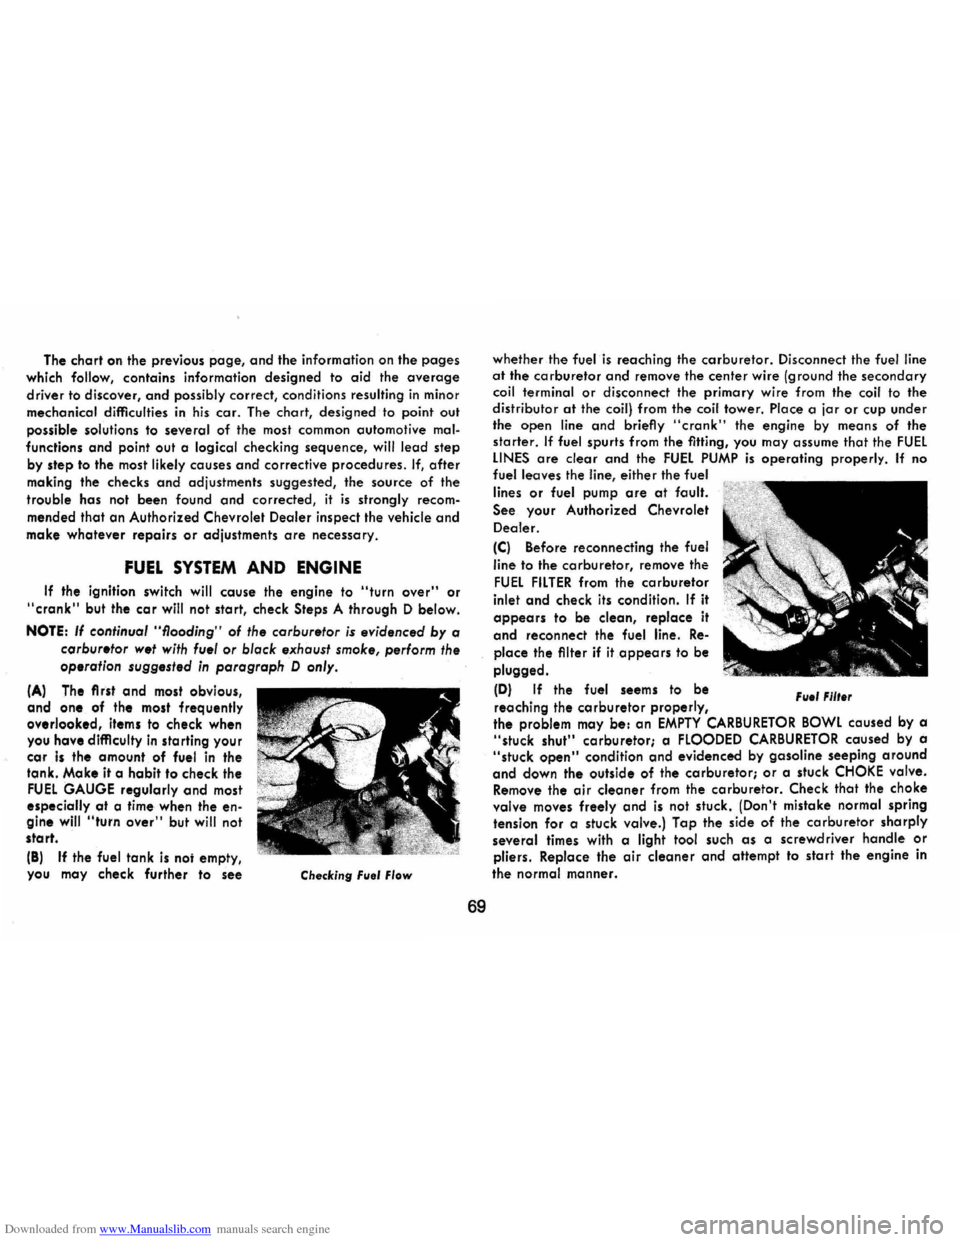
you may cheek further to see Checking Fllel Flow
69
whether the fuel is reaching the carburetor. Disconnect the fuel line at the carburetor and remove the center wire (ground the secondary coil terminal or disconnect the primary wire from the coil to the distributor at the coil) from the coil tower. Place a jar or cup under
the open line and briefly "cronk" the engine by means of the
starter. If fuel spurts from the fitting, you may assume that the FUEL LINES are clear and the FUEL PUMP is operating properly. If no fuel leaves the line, either the fuel
lines
or fuel pump are at fault.
See. your Authorized Chevrolet
Dealer.
(C) Before reconnecting the fuel
line
to the carburetor, remove the
FUEL FILTER from the carburetor
inlet and check its condition. If it
appears to be clean, replace it
and reconnect the fuel line. Re
place the filter if it appears to be
plugged.
(D) If the fuel seems to be
reaching the
carburetor properly, File' Fllt.r
the problem may be: an EMPTY CARBURETOR BOWL caused by a "stuck shut" carburetor; a FLOODED CARBURETOR caused by a "stuck open" condition and evidenced by gasoline seeping around
and down the outside of the carburetor; or a stuck CHOKE valve. Remove the air cleaner from the carburetor. Check that the choke valve moves freely and is not stuck. (Don't mistake normal spring
tension for a stuck valve.) Tap the side of the carburetor sharply
several times with a light tool such as a screwdriver handle or pliers. Replace the air cleaner and attempt to start the engine in
the
normal manner.
Page 73 of 88

Downloaded from www.Manualslib.com manuals search engine (E) If the car will start but stalls when hot or has a rough idle, you can suspect a faulty IDLE ADJUSTMENT, a malfunctioning AUTOMATIC CHOKE or an extremely dirty and blocked AIR CLEANER ELEMENT. Replace paper element air cleaner if necessary. Idle adjustment or automatic choke service (other than that outlined in paragraph D above) should be performed by your Chevrolet Dealer.
If the above Fuel System checks and the checks suggested under the Electrical System following do not correct the malfunction, it is recommended that you return to your Authorized Chevrolet Dealer for further checks, adjustments or repairs.
ELECTRICAL SYSTEM
If, when the ignition key is turned to "Start", the engine will not
turn over, you have good reason to suspect electrical trouble.
NOTE: Never remove Delcotron bat lead without first disconnecting battery ground cable.
(F) When there is no response at all to attempts to start the car, check the obvious-your AUTOMATIC TRANSMISSION SELECTOR LEVER must be in Neutral or Park position before the engine can be started. Turning the IGNITION SWITCH rapidly back and forth several times will sometimes correct a poor internal switch contact.
(G) The BATIERY may be discharged. If so, lights will be dim and the horn will have a poor tone if it will blow at all.
Usually
a garage recharge will be necessary to return the battery to operation. Occasionally, however, a long drive will recharge the battery.
NOTE: If the battery is determined to be dead, and for no apparent reason, have your Authorized Chevrolet Dealer check the
battery, the GENERATOR and the VOLTAGE REGULATOR. GENERATOR trouble should already have been indicated by the gene~ator indicator light on the instrument panel.
70
POOR BATIERY CONNECTIONS may be suspected if the car has operated properly a short time before and now not even the horn will operate. Check both ends of both battery cables. If the con
nections are corroded, a car may sometimes be restored to operation by removing all cable ends, scraping all contacting surfaces clean with a pen knife, and reassembling. If the cables are broken,
they must be replaced. The power supply should now be restored unless the battery is dead.
(H) If, however, the lights and horn work properly but the starter will still not turn over, check the STARTER connections. A "click" from the starter solenoid indicates that the wiring to the starter is properly installed. If the wiring seems to be clean and tightly installed, the trouble is probably in the starter itself and should be referred to your Authorized Chevrolet Dealer.
When the engine will "turn over" but will not start, the following items may be checked along with the Fuel Systems Checks listed
previously.
(I) With a clean dry cloth, wipe the ceramic portions of the spark plugs dry. In particularly damp or rainy weather dampness may be the cause of not starting, especially when the engine is cold.
(J) Check the cables at the top of the distributor and coil as well as each spark plug cable for tightness.
(K) If the car will still not start, check for spark at the spark plugs in the following manner:
Pull one of the spark plug wires off its spark plug. Insert a
short piece of bare wire (such as Distributor and Coil Cables