1969 FORD MUSTANG wheel size
[x] Cancel search: wheel sizePage 244 of 413

04-05-03
Specifications
04-05-03
SHIM PACK THICKNESS CHART TRACTION-LOK DIFFERENTIAL
Feeler
Gauge
Reading
0.001
0.002
0.003
0.004
0.005
0.006
0.007
0.008
0.009
0.010
0.011
0.012
0.013
0.014
0.015
0.016
0.017
0.018
0.019
0.020
0.021
0.022
0.023
0.024
0.025
0.026
0.027
Remove Shim(s)
From
Nominal
None
0.005
0.010
0.015
0.020
0.025
Total Req'd
Shim Pack
Thickness®
0.050
0.045
0.040
0.035
0.030
0.025
Feeler
Gauge
Reading
0.028
0.029
0.030
0.031
0.032
0.033
0.034
0.035
0.036
0.037
0.038
0.039
0.040
0.041
0.042
0.043
0.044
0.045
0.046
0.047
0.048
0.049
0.050
Remove Shim(s)
From
Nominal
0.030
0.035
0.040
0.045
0.050
Total Req'd
Shim Pack
Thickness ®
0.020
0.015
0.010
0.005
0.000
©Service Shims are available in 0.010" and 0.005" Thicknesses.
ADJUSTMENT TORQUE SPECIFICATION -(BY AXLE RING GEAR DIAMETERS
Description
Minimum torque required to tighten
pinion flange nut to obtain
correct pinion bearing preload
7 1/4" & 8 1/2"
8", 8 3/4" & 9"
9 3/8"
Pinion Bearing Preload-
collapsible spacer)®
Original Bearings 7 1/4"
8", 8 1/2", 8 3/4", 9"
New Bearings 7 1/4"
8", 8 1/2", 8 3/4", 9"
Pinion Bearing Preload-
(Solid Spacer) 9 3/8" Only
Torque
Lbs.
In.
6-12
8-14
17-32
22-32
15-35
. Lbs. Ft.
140®
175®
180-220
Description
Lockers Only • Minimum rotating
Torque required to turn axle
shaft and side gear with one
wheel on ground:
Limited Slip 7 1/4"
All other R. G. Sizes
Traction-Lok-All
Lockers only-Rotating Torques
required during bench check
after assembly:
Original Clutch Plates-
Limited Slip 71/4",
All other R. G. Sizes
Traction-Lok-(All)
New Clutch Plates-
Limited Slip 7 1/4"
All other R. G. Sizes
Traction-Lok-All
Torque
Lbs.
In.
Lbs.
Ft.
50
75
40
50 Min.
75 Min.
40 Min.
100-125
155-195
100-250G
©If pinion bearing preload exceeds specification before this torque is obtained, install a new spacer.
©With Oil Seal.
©Rotating torque may fluctuate up to 40 Lbs. Ft.procarmanuals.com
Page 257 of 413

05-02-03
General Clutch Service
05-02-03
in the direction of the face runout
arrow and its center line is parallel to
the center line of the face runout
arrow.
18.
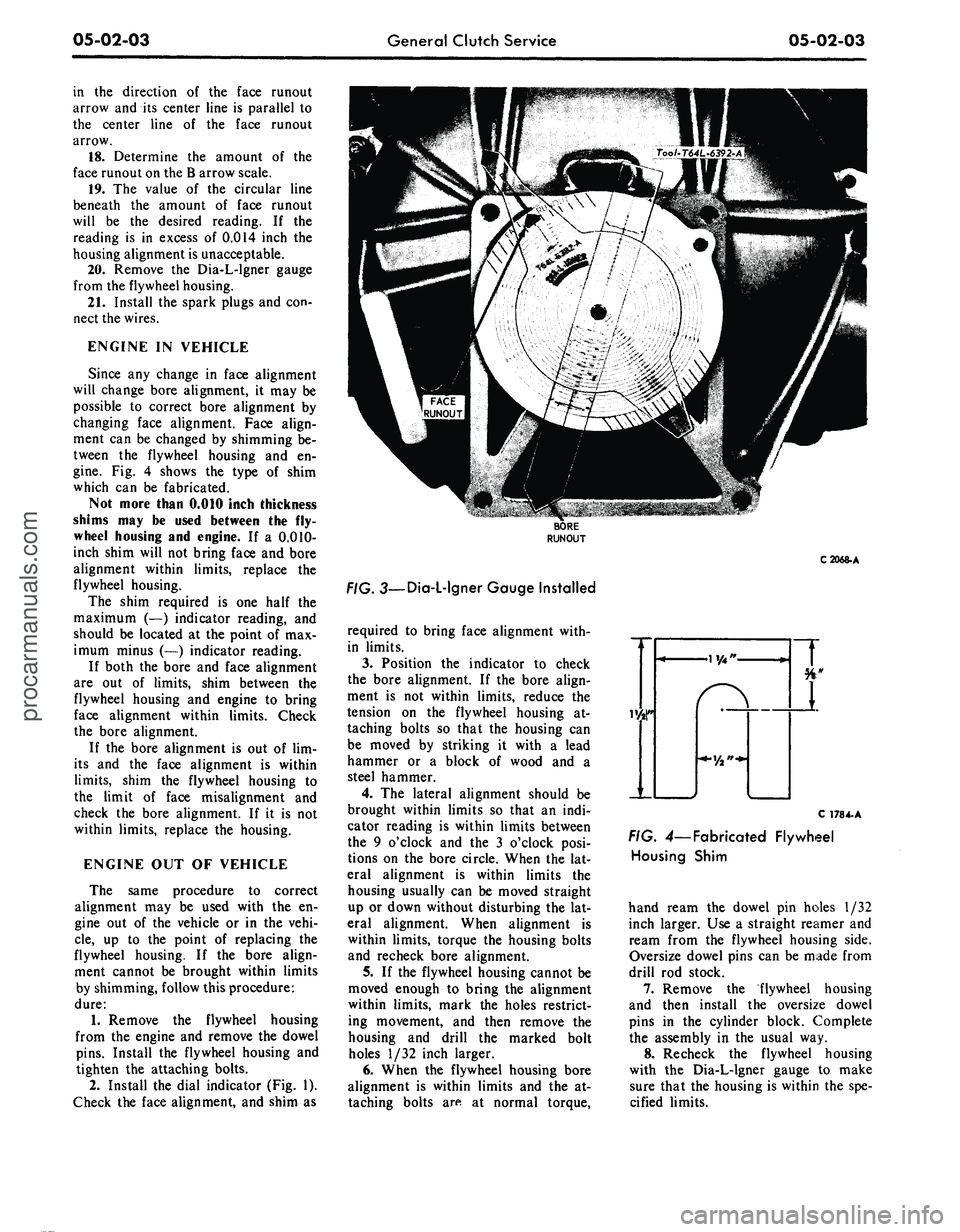
Determine the amount of the
face runout on the B arrow scale.
19.
The value of the circular line
beneath the amount of face runout
will be the desired reading. If the
reading is in excess of 0.014 inch the
housing alignment is unacceptable.
20.
Remove the Dia-L-lgner gauge
from the flywheel housing.
21.
Install the spark plugs and con-
nect the wires.
ENGINE IN VEHICLE
Since any change in face alignment
will change bore alignment, it may be
possible to correct bore alignment by
changing face alignment. Face align-
ment can be changed by shimming be-
tween the flywheel housing and en-
gine.
Fig. 4 shows the type of shim
which can be fabricated.
Not more than 0.010 inch thickness
shims may be used between the fly-
wheel housing and engine. If a 0.010-
inch shim will not bring face and bore
alignment within limits, replace the
flywheel housing.
The shim required is one half the
maximum (—) indicator reading, and
should be located at the point of max-
imum minus (—) indicator reading.
If both the bore and face alignment
are out of limits, shim between the
flywheel housing and engine to bring
face alignment within limits. Check
the bore alignment.
If the bore alignment is out of lim-
its and the face alignment is within
limits,
shim the flywheel housing to
the limit of face misalignment and
check the bore alignment. If it is not
within limits, replace the housing.
ENGINE OUT OF VEHICLE
The same procedure to correct
alignment may be used with the en-
gine out of the vehicle or in the vehi-
cle,
up to the point of replacing the
flywheel housing. If the bore align-
ment cannot be brought within limits
by shimming, follow this procedure:
dure:
1.
Remove the flywheel housing
from the engine and remove the dowel
pins.
Install the flywheel housing and
tighten the attaching bolts.
2.
Install the dial indicator (Fig. 1).
Check the face alignment, and shim as
C2068-A
. 3—Dia-L-lgner Gauge Installed
required to bring face alignment with-
in limits.
3.
Position the indicator to check
the bore alignment. If the bore align-
ment is not within limits, reduce the
tension on the flywheel housing at-
taching bolts so that the housing can
be moved by striking it with a lead
hammer or a block of wood and a
steel hammer.
4.
The lateral alignment should be
brought within limits so that an indi-
cator reading is within limits between
the 9 o'clock and the 3 o'clock posi-
tions on the bore circle. When the lat-
eral alignment is within limits the
housing usually can be moved straight
up or down without disturbing the lat-
eral alignment. When alignment is
within limits, torque the housing bolts
and recheck bore alignment.
5.
If the flywheel housing cannot be
moved enough to bring the alignment
within limits, mark the holes restrict-
ing movement, and then remove the
housing and drill the marked bolt
holes 1/32 inch larger.
6. When the flywheel housing bore
alignment is within limits and the at-
taching bolts are at normal torque,
C 178 4-A
FIG. 4— Fabricated Flywheel
Housing Shim
hand ream the dowel pin holes 1/32
inch larger. Use a straight reamer and
ream from the flywheel housing side.
Oversize dowel pins can be made from
drill rod stock.
7.
Remove the flywheel housing
and then install the oversize dowel
pins in the cylinder block. Complete
the assembly in the usual way.
8. Recheck the flywheel housing
with the Dia-L-lgner gauge to make
sure that the housing is within the spe-
cified limits.procarmanuals.com
Page 413 of 413

07-05-13
Specifications
07-05-13
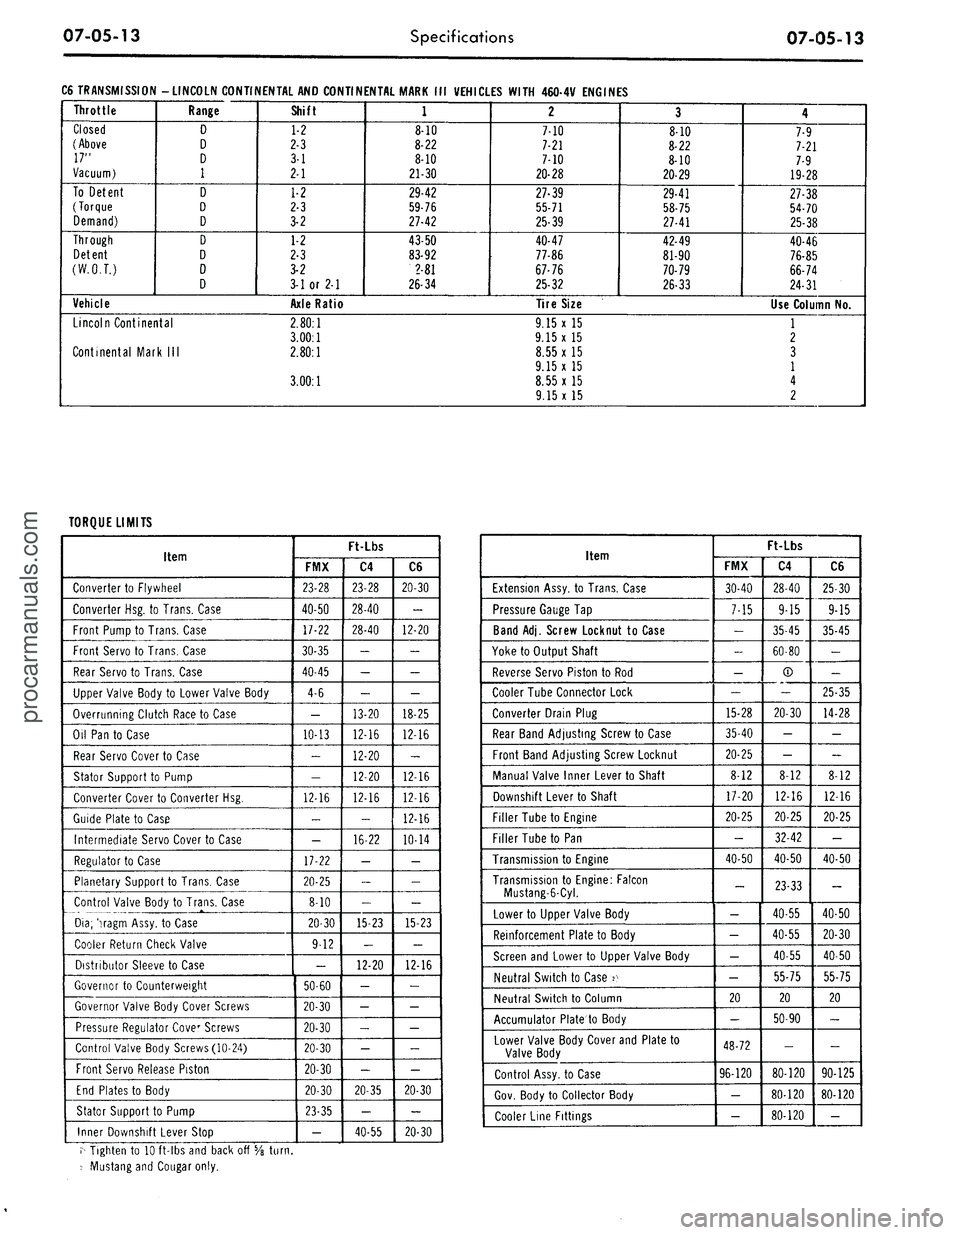
C6 TRANSMISSION -LINCOLN CONTINENTAL AND CONTINENTAL MARK III VEHICLES WITH 460-4V ENGINES
Throttle
Closed
(Above
17"
Vacuum)
To Detent
(Torque
Demand)
Through
Detent
(W.O.T.)
Range
D
D
D
1
D
D
D
D
D
D
D
Vehicle
Lincoln Continental
Continental Mark III
Shift
1-2
2-3
3-1
2-1
1-2
2-3
3-2
1-2
2-3
3-2
3-1 or 2-1
Axle Ratio
2.80:1
3.00:1
2.80:1
3.00:1
1
8-10
8-22
8-10
21-30
29-42
59-76
27-42
43-50
83-92
2-81
26-34
2
7-10
7-21
7-10
20-28
27-39
55-71
25-39
40-47
77-86
67-76
25-32
Tire Size
9.15 x 15
9.15x15
8.55 x 15
9.15 x 15
8.55 x 15
9.15 x 15
3
8-10
8-22
8-10
20-29
29-41
58-75
27-41
42-49
81-90
70-79
26-33
4
7-9
7-21
7-9
19-28
27-38
54-70
25-38
40-46
76-85
66-74
24-31
Use Column No.
1
2
3
1
4
2
TORQUE LIMITS
Item
Converter to Flywheel
Converter Hsg. to Trans. Case
Front Pump to Trans. Case
Front Servo to Trans. Case
Rear Servo to Trans. Case
Upper Valve Body to Lower Valve Body
Overrunning Clutch Race to Case
Oil Pan to Case
Rear Servo Cover to Case
Stator Support to Pump
Converter Cover to Converter Hsg.
Guide Plate to Case
Intermediate Servo Cover to Case
Regulator to Case
Planetary Support to Trans. Case
Control Valve Body to Trans. Case
Dia;
'iragm Assy, to Case
Cooler Return Check Valve
Distributor Sleeve to Case
Governor to Counterweight
Governor Valve Body Cover Screws
Pressure Regulator Cover Screws
Control Valve Body Screws (10-24)
Front Servo Release Piston
End Plates to Body
Stator Support to Pump
Inner Downshift Lever Stop
Ft-Lbs
FMX
23-28
40-50
17-22
30-35
40-45
4-6
—
10-13
-
-
12-16
-
-
17-22
20-25
8-10
20-30
9-12
-
50-60
20-30
20-30
20-30
20-30
20-30
23-35
-
C4
23-28
28-40
28-40
-
-
-
13-20
12-16
12-20
12-20
12-16
-
16-22
-
-
-
15-23
-
12-20
-
-
-
-
-
20-35
-
40-55
C6
20-30
-
12-20
-
-
-
18-25
12-16
-
12-16
12-16
12-16
10-14
-
-
-
15-23
-
12-16
-
-
-
-
-
20-30
-
20-30
Item
Extension Assy, to Trans. Case
Pressure Gauge Tap
Band Adj. Screw Locknut to Case
Yoke to Output Shaft
Reverse Servo Piston to Rod
Cooler Tube Connector Lock
Converter Drain Plug
Rear Band Adjusting Screw to Case
Front Band Adjusting Screw Locknut
Manual Valve Inner Lever to Shaft
Downshift Lever to Shaft
Filler Tube to Engine
Filler Tube to Pan
Transmission to Engine
Transmission to Engine: Falcon
Mustang-6-Cyl.
Lower to Upper Valve Body
Reinforcement Plate to Body
Screen and Lower to Upper Valve Body
Neutral Switch to Case 2^
Neutral Switch to Column
Accumulator Plate to Body
Lower Valve Body Cover and Plate to
Valve Body
Control Assy, to Case
Gov. Body to Collector Body
Cooler Line Fittings
Ft-Lbs
FMX
30-40
7-15
-
-
-
-
15-28
35-40
20-25
8-12
17-20
20-25
-
40-50
-
-
- ;
-
-
20
-
48-72
96-120
-
-
C4
28-40
9-15
35-45
60-80
®
-
20-30
-
-
8-12
12-16
20-25
32-42
40-50
23-33
40-55
40-55
40-55
55-75
20
50-90
-
80-120
80-120
80-120
C6
25-30
9-15
35-45
-
-
25-35
14-28
-
-
8-12
12-16
20-25
-
40-50
-
40-50
20-30
40-50
55-75
20
-
-
90-125
80-120
-
r^ Tighten to 10 ft-lbs and back off 5/8
turn.
-• Mustang and Cougar only.procarmanuals.com