Page 17 of 38

CLEANING HINTS
EXTERIOR APPEARANCE
WASHING YOUR CORVAIR
The best way to preserve the original beauty of the
finish
of your Corvair is to keep it clean. Calcium
chloride and other salts, road tar, excretion from insects,
tree sap, chemicals from factory chimneys and other
foreign matter may permanently damage both paint and
bright metal parts. Regular, frequent washings and a
thorough cleaning after exposure to any of the above is
recommended. Wash the car in either warm or cold
(never hot) water; never in the direct rays of the sun;
and always wait until the sheet metal surfaces have
cooled before beginning. Never wipe off dust and dirt
when surfaces are dry because this may scratch the
finish.
POLISHING YOUR CORVAIR
Your Corvair is finished with Magic Mirror Acrylic
Lacquer. A thorough washing is generally all that is
required to maintain a "new car" appearance. How
ever, if the car is to be polished ma ke certain that the
label of the cleaner or polish used states that the product
is suitable for use on acrylic lacquer finishes. Any of the
14
approved cleaners or polishes listed on Page 27 of this
book may be used. Any tar or road oil remover used
should indicate on the label that it is harmless to Acrylic
finishes. G. M. Tar and Road Oil Remover has been
especially compounded for this purpose.
PROTECTION OF EXTERIOR BRIGHT METAL
PARTS
All bright metal parts of the car-should be regularly
cleaned and protected against the same substances
harmful to the painted surfaces . Normally, washing with
water is all that is required. However, G. M. Chrome
Polish may be used on CHROME or STAINLESS STEEL
trim if necessary. Use special care with ALUMINUM trim.
Never use auto or chrome polish, steam or any caustic
soap to clean aluminum. Wash only with lukewarm water,
and if necessary, a mild soap. Rinse well and dry
thoroughly.
Page 18 of 38

It is recommended that all bright metal parts of your
Corvair, after being thoroughly cleaned, be given a
coating of wax and rubbed to a high polish. This will
serve to keep corrosive agents away from these surfaces,
and should be repeated as often as required.
CLEANING WHITE SIDEWALL TIRES
Use soap, warm water or a tire cleaner such as
G. M. Whitewall Tire Cleaner and a stiff brush to remove
road grime and dirt from white sidewall tires. A fine
grade of steel wool will remove severe curb scrapes.
Do
not use gasoline, kerosene or any oil product which
would discolor or deteriorate the rubber.
CAUTION: Some white sidewall cleaners will cause
serious damage to aluminum trim. Use caution
when cleaning tires with this type of cleaner.
G. M. Whitewall Tire Cleaner is safe to use
around aluminum trim.
15
INTERIOR APPEARANCE
DUST AND DIRT
Clean the interior of your car frequently, using a
broom or vacuum cleaner. A damp cloth will wipe dust
from hard surfaces. G. M. leather Cleaner is available
from your Authorized Chevrolet Dealer to clean any
imitation leather, vinyl or coated trim fabric on seats
or door panels.
SPOTS AND STAINS
Remove upholstery stains as soon as possible or
they may become "set" and difficult or impossible to
remove. First determine the type and age of the stain
and the kind of upholstery material. Kar Kleen Uphol
stery Cleaner or Kar Kleen Upholstery Spot Cleaner,
available from your Authorized Chevrolet Dealer, will
remove most stains. For oil, grease and road grime stains
not removed by these cleaners the use of a volatile type
cleaner such as G. M.Upholstery Spot Remover is recom
mended. Do not use alkaline cleaners ·for they may
damage the color or finish of the materials. Other solu
tions such as hot or cold water, ammonia water, soap,
ink eradicator, etc., will probably discolor and disturb
the material.
Page 19 of 38
AINTENANCE AND LUBRICATION
16
OCTANE REQUIREMENTS
The Corvair six-cylinder engine is designed to deliver
peak performance on what is designated as Regular
grade fuel in the continental United States and Canada.
Regular gasoline may, however, vary in octane between
manufacturers or between different sections of the
country. If unfavorable performance is encountered be
cause of either or both of the above factors, any Author
ized Chevrolet Dealer can make ignition adjustments
which
will restore your car to normal operation.
Before taking your car to foreign countries (except
Canadal, where fuel available generally does not meas-
Page 20 of 38
ure up to U. S. standards, it is desirable to' obtain
detailed information as to availability of fuels in a given
area and service and adjustments n~cessary to adapt
your car to the fuels available. Such information may be
obtained by writing:
General Motors Overseas Operations
Service Department, Room 9-164
General Motors Building
Detroit 2, Michigan
Include with your request the area to which you
plan to take your car and the vehicle type and serial
number.
COOLING SYSTEM CARE
The Corvair engine, being an air cooled engine, is
entirely dependent on the fan belt and blower to supply
sufficient volume of air for cooling purposes. The engine
fan belt should be checked for tightness at regular
intervals and replaced when necessary. Watch the
"Temp-Press" and "Gen-Fan" indicator lights on the
instrument panel for signs of engine overheating.
OIiIOJl~ll!I[olrolin! ...... ~'-~ ............ ,'.,./ .. / ... A/
Page 21 of 38

TIRE CARE
Your new Chevrolet Corvair is designed to operate
most efficiently with the inflation pressure shown in the
following table. Nothing will be gained by exceeding
pressure shown, whereas, excessive pressures can ad
versely affect riding comfort and quietness. Under infla
tion affects vehicle handling and tire life. Over-steer
problems may also be encountered with incorrect pres
sures. Maintain the recommended inflation pressures at
all times.
All four wheels of your Corvair have been static-balanced for best performance and tire life. Wheels should be rebalanced after tire service or replacement.
FRONT AND REAR PRESSURE DIFFERENCE IS IMPORTANT
TO VEHICLE HANDLING.
18
Inspection and Repair
Inspect every 1000 miles for puncturing objects in
the tires. If any are found, do not attempt removal until
you are in a position to change the tire or have it
repaired. Also, check regularly that the wheel rim has
sustained
no damage which could affect the air seal.
Jacking the Car
The scissors type jack, its adapter and ratchet han
dle are stowed under the spare tire. One end of the
ad~pter is a wrench which fits over the wheel nuts and
the hex connection on the jack. The other end fits into
the non-adjustable ratchet wrench. One side of the wrench
faces the car for raising the car or tightening the wheel
nuts. Turn the wrench over so that the opposite side faces
ADAPTER
JACK
WRENCH SPARE TIRE AND JACK STOWAGE
Page 22 of 38

the car for lowering the car or removing the wheel nuts.
When jacking the car, set the hand brake, block diagonal
wheel, and, if changing wheels, remove the hub cap and
loosen wheel nuts. Place the jack under the side of the
car located as shown.
Spare Tire
The tire is mounted in the luggage compartment.
Switching Tires
Switching tires every 5000 miles as shown will pro
mote more even tire wear and longer tire life. After
switch ing tires readjust tire pressure to correspond to
table on page 18.
CAUTION: Never attempt to raise the Corvair by
placing any kind of jack under the bumper.
FRONT
JACKING CAR SWITCHING TIRES 19
CHASSIS LUBRICATION
------
.-
Your Corvair deserves the best care you can give it.
Regular maintenance will guarantee you more, depend
able, trouble free miles of enjoyable driving. The
following pages are devoted to maintenance and lubri
cation items which should be performed at regular inter
vals
. Each item is numbered to correspond to the items
shown on the Lubrication Diagram on page 26. The
Lubrication and Maintenance Guide on pages 24 and
25 provides an easy way of checking on necessary
maintenance at any given mileage or seasonal interval.
Page 23 of 38

1. CRANKCASE LUBRICATION
First 500 miles (if temperature has been over 60° F.I
Change as per table, on page 16.
First 1000 miles (if-temperature has been below
60°F.1
Change as per table on page 16.
Every 4000 miles thereafte.r during favorab·le driving
conditions (over 10 miles per trip).
Change as per table on page 16.
During adverse driving conditions or short trip driving
(less
than 10 miles per trip).
Winter-Change every month.
Summer-Change every two months.
2. OIL FILTER
Change the filter element after the first 5000 miles
of operation, and every 4000 miles thereafter.
NOT~: When changing the filter element, be care
ful not to drip oil on the engine fan belt.
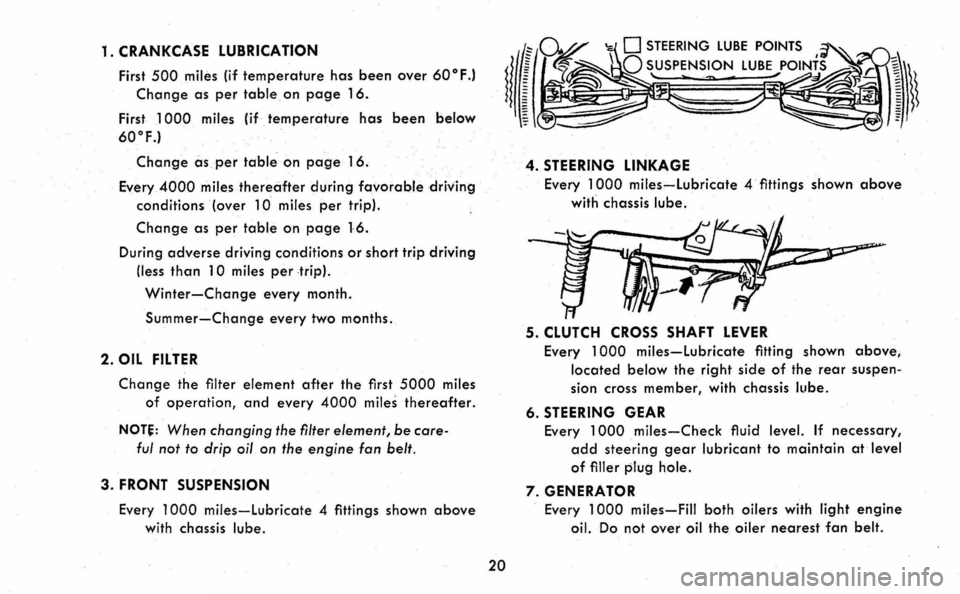
3. FRONT SUSPENSION
Every 1000 miles-lubricate 4 fittings shown above
with chassis lube.
20
4. STEERING LINKAGE
Every 1000 miles-lubricate 4 fittings shown above
with chassis lube.
5. CLUTCH CROSS SHAFT LEVER
Every 1000 miles-lubricate fitting shown above,
located below the right side of the rear suspen
sion cross member, with chassis lube.
6. STEERING GEAR
Every 1000 miles-Check fluid level. If necessary,
add steering gear lubricant to maintain at level
of filler plug hole.
7. GENERATOR
Every 1000 miles-Fill both oilers with light engine
oil. Do not over oil the oiler nearest fan belt.
Page 24 of 38

8. DISTRIBUTOR
Every 1000 miles-Fill hinged cap oiler with light
engine. oil.
Every 5000 miles-Apply small drop of light engine
oil to breaker lever pivot.
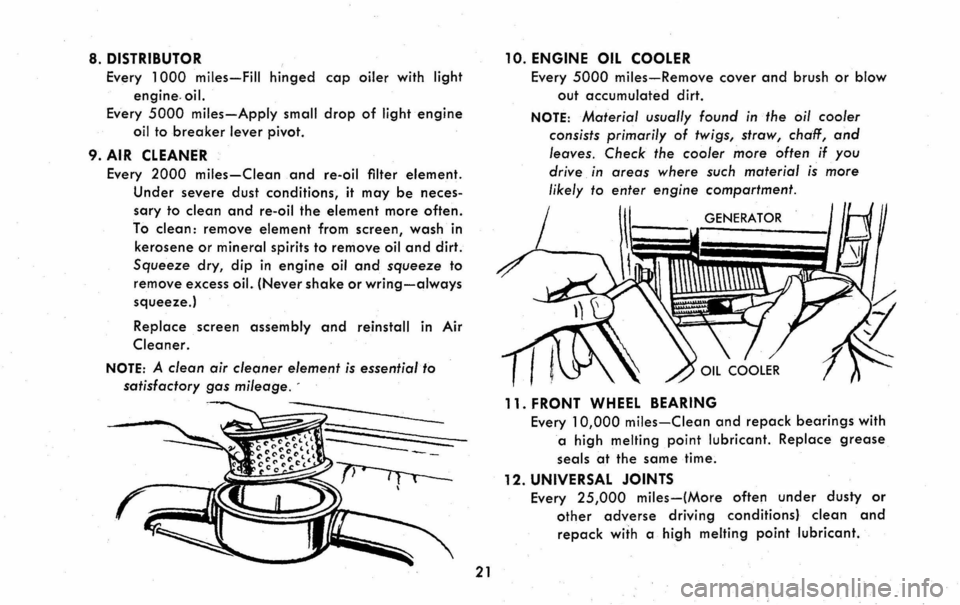
9. AIR CLEANER
Every 2000 miles-Clean .and re-oil filter element.
Under severe dust conditions, it may be neces
sary to clean and re-oil the element more often.
To clean: remove element from screen, wash in
kerosene
or mineral spirits to remove oil and dirt.
Squeeze dry, dip in engine oil and squeeze to
remove excess oiL (Never shake or wring-always
squeeze.)
Replace screen assembly and reinstall in Air
Cleaner.
NOTE: A clean air cleaner element is essential to
satisfactory gas mileage. -
21
10. ENGINE OIL COOLER
Every 5000 miles-Remove cover and brush or blow
out accumulated dirt.
NOTE: Material usually found in the oil cooler
consists primarily
of twigs, straw, chaff, and
leaves. Check the cooler more often if you
drive
in areas where such material is more
likely to enter engine compartment.
GENERATOR
11. FRONT WHEEL BEARING
Every 10,000 miles-Clean and repack bearings with
a high melting point lubricant. Replace grease
seals at the same time.
12. UNIVERSAL JOINTS
Every 25,000 miles-(More often under dusty or
other adverse driving conditions} clean and
repack with a high melting point lubricant.