Page 5 of 38

OPERATING INSTRUCTIONS
BREAKING-IN PERIOD
Sound design and precision manufacturing methods
will permit you to operate your new Corvair in a normal
manner from its very first mile without adhering to a
formal "break-in" schedule. However, during the first
few hundred miles of driving you can, by observing a
few simple precautions, add to the future performance
and economy of your car.
It is recommended that your speed during the first
500 miles be confined to a maximum of 60 M.P.H., but
do not drive for extended periods at anyone constant
speed, either fast or slow. During this period, avoid full
throttle "jack-rabbit" starts and quick, abrupt stops.
Gentle braking during the first few hundred miles of
operation will result in longer brake life and better
future performance. Avoid hard stops especially during
the first 200 miles of operation since brake misuse during
this period will destroy much future brake efficiency.
Always drive at a moderate speed until the engine
has completely warmed up.
2
STARTING THE ENGINE
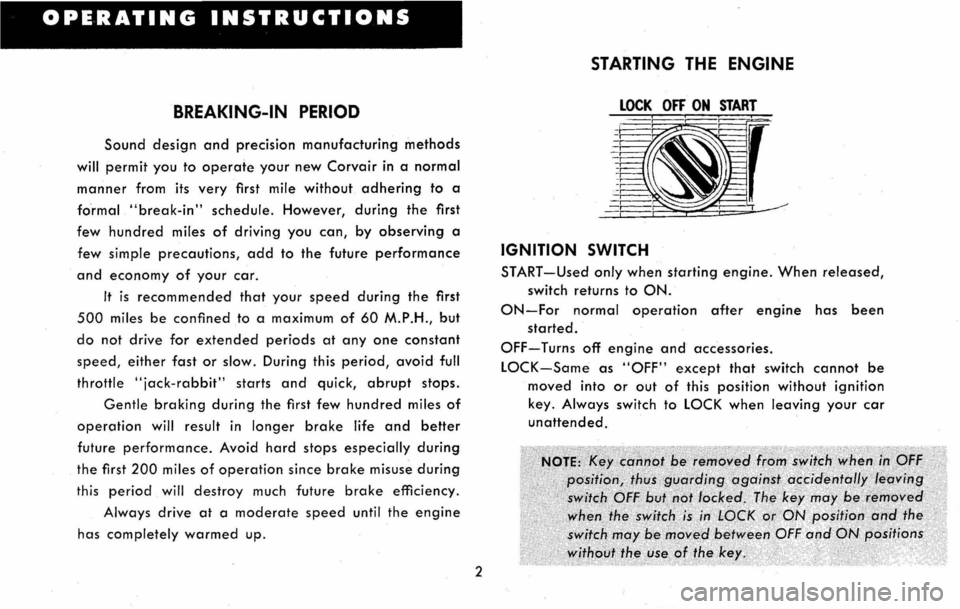
LOCK OFF ON START
IGNITION SWITCH
START-Used only when starting engine. When released,
switch returns to ON.
ON-For normal operation after engine has been
started.
OFF-Turns off engine and accessories.
LOCK-Same as "OFF" except that switch cannot be
moved into or out of this position without ignition
key. Always switch to LOCK when leaving your car
unattended.
Page 10 of 38
LIGHT SWITCH
LEFT TURN
INDICATOR BRIGHT BEAM INDICATOR RIGHT
TURN
INDICATOR
INSTRUMENTS
RADIO SPEAKER GLOVE BOX
LOCK
~~"-fHIf--RADIO
~~~~~~~&J CONTROLS
U:a~II---HEATER CONTROLS
INDICATOR REMAINING LlGHT~D DURING NORMAL OPERATION
TEMP-PRESS Indicator
PROBABLE CAUSE
Low Oil Pressure
Excessive Engi ne Oil Tem p.
GEN-FAN Indicator Generator Not Charging
Fan Not Operating
IMPORTANT:
ITEMS TO BE CHECKED
Engine Oil Level
Oil Level and Fan Belt
Generator
Fan Belt
If either of the indicators light during normal operation, STOP CAR IMMEDIATELY and turn off ignition. Check for a broken or slipping fan belt or low engine oil level. NEVER DRIVE CAR UNTIL BROKEN FAN BELT IS
REPLACED. Never drive car when "Temp-Press" indicator i s lighted. Car can be driven at slow speeds if only "GenFan" indicator is I ighted and fan belt is not broken, however, generator must be checked and serviced as soon as possi ble.
7
Page 11 of 38

CONTROLS
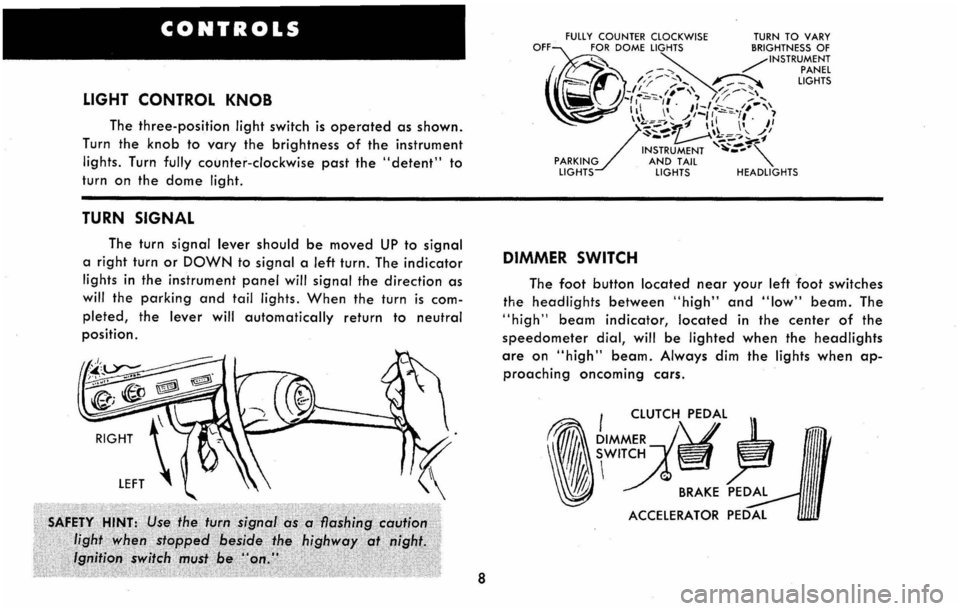
LIGHT CONTROL KNOB
The three-position light switch is operated as shown.
Turn the
knob to vary the brightness of the instrument
lights. Turn fully counter-clockwise past the "detent" to
turn on the dome light.
TURN SIGNAL
The turn signal lever should be moved UP to signal
a right turn or DOWN to signal a left turn. The indicator
lights in the instrument panel will signal the direction as
will the parking and tail lights. When the turn is com
pleted, the lever will automatically return to neutral
position.
8
FULLY COUNTER CLOCKWISE TURN TO VARY OFF@ORDOMELIGHTSBRIGHTNESSOF ~ ~ /INSTRUMENT ___ -." , PANEL
~~~
/,;----;; .... , ~ LIGHTS J -1'-I' ...... ' // ..-.... ~, /)~/,.~ .. ·,' ~ /1/ -' I II I" J/::::,'/·~"·I;'·""\ 1\1-~.P~ ~ \11 I" I'
/
-'-"'~\\ ,,/ ~ ... "., ~~-, ..... '1' ~~ .... "-'--INSTRUMENT ~-""-PARKING AND TAIL "-LIGHTS LIGHTS HEADLIGHTS
DIMMER SWITCH
The foot button located near your left foot switches
the
headlights between "high" and "low" beam. The
"high" beam indicator, located in the center of the
speedometer dial, will be lighted when the headlights
are on "high" beam. Always dim the lights when ap
proaching oncoming cars.
. I CLUTCH PEDAL
,,~~:U
Page 12 of 38

BRAKES
The brake pedal is of the pendant type, providing
ample footroom and extra leverage for easy safe stops.
PARKING BRAKE
Pull the parking brake lever to engage the brake. The
lever will remain in the applied position until released
by means of the "trigger" on the handle. To release,
pull the
handle toward the steering wheel, depress the
unlocking trigger and allow the handle to return to the
releas.ed position. Always engage the parking brake
when parked.
PARKING BRAKE APPLYING HANDLE
9
WINDSHIELD WIPERS AND WASHERS
The parallel acting wipers are operated by means
of the wiper control knob on the dash .
Pressing
once on the accessory windshield washer
button will cause the washer to squirt a measured
amount of water or other cleaning agent onto the glass,
and will at the same time turn on the wiper motor. You
will have to turn off the wiper manually at the switch .
Keep the
washer jar filled to a level 2 inches below
the top of the jar with a suitable solvent. G. M. Part No.
988299, Windshield Washer Anti-Freeze and Solvent,
is recommended for use in the Corvair windshield washer
jar. NEVER USE ANY SOLVENT OR ANTI-FREEZE SOLU
TION WHICH CONTAINS METHANOL Fill the washer
jar only % full to allow for expansion if the solution
freezes. In freezing weather, pre-warm the windshield
using the heater defrosters before using the washers.
Page 14 of 38
KEYS AND LOCKS
A single key operates all locks on your Corvair;
front doors, ignition, glove box and luggage compart
ment. Doors
may be locked from the inside by pushing
forward on the opening handle.
Record the serial number of your keys and then
remove the
knockout plug to prevent duplication by
unauthorized persons.
11
GLOVE BOX
The glove box may be locked and unlocked with
the ignition key.
CIGARETTE LIGHTER AND ASH TRAY
Press in on the optional cigarette lighter to heat.
When ready for use, it will .. pop" out. The ash tray
cover slides toward the front of the car to open. The
ash
receptacle lifts out for cleaning.
AIR VENTS
Additional summer ventilation is provided through
vent inlets in each side of the front passenger compart
ment. The vents may be opened or closed by means of
the control knobs beneath each end of the instrument
panel.
AIR INTAKE
INTO CAR
Page 15 of 38
FRONT SEAT ADJUSTMENT
The front seat may be adjusted forward and back
ward. Lift up on the locking lever at the left end of the
seat,
adjust the seat as desired and release the lever.
Your
Authorized Chevrolet Dealer can make additional
adiustments to tailor the front seat positioning to your
particular comfort requirements.
FOLDING REAR SEAT
The optional folding rear seat, in models so
equipped, may be used to convert the rear of the
12
Corvair into more than 10 cu. ft. of cargo space. To
operate:
• Puff on each end of the seatback to unlock.
• Swing seatback forward and down.
• Press down on front edge of seatback with one hand
while "snapping" the folding panel into place with
the other hand.
Replace the seatback in the same manner, after first
releasing the folding panel at the rear of the seat back.
Page 16 of 38
LUGGAGE COMPARTMENT
The front luggage compartment has a capacity of
more than 10 cu. ft. with the spare tire in place.
• To open the luggage compartment, insert the ignition
key and, holding the lid down to relieve the tension on
the
lock, turn fully clockwise and allow the counter
bdlanced lid to open.
• To close, slam the lid firmly.
A second luggage space is located behind the rear
seat, for parcels or luggage which would otherwise take
up seat or floor space.
13
GAS CAP
The gas cap is concealed beneath the spring loaded
door on the left front fender.
ENGINE COMPARTMENT
• To open: Push up the release while lifting the lid. Lift
the
lid .all the way up, then release.
• To close: Lift up on lid, unlock the support arm catch
lock, then lower the lid carefully. Slam firmly to assure
that the lid lock mechanism is engaged.
For proper engine cooling keep the engine compart
ment lid vents free of ice, snow or leaves.
Page 22 of 38

the car for lowering the car or removing the wheel nuts.
When jacking the car, set the hand brake, block diagonal
wheel, and, if changing wheels, remove the hub cap and
loosen wheel nuts. Place the jack under the side of the
car located as shown.
Spare Tire
The tire is mounted in the luggage compartment.
Switching Tires
Switching tires every 5000 miles as shown will pro
mote more even tire wear and longer tire life. After
switch ing tires readjust tire pressure to correspond to
table on page 18.
CAUTION: Never attempt to raise the Corvair by
placing any kind of jack under the bumper.
FRONT
JACKING CAR SWITCHING TIRES 19
CHASSIS LUBRICATION
------
.-
Your Corvair deserves the best care you can give it.
Regular maintenance will guarantee you more, depend
able, trouble free miles of enjoyable driving. The
following pages are devoted to maintenance and lubri
cation items which should be performed at regular inter
vals
. Each item is numbered to correspond to the items
shown on the Lubrication Diagram on page 26. The
Lubrication and Maintenance Guide on pages 24 and
25 provides an easy way of checking on necessary
maintenance at any given mileage or seasonal interval.