1900 MITSUBISHI DIAMANTE tire size
[x] Cancel search: tire sizePage 2 of 408
.
1-2 GENERALINFORMATIONAND MAINTENANCE
Chitton’s Total Car Care manual for the 199M10
Mitsubishi Mirage, Galant and Diamante is intended
to help you learn more about the inner workings of
your vehicle while saving you money on its upkeep
and operation.
The beginning of the book will likely be referred to
the most, since that is where you will find information
for maintenance and tune-up. The other sections deal
with the more complex systems of your vehicle. Oper-
ating systems from engine through brakes are cov-
ered to the extent that the average do-it-yourselfer be-
comes mechanically involved. This book will not
explain such things as rebuilding a differential for the
simple reason that the expertise required and the in-
vestment in special tools make this task uneconomi-
cal. It will, however, give you detailed instructions to
help you change your own brake pads and shoes, re-
place spark plugs, and perform many more jobs that
can save you money, give you personal satisfaction
and help you avoid expensive problems.
A secondary purpose of this book is a reference for
owners who want to understand their vehicle and/or
their mechanics better. In this case, no tools at all are
required.
Before removing any bolts, read through the entire
procedure. This will give you the overall view of what
tools and supplies will be required. There is nothing
more frustrating than having to walk to the bus stop
on Monday morning because you were short one bolt
on Sunday afternoon. So read ahead and plan ahead.
Each operation should be approached logically and
all procedures thoroughly understood before attempt-
ing any work.
All sections contain adjustments, maintenance, re-
moval and installation procedures, and in some cases,
repair or overhaul procedures. When repair is not con-
sidered practical, we tell you how to remove the part
and then how to install the new or rebuilt replacement.
In this way, you at least save labor costs. “Backyard”
repair of some components is just not practical.
Many procedures in this book require you to “label
and disconnect. . ” a group of lines, hoses or wires.
Don’t be lulled into thinking you can remember where
everything goes-you won’t. If you hook up vacuum
or fuel lines incorrectly, the vehicle may run poorly, if
at all. If you hook up electrical wiring incorrectly, you
may instantly learn a very expensive lesson.
You don’t need to know the official or engineering
name for each hose or line. A piece of masking tape
on the hose and a piece on its fitting will allow you to
assign your own label such as the letter A or a short name. As long as you remember your own code, the
lines can be reconnected by matching similar letters
or names. Do remember that tape will dissolve in
gasolrne or other fluids; if a component is to be
washed or cleaned, use another method of identifica-
tion. A permanent felt-tipped marker or a metal scribe
can be very handy for marking metal parts. Remove
any tape or paper labels after assembly.
It’s necessary to mention the difference between
maintenance and repair Maintenance includes rou-
tine inspections, adjustments, and replacement of
parts which show signs of normal wear Maintenance
compensates for wear or deterioration. Repair implies
that something has broken or is not working. A need
for repair is often caused by lack of maintenance. Ex-
ample, draining and refilling the automatic transaxle
fluid is maintenance recommended by the manufac-
turer at specific mileage intervals. Failure to do this
can shorten the life of the transmission/transaxle, re-
quiring very expensive repairs. While no maintenance
program can prevent items from breaking or wearing
out, a general rule can be stated: MAINTENANCE IS
CHEAPER THAN REPAIR.
Two basic mechanrc’s rules should be mentioned
here. First, whenever the left side of the vehicle or en-
gine is referred to, it is meant to specify the drivers
side. Conversely, the right side of the vehicle means
the passengers side. Second, screws and bolts are
removed by turning counterclockwise, and tightened
by turning clockwrse unless specifically noted.
Safety is always the most important rule. Con-
stantly be aware of the dangers involved in working
on an automobile and take the proper precautions.
See the informatron in this section regarding SER-
VICING YOUR VEHICLE SAFELY and the SAFETY
NOTICE on the acknowledgment page.
Pay attention to the instructions provided. There
are 3 common mistakes in mechanical work:
1. Incorrect order of assembly, disassembly or
adjustment. When taking something apart or putting
it together, performing steps in the wrong order usu-
ally just costs you extra time; however, it CAN break
something. Read the entire procedure before begin-
ning disassembly. Perform everything in the order in
which the instructions say you should, even if you
can’t immedrately see a reason for it. When you’re
taking apart something that is very intricate, you
might want to draw a picture of how it looks when as-
sembled at one point in order to make sure you get everything back in its proper position. We will supply
exploded views whenever possible. When making
adjustments, perform them in the proper order. One
adjustment possibly will affect another.
2. Overtorquing (or undertorquing). While it is
more common for overtorquing to cause damage,
undertorquing may allow a fastener to vibrate loose
causing serious damage. Especially when dealing
with aluminum parts, pay attention to torque specifi-
cations and utilize a torque wrench in assembly. If a
torque figure is not available, remember that if you
are using the right tool to perform the job, you will
probably not have to strain yourself to get a fastener
tight enough. The pitch of most threads is so slight
that the tension you put on the wrench will be multi-
plied many times in actual force on what you are
tightening. A good example of how critical torque is
can be seen in the case of spark plug installation, es-
pecially where you are putting the plug into an alu-
minum cylinder head. Too little torque can fail to
crush the gasket, causing leakage of combustion
gases and consequent overheating of the plug and
engine parts. Too much torque can damage the
threads or distort the plug, changing the spark gap.
There are many commercial products available for
ensuring that fasteners won’t come loose, even if they
are not torqued just right (a very common brand is
Loctite? If you’re worried
about getting something
together tight enough to hold, but loose enough to
avoid mechanical damage during assembly, one of
these products might offer substantial insurance. Be-
fore choosing a threadlocking compound, read the
label on the package and make sure the product is
compatible with the materials, fluids, etc. involved.
3. Crossthreading. This occurs when a part such
as a bolt is screwed into a nut or casting at the wrong
angle and forced. Crossthreading is more likely to
occur if access is difficult. It helps to clean and lubri-
cate fasteners, then to start threading the bolt, spark
plug, etc. with your fingers If you encounter resis-
tance, unscrew the part and start over again at a dif-
ferent angle until it can be inserted and turned several
times without much effort. Keep in mind that many
parts, especially spark plugs, have tapered threads,
so that gentle turning will automatically bring the part
you’re threading to the proper angle. Don’t put a
wrench on the part until its been tightened a couple
of turns by hand. If you suddenly encounter resis-
tance, and the part has not seated fully, don’t force it.
Pull it back out to make sure it’s clean and threading
properly.
Be sure to take your time and be patient, and al-
ways plan ahead. Allow yourself ample time to per-
form repairs and maintenance You may find main-
taining your car a satisfying and enjoyable
experience.
b See Figures 1 thru 15
Naturally, without the proper tools and equipment
it is impossible to properly service your vehicle. It
would also be virtually impossible
to catalog every
tool that you would need to perform all of the opera-
tions in this book. Of course, It would be unwise for
the amateur to rush out and buy an expensive set of
tools on the theory that he/she may need one or more
of them at some time, The best approach is to proceed slowly, gathering savings will
be far outweighed by frustration and
a good quality set of those tools that are used most mangled knuckles.
frequently Don’t be misled by the low cost of bargain Begin accumulating those tools that are used most
tools. It is far better to spend a little more for better frequently: those associated with routine maintenance
quality. Forged wrenches, 6 or 12-point sockets and and tune-up. In addition to the normal assortment of
fine tooth ratchets are by far preferable to their less screwdrivers and pliers, you should have the follow-
expensive counterparts. As any good mechanic can ing tools:
tell you, there are few worse experiences than trying
l Wrenches/sockets and combination open
to work on a vehicle with bad tools. Your monetary end/box end wrenches in sizes from %-% in. or
Page 23 of 408
l-24 GENERALINFORMATIONAND MAINTENANCE
b%slZl2 Fig. 97 A variety of tools and gauges are
needed for spark plug service tm2903 Fig. 98 Checking the spark plug @au with a tccs2904 feeler gauge. - Fig. 99 Adjusting the spark plug gap
ig. 100 If the standard plug Is in good con-
ftlon, the electrode may be filed flat- the two ends. Take the length and multiply it by 6,000
to achieve the maximum resistance allowable in each
wire, resistance should not exceed this value. If resis-
tance does exceed this value, replace the wire.
*Whenever the high tension wires are re- ’
moved from the plugs, coil, or distributor,
silicone grease must be applied to the boot
before reconnection. Coat the entire Interior
surface with a suitable silicone grease.
REMOVAL &INSTALLATION
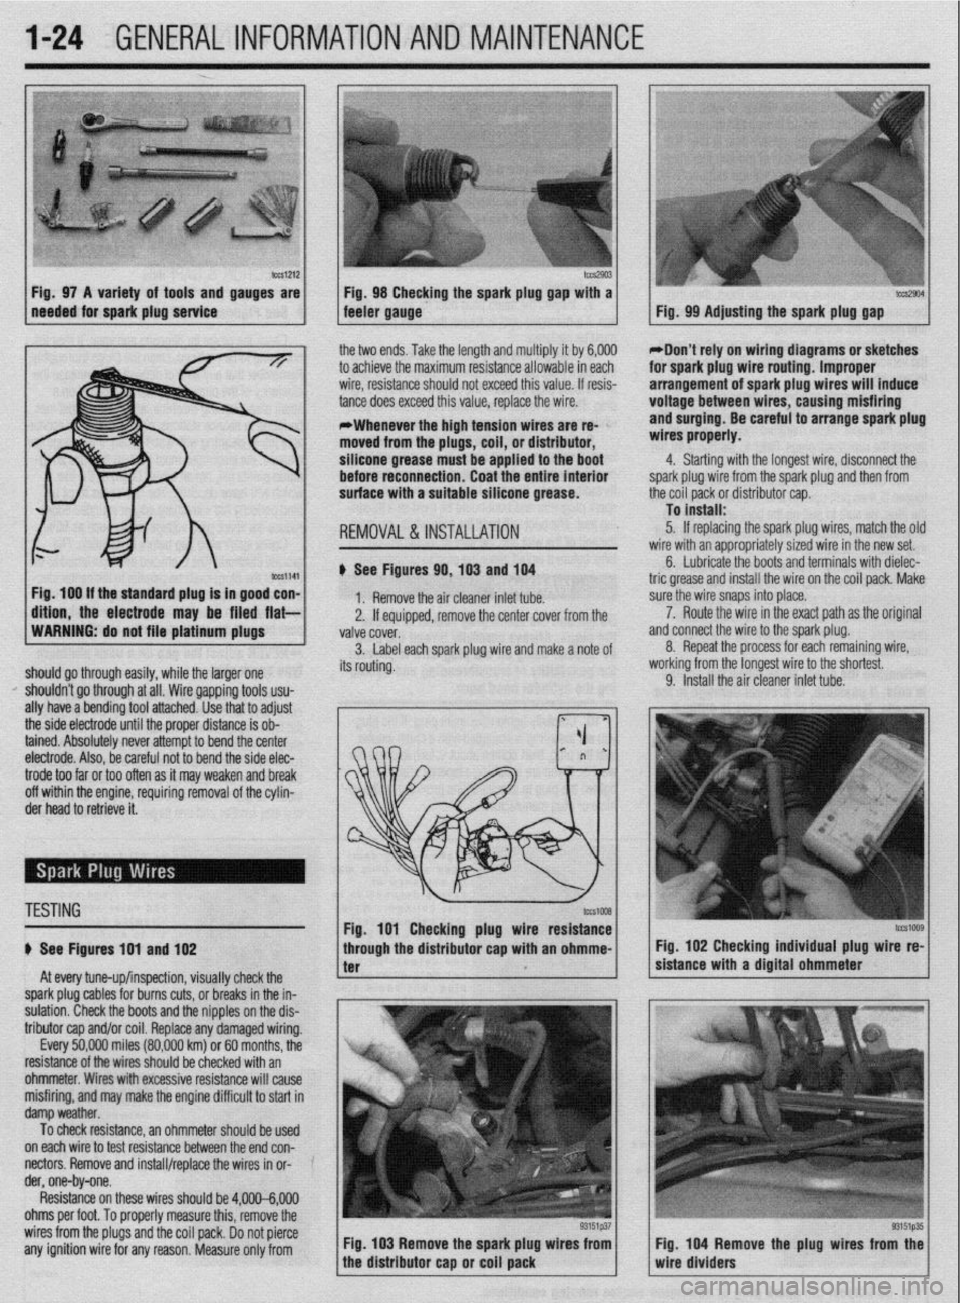
# See Figures 90,103 and 104
1. Remove the air cleaner inlet tube.
2. If eouiooed, remove the center cover from the
WARNING: do not file platinum plugs
valve covei.
3. Label each spark plug wire and make a note of
should go through easily, while the larger one its routing.
I’ shouldn’t go through at all. Wire gapping tools usu-
ally have a bending tool attached. Use that to adjust
the side electrode until the proper distance is ob-
tained. Absolutely never attempt to bend the center
electrode. Also, be careful not to bend the side elec- *Don’t rely on wiring diagrams or sketches
for spark plug wire routing. Improper
arrangement of spark plug wires will induce
voltage between wires, causing misfiring
and surging. Be careful to arrange spark plug
wires properly.
4. Starting with the longest wire, disconnect the
spark plug wire from the spark plug and then from
the coil pack or distributor cap.
To install:
5. If replacing the spark plug wires, match the olc
wire with an appropriately sized wire in the new set.
6. Lubricate the boots and terminals with dielec-
tric grease and install the wire on the coil pack. Make
sure the wire snaps into place.
a 7. Route the wire in the exact path as the original
nd connect the wire to the spark plug.
8. Repeat the process for each remaining wire,
iorking from the longest wire to the shortest.
9. Install the air cleaner inlet tube.
trode too far or too often as it may weaken and break
off within the engine, requiring removal of the cylin-
der head to retrieve it.
TESTING
# See Figures 191 and 102
At every tune-up/inspection, visually check the
spark plug cables for burns cuts, or breaks in the in-
sulation. Check the boots and the nipples on the dis-
tributor cap and/or coil. Replace any damaged wiring.
Every 50,000 miles (80,000 km) or 60 months, the
resistance of the wires should be checked with an
ohmmeter. Wires with excessive resistance will cause
misfiring, and may make the engine difficult to start in
damp weather.
To check resistance, an ohmmeter should be used ’
on each wire to test resistance between the end con-
nectors. Remove and install/replace the wires in or- ’
der, one-by-one.
Resistance on these wires should be 4,000-6,000
ohms per foot. To properly measure this, remove the
wires from the plugs and the coil pack. Do not pierce
any ignition wire for any reason. Measure only from Fig. 103 Remove the spark plug wires from
tcG1009 Fig. 102 Checking individual plug wire re-
sistance with a digital ohmmeter
Fig. 104 Remove the plug wires from the
wire dividers
Page 30 of 408
GENERALINFORMATIONAND MAlNTENANdE 1-31
When rotating “unidirectional tires,” make sure
that they always roll in the same direction. This
means that a tire used on the left side of the vehicle
must not be switched to the right side and vice-versa.
Such tires should only be rotated front-to-rear or
rear-to-front, while always remaining on the same
side of the vehicle. These tires are marked on the
sidewall as to the direction of rotation; observe the
marks when reinstalling the tire(s).
Some styled or “mag” wheels may have different
offsets front to rear. In these cases, the rear wheels
must not be used up front and vice-versa. Further-
more, if these wheels are equipped with unidirectional
tires, they cannot be rotated unless the tire is re-
mounted for the proper direction of rotation.
*The compact or space-saver spare is
strictly for emergency use. it must never be
included in the tire rotation or placed on the
vehicle for everyday use. check the installed tire for any sign of interference
with the body or suspension while the vehicle is stop-
ping, turning sharply or heavily loaded.
Snow Tires
Good radial tires can produce a big advantage in
slippery weather, but in snow, a street radial tire does
not have sufficient tread to provide traction and con-
trol. The small grooves of a street tire quickly pack
with snow and the tire behaves like a billiard ball on a
marble floor, The more open, chunky tread of a snow
tire will self-clean as the tire turns, providing much
better grip on snowy surfaces.
To satisfy municipalities requiring snow tires dur-
ing weather emergencies, most snow tires carry either
an M + S designation after the tire size stamped on
the sidewall, or the designation “all-season.” In gen-
eral, no change in tire size is necessary when buying
snow tires.
Most manufacturers stronqlv recommend the use styled wheels, see if inexpensive steel
wheels are available, Although the look of
the vehicle will change, the expensive
wheels will be protected from salt, curb hits
and pothole damage.
TIRESTORAGE
If they are mounted on wheels, store the tires at
proper inflation pressure. All tires should be kept in a
cool, dry place. If they are stored in the garage or
basement, do not let them stand on a concrete floor;
set them on strips of wood, a mat or a large stack of
newspaper. Keeping them away from direct moisture
is of paramount importance. Tires should not be
stored upright, but in a flat position.
INFLATION & INSPECTION
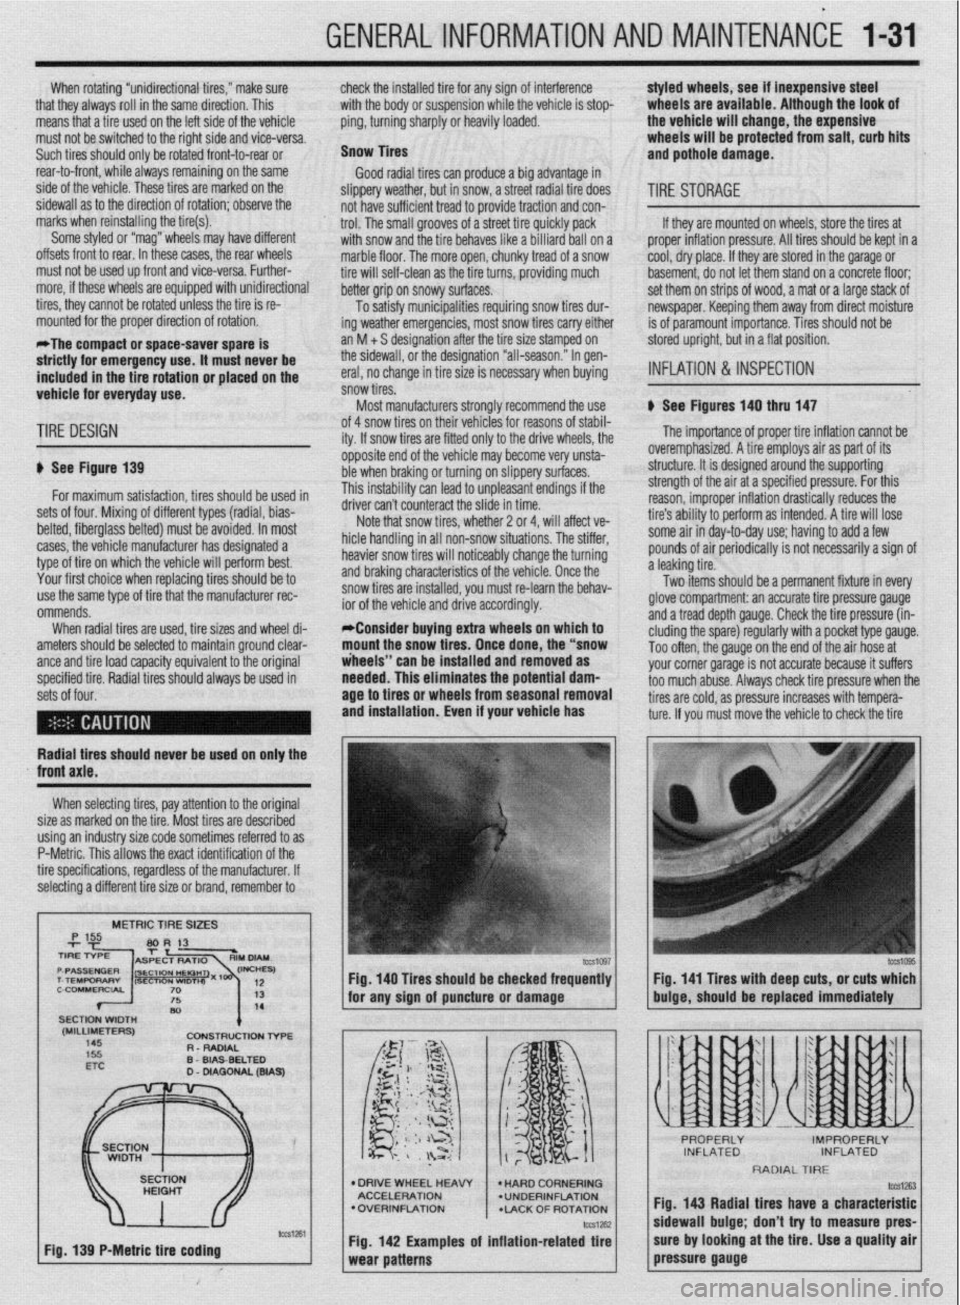
b See Figures 140 thru 147
TIRE DESIGN
p See Figure 139
for maximum satisfaction, tires should be used in
sets of four. Mixing of different types (radial, bias-
belted, fiberglass belted) must be avoided. In most
cases, the vehicle manufacturer has designated a
type of tire on which the vehicle will perform best.
Your first choice when replacing tires should be to
use the same type of tire that the manufacturer rec-
ommends.
When radial tires are used, tire sizes and wheel di-
ameters should be selected to maintain ground clear-
ante and tire load caoacitv eauivalent to the oriainal
specified tire. Radial tiresshould always be used in
sets of four. of 4 snow tires on their
lehicies for reasons of stabil-
ity. If snow tires are fitter
1 only to the drive wheels, the
opposite end of the vehil cle may become very unsta-
ble when braking or turn
ring on slippery surfaces.
This instability can lead to unpleasant endings if the
A*:,,“- r-..l, ^_.. ..& ^_^^, &I.
UIIVU MII I LUUII~~MLL iue slide in time.
Note that snow tires, whether 2 or 4, will affect ve-
hicle handling in all non-snow situations. The stiffer,
heavier snow tires will noticeably change the turning
and braking characteristics of the vehicle. Once the
snow tires are installed, you must re-learn the behav-
ior of the vehicle and drive accordingly.
*Consider buying extra wheels on which to
mount the snow tires. Once done, the “snow
iheeis” can be installed and removed as
needed. This eliminates the potential
dam- age to tires or wheels from seasonal removal
and installation. Even if your vehicle has
lb The importance of proper tire inflation cannot be
overemphasized. A tire employs air as part of its
structure. It is designed around the supporting
strength of the air at a specified pressure. For this
reason, improper inflation drastically reduces the
tire’s ability to perform as intended. A tire will lose
some air in day-to-day use; having to add a few
pounds of air periodically is not necessarily a sign of
a leaking tire.
Two items should be a permanent fixture in every
glove compartment: an accurate tire pressure gauge
and a tread depth gauge. Check the tire pressure (in-
eluding the spare) regularly with a pocket type gauge.
Too often, the gauge on the end of the air hose at
vnr rr corner narane is not accurate because it suffers
~rs check tire oressure when the
Radial tires should never be used on only the
XI I._.
‘-’ --“‘“’ J s too much abuse. Alwa!
tires are cold, as pressure increases with tempera-
ture. If you must move the vehicle to check the tire
front axle.
When selecting tires, pay attention to the original
size as marked on the tire. Most tires are described
using an industry size code sometimes referred to as
P-Metric. This allows the exact identification of the
tire specifications, regardless of the manufacturer. If
selecting a different tire size or brand, remember to
METRIC TIRE SIZES
(MILLIMETERS)
145 CDNStRUCtlDN l-6-E
R - RADIAL
D
WA9
Fig. 139 P-Metric tire coding Fig. 140 Tires should be checked frequently
I I Fig. 141 Tires with deep cuts, or cuts which
for any sion of auncture or damaoe
buioe, should be replaced immediately
l DRIVE WHEEL HEAW
ACCELERATION
l OVERINFLATION
*LACK OF ROTATION
Fig. 142 Examples of inflation-related tire
RADIAL TIRE
fig. 143 Radial tires have a characteristic
sidewall bulge; don’t try to measure pres-
sure by looking at the tire. Use a quality air
pressure gauge
Page 127 of 408
3-66 ENGINEANDENGINEOVERHAUL
should be performed on all of the components, but
just because you don’t see a crack does not mean it
is not there. Some more reliable methods for inspect-
ing for cracks include Magnaflux? a magnetic
process or Zyglo@‘, a dye penetrant. Magnaflux@ is
used only on ferrous metal (cast iron). Zyglo@ uses a
spray on fluorescent mixture along with a black light
to reveal the cracks. It is strongly recommended to
have your engine block checked professionally for
cracks, especially if the engine was known to have
overheated and/or leaked or consumed coolant. Con-
tact a local shop for availability and pricing of these
services.
Engine Block
ENGINE BLOCK BEARING ALIGNMENT
Remove the main bearing caps and, if still in:
stalled, the main bearing inserts. Inspect all of the
main bearing saddles and caps for damage, burrs or
high spots. If damage is found, and it is caused from
a spun main bearing, the block will need to be align-
bored or, if severe enough, replacement. Any burrs or
high spots should be carefully removed with a metal
file.
Place a straightedge on the bearing saddles, in the
engine block, along the centerline of the crankshaft. If
any clearance exists between the straightedge and the
saddles, the block must be align-bored.
Align-boring consists of machining the main
bearing saddles and caps by means of a flycutter that
runs through the bearing saddles.
DECK FLATNESS
The top of the engine block where the cylinder
head mounts is called the deck. Insure that the deck
surface is clean of dirt, carbon deposits and old gas-
ket material. Place a straightedge across the surface
of the deck along its centerline and, using feeler
gauges, check the clearance along several points. Re-
peat the checking procedure with the straightedge
placed along both diagonals of the deck surface. If
the reading exceeds 0.003 in. (0.076mm) within a 6.0
in. (152cm) span, or 0.006 in. (0.152mm) over the
total length of the deck, it must be machined.
CYLINDER BORES
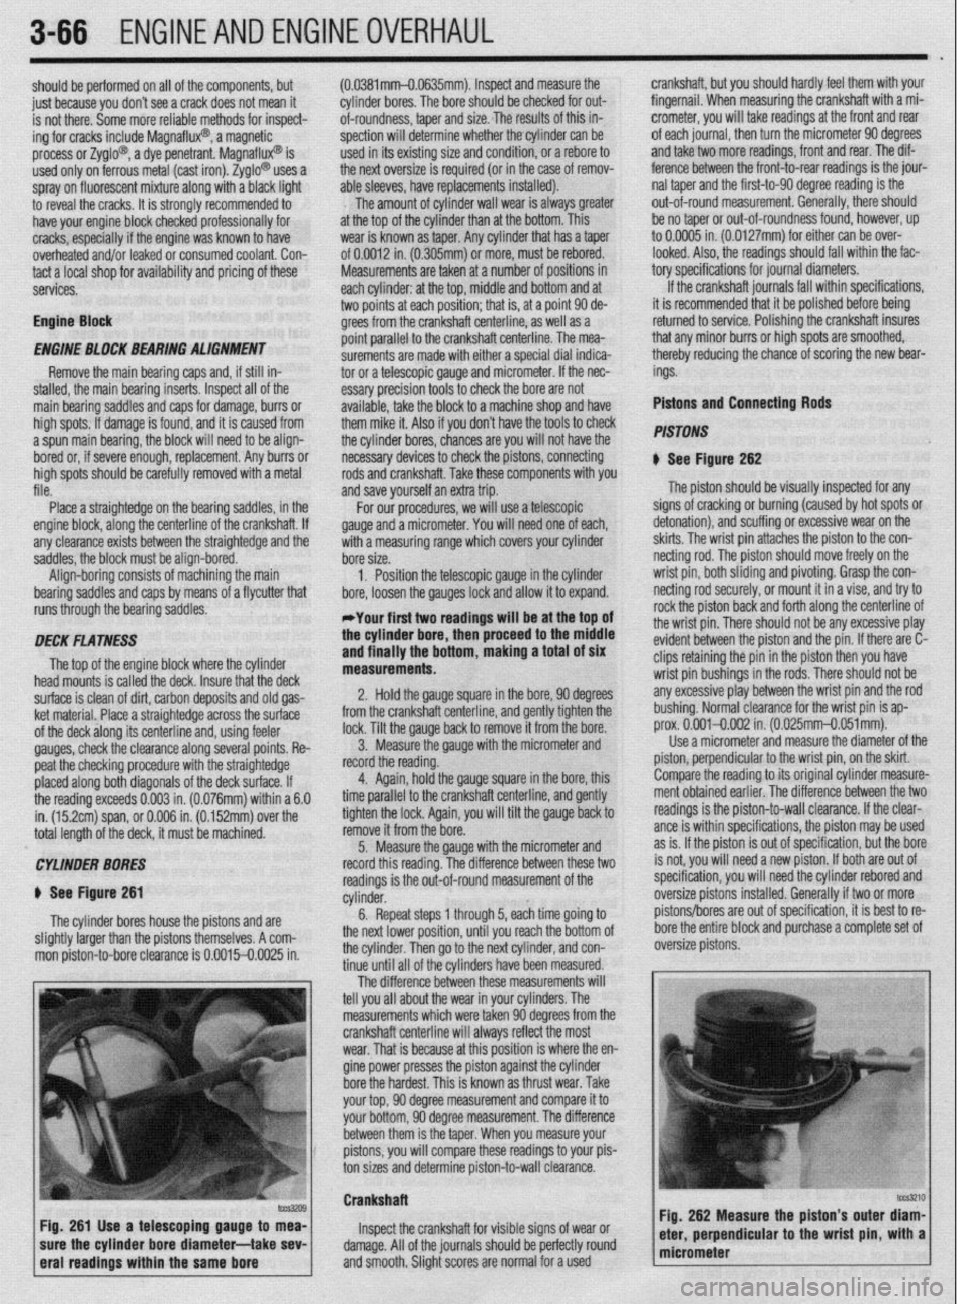
$ See Figure 261
The cylinder bores house the pistons and are
slightly larger than the pistons themselves. A com-
mon piston-to-bore clearance is 0.0015-0.0025 in. (0.0381mm-O.0635mm). Inspect and measure the
cylinder bores. The bore should be checked for out-
of-roundness, taper and size. The results of this in-
spection will determine whether thecylinder can be
used in its existing size and condition, or a rebore to
the next oversize is required (or in the case of remov-
able sleeves, have replacements installed).
The amount of cylinder wall wear is always greater
at the top of the cylinder than at the bottom. This
wear is known as taper. Any cylinder that has a taper
of 0.0012 in. (0.305mm) or more, must be rebored.
Measurements are taken at a number of positions in
each cylinder: at the top, middle and bottom and at
two points at each position; that is, at a point 90 de-
grees from the crankshaft centerline, as well as a
point parallel to the crankshaft centerline. The mea-
surements are made with either a special dial indica-
tor or a telescopic gauge and micrometer. If the nec-
essary precision tools to check the bore are not
available, take the block to a machine shop and have
them mike it. Also if you don’t have the tools to check
the cylinder bores, chances are you will not have the
necessary devices to check the pistons, connecting
rods and crankshaft. Take these components with you
and save yourself an extra trip.
For our procedures, we will use a telescopic
gauge and a micrometer. You will need one of each,’
with a measuring range which covers your cylinder
bore size.
1, Position the telescopic gauge in the cylinder
bore, loosen the gauges lock and allow it to expand.
*Your first two readings will be at the top of
the cylinder bore, then proceed to the middle
and finally the bottom, making a total of six
measurements.
2. Hold the gauge square in the bore, 90 degrees
from the crankshaft centerline, and gently tighten the
lock. Tilt the gauge back to remove it from the bore.
3. Measure the gauge with the micrometer and
record the reading.
4. Again, hold the gauge square in the bore, this
time parallel to the crankshaft centerline, and gently
tighten the lock. Again, you will tilt the gauge back to
remove it from the bore.
5. Measure the gauge with the micrometer and
record this reading. The difference between these two
readings is the out-of-round measurement of the
cylinder.
6. Repeat steps 1 through 5, each time going to
the next lower position, until you reach the bottom of
the cylinder. Then go to the next cylinder, and con-
tinue until all of the cylinders have been measured.
The difference between these measurements will
tell you all about the wear in your cylinders. The
measurements which were taken 90 degrees from the
crankshaft centerline will always reflect the most
wear.,That is because at this position is where the en-
gine power presses the piston against the cylinder
bore the hardest. This is known as thrust wear. Take
your top, 90 degree measurement and compare it to
your bottom, 90 degree measurement. The difference
between them is the taper. When you measure your
pistons, you will compare these readings to your pis-
ton sizes and determine piston-to-wall clearance. crankshaft, but you should hardly feel them with your
fingernail. When measuring the crankshaft with a mi-
crometer, you will take readings at the front and rear
of each journal, then turn the micrometer 90 degrees
and take two more readings, front and rear. The dif-
ference between the front-to-rear readings is the jour-
nal taper and the first-to-90 degree reading is the
out-of-round measurement. Generally, there should
be no taper or out-of-roundness found, however, up
to 0.0005 in. (0.0127mm) for either can be over-
looked. Also, the readings should fall within the fac-
tory specifications for journal diameters.
If the crankshaft journals fall within specifications,
it is recommended that it be polished before being
returned to service. Polishing the crankshaft insures
that any minor burrs or high spots are smoothed,
thereby reducing the chance of scoring the new bear-
ings.
Pistons and Connecting Rods
PISTONS
N See Figure 262
The piston should be visually inspected for any
signs of cracking or burning (caused by hot spots or
detonation), and scuffing or excessive wear on the
skirts. The wrist pin attaches the piston to the con-
netting rod. The piston should move freely on the
wrist pin, both sliding and pivoting. Grasp the con-
netting rod securely, or mount it in a vise, and try to
rock the piston back and forth along the centerline of
the wrist pin. There should not be any excessive play
evident between the piston and the pin. If there are C-
clips retaining the pin in the piston then you have
wrist pin bushings in the rods. There should not be
any excessive play between the wrist pin and the rod
bushing. Normal clearance for the wrist pin is ap-
prox. 0.001-0.002 in. (0.025mm-0.051mm).
Use a micrometer and measure the diameter of the
piston, perpendicular to the wrist pin, on the skirt.
Compare the reading to its original cylinder measure-
ment obtained earlier. The difference between the two
readings is the piston-to-wall clearance. If the clear-
ante is within specifications, the piston may be used
as is. If the piston is out of specification, but the bore
is not, you will need a new piston. If both are out of
specification, you will need the cylinder rebored and
oversize pistons installed. Generally if two or more
pistons/bores are out of specification, it is best to re-
bore the entire block and purchase a complete set of
oversize pistons.
Crankshaft
Inspect the crankshaft for visible signs of wear or
damage. All of the journals should be perfectly round
and smooth. Slight scores are normal for a used
Page 128 of 408
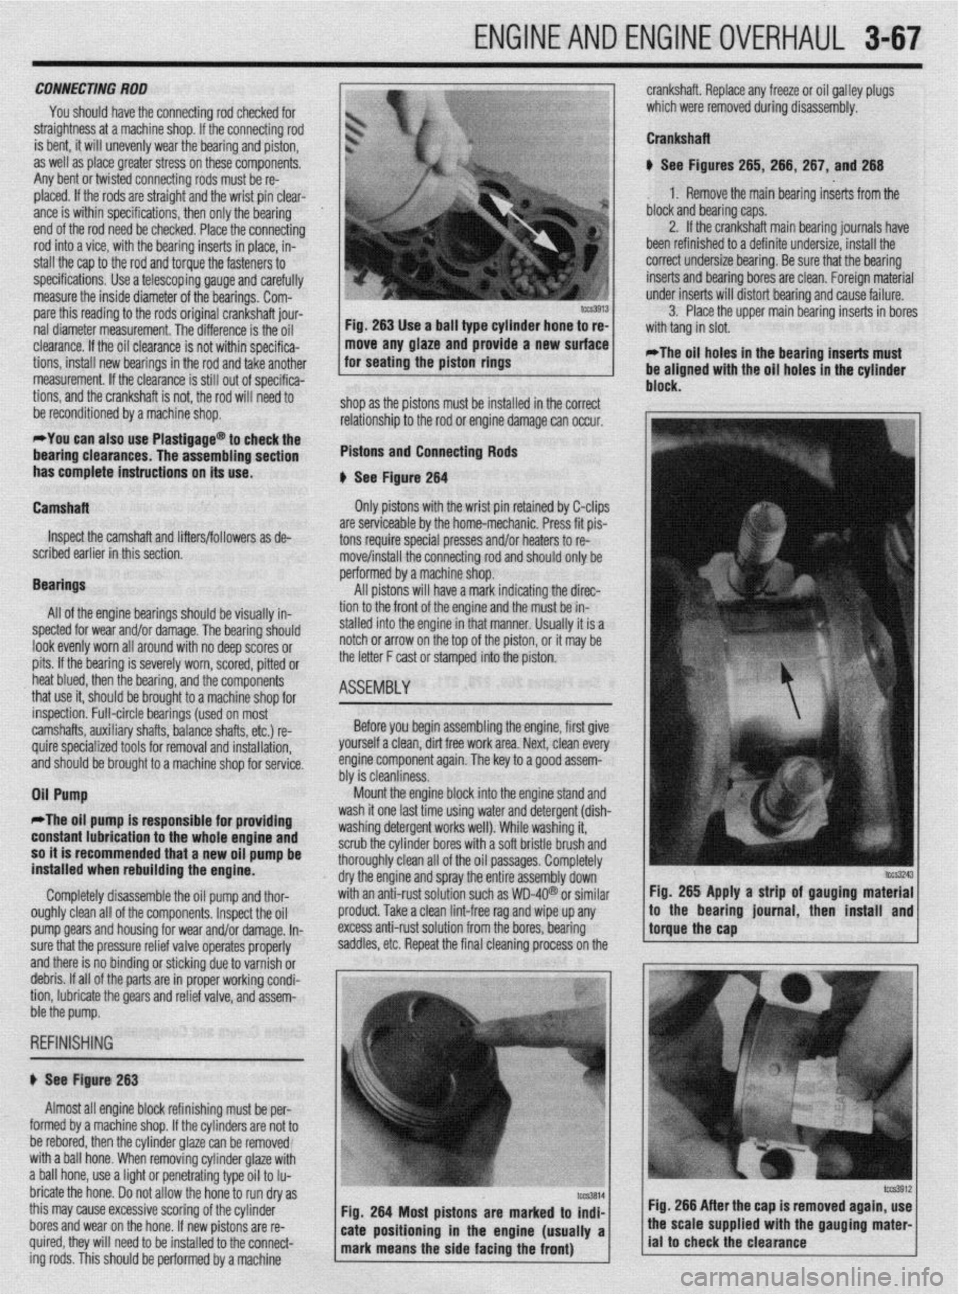
ENGINEANDENGINEOVERHAUL 3-67
CONNECTING ROD
You should have the connecting rod checked for
StraiQhtness at a machine shop. If the connecting rod
is bent, it will unevenly wear the bearing and piston,
as well as place greater stress on these components.
Any bent or twisted connecting rods must be re-
placed. If the rods are straight and the wrist pin clear-
ance is within specifications, then only the bearing
end of the rod need be checked. Place the connecting
rod into a vice, with the bearing inserts in place, in-
stall the cap to the rod and torque the fasteners to
specifications. Use a telescoping gauge and carefully
measure the inside diameter of the bearings. Com-
pare this reading to the rods original crankshaft jour-
nal diameter measurement. The difference is the oil
clearance. If the oil clearance is not within specifica-
tions, install new bearings in the rod and take another
.
specifica- L
need to
shop as the pistons must be installed in the con measurement. it the Clearance is still out of :
tions, and the crankshaft is not, the rod will
be reconditioned by a machine shop.
*You can also use Plastigage’
@to check the
bearing clearances. The assen- . ...= - _______
Mm sectinn has complete instructions on its use.
Camshaft
Inspect the camshaft and lifters/followers as de
scribed earlier in this section.
Bearings
All of the enaine bearinos should be visuallv in-
~~~ I~ .- - -- ..-_-..,
spected for we; and/or damage. The bearing should
look evenly worn all around with no deep scores or
pits. If the bearing is severely worn, scored, pitted or
heat blued, then the bearing, and the components
that use it, should be brought to a machine shop for
block. ,ect
relationshipto the rod or engine damage can occur,
Pistons and Connecting Rods
I
b See Fiaute 264 --- --*------
Only pistons with the wrist pin retained by C-clips
are serviceable by the home-mechanic. Press fit pis-
tons require special presses and/or heaters to re- I”
rr
rove/install the connecting rod and should only be
PC srformed by a machine shop.
All pistons will have a mark indicating the direc-
tir 9n to the front of the engine and the must be in-
stalled into the engine in that manner. Usually it is a
notch or arrow on the top of the piston, or it may be
the letter F cast or stamped into the piston.
ASEtiBlY
1
crankshaft. Replace any freeze or oil galley plugs
which were removed during disassembly.
Crankshaft
u See Figures 265, 266, 267, and 266
1. Remove the main bearing inserts from the
block and bearing caps.
2. If the crankshaft main bearing journals have
been refinished to a definite undersize, install the
correct undersize bearina. Be sure that the bearina
inserts and bearing bores are clean. Foreign mateiial
under inserts will distort bearinq and cause failure.
3. Place the upper main bearing inserts in bores
*The oil holes in the bearing inserts must
be aligned with the oil holes in the cylinder
. . .
inspection. Full-circle bearings (used on most
camshafts, auxiliary shafts, balance shafts, etc.) re-
quire specialized tools for removal and installation, ’
and should be brought to a machine shop for service.
Oil Pump Before you begin assembling the engine, first give
yourself a clean, dirt free work area. Next, clean every
engine component again. The key to a QOOd assem-
hhr io da~nlinmw “‘I Ia ~rGiOllll,lc7.Ja. Mount the engine block into the engine stand and
II
*The oil pump is responsible fo
r providing wasn It one last time usmg water and detergent (dish-
unrhinn rldarnant ~nrirc well), While washing it, with a soft bristle brush and
: oil oassaoes. Comoletelv constant lubrication to the whole engine and 1ILl.M 0, ,y “GSGl ycx II ““1 n
so it is recommended that a new oil pump be scrub the cylinder bore:
installed when rebuilding the engine. thoroughly clean all oft
dry the engine and spra
Completely disassemble the oil pump and thor- with an anti-rust solutio
oughly clean all of the components. Inspect the oil
pro
pump Qears and housing for wear and/or damage. In- exe
sure that the pressure relief valve operates properly sac
and there is no binding or sticking due to varnish or
debris. If all of the parts are in proper working condi-
tion, lubricate the gears and relief valve, and assem-
r
j ht
y the entire assembly down’
in such as WD-4Q@ or similar Fig. 265 Apply a strip of gauging material
Iduct. Take a clean lint-free rag and wipe up any
less anti-rust solution from the bores, bearing
Idles, etc. Repeat the final cleaning process on the !torguethe~~p * ,’ / to the bearmg lournal, then mstall and
ble the pump.
REFINISHING
# See Figure 263
Almost all engine block refinishing must be per-
I
IUIIII~U uy a macnme snap. ir me cynnoers are nor ro
be rebored, then the cylinder glaze can be removed
with a ball hone. When removing cylinder glaze with
a ball hone, use a light or penetrating type oil to Iu-
bricate the hone. Do not allow the hone to run dry as
this may cause excessive scoring of the cylinder
bores and wear on the hone. If new pistons are re-
quired, they will need to be installed to the connect-
ing rods. This should be oerformed bv a machine Fig. 266 After the cap is removed again, use
Page 129 of 408
.
3-68 ENGINEANDENGINEOVERHAUL
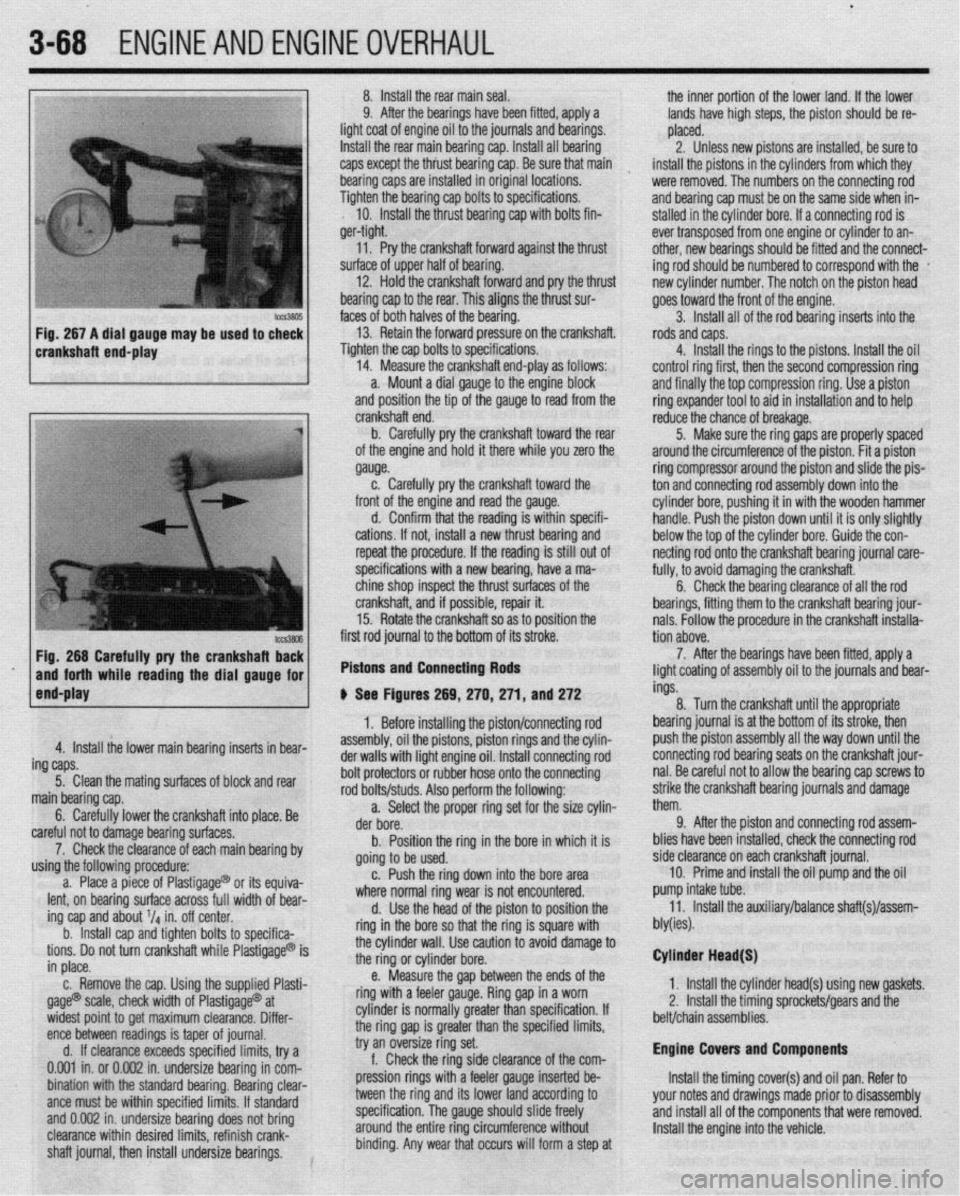
crankshaft end-play 8. Install the rear main seal.
the inner portion of the lower land. If the lower
9. After the bearings have been fitted, apply a
lands have high steps, the piston should be re-
light coat of engine oil to the journals and bearings.
placed.
Install the rear main bearing cap. Install all bearing
2. Unless new pistons are installed, be sure to
caps except the thiust bearing cap. Be sure that main
I
install the pistons in the cylinders from which they
bearing caps are installed in original locations.
were removed. The numbers on the connecting rod
Tighten the bearing cap bolts to specifications.
and bearing cap must be on the same side when in-
10. Install the thrust bearing cap with bolts fin-
stalled in the cylinder bore. If a connecting rod is
ger-tight.
ever transposed from one engine or cylinder to an-
11. Pry the crankshaft forward against the thrust
other, new bearings should be fitted and the connect-
surface of upper half of bearing.
ing rod should be numbered to correspond with the *
12. Hold the crankshaft forward and pry the thrust
new cylinder number. The notch on the piston head
bearing cap to the rear. This aligns the thrust sur-
goes toward the front of the engine.
faces of both halves of the bearing.
3. Install all of the rod bearing inserts into the
13. Retain the forward pressure on the crankshaft.
rods and caps.
Tighten the cap bolts to specifications.
4. Install the rings to the pistons. Install the oil
14. Measure the crankshaft end-play as follows:
control ring first, then the second compression ring
a. Mount a dial gauge to the engine block
and finally the top compression ring. Use a piston
and position the tip of the gauge to read from the
ring expander tool to aid in installation and to help
Fig. 266 Carefully pry the crankshafl Ez
and forth while reading the dial gauge for
end-play first rod journal to the bottom of its stroke.
Pistons and Connecting Rods
4. Install the lower main bearing inserts in bear-
ing caps.
5. Clean the mating surfaces of block and rear
main bearing cap.
6. Carefully lower the crankshaft into place. Be
careful not to damage bearing surfaces.
7. Check the clearance of each main bearing by
using the following procedure:
a. Place a piece of Plastigage@ or its equiva-
lent, on bearing surface across full width of bear-
ing cap and about V4 in. off center.
b. Install cap and tighten bolts to specifica-
tions. Do not turn crankshaft while Plastigage@ is
in place.
c. Remove the cap. Using the supplied Plasti-
gage@ scale, check width of Plastigage@ at
widest point to get maximum clearance. Differ-
ence between readings is taper of journal.
d. If clearance exceeds specified limits, try a
0.001 in. or 0.002 in. undersize bearing in com-
bination with the standard bearing. Bearing clear-
ante must be within specified limits. If standard
and 0.002 in. undersize bearing does not bring
clearance within desired limits, refinish crank-
shaft journal, then install undersize bearings. crankshaft end.
b. Carefully pry the crankshaft toward the rear
of the engine and hold it there while you zero the
gauge.
c. Carefully pry the crankshaft toward the
front of the engine and read the gauge.
d. Confirm that the reading is within specifi-
cations. If not, install a new thrust bearing and
repeat the procedure. If the reading is still out of
specifications with a new bearing, have a ma-
chine shop inspect the thrust surfaces of the
crankshaft, and if possible, repair it.
15. Rotate the crankshaft so as to position the
# See Figures 269, 270,271, and 272
1. Before installing the piston/connecting rod
assembly, oil the pistons, piston rings and the cylin-
der walls with light engine oil. Install connecting rod
bolt protectors or rubber hose onto the connecting
rod bolts/studs. Also perform the following:
a. Select the proper ring set for the size cylin-
der bore.
b. Position the ring in the bore in which it is
going to be used.
c. Push the ring down into the bore area
where normal ring wear is not encountered.
d. Use the head of the piston to position the
ring in the bore so that the ring is square with
the cylinder wall. Use caution to avoid damage to
the ring or cylinder bore.
e. Measure the gap between the ends of the
ring with a feeler gauge. Ring gap in a worn
cylinder is normally greater than specification. If
the ring gap is greater than the specified limits,
try an oversize ring set.
f. Check the ring side clearance of the com-
pression rings with a feeler gauge inserted be-
tween the ring and its lower land according to
specification. The gauge should slide freely
around the entire ring circumference without
binding. Any wear that occurs will form a step at reduce the chance of breakage.
5. Make sure the ring gaps are properly spaced
around the circumference of the piston. Fit a piston
ring compressor around the piston and slide the pis-
ton and connecting rod assembly down into the
cylinder bore, pushing it in with the wooden hammer
handle. Push the piston down until it is only slightly
below the top of the cylinder bore. Guide the con-
netting rod onto the crankshaft bearing journal care-
fully, to avoid damaging the crankshaft.
6. Check the bearing clearance of all the rod
bearings, fitting them to the crankshaft bearing jour-
nals. Follow the procedure in the crankshaft installa-
tion above.
7. After the bearings have been fitted, apply a
light coating of assembly oil to the journals and bear-
ings.
8. Turn the crankshaft until the appropriate
bearing journal is at the bottom of its stroke, then
push the piston assembly all the way down until the
connecting rod bearing seats on the crankshaft jour-
nal. Be careful not to allow the bearing cap screws to
strike the crankshaft bearing journals and damage
them.
9. After the piston and connecting rod assem-
blies have been installed, check the connecting rod
side clearance on each crankshaft journal.
10. Prime and install the oil pump and the oil
pump intake tube.
11. Install the auxiliary/balance shaft(s)/assem-
bly(ies).
Cylinder Head(S)
1. Install the cylinder head(s) using new gaskets.
2, Install the timing sprockets/gears and the
belt/chain assemblies.
Engine Covers and Components
Install the timing cover(s) and oil pan. Refer to
your notes and drawings made prior to disassembly
and install all of the components that were removed.
Install the engine into the vehicle.
Page 207 of 408
I
6-4 CHASSIS ELECTRICAL
I
printed circuit is sandwiched between two sheets of
plastic for more protection and flexibility. A complete l Weatherproof-these connectors are most the jumper wire is of too small a gauge, it
printed circuit, consisting of conductors, insulating commonly used where the connector is exposed to
may overheat and possibly melt. Never use
material and connectors for lamps or other compo- the elements. Terminals are protected against mois-
nents is called a printed circuit board. Printed cir- ture and dirt by sealing rings which provide a weath- jumpers to bypass high resistance loads in a
et-tight seal. All repairs require the use of a special circuit. Bypassing resistances, in effect, cre-
cuitry is used in place of individual wires or har- ates a short circuit. This may, in turn, cause
nesses in places where space is limited, such as terminal and the tool required to service it. Unlike
behind instrument panels. standard blade type terminals, these weatherproof damage and fire. Jumper wires should only
be used to bypass lengths of wire or to simu-
Since automotive electrical systems are very sen- terminals cannot be straightened once they are bent. late switches.
sitive to changes in resistance, the selection of prop- ‘Make certain that the connectors are properly seated
erly sized wires is critical when systems are repaired, and all of the sealing rings are in place when con-
netting leads. Jumper wires are simple, yet extremely valuable,
A loose or corroded connection or a replacement wire pieces of test equipment. They are basically test wires
that is too small for the circuit will add extra resis-
l Molded-these connectors require complete which are used to bypass sections of a circuit. Al-
replacement of the connector if found to be defective.
tance and an additional voltage drop to the circuit. though jumper wires can be purchased, they are usu-
The wire gauge number is an expression of the This means splicing a new connector assembly into ally fabricated from lengths of standard automotive
cross-section area of the conductor. Vehicles from the harness. All splices should be soldered to insure
proper contact. Use care when probing the connec- wire and whatever type of connector (alligator clip,
countries that use the metric system will typically de- spade connector or pin connector) that is required for
scribe the wire size as its cross-sectional area in tions or replacing terminals in them, as it is possible
square millimeters. In this method, the larger the to create a short circuit between opposite terminals. If the particular application being tested. In cramped,
hard-to-reach areas, it is advisable to have insulated
wire, the greater the number. Another common sys- this happens to the wrong terminal pair, it is possible
to damage certain components. Always use jumper boots over the jumper wire terminals in order to pre-
tern for expressing wire size is the American Wire vent accidental grounding. It is also advisable to in-
Gauge (AWG) system. As gauge number increases, wires between connectors for circuit checking and
NEVER probe through weatherproof seals. elude a standard automotive fuse in any jumper wire.
area decreases and the wire becomes smaller. An 18
gauge wire is smaller than a 4 gauge wire. A wire
l Hard Shell-unlike molded connectors, the This is commonly referred to as a “fused jumper”. By
inserting an in-line fuse holder between a set of test
terminal contacts in hard-shell connectors can be re-
with a higher gauge number will carry less current
placed. Replacement usually involves the use of a leads, a fused jumper wire can be used for bypassing :
than a wire with a lower gauge number. Gauge wire open circuits. Use a 5 amp fuse to provide protection
size refers to the size of the strands of the conductor, special terminal removal tool that depresses the lock- against voltage spikes.
not the size of the complete wire with insulator. It is ing tangs (barbs) on the connector terminal and al-
lows the connector to be removed from the rear of the Jumper wires are used primarily to locate open
possible, therefore, to have two wires of the same
shell. The connector shell should be replaced if it electrical circuits, on either the ground (-) side of the
gauge with different diameters because one may have
thicker insulation than the other. shows any evidence of burning, melting, cracks, or circuit or on the power (+) side. If an electrical corn-
breaks. Replace individual terminals that are burnt, ponent fails to operate, connect the jumper wire be-
It is essential to understand how a circuit works
corroded, distorted or loose. tween the component and a good ground. If the corn-
before trying to figure out why it doesn’t. An electrical ponent operates only with the jumper installed, the
schematic shows the electrical current paths when a ground circuit is open. If the ground circuit is good,
circuit is operating properly. Schematics break the but the component does not operate, the circuit be-
entire electrical system down into individual circuits. tween the power feed and component may be open. ’
In a schematic, usually no attempt is made to repre- Pinpointing the exact cause of trouble in an elec- By moving the jumper wire successively back from
trical circuit is most times accomplished by the use the component toward the power source, you can
; : sent wiring and components as they physically ap-
pear on the vehicle; switches and other components of special test equipment. The following describes isolate the area of the circuit where the open is lo-
are shown as simply as possible. Face views of har- different types of commonly used test equipment and cated. When the component stops functioning, or the f
j
ness connectors show the cavity or terminal locations briefly explains how to use them in diagnosis. In ad- power is cut off, the open is in the segment of wire j
in all multi-pin connectors to help locate test points. dition to the information covered below, the tool between the jumper and the point previously tested.
! manufacturer’s instructions booklet (provided with You can sometimes connect the jumper wire di-
the tester) should be read and clearly under.$ood be- rectly from the battery to the “hot” terminal of the I
CONNECTORS 1 fore attempting any test procedures. component, but first make sure the component uses 1
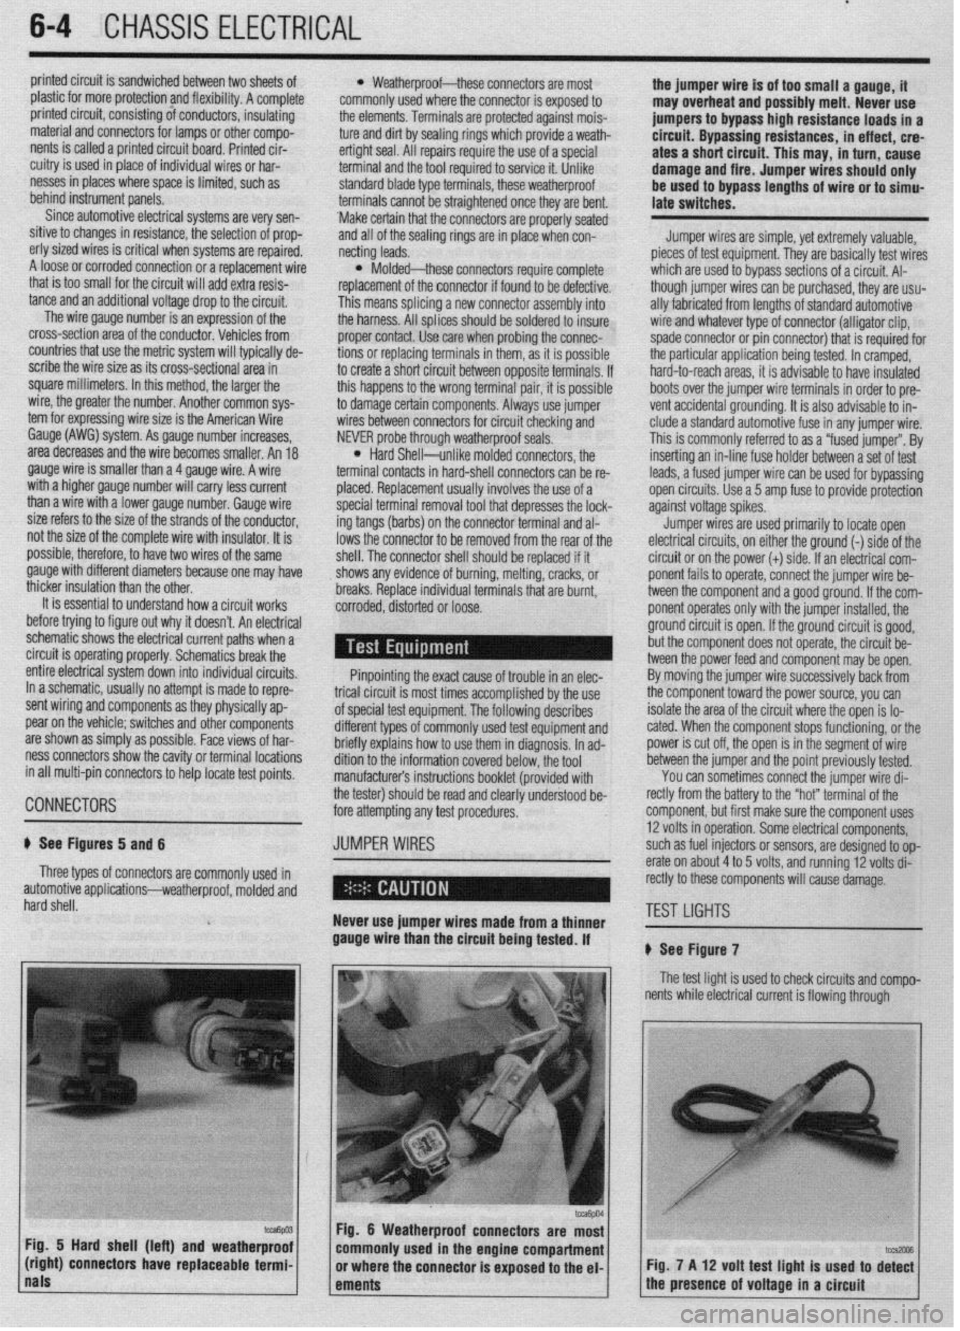
# See Figures 5 and 6 JUMPER WIRES 12 volts in operation. Some electrical components, i
such as fuel injectors or sensors, are designed to op-
Three types of connectors are commonly used in erate on about 4 to 5 volts, and running 12 volts di- j
)
automotive applications-weatherproof, molded and rectly to these components will cause damage.
hard shell.
Never use jumper wires made from a thinner TEST LIGHTS I
gauge wire than the circuit being tested. If
# See Figure 7
The test light is used to check circuits and compo-
I nents while electrical current is flowing through
Fig. 5 Hard shell (left) and weatherproof
(right) connectors have replaceable termi- Fig. 7 A 12 volt test light is used to di%
nals
ements 1 the presence of voltage in a circuit
Page 294 of 408
DRIVETRAiN 7-15
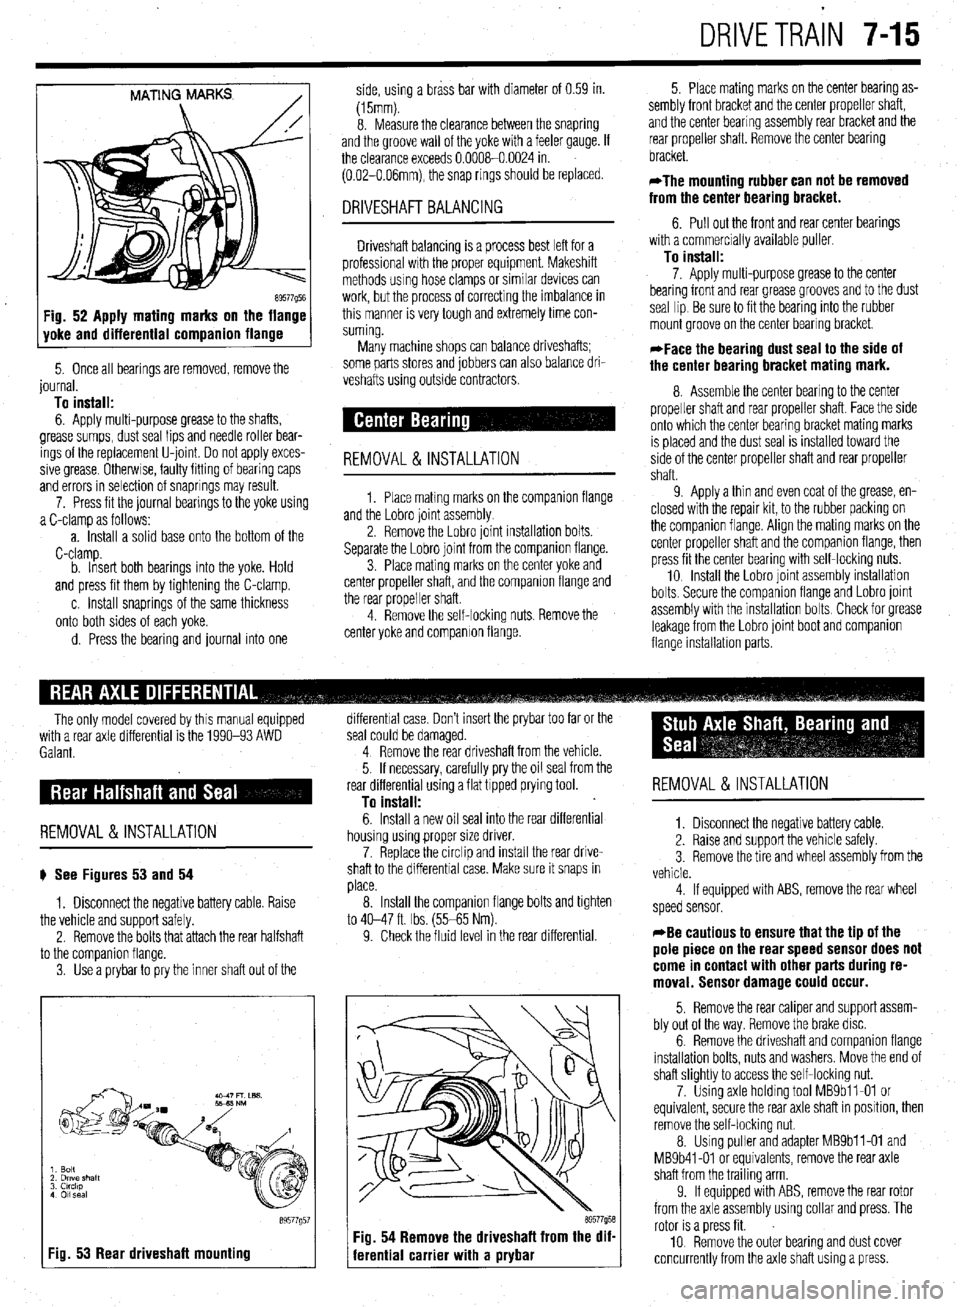
MATING MARKS
/
89577Q5E Fig. 52 Apply mating marks on the flange
yoke and differential companion flange
5. Once all bearings are removed, remove the
journal.
To install:
6. Apply multi-purpose grease to the shafts,
grease sumps, dust seal lips and needle roller bear-
ings of the replacement U-joint Do not apply exces-
sive grease Otherwse, faulty fitting of bearing caps
and errors in selection of snaprings may result.
7. Press fit the journal bearings to the yoke using
a C-clamp as follows:
a. Install a solid base onto the bottom of the
C-clamp.
b. Insert both bearings into the yoke. Hold
and press fit them by tightening the C-clamp.
c. Install snaprings of the same thickness
onto both sides of each yoke.
d. Press the bearing and journal into one side, using a brass bar with diameter of 0.59 in.
(15mm).
8. Measure the clearance between the snapring
and the groove wall of the yoke with a feeler gauge. If
the clearance exceeds 0.0008-0.0024 in.
(0.02-O.O6mm), the snap rings should be replaced.
DRIVESHAFT BALANCING
Driveshaft balancing is a process best left for a
professional wrth the proper equipment. Makeshift
methods using hose clamps or similar devices can
work, but the process of correcting the imbalance in
this manner is very tough and extremely time con-
suming.
Many machine shops can balance driveshafts;
some parts stores and jobbers can also balance dri-
veshafts using outside contractors.
REMOVAL&INSTALLATION
1. Place matmg marks on the companron flange
and the Lobro joint assembly
2. Remove the Lobro joint installation bolts.
Separate the Lobro joint from the companion flange.
3. Place mating marks on the center yoke and
center propeller shaft, and the companion flange and
the rear propeller shaft.
4. Remove the self-locking nuts. Remove the
center yoke and companion flange. 5. Place mating marks on the center bearing as-
sembly front bracket and the center propeller shaft,
and the center bearing assembly rear bracket and the
rear propeller shaft. Remove the center bearing
bracket.
*The mounting rubber can not be removed
from the center bearing bracket.
6. Pull out the front and rear center bearings
with a commercially available puller
To install:
7. Apply multi-purpose grease to the center
bearing front and rear grease grooves and to the dust
seal lip Be sure to fit the bearing into the rubber
mount groove on the center bearing bracket.
*Face the bearing dust seal to the side of
the center bearing bracket mating mark.
8. Assemble the center bearing to the center
propeller shaft and rear propeller shaft. Face the side
onto which the center bearing bracket mating marks
IS placed and the dust seal is installed toward the
side of the center propeller shaft and rear propeller
shaft.
9 Apply a thin and even coat of the grease, en-
closed with the repair kit, to the rubber packing on
the companion flange. Align the mating marks on the
center propeller shaft and the companion flange, then
press fit the center bearing with self-locking nuts.
10 Install the Lobro joint assembly installation
bolts. Secure the companron flange and Lobro joint
assembly with the installation bolts Check for grease
leakage from the Lobro joint boot and companion
flange installabon parts.
The only model covered by this manual equipped
with a rear axle differential is the 1990-93 AWD
Galant.
REMOVAL &INSTALLATION
# See Figures 53 and 54
1. Disconnect the negative battery cable. Raise
the vehicle and support safely.
2. Remove the bolts that attach the rear halfshaft
to the comoanion flanae.
3. Use’a prybar topry the inner shaft out of the
I Fig. 53 Rear driveshaft mounting
89577g5
differential case. Don’t insert the prybar too far or the
seal could be damaged.
4 Remove the rear driveshaft from the vehicle.
5. If necessary, carefully pry the oil seal from the
rear differential using a flat tipped prying tool.
To install:
6. Install a new oil seal into the rear differential
housing using proper size driver.
7. Replace the circlip and install the rear drive-
shaft to the differential case. Make sure it snaps in
place.
8. Install the companion flange bolts and tighten
to 40-47 ft. Ibs. (55-65 Nm).
9. Check the fluid level in the rear differential.
69577958 Fig. 54 Remove the driveshaft from the dif-
ferential carrier with a prybar
REMOVAL &INSTALLATION
1. Disconnect the negative battery cable.
2. Raise and support the vehicle safely.
3 Remove the tire and wheel assembly from the
vehicle.
4 If equipped with ABS, remove the rear wheel
speed sensor.
*Be cautious to ensure that the tip of the
pole piece on the rear speed sensor does not
come in contact with other parts during re-
moval. Sensor damage could occur.
5. Remove the rear caliper and support assem-
bly out of the way. Remove the brake disc.
6. Remove the driveshaft and companion flange
installation bolts, nuts and washers. Move the end of
shaft slightly to access the self-locking nut.
7. Using axle holding tool MBSbll-01 or
equivalent, secure the rear axle shaft in position, then
remove the self-locking nut.
8. Using puller and adapter MBSbll-01 and
MB9b41-01 or equivalents, remove the rear axle
shaft from the trailing arm
9. If equipped with ABS, remove the rear rotor
from the axle assembly using collar and press. The
rotor is a press fit.
10 Remove the outer bearing and dust cover
concurrently from the axle shaft using a press.