2024 FORD F650/750 belt
[x] Cancel search: beltPage 72 of 386

Door Ajar
Displays when the ignition is onand any door is not completelyclosed.
Electronic Locking Differential (If
Equipped)
Illuminates when using theelectronic locking differential.
Engine Coolant Temperature
If it illuminates when your vehicleis moving, this indicates that theengine is overheating. Stop yourvehicle as soon as it is safe to do so andswitch the engine off. Have your vehiclechecked as soon as possible. See EngineCoolant Check (page 238).idk
Engine Oil Pressure
If it illuminates with the enginerunning, or when you are driving,this indicates a malfunction.Stop your vehicle as soon as it is safe todo so and switch off the engine. Check theengine oil level.
Note:Do not resume your journey if itilluminates despite the level being correct.Have the system checked as soon aspossible.
Exhaust Brake On (If Equipped)
The exhaust brake indicator lightilluminates when you switch theexhaust brake on.
Fasten Seatbelt
Illuminates and a tone soundsto remind you to fasten yourseatbelt.
High Beam
Illuminates when you switch onthe high beam headlamps. Itflashes when you use theheadlamp flasher.
Hydromax
If the light illuminates andremains on when the key is in theon position or the engine isrunning, this indicates inadequate hydraulicbooster pressure or reserve pump systemfailure. Stop the vehicle as soon aspossible and have your vehicle checked.
Low Fuel Level
Illuminates when the fuel levelis low or the fuel tank is nearlyempty. Refuel as soon aspossible.
Parking Brake Warning
Briefly illuminates when youswitch the ignition to the onposition, with the engine off. Italso illuminates when you apply theparking brake. If the park brake lamp doesnot illuminate at these times, seekimmediate service. Vehicles with the powerparking brake option: If the park brakewarning lamp begins to blink after settingthe parking brake, this may indicate afailure in the parking brake system. Havethe system checked as soon as possible.Driving extended distances with theparking brake engaged can cause brakefailure and the risk of personal injury.
Parking Lamps
Illuminates when you switch thelow beam headlamps or theparking lamps on.
68
2024 F-650/750 (TBC) , enUSA, Edition date: 202210, First-PrintingInstrument Cluster E163170 E103308 E67022 E171217 E71880 E67019 E146190 E208810 E71341
Page 93 of 386
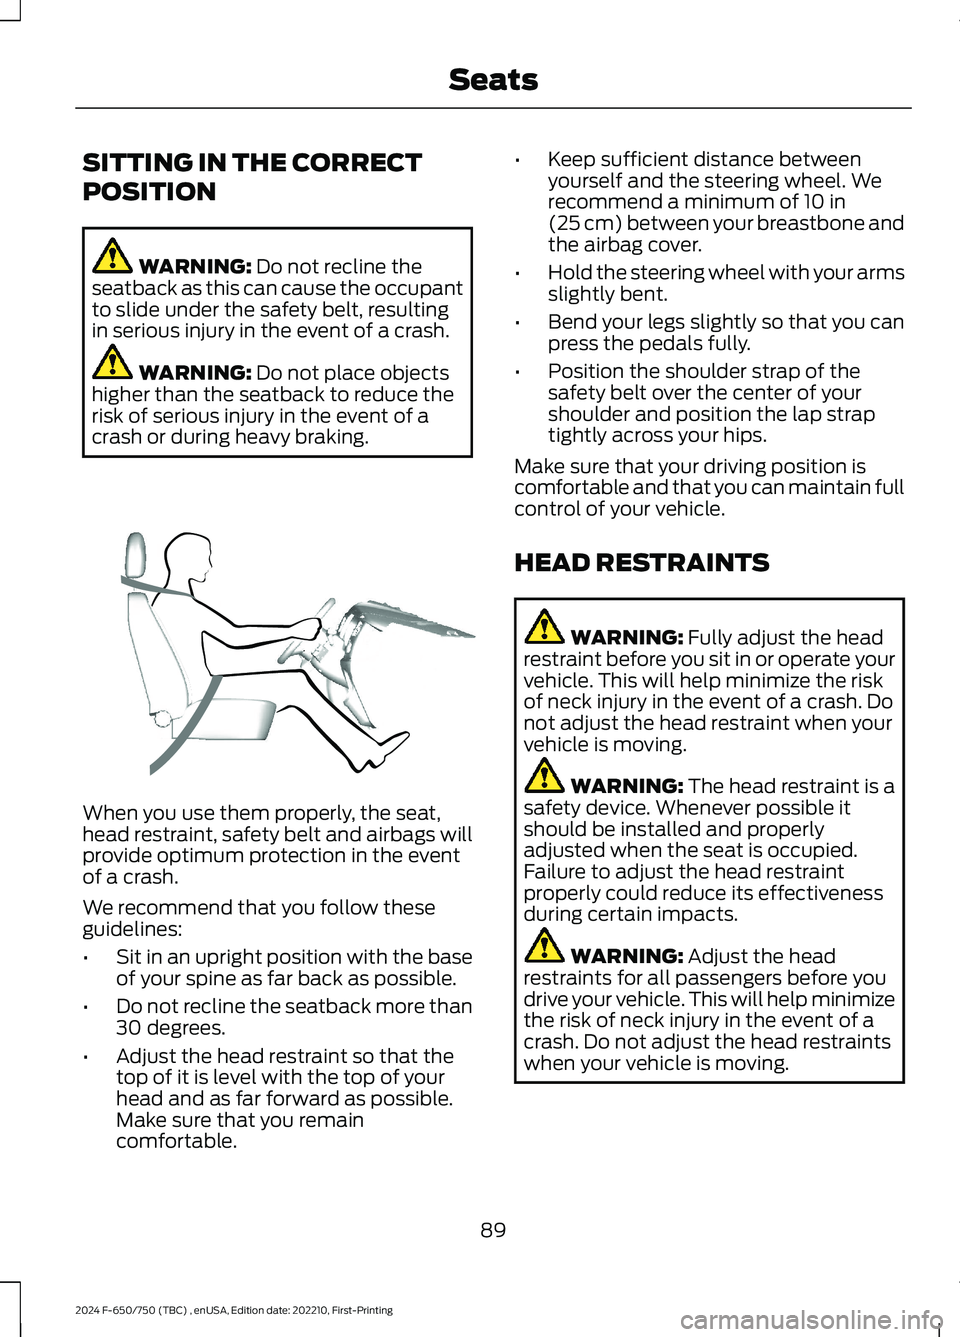
SITTING IN THE CORRECT
POSITION
WARNING: Do not recline theseatback as this can cause the occupantto slide under the safety belt, resultingin serious injury in the event of a crash.
WARNING: Do not place objectshigher than the seatback to reduce therisk of serious injury in the event of acrash or during heavy braking.
When you use them properly, the seat,head restraint, safety belt and airbags willprovide optimum protection in the eventof a crash.
We recommend that you follow theseguidelines:
•Sit in an upright position with the baseof your spine as far back as possible.
•Do not recline the seatback more than30 degrees.
•Adjust the head restraint so that thetop of it is level with the top of yourhead and as far forward as possible.Make sure that you remaincomfortable.
•Keep sufficient distance betweenyourself and the steering wheel. Werecommend a minimum of 10 in(25 cm) between your breastbone andthe airbag cover.
•Hold the steering wheel with your armsslightly bent.
•Bend your legs slightly so that you canpress the pedals fully.
•Position the shoulder strap of thesafety belt over the center of yourshoulder and position the lap straptightly across your hips.
Make sure that your driving position iscomfortable and that you can maintain fullcontrol of your vehicle.
HEAD RESTRAINTS
WARNING: Fully adjust the headrestraint before you sit in or operate yourvehicle. This will help minimize the riskof neck injury in the event of a crash. Donot adjust the head restraint when yourvehicle is moving.
WARNING: The head restraint is asafety device. Whenever possible itshould be installed and properlyadjusted when the seat is occupied.Failure to adjust the head restraintproperly could reduce its effectivenessduring certain impacts.
WARNING: Adjust the headrestraints for all passengers before youdrive your vehicle. This will help minimizethe risk of neck injury in the event of acrash. Do not adjust the head restraintswhen your vehicle is moving.
89
2024 F-650/750 (TBC) , enUSA, Edition date: 202210, First-PrintingSeatsE68595
Page 106 of 386

Note:When you switch the ignition off andleave your vehicle, do not leave your key inthe ignition. This could cause your vehiclebattery to lose charge.
I (accessory) - Allows the electricalaccessories, such as the radio, to operatewhile the engine is not running.
Note:Do not leave the ignition key in thisposition for too long. This could cause yourvehicle battery to lose charge.
II (on) - All electrical circuits areoperational and the warning lamps andindicators illuminate.
III (start) - Cranks the engine.
STARTING A GASOLINE
ENGINE
When you start the engine, the idle speedincreases helping to warm up the engine.If the engine idle speed does not slowdown, have your vehicle checked as soonas possible.
Before starting the engine check thefollowing:
•Make sure all occupants fasten theirseatbelts.
•Make sure the headlamps andelectrical accessories are off.
•Make sure the parking brake is on.
•Make sure the transmission is in park(P) or neutral (N).
•Turn the ignition key to the on position.
Note:Do not press the accelerator pedal.
1.Fully press the brake pedal.
2.Turn the key to the start position tostart the engine. Release the key whenthe engine starts.
Note:The engine may continue crankingfor up to 15 seconds or until it starts.
Note:If you cannot start the engine on thefirst try, wait for a short period and try again.
Failure to Start
If you cannot start the engine after threeattempts, wait 10 seconds and follow thisprocedure:
1.Fully press the brake pedal.
2.Shift into park (P).
3.Fully press and hold the acceleratorpedal.
4.Attempt to start your vehicle and waituntil the engine stops cranking.
5.Release the accelerator pedal.
6.Start the engine.
Stopping the Engine When YourVehicle is Stationary
1.Shift into park (P) or neutral (N).
2.Turn the key to the off position.
3.Apply the parking brake.
Stopping the Engine When YourVehicle is Moving
WARNING: Switching off theengine when your vehicle is still movingresults in a significant decrease inbraking assistance. Higher effort isrequired to apply the brakes and to stopyour vehicle. A significant decrease insteering assistance could also occur. Thesteering does not lock, but higher effortcould be required to steer your vehicle.When you switch the ignition off, someelectrical circuits, for example airbags,also turn off. If you unintentionally switchthe ignition off, shift into neutral (N) andrestart the engine.
1.Switch the ignition off to stop theengine.
102
2024 F-650/750 (TBC) , enUSA, Edition date: 202210, First-PrintingStarting and Stopping the Engine
Page 107 of 386
2.Put the transmission into neutral (N)and use the brakes to bring your vehicleto a safe stop.
3.When your vehicle has stopped, shiftinto park (P).
4.Apply the parking brake.
Guarding Against Exhaust Fumes
WARNING: Exhaust leaks mayresult in entry of harmful and potentiallylethal fumes into the passengercompartment. If you smell exhaustfumes inside your vehicle, have yourvehicle inspected immediately. Do notdrive if you smell exhaust fumes.
Important Ventilating Information
If you stop your vehicle and leave theengine idling for long periods of time, werecommend you either open the windowsat least 1 in (3 cm) or set the climatecontrol to outside air.
STARTING A DIESEL ENGINE
Read all starting instructions carefullybefore you start your vehicle.
The 6.7L diesel engine incorporates a delaybetween a crank command and starterengagement to crank the engine. Thisdelay ensures robust starting performancein all environmental conditions includingextreme cold. The crank command isinitiated by the operator by turning theignition key. The delay varies with enginecoolant temperature. There is no delay forhot coolant temperature. The delayincreases at colder coolant temperatures.Maximum delay of 2.5 seconds isexperienced below -13.0°F (-25°C).
Diesel Engine Fast Start Glow PlugSystem
The diesel engine glow system consists of:
•Eight glow plugs, one per cylinder.
•Glow plug control module.
•Engine coolant temperature sensor.
•Barometric pressure sensor.
•Environmental temperature sensor.
The powertrain and glow plug controlmodules electronically control the glowplug system. After you switch the ignitionon, the glow plug control moduleimmediately energizes the glow plugs. Theglow plug control module, using the enginecoolant temperature, barometric pressuresensor and environmental temperaturesensor, determines how long the glowplugs stay energized. The required time forthe glow plugs to be energized decreasesas the coolant temperature, barometricpressure and environmental temperatureincrease.
Before starting the engine, check thefollowing:
•Make sure all occupants fasten theirseatbelt.
•Make sure the headlamps andelectrical accessories are off.
•Make sure the parking brake is on.
•Make sure the transmission is in park(P) or neutral (N).
•Turn the ignition key to the on position.
Note:Do not press the accelerator duringstarting.
1.Fully press the brake pedal.
2.Turn the key to the start position tostart the engine. Release the key whenthe engine starts.
103
2024 F-650/750 (TBC) , enUSA, Edition date: 202210, First-PrintingStarting and Stopping the Engine
Page 197 of 386
We recommend the use of a wheel lift anddollies or flatbed equipment to tow yourvehicle. Do not tow with a slingbelt. FordMotor Company has not approved aslingbelt towing procedure. Vehicledamage may occur if towed incorrectly, orby any other means.
Ford Motor Company produces a towingmanual for all authorized tow truckoperators. Have your tow truck operatorrefer to this manual for proper hook-upand towing procedures for your vehicle.
It is acceptable to have your two-wheeldrive vehicle towed with the front wheelson the ground (without dollies) and therear wheels off the ground.
TOWING POINTS (IF EQUIPPED)
WARNING: Using recovery hooksis dangerous and should only be done bya person familiar with proper vehiclerecovery safety practices. Improper useof recovery hooks may cause hook failureor separation from the vehicle and couldresult in serious injury or death.
WARNING: Always slowly removethe slack from the recovery strap priorto pulling. Failure to do so can introducesignificantly higher loads which cancause the recovery hooks to break off, orthe recovery strap to fail which can causeserious injury or death.
WARNING: Never link two strapstogether with a clevis pin. These heavymetal objects could become projectilesif the strap breaks and can cause seriousinjury or death.
Your vehicle comes equipped withframe-mounted front recovery hooks.These hooks should never have a loadapplied to them greater than the grossvehicle weight rating of your vehicle.
Before using recovery hooks:
•Make sure all attaching points aresecure and capable of withstandingthe applied load.
•Never use chains, cables or tow strapswith metal hook ends.
•Only use recovery straps that have aminimum breaking strength two tothree times the gross vehicle weight ofthe stuck vehicle.
•Make sure the recovery strap is in goodcondition and free of visible cuts, tearsor damage.
•Use a damper device such as a tarp,heavy blanket or piece of carpetdraped over the recovery strap to helpabsorb the energy in the event thestrap breaks.
•Make sure the stuck vehicle is notloaded heavier than its gross vehicleweight rating specified on thecertification label.
•Always align the tow vehicle and stuckvehicle in a straight line (within 10degrees).
•Keep bystanders to the sides of thevehicle, at a distance of at least twicethe length of the recovery strap. Thishelps avoid injury from the hazard of arecovery hook or strap breaking, or avehicle lurching into their path.
193
2024 F-650/750 (TBC) , enUSA, Edition date: 202210, First-PrintingRoadside Emergencies
Page 218 of 386
Engine compartment (with engine off)
Inspect for glazing, fraying or cracking. There should be nomore than 5-7 cracks per rib, per 1 in (2.5 cm)Belts (fan, alternator,water pump and airconditioningcompressor)
Inspect for signs of fluid puddles or dripping fluid on theground under the engine, or the underside of the engine.Fluid leaks
Inspect for debris that may have collected on the HVAC airinlet grille or inside the exterior module as this may reducesystem performance.
HVAC air inlet
Engine starting (with parking brake applied)
Before entering the cab, verify that the vehicle is equippedwith spare electrical fuses (if used), three red reflectivetriangles, a properly charged and rated fire extinguisher andwheel chocks.
Safety and emergencyequipment
Walk around the vehicle and verify all steps and grab handles,inside and out (as well as behind), are tight and clean. Useextreme caution and a three-point stance at all times.
Inspect door latches for proper closing, latching and locking.
Set the parking brake. Make sure the gearshift lever is inneutral (N) or park (P) (if equipped with a park position).Starting the engine
Diesel engine: Turn the key to the on position. Turn the keyto start when the wait to start indicator light in the instrumentcluster turns off.
Gasoline engine: Turn the key to start, and then release itas soon as the engine starts.
Verify pressure builds to normal operating range.Engine oil pressure
A tone indicating low air pressure should sound immediatelyafter the engine starts but before the compressor has built-up pressure. The tone should stop when the air pressurereaches 70 psi (483 kPa). Let the air pressure build togoverned cutout pressure, which should occur between115–130 psi (793–896 kPa).
Low air pressure warningtone (if equipped with anair compressor)
Press the accelerator and verify that it operates smoothly,without any binding or irregular feel. Release the pedal andverify the engine returns to idle speed immediately.
Accelerator
214
2024 F-650/750 (TBC) , enUSA, Edition date: 202210, First-PrintingVehicle Inspection Guide
Page 269 of 386
•Never wash or rinse the engine while itis hot or running; water in the runningengine may cause internal damage.
•Never wash or rinse any ignition coil,spark plug wire or spark plug well, orthe area in and around these locations.
•Cover the battery, power distributionbox, and air filter assembly to preventwater damage when cleaning theengine.
CLEANING THE WINDOWS AND
WIPER BLADES
Car wash chemicals and environmentalfallout can result in windshield and wiperblade contamination. Dirty windshield andwipers will result in poor windshield wiperoperation. Keep the windshield and wiperblades clean to maintain windshield wiperperformance.
To clean the windshield and wiper blades:
•Clean the windshield with anon-abrasive glass cleaner. Whencleaning the interior of the windshield,avoid getting any glass cleaner on theinstrument panel or door panels. Wipeany glass cleaner off these surfacesimmediately.
•For windshields contaminated withtree sap, chemicals, wax or bugs, cleanthe entire windshield using steel wool(no greater than 0000 grade) in acircular motion and rinse with water.
•Clean the wiper blades with isopropylrubbing alcohol or windshield washerconcentrate.
Note: Do not use razor blades or othersharp objects to clean or remove decalsfrom the inside of the heated rear window.The vehicle warranty does not coverdamage caused to the heated rear windowgrid lines.
CLEANING THE INTERIOR
WARNING: Do not use cleaningsolvents, bleach or dye on the vehicle'sseatbelts, as these actions may weakenthe belt webbing.
WARNING: On vehicles equippedwith seat-mounted airbags, do not usechemical solvents or strong detergents.Such products could contaminate theside airbag system and affectperformance of the side airbag in a crash.
For fabric, carpets, cloth seats and seatsequipped with side airbags:
•Remove dust and loose dirt with avacuum cleaner.
•Remove light stains and soil withMotorcraft Professional StrengthCarpet & Upholstery Cleaner.
•If grease or tar is present on thematerial, spot-clean the area first withMotorcraft Spot and Stain Remover. InCanada, use Motorcraft Multi-PurposeCleaner.
•If a ring forms on the fabric after spotcleaning, clean the entire areaimmediately (but do not oversaturate)or the ring will set.
•Do not use household cleaningproducts or glass cleaners, which canstain and discolor the fabric and affectthe flame retardant abilities of the seatmaterials.
Mirrors
Do not clean the housing or glass of anymirror with harsh abrasives, fuel or otherpetroleum or ammonia-based cleaningproducts.
265
2024 F-650/750 (TBC) , enUSA, Edition date: 202210, First-PrintingVehicle Care
Page 295 of 386
ENGINE SPECIFICATIONS - 6.7L DIESEL
6.7L V8 Diesel EngineEngine
406 in³ (6,651 cm³)Displacement.
Ultra Low Sulfur Diesel up to B20Required fuel.
1-3-7-2-6-5-4-8Firing order.
15.2:1Compression ratio.
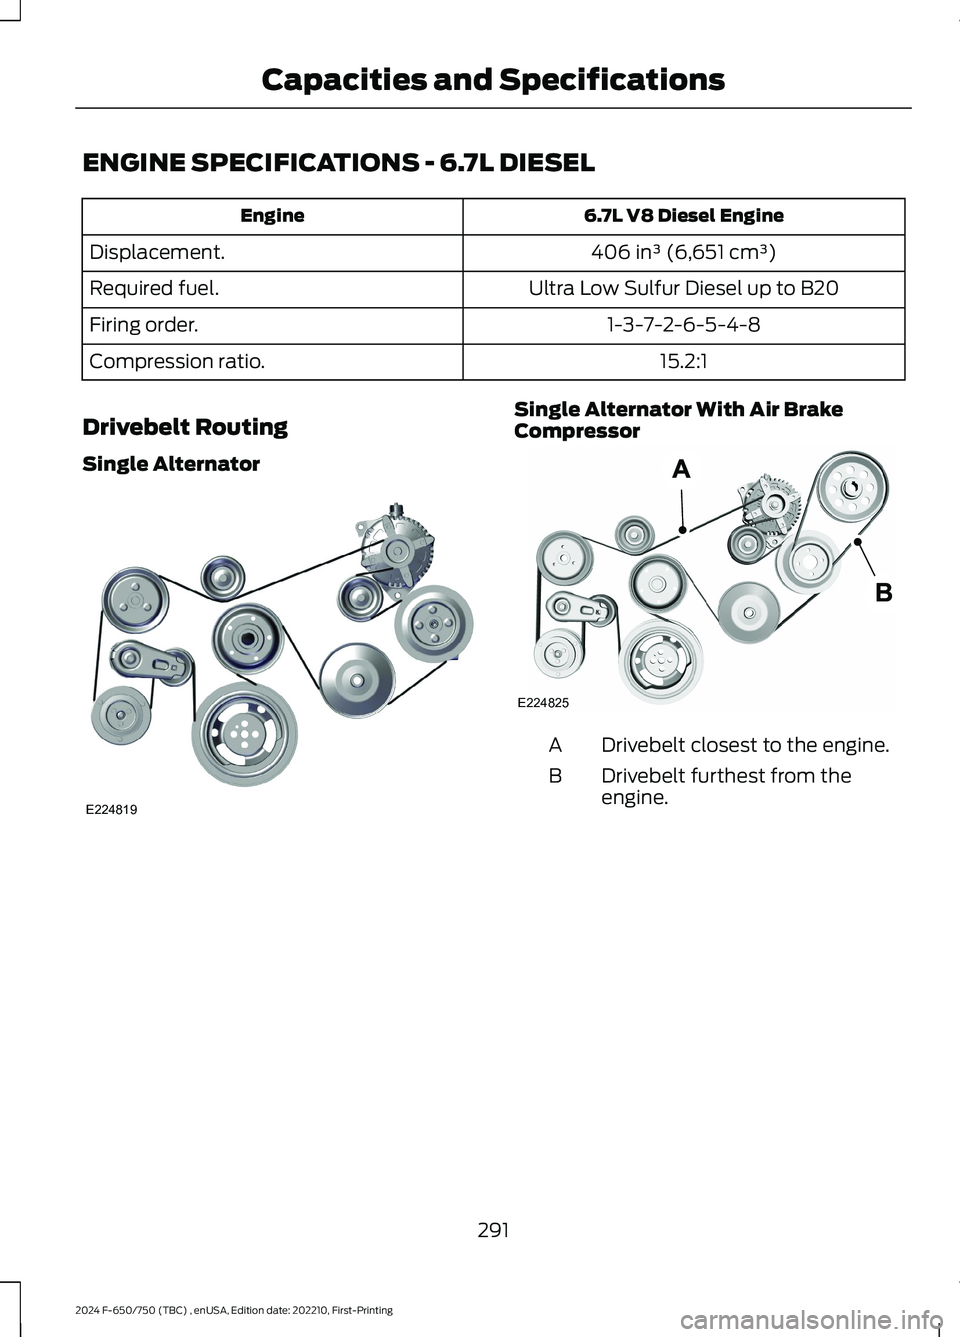
Drivebelt Routing
Single Alternator
Single Alternator With Air BrakeCompressor
Drivebelt closest to the engine.A
Drivebelt furthest from theengine.B
291
2024 F-650/750 (TBC) , enUSA, Edition date: 202210, First-PrintingCapacities and SpecificationsE224819 E224825