2024 FORD F650/750 weight
[x] Cancel search: weightPage 187 of 386
ESSENTIAL TOWING CHECKS
See Load limits in the Load Carryingchapter for load specification terms foundon the tire label and Safety Compliancelabel and instructions on calculating yourvehicle's load.
Remember to account for the trailertongue weight as part of your vehicle loadwhen calculating the total vehicle weight.
Hitches
Do not use a hitch that either clamps ontothe bumper or attaches to the axle. Youmust distribute the load in your trailer sothat 10-15% of the total weight of thetrailer is on the tongue.
Safety Chains
Note:Do not attach safety chains to thebumper.
Always connect the safety chains to theframe or hook retainers of your vehiclehitch.
To connect the safety chains, cross thechains under the trailer tongue and allowenough slack for turning tight corners. Donot allow the chains to drag on the ground.
Trailer Brakes
WARNING: Do not connect atrailer's hydraulic brake system directlyto your vehicle's brake system. Yourvehicle may not have enough brakingpower and your chances of having acollision greatly increase.
Electric brakes and manual, automatic orsurge-type trailer brakes are safe if youinstall them properly and adjust them tothe manufacturer's specifications. Thetrailer brakes must meet local and federalregulations.
The rating for the tow vehicle's brakingsystem operation is at the gross vehicleweight rating, not the gross combinedweight rating.
Trailer Lamps
WARNING: Never connect anytrailer lamp wiring to the vehicle's taillamp wiring; this may damage theelectrical system resulting in fire. Contactyour authorized dealer as soon aspossible for assistance in proper trailertow wiring installation. Additionalelectrical equipment may be required.
Trailer lamps are required on most towedvehicles. Make sure all running lights, brakelights, turn signals and hazard lights areworking.
Before Towing a Trailer
Practice turning, stopping and backing upto get the feel of your vehicle-trailercombination before starting on a trip.When turning, make wider turns so thetrailer wheels clear curbs and otherobstacles.
When Towing a Trailer
•Check your hitch, electrical connectionsand trailer wheel lug nuts thoroughlyafter you have traveled 50 mph(80 km/h).
•When stopped in congested or heavytraffic during hot weather, place thetransmission in park (P) or neutral (N)to aid engine and transmission coolingand to help air conditioningperformance.
•Turn off the speed control with heavyloads or in hilly terrain. The speedcontrol may turn off automaticallywhen you are towing on long, steepgrades.
183
2024 F-650/750 (TBC) , enUSA, Edition date: 202210, First-PrintingTowing
Page 188 of 386
•Shift to a lower gear when driving downa long or steep hill. Do not apply thebrakes continuously, as they mayoverheat and become less effective.
•If your transmission is equipped withthe Tow/Haul feature, use this featurewhen towing. This provides enginebraking and helps eliminate excessivetransmission shifting for optimum fueleconomy and transmission cooling.
•Allow more distance for stopping witha trailer attached. Anticipate stops andbrake gradually.
FIFTH WHEEL OPERATION (IF
EQUIPPED)
WARNING: Failure to follow thefifth wheel manufacturer’s instructionsfor hooking and unhooking as well assliding the fifth wheel could result in anaccident, personal injury or death.
WARNING: When the tractor andtrailer are parked unattended, the trailerbrake hand control should never be usedto apply the brake, since air may leakfrom the system, allowing vehiclemovement, resulting in possible propertydamage, personal injury or death.
Before hook-up, make sure:
•The fifth wheel jaws are fully open.
•The fifth wheel is fully tilted back toprevent body damage when the tractoris backed under a trailer.
•You block the trailer wheels and adjustand apply the trailer spring brakes.Never chase a trailer.
•The brake hoses and light cords areclear of the fifth wheel.
Hook-up
1.Back the tractor squarely under thetrailer, engaging the fifth-wheel jawson the kingpin. Always back up slowly;make sure the trailer is neither too highnor too low. Avoid backing under thetrailer from an angle.
2.Connect the service and emergencybrake hoses and trailer light connector.
3.Inspect the jaws of the fifth wheel tobe sure they have fully closed on thetrailer kingpin and the trailer plate isresting securely on the fifth wheel.
4.Make sure the coupler release lever isin the locked position.
5.Charge the trailer brake system. Setthe trailer brakes, with either the handvalve or tractor protection valve. Pullagainst the trailer for an extra check ofproper hook-up. Do not pull hardenough to damage or strain theequipment.
6.Set the tractor parking brakes and fullyraise the trailer landing gear.
7.Check the operation of all trailer lightsand correct any lights that may befaulty.
Un-hook
1.Try to keep the tractor and trailer in astraight line.
2.Apply the parking brakes.
3.Lower the trailer landing gear, makingsure it is on solid, level ground. Theweight of the trailer is to be on thelanding gear.
4.Block the trailer wheels.
5.Disconnect the brake hoses and lightcords. Be sure hoses and cords areclear.
6.Pull coupler release lever to disengagethe fifth wheel jaws.
184
2024 F-650/750 (TBC) , enUSA, Edition date: 202210, First-PrintingTowing
Page 191 of 386
ECONOMICAL DRIVING
Your fuel economy is affected by severalthings, such as how you drive, theconditions you drive under, and how youmaintain your vehicle.
You may improve your fuel economy bykeeping these things in mind:
•Accelerate and slow down in a smooth,moderate fashion.
•Drive at steady speeds withoutstopping.
•Anticipate stops; slowing down mayeliminate the need to stop.
•Close the windows for high-speeddriving.
•Drive at reasonable speeds. Travelingat 55 mph (90 km/h) uses 15% lessfuel than traveling at 65 mph(105 km/h).
•Keep the tires properly inflated and useonly the recommended size.
•Use the recommended engine oil.
•Perform all regularly scheduledmaintenance.
Avoid these actions; they reduce your fueleconomy:
•Sudden accelerations or hardaccelerations.
•Warm up your vehicle on coldmornings.
•Use the air conditioner.
•Use the speed control in hilly terrain.
•Rest your foot on the brake pedal whiledriving.
•Carry unnecessary weight.Approximately 1 mpg [0.4 km/L] is lostfor every 400 lb (180 kg) of weightcarried.
•Driving with the wheels out ofalignment.
Conditions
•Adding certain accessories to yourvehicle may reduce fuel economy. Forexample bug deflectors, rollbars, lightbars, running boards, ski racks orluggage racks.
•Using fuel blended with alcohol maylower fuel economy.
•Fuel economy may decrease with lowertemperatures during the first 5–10 mi(12–16 km) of driving.
•Driving on flat terrain offers improvedfuel economy as compared to drivingon hilly terrain.
•Transmissions give their best fueleconomy when operated in the topcruise gear and with steady pressureon the gas pedal.
COLD WEATHER
PRECAUTIONS - 6.7L DIESEL
Winter Grille Cover (If Equipped)
The winter grille cover enhances heaterperformance and will reduce the amountof time it takes to warm the inside of yourvehicle in extremely cold conditions below-0.4°F (-18°C).
The winter grille cover installs over theoutside of the front grille and restricts theair flowing to the engine compartment bycovering the radiator grille openings.
187
2024 F-650/750 (TBC) , enUSA, Edition date: 202210, First-PrintingDriving Hints
Page 197 of 386
We recommend the use of a wheel lift anddollies or flatbed equipment to tow yourvehicle. Do not tow with a slingbelt. FordMotor Company has not approved aslingbelt towing procedure. Vehicledamage may occur if towed incorrectly, orby any other means.
Ford Motor Company produces a towingmanual for all authorized tow truckoperators. Have your tow truck operatorrefer to this manual for proper hook-upand towing procedures for your vehicle.
It is acceptable to have your two-wheeldrive vehicle towed with the front wheelson the ground (without dollies) and therear wheels off the ground.
TOWING POINTS (IF EQUIPPED)
WARNING: Using recovery hooksis dangerous and should only be done bya person familiar with proper vehiclerecovery safety practices. Improper useof recovery hooks may cause hook failureor separation from the vehicle and couldresult in serious injury or death.
WARNING: Always slowly removethe slack from the recovery strap priorto pulling. Failure to do so can introducesignificantly higher loads which cancause the recovery hooks to break off, orthe recovery strap to fail which can causeserious injury or death.
WARNING: Never link two strapstogether with a clevis pin. These heavymetal objects could become projectilesif the strap breaks and can cause seriousinjury or death.
Your vehicle comes equipped withframe-mounted front recovery hooks.These hooks should never have a loadapplied to them greater than the grossvehicle weight rating of your vehicle.
Before using recovery hooks:
•Make sure all attaching points aresecure and capable of withstandingthe applied load.
•Never use chains, cables or tow strapswith metal hook ends.
•Only use recovery straps that have aminimum breaking strength two tothree times the gross vehicle weight ofthe stuck vehicle.
•Make sure the recovery strap is in goodcondition and free of visible cuts, tearsor damage.
•Use a damper device such as a tarp,heavy blanket or piece of carpetdraped over the recovery strap to helpabsorb the energy in the event thestrap breaks.
•Make sure the stuck vehicle is notloaded heavier than its gross vehicleweight rating specified on thecertification label.
•Always align the tow vehicle and stuckvehicle in a straight line (within 10degrees).
•Keep bystanders to the sides of thevehicle, at a distance of at least twicethe length of the recovery strap. Thishelps avoid injury from the hazard of arecovery hook or strap breaking, or avehicle lurching into their path.
193
2024 F-650/750 (TBC) , enUSA, Edition date: 202210, First-PrintingRoadside Emergencies
Page 233 of 386
•Frequent low-speed operation, orconsistent heavy traffic less than25 mph (40 km/h).
•Operating in severe dust conditions.
•Operating the vehicle off road.
•Towing a trailer over 1,000 mi(1,600 km).
•Sustained, high-speed driving at thegross vehicle weight rating.
•Use of fuels with sulfur content otherthan ultra-low sulfur diesel (ULSD).
•Use of high-sulfur diesel fuel.
Only use engine oil that meets ourspecifications. See Capacities andSpecifications (page 291).
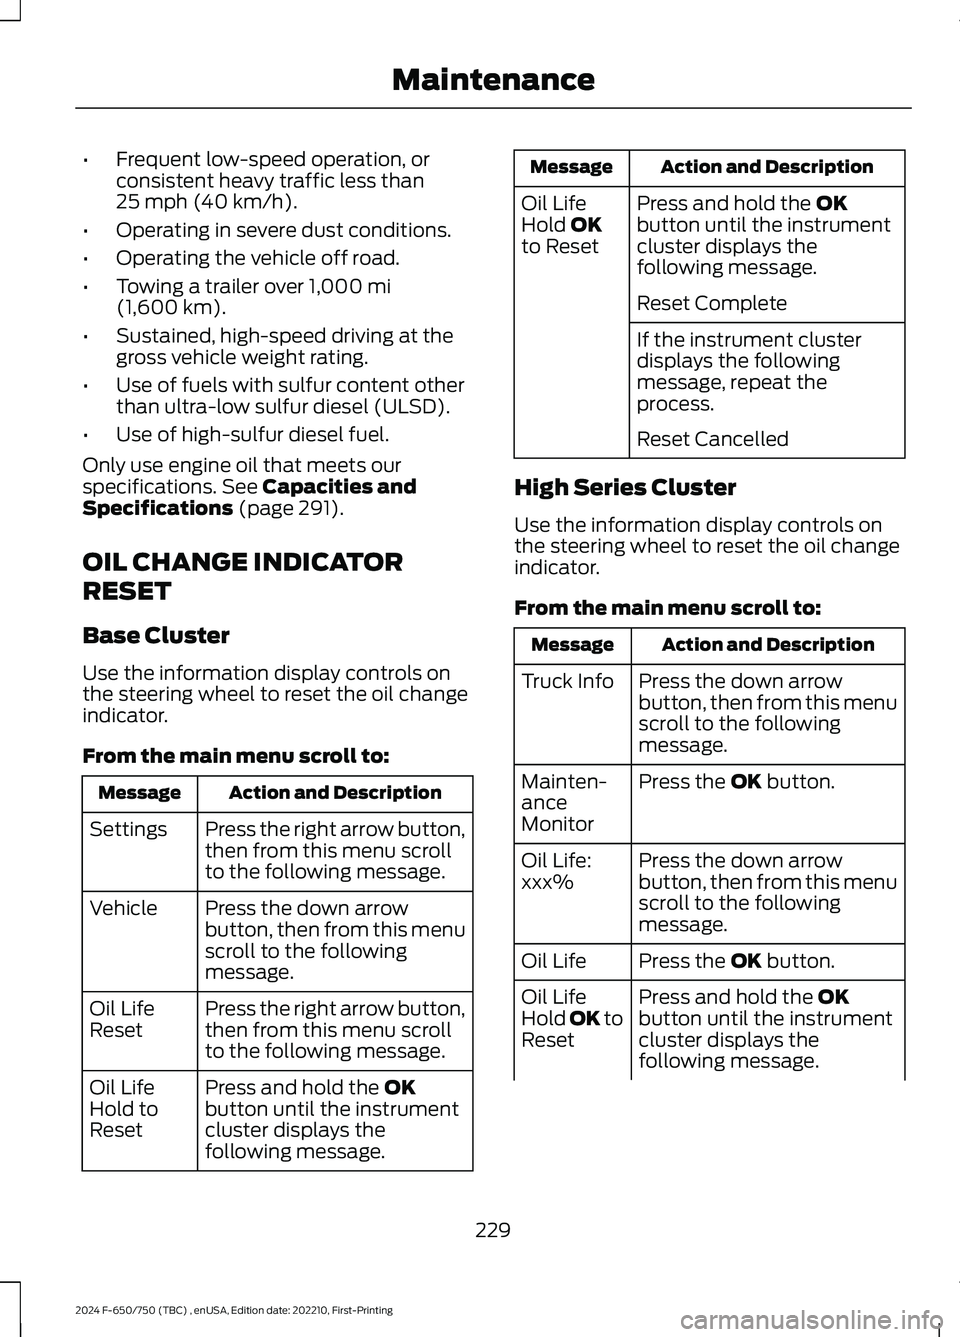
OIL CHANGE INDICATOR
RESET
Base Cluster
Use the information display controls onthe steering wheel to reset the oil changeindicator.
From the main menu scroll to:
Action and DescriptionMessage
Press the right arrow button,then from this menu scrollto the following message.
Settings
Press the down arrowbutton, then from this menuscroll to the followingmessage.
Vehicle
Press the right arrow button,then from this menu scrollto the following message.
Oil LifeReset
Press and hold the OKbutton until the instrumentcluster displays thefollowing message.
Oil LifeHold toReset
Action and DescriptionMessage
Press and hold the OKbutton until the instrumentcluster displays thefollowing message.
Oil LifeHold OKto Reset
Reset Complete
If the instrument clusterdisplays the followingmessage, repeat theprocess.
Reset Cancelled
High Series Cluster
Use the information display controls onthe steering wheel to reset the oil changeindicator.
From the main menu scroll to:
Action and DescriptionMessage
Press the down arrowbutton, then from this menuscroll to the followingmessage.
Truck Info
Press the OK button.Mainten-anceMonitor
Press the down arrowbutton, then from this menuscroll to the followingmessage.
Oil Life:xxx%
Press the OK button.Oil Life
Press and hold the OKbutton until the instrumentcluster displays thefollowing message.
Oil LifeHold OK toReset
229
2024 F-650/750 (TBC) , enUSA, Edition date: 202210, First-PrintingMaintenance
Page 273 of 386
TIRE CARE
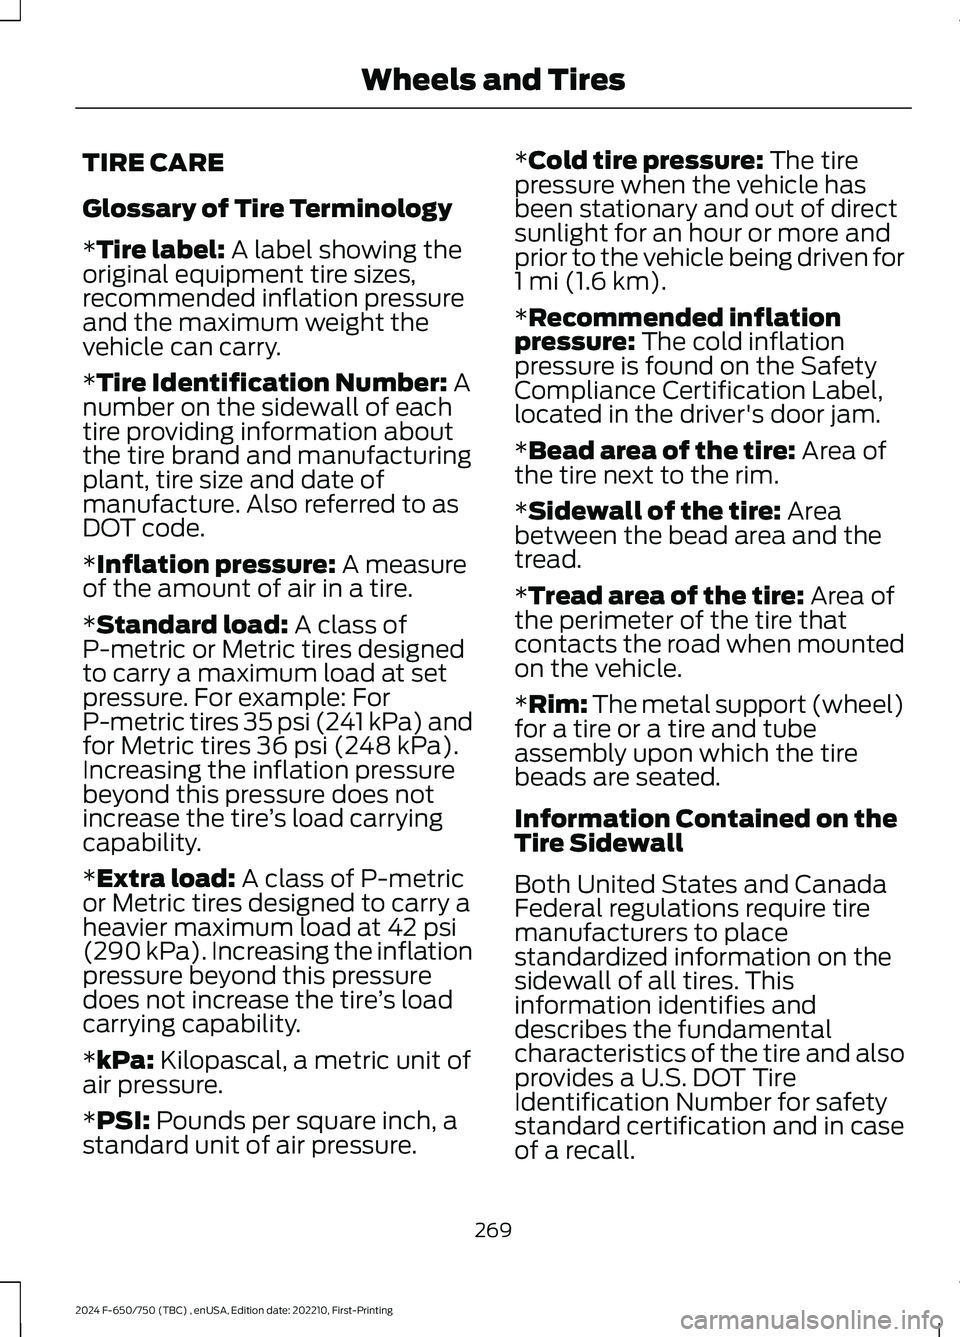
Glossary of Tire Terminology
*Tire label: A label showing theoriginal equipment tire sizes,recommended inflation pressureand the maximum weight thevehicle can carry.
*Tire Identification Number: Anumber on the sidewall of eachtire providing information aboutthe tire brand and manufacturingplant, tire size and date ofmanufacture. Also referred to asDOT code.
*Inflation pressure: A measureof the amount of air in a tire.
*Standard load: A class ofP-metric or Metric tires designedto carry a maximum load at setpressure. For example: ForP-metric tires 35 psi (241 kPa) andfor Metric tires 36 psi (248 kPa).Increasing the inflation pressurebeyond this pressure does notincrease the tire’s load carryingcapability.
*Extra load: A class of P-metricor Metric tires designed to carry aheavier maximum load at 42 psi(290 kPa). Increasing the inflationpressure beyond this pressuredoes not increase the tire’s loadcarrying capability.
*kPa: Kilopascal, a metric unit ofair pressure.
*PSI: Pounds per square inch, astandard unit of air pressure.
*Cold tire pressure: The tirepressure when the vehicle hasbeen stationary and out of directsunlight for an hour or more andprior to the vehicle being driven for1 mi (1.6 km).
*Recommended inflationpressure: The cold inflationpressure is found on the SafetyCompliance Certification Label,located in the driver's door jam.
*Bead area of the tire: Area ofthe tire next to the rim.
*Sidewall of the tire: Areabetween the bead area and thetread.
*Tread area of the tire: Area ofthe perimeter of the tire thatcontacts the road when mountedon the vehicle.
*Rim: The metal support (wheel)for a tire or a tire and tubeassembly upon which the tirebeads are seated.
Information Contained on theTire Sidewall
Both United States and CanadaFederal regulations require tiremanufacturers to placestandardized information on thesidewall of all tires. Thisinformation identifies anddescribes the fundamentalcharacteristics of the tire and alsoprovides a U.S. DOT TireIdentification Number for safetystandard certification and in caseof a recall.
269
2024 F-650/750 (TBC) , enUSA, Edition date: 202210, First-PrintingWheels and Tires
Page 274 of 386
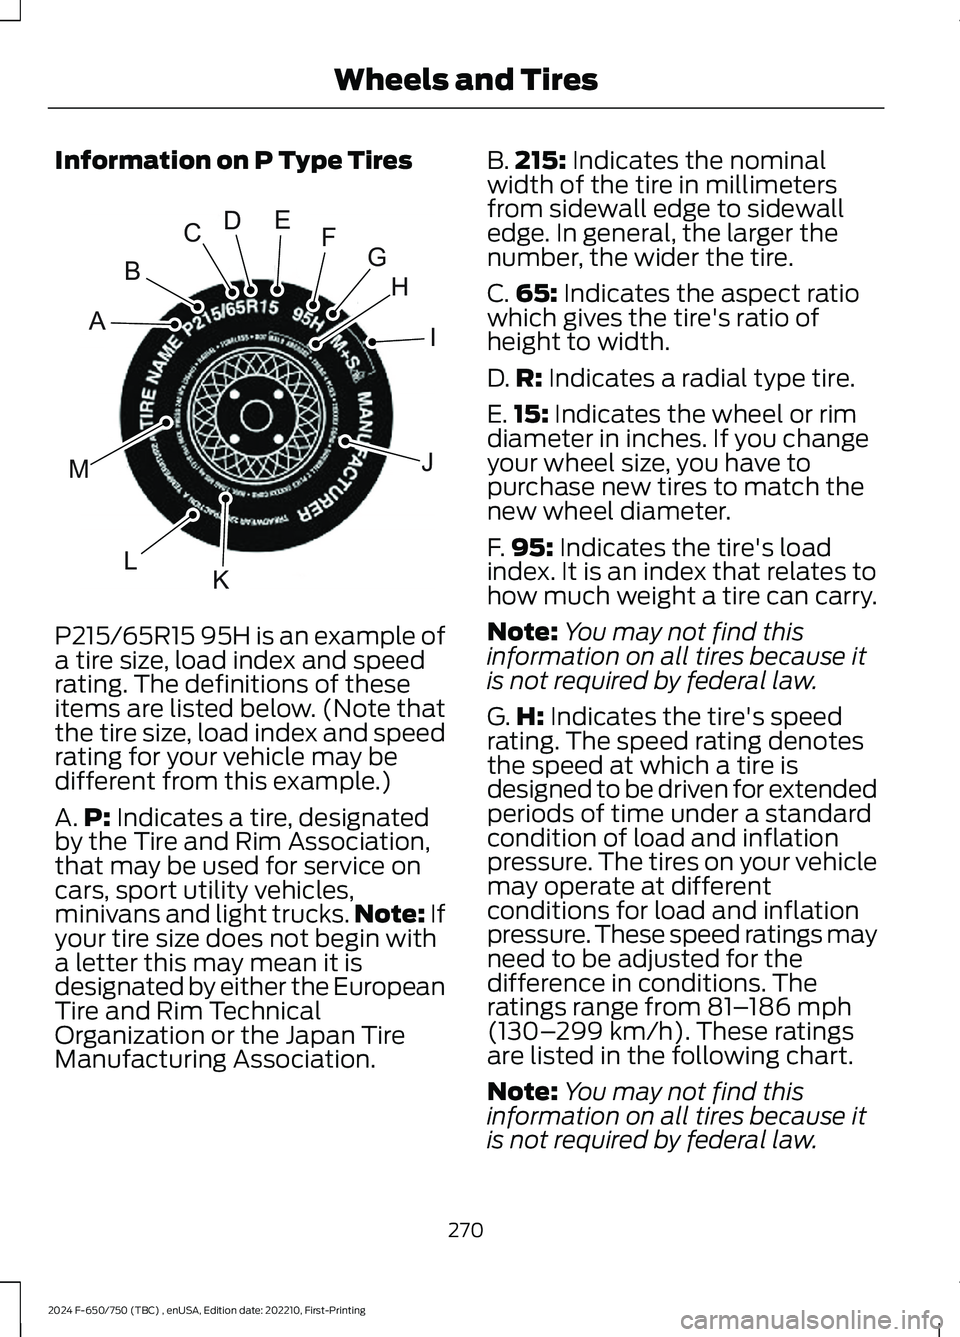
Information on P Type Tires
P215/65R15 95H is an example of
a tire size, load index and speedrating. The definitions of theseitems are listed below. (Note thatthe tire size, load index and speedrating for your vehicle may bedifferent from this example.)
A.P: Indicates a tire, designatedby the Tire and Rim Association,that may be used for service oncars, sport utility vehicles,minivans and light trucks.Note: Ifyour tire size does not begin witha letter this may mean it isdesignated by either the EuropeanTire and Rim TechnicalOrganization or the Japan TireManufacturing Association.
B.215: Indicates the nominalwidth of the tire in millimetersfrom sidewall edge to sidewalledge. In general, the larger thenumber, the wider the tire.
C.65: Indicates the aspect ratiowhich gives the tire's ratio ofheight to width.
D.R: Indicates a radial type tire.
E.15: Indicates the wheel or rimdiameter in inches. If you changeyour wheel size, you have topurchase new tires to match thenew wheel diameter.
F.95: Indicates the tire's loadindex. It is an index that relates tohow much weight a tire can carry.
Note:You may not find thisinformation on all tires because itis not required by federal law.
G.H: Indicates the tire's speedrating. The speed rating denotesthe speed at which a tire isdesigned to be driven for extendedperiods of time under a standardcondition of load and inflationpressure. The tires on your vehiclemay operate at differentconditions for load and inflationpressure. These speed ratings mayneed to be adjusted for thedifference in conditions. Theratings range from 81–186 mph(130–299 km/h). These ratingsare listed in the following chart.
Note:You may not find thisinformation on all tires because it
is not required by federal law.
270
2024 F-650/750 (TBC) , enUSA, Edition date: 202210, First-PrintingWheels and TiresHIJKLMABCDEFGE142543
Page 286 of 386
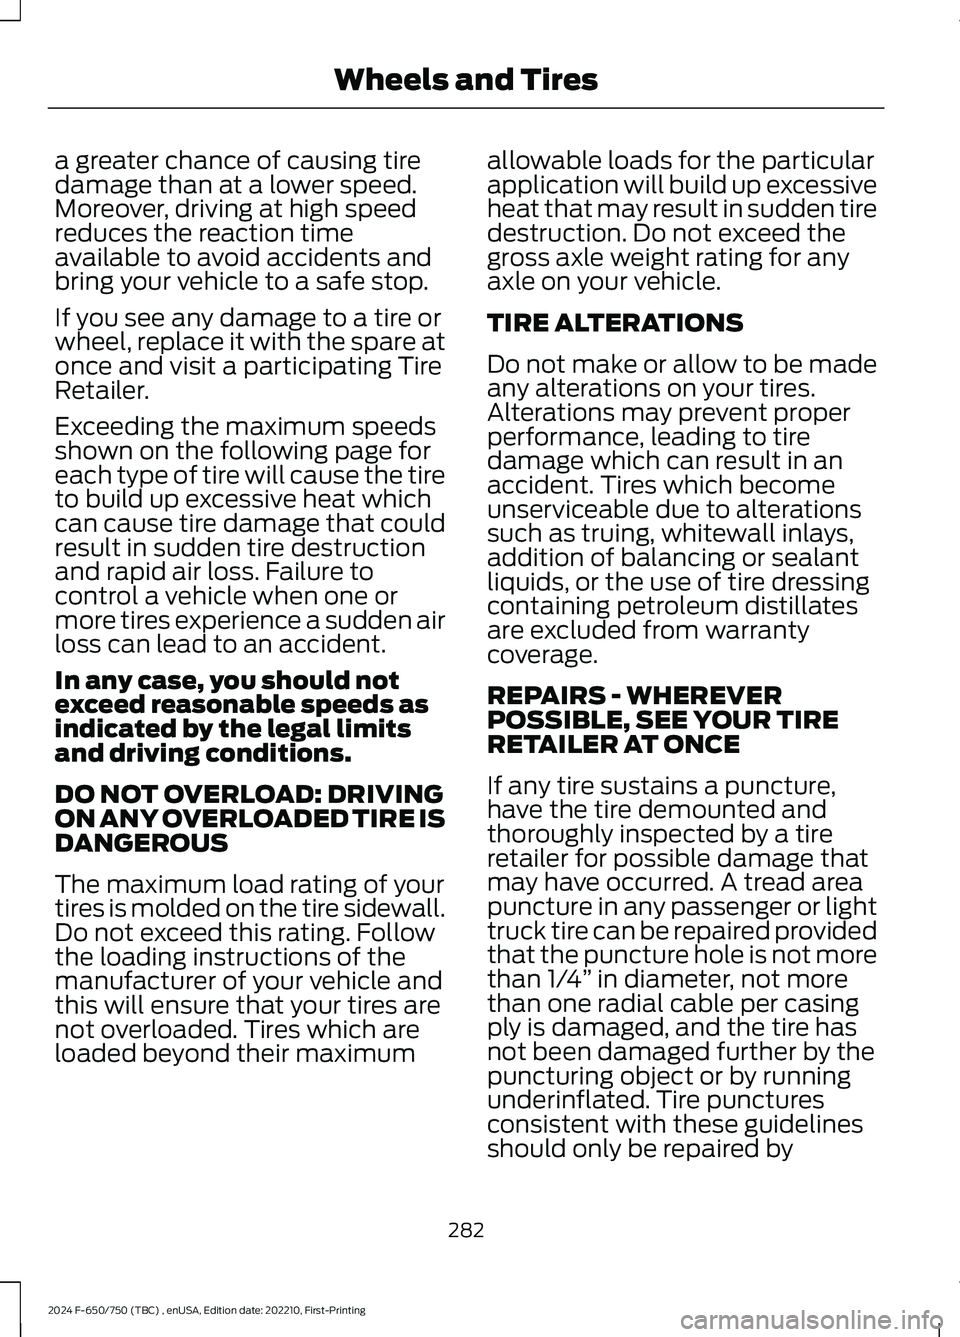
a greater chance of causing tiredamage than at a lower speed.Moreover, driving at high speedreduces the reaction timeavailable to avoid accidents andbring your vehicle to a safe stop.
If you see any damage to a tire orwheel, replace it with the spare atonce and visit a participating TireRetailer.
Exceeding the maximum speedsshown on the following page foreach type of tire will cause the tireto build up excessive heat whichcan cause tire damage that couldresult in sudden tire destructionand rapid air loss. Failure tocontrol a vehicle when one ormore tires experience a sudden airloss can lead to an accident.
In any case, you should notexceed reasonable speeds asindicated by the legal limitsand driving conditions.
DO NOT OVERLOAD: DRIVINGON ANY OVERLOADED TIRE ISDANGEROUS
The maximum load rating of yourtires is molded on the tire sidewall.Do not exceed this rating. Followthe loading instructions of themanufacturer of your vehicle andthis will ensure that your tires arenot overloaded. Tires which areloaded beyond their maximum
allowable loads for the particularapplication will build up excessiveheat that may result in sudden tiredestruction. Do not exceed thegross axle weight rating for anyaxle on your vehicle.
TIRE ALTERATIONS
Do not make or allow to be madeany alterations on your tires.Alterations may prevent properperformance, leading to tiredamage which can result in anaccident. Tires which becomeunserviceable due to alterationssuch as truing, whitewall inlays,addition of balancing or sealantliquids, or the use of tire dressingcontaining petroleum distillatesare excluded from warrantycoverage.
REPAIRS - WHEREVERPOSSIBLE, SEE YOUR TIRERETAILER AT ONCE
If any tire sustains a puncture,have the tire demounted andthoroughly inspected by a tireretailer for possible damage thatmay have occurred. A tread areapuncture in any passenger or lighttruck tire can be repaired providedthat the puncture hole is not morethan 1/4” in diameter, not morethan one radial cable per casingply is damaged, and the tire hasnot been damaged further by thepuncturing object or by runningunderinflated. Tire puncturesconsistent with these guidelinesshould only be repaired by
282
2024 F-650/750 (TBC) , enUSA, Edition date: 202210, First-PrintingWheels and Tires