2024 CHEVROLET SILVERADO tow
[x] Cancel search: towPage 92 of 433

Chevrolet Silverado 2500 HD/3500 HD Owner Manual (GMNA-Localizing-U.
S./Canada/Mexico-16908339) - 2024 - CRC - 12/5/22
90 Seats and Restraints
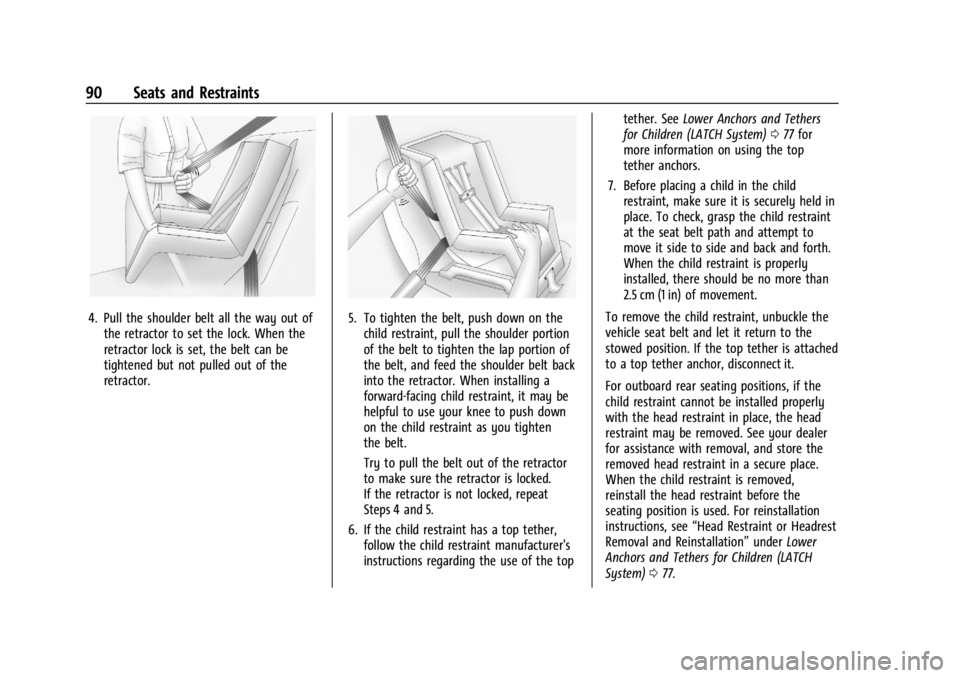
4. Pull the shoulder belt all the way out ofthe retractor to set the lock. When the
retractor lock is set, the belt can be
tightened but not pulled out of the
retractor.5. To tighten the belt, push down on thechild restraint, pull the shoulder portion
of the belt to tighten the lap portion of
the belt, and feed the shoulder belt back
into the retractor. When installing a
forward-facing child restraint, it may be
helpful to use your knee to push down
on the child restraint as you tighten
the belt.
Try to pull the belt out of the retractor
to make sure the retractor is locked.
If the retractor is not locked, repeat
Steps 4 and 5.
6. If the child restraint has a top tether, follow the child restraint manufacturer's
instructions regarding the use of the top tether. See
Lower Anchors and Tethers
for Children (LATCH System) 077 for
more information on using the top
tether anchors.
7. Before placing a child in the child restraint, make sure it is securely held in
place. To check, grasp the child restraint
at the seat belt path and attempt to
move it side to side and back and forth.
When the child restraint is properly
installed, there should be no more than
2.5 cm (1 in) of movement.
To remove the child restraint, unbuckle the
vehicle seat belt and let it return to the
stowed position. If the top tether is attached
to a top tether anchor, disconnect it.
For outboard rear seating positions, if the
child restraint cannot be installed properly
with the head restraint in place, the head
restraint may be removed. See your dealer
for assistance with removal, and store the
removed head restraint in a secure place.
When the child restraint is removed,
reinstall the head restraint before the
seating position is used. For reinstallation
instructions, see “Head Restraint or Headrest
Removal and Reinstallation” underLower
Anchors and Tethers for Children (LATCH
System) 077.
Page 95 of 433

Chevrolet Silverado 2500 HD/3500 HD Owner Manual (GMNA-Localizing-U.
S./Canada/Mexico-16908339) - 2024 - CRC - 12/5/22
Seats and Restraints 93
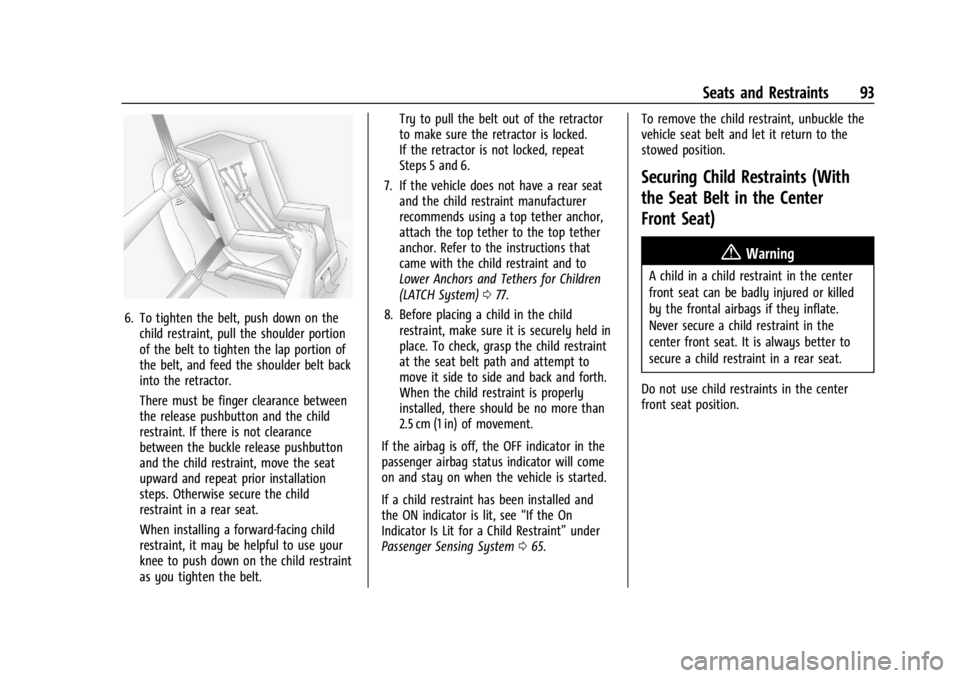
6. To tighten the belt, push down on thechild restraint, pull the shoulder portion
of the belt to tighten the lap portion of
the belt, and feed the shoulder belt back
into the retractor.
There must be finger clearance between
the release pushbutton and the child
restraint. If there is not clearance
between the buckle release pushbutton
and the child restraint, move the seat
upward and repeat prior installation
steps. Otherwise secure the child
restraint in a rear seat.
When installing a forward-facing child
restraint, it may be helpful to use your
knee to push down on the child restraint
as you tighten the belt. Try to pull the belt out of the retractor
to make sure the retractor is locked.
If the retractor is not locked, repeat
Steps 5 and 6.
7. If the vehicle does not have a rear seat and the child restraint manufacturer
recommends using a top tether anchor,
attach the top tether to the top tether
anchor. Refer to the instructions that
came with the child restraint and to
Lower Anchors and Tethers for Children
(LATCH System) 077.
8. Before placing a child in the child restraint, make sure it is securely held in
place. To check, grasp the child restraint
at the seat belt path and attempt to
move it side to side and back and forth.
When the child restraint is properly
installed, there should be no more than
2.5 cm (1 in) of movement.
If the airbag is off, the OFF indicator in the
passenger airbag status indicator will come
on and stay on when the vehicle is started.
If a child restraint has been installed and
the ON indicator is lit, see “If the On
Indicator Is Lit for a Child Restraint” under
Passenger Sensing System 065. To remove the child restraint, unbuckle the
vehicle seat belt and let it return to the
stowed position.
Securing Child Restraints (With
the Seat Belt in the Center
Front Seat)
{Warning
A child in a child restraint in the center
front seat can be badly injured or killed
by the frontal airbags if they inflate.
Never secure a child restraint in the
center front seat. It is always better to
secure a child restraint in a rear seat.
Do not use child restraints in the center
front seat position.
Page 97 of 433

Chevrolet Silverado 2500 HD/3500 HD Owner Manual (GMNA-Localizing-U.
S./Canada/Mexico-16908339) - 2024 - CRC - 12/5/22
Storage 95
Rear
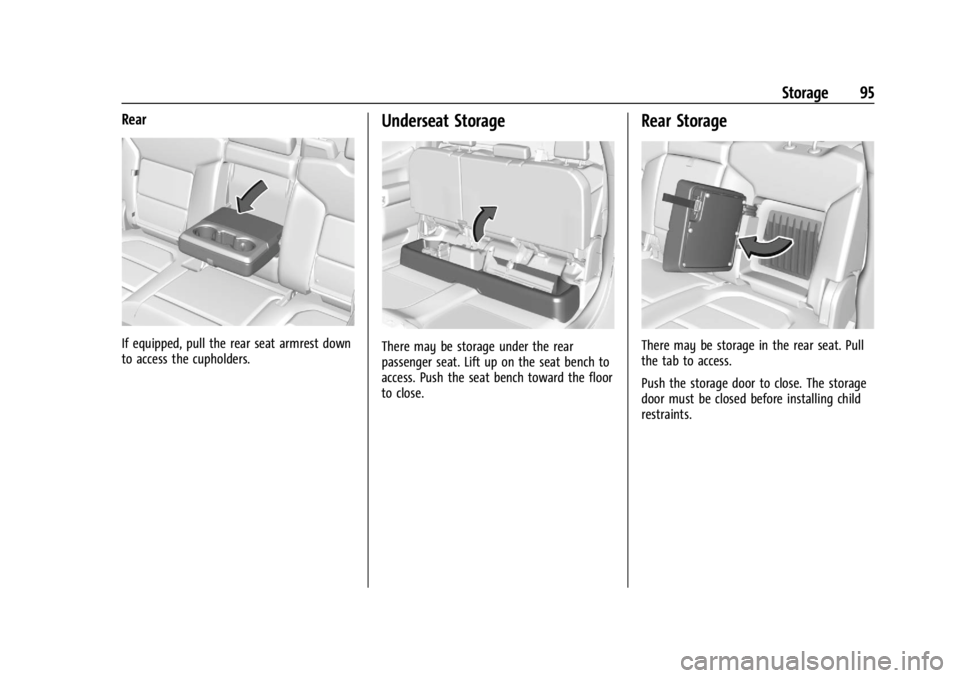
If equipped, pull the rear seat armrest down
to access the cupholders.
Underseat Storage
There may be storage under the rear
passenger seat. Lift up on the seat bench to
access. Push the seat bench toward the floor
to close.
Rear Storage
There may be storage in the rear seat. Pull
the tab to access.
Push the storage door to close. The storage
door must be closed before installing child
restraints.
Page 101 of 433

Chevrolet Silverado 2500 HD/3500 HD Owner Manual (GMNA-Localizing-U.
S./Canada/Mexico-16908339) - 2024 - CRC - 12/15/22
Instruments and Controls 99
Instruments and Controls
Controls
Steering Wheel Adjustment . . . . . . . . . . . 100
Heated Steering Wheel . . . . . . . . . . . . . . . . 100
Horn . . . . . . . . . . . . . . . . . . . . . . . . . . . . . . . . . . . 101
Windshield Wiper/Washer . . . . . . . . . . . . . 101
Compass . . . . . . . . . . . . . . . . . . . . . . . . . . . . . . . 102
Clock . . . . . . . . . . . . . . . . . . . . . . . . . . . . . . . . . . 102
Power Outlets . . . . . . . . . . . . . . . . . . . . . . . . . 102
Wireless Charging . . . . . . . . . . . . . . . . . . . . . 104
Warning Lights, Gauges, and Indicators
Warning Lights, Gauges, andIndicators . . . . . . . . . . . . . . . . . . . . . . . . . . . . 106
Instrument Cluster (Base Level) . . . . . . . . 107
Instrument Cluster (Uplevel) . . . . . . . . . . . 108
Speedometer . . . . . . . . . . . . . . . . . . . . . . . . . . . 111
Odometer . . . . . . . . . . . . . . . . . . . . . . . . . . . . . . 111
Trip Odometer . . . . . . . . . . . . . . . . . . . . . . . . . 111
Tachometer . . . . . . . . . . . . . . . . . . . . . . . . . . . . 111
Fuel Gauge . . . . . . . . . . . . . . . . . . . . . . . . . . . . . 111
Engine Oil Pressure Gauge . . . . . . . . . . . . . 112
Engine Coolant Temperature Gauge . . . . 113
Transmission Temperature Gauge (Uplevel only) . . . . . . . . . . . . . . . . . . . . . . . . 114
Voltmeter Gauge . . . . . . . . . . . . . . . . . . . . . . 114
Seat Belt Reminders . . . . . . . . . . . . . . . . . . . . 115
Airbag Readiness Light . . . . . . . . . . . . . . . . . 116
Passenger Airbag Status Indicator . . . . . . 116 Charging System Light . . . . . . . . . . . . . . . . . 117
Malfunction Indicator Lamp (Check
Engine Light) . . . . . . . . . . . . . . . . . . . . . . . . . 117
Brake System Warning Light . . . . . . . . . . . 119
Electric Parking Brake Light . . . . . . . . . . . . 119
Service Electric Parking Brake Light . . . . 119
Antilock Brake System (ABS) Warning Light . . . . . . . . . . . . . . . . . . . . . . . . . . . . . . . . . 120
Four-Wheel-Drive Light . . . . . . . . . . . . . . . . 120
Tow/Haul Mode Light . . . . . . . . . . . . . . . . . 120
Hill Descent Control Light . . . . . . . . . . . . . . 121
Lane Departure Warning (LDW) Light . . . . . . . . . . . . . . . . . . . . . . . . . . . . . . . . . 121
Automatic Emergency Braking (AEB) Disabled Light . . . . . . . . . . . . . . . . . . . . . . . . 121
Vehicle Ahead Indicator . . . . . . . . . . . . . . . . 121
Pedestrian Ahead Indicator . . . . . . . . . . . . . 121
Traction Off Light . . . . . . . . . . . . . . . . . . . . . . 122
Traction Control System (TCS)/Electronic Stability Control Light . . . . . . . . . . . . . . . . 122
Electronic Stability Control (ESC) Off Light . . . . . . . . . . . . . . . . . . . . . . . . . . . . . . . . . 122
Engine Coolant Temperature Warning Light . . . . . . . . . . . . . . . . . . . . . . . . . . . . . . . . . 123
Driver Mode Control Light . . . . . . . . . . . . . 123
Tire Pressure Light . . . . . . . . . . . . . . . . . . . . . 123
Engine Oil Pressure Light (Uplevel Cluster) . . . . . . . . . . . . . . . . . . . . . . . . . . . . . . 124
Low Fuel Warning Light . . . . . . . . . . . . . . . 124
Security Light . . . . . . . . . . . . . . . . . . . . . . . . . . 125 High-Beam On Light . . . . . . . . . . . . . . . . . . . 125
Front Fog Lamp Light . . . . . . . . . . . . . . . . . . 125
Lamps On Reminder . . . . . . . . . . . . . . . . . . . 125
Cruise Control Light . . . . . . . . . . . . . . . . . . . 126
Door Ajar Light . . . . . . . . . . . . . . . . . . . . . . . . 126
Information Displays
Driver Information Center (DIC) (Base
Level) . . . . . . . . . . . . . . . . . . . . . . . . . . . . . . . . 126
Driver Information Center (DIC) (Uplevel) . . . . . . . . . . . . . . . . . . . . . . . . . . . . . 128
Head-Up Display (HUD) . . . . . . . . . . . . . . . . 130
Vehicle Messages
Vehicle Messages . . . . . . . . . . . . . . . . . . . . . . 134
Engine Power Messages . . . . . . . . . . . . . . . 134
Vehicle Speed Messages . . . . . . . . . . . . . . . 134
Universal Remote System
Universal Remote System . . . . . . . . . . . . . . 134
Universal Remote System Programming . . . . . . . . . . . . . . . . . . . . . . . . 135
Universal Remote System Operation . . . 136
Page 112 of 433

Chevrolet Silverado 2500 HD/3500 HD Owner Manual (GMNA-Localizing-U.
S./Canada/Mexico-16908339) - 2024 - CRC - 12/15/22
110 Instruments and Controls
Audio
Browse music, select from the favorites,
or change the audio source. Use the
thumbwheel to change the station or go to
the next or previous track.
Navigation
If there is an active route, the Turn-by-Turn
directions will appear on the Navigation
Page, if there is no active route a compass
will be displayed.
Phone
If there is no active phone call, view recent
calls, or scroll through contacts.
Options
Use the thumbwheel to scroll through items
in the Options menu.
Display Layout :Choose Classic, Progressive,
Digital, and Clean layout by pressing the
thumbwheel while the desired item is
highlighted. Exit the Layout menu by
pressing
o.
Left/Right Side Info : Press the thumbwheel
to select the items to be displayed in the
display areas. See "Left/Right Side Info"
previously in this section. Lower Gauges :
Choose one of three gauge
configurations by pressing the thumbwheel
while the desired item is highlighted. The
selected configuration will be displayed at
the bottom of the display.
Maximum displays fuel level, coolant
temperature, engine oil pressure, and
battery voltage. Transmission fluid
temperature displays instead of battery
voltage while in Tow Haul mode.
Medium displays fuel level, and coolant
temperature.
Minimum displays only the fuel level.
Info Page Options : Press the thumbwheel
to select the items to be displayed in the
Info app. See Driver Information Center (DIC)
(Base Level) 0126 orDriver Information
Center (DIC) (Uplevel) 0128.
Units : Choose US or metric units by
pressing the thumbwheel while the desired
item is highlighted.
Speed Warning : Allows the driver to set a
speed that they do not want to exceed. To
set the Speed Warning press the
thumbwheel when Speed Warning is
displayed. Use the thumbwheel to adjust
the value and press to set the speed. Once the speed is set, this feature can be
turned off by pressing the thumbwheel
while viewing this page. If the selected
speed limit is exceeded, a pop-up warning is
displayed with a chime.
Speed Sign Display :
Shows sign
information, which comes from a roadway
database in the onboard navigation system,
if equipped. The sign will show “− −”when
offline maps are unavailable. See Maps
0 160.
Head-up Display (HUD) : If equipped, this
feature allows for adjusting the angle of the
HUD image and changing or turning off the
Speed Limit Sign.
HUD Rotation: Press the thumbwheel while
Adjust Rotation is highlighted to enter
Adjust Mode. Scroll to adjust the angle of
the HUD display. Press the thumbwheel to
confirm and save the setting. This feature
may only be available in P (Park).
Speed Limit Style: Press the thumbwheel
while Speed Limit Style is highlighted to
change the speed sign style or to turn it off.
Software Information : Displays open source
software information.
Reset To Defaults : Allows the driver to
reset to default settings.
Page 116 of 433

Chevrolet Silverado 2500 HD/3500 HD Owner Manual (GMNA-Localizing-U.
S./Canada/Mexico-16908339) - 2024 - CRC - 12/15/22
114 Instruments and Controls
Transmission Temperature Gauge
(Uplevel only)
Metric Uplevel
English Uplevel
This gauge displays while the vehicle is in
the Tow/Haul driver mode, and the lower
gauges are configured to display four
gauges. The transmission fluid temperature
is also selectable as Left/Right side info. To
change gauge configurations, see “Options”
under Instrument Cluster (Base Level) 0107
or Instrument Cluster (Uplevel) 0108.
The transmission temperature gauge shows
the transmission fluid temperature. If the
gauge is reading in the red area and/or a message appears in the Driver Information
Center (DIC), the vehicle must be stopped
and the cause checked. One possible cause is
a low fluid level in the transmission.
Caution
Do not drive the vehicle while the
transmission fluid is overheating, or the
transmission can be damaged. This could
lead to costly repairs that would not be
covered by the warranty.
Voltmeter Gauge
Base Level
Uplevel
When the ignition is on, this gauge indicates
the battery voltage.
When the engine is running, this gauge
shows the condition of the charging system.
The gauge can transition from a higher to
lower or a lower to higher reading. This is
normal. If the vehicle is operating outside
the normal operating range, the charging
system light comes on. See Charging System
Light 0117. The voltmeter gauge may also
read lower when in fuel economy mode.
This is normal.
Readings outside the normal operating
range can also occur when a large number
of electrical accessories are operating in the
vehicle and the engine is left idling for an
extended period. This condition is normal
since the charging system is not able to
provide full power at engine idle. As engine
speeds are increased, this condition should
Page 117 of 433

Chevrolet Silverado 2500 HD/3500 HD Owner Manual (GMNA-Localizing-U.
S./Canada/Mexico-16908339) - 2024 - CRC - 12/15/22
Instruments and Controls 115
correct itself as higher engine speeds allow
the charging system to create maximum
power.
The vehicle can only be driven for a short
time with the readings outside the normal
operating range. If the vehicle must be
driven, turn off all accessories, such as the
radio and air conditioner.
Readings outside the normal operating
range indicate a possible problem in the
electrical system. Have the vehicle serviced
as soon as possible.
Uplevel
This gauge displays while the lower gauges
are configured to display four gauges. When
the vehicle is in the Tow/Haul driver mode
this gauge is replaced by the transmission
temperature gauge. To change gauge
configurations, see“Options”under
Instrument Cluster (Base Level) 0107 or
Instrument Cluster (Uplevel) 0108.
Seat Belt Reminders
Driver Seat Belt Reminder Light
There is a driver seat belt reminder light on
the instrument cluster.
When the vehicle is started, this light
flashes and a chime may come on to remind
the driver to fasten their seat belt. Then the
light stays on solid until the belt is buckled.
This cycle may continue several times if the
driver remains or becomes unbuckled while
the vehicle is moving.
If the driver seat belt is buckled, neither the
light nor the chime comes on.
Front Passenger Seat Belt Reminder
Light
The vehicle may have a front passenger seat
belt reminder light near the passenger
airbag status indicator.
See Passenger Sensing System 065.
When the vehicle is started, this light
flashes and a chime may come on to remind
passengers to fasten their seat belt. Then
the light stays on solid until the belt is
buckled. This cycle continues several times if
the front passenger remains or becomes
unbuckled while the vehicle is moving.
If the front passenger seat belt is buckled,
neither the chime nor the light comes on.
The front passenger seat belt reminder light
and chime may turn on if an object is put
on the seat such as a briefcase, handbag,
grocery bag, laptop, or other electronic
device. To turn off the reminder light and/or
chime, remove the object from the seat or
buckle the seat belt.
Second Row Passenger Seat Belt
Reminder Lights
The vehicle may have second row passenger
seat belt reminder lights.
Page 120 of 433

Chevrolet Silverado 2500 HD/3500 HD Owner Manual (GMNA-Localizing-U.
S./Canada/Mexico-16908339) - 2024 - CRC - 12/15/22
118 Instruments and Controls
Caution
If the vehicle is driven continually with
this light on, the emission control system
may not work as well, the fuel economy
may be lower, and the vehicle may not
run smoothly. This could lead to costly
repairs that might not be covered by the
vehicle warranty.
Caution
Modifications to the engine, transmission,
exhaust, intake, or fuel system, or the
use of replacement tires that do not
meet the original tire specifications, can
cause this light to come on. This could
lead to costly repairs not covered by the
vehicle warranty. This could also affect
the vehicle’s ability to pass an Emissions
Inspection/Maintenance test. See
Accessories and Modifications0304.
If the light is flashing : A malfunction has
been detected that could damage the
emission control system and increase vehicle
emissions. Diagnosis and service may be
required. To help prevent damage, reduce vehicle
speed and avoid hard accelerations and
uphill grades. If towing a trailer, reduce the
amount of cargo being hauled as soon as
possible.
If the light continues to flash, find a safe
place to park. Turn the vehicle off and wait
at least 10 seconds before restarting the
engine. If the light is still flashing, follow
the previous guidelines and see your dealer
for service as soon as possible.
If the light is on steady :
A malfunction has
been detected. Diagnosis and service may be
required.
Check the following:
.If fuel has been added to the vehicle
using the capless funnel adapter, make
sure that it has been removed. See
“Filling the Tank with a Portable Gas Can”
under Filling the Tank (Chassis Cab and
Box Delete Models) 0269 or
Filling the Tank (Pickup Models) 0267.
The diagnostic system can detect if the
adapter has been left installed in the
vehicle, allowing fuel to evaporate into
the atmosphere. A few driving trips with
the adapter removed may turn off the
light.
.Poor fuel quality can cause inefficient
engine operation and poor driveability,
which may go away once the engine is
warmed up. If this occurs, change the fuel
brand. It may require at least one full
tank of the proper fuel to turn the light
off. See Recommended Fuel 0266.
If the light remains on, see your dealer.
Emissions Inspection and Maintenance
Programs
If the vehicle requires an Emissions
Inspection/Maintenance test, the test
equipment will likely connect to the
vehicle's Data Link Connector (DLC).
The DLC is under the instrument panel to
the left of the steering wheel. Connecting
devices that are not used to perform an
Emissions Inspection/Maintenance test or to
service the vehicle may affect vehicle