2024 CHEVROLET SILVERADO tow
[x] Cancel search: towPage 227 of 433
Chevrolet Silverado 2500 HD/3500 HD Owner Manual (GMNA-Localizing-U.
S./Canada/Mexico-16908339) - 2024 - CRC - 12/12/22
Driving and Operating 225
Shifting Out of N (Neutral)
To shift out of N (Neutral):1. Turn the ignition on with the engine off. See Ignition Positions 0211.
2. Set the parking brake. See Electric
Parking Brake 0228.
3. Shift the transmission to N (Neutral).
4. Shift the transfer case to 2
m. Transfer
case shifts out of N (Neutral) can only be
made into 2
m. When the shift to 2mis
complete, the indicator in the instrument
cluster will stop flashing. If the transfer
case cannot complete a shift, the
indicator will return to the previously
selected setting.
Part-time Transfer Case
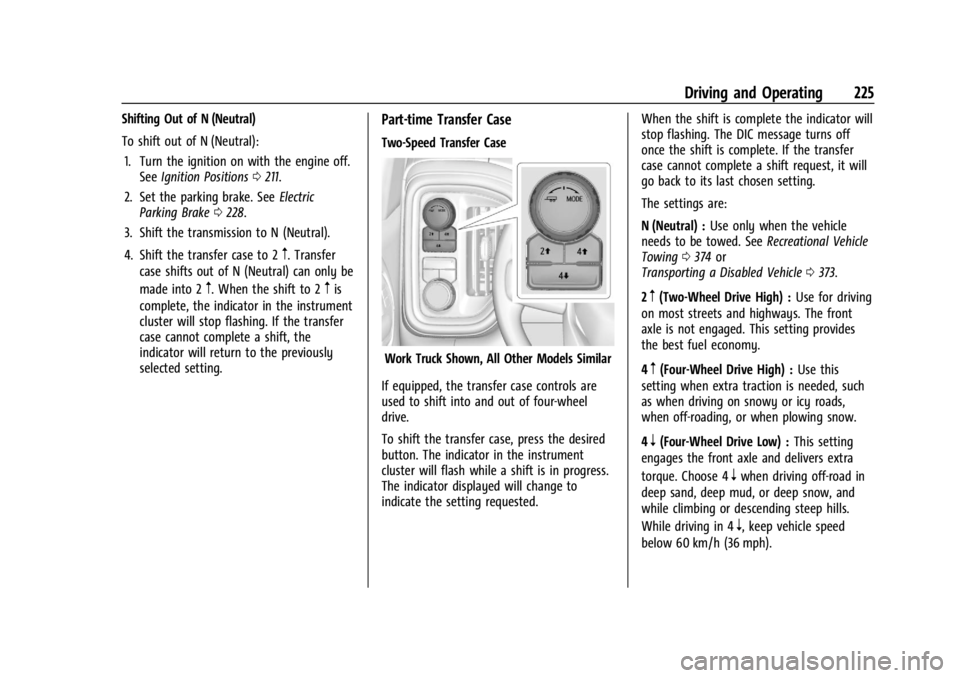
Two-Speed Transfer Case
Work Truck Shown, All Other Models Similar
If equipped, the transfer case controls are
used to shift into and out of four-wheel
drive.
To shift the transfer case, press the desired
button. The indicator in the instrument
cluster will flash while a shift is in progress.
The indicator displayed will change to
indicate the setting requested. When the shift is complete the indicator will
stop flashing. The DIC message turns off
once the shift is complete. If the transfer
case cannot complete a shift request, it will
go back to its last chosen setting.
The settings are:
N (Neutral) :
Use only when the vehicle
needs to be towed. See Recreational Vehicle
Towing 0374 or
Transporting a Disabled Vehicle 0373.
2
m(Two-Wheel Drive High) : Use for driving
on most streets and highways. The front
axle is not engaged. This setting provides
the best fuel economy.
4
m(Four-Wheel Drive High) : Use this
setting when extra traction is needed, such
as when driving on snowy or icy roads,
when off-roading, or when plowing snow.
4
n(Four-Wheel Drive Low) : This setting
engages the front axle and delivers extra
torque. Choose 4
nwhen driving off-road in
deep sand, deep mud, or deep snow, and
while climbing or descending steep hills.
While driving in 4
n, keep vehicle speed
below 60 km/h (36 mph).
Page 231 of 433
Chevrolet Silverado 2500 HD/3500 HD Owner Manual (GMNA-Localizing-U.
S./Canada/Mexico-16908339) - 2024 - CRC - 12/12/22
Driving and Operating 229
If the EPB is applied while the vehicle is
moving, the vehicle will decelerate as long
as the switch is pressed. If the switch is
pressed until the vehicle comes to a stop,
the EPB will remain applied.
The vehicle may automatically apply the EPB
in some situations when the vehicle is not
moving. This is normal, and is done to
periodically check the correct operation of
the EPB system, or at the request of other
safety functions that utilize the EPB.
If the EPB fails to apply, block the rear
wheels to prevent vehicle movement.
EPB Release
To release the EPB:1. Turn the ignition on or to accessory mode.
2. Apply and hold the brake pedal.
3. Press the EPB switch momentarily.
The EPB is released when the red parking
brake status light is off.
If the amber service parking brake warning
light is on, release the EPB by pressing and
holding the EPB switch. Continue to hold the
switch until the red parking brake status
light is off. If either light stays on after
release is attempted, see your dealer.
Caution
Driving with the parking brake on can
overheat the brake system and cause
premature wear or damage to brake
system parts. Make sure that the parking
brake is fully released and the brake
warning light is off before driving.
If you are towing a trailer and parking on a
hill, see Driving Characteristics and Towing
Tips 0270.
Automatic EPB Release
The EPB will automatically release if the
vehicle is running, placed into gear, and an
attempt is made to drive away. Avoid rapid
acceleration when the EPB is applied, to
preserve parking brake lining life.
Brake Assist
Brake Assist detects rapid brake pedal
applications due to emergency braking
situations and provides additional braking to
activate the Antilock Brake System (ABS) if
the brake pedal is not pushed hard enough
to activate ABS normally. Minor noise, brake
pedal pulsation, and/or pedal movement
during this time may occur. Continue to apply the brake pedal as the driving
situation dictates. Brake Assist disengages
when the brake pedal is released.
Hill Start Assist (HSA)
{Warning
Do not rely on the HSA feature. HSA does
not replace the need to pay attention
and drive safely. You may not hear or
feel alerts or warnings provided by this
system. Failure to use proper care when
driving may result in injury, death,
or vehicle damage. See
Defensive Driving
0 194.
When the vehicle is stopped on a grade, Hill
Start Assist (HSA) prevents the vehicle from
rolling in an unintended direction during the
transition from brake pedal release to
accelerator pedal apply. The brakes release
when the accelerator pedal is applied. If the
accelerator pedal is not applied within a few
minutes, the Electric Parking Brake will
apply. The brakes may also release under
other conditions. Do not rely on HSA to hold
the vehicle.
Page 234 of 433
Chevrolet Silverado 2500 HD/3500 HD Owner Manual (GMNA-Localizing-U.
S./Canada/Mexico-16908339) - 2024 - CRC - 12/12/22
232 Driving and Operating
Noise from the Electronic Brake Control
Module (EBCM) is normal when HDC is
active.
When HDC is activated, the initial HDC
speed is set to the current driving speed.
It can be increased or decreased by pressing
+RES or SET- on the steering wheel, or by
applying the accelerator or brake pedal. This
adjusted speed becomes the new set speed.
HDC will remain enabled between 30 and
60 km/h (19 and 37 mph); however, vehicle
speed cannot be set or maintained in this
range. HDC will automatically disable if the
vehicle speed is above 80 km/h (50 mph) or
above 60 km/h (37 mph) for at least
30 seconds.
5must be pressed again to re-enable HDC.
HDC may disable after an extended period
of use. If this happens, HDC will require
time to cool down. The length of time HDC
remains active depends on road conditions,
grade, set speed, vehicle loading, and
outside temperature.
When enabled, if the vehicle speed is above
30 km/h (19 mph) and below 60 km/h
(37 mph), a DIC message will display.
Driver Mode Control
Driver Mode Control (DMC) allows the driver
to adjust the overall driving experience to
better suit preference by adjusting multiple
systems to fit specific driving needs. Drive
mode availability and affected vehicle
subsystems are dependent upon vehicle trim
level, region, and optional features.
Mode Activation
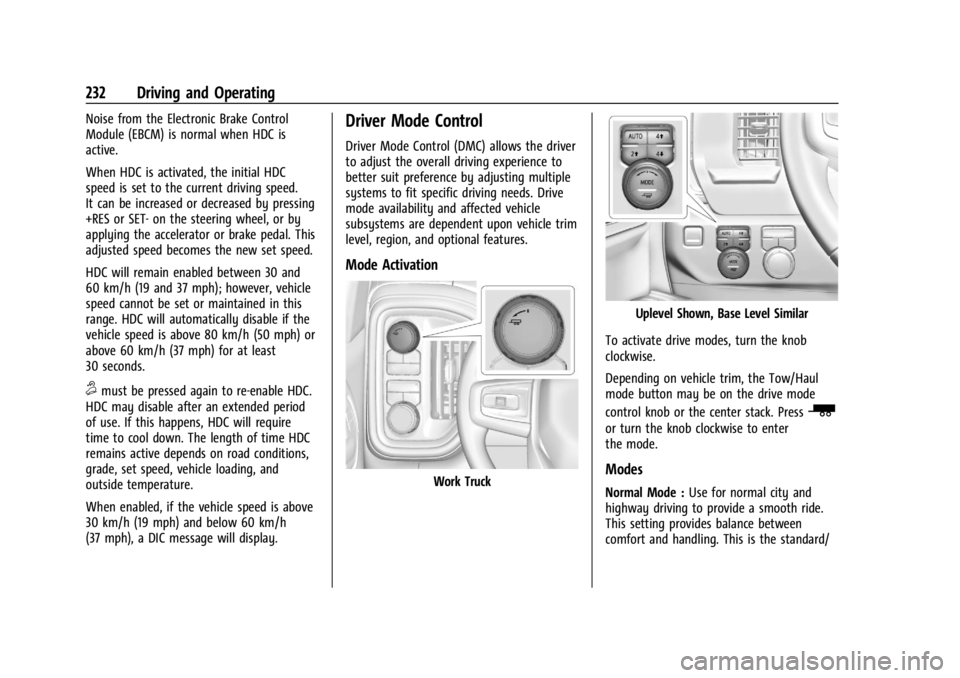
Work Truck
Uplevel Shown, Base Level Similar
To activate drive modes, turn the knob
clockwise.
Depending on vehicle trim, the Tow/Haul
mode button may be on the drive mode
control knob or the center stack. Press
_
or turn the knob clockwise to enter
the mode.
Modes
Normal Mode : Use for normal city and
highway driving to provide a smooth ride.
This setting provides balance between
comfort and handling. This is the standard/
Page 235 of 433
Chevrolet Silverado 2500 HD/3500 HD Owner Manual (GMNA-Localizing-U.
S./Canada/Mexico-16908339) - 2024 - CRC - 12/12/22
Driving and Operating 233
default mode. There is no persistent
indicator in the instrument cluster for
this mode.
6Snow/Ice Mode :Snow/Ice Mode
improves vehicle acceleration on snow and
ice covered roads. When active, Snow/Ice
Mode will adjust acceleration to optimize
traction on slippery surfaces. This can
compromise the acceleration on dry asphalt.
This feature is not intended for use when
the vehicle is stuck in sand, mud, ice, snow,
or gravel. If the vehicle becomes stuck, see If
the Vehicle Is Stuck 0203.
7Off-Road Mode : Use this mode for
off-road recreational driving. Off-Road Mode
should be used to improve driving at
moderate speeds, on grass, gravel, dirt,
unpaved roads, or snow-covered roads. The
accelerator pedal is tuned for off-road use.
This mode modifies pedal mapping,
transmission shift pattern, Antilock Brake
System (ABS), StabiliTrak/Electronic Stability
Control (ESC), and Traction Control System
(TCS) performance.
For more information on off-road driving see
Off-Road Driving 0197.
_Tow/Haul Mode : Use this mode
when hauling heavy loads to provide
increased performance and vehicle control.
Tow/Haul Mode adjusts the transmission
shift pattern, trailer sway, and steering.
If the vehicle is turned off with Tow/Haul
Mode active and then restarted within four
hours or less, Tow/Haul will remain active.
Otherwise, the vehicle will start in
Normal Mode.
If the vehicle has a diesel engine, exhaust
braking is automatically activated when
Tow/Haul Mode is selected. It maintains
vehicle speed by automatically
implementing a shift pattern that uses the
engine and the transmission to slow the
vehicle. The system will command
downshifts and use the turbocharger on the
engine to reduce vehicle speed when the
brake is applied. The normal tow/haul shift
pattern will return once the vehicle is on a
low grade or when the accelerator pedal is
pressed.
While in the Electronic Range Select (ERS)
Mode, grade breaking is deactivated,
allowing the driver to select a range and
limiting the highest gear available. See
Manual Mode 0220. For more information on trailer weight
specifications, see
Towing Equipment 0278.
Locking Rear Axle
Vehicles with a locking rear axle can give
more traction on snow, mud, ice, sand,
or gravel. It works like a standard axle most
of the time, but when traction is low, this
feature will allow the rear wheel with the
most traction to move the vehicle.
Cruise Control
If equipped, cruise control allows the vehicle
to maintain a set speed of 40 km/h
(25 mph) or more without active
acceleration. Cruise control does not work at
speeds below about 40 km/h (25 mph).
{Warning
Cruise control can be dangerous where
you cannot drive safely at a steady
speed. Do not use cruise control on
winding roads or in heavy traffic.
Cruise control can be dangerous on
slippery roads. On such roads, fast
changes in tire traction can cause
(Continued)
Page 237 of 433

Chevrolet Silverado 2500 HD/3500 HD Owner Manual (GMNA-Localizing-U.
S./Canada/Mexico-16908339) - 2024 - CRC - 12/12/22
Driving and Operating 235
Reducing Speed While Using Cruise Control
If cruise control is already activated:
.Press and hold SET–down until the
desired lower speed is reached, then
release it.
.To decrease vehicle speed in small
increments, briefly press SET– down. For
each press, the vehicle goes about 1 km/h
(1 mph) slower.
The speedometer reading can be displayed
in either English or metric units. See
Instrument Cluster (Base Level) 0107 or
Instrument Cluster (Uplevel) 0108. The
increment value used depends on the units
displayed.
Passing Another Vehicle While Using Cruise
Control
Use the accelerator pedal to increase the
vehicle speed. When you take your foot off
the accelerator pedal, the vehicle will slow
down to the previously set cruise speed.
While pressing the accelerator pedal or
shortly following the release to override
cruise control, briefly pressing SET– will
result in cruise control set to the current
vehicle speed. Using Cruise Control on Hills
How well cruise control works on a hill
depends on the vehicle speed, the load, and
the steepness of the hill. When going up a
steep hill, you may have to apply the
accelerator pedal to maintain the set speed.
While going downhill, cruise braking helps
maintain driver selected speed.
Cruise Grade Braking is enabled when the
vehicle is started and cruise control is active.
It assists in maintaining driver selected
speed when driving on downhill grades by
using the engine and transmission to slow
the vehicle.
For other forms of descent control, see
Hill
Descent Control (HDC) 0231, Automatic
Transmission 0218, and Tow/Haul Mode
0 221.
Ending Cruise Control
There are four ways to end cruise control:
.Lightly apply the brake pedal.
.Press*.
.Shift the transmission to N (Neutral).
.Press5. Erasing Speed Memory
The cruise control set speed is erased from
memory if
5is pressed or the ignition is
turned off.
Adaptive Cruise Control (Camera)
If equipped, Adaptive Cruise Control (ACC)
allows the cruise control set speed and
following gap to be selected. Read this
entire section before using this system. The
following gap is the following time between
your vehicle and a vehicle detected directly
ahead in your path, moving in the same
direction. If no vehicle is detected in your
path, ACC works like regular cruise control.
ACC uses a windshield mounted front
camera sensor.
See Radio Frequency Statement 0407.
If a vehicle is detected in your path, ACC can
apply acceleration or limited, moderate
braking to maintain the selected following
gap. To disengage ACC, apply the brake.
If ACC is controlling the vehicle speed when
the Traction Control System (TCS) or
StabiliTrak/Electronic Stability Control (ESC)
system activates, ACC may automatically
disengage. See Traction Control/Electronic
Stability Control 0230. When road
Page 246 of 433

Chevrolet Silverado 2500 HD/3500 HD Owner Manual (GMNA-Localizing-U.
S./Canada/Mexico-16908339) - 2024 - CRC - 12/12/22
244 Driving and Operating
When following a vehicle and entering a
curve, ACC may not detect the vehicle ahead
and accelerate to the set speed. When this
happens, the vehicle ahead indicator will not
appear.
ACC may detect a vehicle that is not in your
lane and apply the brakes.
ACC may occasionally provide an alert and/
or braking that is considered unnecessary.
It could respond to vehicles in different
lanes or stationary objects when entering or
exiting a curve. This is normal operation.
The vehicle does not need service.Other Vehicle Lane Changes
ACC will not detect a vehicle ahead until it
is completely in the lane. The brakes may
need to be manually applied.
Objects Not Directly in Front of Your Vehicle
The detection of objects in front of the
vehicle may not be possible if:
.The vehicle or object ahead is not within
your lane.
.The vehicle ahead is shifted, not centered,
or is shifted to one side of the lane.
Driving in Narrow Lanes
Vehicles in adjacent traffic lanes or roadside
objects may be incorrectly detected when
located along the roadway. Do Not Use ACC on Hills
Do not use ACC when driving on steep hills
as ACC may not detect a vehicle ahead.
Towing with ACC
If equipped when towing a trailer, ACC
driving characteristics such as following gap,
acceleration rates and braking rates may be
modified to provide a better towing
experience.
When ACC is used with vehicles equipped
with aftermarket trailer brake controller,
disengage ACC before applying the manual
trailer brake. ACC will not automatically
disengage when manual trailer brake is
applied.
ACC may be used when towing a trailer
when trailer attached is within GM-approved
allowable size and weight limits. See
Trailer
Towing 0274.
Page 247 of 433
Chevrolet Silverado 2500 HD/3500 HD Owner Manual (GMNA-Localizing-U.
S./Canada/Mexico-16908339) - 2024 - CRC - 12/12/22
Driving and Operating 245
When towing a trailer with ACC, it is
important to properly set the Trailer Gain.
See“Integrated Trailer Brake Control
System” inTowing Equipment 0278 for
Trailer Gain Adjustment Procedure.
Use Tow/Haul mode when driving down
steep hills or mountain grades, or when
hauling heavy loads. See Driver Mode
Control 0232.
Disengaging ACC
There are three ways to disengage ACC:
.Step lightly on the brake pedal.
.Press*.
.PressJ.
Erasing Speed Memory
The ACC set speed is erased from memory if
Jis pressed or if the ignition is turned off.
Weather Conditions Affecting ACC
If the interior temperature is extremely
high, the instrument cluster may indicate
that ACC is temporarily unavailable. This can
be caused by extreme hot weather
conditions with direct sunlight on the front
camera. ACC will return to normal operation
once the cabin temperature is lower. Conditions that are associated with low
visibility, such as fog, rain, snow, or road
spray, may limit ACC performance. Water
droplets from rain or snow that remain on
the windshield may also limit ACC’s ability
to detect objects.
System operation may be limited under
snow, heavy rain, or road spray conditions.
{Warning
Camera visibility may be limited and the
ACC system may not work properly if the
windshield is not clear. Do not use ACC if
moisture is present on the inside of the
windshield or the windshield washer is
used in cold weather. Turn on the front
defroster and make sure the windshield is
clear before using ACC. Before driving,
check that the windshield wipers are in
good condition and replace them if worn.
Lighting Conditions Affecting ACC
The ACC front camera can be affected by
poor lighting conditions, and ACC may have
limited performance when:
.There are changes in brightness, such as
entering and exiting tunnels, bridges, and
overpasses.
.Low sun angles cause the camera to not
detect objects, or it is more difficult to
detect objects in the same traffic lane.
.Lighting is poor in the evening or early
morning
.There are multiple changes in brightness
or shadows along the vehicle roadway.
.In a tunnel without the headlamps on,
or in a tunnel when there is a vehicle in
front that does not have its taillamps on.
.Subjected to strong light from opposing
lane traffic in the front of the vehicle,
such as high-beam headlamps from
oncoming traffic.
Accessory Installations and Vehicle
Modifications
Do not install or place any object around
the front camera windshield area that would
obstruct the front camera view.
Do not install objects on top of the vehicle
that overhang and obstruct the front
camera, such as a canoe, kayak, or other
items that can be transported on the
vehicle roof.
Do not modify the hood, headlamps, or fog
lamps, as this may limit the camera’s ability
to detect an object.
Page 255 of 433

Chevrolet Silverado 2500 HD/3500 HD Owner Manual (GMNA-Localizing-U.
S./Canada/Mexico-16908339) - 2024 - CRC - 12/12/22
Driving and Operating 253
when the Camera App is active. To
access this view when in a forward
gear above 12 km/h (8 mph), select
CAMERA on the infotainment
display and select Picture-in-Picture
Side View. The view can be closed
by selecting X, Home or Back.
Additional Views and Alerts
.Turn Signal Activated Views
Displays a rearward view of the left or
right side of the vehicle and trailer when
a trailer is connected. Views are provided
based on turn signal activation with the
right-side view being shown when the
right turn signal is active and the left side
view being shown when the left turn
signal is active. The feature can be
enabled or disabled.To view available
settings from the infotainment screen,
touch Settings > Vehicle > Collision/
Detection Systems. The view can be
closed early by selecting X, Home or Back.
A Trailer Length Indicator Overlay is
available in the Turn Signal Activated
Views when the trailer is relatively
straight behind the vehicle and a
compatible profile is configured and
selected via the Trailering App. The
overlay will not be visible when the position of the trailer is too far to the left
or right. The overlay can be enabled or
disabled. To view available settings from
the infotainment screen, touch Settings >
Vehicle > Collision/Detection Systems.
.Jack-Knife Detection and Alert
The vehicle may be equipped with
Jack-Knife Detection. The system will track
the position of the trailer relative to the
vehicle. As the front of the trailer
approaches the rear of the vehicle, a
warning or an alert will be displayed.
A warning indicates to the driver to
proceed with caution, an alert indicates
that a collision is imminent. Based on
vehicle equipment and user settings, the
visual warning or alert may be
accompanied by audible or safety alert
seat notifications. To view available
settings from the infotainment screen,
touch Settings > Vehicle > Collision/
Detection Systems.
.Trailer Angle Indicator
The vehicle may be equipped with a
Trailer Angle Indicator. The Trailer Angle
Indicator gives the driver a visual
representation of the trailer’s position
relative to the vehicle. (Available only in
Reverse, Guidelines On, Rear Trailering
Views).
{Warning
Use Hitch Guidance only to help back the
vehicle to a trailer hitch or, when
traveling above 12 km/h (8 mph), to
briefly check the status of your trailer. Do
not use for any other purpose, such as
making lane change decisions. Before
making a lane change, always check the
mirrors and glance over your shoulder.
Improper use could result in serious
injury to you or others.
HD Surround Vision with Trailer Camera
Provisions
If equipped, this feature provides additional
views to aid in trailering/towing. The
system shows multiple views in the
infotainment display using five cameras
mounted around the vehicle and up to two
additional accessory cameras that can be
mounted on or in a trailer. The front camera
is in the grille under the front emblem, the
side cameras are on the bottom of the
outside mirrors, the rear camera is in the
tailgate handle and the bed camera is