2024 CHEVROLET SILVERADO EV warning
[x] Cancel search: warningPage 118 of 429
Chevrolet Silverado EV Owner Manual (GMNA-Localizing-U.S./Canada-
16702912) - 2024 - CRC - 1/13/23
Instruments and Controls 117
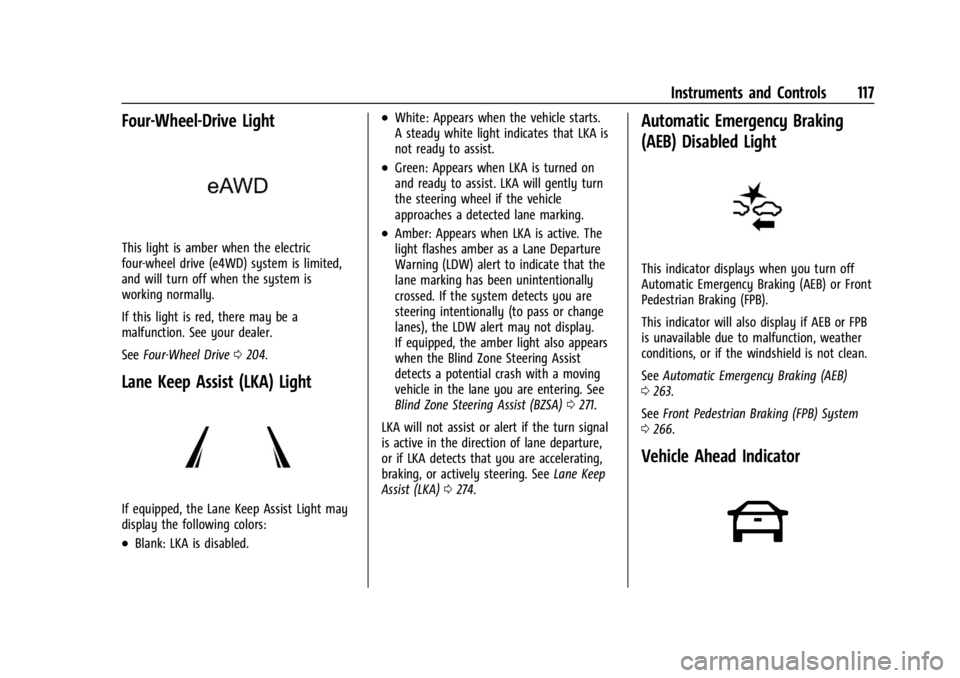
Four-Wheel-Drive Light
This light is amber when the electric
four-wheel drive (e4WD) system is limited,
and will turn off when the system is
working normally.
If this light is red, there may be a
malfunction. See your dealer.
SeeFour-Wheel Drive 0204.
Lane Keep Assist (LKA) Light
If equipped, the Lane Keep Assist Light may
display the following colors:
.Blank: LKA is disabled.
.White: Appears when the vehicle starts.
A steady white light indicates that LKA is
not ready to assist.
.Green: Appears when LKA is turned on
and ready to assist. LKA will gently turn
the steering wheel if the vehicle
approaches a detected lane marking.
.Amber: Appears when LKA is active. The
light flashes amber as a Lane Departure
Warning (LDW) alert to indicate that the
lane marking has been unintentionally
crossed. If the system detects you are
steering intentionally (to pass or change
lanes), the LDW alert may not display.
If equipped, the amber light also appears
when the Blind Zone Steering Assist
detects a potential crash with a moving
vehicle in the lane you are entering. See
Blind Zone Steering Assist (BZSA) 0271.
LKA will not assist or alert if the turn signal
is active in the direction of lane departure,
or if LKA detects that you are accelerating,
braking, or actively steering. See Lane Keep
Assist (LKA) 0274.
Automatic Emergency Braking
(AEB) Disabled Light
This indicator displays when you turn off
Automatic Emergency Braking (AEB) or Front
Pedestrian Braking (FPB).
This indicator will also display if AEB or FPB
is unavailable due to malfunction, weather
conditions, or if the windshield is not clean.
See Automatic Emergency Braking (AEB)
0 263.
See Front Pedestrian Braking (FPB) System
0 266.
Vehicle Ahead Indicator
Page 125 of 429
Chevrolet Silverado EV Owner Manual (GMNA-Localizing-U.S./Canada-
16702912) - 2024 - CRC - 1/13/23
124 Instruments and Controls
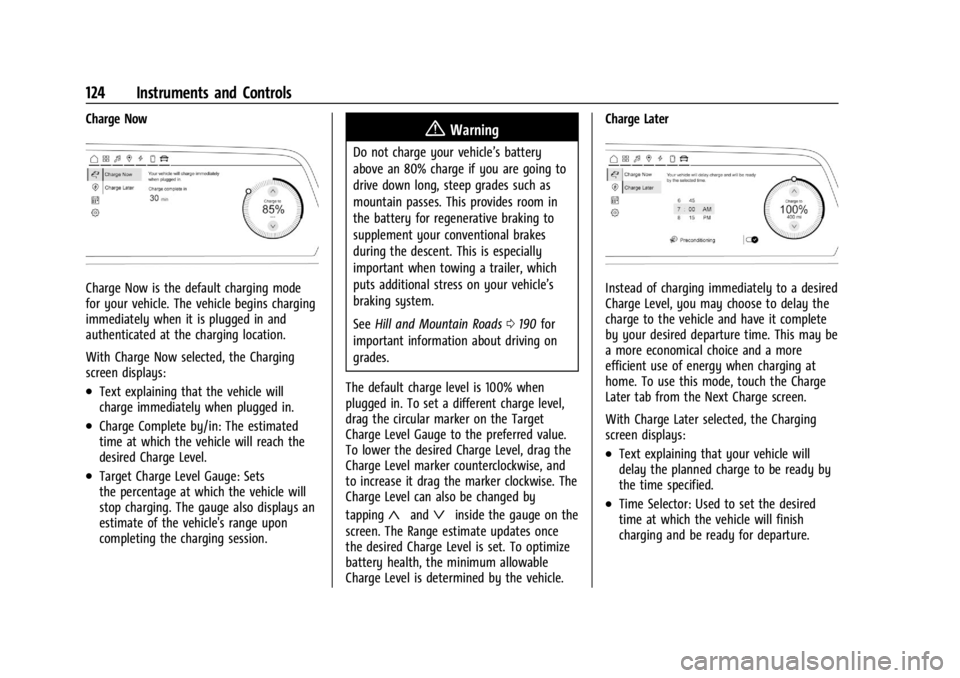
Charge Now
Charge Now is the default charging mode
for your vehicle. The vehicle begins charging
immediately when it is plugged in and
authenticated at the charging location.
With Charge Now selected, the Charging
screen displays:
.Text explaining that the vehicle will
charge immediately when plugged in.
.Charge Complete by/in: The estimated
time at which the vehicle will reach the
desired Charge Level.
.Target Charge Level Gauge: Sets
the percentage at which the vehicle will
stop charging. The gauge also displays an
estimate of the vehicle's range upon
completing the charging session.
{Warning
Do not charge your vehicle’s battery
above an 80% charge if you are going to
drive down long, steep grades such as
mountain passes. This provides room in
the battery for regenerative braking to
supplement your conventional brakes
during the descent. This is especially
important when towing a trailer, which
puts additional stress on your vehicle’s
braking system.
SeeHill and Mountain Roads 0190 for
important information about driving on
grades.
The default charge level is 100% when
plugged in. To set a different charge level,
drag the circular marker on the Target
Charge Level Gauge to the preferred value.
To lower the desired Charge Level, drag the
Charge Level marker counterclockwise, and
to increase it drag the marker clockwise. The
Charge Level can also be changed by
tapping
«andªinside the gauge on the
screen. The Range estimate updates once
the desired Charge Level is set. To optimize
battery health, the minimum allowable
Charge Level is determined by the vehicle. Charge Later
Instead of charging immediately to a desired
Charge Level, you may choose to delay the
charge to the vehicle and have it complete
by your desired departure time. This may be
a more economical choice and a more
efficient use of energy when charging at
home. To use this mode, touch the Charge
Later tab from the Next Charge screen.
With Charge Later selected, the Charging
screen displays:
.Text explaining that your vehicle will
delay the planned charge to be ready by
the time specified.
.Time Selector: Used to set the desired
time at which the vehicle will finish
charging and be ready for departure.
Page 134 of 429
Chevrolet Silverado EV Owner Manual (GMNA-Localizing-U.S./Canada-
16702912) - 2024 - CRC - 1/13/23
Instruments and Controls 133
overall vehicle energy use are shown. When
selected, distance driven, total energy,
energy usage bar diagram, and selectable
categories are displayed. Select a category
to learn more about how your vehicle uses
energy from the battery.
When selected, Add to Driver Display may
be chosen in the dialog.
Energy Efficiency :Displays a graph showing
the energy efficiency that has been used by
the vehicle over a recently driven distance.
When selected, regenerated range, and
instant efficiency is shown along with
average efficiency in the dialog.
When selected, Add to Driver Display may
be chosen in the dialog.
Trip
Trip Information : Trip 1 or 2 displays the
current distance traveled, in either
kilometers (km) or miles (mi), since the trip
odometer was last reset.
If equipped, Average Efficiency shows the
approximate average kilometers per kilowatt
hour kWh (km/kWh) or miles per kilowatt
hour kWh (mi/kWh). This number is
calculated based on the number of km/kWh
or mi/kWh recorded since the last time this
menu item was reset. This number only reflects the approximate average electrical
energy economy that the vehicle has at that
moment, and changes as driving conditions
change.
To reset these values, touch reset on the
touchscreen display when the Trip
Information dialog is selected.
When selected, the following options may
be chosen in the dialog: Reset Trip 1, Reset
Trip 2, and Add to Driver Display.
Current Trip :
Displays distance driven,
average efficiency, and time elapsed since
vehicle startup. It resets when you turn your
vehicle off.
When selected, Add to Driver Display may
be chosen in the dialog.
Head-Up Display (HUD)
{Warning
If the HUD image is too bright or too
high in your field of view, it may take
you more time to see things you need to
see when it is dark outside. Be sure to
keep the HUD image dim and placed low
in your field of view. If equipped, some vehicle information can be
projected as an image on the windshield via
the HUD lens on top of the instrument
panel.
Caution
If you try to use the HUD image as a
parking aid, you may misjudge the
distance and damage your vehicle. Do not
use the HUD image as a parking aid.
HUD information can be displayed in various
languages. The speedometer reading and
other numerical values can be displayed in
either English or metric units.
The language selection is changed through
the radio, and the units of measurement are
changed through the infotainment display.
See Settings 0166.
Page 136 of 429
Chevrolet Silverado EV Owner Manual (GMNA-Localizing-U.S./Canada-
16702912) - 2024 - CRC - 1/13/23
Instruments and Controls 135
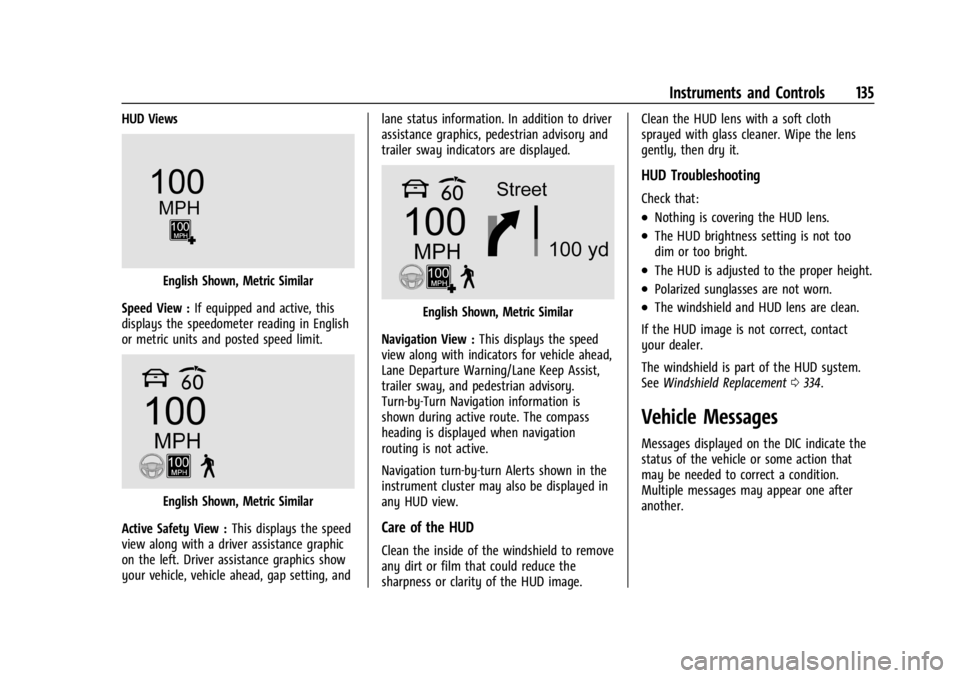
HUD Views
English Shown, Metric Similar
Speed View : If equipped and active, this
displays the speedometer reading in English
or metric units and posted speed limit.
English Shown, Metric Similar
Active Safety View : This displays the speed
view along with a driver assistance graphic
on the left. Driver assistance graphics show
your vehicle, vehicle ahead, gap setting, and lane status information. In addition to driver
assistance graphics, pedestrian advisory and
trailer sway indicators are displayed.
English Shown, Metric Similar
Navigation View : This displays the speed
view along with indicators for vehicle ahead,
Lane Departure Warning/Lane Keep Assist,
trailer sway, and pedestrian advisory.
Turn-by-Turn Navigation information is
shown during active route. The compass
heading is displayed when navigation
routing is not active.
Navigation turn-by-turn Alerts shown in the
instrument cluster may also be displayed in
any HUD view.
Care of the HUD
Clean the inside of the windshield to remove
any dirt or film that could reduce the
sharpness or clarity of the HUD image. Clean the HUD lens with a soft cloth
sprayed with glass cleaner. Wipe the lens
gently, then dry it.
HUD Troubleshooting
Check that:
.Nothing is covering the HUD lens.
.The HUD brightness setting is not too
dim or too bright.
.The HUD is adjusted to the proper height.
.Polarized sunglasses are not worn.
.The windshield and HUD lens are clean.
If the HUD image is not correct, contact
your dealer.
The windshield is part of the HUD system.
See Windshield Replacement 0334.
Vehicle Messages
Messages displayed on the DIC indicate the
status of the vehicle or some action that
may be needed to correct a condition.
Multiple messages may appear one after
another.
Page 141 of 429
Chevrolet Silverado EV Owner Manual (GMNA-Localizing-U.S./Canada-
16702912) - 2024 - CRC - 1/13/23
140 Lighting
Lighting
Exterior Lighting
Exterior Lamp Controls . . . . . . . . . . . . . . . . 140
Exterior Lamps Off Reminder . . . . . . . . . . . 141
Headlamp High/Low-Beam Changer . . . . 141
Flash-to-Pass . . . . . . . . . . . . . . . . . . . . . . . . . . . 141
Daytime Running Lamps (DRL) . . . . . . . . . 141
Automatic Headlamp System . . . . . . . . . . 142
Hazard Warning Flashers . . . . . . . . . . . . . . 142
Turn and Lane-Change Signals . . . . . . . . . 143
Exterior Cargo Lamps . . . . . . . . . . . . . . . . . . 143
Interior Lighting
Instrument Panel IlluminationControl . . . . . . . . . . . . . . . . . . . . . . . . . . . . . . 143
Dome Lamps . . . . . . . . . . . . . . . . . . . . . . . . . . 144
Reading Lamps . . . . . . . . . . . . . . . . . . . . . . . . 144
Lighting Features
Entry Lighting . . . . . . . . . . . . . . . . . . . . . . . . . 144
Exit Lighting . . . . . . . . . . . . . . . . . . . . . . . . . . . 145
Battery Load Management . . . . . . . . . . . . 145
Battery Power Protection . . . . . . . . . . . . . . 145
Exterior Lighting Battery Saver . . . . . . . . 146
Exterior Lighting
Exterior Lamp Controls
The exterior lamp controls, also known as
headlights, are in the Controls App on the
infotainment home screen. Select Controls >
Lights > Headlights.
To operate, select the following options:
Off : Turns off the exterior lamps.
For vehicles first sold in Canada, the
headlamps will automatically reactivate
when the vehicle is shifted out of P (Park).
Auto : Automatically turns on the
headlamps, parking lamps, taillamps,
instrument panel lights, roof marker lamps
(if equipped), license plate lamps or Daytime
Running Lamps (DRL), depending on outside
light conditions.
Parking : Turns on the parking lamps.
On : Turns on the exterior lamps.
IntelliBeam System
If equipped, this system turns the high-beam
headlamps on and off according to
surrounding traffic conditions. The system turns the high-beam headlamps
on when it is dark enough and there is no
other traffic present.
This light
bappears on the instrument
cluster when the IntelliBeam system is
enabled.
Turning the IntelliBeam On and Off
To enable and disable the IntelliBeam
system on the infotainment home screen,
select Control App > Lights >
bAuto
High Beams when the headlights are set in
the Auto position.
Driving with IntelliBeam
The system only activates the high beams
when driving over 40 km/h (25 mph).
The blue high-beam on light appears on the
instrument cluster when the high beams
are on.
There is a sensor near the top center of the
windshield that automatically controls the
system. Keep this area of the windshield
clear of debris to allow for best system
performance.
Page 142 of 429
Chevrolet Silverado EV Owner Manual (GMNA-Localizing-U.S./Canada-
16702912) - 2024 - CRC - 1/13/23
Lighting 141
The high-beam headlamps remain on, under
the automatic control, until one of the
following situations occurs:
.The system detects an approaching
vehicle's headlamps.
.The system detects a preceding vehicle's
taillamps.
.The outside light is bright enough that
high-beam headlamps are not required.
.The vehicle speed drops below 20 km/h
(12 mph).
The high beams may not turn off
automatically if the system cannot detect
another vehicle's lamps because of any of
the following:
.The other vehicle's lamps are missing,
damaged, obstructed from view,
or otherwise undetected.
.The other vehicle's lamps are covered
with dirt, snow, and/or road spray.
.The other vehicle's lamps cannot be
detected due to dense exhaust, smoke,
fog, snow, road spray, mist, or other
airborne obstructions.
.The vehicle windshield is dirty, cracked,
or obstructed by something that blocks
the view of the light sensor.
.The vehicle is loaded such that the front
end points upward, causing the light
sensor to aim high and not detect
headlamps and taillamps.
.The vehicle is being driven on winding or
hilly roads.
The automatic high-beam headlamps may
need to be disabled if any of the above
conditions exist.
Exterior Lamps Off Reminder
A warning chime sounds if the driver door is
opened while the vehicle is off and the
exterior lamps are on.
Headlamp High/Low-Beam
Changer
Push the turn signal lever away from you
and release, to turn the high beams on. To
return to low beams, push the lever again
or pull it toward you and release.
This indicator light turns on in the
instrument cluster when the high-beam
headlamps are on.
Flash-to-Pass
To flash the high beams, pull the turn signal
lever toward you, and release.
Daytime Running Lamps (DRL)
DRL can make it easier for others to see the
front of your vehicle during the day.
Fully functional DRL are required on all
vehicles first sold in Canada.
The DRL come on when all of the following
conditions are met:
.The vehicle is on.
.The exterior lamp control is in AUTO.
.The light sensor determines it is daytime.
The taillamps, instrument panel lights, and
other lamps will not turn on when this
feature is activated.
The DRL turn off when the headlamps are
turned to
Oor the vehicle is off.
For vehicles first sold in Canada, the DRL can
only be turned off when the vehicle is
parked.
Page 143 of 429
Chevrolet Silverado EV Owner Manual (GMNA-Localizing-U.S./Canada-
16702912) - 2024 - CRC - 1/13/23
142 Lighting
Automatic Headlamp System
When the exterior lamp control is set to
Auto and it is dark enough outside, the
headlamps come on automatically.
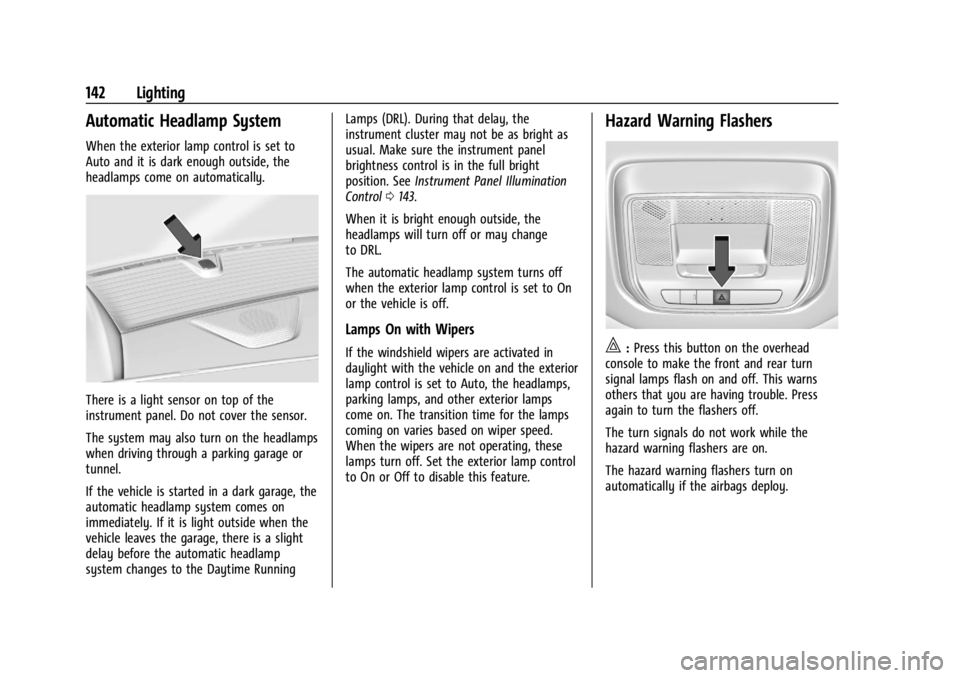
There is a light sensor on top of the
instrument panel. Do not cover the sensor.
The system may also turn on the headlamps
when driving through a parking garage or
tunnel.
If the vehicle is started in a dark garage, the
automatic headlamp system comes on
immediately. If it is light outside when the
vehicle leaves the garage, there is a slight
delay before the automatic headlamp
system changes to the Daytime RunningLamps (DRL). During that delay, the
instrument cluster may not be as bright as
usual. Make sure the instrument panel
brightness control is in the full bright
position. See
Instrument Panel Illumination
Control 0143.
When it is bright enough outside, the
headlamps will turn off or may change
to DRL.
The automatic headlamp system turns off
when the exterior lamp control is set to On
or the vehicle is off.
Lamps On with Wipers
If the windshield wipers are activated in
daylight with the vehicle on and the exterior
lamp control is set to Auto, the headlamps,
parking lamps, and other exterior lamps
come on. The transition time for the lamps
coming on varies based on wiper speed.
When the wipers are not operating, these
lamps turn off. Set the exterior lamp control
to On or Off to disable this feature.
Hazard Warning Flashers
|: Press this button on the overhead
console to make the front and rear turn
signal lamps flash on and off. This warns
others that you are having trouble. Press
again to turn the flashers off.
The turn signals do not work while the
hazard warning flashers are on.
The hazard warning flashers turn on
automatically if the airbags deploy.
Page 148 of 429
Chevrolet Silverado EV Owner Manual (GMNA-Localizing-U.S./Canada-
16702912) - 2024 - CRC - 1/13/23
Infotainment System 147
Infotainment System
Introduction
Introduction . . . . . . . . . . . . . . . . . . . . . . . . . . . 147
Overview . . . . . . . . . . . . . . . . . . . . . . . . . . . . . . 148
Steering Wheel Controls . . . . . . . . . . . . . . . 149
Using the System . . . . . . . . . . . . . . . . . . . . . 149
Software Updates . . . . . . . . . . . . . . . . . . . . . . 152
Radio
AM-FM Radio . . . . . . . . . . . . . . . . . . . . . . . . . . 152
Satellite Radio . . . . . . . . . . . . . . . . . . . . . . . . . 153
Radio Reception . . . . . . . . . . . . . . . . . . . . . . . . 153
Multi-Band Antenna . . . . . . . . . . . . . . . . . . . 154
Audio Players
Avoiding Untrusted Media Devices . . . . . 154
USB Port . . . . . . . . . . . . . . . . . . . . . . . . . . . . . . . 154
Bluetooth Audio . . . . . . . . . . . . . . . . . . . . . . . 155
Navigation
Using the Navigation System . . . . . . . . . . 155
Maps . . . . . . . . . . . . . . . . . . . . . . . . . . . . . . . . . . 156
Navigation Symbols . . . . . . . . . . . . . . . . . . . 156
Destination . . . . . . . . . . . . . . . . . . . . . . . . . . . . 157
Global Positioning System (GPS) . . . . . . . 157
Vehicle Positioning . . . . . . . . . . . . . . . . . . . . 158
Problems with Route Guidance . . . . . . . . 158
Voice Recognition
Voice Recognition . . . . . . . . . . . . . . . . . . . . . . 159
Phone
Bluetooth (Overview) . . . . . . . . . . . . . . . . . . 160
Bluetooth (Pairing and Using aPhone) . . . . . . . . . . . . . . . . . . . . . . . . . . . . . . . 161
Apple CarPlay and Android Auto . . . . . . . 165
Settings
Settings . . . . . . . . . . . . . . . . . . . . . . . . . . . . . . . 166
Teen Driver . . . . . . . . . . . . . . . . . . . . . . . . . . . . 168
Trademarks and License Agreements
Trademarks and License Agreements . . . 171
Introduction
Read the following pages to become familiar
with the features.
{Warning
Taking your eyes off the road for too
long or too often while using any
infotainment feature can cause a crash.
You or others could be injured or killed.
Do not give extended attention to
infotainment tasks while driving. Limit
your glances at the vehicle displays and
focus your attention on driving. Use voice
commands whenever possible.
The infotainment system has built-in
features intended to help avoid distraction
by disabling some features when driving.
These features may gray out when they are
unavailable. Many infotainment features are
also available through the instrument cluster
and steering wheel controls.
Before driving:
.Become familiar with the operation,
center stack controls, steering wheel
controls, and infotainment display.