2024 CHEVROLET SILVERADO EV stop start
[x] Cancel search: stop startPage 279 of 429
Chevrolet Silverado EV Owner Manual (GMNA-Localizing-U.S./Canada-
16702912) - 2024 - CRC - 1/17/23
278 Driving and Operating
.All files can be viewed on the playback
app or when the SD card is read by a
personal computer (PC).
.Once the SD card is full, the oldest files
will be overwritten.
To Delete Data : Remove the SD card from
the vehicle and insert into a PC to manually
delete the file.
Error messages can occur if:
.No SD card is present.
.An empty SD card is present.
.The video files are the wrong format.
.The video files are corrupt.
.The SD card is full.
.There is a system error.
Other files should not be stored on the
same SD card as the surround vision
recorder files. Storing other files on the
same card may increase recording start up
and playback time or result in a loss of
data. An error message may be displayed if
no surround vision recorded video file is
available for playback.
Charging
When to Charge
When the high voltage battery is low, the
following charging messages may display on
the Driver Information Center (DIC):
CHARGE VEHICLE SOON : The battery needs
to be charged soon.
REDUCED ACCELERATION DRIVE WITH CARE :
The accelerator pedal response is reduced
and the remaining range value changes to
LOW, charge the vehicle immediately. See
Propulsion Power Messages 0136.
OUT OF ENERGY, CHARGE VEHICLE NOW :
The battery charge is fully depleted. The
vehicle will slow to a stop. Brake and
steering assist will continue operating. Once
stopped, turn the vehicle off.
Plug-In Charging
Plug-in charge times vary based on the
battery condition, charge level, and the
outside temperature. See Charging0123 for
charge mode selection.
Do not allow the vehicle to remain in
temperature extremes for long periods
without being driven or plugged in. When temperatures are below 0 °C (32 °F) and
above 32 °C (90 °F), plug in the vehicle to
maximize high voltage battery life.
In extreme temperature conditions, a full
charge will take additional time.
Charging will slow down as the battery fills
up. Charge the battery to 80% for daily
driving, or when driving in mountainous
terrain. The vehicle can be charged above
80% for long trips when not driving in
mountainous terrain.
It is normal to hear fans, pumps, and
electrical devices clicking while the vehicle is
turned off and charging.
The vehicle does not require indoor charging
area ventilation before, during, or after
charging.
The vehicle cannot be driven while the
charge cord is plugged into the vehicle.Caution
To avoid damage to the vehicle, make
sure the charging cord plug is in good
condition, is not worn or damaged, and is
connected securely to the vehicle's
charging port. If vehicle charging is
(Continued)
Page 282 of 429
Chevrolet Silverado EV Owner Manual (GMNA-Localizing-U.S./Canada-
16702912) - 2024 - CRC - 1/17/23
Driving and Operating 281
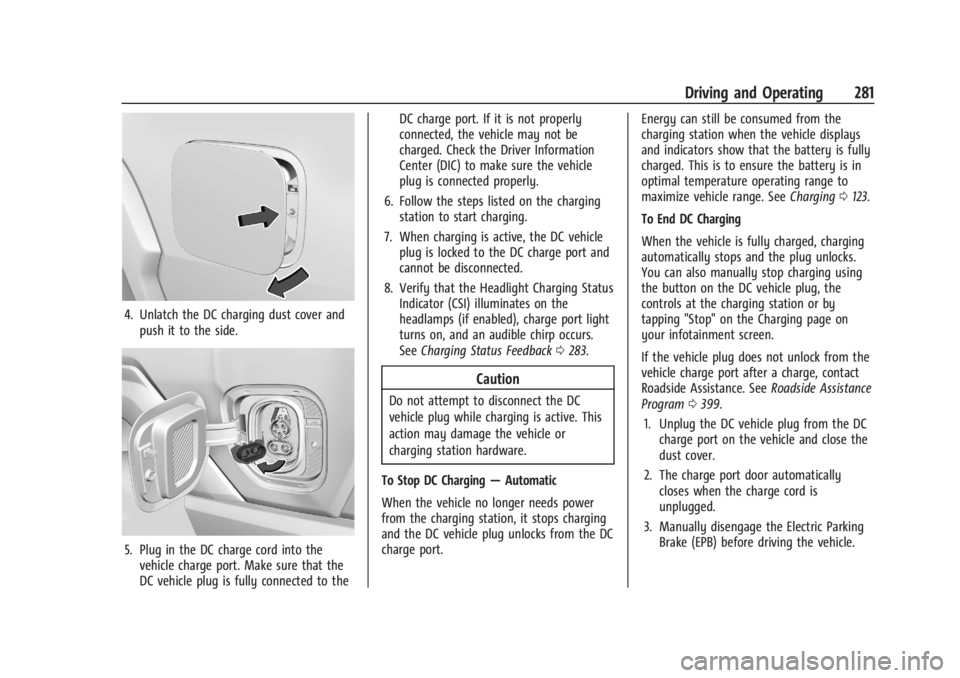
4. Unlatch the DC charging dust cover andpush it to the side.
5. Plug in the DC charge cord into thevehicle charge port. Make sure that the
DC vehicle plug is fully connected to the DC charge port. If it is not properly
connected, the vehicle may not be
charged. Check the Driver Information
Center (DIC) to make sure the vehicle
plug is connected properly.
6. Follow the steps listed on the charging station to start charging.
7. When charging is active, the DC vehicle plug is locked to the DC charge port and
cannot be disconnected.
8. Verify that the Headlight Charging Status Indicator (CSI) illuminates on the
headlamps (if enabled), charge port light
turns on, and an audible chirp occurs.
See Charging Status Feedback 0283.
Caution
Do not attempt to disconnect the DC
vehicle plug while charging is active. This
action may damage the vehicle or
charging station hardware.
To Stop DC Charging —Automatic
When the vehicle no longer needs power
from the charging station, it stops charging
and the DC vehicle plug unlocks from the DC
charge port. Energy can still be consumed from the
charging station when the vehicle displays
and indicators show that the battery is fully
charged. This is to ensure the battery is in
optimal temperature operating range to
maximize vehicle range. See
Charging0123.
To End DC Charging
When the vehicle is fully charged, charging
automatically stops and the plug unlocks.
You can also manually stop charging using
the button on the DC vehicle plug, the
controls at the charging station or by
tapping "Stop" on the Charging page on
your infotainment screen.
If the vehicle plug does not unlock from the
vehicle charge port after a charge, contact
Roadside Assistance. See Roadside Assistance
Program 0399.
1. Unplug the DC vehicle plug from the DC charge port on the vehicle and close the
dust cover.
2. The charge port door automatically closes when the charge cord is
unplugged.
3. Manually disengage the Electric Parking Brake (EPB) before driving the vehicle.
Page 293 of 429
Chevrolet Silverado EV Owner Manual (GMNA-Localizing-U.S./Canada-
16702912) - 2024 - CRC - 1/17/23
292 Driving and Operating
the charging. If this error continues, stop
charging your vehicle. See your dealer for
service.
Charge Level Selection
Charge level selection can be made using
the Charging tab in the Energy Application
on the infotainment display. For instructions
to set cord limit settings for a charge
session, seeCharging0123.
{Warning
Using a charge level that exceeds the
electrical circuit or electrical outlet
capacity may start a fire or damage the
electrical circuit. Use the lowest charge
level until a qualified electrician inspects
the electrical circuit capacity. Use the
lowest charge level if the electrical circuit
or electrical outlet capacity is not known.
Troubleshooting
Disconnect the charge cord from the vehicle
and confirm that the attachment plug is not
too hot to grasp before removing. If it is not hot, manually reboot the charge
cord by unplugging and re-plugging the
attachment plug into the electrical outlet.
If the same fault reoccurs, test the charge
cord with a different electrical outlet.
The charge cord monitors temperature at
several locations and may reduce charging
power or interrupt charging if temperatures
become too high. The charge cord status
indicators illuminate and identify this fault.
In hot climates, move the charge cord away
from direct sunlight and/or hot surfaces
such as asphalt paving for approximately
30 minutes.
If there are signs of melting or scorching, do
not touch the charge cord or attachment
plug. Have a qualified electrician inspect and
repair the issue.
If there are no signs of damage, check how
firm the fit of the plug is. If the plug easily
pulls away from the electrical outlet, test
the plug on a known good electrical outlet.
If the fault condition returns, have your
charge cord inspected by your dealership.
If the fault does not return, stop using the
suspected circuit and have a qualified
electrician inspect and repair the issue.
Grounding Instructions
The charge circuit must be grounded. If the
charge circuit should malfunction or break
down, grounding provides a path of least
resistance for the electric current to reduce
the risk of electric shock. This product is
equipped with a cord that has an equipment
grounding conductor and a grounding plug.
The plug must be plugged into an
appropriate outlet that is properly installed
and grounded in accordance with all local
codes and ordinances.
{Warning
Improper connection of the charge cord
ground may cause electrical shock. Check
with a qualified electrician if there is
doubt as to whether the charge circuit is
properly grounded. Do not modify the
plug provided with the product. If it will
not fit the electrical outlet, have a proper
electrical outlet installed by a qualified
electrician.
FCC Information
See
Radio Frequency Statement 0404.
Page 295 of 429
Chevrolet Silverado EV Owner Manual (GMNA-Localizing-U.S./Canada-
16702912) - 2024 - CRC - 1/17/23
294 Driving and Operating
Driving Characteristics and
Towing Tips
{Warning
You can lose control when towing a
trailer if the correct equipment is not
used or the vehicle is not driven properly.
For example, if the trailer is too heavy or
the trailer brakes are inadequate for the
load, the vehicle may not stop as
expected. You and others could be
seriously injured. The vehicle may also be
damaged, and the repairs would not be
covered by the vehicle warranty. Pull a
trailer only if all the steps in this section
have been followed. Ask your dealer for
advice and information about towing a
trailer with the vehicle.
Driving with a Trailer
Trailering is different than just driving the
vehicle by itself. Trailering affects handling,
acceleration, braking, and durability.
Successful and safe trailering requires proper
use of the correct equipment.The following information has many
time-tested, important trailering tips and
safety rules. Many of these are important
for your safety and that of your passengers.
Read this section carefully before towing a
trailer.
When towing a trailer:
.Become familiar with, and follow all state
and local laws that apply to trailer
towing. These requirements vary from
state to state.
.State laws may require the use of
extended side view mirrors. If your
visibility is limited or restricted while
towing, install extended side view mirrors
on your vehicle, even if not required.
.Do not tow a trailer during the first
800 km (500 mi) of vehicle use to prevent
damage to vehicle.
.Do not drive over 800 km/h (50 mph) and
do not make starts at full throttle during
the first 800 km (500 mi) of trailer
towing.
.Tow in D (Drive). Tow/Haul Mode is
recommended for heavier trailers. See
Driver Mode Control
0209.
.One-Pedal Driving can be a useful feature
when towing. See One-Pedal Driving
0 203. The following advanced driver assistance
features should be turned off when towing
a trailer, and may turn off automatically
when a trailer is detected:
.Park Assist
.Reverse Automatic Braking (RAB)
.Rear Cross Traffic Alert (RCTA)
.Rear Cross Traffic Braking (RCTB)
.Lane Change Alert (LCA)
.Super Cruise and Adaptive Cruise Control
(ACC), unless equipped with trailering
functionality, see
Adaptive Cruise Control
(Advanced) 0217.
Automatic Emergency Braking (AEB) and
Front Pedestrian Braking (FPB) should be set
to Alert unless equipped with Super Cruise.
Do not use Automatic Parking Assist (APA)
while towing a trailer.
Towing a trailer requires experience. The
combination of the vehicle and trailer is
longer and not as responsive as the vehicle
itself. Become familiar with handling and
braking of the combination by driving on a
level road surface before driving on public
roads.
Page 297 of 429
Chevrolet Silverado EV Owner Manual (GMNA-Localizing-U.S./Canada-
16702912) - 2024 - CRC - 1/17/23
296 Driving and Operating
When parking your vehicle and trailer on
a hill:1. Press and hold the brake pedal, but do not shift into P (Park). Turn the wheels
toward the curb if facing downhill or
toward traffic if facing uphill.
2. Have someone place chocks under the trailer wheels.
3. When the wheel chocks are in place, gradually release the brake pedal to
allow the chocks to absorb the load of
the trailer.
4. Reapply the brake pedal. Then apply the electric parking brake and shift into
P (Park).
5. Release the brake pedal.
Leaving After Parking on a Hill
1. Apply and hold the brake pedal.
.Start the vehicle.
.Shift into the desired gear.
.Release the parking brake.
2. Let up on the brake pedal.
3. Drive slowly until the trailer is clear of the chocks.
4. Stop and have someone pick up and store the chocks.
Launching and Retrieving a Boat
Backing the Trailer into the Water
{Warning
.Have all passengers get out of the
vehicle before backing onto the sloped
part of the ramp. Lower the driver and
passenger side windows before
backing onto the ramp. This will
provide a means of escape in the
unlikely event the vehicle slides into
the water.
.If the boat launch surface is slippery,
have the driver remain in the vehicle
with the brake pedal applied while the
boat is being launched. The boat
launch can be especially slippery at
low tide when part of the ramp was
previously submerged at high tide. Do
not back onto the ramp to launch the
boat if you are not sure the vehicle
can maintain traction.
.Do not move the vehicle if someone is
in the path of the trailer. Some parts
of the trailer might be underwater and
not visible to people who are assisting
in launching the boat. Disconnect the trailer wiring before backing
the trailer into the water to prevent damage
to the electrical circuits. Reconnect the
wiring to the trailer after removing the
trailer from the water. If the trailer has
electric brakes that can function when the
trailer is submerged, it might help to leave
the electrical trailer connector attached to
maintain trailer brake functionality while on
the boat ramp.
To back the trailer into the water:
1. Slowly back down the boat ramp until the boat is floating, but no further than
necessary.
2. Press and hold the brake pedal, but do not shift into P (Park).
3. Have someone place chocks under the front wheels of the vehicle.
4. Gradually release the brake pedal to allow the chocks to absorb the load of
the trailer.
5. Reapply the brake pedal. Then apply the parking brake and shift into P (Park).
6. Release the brake pedal.
Page 298 of 429
Chevrolet Silverado EV Owner Manual (GMNA-Localizing-U.S./Canada-
16702912) - 2024 - CRC - 1/17/23
Driving and Operating 297
Pulling the Trailer from the Water1. Press and hold the brake pedal.
2. Start the vehicle and shift into D (Drive) or L (Low).
3. Release the parking brake.
4. Let up on the brake pedal.
5. Drive slowly until the tires are clear of the chocks.
6. Stop and have someone pick up and store the chocks.
7. Slowly pull the trailer from the water.
Caution
If the vehicle tires begin to spin and the
vehicle begins to slide toward the water,
remove your foot from the accelerator
pedal and apply the brake pedal. Seek
help to have the vehicle towed up
the ramp.
Maintenance when Trailer Towing
The vehicle needs service more often when
used to tow trailers. See Maintenance
Schedule 0389. It is especially important to
check the cooling system and brake system
before and during each trip. Check periodically that all nuts and bolts on
the trailer hitch are tight.
Trailer Towing
Caution
Towing a trailer improperly can damage
the vehicle and result in costly repairs
not covered by the vehicle warranty. To
tow a trailer correctly, follow the
directions in this section and see your
dealer for important information about
towing a trailer with the vehicle.
Trailering is different than just driving the
vehicle by itself. Trailering means changes in
handling, acceleration, braking, and
durability. Successful, safe trailering takes
correct equipment, and it has to be used
properly.
The following information has many
time-tested, important trailering tips and
safety rules. Many of these are important
for your safety and that of your passengers.
Read this section carefully before pulling a
trailer.
Trailer Weight
{Warning
Never exceed the towing capacity for
your vehicle.
Safe trailering requires monitoring the
weight, speed, altitude, road grades, outside
temperature, and how frequently the vehicle
is used to tow a trailer.
Trailer Weight Ratings
When towing a trailer, the combined weight
of the vehicle, vehicle contents, trailer, and
trailer contents must be below all of the
maximum weight ratings for the vehicle,
including:
.Gross Combined Weight Rating (GCWR)
.Gross Vehicle Weight Rating (GVWR)
.Maximum Trailer Weight Rating
.Maximum Trailer Tongue Weight Rating
.Gross Axle Weight Rating-Rear (GAWR-RR)
See “Weight-Distributing Hitch and
Adjustment” underTowing Equipment 0301
to determine if equalizer bars are required
to obtain the maximum trailer weight
rating.
Page 306 of 429
Chevrolet Silverado EV Owner Manual (GMNA-Localizing-U.S./Canada-
16702912) - 2024 - CRC - 1/17/23
Driving and Operating 305
Trailer Lamps
Always check that all trailer lamps are
working at the beginning of each trip, and
periodically on longer trips.
If equipped, the Trailering App will monitor
the right-hand turn/brake lamp circuit,
left-hand turn/brake lamp circuit, running
lamp circuit, and reverse lamp circuits on
the trailer. DIC messages and Trailering App
alerts may be displayed if lighting circuit
issues are detected on the trailer.
If a trailer cannot be detected, the
trailer-related DIC messages and/or
Trailering App alerts will not display.
Pressing START LIGHT TEST in the Trailering
App automatically activates trailer lamps.
The Trailering App is not a substitute for
manually inspecting your trailer lamps. See
Trailering App0310.
Trailer Connection and Lamp Messages
When a trailer is properly connected and
working, no trailer connection or lamp
messages appear on the Driver Information
Center (DIC). However, if the vehicle detects
an issue with a trailer connection or lamp,
you may see the following DIC message(s):
.TRAILER DISCONNECTED CHECK
CONNECTION appears when a connected
trailer is disconnected. It appears
immediately when the vehicle is on,
or upon the next start-up if the trailer
was disconnected while the vehicle was
off. Check the trailer connection as
appropriate.
.CHECK TRAILER XXX LAMP appears when
there is a detected lamp or wiring fault
on the trailer. Check the trailer wiring and
lamps.
Turn Signals When Towing a Trailer
When properly connected, the trailer turn
signals will illuminate to indicate the vehicle
is turning, changing lanes, or stopping.
When towing a trailer, the arrows on the
instrument cluster will illuminate even if the
trailer is not properly connected or the bulbs
are burned out.
Tow/Haul Mode
For instructions on how to enter Tow/Haul
mode, see Driver Mode Control 0209.
Tow/Haul mode assists when pulling a
heavy trailer or a large or heavy load. Tow/Haul mode is designed to be most
effective when the vehicle and trailer
combined weight is at least 75% of the
vehicle's Gross Combined Weight Rating
(GCWR). See
“Maximum Trailer Weight”
under Trailer Towing 0297.
Tow/Haul mode is most useful when towing
a heavy trailer or carrying a large or
heavy load:
.through rolling terrain
.in stop-and-go traffic
.in busy parking lots
Integrated Trailer Brake Control System
The vehicle may have an Integrated Trailer
Brake Control (ITBC) system for use with
electric trailer brakes or most electric over
hydraulic trailer brake systems. These
instructions apply to both types of electric
trailer brakes.
Page 312 of 429
Chevrolet Silverado EV Owner Manual (GMNA-Localizing-U.S./Canada-
16702912) - 2024 - CRC - 1/17/23
Driving and Operating 311
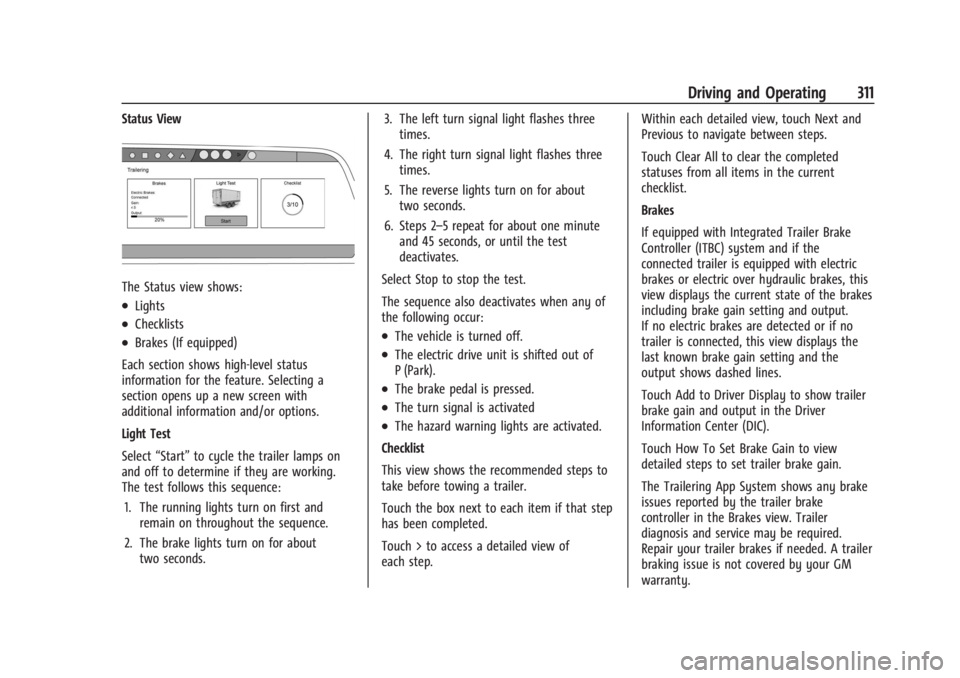
Status View
The Status view shows:
.Lights
.Checklists
.Brakes (If equipped)
Each section shows high-level status
information for the feature. Selecting a
section opens up a new screen with
additional information and/or options.
Light Test
Select “Start” to cycle the trailer lamps on
and off to determine if they are working.
The test follows this sequence:
1. The running lights turn on first and remain on throughout the sequence.
2. The brake lights turn on for about two seconds. 3. The left turn signal light flashes three
times.
4. The right turn signal light flashes three times.
5. The reverse lights turn on for about two seconds.
6. Steps 2–5 repeat for about one minute and 45 seconds, or until the test
deactivates.
Select Stop to stop the test.
The sequence also deactivates when any of
the following occur:.The vehicle is turned off.
.The electric drive unit is shifted out of
P (Park).
.The brake pedal is pressed.
.The turn signal is activated
.The hazard warning lights are activated.
Checklist
This view shows the recommended steps to
take before towing a trailer.
Touch the box next to each item if that step
has been completed.
Touch > to access a detailed view of
each step. Within each detailed view, touch Next and
Previous to navigate between steps.
Touch Clear All to clear the completed
statuses from all items in the current
checklist.
Brakes
If equipped with Integrated Trailer Brake
Controller (ITBC) system and if the
connected trailer is equipped with electric
brakes or electric over hydraulic brakes, this
view displays the current state of the brakes
including brake gain setting and output.
If no electric brakes are detected or if no
trailer is connected, this view displays the
last known brake gain setting and the
output shows dashed lines.
Touch Add to Driver Display to show trailer
brake gain and output in the Driver
Information Center (DIC).
Touch How To Set Brake Gain to view
detailed steps to set trailer brake gain.
The Trailering App System shows any brake
issues reported by the trailer brake
controller in the Brakes view. Trailer
diagnosis and service may be required.
Repair your trailer brakes if needed. A trailer
braking issue is not covered by your GM
warranty.