2024 CHEVROLET SILVERADO EV tow
[x] Cancel search: towPage 64 of 429
Chevrolet Silverado EV Owner Manual (GMNA-Localizing-U.S./Canada-
16702912) - 2024 - CRC - 1/13/23
Seats and Restraints 63
Frontal airbags are designed to inflate in
moderate to severe frontal crashes to help
reduce the potential for severe injuries,
mainly to the driver's or front outboard
passenger's head and chest.
Whether the frontal airbags will or should
inflate is not based primarily on how fast
the vehicle is traveling. It depends on what
is hit, the direction of the impact, and how
quickly the vehicle slows down.
Frontal airbags may inflate at different crash
speeds depending on whether the vehicle
hits an object straight on or at an angle,
and whether the object is fixed or moving,
rigid or deformable, narrow or wide.
Frontal airbags are not intended to inflate
during vehicle rollovers, rear impacts,
or many side impacts.
In addition, the vehicle has advanced
technology frontal airbags. Advanced
technology frontal airbags adjust the
restraint according to either crash severity
or occupant interaction.
Seat-mounted side impact airbags are
designed to inflate in moderate to severe
side crashes depending on the location of
the impact. These airbags may also inflate
in some moderate to severe frontal impacts.Seat-mounted side impact airbags are not
designed to inflate in rollovers or rear
impacts. A seat-mounted side impact airbag
is designed to inflate on the side of the
vehicle that is struck.
Roof-rail airbags are designed to inflate in
moderate to severe side crashes depending
on the location of the impact. In addition,
these roof-rail airbags may inflate during a
rollover or in a severe frontal impact.
Roof-rail airbags are not designed to inflate
in rear impacts. Both roof-rail airbags may
inflate when either side of the vehicle is
struck or if the sensing system predicts that
the vehicle is about to roll over on its side,
or in a severe frontal impact.
In any particular crash, no one can say
whether an airbag should have inflated
simply because of the vehicle damage or
repair costs.
What Makes an Airbag Inflate?
In a deployment event, the sensing system
sends an electrical signal triggering a release
of gas from the inflator. Gas from the
inflator fills the airbag causing the bag to
break out of the cover. The inflator, the
airbag, and related hardware are all part of
the airbag module.For airbag locations, see
Where Are the
Airbags? 061.
How Does an Airbag Restrain?
In moderate to severe frontal collisions, even
belted occupants can contact the steering
wheel or the instrument panel. In moderate
to severe side collisions, even belted
occupants can contact the inside of the
vehicle.
Airbags supplement the protection provided
by seat belts by distributing the force of the
impact more evenly over the
occupant's body.
Rollover capable roof-rail airbags are
designed to help contain the head and chest
of occupants in the outboard seating
positions in the first and second rows. The
rollover capable roof-rail airbags are
designed to help reduce the risk of full or
partial ejection in rollover events, although
no system can prevent all such ejections.
But airbags would not help in many types
of collisions, primarily because the
occupant's motion is not toward those
airbags. See When Should an Airbag Inflate?
0 62.
Page 69 of 429
Chevrolet Silverado EV Owner Manual (GMNA-Localizing-U.S./Canada-
16702912) - 2024 - CRC - 1/13/23
68 Seats and Restraints
Additional Factors Affecting System
Operation
Seat belts help keep the passenger in
position on the seat during vehicle
maneuvers and braking, which helps the
passenger sensing system maintain the
passenger airbag status. See“Seat Belts”
and “Child Restraints” in the Index for
additional information about the importance
of proper restraint use.
A thick layer of additional material, such as
a blanket or cushion, or aftermarket
equipment such as seat covers, seat heaters,
and seat massagers can affect how well the
passenger sensing system operates. We
recommend that you not use seat covers or
other aftermarket equipment except when
approved by GM for your specific vehicle.
See Adding Equipment to the
Airbag-Equipped Vehicle 068 for more
information about modifications that can
affect how the system operates.
The ON indicator may be lit if an object,
such as a briefcase, handbag, grocery bag,
laptop, or other electronic device, is put on
an unoccupied seat. If this is not desired,
remove the object from the seat.
{Warning
Stowing articles under the passenger seat
or between the passenger seat cushion
and seatback may interfere with the
proper operation of the passenger
sensing system.
Servicing the Airbag-Equipped
Vehicle
Airbags affect how the vehicle should be
serviced. There are parts of the airbag
system in several places around the vehicle.
Your dealer and the service manual have
information about servicing the vehicle and
the airbag system. To purchase a service
manual, see Publication Ordering
Information 0404.
{Warning
For up to 10 seconds after the vehicle is
turned off and the battery is
disconnected, an airbag can still inflate
during improper service. You can be
injured if you are close to an airbag
when it inflates. Avoid yellow connectors.
They are probably part of the airbag
(Continued)
Warning (Continued)
system. Be sure to follow proper service
procedures, and make sure the person
performing work for you is qualified to
do so.
Adding Equipment to the
Airbag-Equipped Vehicle
Adding accessories that change the vehicle's
frame, bumper system, height, front end,
or side sheet metal may keep the airbag
system from working properly.
The operation of the airbag system can also
be affected by changing, including
improperly repairing or replacing, any parts
of the following:
.Airbag system, including airbag modules,
front or side impact sensors, sensing and
diagnostic module, or airbag wiring
.Front seats, including stitching, seams,
or zippers
.Seat belts
.Steering wheel, instrument panel,
overhead console, ceiling trim, or pillar
garnish trim
.Inner door seals, including speakers
Page 82 of 429

Chevrolet Silverado EV Owner Manual (GMNA-Localizing-U.S./Canada-
16702912) - 2024 - CRC - 1/13/23
Seats and Restraints 81
Warning (Continued)
tighten the belt behind the child restraint
after the child restraint has been
installed.
Caution
Do not let the LATCH attachments rub
against the vehicle’s seat belts. This may
damage these parts. If necessary, move
buckled seat belts to avoid rubbing the
LATCH attachments.
Do not fold the rear seat cushion when
the seat is occupied. Do not fold the
empty rear seat with a seat belt buckled.
This could damage the seat belt or the
seat. Unbuckle and return the seat belt to
its stowed position, before folding
the seat.
If you need to secure more than one child
restraint in the rear seat, see Where to Put
the Restraint 075.
Uplevel Models 1. For forward-facing child restraints, attach and tighten the top tether to the top
tether anchor, if your vehicle has one. Follow the child restraint instructions and
the vehicle LATCH anchor weight limits
described at the beginning of this
section, and the following steps:
1.1. Rotate the seatback forward. See
Rear Seats 049.
1.2. Find the top tether anchor.
1.3. Route and attach the top tether according to your child restraint
instructions and the following
instructions:
If the position you are using has an
adjustable headrest or head
restraint, adjust it accordingly to
allow proper fitment. If you are
using a dual tether, route the
tether around the headrest or head
restraint posts. If the child restraint is installed next
to a center seat, make sure the top
tether does not interfere with the
center seating position shoulder
belt/retractor. If it does, find
another suitable seating position to
install the child restraint.
If the position you are using has an
adjustable headrest or head
restraint, adjust it accordingly to
allow proper fitment. If you are
using a single tether, route the
tether in between the headrest or
head restraint posts.
2. Make sure the child restraint top tether hook is completely closed and secured to
the top tether anchor.
3. Raise the seatback. See Rear Seats049.
Page 88 of 429
Chevrolet Silverado EV Owner Manual (GMNA-Localizing-U.S./Canada-
16702912) - 2024 - CRC - 1/13/23
Seats and Restraints 87
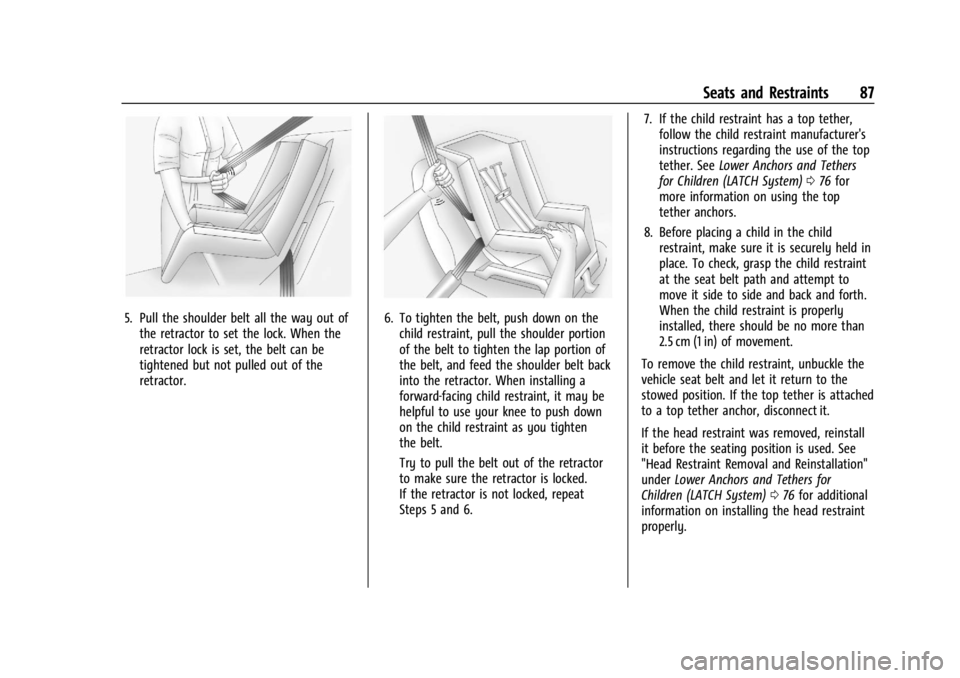
5. Pull the shoulder belt all the way out ofthe retractor to set the lock. When the
retractor lock is set, the belt can be
tightened but not pulled out of the
retractor.6. To tighten the belt, push down on thechild restraint, pull the shoulder portion
of the belt to tighten the lap portion of
the belt, and feed the shoulder belt back
into the retractor. When installing a
forward-facing child restraint, it may be
helpful to use your knee to push down
on the child restraint as you tighten
the belt.
Try to pull the belt out of the retractor
to make sure the retractor is locked.
If the retractor is not locked, repeat
Steps 5 and 6. 7. If the child restraint has a top tether,
follow the child restraint manufacturer's
instructions regarding the use of the top
tether. See Lower Anchors and Tethers
for Children (LATCH System) 076 for
more information on using the top
tether anchors.
8. Before placing a child in the child restraint, make sure it is securely held in
place. To check, grasp the child restraint
at the seat belt path and attempt to
move it side to side and back and forth.
When the child restraint is properly
installed, there should be no more than
2.5 cm (1 in) of movement.
To remove the child restraint, unbuckle the
vehicle seat belt and let it return to the
stowed position. If the top tether is attached
to a top tether anchor, disconnect it.
If the head restraint was removed, reinstall
it before the seating position is used. See
"Head Restraint Removal and Reinstallation"
under Lower Anchors and Tethers for
Children (LATCH System) 076 for additional
information on installing the head restraint
properly.
Page 91 of 429
Chevrolet Silverado EV Owner Manual (GMNA-Localizing-U.S./Canada-
16702912) - 2024 - CRC - 1/13/23
90 Seats and Restraints
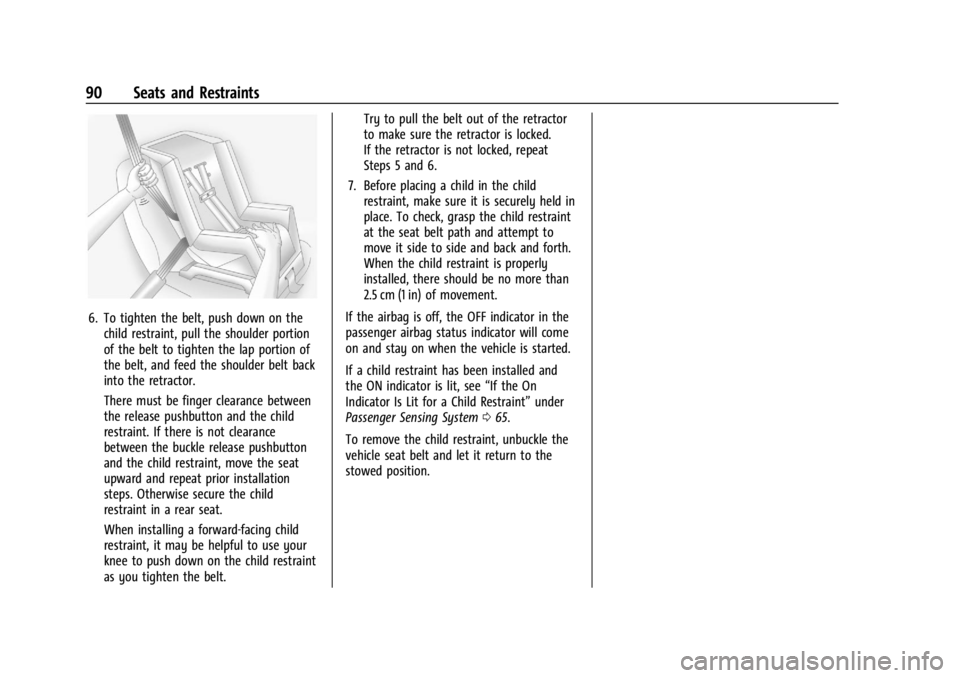
6. To tighten the belt, push down on thechild restraint, pull the shoulder portion
of the belt to tighten the lap portion of
the belt, and feed the shoulder belt back
into the retractor.
There must be finger clearance between
the release pushbutton and the child
restraint. If there is not clearance
between the buckle release pushbutton
and the child restraint, move the seat
upward and repeat prior installation
steps. Otherwise secure the child
restraint in a rear seat.
When installing a forward-facing child
restraint, it may be helpful to use your
knee to push down on the child restraint
as you tighten the belt. Try to pull the belt out of the retractor
to make sure the retractor is locked.
If the retractor is not locked, repeat
Steps 5 and 6.
7. Before placing a child in the child restraint, make sure it is securely held in
place. To check, grasp the child restraint
at the seat belt path and attempt to
move it side to side and back and forth.
When the child restraint is properly
installed, there should be no more than
2.5 cm (1 in) of movement.
If the airbag is off, the OFF indicator in the
passenger airbag status indicator will come
on and stay on when the vehicle is started.
If a child restraint has been installed and
the ON indicator is lit, see “If the On
Indicator Is Lit for a Child Restraint” under
Passenger Sensing System 065.
To remove the child restraint, unbuckle the
vehicle seat belt and let it return to the
stowed position.
Page 95 of 429
Chevrolet Silverado EV Owner Manual (GMNA-Localizing-U.S./Canada-
16702912) - 2024 - CRC - 1/13/23
94 Storage
Midgate Drain Grate Removal and
Cleaning
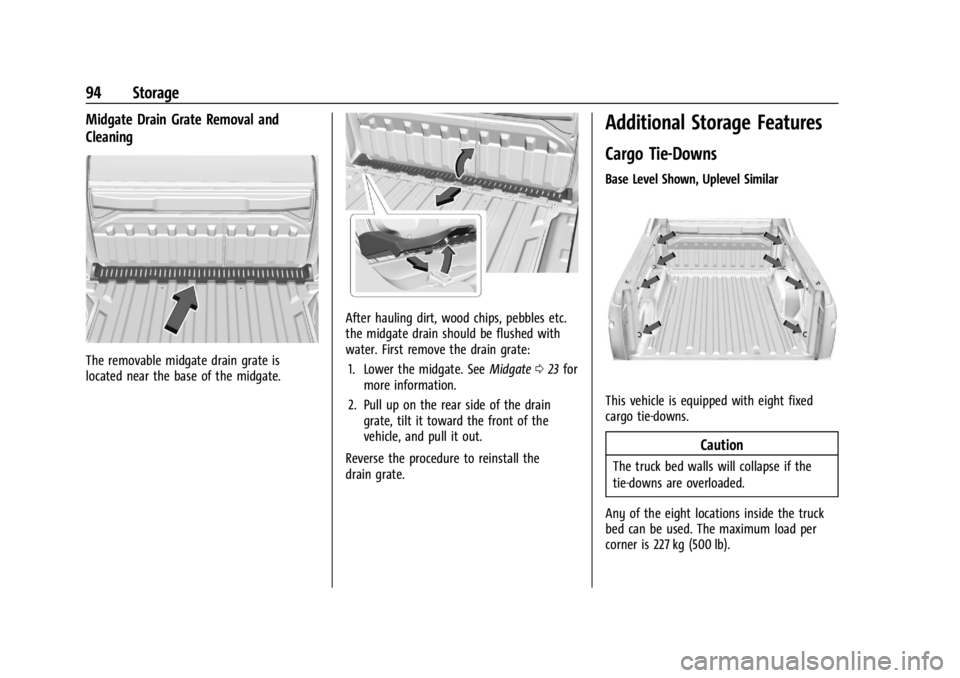
The removable midgate drain grate is
located near the base of the midgate.
After hauling dirt, wood chips, pebbles etc.
the midgate drain should be flushed with
water. First remove the drain grate:1. Lower the midgate. See Midgate023 for
more information.
2. Pull up on the rear side of the drain grate, tilt it toward the front of the
vehicle, and pull it out.
Reverse the procedure to reinstall the
drain grate.
Additional Storage Features
Cargo Tie-Downs
Base Level Shown, Uplevel Similar
This vehicle is equipped with eight fixed
cargo tie-downs.
Caution
The truck bed walls will collapse if the
tie-downs are overloaded.
Any of the eight locations inside the truck
bed can be used. The maximum load per
corner is 227 kg (500 lb).
Page 116 of 429
Chevrolet Silverado EV Owner Manual (GMNA-Localizing-U.S./Canada-
16702912) - 2024 - CRC - 1/13/23
Instruments and Controls 115
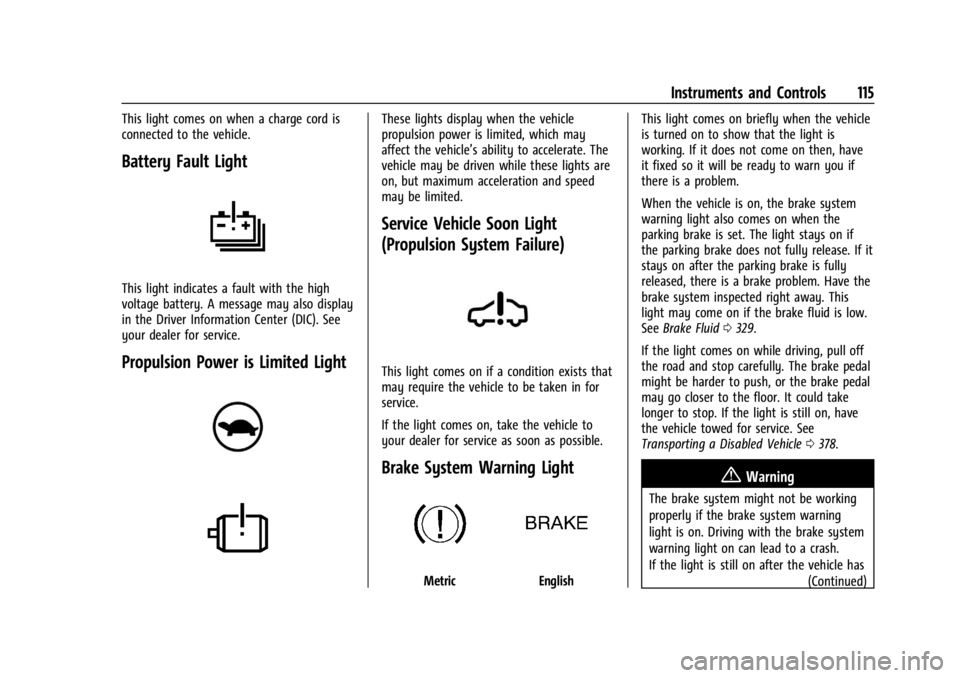
This light comes on when a charge cord is
connected to the vehicle.
Battery Fault Light
This light indicates a fault with the high
voltage battery. A message may also display
in the Driver Information Center (DIC). See
your dealer for service.
Propulsion Power is Limited Light
These lights display when the vehicle
propulsion power is limited, which may
affect the vehicle’s ability to accelerate. The
vehicle may be driven while these lights are
on, but maximum acceleration and speed
may be limited.
Service Vehicle Soon Light
(Propulsion System Failure)
This light comes on if a condition exists that
may require the vehicle to be taken in for
service.
If the light comes on, take the vehicle to
your dealer for service as soon as possible.
Brake System Warning Light
MetricEnglishThis light comes on briefly when the vehicle
is turned on to show that the light is
working. If it does not come on then, have
it fixed so it will be ready to warn you if
there is a problem.
When the vehicle is on, the brake system
warning light also comes on when the
parking brake is set. The light stays on if
the parking brake does not fully release. If it
stays on after the parking brake is fully
released, there is a brake problem. Have the
brake system inspected right away. This
light may come on if the brake fluid is low.
See
Brake Fluid 0329.
If the light comes on while driving, pull off
the road and stop carefully. The brake pedal
might be harder to push, or the brake pedal
may go closer to the floor. It could take
longer to stop. If the light is still on, have
the vehicle towed for service. See
Transporting a Disabled Vehicle 0378.
{Warning
The brake system might not be working
properly if the brake system warning
light is on. Driving with the brake system
warning light on can lead to a crash.
If the light is still on after the vehicle has
(Continued)
Page 117 of 429
Chevrolet Silverado EV Owner Manual (GMNA-Localizing-U.S./Canada-
16702912) - 2024 - CRC - 1/13/23
116 Instruments and Controls
Warning (Continued)
been pulled off the road and carefully
stopped, have the vehicle towed for
service.
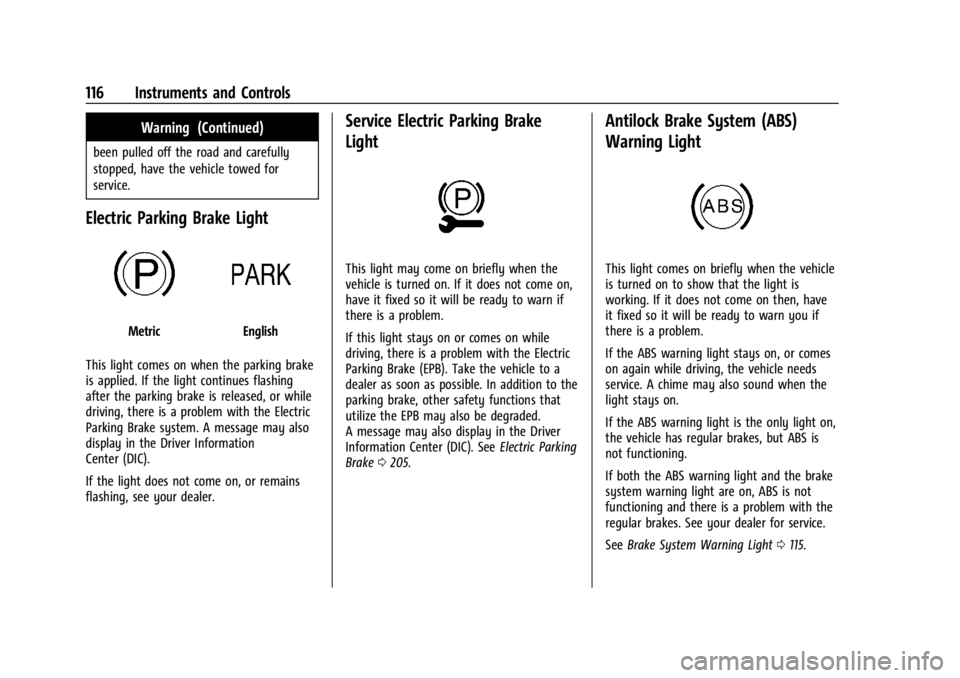
Electric Parking Brake Light
MetricEnglish
This light comes on when the parking brake
is applied. If the light continues flashing
after the parking brake is released, or while
driving, there is a problem with the Electric
Parking Brake system. A message may also
display in the Driver Information
Center (DIC).
If the light does not come on, or remains
flashing, see your dealer.
Service Electric Parking Brake
Light
This light may come on briefly when the
vehicle is turned on. If it does not come on,
have it fixed so it will be ready to warn if
there is a problem.
If this light stays on or comes on while
driving, there is a problem with the Electric
Parking Brake (EPB). Take the vehicle to a
dealer as soon as possible. In addition to the
parking brake, other safety functions that
utilize the EPB may also be degraded.
A message may also display in the Driver
Information Center (DIC). See Electric Parking
Brake 0205.
Antilock Brake System (ABS)
Warning Light
This light comes on briefly when the vehicle
is turned on to show that the light is
working. If it does not come on then, have
it fixed so it will be ready to warn you if
there is a problem.
If the ABS warning light stays on, or comes
on again while driving, the vehicle needs
service. A chime may also sound when the
light stays on.
If the ABS warning light is the only light on,
the vehicle has regular brakes, but ABS is
not functioning.
If both the ABS warning light and the brake
system warning light are on, ABS is not
functioning and there is a problem with the
regular brakes. See your dealer for service.
See Brake System Warning Light 0115.