2024 CHEVROLET SILVERADO EV trailer
[x] Cancel search: trailerPage 136 of 429
Chevrolet Silverado EV Owner Manual (GMNA-Localizing-U.S./Canada-
16702912) - 2024 - CRC - 1/13/23
Instruments and Controls 135
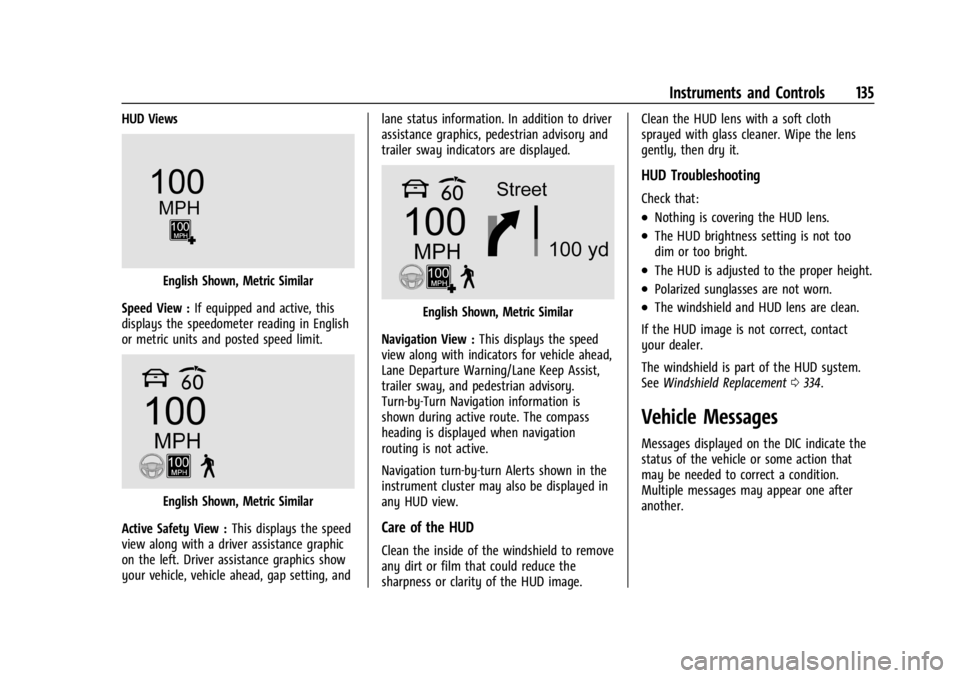
HUD Views
English Shown, Metric Similar
Speed View : If equipped and active, this
displays the speedometer reading in English
or metric units and posted speed limit.
English Shown, Metric Similar
Active Safety View : This displays the speed
view along with a driver assistance graphic
on the left. Driver assistance graphics show
your vehicle, vehicle ahead, gap setting, and lane status information. In addition to driver
assistance graphics, pedestrian advisory and
trailer sway indicators are displayed.
English Shown, Metric Similar
Navigation View : This displays the speed
view along with indicators for vehicle ahead,
Lane Departure Warning/Lane Keep Assist,
trailer sway, and pedestrian advisory.
Turn-by-Turn Navigation information is
shown during active route. The compass
heading is displayed when navigation
routing is not active.
Navigation turn-by-turn Alerts shown in the
instrument cluster may also be displayed in
any HUD view.
Care of the HUD
Clean the inside of the windshield to remove
any dirt or film that could reduce the
sharpness or clarity of the HUD image. Clean the HUD lens with a soft cloth
sprayed with glass cleaner. Wipe the lens
gently, then dry it.
HUD Troubleshooting
Check that:
.Nothing is covering the HUD lens.
.The HUD brightness setting is not too
dim or too bright.
.The HUD is adjusted to the proper height.
.Polarized sunglasses are not worn.
.The windshield and HUD lens are clean.
If the HUD image is not correct, contact
your dealer.
The windshield is part of the HUD system.
See Windshield Replacement 0334.
Vehicle Messages
Messages displayed on the DIC indicate the
status of the vehicle or some action that
may be needed to correct a condition.
Multiple messages may appear one after
another.
Page 146 of 429
Chevrolet Silverado EV Owner Manual (GMNA-Localizing-U.S./Canada-
16702912) - 2024 - CRC - 1/13/23
Lighting 145
All lamps will gradually fade out after about
30 seconds.
Entry lighting can be disabled manually by
closing all doors, pressing
Qon the remote
key, or starting the vehicle.
This feature can be changed. On the
infotainment home page, select Settings
T
VehicleTVehicle Locator Lights.
Exit Lighting
Some exterior lamps and interior lamps turn
on when the driver door is opened after the
vehicle is turned off.
The exterior and interior lamps remain on
for a set amount of time, then automatically
turn off.
The interior lights turn on when the vehicle
is turned off.
The exterior lamps turn off immediately by
turning the exterior lamp control off.
This feature can be changed. On the
infotainment home screen, select Settings
T
VehicleTExit Lighting.
Battery Load Management
The vehicle has Electric Power Management
(EPM) that estimates the battery
temperature and state of charge. It then
adjusts the voltage for best performance
and extended life of the 12-volt battery.
When the battery state of charge is low, the
voltage is raised slightly to quickly increase
the charge. When the state of charge is
high, the voltage is lowered slightly to
prevent over charging. As this adjustment
occurs, you may see the voltage move up or
down on the voltmeter gauge or voltage
display on the Driver Information Center
(DIC), if equipped. This is normal. If a
problem occurs, an alert will be displayed.
If the electrical loads are very high, the
battery can be discharged when the vehicle
is stationary. A high electrical load occurs
when several features are on, such as:
headlamps, high beams, rear window
defogger, climate control fan at high speed,
heated seats, motor cooling fans, trailer
loads, and loads plugged into accessory
power outlets.
EPM works to prevent excessive discharge of
the battery by balancing the electrical
system output and the vehicle's electrical needs. In some cases, it can temporarily
reduce the power demands of some
accessories.
These actions occur in steps or levels
without being noticeable. In rare cases at
the highest levels of corrective action, this
action may be noticeable to the driver. If so,
a DIC battery voltage and charging message
displays. It is recommended that the driver
reduce the electrical loads as much as
possible. See
Driver Information Center (DIC)
(Base Level) 0129 or
Driver Information Center (DIC) (Uplevel)
0 130.
Battery Power Protection
This feature helps prevent the battery from
being drained if the interior courtesy lamps
or reading lamps are accidentally left on.
If any of these lamps are left on, they
automatically turn off after 10 minutes when
the vehicle is turned off. The lamps will not
come back on again until one of the
following occurs:
.The vehicle is started.
.The doors are closed and then re-opened.
Page 168 of 429
Chevrolet Silverado EV Owner Manual (GMNA-Localizing-U.S./Canada-
16702912) - 2024 - CRC - 1/13/23
Infotainment System 167
Wi-Fi Hotspot
Allows adjustment of different Wi-Fi
features.
Vehicle-to-Phone Sharing
Trusted Device
Allows for setting a phone as your trusted
device to establish a secure communication
channel between your phone and vehicle
that enables convenient features like instant
profile unlocking and account sign in. When
nearby, your trusted device is recognized
automatically via a unique Bluetooth
connection.
Vehicle
The menu may contain the following:
Teen Driver
SeeTeen Driver 0168.
Rear Seat Reminder
Allows for a chime and a message when the
rear door has been opened before or during
operation of the vehicle. Buckle to Drive
This feature can prevent shifting out of Park
when the driver, and if applicable the front
passenger, seat belt is not buckled. See
Buckle To Drive
053.
Climate and Air Quality
Adjusts different climate settings.
Collision/Detection Systems
Adjusts different driver assistance system
settings.
Comfort and Convenience
Adjusts different comfort and convenience
settings.
Lighting
Adjusts different lighting settings.
Power Door Locks
Adjusts different door lock settings.
Remote Lock, Unlock, and Start
Adjusts different remote lock settings.
Ride Height
Adjusts different ride height settings.
Power Assist Steps
Adjusts different running board settings. Seating Position
Adjusts different seating position settings.
Suspension
Adjusts different suspension settings.
Trailering
Adjusts different trailering settings.
Apps and Notifications
Shows a list of installed apps and the
permissions used.
Date / Time
Allows setting of the clock.
Display
Allows adjustment of the infotainment
display.
Sounds
Allows adjustment of the infotainment
system sounds.
Profiles and Accounts
Modifies the infotainment system’s profiles
and provides access to the accounts assigned
to the currently active profile.
Page 171 of 429
Chevrolet Silverado EV Owner Manual (GMNA-Localizing-U.S./Canada-
16702912) - 2024 - CRC - 1/13/23
170 Infotainment System
started with a Teen Driver key, the DIC
displays a message that the top speed is
limited.
On certain vehicles, when the Speed Limiter
is turned ON, the vehicle’s maximum
acceleration will be limited. The DIC will
display a message that the acceleration is
limited.
Teen Driver Speed Warning :Displays a
warning in the DIC when exceeding a
selectable speed. Turn the speed warning on
or off and choose the desired speed warning
level. The speed warning does not limit the
speed of the vehicle. On some infotainment
systems, touch Set Teen Driver Speed
Warning to set the warning speed.
Set Teen Driver Speed Warning : Choose the
desired speed warning level. The speed
warning does not limit the speed of the
vehicle.
SiriusXM Explicit Content Filter : Allows the
SiriusXM Explicit Content Filter to be turned
ON or OFF. When ON, the teen driver will
not be able to listen to SiriusXM stations
that contain explicit content, and the Explicit
Content Filter selection in the Audio Settings
will be unavailable for change. When Teen Driver is Active:
.If equipped, the radio will mute when the
driver seat belt, and in some vehicles the
front passenger seat belt, is not buckled.
The audio from any device paired to the
vehicle will also be muted.
.An object placed on the front passenger
seat, such as a briefcase, handbag,
grocery bag, laptop, or other electronic
device, could cause the passenger sensing
system to falsely sense an unbuckled
front passenger and mute the radio.
If this happens, remove the object from
the seat. See
Passenger Sensing System
0 65.
.Some safety systems, such as Automatic
Emergency Braking, if equipped, cannot
be turned off.
.The gap setting for Adaptive Cruise
Control and alert timing for Forward
Collision Alert, if equipped, cannot be
changed.
.When trying to change a safety feature
that is not configurable in Teen Driver,
the feature may be grayed out or
removed from the infotainment menu,
or the DIC will display a message
indicating that Teen Driver is active and
the action is not available.
.Super Cruise or Ultra Cruise, if equipped,
is not available.
.Do not tow a trailer if equipped with
Automatic Emergency Braking.
Report Card
The vehicle owner must secure the driver’s
consent to record certain vehicle data when
the vehicle is driven with a registered Teen
Driver key. There is one Report Card per
vehicle. Data is only recorded when a
registered Teen Driver key is used to
operate the vehicle.
The Report Card data is collected from the
time Teen Driver is activated or the last
time the Report Card was reset. The
following items may be recorded:
.Distance Driven –the total distance
driven.
.Maximum Speed –the maximum vehicle
speed detected.
.Overspeed Warnings –the number of
times the speed warning setting was
exceeded.
.Wide Open Throttle –the number of
times the accelerator pedal was pressed
nearly all the way down.
Page 182 of 429
Chevrolet Silverado EV Owner Manual (GMNA-Localizing-U.S./Canada-
16702912) - 2024 - CRC - 1/17/23
Driving and Operating 181
Trailer Towing
General Towing Information . . . . . . . . . . . 293
Driving Characteristics andTowing Tips . . . . . . . . . . . . . . . . . . . . . . . . . 294
Trailer Towing . . . . . . . . . . . . . . . . . . . . . . . . . 297
Towing Equipment . . . . . . . . . . . . . . . . . . . . 301
Trailer Sway Control (TSC) . . . . . . . . . . . . 309
Trailering App . . . . . . . . . . . . . . . . . . . . . . . . . 310
Conversions and Add-Ons
Add-On Electrical Equipment . . . . . . . . . . . 321
Auxiliary Switches . . . . . . . . . . . . . . . . . . . . . 321
Driving Information
Driving for Better Energy
Efficiency
Use the following tips to help maximize
energy efficiency and driving range.
The Energy Usage card available on the
Driver Information Center (DIC) estimates
the influence of the main factors impacting
vehicle range. It displays how energy is
being used for the current drive
as percentages of overall vehicle energy use.
See Driver Information Center (DIC) (Base
Level) 0129 or
Driver Information Center (DIC) (Uplevel)
0 130 and
Vehicle Status 0132.
Acceleration/Braking/Coasting
Avoid rapid accelerations and decelerations.
Driving range is maximized at 89 km/h
(55 mph) and less.
Use cruise control when appropriate.
Using the steering wheel paddle during
deceleration recovers more energy. See
Regenerative Braking 0206. Terrain and Vehicle Speed
Plan ahead for decelerations and coast
whenever possible. Do not rush to traffic
signals. Do not shift to N (Neutral) to coast.
Higher speeds and grade changes use more
energy and can significantly reduce driving
range.
Climate Setting
Using the heat and air conditioning systems
decreases the energy available for electric
driving.
Optimal energy efficiency is achieved when
the heat, air conditioning, and fan are
turned off.
Use the heated seat features instead of
climate control system. Heating the seat
uses less energy than heating and cooling
the interior.
Use remote start to heat or cool the interior
when the vehicle is plugged in to maximize
the driving range by using electricity from
the electrical outlet.
In hot weather, avoid parking in direct
sunlight or use sunshades inside the vehicle.
Page 191 of 429
Chevrolet Silverado EV Owner Manual (GMNA-Localizing-U.S./Canada-
16702912) - 2024 - CRC - 1/17/23
190 Driving and Operating
{Warning
Wet brakes can cause crashes. They
might not work as well in a quick stop
and could cause pulling to one side. You
could lose control of the vehicle.
After driving through a large puddle of
water or a car/vehicle wash, lightly apply
the brake pedal until the brakes work
normally.
Flowing or rushing water creates strong
forces. Driving through flowing water
could cause the vehicle to be carried
away. If this happens, you and other
vehicle occupants could drown. Do not
ignore police warnings and be very
cautious about trying to drive through
flowing water.
Hydroplaning
Hydroplaning is dangerous. Water can build
up under the vehicle's tires so they actually
ride on the water. This can happen when
the road is wet and you are driving fast.
When the vehicle is hydroplaning, it has
little or no contact with the road.There is no hard and fast rule about
hydroplaning. The best advice is to slow
down when the road is wet.
Other Rainy Weather Tips
Besides slowing down, other wet weather
driving tips include:
.Allow extra following distance.
.Pass with caution.
.Keep windshield wiping equipment in
good shape, and keep the windshield
washer fluid reservoir filled.
.Ensure the tires are maintained and have
proper tread depth. See
Tires0344.
.Turn off any cruise control, if equipped.
See Adaptive Cruise Control (Advanced)
0 217 or
Super Cruise 0227.
.Turn off One-Pedal Driving mode. See
One-Pedal Driving 0203.
.Turn on the Traction Control System (TCS)
and the Electronic Stability Control (ESC).
See Traction Control/Electronic Stability
Control 0207.
Hill and Mountain Roads
{Warning
Do not charge your vehicle’s battery
above an 80% charge if you are going to
drive down long, steep grades such as
mountain passes. This provides room in
the battery for regenerative braking to
supplement your conventional brakes
during the descent. This is especially
important when towing a trailer, which
puts additional stress on your vehicle’s
braking system.
If the battery becomes full, regenerative
braking will be limited or unavailable. The
brakes will have to do all the work of
slowing down the vehicle and could
become too hot. Hot brakes may not be
able to slow the vehicle enough to
maintain speed and control. To help avoid
the risk of a crash, limit the battery’s
charge and, if you experience brake fade
or receive a brake warning, stop the
vehicle and allow the brakes to cool.
See “Charge Now” underCharging 0123
for information on setting charge limits.
Page 195 of 429
Chevrolet Silverado EV Owner Manual (GMNA-Localizing-U.S./Canada-
16702912) - 2024 - CRC - 1/17/23
194 Driving and Operating
Steps for Determining Correct Load Limit1.
Locate the statement "The combined
weight of occupants and cargo
should never exceed XXX kg or
XXX lbs." on your vehicle’s placard.
2.Determine the combined weight of
the driver and passengers that will
be riding in your vehicle.
3.Subtract the combined weight of the
driver and passengers from XXX kg
or XXX lbs.
4.The resulting figure equals the
available amount of cargo and
luggage load capacity. For example,
if the "XXX" amount equals 1400 lbs.
and there will be five 150 lb
passengers in your vehicle, the
amount of available cargo and
luggage load capacity is 650 lbs.
(1400-750 (5 x 150) = 650 lbs.)
5.Determine the combined weight of
luggage and cargo being loaded on
the vehicle. That weight may not
safely exceed the available cargo and
luggage load capacity calculated in
Step 4.
6.If your vehicle will be towing a
trailer, load from your trailer will be
transferred to your vehicle. Consult
this manual to determine how this
reduces the available cargo and
luggage load capacity of your
vehicle.
See Trailer Towing 0297 for important
information on towing a trailer, towing
safety rules, and trailering tips.
If aftermarket accessories are installed on
the vehicle, for example a rooftop carrier, be
sure to add the weight of all installed
accessories to the combined weight of
luggage and cargo.Example 1
1. Vehicle Capacity Weight for Example 1 = 453 kg (1,000 lb)
Then subtract Accessory Weight, for
example a rooftop cargo box =
15.8 kg (35 lb)
2. Subtract Occupant Weight @ 68 kg(150 lb) × 2 = 136 kg (300 lb)
3. Remaining available capacity for Cargo Weight = 301.2 kg (665 lb)
Page 204 of 429
Chevrolet Silverado EV Owner Manual (GMNA-Localizing-U.S./Canada-
16702912) - 2024 - CRC - 1/17/23
Driving and Operating 203
When shifting to P (Park) on a hill, use the
brakes to hold the vehicle then shift to
P (Park).
L :This position provides additional coast
braking for driving downhill, towing a trailer,
or hauling a heavy load.
To use this feature:
1. Ensure the vehicle is in D (Drive).
2. From the center position, move the shift lever rearward toward you and
then down.
After releasing the shift lever, it will
return to the center position
To exit L (Low) and shift into D (Drive) or
N (Neutral): At any speed, shift to D (Drive)
or N (Neutral).
To exit L (Low) and shift into P (Park) or
R (Reverse): 1. Bring the vehicle to a complete stop.
2. Shift to the desired gear.
Cruise control can be used while the vehicle
is in L (Low) Mode.One-Pedal Driving
One-Pedal Driving allows the use of the
accelerator pedal to control the deceleration
of the vehicle to a complete stop.
Completely releasing the accelerator pedal
will result in aggressive deceleration.
Partially lifting off the accelerator pedal
allows the deceleration of the vehicle to be
adjusted as desired.
Use the brake pedal if emergency braking is
required.
To view and configure One-Pedal Driving,
from the infotainment display home screen,
select Controls > Drive & Park > One-Pedal
Driving.
Select Off to disable One-Pedal Driving for
traditional two-pedal driving, similar to a
gasoline vehicle.
Select On to enable One-Pedal Driving where
a moderate level of braking is applied when
the accelerator pedal is released while
driving.
Select High to enable One-Pedal Driving
where a strong level of braking is applied
when the accelerator pedal is released while
driving. When enabled, One-Pedal Driving applies in
D (Drive). The vehicle will remain in
One-Pedal Driving mode, including through
vehicle off and on power cycles, until
manually disabled by the driver. Press the
accelerator pedal to the desired speed. The
brake lamps will come on during substantial
deceleration and when the vehicle is
stopped.
If One-Pedal Driving is turned off while
stopped, the vehicle will stay stopped. Press
the brake pedal or accelerator pedal to
return to two-pedal driving.
For faster access, One-Pedal Driving can be
toggled in the Drive Mode app.
Touch
lto toggle One-Pedal Driving on or
off. When turned on, One-Pedal Driving
returns to the previously selected level. To
change the level, press the Settings link in
the pop-up box to go to the full One-Pedal
Driving selection.
When possible, One-Pedal Driving uses
regenerative braking to slow the vehicle for
energy efficiency. Friction brakes may be
used in some cases when regenerative
braking is reduced. Friction brakes will be