2024 CHEVROLET SILVERADO EV tire type
[x] Cancel search: tire typePage 186 of 429
Chevrolet Silverado EV Owner Manual (GMNA-Localizing-U.S./Canada-
16702912) - 2024 - CRC - 1/17/23
Driving and Operating 185
The vehicle's right wheels can drop off the
edge of a road onto the shoulder while
driving. Follow these tips:1. Ease off the accelerator and then, if there is nothing in the way, steer the
vehicle so that it straddles the edge of
the pavement.
2. Turn the steering wheel about one-eighth of a turn, until the right front
tire contacts the pavement edge.
3. Turn the steering wheel to go straight down the roadway.
Loss of Control
Skidding
There are three types of skids that
correspond to the vehicle's three control
systems:
.Braking Skid —wheels are not rolling.
.Steering or Cornering Skid —too much
speed or steering in a curve causes tires
to slip and lose cornering force.
.Acceleration Skid —too much throttle
causes the driving wheels to spin.
Antilock brakes help to avoid only the
braking skid. Defensive drivers avoid most skids by taking
reasonable care suited to existing conditions,
and by not exceeding those conditions. But
skids are always possible.
If the vehicle starts to skid, follow these
suggestions:
.Ease your foot off the accelerator pedal
and steer the way you want the vehicle
to go. The vehicle may straighten out,
but if it skids again from oversteer, be
ready to correct another skid if it occurs.
.Slow down and adjust your driving
according to weather conditions. Stopping
distance may be longer and vehicle
control may be affected when traction is
reduced by water, snow, ice, gravel,
or other material on the road. Learn to
recognize warning clues
—such as
enough water, ice, or packed snow on the
road to make a mirrored surface —and
slow down when you have any doubt.
.Try to avoid sudden steering, acceleration,
or braking, including reducing vehicle
speed by shifting to a lower gear. Any
sudden changes could cause the tires to
slide.
Off-Road Driving
Four-wheel-drive vehicles can be used for
off-road driving. Vehicles without four-wheel
drive and vehicles not equipped with All
Terrain (AT) or On-Off Road (OOR) tires must
not be driven off-road except on a level,
solid surface. For contact information about
the original equipment tires, see the
warranty manual.
One of the best ways for successful off-road
driving is to control the speed.
{Warning
When driving off-road, bouncing and
quick changes in direction can easily
throw you out of position. This could
cause you to lose control and crash. You
and your passengers should always wear
seat belts.
Off-Road Vehicle Features
If equipped, the following off-road features
may be available:
.Four-Wheel Steering: Provides the ability
to steer the vehicle with all four wheels,
reducing the turning diameter and
improving maneuverability of the vehicle.
See Four-Wheel Steering 0210.
Page 190 of 429
Chevrolet Silverado EV Owner Manual (GMNA-Localizing-U.S./Canada-
16702912) - 2024 - CRC - 1/17/23
Driving and Operating 189
.After exiting the water, repeatedly and
gently apply the brakes to dry them off
and restore effectiveness.
If Something Goes Wrong
If during your off-road experience a warning
light or warning message displays on the
instrument cluster, or if the vehicle sustains
damage, stop driving as soon as it is safe to
do so. Correct the condition if possible
before continuing driving. If a warning light
or message appears, or if the condition
cannot be corrected, see your dealer. See
Vehicle Messages0135.
If the vehicle is operating with reduced
acceleration or reduced propulsion, stop
your off-road experience and drive slowly to
an accessible point for further assistance.
The vehicle should be taken to your dealer
for service as soon as possible. See
Propulsion Power Messages 0136 and
Propulsion Power is Limited Light 0115.
{Warning
A vehicle with driveline damage may roll
when shifted into P (Park). Always set
the Electric Parking Brake before
inspecting for driveline damage or when
(Continued)
Warning (Continued)
securing the vehicle on a flatbed tow
truck. SeeElectric Parking Brake 0205
and
Transporting a Disabled Vehicle 0378.
After Driving Your Vehicle Off-Road
Be sure to switch out of Off-Road Mode or
Terrain Mode to return to normal driving.
See Driver Mode Control 0209.
Remove any brush or debris that has
collected on the underbody or chassis,
or under the hood. Clean the lens of the
underbody camera. These accumulations can
be a fire hazard.
The extreme conditions of off-road driving
require more frequent maintenance service.
See "Severe Conditions Requiring More
Frequent Maintenance" and "Additional
Required Services —Severe Service" on
Maintenance Schedule 0389.
After operation in mud or sand, have the
brake linings cleaned and checked. These
substances can cause glazing and uneven
braking. Check the body structure, driveline, steering,
suspension, wheels, tires, and other vehicle
systems for damage, or have these
inspections done by your dealer.
{Warning
Lifting a vehicle and getting under it to
do maintenance or repairs is dangerous
without the appropriate safety equipment
and training. If a jack is provided with
the vehicle, it is designed only for
changing a flat tire. If it is used for
anything else, you or others could be
badly injured or killed if the vehicle slips
off the jack. If a jack is provided with the
vehicle, only use it for changing a
flat tire.
Driving on Wet Roads
Rain and wet roads can reduce vehicle
traction and affect your ability to stop and
accelerate. Always drive slower in these
types of driving conditions and avoid driving
through large puddles and deep-standing or
flowing water.
Page 253 of 429
Chevrolet Silverado EV Owner Manual (GMNA-Localizing-U.S./Canada-
16702912) - 2024 - CRC - 1/17/23
252 Driving and Operating
Certain trailer views require a compatible
trailer profile be configured and selected.
A compatible trailer is a box type trailer
(cargo, camper, etc.) with a conventional
hitch.
Available camera views:
.Front/Rear Standard View
.Front/Rear Top-Down View
.Rear Bowl View
.Front/Rear Side View
.Hitch View
.Rear Trailer View
.Rear Side View with Available Articulation
Functionality
.Picture-in-Picture Side View
.Interior Trailer View
.Transparent Trailer View
.Surround View
.Guidance Lines
.Hitch Guidance
Troubleshooting
The Trailer Camera calibration may take
longer than expected or not calibrate if:
.The vehicle is driven too fast during
calibration. Maintain speeds below
50 km/h (31 mph).
.The vehicle is not driven straight during
calibration. Steering should be maintained
as straight as possible. Excessive Steering
during calibration may extend
calibration time.
.The calibration is attempted in low light.
Calibration should be attempted when
there is enough light.
.The calibration is attempted during
adverse weather conditions. Calibration
during conditions such as snow or heavy
rain should be avoided.
.The road surface is not ideal for
calibration. Calibration should be
attempted on an alternate road surface.
.The accessory trailer cameras are
swapped at the hitch connector. Ensure
that the camera mounted to the rear of
the trailer is connected to the rear trailer
camera input.
.The accessory trailer camera is mounted,
angled, or rotated outside of the defined
mounting location (see camera
installation instructions).
.The vehicle or accessory trailer camera is
obstructed by dirt or debris. Check
cameras and clean as needed.
.The accessory trailer camera is mounted
such that obstructions are visible in the
view (spare tire, bike/cargo racks, etc.).
Calibration should be attempted with
obstruction temporarily removed.
Shadows resulting from driving toward
the sun may be perceived as obstructions.
Attempt to calibrate driving in an
alternate direction if possible.
.The entered trailer profile dimensions are
inaccurate. Measurements are expected to
be made to the nearest centimeter or
inch. Enter accurate measurements and
reattempt calibration.
Distortion may be observed in a rear trailer
camera view if:
.The accessory trailer camera is mounted,
angled or rotated outside of the defined
mounting location. See your dealer.
.The entered trailer profile dimensions are
inaccurate. Measurements are expected to
be made to the nearest centimeter or
inch. Enter accurate measurements and
reattempt calibration.
Page 314 of 429
Chevrolet Silverado EV Owner Manual (GMNA-Localizing-U.S./Canada-
16702912) - 2024 - CRC - 1/17/23
Driving and Operating 313
a maximum of two minutes to detect and
label each TTPMS sensor. After each sensor
is learned, a check mark appears next to the
tire, the vehicle horn sounds, the vehicle
brake lamps flash, and all working trailer
lamps flash.
The recommended tire pressure must be
entered for the trailer tires. An alert appears
when a trailer tire's pressure is high or low.
Tool Method: A TTPMS activation tool can
be purchased separately to learn the trailer
TTPMS sensor locations.
Manual Method: Without the TTPMS
activation tool, the air pressure can be
increased or decreased in each tire for
10 seconds. Do not exceed the maximum
inflation pressure found on the tire
sidewalls. Make sure to readjust tire
pressure to the recommended level when
the process is complete.
Sensor Learning Steps
To complete the sensor-to-vehicle learn
process:1. Touch Start on the Learn Sensors screen. The horn chirps twice and the Learning
Active screen appears on the
infotainment display. 2. Start with the driver side front
trailer tire.
3. Activate the tool near the valve stem or adjust the air pressure of this tire until
the horn chirps and all working vehicle
and trailer lights flash.
The process stops without saving the
sensor locations if this step takes more
than two minutes.
4. Move to the next tire and repeat Step 3 for each sensor. The horn chirps twice
when all sensors are completed.
5. Return to the vehicle to complete the setup.
Maintenance Reminders
To set up maintenance reminders, touch the
Trailer Maintenance icon. Follow the
on-screen prompts. The maximum number
of reminders is 50.
Camera Views and Guides
To set up the trailer camera and guideline
features, if equipped, touch the Camera
Views and Guides icon.
1. Select the number of axles on the trailer.
2. Select the wheel location on the trailer (inboard or outboard). 3. Enter the trailer dimensions as prompted.
Follow the on-screen instructions to
complete setup for available features.
Certain trailer features require a compatible
trailer profile be configured and selected.
A compatible trailer is a box-type trailer
(cargo, camper, etc.) with a conventional
hitch.
Transparent Trailer Setup
If equipped, the rear trailer camera must be
mounted on the trailer and electrically
connected to the vehicle before transparent
trailer feature can be used. See Assistance
Systems for Parking or Backing 0246.
Follow the on-screen instructions to enter
the trailer dimensions.
Trailer dimensions must be in range and
transparent trailer must be calibrated
before use.
.Trailer Length: Measure from center of
coupler to furthest rear point on the
trailer.
.Trailer Total Width: Measure from the left
most edge of trailer, including the wheels,
to the right most edge.
Page 347 of 429
Chevrolet Silverado EV Owner Manual (GMNA-Localizing-U.S./Canada-
16702912) - 2024 - CRC - 1/13/23
346 Vehicle Care
With winter tires, there may be decreased
dry road traction, increased road noise, and
shorter tread life. After changing to winter
tires, be alert for changes in vehicle
handling and braking.
If using winter tires:
.Use tires of the same brand and tread
type on all four wheel positions.
.Use only radial ply tires of the same size,
load range, and speed rating as the
original equipment tires.
Winter tires with the same speed rating as
the original equipment tires may not be
available for H, V, W, Y, and ZR speed rated
tires. If winter tires with a lower speed
rating are chosen, never exceed the tire's
maximum speed capability.
Tire Sidewall Labeling
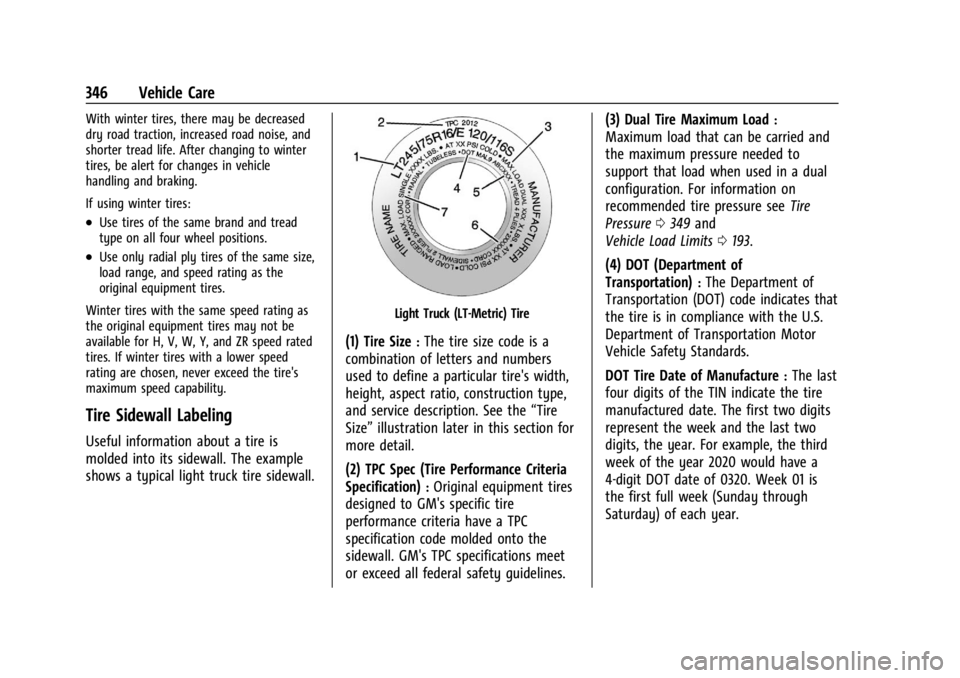
Useful information about a tire is
molded into its sidewall. The example
shows a typical light truck tire sidewall.
Light Truck (LT-Metric) Tire
(1) Tire Size:The tire size code is a
combination of letters and numbers
used to define a particular tire's width,
height, aspect ratio, construction type,
and service description. See the “Tire
Size” illustration later in this section for
more detail.
(2) TPC Spec (Tire Performance Criteria
Specification)
:Original equipment tires
designed to GM's specific tire
performance criteria have a TPC
specification code molded onto the
sidewall. GM's TPC specifications meet
or exceed all federal safety guidelines. (3) Dual Tire Maximum Load
:
Maximum load that can be carried and
the maximum pressure needed to
support that load when used in a dual
configuration. For information on
recommended tire pressure see
Tire
Pressure 0349 and
Vehicle Load Limits 0193.
(4) DOT (Department of
Transportation)
:The Department of
Transportation (DOT) code indicates that
the tire is in compliance with the U.S.
Department of Transportation Motor
Vehicle Safety Standards.
DOT Tire Date of Manufacture
:The last
four digits of the TIN indicate the tire
manufactured date. The first two digits
represent the week and the last two
digits, the year. For example, the third
week of the year 2020 would have a
4-digit DOT date of 0320. Week 01 is
the first full week (Sunday through
Saturday) of each year.
Page 348 of 429
Chevrolet Silverado EV Owner Manual (GMNA-Localizing-U.S./Canada-
16702912) - 2024 - CRC - 1/13/23
Vehicle Care 347
(5) Tire Identification Number (TIN):
The letters and numbers following the
DOT code are the Tire Identification
Number (TIN). The TIN shows the
manufacturer and plant code, tire size,
and date the tire was manufactured.
The TIN is molded onto both sides of
the tire, although only one side may
have the date of manufacture.
(6) Tire Ply Material
:The type of cord
and number of plies in the sidewall and
under the tread.
(7) Single Tire Maximum Load
:
Maximum load that can be carried and
the maximum pressure needed to
support that load when used as a
single. For information on
recommended tire pressure see Tire
Pressure 0349 and
Vehicle Load Limits 0193.
Tire Designations
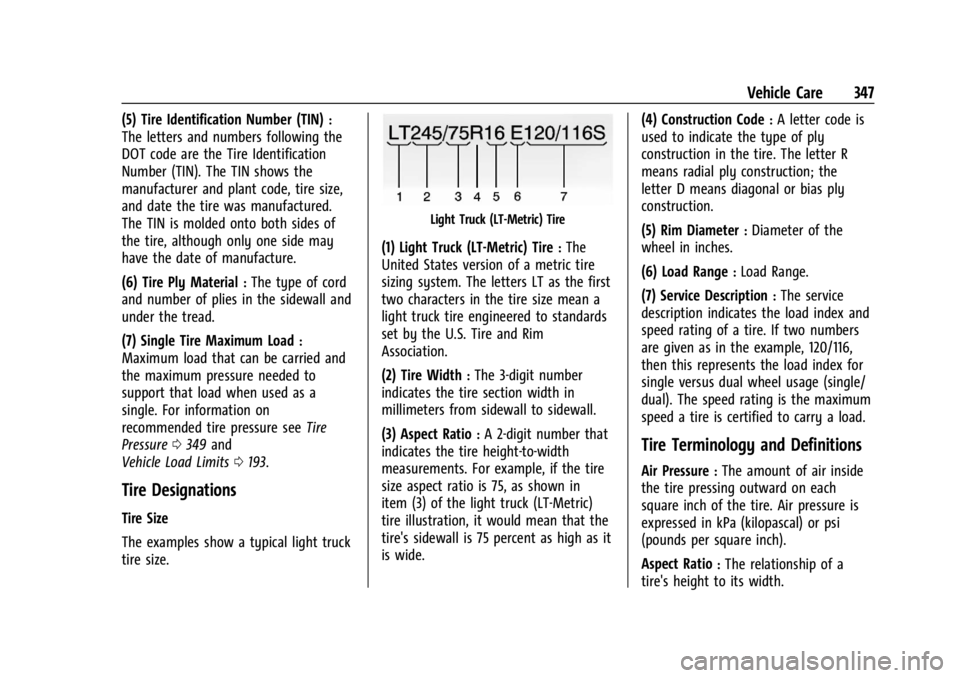
Tire Size
The examples show a typical light truck
tire size.
Light Truck (LT-Metric) Tire
(1) Light Truck (LT-Metric) Tire:The
United States version of a metric tire
sizing system. The letters LT as the first
two characters in the tire size mean a
light truck tire engineered to standards
set by the U.S. Tire and Rim
Association.
(2) Tire Width
:The 3-digit number
indicates the tire section width in
millimeters from sidewall to sidewall.
(3) Aspect Ratio
:A 2-digit number that
indicates the tire height-to-width
measurements. For example, if the tire
size aspect ratio is 75, as shown in
item (3) of the light truck (LT-Metric)
tire illustration, it would mean that the
tire's sidewall is 75 percent as high as it
is wide. (4) Construction Code
:A letter code is
used to indicate the type of ply
construction in the tire. The letter R
means radial ply construction; the
letter D means diagonal or bias ply
construction.
(5) Rim Diameter
:Diameter of the
wheel in inches.
(6) Load Range
:Load Range.
(7) Service Description
:The service
description indicates the load index and
speed rating of a tire. If two numbers
are given as in the example, 120/116,
then this represents the load index for
single versus dual wheel usage (single/
dual). The speed rating is the maximum
speed a tire is certified to carry a load.
Tire Terminology and Definitions
Air Pressure:The amount of air inside
the tire pressing outward on each
square inch of the tire. Air pressure is
expressed in kPa (kilopascal) or psi
(pounds per square inch).
Aspect Ratio
:The relationship of a
tire's height to its width.
Page 351 of 429
Chevrolet Silverado EV Owner Manual (GMNA-Localizing-U.S./Canada-
16702912) - 2024 - CRC - 1/13/23
350 Vehicle Care
Warning (Continued)
.Needless damage from road
hazards
The Tire and Loading Information label
on the vehicle indicates the original
equipment tires and the correct cold
tire inflation pressures. The
recommended pressure is the minimum
air pressure needed to support the
vehicle's maximum load carrying
capacity.
For additional information regarding
how much weight the vehicle can carry,
and an example of the Tire and Loading
Information label, see Vehicle Load
Limits 0193. How the vehicle is loaded
affects vehicle handling and ride
comfort. Never load the vehicle with
more weight than it was designed to
carry.
When to Check
Check the pressure of the tires once a
month or more. Do not forget the spare, if the vehicle
has one. See
Full-Size Spare Tire 0374
for additional information.
How to Check
Use a good quality pocket-type gauge
to check tire pressure. Proper tire
inflation cannot be determined by
looking at the tire. Check the tire
inflation pressure when the tires are
cold, meaning the vehicle has not been
driven for at least three hours or no
more than 1.6 km (1 mi).
Remove the valve cap from the tire
valve stem. Press the tire gauge firmly
onto the valve to get a pressure
measurement. If the cold tire inflation
pressure matches the recommended
pressure on the Tire and Loading
Information label, no further adjustment
is necessary. If the inflation pressure is
low, add air until the recommended
pressure is reached. If the inflation
pressure is high, press on the metal
stem in the center of the tire valve to
release air. Re-check the tire pressure with the tire
gauge.
Put the valve caps back on the valve
stems to keep out dirt and moisture.
Use only valve caps designed for the
vehicle by GM. TPMS sensors could be
damaged and would not be covered by
the vehicle warranty.
Tire Pressure for High-Speed
Operation
{Warning
Driving at high speeds, 160 km/h
(100 mph) or higher, puts additional
strain on tires. Sustained high-speed
driving causes excessive heat buildup and
can cause sudden tire failure. This could
cause a crash, and you or others could be
killed. Some high-speed rated tires require
inflation pressure adjustment for
high-speed operation. When speed limits
and road conditions allow the vehicle to
be driven at high speeds, make sure the
tires are rated for high-speed operation,
(Continued)
Page 359 of 429
Chevrolet Silverado EV Owner Manual (GMNA-Localizing-U.S./Canada-
16702912) - 2024 - CRC - 1/13/23
358 Vehicle Care
Buying New Tires
GM has developed and matched specific
tires for the vehicle. The original
equipment tires installed were designed
to meet General Motors Tire
Performance Criteria Specification (TPC
Spec) system rating. When replacement
tires are needed, GM strongly
recommends buying tires with the same
TPC Spec rating.
GM's exclusive TPC Spec system
considers over a dozen critical
specifications that impact the overall
performance of the vehicle, including
brake system performance, ride and
handling, traction control, and tire
pressure monitoring performance. GM's
TPC Spec number is molded onto the
tire's sidewall near the tire size. If the
tires have an all-season tread design,
the TPC Spec number will be followed
by MS for mud and snow. SeeTire
Sidewall Labeling 0346 for additional
information. GM recommends replacing worn tires in
complete sets of four. Uniform tread
depth on all tires will help to maintain
the performance of the vehicle. Braking
and handling performance may be
adversely affected if all the tires are not
replaced at the same time. If proper
rotation and maintenance have been
done, all four tires should wear out at
about the same time. However, if it is
necessary to replace only one axle set
of worn tires, place the new tires on
the rear axle. See
Tire Rotation0356.
{Warning
Tires could explode during improper
service. Attempting to mount or
dismount a tire could cause injury or
death. Only your dealer or authorized
tire service center should mount or
dismount the tires.
{Warning
Mixing tires of different sizes (other
than those originally installed on the
vehicle), brands, tread patterns,
or types may cause loss of vehicle
control, resulting in a crash or other
vehicle damage. Use the correct size,
brand, and type of tire on all wheels.
{Warning
Using bias-ply tires on the vehicle
may cause the wheel rim flanges to
develop cracks after many miles of
driving. A tire and/or wheel could fail
suddenly and cause a crash. Use only
radial-ply tires with the wheels on
the vehicle.
Winter tires with the same speed rating
as the original equipment tires may not
be available for H, V, W, Y and ZR
speed rated tires. Never exceed the
winter tires’ maximum speed capability
when using winter tires with a lower
speed rating.