2024 CHEVROLET SILVERADO EV four wheel drive
[x] Cancel search: four wheel drivePage 211 of 429
Chevrolet Silverado EV Owner Manual (GMNA-Localizing-U.S./Canada-
16702912) - 2024 - CRC - 1/17/23
210 Driving and Operating
For more information on Tow/Haul mode,
seeTowing Equipment 0301.
Wide Open Watts : Use this mode for short
durations. It not intended for daily use.
Wide Open Watts provides maximum
propulsion. Engaging Wide Open Watts will
not change the currently active drive mode
but will provide additional propulsion torque
for maximum acceleration.
Wide Open Watts will not function when
the vehicle battery is low. Remaining in this
mode will reduce the range of the vehicle.
Wide Open Watts adjusts the acceleration
pedal map.
qMy Mode : Use this mode to
personalize everyday driving. This mode
allows the driver to configure the vehicle
subsystem settings to their driving
preferences. My mode remains active across
on/off cycles.
Through the infotainment display, the
following vehicle subsystems may be
available for customization in this mode:
Acceleration Pedal : Relaxed, Normal, Sport
Steering Effort : Low, Normal, High
Suspension : Soft, Normal, Firm Motor Sound :
Off, Refined, Engaging
For a more detailed description of each
selectable option, refer to “Drive Mode
Customization.”
Drive Mode Customization
The vehicle is equipped to modify the
following settings based on vehicle content.
Through the infotainment home screen,
select Settings > Vehicle > Drive Mode
Customization to personalize My mode.
These settings will be retained over each
on/off cycle, and do not have to be reset
each time the vehicle is started.
Acceleration Pedal : Choose how responsive
you want acceleration to feel. You can
adjust the accelerator pedal to provide
increased power.
Steering Effort : Choose how responsive you
want the steering to feel. You can set the
steering wheel to provide more feedback,
which requires more steering effort.
Suspension : Choose how responsive you
want the suspension to feel. You can make
the suspension stiffer or more comfortable. Motor Sound :
Customize how your vehicle
sounds when you are accelerating. Your
electric motor remains quiet outside but the
sound you hear inside changes as you drive
faster or slower.Four-Wheel Steering
This vehicle is equipped with four-wheel
steering. This feature steers the vehicle with
all four wheels, which reduces the vehicle
turn diameter and improves maneuverability
of the vehicle.
At slower speeds the front and rear wheels
will turn in opposite directions. This helps
the vehicle make tighter turns, such as
during parking, cornering and turning into
tight spaces. At higher speeds the front and
rear wheels will turn in the same direction.
This improves stability of the vehicle during
lane changes and wide turns
When the vehicle is shut-off, the rear
steering angle will automatically return to
the forward position.
Four-wheel steering is not operational when
Super Cruise is active. See Super Cruise
0 227.
Page 212 of 429
Chevrolet Silverado EV Owner Manual (GMNA-Localizing-U.S./Canada-
16702912) - 2024 - CRC - 1/17/23
Driving and Operating 211
Maximum vehicle speed may be limited if
the four-wheel steering system becomes
inoperable.
When towing a trailer the four-wheel
steering provides enhanced stability allowing
the trailer to follow the path of the tow
vehicle more closely, especially during lane
changes. SeeGeneral Towing Information
0 293 for more information on towing a
trailer.
Four-Wheel Steering Behavior at 0 MPH
The rear wheels may not steer to full travel
when the vehicle is stationary. Additional
travel may be achieved once the vehicle
begins to move.
Care should be taken to ensure the vehicle
path is clear of obstacles if the rear tires
steer once the vehicle is moving.
Limited-Slip Differential
If equipped, the limited-slip differential can
give more traction on snow, mud, ice, sand,
or gravel. It works like a standard axle most
of the time, but when traction is low, this
feature allows the drive wheel with the
most traction to move the vehicle. For
vehicles with the limited-slip differential, driven under severe conditions, the rear axle
fluid should be changed. See
Maintenance
Schedule 0389.
Air Suspension
If equipped, the Air Suspension feature
provides full time load leveling capability
along with the benefit of adjusting ride
height for increased convenience and
capability.
{Warning
To help avoid personal injury or death,
make sure the area underneath the
vehicle and inside the wheel wells is clear
when lowering the vehicle.
{Warning
To help avoid personal injury or death,
always select the lowest ride height for
the current driving conditions. Higher ride
heights raise the vehicle's center of
gravity, increasing the chance of a
rollover during extreme maneuvers.
{Warning
Heavy loads on the roof rack will make
the vehicle's center of gravity higher,
increasing the possibility of a rollover. To
avoid losing control of the vehicle, always
select the normal height setting and
avoid high speeds, sudden starts, sharp
turns, sudden braking, or abrupt
maneuvers when carrying cargo on the
roof rack.
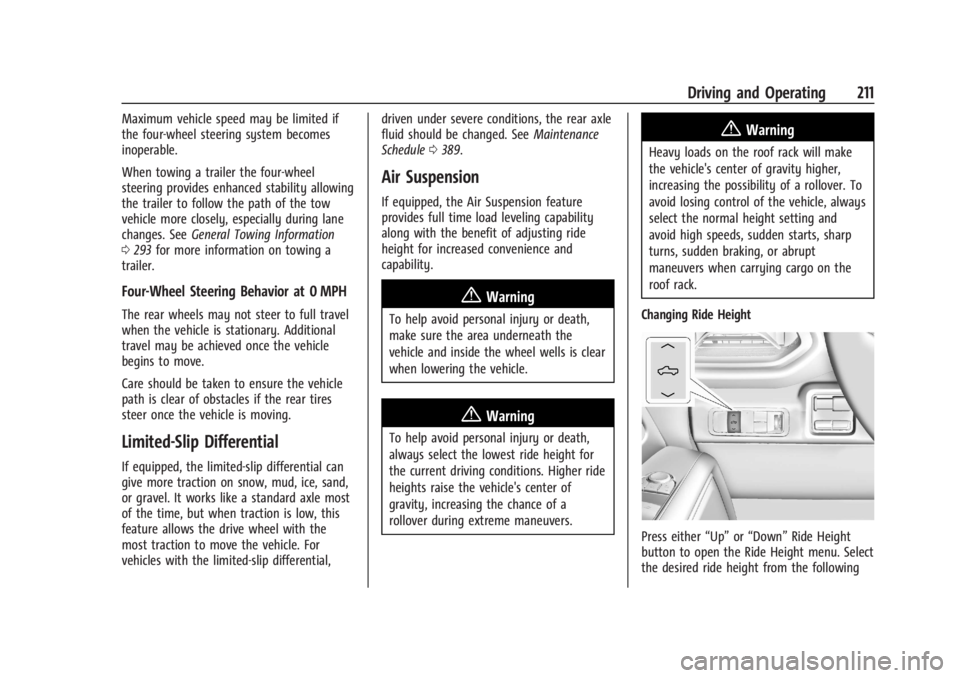
Changing Ride Height
Press either “Up”or“Down” Ride Height
button to open the Ride Height menu. Select
the desired ride height from the following
Page 228 of 429
Chevrolet Silverado EV Owner Manual (GMNA-Localizing-U.S./Canada-
16702912) - 2024 - CRC - 1/17/23
Driving and Operating 227
Towing with ACC
If equipped when towing a trailer, ACC
driving characteristics such as following gap,
acceleration rates, and braking rates may be
modified to provide a better towing
experience.
When ACC is used with vehicles equipped
with an aftermarket trailer brake controller,
disengage ACC before applying the manual
trailer brake. ACC will not automatically
disengage when the manual trailer brake is
applied.
ACC may be used when towing a trailer if
the trailer is within the GM-approved
allowable size and weight limits. SeeTrailer
Towing 0297.
When towing a trailer with ACC, it is
important to properly set the Trailer Gain.
See “Integrated Trailer Brake Control
System” inTowing Equipment 0301 for
information about the Trailer Gain
adjustment procedure.
Use Tow/Haul mode when driving down
steep hills or mountain grades, or when
hauling heavy loads. See Driver Mode
Control 0209. Disengaging ACC
There are four ways to disengage ACC:
.Press*.
.Lightly apply the brake pedal.
.Apply the Regen on Demand steering
wheel paddle, if equipped.
.Press5.
Erasing Speed Memory
The ACC set speed is erased from memory if
5is pressed or if the vehicle is turned off.
Weather Conditions Affecting ACC
ACC system operation may be limited under
snow, heavy rain, or road spray conditions.
Accessory Installations and Vehicle
Modifications
.Do not install or place any object around
the front camera windshield area that
would obstruct the front camera view.
.Do not install objects on top of the
vehicle that overhang and may obstruct
the front camera, such as a canoe, kayak,
or other items that can be transported on
top of the vehicle.
.Do not modify the hood, headlamps,
or fog lamps, as this may limit the
camera’s ability to detect an object. Cleaning the Sensing System
The camera sensor on the windshield behind
the rearview mirror, and the sensors on the
front of the vehicle can become blocked by
snow, ice, dirt, mud, or other debris. These
areas must be clean for ACC to operate
properly. For proper cleaning instructions,
see the section
“Washing the Vehicle” in
Exterior Care 0379.
If driving conditions temporarily prevent
normal and safe ACC operation, regular
cruise control may be available. See
“Switching Between ACC and Regular Cruise
Control” previously in this section. Always
consider driving conditions before using
either cruise control system.
Super Cruise
If equipped, Super Cruise can steer to
maintain lane position under certain
conditions on Super Cruise-enabled roads.
Super Cruise can also steer to perform a
lane change under certain conditions on
Super Cruise-enabled roads.
A lane change can be initiated by the driver
using the turn signal lever.
Page 277 of 429
Chevrolet Silverado EV Owner Manual (GMNA-Localizing-U.S./Canada-
16702912) - 2024 - CRC - 1/17/23
276 Driving and Operating
To turn LKA on and off, pressAon the
instrument panel to the left of the steering
wheel. If equipped, the indicator light on the
button comes on when LKA is on and turns
off when LKA is disabled. In some vehicles,
you must press the button for more than
three seconds to turn LKA off.
LKA is not available when Terrain Mode,
Snow/Ice Mode, or Off-Road Mode is
selected.
See Driver Mode Control 0209. See
Four-Wheel Steering 0210.
When attempting to enable LKA in any of
the above conditions, LKA UNAVAILABLE will
display.
When on,
Ais white, if equipped,
indicating that the system is not ready to
assist.
Ais green if LKA is ready to
assist. LKA may assist by gently turning the
steering wheel if the vehicle approaches a
detected lane marking.
Ais amber when
assisting. It may also provide a Lane
Departure Warning (LDW) alert by flashing
Aamber if the vehicle crosses a
detected lane marking. Additionally, there
may be three beeps, or the driver seat may
pulse three times, on the right or left,
depending on the lane departure direction. Take Steering
The LKA system does not continuously steer
the vehicle. If LKA does not detect active
driver steering, an alert and chime may be
provided. Steer the vehicle to dismiss. LKA
may become temporarily unavailable after
repeated take steering alerts.
When the System Does Not Seem to
Work Properly
The system performance may be
affected by:
.Close vehicles ahead.
.Sudden lighting changes, such as when
driving through tunnels.
.Banked roads.
.Roads with poor lane markings, such as
two-lane roads.
If the LKA system is not functioning
properly when lane markings are clearly
visible, cleaning the windshield may help.
A camera blocked message may display if
the camera is blocked. Some driver
assistance systems may have reduced
performance or not work at all. An LKA or
LDW unavailable message may display if the
systems are temporarily unavailable. This
message could be due to a blocked camera. The LKA system does not need service. Clean
the outside of the windshield behind the
rearview mirror.
LKA assistance and/or LDW alerts may occur
due to tar marks, shadows, cracks in the
road, temporary or construction lane
markings, or other road imperfections. This
is normal system operation; the vehicle does
not need service. Turn LKA off if these
conditions continue.
Surround Vision Recorder
If equipped, this system records the 360°
camera views to an SD card. Only images
are recorded, no sound. An SD card will be
needed for this system. The minimum
recommended SD card specifications are at
least 64GB with FAT32 file system, Class V30
or greater.
Page 278 of 429
Chevrolet Silverado EV Owner Manual (GMNA-Localizing-U.S./Canada-
16702912) - 2024 - CRC - 1/17/23
Driving and Operating 277
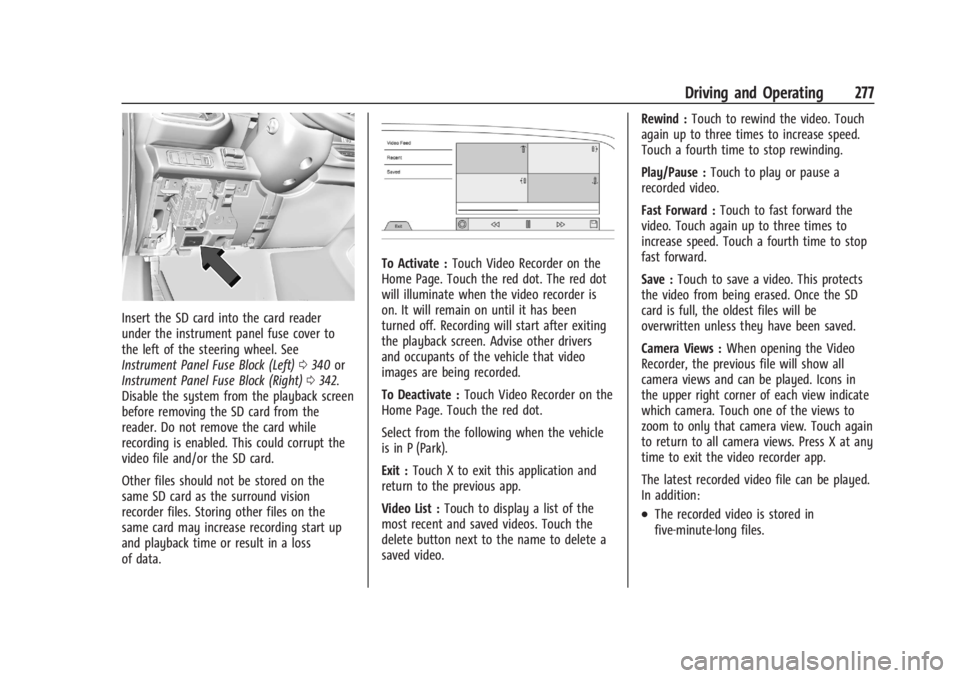
Insert the SD card into the card reader
under the instrument panel fuse cover to
the left of the steering wheel. See
Instrument Panel Fuse Block (Left)0340 or
Instrument Panel Fuse Block (Right) 0342.
Disable the system from the playback screen
before removing the SD card from the
reader. Do not remove the card while
recording is enabled. This could corrupt the
video file and/or the SD card.
Other files should not be stored on the
same SD card as the surround vision
recorder files. Storing other files on the
same card may increase recording start up
and playback time or result in a loss
of data.
To Activate : Touch Video Recorder on the
Home Page. Touch the red dot. The red dot
will illuminate when the video recorder is
on. It will remain on until it has been
turned off. Recording will start after exiting
the playback screen. Advise other drivers
and occupants of the vehicle that video
images are being recorded.
To Deactivate : Touch Video Recorder on the
Home Page. Touch the red dot.
Select from the following when the vehicle
is in P (Park).
Exit : Touch X to exit this application and
return to the previous app.
Video List : Touch to display a list of the
most recent and saved videos. Touch the
delete button next to the name to delete a
saved video. Rewind :
Touch to rewind the video. Touch
again up to three times to increase speed.
Touch a fourth time to stop rewinding.
Play/Pause : Touch to play or pause a
recorded video.
Fast Forward : Touch to fast forward the
video. Touch again up to three times to
increase speed. Touch a fourth time to stop
fast forward.
Save : Touch to save a video. This protects
the video from being erased. Once the SD
card is full, the oldest files will be
overwritten unless they have been saved.
Camera Views : When opening the Video
Recorder, the previous file will show all
camera views and can be played. Icons in
the upper right corner of each view indicate
which camera. Touch one of the views to
zoom to only that camera view. Touch again
to return to all camera views. Press X at any
time to exit the video recorder app.
The latest recorded video file can be played.
In addition:
.The recorded video is stored in
five-minute-long files.
Page 355 of 429
Chevrolet Silverado EV Owner Manual (GMNA-Localizing-U.S./Canada-
16702912) - 2024 - CRC - 1/13/23
354 Vehicle Care
.There is a malfunction in the TPMS.
.There is a malfunction in the horn or turn
signal lamps.
.The identification code of the TPMS
sensor is not registered to the system.
.The battery of the TPMS sensor is low.
If the tire fill alert does not operate due to
TPMS interference, move the vehicle about
1 m (3 ft) back or forward and try again.
If the tire fill alert feature is not working,
use a tire pressure gauge to confirm tire
pressure.
TPMS Sensor Matching Process —Auto
Learn Function
Each TPMS sensor has a unique
identification code. The identification code
needs to be matched to a new tire/wheel
position after rotating the tires or replacing
one or more of the TPMS sensors. When a
tire is installed, the vehicle must be
stationary for about 20 minutes before the
system recalculates. The following relearn
process takes up to 10 minutes, driving at a
minimum speed of 20 km/h (12 mph). A dash (-) or pressure value will display in
the DIC. See
Driver Information Center (DIC)
(Base Level) 0129 or
Driver Information Center (DIC) (Uplevel)
0 130. A warning message displays in the
DIC if a problem occurs during the relearn
process.
Trailer Tire Pressure Monitoring
Operation
If equipped, the Trailer Tire Pressure
Monitoring System (TTPMS) is designed to
monitor the pressure of the trailer tires and
warn the driver when a low pressure
condition exists. TTPMS sensors for four tires
are provided. The system can accommodate
a trailer with up to six tires if additional
sensors are purchased from the dealer. Also,
the system can be paired with up to five
individual trailers.
Prior to use, the vehicle must learn the
sensors by following the learning process.
See Trailering App 0310.
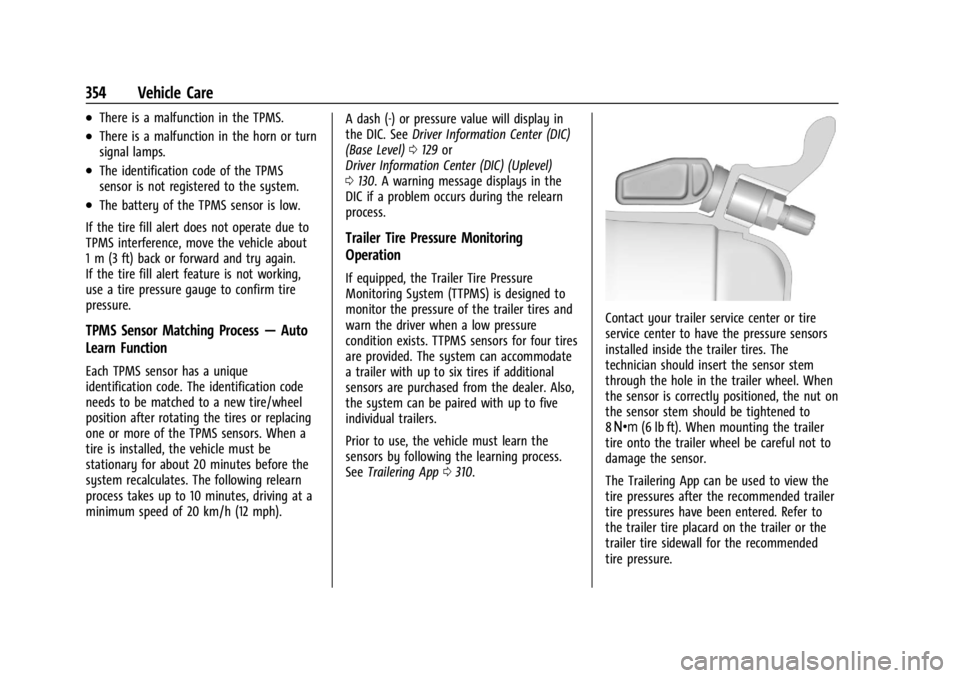
Contact your trailer service center or tire
service center to have the pressure sensors
installed inside the trailer tires. The
technician should insert the sensor stem
through the hole in the trailer wheel. When
the sensor is correctly positioned, the nut on
the sensor stem should be tightened to
8Y (6 lb ft). When mounting the trailer
tire onto the trailer wheel be careful not to
damage the sensor.
The Trailering App can be used to view the
tire pressures after the recommended trailer
tire pressures have been entered. Refer to
the trailer tire placard on the trailer or the
trailer tire sidewall for the recommended
tire pressure.
Page 375 of 429
Chevrolet Silverado EV Owner Manual (GMNA-Localizing-U.S./Canada-
16702912) - 2024 - CRC - 1/13/23
374 Vehicle Care
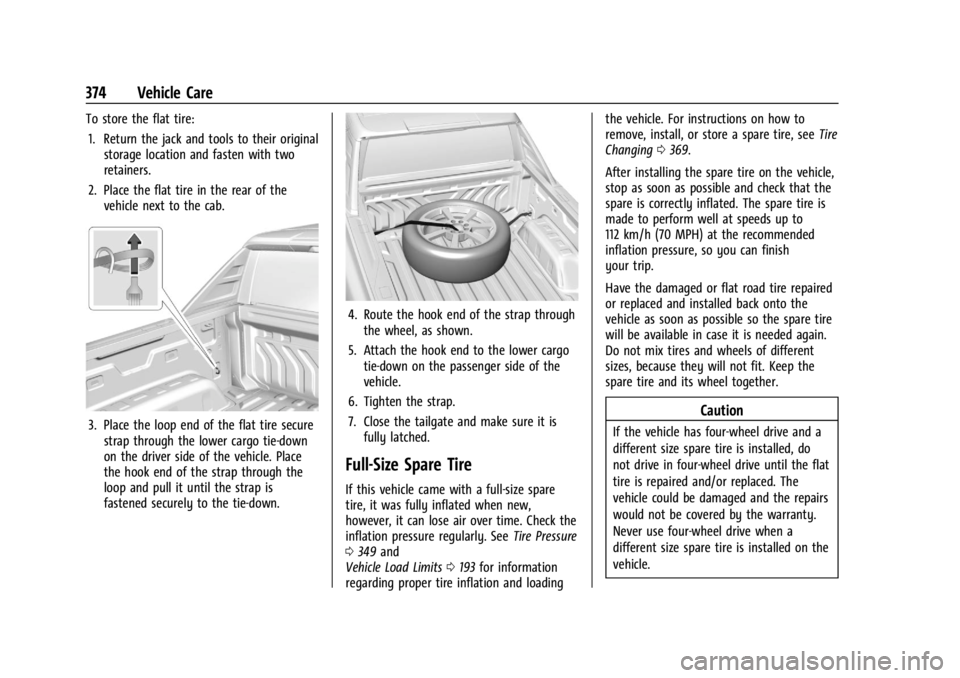
To store the flat tire:1. Return the jack and tools to their original storage location and fasten with two
retainers.
2. Place the flat tire in the rear of the vehicle next to the cab.
3. Place the loop end of the flat tire securestrap through the lower cargo tie-down
on the driver side of the vehicle. Place
the hook end of the strap through the
loop and pull it until the strap is
fastened securely to the tie-down.
4. Route the hook end of the strap throughthe wheel, as shown.
5. Attach the hook end to the lower cargo tie-down on the passenger side of the
vehicle.
6. Tighten the strap.
7. Close the tailgate and make sure it is fully latched.
Full-Size Spare Tire
If this vehicle came with a full-size spare
tire, it was fully inflated when new,
however, it can lose air over time. Check the
inflation pressure regularly. See Tire Pressure
0 349 and
Vehicle Load Limits 0193 for information
regarding proper tire inflation and loading the vehicle. For instructions on how to
remove, install, or store a spare tire, see
Tire
Changing 0369.
After installing the spare tire on the vehicle,
stop as soon as possible and check that the
spare is correctly inflated. The spare tire is
made to perform well at speeds up to
112 km/h (70 MPH) at the recommended
inflation pressure, so you can finish
your trip.
Have the damaged or flat road tire repaired
or replaced and installed back onto the
vehicle as soon as possible so the spare tire
will be available in case it is needed again.
Do not mix tires and wheels of different
sizes, because they will not fit. Keep the
spare tire and its wheel together.
Caution
If the vehicle has four-wheel drive and a
different size spare tire is installed, do
not drive in four-wheel drive until the flat
tire is repaired and/or replaced. The
vehicle could be damaged and the repairs
would not be covered by the warranty.
Never use four-wheel drive when a
different size spare tire is installed on the
vehicle.
Page 376 of 429
Chevrolet Silverado EV Owner Manual (GMNA-Localizing-U.S./Canada-
16702912) - 2024 - CRC - 1/13/23
Vehicle Care 375
The vehicle may have a different size spare
tire than the road tires originally installed
on the vehicle. This spare tire was developed
for use on this vehicle, so it is all right to
drive on it. If the vehicle has four-wheel
drive and a different size spare tire is
installed, drive only in two-wheel drive.
If the vehicle has a spare tire that does not
match the original road tires and wheels in
size and type, do not include the spare in
the tire rotation.
If equipped with a temporary use full-size
spare tire, it is indicated on the tire sidewall.
SeeTire Sidewall Labeling 0346. This spare
tire should not be driven on over 112 km/h
(70 mph), or 88 km/h (55 mph) when
pulling a trailer, at the proper inflation
pressure. Repair and replace the road tire as
soon as it is convenient, and stow the spare
tire for future use.
Jump Starting
Jump Starting - North America
For more information about the vehicle
battery, see Battery - North America 0330. If the battery has run down, use another
vehicle and some jumper cables to start the
vehicle. Be sure to use the following steps
to do it safely.
{Warning
WARNING:
Battery posts, terminals and
related accessories can expose you to
chemicals including lead and lead
compounds, which are known to the
State of California to cause cancer and
birth defects or other reproductive harm.
Wash hands after handling. For more
information go to
www.P65Warnings.ca.gov.
See California Proposition 65 Warning 01.
{Warning
Batteries can hurt you. They can be
dangerous because:
.They contain acid that can burn you.
.They contain gas that can explode or
ignite.
.They contain enough electricity to
burn you.
(Continued)
Warning (Continued)
If you do not follow these steps exactly,
some or all of these things can hurt you.
Caution
The vehicle is equipped with an AGM/
VRLA 12-volt battery, which can be
damaged by using the incorrect type of
trickle charger. An AGM/VRLA-compatible
charger must be used, with the
appropriate setting selected. Follow the
trickle charger manufacturer instructions.
Caution
Ignoring these steps could result in costly
damage to the vehicle that would not be
covered by the vehicle warranty. Trying
to start the vehicle by pushing or pulling
it will not work, and it could damage the
vehicle.
The battery is under a cover in the
underhood compartment.
To access the battery under the hood, the
left cover needs to be removed.