2024 CHEVROLET CORVETTE oil temperature
[x] Cancel search: oil temperaturePage 4 of 362
Chevrolet Corvette Owner Manual (GMNA-Localizing-U.S./Canada/Mexico-
17272984) - 2024 - CRC - 2/20/23
Introduction 3
A circle with a slash through it is a safety
symbol which means“Do not,” “Do not do
this,” or“Do not let this happen.”
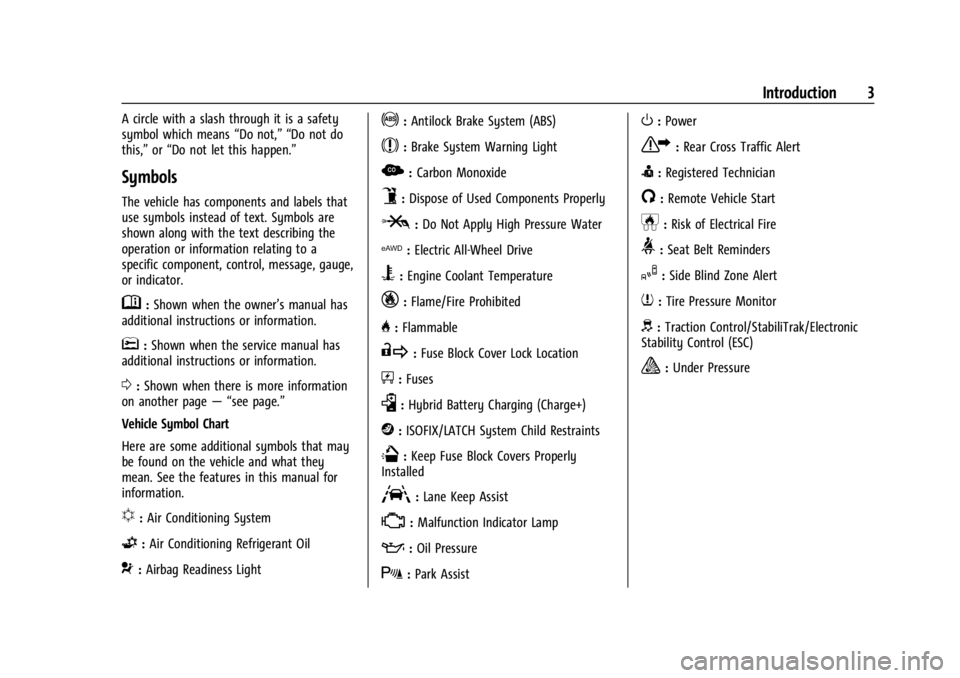
Symbols
The vehicle has components and labels that
use symbols instead of text. Symbols are
shown along with the text describing the
operation or information relating to a
specific component, control, message, gauge,
or indicator.
M:Shown when the owner’s manual has
additional instructions or information.
*: Shown when the service manual has
additional instructions or information.
0: Shown when there is more information
on another page — “see page.”
Vehicle Symbol Chart
Here are some additional symbols that may
be found on the vehicle and what they
mean. See the features in this manual for
information.
u: Air Conditioning System
G:Air Conditioning Refrigerant Oil
9:Airbag Readiness Light
!:Antilock Brake System (ABS)
$:Brake System Warning Light
z: Carbon Monoxide
9:Dispose of Used Components Properly
P:Do Not Apply High Pressure Water
l: Electric All-Wheel Drive
B:Engine Coolant Temperature
_:Flame/Fire Prohibited
H: Flammable
R:Fuse Block Cover Lock Location
+:Fuses
k:Hybrid Battery Charging (Charge+)
j:ISOFIX/LATCH System Child Restraints
Q:Keep Fuse Block Covers Properly
Installed
A: Lane Keep Assist
*: Malfunction Indicator Lamp
::Oil Pressure
X:Park Assist
O:Power
7:Rear Cross Traffic Alert
I:Registered Technician
/:Remote Vehicle Start
h:Risk of Electrical Fire
>:Seat Belt Reminders
I:Side Blind Zone Alert
7:Tire Pressure Monitor
d:Traction Control/StabiliTrak/Electronic
Stability Control (ESC)
a: Under Pressure
Page 14 of 362
Chevrolet Corvette Owner Manual (GMNA-Localizing-U.S./Canada/Mexico-
17272984) - 2024 - CRC - 2/20/23
Keys, Doors, and Windows 13
If your vehicle is low on fuel, do not use the
remote start feature. The vehicle may run
out of fuel.
The remote key range may be shorter while
the vehicle is running.
Other conditions can affect the performance
of the remote key. SeeRemote Key07.
You have a total of 30 minutes of engine
running time. The maximum run time of a
single start is 15 minutes, and it will shut off
automatically. You could do three 10 minute
starts if you manually shut off after
10 minutes. The last 10 minute start would
shut off automatically as your total
30 minutes will have been used.
Starting the Engine Using Remote Start
1. Press
Stwice on the remote key. The
turn signal lamps will flash. The lamps
flash to confirm the request to remote
start the vehicle has been received.
During the remote start, the parking
lamps will remain on as long as the
engine is running.
2. The engine will shut off after 15 minutes or after the remainder of the 30 minute
total running time is used, unless you stop the remote start before engine
running has completed or the ignition is
turned on.
3. Press the brake pedal and turn the ignition on to drive the vehicle.
Total Engine Run Time
Remote start can be used for up to
30 minutes of total engine run time.
After two remote starts of 15 minutes,
or multiple shorter time starts totaling
30 minutes have been used, the vehicle's
ignition must be turned on and then off
before the remote start can be used again.
Canceling a Remote Start
To cancel a remote start, do any of the
following:.PressS. The parking lamps will turn off.
.Turn on the hazard warning flashers.
.Turn the vehicle on and then back off.
Conditions in Which Remote Start Will
Not Work
The remote start will not operate if any of
the following occur:
.The ignition is in any mode other
than off.
.A remote key is in the vehicle.
.The hatch/trunk is not closed.
.The convertible top is not fully open or
closed.
.The tonneau cover is not closed.
.The hazard warning flashers are on.
.There is an emission control system
malfunction.
.The engine coolant temperature is
too high.
.The oil pressure is low.
.The 30 minutes of engine run time have
been used.
.The vehicle is not in P (Park).
Door Locks
{Warning
Unlocked doors can be dangerous.
.Passengers, especially children, can
easily open the doors and fall out of a
moving vehicle. The doors can be
unlocked and opened while the vehicle
is moving. The chance of being thrown
out of the vehicle in a crash is
increased if the doors are not locked. (Continued)
Page 75 of 362

Chevrolet Corvette Owner Manual (GMNA-Localizing-U.S./Canada/Mexico-
17272984) - 2024 - CRC - 2/20/23
74 Instruments and Controls
Instruments and Controls
Controls
Steering Wheel Adjustment . . . . . . . . . . . . . 75
Heated Steering Wheel . . . . . . . . . . . . . . . . . 75
Horn . . . . . . . . . . . . . . . . . . . . . . . . . . . . . . . . . . . . 75
Windshield Wiper/Washer . . . . . . . . . . . . . . 75
Compass . . . . . . . . . . . . . . . . . . . . . . . . . . . . . . . 76
Clock . . . . . . . . . . . . . . . . . . . . . . . . . . . . . . . . . . . 76
Power Outlets . . . . . . . . . . . . . . . . . . . . . . . . . . 77
Wireless Charging . . . . . . . . . . . . . . . . . . . . . . 78
Warning Lights, Gauges, and Indicators
Warning Lights, Gauges, andIndicators . . . . . . . . . . . . . . . . . . . . . . . . . . . . 80
Instrument Cluster . . . . . . . . . . . . . . . . . . . . . . 81
Speedometer . . . . . . . . . . . . . . . . . . . . . . . . . . . 85
Odometer . . . . . . . . . . . . . . . . . . . . . . . . . . . . . . 85
Trip Odometer . . . . . . . . . . . . . . . . . . . . . . . . . . 85
Tachometer . . . . . . . . . . . . . . . . . . . . . . . . . . . . 85
Battery Gauge (High Voltage) . . . . . . . . . . 86
Stealth Drive Mode Capability Gauge . . . . . . . . . . . . . . . . . . . . . . . . . . . . . . . . 86
Fuel Gauge . . . . . . . . . . . . . . . . . . . . . . . . . . . . . 86
Hybrid Battery Charging Light (Charge+) . . . . . . . . . . . . . . . . . . . . . . . . . . . . . 87
Power Indicator Gauge . . . . . . . . . . . . . . . . . 87
Engine Coolant Temperature Gauge . . . . 87
Transmission Temperature Gauge . . . . . . 88
Seat Belt Reminders . . . . . . . . . . . . . . . . . . . . 88 Airbag Readiness Light . . . . . . . . . . . . . . . . . 88
Passenger Airbag Status Indicator . . . . . . 89
Charging System Light (12-Volt
Battery) . . . . . . . . . . . . . . . . . . . . . . . . . . . . . . 90
Malfunction Indicator Lamp (Check
Engine Light) . . . . . . . . . . . . . . . . . . . . . . . . . 90
Front Lift System Light . . . . . . . . . . . . . . . . . 91
Brake System Warning Light . . . . . . . . . . . 92
Electric Parking Brake Light . . . . . . . . . . . . . 92
Service Electric Parking Brake Light . . . . . 92
Antilock Brake System (ABS) Warning Light . . . . . . . . . . . . . . . . . . . . . . . . . . . . . . . . . . 93
Performance Transmission Active . . . . . . . 93
All-Wheel-Drive Light . . . . . . . . . . . . . . . . . . . 93
Lane Keep Assist (LKA) Light . . . . . . . . . . . 94
Automatic Emergency Braking (AEB) Disabled Light . . . . . . . . . . . . . . . . . . . . . . . . 94
Vehicle Ahead Indicator . . . . . . . . . . . . . . . . 94
Pedestrian Ahead Indicator . . . . . . . . . . . . . 94
Traction Off Light . . . . . . . . . . . . . . . . . . . . . . 95
Traction Control System (TCS)/Electronic Stability Control Light . . . . . . . . . . . . . . . . 95
Electronic Stability Control (ESC) Off Light . . . . . . . . . . . . . . . . . . . . . . . . . . . . . . . . . . 95
Engine Coolant Temperature Warning Light . . . . . . . . . . . . . . . . . . . . . . . . . . . . . . . . . 96
Driver Mode Control Light . . . . . . . . . . . . . . 96
Tire Pressure Light . . . . . . . . . . . . . . . . . . . . . . 97
Engine Oil Pressure Light . . . . . . . . . . . . . . . 97
Low Fuel Warning Light . . . . . . . . . . . . . . . . 97 Auto Stop Indicator . . . . . . . . . . . . . . . . . . . . 98
Traffic Sign Indicator . . . . . . . . . . . . . . . . . . . 98
Security Light . . . . . . . . . . . . . . . . . . . . . . . . . . 98
High-Beam On Light . . . . . . . . . . . . . . . . . . . . 98
Lamps On Reminder . . . . . . . . . . . . . . . . . . . . 99
Cruise Control Light . . . . . . . . . . . . . . . . . . . . 99
Door Ajar Light . . . . . . . . . . . . . . . . . . . . . . . . . 99
Information Displays
Driver Information Center (DIC) . . . . . . . . 99
Head-Up Display (HUD) . . . . . . . . . . . . . . . . 102
Vehicle Messages
Vehicle Messages . . . . . . . . . . . . . . . . . . . . . . 105
Engine Power Messages . . . . . . . . . . . . . . . 106
Vehicle Speed Messages . . . . . . . . . . . . . . . 106
Universal Remote System
Universal Remote System . . . . . . . . . . . . . 106
Universal Remote System
Programming . . . . . . . . . . . . . . . . . . . . . . . . 106
Universal Remote System Operation . . . . . . . . . . . . . . . . . . . . . . . . . . . 108
Page 83 of 362
Chevrolet Corvette Owner Manual (GMNA-Localizing-U.S./Canada/Mexico-
17272984) - 2024 - CRC - 2/20/23
82 Instruments and Controls
.Trip Computer/Performance/Maintenance:
The selected Driver Information Center
(DIC) displays can be viewed. SeeDriver
Information Center (DIC) 099.
.Audio
.Options
.Simplify
Info Tiles
The following is the list of all possible info
tiles that is shown on the left side of the
speedometer. Depending on the vehicle,
some may not be available. Information
displayed here can be customized from the
Options menu. See “Options”below.
Time & Temperature : Displays the current
time and the current outside air
temperature.
Instant Fuel Economy/Economy Trend :
Displays the current fuel economy in liters
per 100 kilometers (L/100 km) or miles per
gallon (mpg). This number reflects only the
approximate fuel economy and changes
frequently as driving conditions change.
This display cannot be reset. Shows history of the Average Fuel Economy
from the last 100 km (62 mi). Each bar
represents about 5 km (3 mi) of driving.
When driving, the bars shift to reflect the
most recent distance on the right side.
G-force :
Gives the driver an indication of
the vehicle performance in cornering. The
G-force gauge will show as an info tile on
the left side of the cluster, if selected.
Oil Temperature : Shows the current oil
temperature in either degrees Celsius (°C) or
degrees Fahrenheit (°F).
Oil Pressure : Shows the current oil pressure
in either kilopascal (kPa) or in pounds per
square inch (psi).
Battery Voltage : Shows the current 12-Volt
battery voltage.
Transmission Fluid Temperature : Shows the
temperature of the transmission fluid in
either degrees Celsius (°C) or degrees
Fahrenheit (°F).
Tire Status : Shows individual tire pressures
and overall temperature as either Cold, Cool,
Normal, Warm, or Hot. Normal is typical for
normal driving while Warm is typical for
spirited driving. Unknown may be displayed
if tire temperature information is
unavailable. Tire Pressure shows the approximate
pressures of all four tires. Tire pressure is
displayed in either kilopascal (kPa) or in
pounds per square inch (psi). If the pressure
is low, the value for that tire is shown in
amber. See
Tire Pressure Monitor System
0 288 and
Tire Pressure Monitor Operation 0289.
eLSD : If equipped, displays the amount of
rear differential coupling when the Electronic
Limited-Slip Differential (eLSD) is active and
functioning during vehicle operation.
A reading of 1% is an open differential and
100% is locked. It is normal for the value to
make small or large changes due to driving
conditions and driver inputs. See Limited-Slip
Differential 0211.
Wheel Slip : Shows the wheel
slip percentage of the vehicle.
Front Lift : During a driver requested Front
Lift (if equipped), the driver may
"remember" using the
S, or dismiss the
display by pressing the thumbwheel. When
the Front Lift is Raised due to location, the
driver may delete that stored location using
the
S, or dismiss the display by pressing
the thumbwheel.
See Front Lift System 0205.
Page 85 of 362
Chevrolet Corvette Owner Manual (GMNA-Localizing-U.S./Canada/Mexico-
17272984) - 2024 - CRC - 2/20/23
84 Instruments and Controls
Speed, Tachometer, Electronic
Transmission Range, Current Gear, Info
Area, and Interactive Area.
.Night: Displays Coolant Temperature, Fuel
Gauge, and Digital Speed.
.Shuttle: If equipped, displays Battery
Gauge, Power Indicator Gauge, Odometer,
and Digital Speed.
.Stealth: If equipped, displays Battery
Gauge, Fuel Gauge, Electric Capability
Gauge, Odometer, Drive Mode Indicator,
and Digital Speed.
Preset info tiles shown on each layout:
Sport : G-Force, Oil Pressure
G-Force, Hybrid Battery
Track : Oil Pressure, Transmissions Fluid
Temperature, Tire Pressure & Tire
Temperature, Oil Temperature
Hybrid Battery Temperature, Hybrid Battery,
Oil Temperature, Tire Pressure & Tire
Temperature
Tour : Time & Outside Air Temperature, Tire
Pressure & Tire Temperature
Electric Power, Tire Pressure & Tire
Temperature Weather :
Tire Pressure & Tire Temperature,
Oil Temperature
Tire Pressure & Tire Temperature, Hybrid
Battery
Z-Mode : G-Force, Oil Temperature
Hybrid Battery, Electric Power
My Mode : Time & Outside Air
Temperature, Oil Pressure
Electric Power, Oil Pressure
Night : None
Shuttle : None
Stealth : None
Info Titles Selection
Use the thumbwheel to select the items to
be displayed in the display areas. See "Info
Tiles" previously in this section.
If the maximum amount of info tiles has
been selected, all deselected info tiles
appear in an disabled state. If maximum
amount of info tiles is not selected, all info
tiles appear in an normal state and can be
selected. In the default layout, the info tiles
will be inserted from top to bottom. In the
enhanced layout, the info tiles will be inserted from top left to top right to bottom
left to bottom right. Info tiles that are
already occupied will be skipped.
Tachometer
Available in some Drive Modes, press the
thumbwheel while Tachometer is displayed
to enter the Tachometer menu. Choose
Traditional or Numerical by pressing the
thumbwheel while the desired item is
highlighted. A selected mark will be
displayed next to the selected item.
Traditional tachometer shows a linear gauge,
and Numerical tachometer shows shift lights
with numerical RPM.
Units
Press the thumbwheel while Units is
displayed to enter the Units menu. Choose
US or metric units by pressing the
thumbwheel while the desired item is
highlighted. A selected mark will be
displayed next to the selected item.
Tire Pressure
Use the thumbwheel to select the tire
pressure warning thresholds. Choose Light,
Eco, or Max by pressing the thumbwheel
Page 162 of 362
Chevrolet Corvette Owner Manual (GMNA-Localizing-U.S./Canada/Mexico-
17272984) - 2024 - CRC - 2/20/23
Driving and Operating 161
Check the oil level often during track events
and competitive driving. See“Checking the
Engine Oil" in Engine Oil (5.5L LT6 Engine)
0 246 or
Engine Oil (6.2L LT2 Engine) 0249.
Engine Cooling
If reduced performance is experienced during
track events or competitive driving, turning
off the A/C will help to improve engine
performance.
Maintain a mixture of 40% DEX-COOL
coolant and 60% clean, drinkable water to
optimize engine performance.
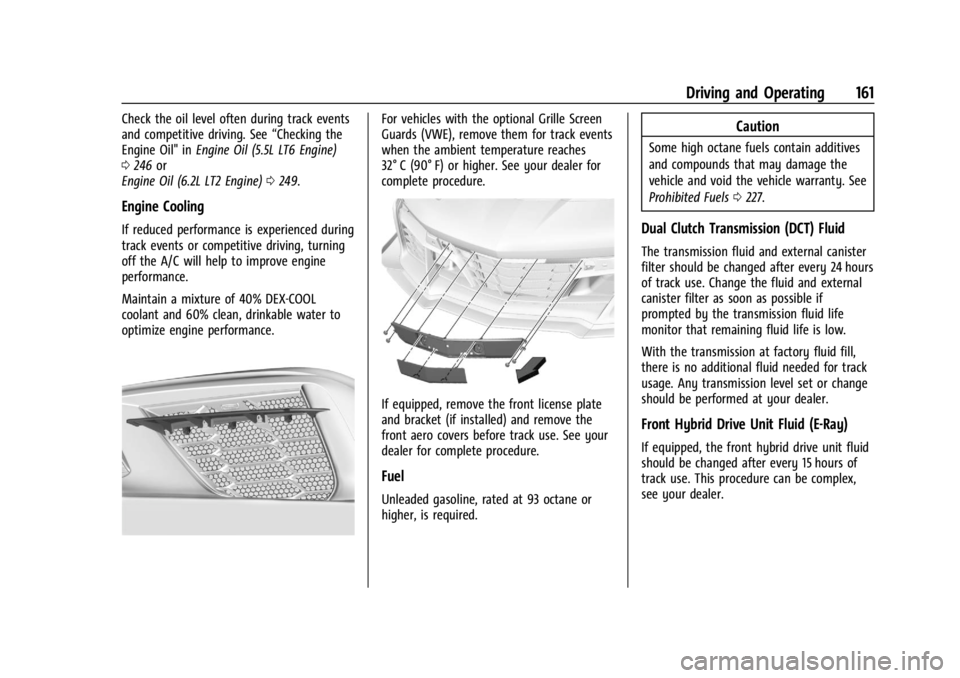
For vehicles with the optional Grille Screen
Guards (VWE), remove them for track events
when the ambient temperature reaches
32° C (90° F) or higher. See your dealer for
complete procedure.
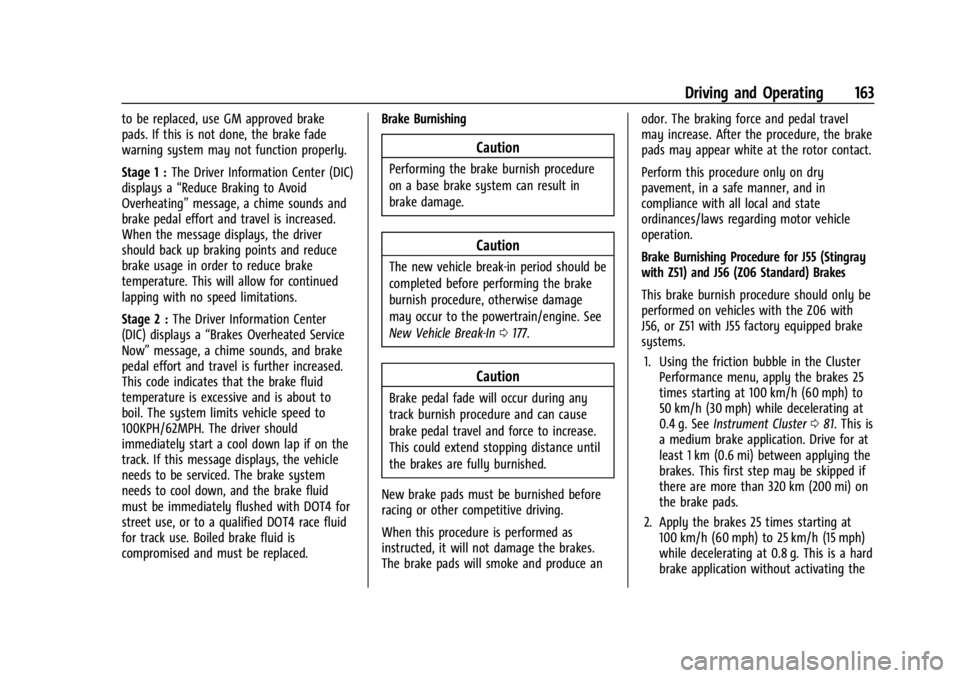
If equipped, remove the front license plate
and bracket (if installed) and remove the
front aero covers before track use. See your
dealer for complete procedure.
Fuel
Unleaded gasoline, rated at 93 octane or
higher, is required.
Caution
Some high octane fuels contain additives
and compounds that may damage the
vehicle and void the vehicle warranty. See
Prohibited Fuels 0227.
Dual Clutch Transmission (DCT) Fluid
The transmission fluid and external canister
filter should be changed after every 24 hours
of track use. Change the fluid and external
canister filter as soon as possible if
prompted by the transmission fluid life
monitor that remaining fluid life is low.
With the transmission at factory fluid fill,
there is no additional fluid needed for track
usage. Any transmission level set or change
should be performed at your dealer.
Front Hybrid Drive Unit Fluid (E-Ray)
If equipped, the front hybrid drive unit fluid
should be changed after every 15 hours of
track use. This procedure can be complex,
see your dealer.
Page 164 of 362
Chevrolet Corvette Owner Manual (GMNA-Localizing-U.S./Canada/Mexico-
17272984) - 2024 - CRC - 2/20/23
Driving and Operating 163
to be replaced, use GM approved brake
pads. If this is not done, the brake fade
warning system may not function properly.
Stage 1 :The Driver Information Center (DIC)
displays a “Reduce Braking to Avoid
Overheating” message, a chime sounds and
brake pedal effort and travel is increased.
When the message displays, the driver
should back up braking points and reduce
brake usage in order to reduce brake
temperature. This will allow for continued
lapping with no speed limitations.
Stage 2 : The Driver Information Center
(DIC) displays a “Brakes Overheated Service
Now” message, a chime sounds, and brake
pedal effort and travel is further increased.
This code indicates that the brake fluid
temperature is excessive and is about to
boil. The system limits vehicle speed to
100KPH/62MPH. The driver should
immediately start a cool down lap if on the
track. If this message displays, the vehicle
needs to be serviced. The brake system
needs to cool down, and the brake fluid
must be immediately flushed with DOT4 for
street use, or to a qualified DOT4 race fluid
for track use. Boiled brake fluid is
compromised and must be replaced. Brake Burnishing
Caution
Performing the brake burnish procedure
on a base brake system can result in
brake damage.
Caution
The new vehicle break-in period should be
completed before performing the brake
burnish procedure, otherwise damage
may occur to the powertrain/engine. See
New Vehicle Break-In
0177.
Caution
Brake pedal fade will occur during any
track burnish procedure and can cause
brake pedal travel and force to increase.
This could extend stopping distance until
the brakes are fully burnished.
New brake pads must be burnished before
racing or other competitive driving.
When this procedure is performed as
instructed, it will not damage the brakes.
The brake pads will smoke and produce an odor. The braking force and pedal travel
may increase. After the procedure, the brake
pads may appear white at the rotor contact.
Perform this procedure only on dry
pavement, in a safe manner, and in
compliance with all local and state
ordinances/laws regarding motor vehicle
operation.
Brake Burnishing Procedure for J55 (Stingray
with Z51) and J56 (Z06 Standard) Brakes
This brake burnish procedure should only be
performed on vehicles with the Z06 with
J56, or Z51 with J55 factory equipped brake
systems.
1. Using the friction bubble in the Cluster Performance menu, apply the brakes 25
times starting at 100 km/h (60 mph) to
50 km/h (30 mph) while decelerating at
0.4 g. See Instrument Cluster 081. This is
a medium brake application. Drive for at
least 1 km (0.6 mi) between applying the
brakes. This first step may be skipped if
there are more than 320 km (200 mi) on
the brake pads.
2. Apply the brakes 25 times starting at 100 km/h (60 mph) to 25 km/h (15 mph)
while decelerating at 0.8 g. This is a hard
brake application without activating the
Page 247 of 362
Chevrolet Corvette Owner Manual (GMNA-Localizing-U.S./Canada/Mexico-
17272984) - 2024 - CRC - 2/20/23
246 Vehicle Care
Engine Oil (5.5L LT6 Engine)
To ensure proper engine performance and
long life, pay careful attention to engine oil.
Follow these important steps:
.Use engine oil approved to the proper
specification and of the proper viscosity
grade. See“Selecting the Right Engine
Oil” later in this section.
.Check the engine oil level regularly and
maintain the proper oil level. See
“Checking Engine Oil” and“When to Add
Engine Oil” later in this section.
.Change the engine oil at the appropriate
time. SeeEngine Oil Life System 0252.
.Always dispose of engine oil properly. See
“What to Do with Used Oil” in this
section.
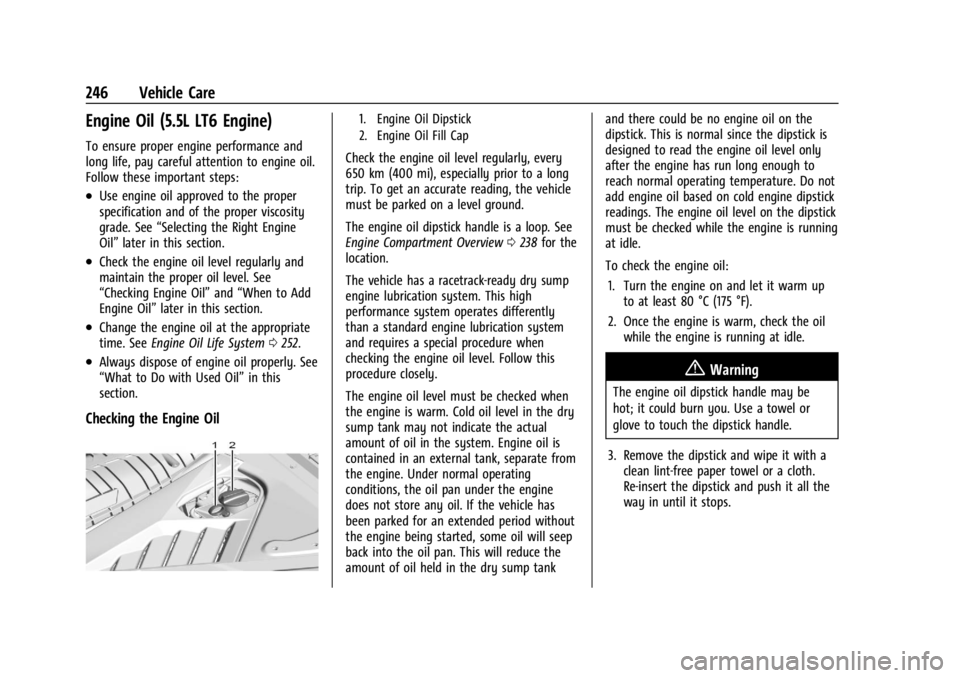
Checking the Engine Oil
1. Engine Oil Dipstick
2. Engine Oil Fill Cap
Check the engine oil level regularly, every
650 km (400 mi), especially prior to a long
trip. To get an accurate reading, the vehicle
must be parked on a level ground.
The engine oil dipstick handle is a loop. See
Engine Compartment Overview 0238 for the
location.
The vehicle has a racetrack-ready dry sump
engine lubrication system. This high
performance system operates differently
than a standard engine lubrication system
and requires a special procedure when
checking the engine oil level. Follow this
procedure closely.
The engine oil level must be checked when
the engine is warm. Cold oil level in the dry
sump tank may not indicate the actual
amount of oil in the system. Engine oil is
contained in an external tank, separate from
the engine. Under normal operating
conditions, the oil pan under the engine
does not store any oil. If the vehicle has
been parked for an extended period without
the engine being started, some oil will seep
back into the oil pan. This will reduce the
amount of oil held in the dry sump tank and there could be no engine oil on the
dipstick. This is normal since the dipstick is
designed to read the engine oil level only
after the engine has run long enough to
reach normal operating temperature. Do not
add engine oil based on cold engine dipstick
readings. The engine oil level on the dipstick
must be checked while the engine is running
at idle.
To check the engine oil:
1. Turn the engine on and let it warm up to at least 80 °C (175 °F).
2. Once the engine is warm, check the oil while the engine is running at idle.
{Warning
The engine oil dipstick handle may be
hot; it could burn you. Use a towel or
glove to touch the dipstick handle.
3. Remove the dipstick and wipe it with a clean lint-free paper towel or a cloth.
Re-insert the dipstick and push it all the
way in until it stops.