2024 CHEVROLET CORVETTE park assist
[x] Cancel search: park assistPage 4 of 362
Chevrolet Corvette Owner Manual (GMNA-Localizing-U.S./Canada/Mexico-
17272984) - 2024 - CRC - 2/20/23
Introduction 3
A circle with a slash through it is a safety
symbol which means“Do not,” “Do not do
this,” or“Do not let this happen.”
Symbols
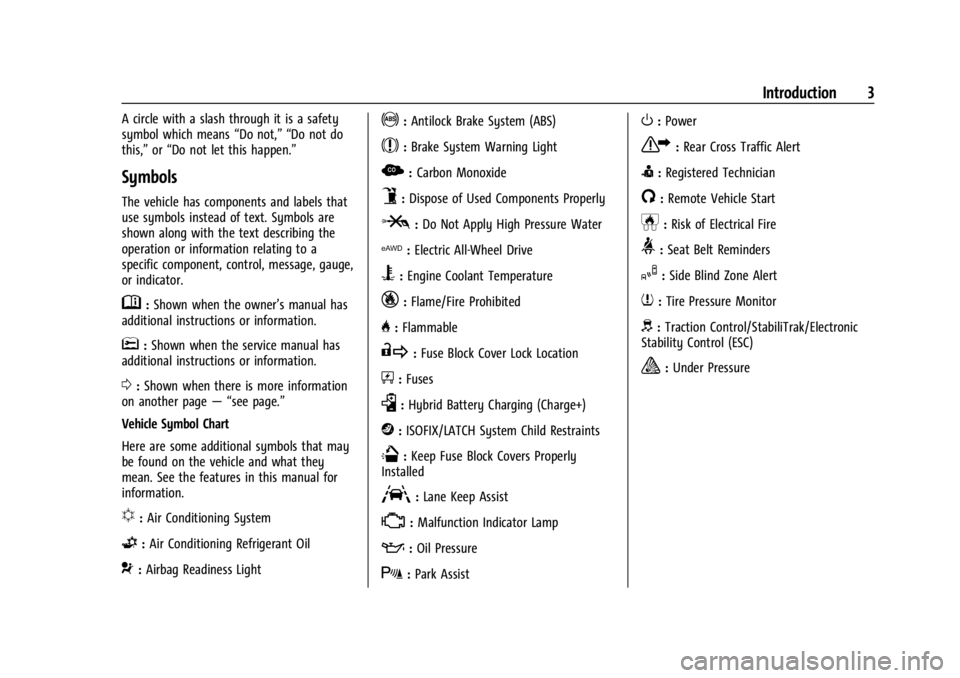
The vehicle has components and labels that
use symbols instead of text. Symbols are
shown along with the text describing the
operation or information relating to a
specific component, control, message, gauge,
or indicator.
M:Shown when the owner’s manual has
additional instructions or information.
*: Shown when the service manual has
additional instructions or information.
0: Shown when there is more information
on another page — “see page.”
Vehicle Symbol Chart
Here are some additional symbols that may
be found on the vehicle and what they
mean. See the features in this manual for
information.
u: Air Conditioning System
G:Air Conditioning Refrigerant Oil
9:Airbag Readiness Light
!:Antilock Brake System (ABS)
$:Brake System Warning Light
z: Carbon Monoxide
9:Dispose of Used Components Properly
P:Do Not Apply High Pressure Water
l: Electric All-Wheel Drive
B:Engine Coolant Temperature
_:Flame/Fire Prohibited
H: Flammable
R:Fuse Block Cover Lock Location
+:Fuses
k:Hybrid Battery Charging (Charge+)
j:ISOFIX/LATCH System Child Restraints
Q:Keep Fuse Block Covers Properly
Installed
A: Lane Keep Assist
*: Malfunction Indicator Lamp
::Oil Pressure
X:Park Assist
O:Power
7:Rear Cross Traffic Alert
I:Registered Technician
/:Remote Vehicle Start
h:Risk of Electrical Fire
>:Seat Belt Reminders
I:Side Blind Zone Alert
7:Tire Pressure Monitor
d:Traction Control/StabiliTrak/Electronic
Stability Control (ESC)
a: Under Pressure
Page 6 of 362

Chevrolet Corvette Owner Manual (GMNA-Localizing-U.S./Canada/Mexico-
17272984) - 2024 - CRC - 2/20/23
Introduction 5
1.Air Vents 0153.
2. Turn Signal Lever. See Turn and
Lane-Change Signals 0112.
Exterior Lamp Controls 0109.
3. Manual Shift Paddles. See Manual Mode
0 187.
4. Instrument Cluster 081.
5. Windshield Wiper/Washer 075.
6. Volume Control Knob and Infotainment Home Button. See Overview0117.
7. Infotainment Display. See Using the
System 0120.
8. Alarm System Indicator Light. See Vehicle
Alarm System 022.
Light Sensor. See Automatic Headlamp
System 0111.
9. Dual Automatic Climate Control System
0150.
Driver and Passenger Heated and
Ventilated Seat Controls (If Equipped).
See Heated and Ventilated Front Seats
0 44. 10.
Traction Control/Electronic Stability
Control 0194.
Curb View Camera (If Equipped). See
Assistance Systems for Parking or Backing
0 215.
Front Lift System Control (If Equipped).
See Front Lift System 0205.
11. Driver Mode Control 0196.
12. Shift Switches. See Dual Clutch
Transmission 0184.
13. Hybrid Battery Charging (Charge+). See Driver Mode Control 0196.
Auto Stop Disable Switch. See Stop/Start
System 0180.
14. Keyless Ignition. See Ignition Positions
0 178.
15. Driver Information Center (DIC) Controls. SeeDriver Information Center (DIC) 099.
16. Heated Steering Wheel 075 (If
Equipped).
17. Bluetooth Controls. See Steering Wheel
Controls 0119.
Voice Recognition Controls. See Steering
Wheel Controls 0119. 18. Volume Control Buttons. See
Steering
Wheel Controls 0119.
19. Horn 075.
20. Favorites Select Buttons. Steering Wheel
Controls 0119.
21. Z-Mode Control. See Driver Mode Control
0 196.
Forward Collision Alert (FCA) System
0 218.
22. Cruise Control 0212.
23. Electric Parking Brake 0192.
24. Data Link Connector (DLC) (Out of View). SeeMalfunction Indicator Lamp (Check
Engine Light) 090.
25. Instrument Panel Illumination Control
0113.
26. Head-Up Display Controls (If Equipped). SeeHead-Up Display (HUD) 0102.
Page 75 of 362

Chevrolet Corvette Owner Manual (GMNA-Localizing-U.S./Canada/Mexico-
17272984) - 2024 - CRC - 2/20/23
74 Instruments and Controls
Instruments and Controls
Controls
Steering Wheel Adjustment . . . . . . . . . . . . . 75
Heated Steering Wheel . . . . . . . . . . . . . . . . . 75
Horn . . . . . . . . . . . . . . . . . . . . . . . . . . . . . . . . . . . . 75
Windshield Wiper/Washer . . . . . . . . . . . . . . 75
Compass . . . . . . . . . . . . . . . . . . . . . . . . . . . . . . . 76
Clock . . . . . . . . . . . . . . . . . . . . . . . . . . . . . . . . . . . 76
Power Outlets . . . . . . . . . . . . . . . . . . . . . . . . . . 77
Wireless Charging . . . . . . . . . . . . . . . . . . . . . . 78
Warning Lights, Gauges, and Indicators
Warning Lights, Gauges, andIndicators . . . . . . . . . . . . . . . . . . . . . . . . . . . . 80
Instrument Cluster . . . . . . . . . . . . . . . . . . . . . . 81
Speedometer . . . . . . . . . . . . . . . . . . . . . . . . . . . 85
Odometer . . . . . . . . . . . . . . . . . . . . . . . . . . . . . . 85
Trip Odometer . . . . . . . . . . . . . . . . . . . . . . . . . . 85
Tachometer . . . . . . . . . . . . . . . . . . . . . . . . . . . . 85
Battery Gauge (High Voltage) . . . . . . . . . . 86
Stealth Drive Mode Capability Gauge . . . . . . . . . . . . . . . . . . . . . . . . . . . . . . . . 86
Fuel Gauge . . . . . . . . . . . . . . . . . . . . . . . . . . . . . 86
Hybrid Battery Charging Light (Charge+) . . . . . . . . . . . . . . . . . . . . . . . . . . . . . 87
Power Indicator Gauge . . . . . . . . . . . . . . . . . 87
Engine Coolant Temperature Gauge . . . . 87
Transmission Temperature Gauge . . . . . . 88
Seat Belt Reminders . . . . . . . . . . . . . . . . . . . . 88 Airbag Readiness Light . . . . . . . . . . . . . . . . . 88
Passenger Airbag Status Indicator . . . . . . 89
Charging System Light (12-Volt
Battery) . . . . . . . . . . . . . . . . . . . . . . . . . . . . . . 90
Malfunction Indicator Lamp (Check
Engine Light) . . . . . . . . . . . . . . . . . . . . . . . . . 90
Front Lift System Light . . . . . . . . . . . . . . . . . 91
Brake System Warning Light . . . . . . . . . . . 92
Electric Parking Brake Light . . . . . . . . . . . . . 92
Service Electric Parking Brake Light . . . . . 92
Antilock Brake System (ABS) Warning Light . . . . . . . . . . . . . . . . . . . . . . . . . . . . . . . . . . 93
Performance Transmission Active . . . . . . . 93
All-Wheel-Drive Light . . . . . . . . . . . . . . . . . . . 93
Lane Keep Assist (LKA) Light . . . . . . . . . . . 94
Automatic Emergency Braking (AEB) Disabled Light . . . . . . . . . . . . . . . . . . . . . . . . 94
Vehicle Ahead Indicator . . . . . . . . . . . . . . . . 94
Pedestrian Ahead Indicator . . . . . . . . . . . . . 94
Traction Off Light . . . . . . . . . . . . . . . . . . . . . . 95
Traction Control System (TCS)/Electronic Stability Control Light . . . . . . . . . . . . . . . . 95
Electronic Stability Control (ESC) Off Light . . . . . . . . . . . . . . . . . . . . . . . . . . . . . . . . . . 95
Engine Coolant Temperature Warning Light . . . . . . . . . . . . . . . . . . . . . . . . . . . . . . . . . 96
Driver Mode Control Light . . . . . . . . . . . . . . 96
Tire Pressure Light . . . . . . . . . . . . . . . . . . . . . . 97
Engine Oil Pressure Light . . . . . . . . . . . . . . . 97
Low Fuel Warning Light . . . . . . . . . . . . . . . . 97 Auto Stop Indicator . . . . . . . . . . . . . . . . . . . . 98
Traffic Sign Indicator . . . . . . . . . . . . . . . . . . . 98
Security Light . . . . . . . . . . . . . . . . . . . . . . . . . . 98
High-Beam On Light . . . . . . . . . . . . . . . . . . . . 98
Lamps On Reminder . . . . . . . . . . . . . . . . . . . . 99
Cruise Control Light . . . . . . . . . . . . . . . . . . . . 99
Door Ajar Light . . . . . . . . . . . . . . . . . . . . . . . . . 99
Information Displays
Driver Information Center (DIC) . . . . . . . . 99
Head-Up Display (HUD) . . . . . . . . . . . . . . . . 102
Vehicle Messages
Vehicle Messages . . . . . . . . . . . . . . . . . . . . . . 105
Engine Power Messages . . . . . . . . . . . . . . . 106
Vehicle Speed Messages . . . . . . . . . . . . . . . 106
Universal Remote System
Universal Remote System . . . . . . . . . . . . . 106
Universal Remote System
Programming . . . . . . . . . . . . . . . . . . . . . . . . 106
Universal Remote System Operation . . . . . . . . . . . . . . . . . . . . . . . . . . . 108
Page 92 of 362

Chevrolet Corvette Owner Manual (GMNA-Localizing-U.S./Canada/Mexico-
17272984) - 2024 - CRC - 2/20/23
Instruments and Controls 91
To help prevent damage, reduce vehicle
speed and avoid hard accelerations and
uphill grades.
If the light continues to flash, find a safe
place to park. Turn the vehicle off and wait
at least 10 seconds before restarting the
engine. If the light is still flashing, follow
the previous guidelines and see your dealer
for service as soon as possible.
If the light is on steady :A malfunction has
been detected. Diagnosis and service may be
required.
Check the following:
.If fuel has been added to the vehicle
using the capless funnel adapter, make
sure that it has been removed. See
“Filling the Tank with a Portable Gas Can”
under Filling the Tank 0228. The
diagnostic system can detect if the
adapter has been left installed in the
vehicle, allowing fuel to evaporate into
the atmosphere. A few driving trips with
the adapter removed may turn off the
light.
.Poor fuel quality can cause inefficient
engine operation and poor driveability,
which may go away once the engine is
warmed up. If this occurs, change the fuel brand. It may require at least one full
tank of the proper fuel to turn the light
off. See
Recommended Fuel 0227.
If the light remains on, see your dealer.
Emissions Inspection and Maintenance
Programs
If the vehicle requires an Emissions
Inspection/Maintenance test, the test
equipment will likely connect to the
vehicle's Data Link Connector (DLC).
The DLC is under the instrument panel to
the left of the steering wheel. Connecting
devices that are not used to perform an
Emissions Inspection/Maintenance test or to
service the vehicle may affect vehicle
operation. See Add-On Electrical Equipment
0 230. See your dealer if assistance is
needed.
The vehicle may not pass inspection if:
.The light is on when the engine is
running.
.The light does not come on when the
ignition is in Service Mode.
.Critical emission control systems have not
been completely diagnosed. If this
happens, the vehicle would not be ready
for inspection and may require
several days of routine driving before the
system is ready for inspection. This can
happen if the 12-volt battery has recently
been replaced or run down, or if the
vehicle has been recently serviced.
See your dealer if the vehicle will not pass
or cannot be made ready for the test.
Front Lift System Light
If equipped, this light will flash to indicate
when the front of the vehicle is being raised
or lowered. An up or down arrow in the
light will display, depending on the direction
of movement. The light will stay lit while
the front is fully raised.
Page 104 of 362
Chevrolet Corvette Owner Manual (GMNA-Localizing-U.S./Canada/Mexico-
17272984) - 2024 - CRC - 2/20/23
Instruments and Controls 103
.Upcoming Maneuver from On-Board
Navigation
.Upcoming Maneuver from OnStar
.Incoming Call
.Advanced Driver Assistance Systems
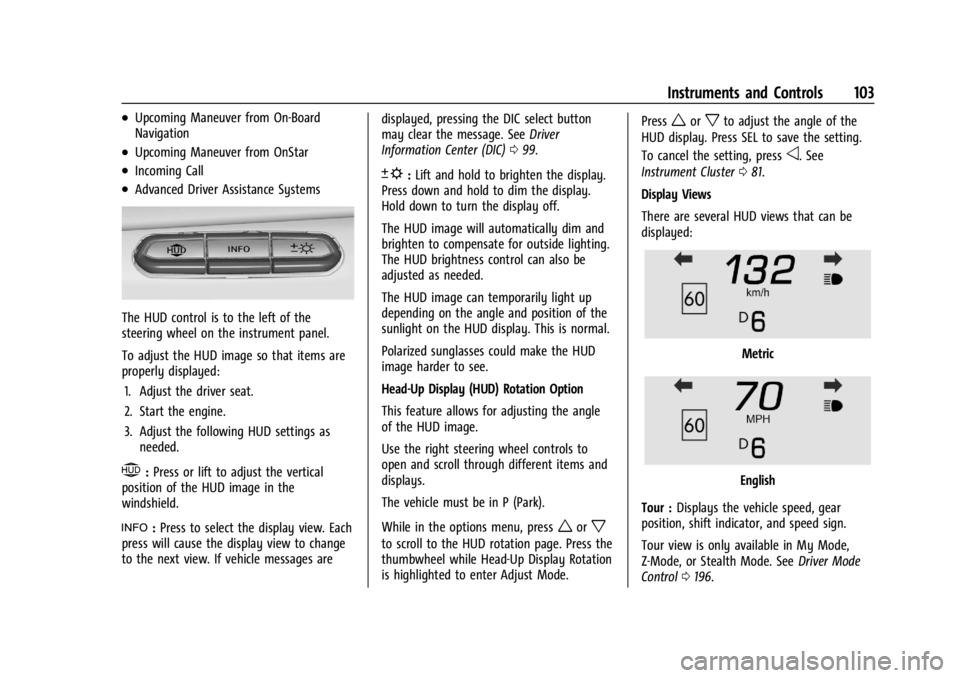
The HUD control is to the left of the
steering wheel on the instrument panel.
To adjust the HUD image so that items are
properly displayed:1. Adjust the driver seat.
2. Start the engine.
3. Adjust the following HUD settings as needed.
$:Press or lift to adjust the vertical
position of the HUD image in the
windshield.
!: Press to select the display view. Each
press will cause the display view to change
to the next view. If vehicle messages are displayed, pressing the DIC select button
may clear the message. See
Driver
Information Center (DIC) 099.
D:Lift and hold to brighten the display.
Press down and hold to dim the display.
Hold down to turn the display off.
The HUD image will automatically dim and
brighten to compensate for outside lighting.
The HUD brightness control can also be
adjusted as needed.
The HUD image can temporarily light up
depending on the angle and position of the
sunlight on the HUD display. This is normal.
Polarized sunglasses could make the HUD
image harder to see.
Head-Up Display (HUD) Rotation Option
This feature allows for adjusting the angle
of the HUD image.
Use the right steering wheel controls to
open and scroll through different items and
displays.
The vehicle must be in P (Park).
While in the options menu, press
worx
to scroll to the HUD rotation page. Press the
thumbwheel while Head-Up Display Rotation
is highlighted to enter Adjust Mode. Press
worxto adjust the angle of the
HUD display. Press SEL to save the setting.
To cancel the setting, press
o. See
Instrument Cluster 081.
Display Views
There are several HUD views that can be
displayed:
Metric
English
Tour : Displays the vehicle speed, gear
position, shift indicator, and speed sign.
Tour view is only available in My Mode,
Z-Mode, or Stealth Mode. See Driver Mode
Control 0196.
Page 108 of 362
Chevrolet Corvette Owner Manual (GMNA-Localizing-U.S./Canada/Mexico-
17272984) - 2024 - CRC - 2/20/23
Instruments and Controls 107
Keep the original hand-held transmitter for
use in other vehicles as well as for future
programming. Erase the programming when
vehicle ownership is terminated. See
“Erasing Universal Remote System Buttons”
later in this section.
To program a garage door opener, park
outside directly in line with and facing the
garage door opener receiver. Clear all people
and objects near the garage door.
Make sure the hand-held transmitter has a
new battery for quick and accurate
transmission of the radio-frequency signal.
Programming the Universal Remote
System
Programming involves time-sensitive actions
and may time out, requiring the procedure
to be repeated. Read these instructions
completely before programming the
Universal Remote system. It may help to
have another person assist with the
programming process.1. Hold the end of the hand-held transmitter about 3 to 8 cm (1 to 3 in)
away from the Universal Remote system
buttons with the indicator light in view. The hand-held transmitter was supplied
by the manufacturer of the garage door
opener receiver.
2. At the same time, press and hold both the hand-held transmitter button and
one of the three Universal Remote
system buttons to be used to operate
the garage door. Do not release either
button until the indicator light changes
from a slow to a rapid flash or
continuous light. Then release both
buttons.
Some garage door openers may require
substitution of Step 2 with the procedure
under “Radio Signals for Some Gate
Operators” later in this section.
3. Press and hold the newly programmed Universal Remote system button for
five seconds while watching the indicator
light and garage door activation.
.If the indicator light stays on
continuously or the garage door
moves when the button is pressed,
then programming is complete. There
is no need to complete Steps 4–6.
.If the indicator light does not come
on or the garage door does not
move, a second button press may be
required. For a second time, press and hold the newly programmed
button for five seconds. If the
indicator light stays on continuously
or the garage door moves when the
button is pressed, then programming
is complete. There is no need to
complete Steps 4–6.
.If the garage door does not move,
continue with programming
Steps 4–6.
Learn or Smart Button
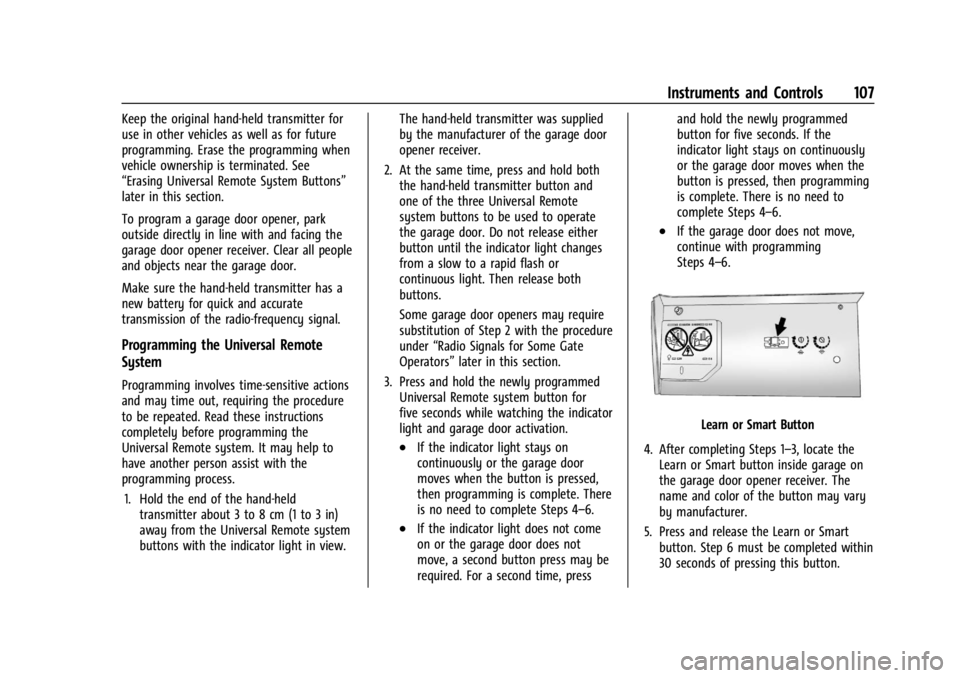
4. After completing Steps 1–3, locate the Learn or Smart button inside garage on
the garage door opener receiver. The
name and color of the button may vary
by manufacturer.
5. Press and release the Learn or Smart button. Step 6 must be completed within
30 seconds of pressing this button.
Page 130 of 362
Chevrolet Corvette Owner Manual (GMNA-Localizing-U.S./Canada/Mexico-
17272984) - 2024 - CRC - 2/20/23
Infotainment System 129
.The route prohibits the entry of a vehicle
due to a regulation by time or season or
any other regulation which may be given.
.Some routes might not be searched.
.The route to the destination might not be
shown if there are new roads, if roads
have recently changed, or if certain roads
are not listed in Maps.
To recalibrate the vehicle's position on the
map, park with the vehicle running for two
to five minutes, until the vehicle position
updates. Make sure the vehicle is parked in
a location that is safe and has a clear view
of the sky and away from large
obstructions.
Voice Recognition
If equipped, Google Assistant allows for
hands-free use of media and messaging,
navigation and climate control functionality
in the vehicle. This feature can be started by
pressing
gon the steering wheel, touching
Google Assistant on the Home screen, or by
using the wake up words “Hey Google”or
“OK Google.”
However, not all features within these areas
are supported by voice commands and
requires the user to have a valid data subscription plan or connected to WiFi in
order to use some of the Google Assistant
features.
Using Voice Recognition
Voice recognition becomes available once
the system is initialized. This begins when
the vehicle is turned on. Initialization may
take a few moments.
1. Press
gon the steering wheel controls,
touch Google Assistant on the Home
screen, or use the wake up words “Hey
Google” or“OK Google” to activate voice
recognition. Google Assistant must be set
as the Default Assistant for the
gand
the wake word options to work.
2. Clearly speak one of the commands described later in this section.
Canceling Google Assistant
.Presscon the steering wheel controls
to cancel the Google Assistant request.
Helpful Hints for Speaking Commands
Voice recognition identifies commands that
are naturally stated in sentence form,
or direct commands that state the
application and the task. For best results:
.Speak the command naturally, not too
fast, not too slow.
.Use direct commands without a lot of
extra words. For example,
“Call
at work,” “Play” followed by the artist or
song name, or “Play”followed by the
radio station number.
Direct commands are more clearly
understood by the system. An example of a
direct command is “Dial
If a cell phone number was saved with a
name and a place, the direct command
should include both. For example “Call
Voice Recognition for the Radio
When voice is started, the voice recognition
commands for AM, FM, SiriusXM (if
equipped), and media apps (if supported) are
available.
“Play
radio station frequency identified in the
command (like “nine fifty”).
“Play
radio station frequency identified in the
command (like “one oh one point one”).
Page 137 of 362
Chevrolet Corvette Owner Manual (GMNA-Localizing-U.S./Canada/Mexico-
17272984) - 2024 - CRC - 2/20/23
136 Infotainment System
Phone
Bluetooth (Overview)
The Bluetooth-capable system can interact
with many mobile devices to:
.Place and receive calls in a
hands-free mode.
.Share the device’s address book or
contact list with the vehicle.
.Stream audio (music, podcasts).
.Notify receipt of text messages.
To minimize driver distraction, before
driving, and with the vehicle parked:
.Become familiar with the features of the
mobile device. Organize the phone book
and contact lists clearly and delete
duplicate or rarely used entries.
.Review the controls and operation of the
infotainment system.
.Pair mobile device(s) to the vehicle. The
system may not work with all mobile
devices. See “Pairing”later in this section.
Vehicles with a Bluetooth system can use a
Bluetooth-capable mobile device with a
Hands-Free Profile to make and receive
phone calls. The infotainment system and
voice recognition are used to control the system. The system can be used while the
vehicle is on or in accessory mode. The
range of the Bluetooth system can be up to
9.1 m (30 ft). Not all mobile devices support
all functions and not all mobile devices work
with the Bluetooth system. See
Online
Account 0332 for more information about
compatible mobile devices.
Controls
Use the controls on the infotainment display
and the steering wheel to operate the
Bluetooth system.
Steering Wheel Controls
g: Press and release to answer incoming
calls on your connected Bluetooth mobile
device. Press and hold for mobile device
assistant.
c: Press to end a call, decline a call,
or cancel an operation. Press to mute or
unmute the infotainment system when not
on a call.
Infotainment System Controls
For information about how to navigate the
menu system using the infotainment
controls, see Using the System 0120.
Audio System
When using the Bluetooth mobile device
system, sound comes through the vehicle's
front audio system speakers and overrides
the audio system. The volume level while on
a mobile device call can be adjusted by
pressing the steering wheel controls or the
volume controls for the infotainment
system. The adjusted volume level remains
in memory for later calls. The volume
cannot be lowered beyond a certain level.
Bluetooth (Pairing and Using a
Phone)
Pairing
A Bluetooth-enabled mobile device must be
paired to the Bluetooth system and then
connected to the vehicle before it can be
used. See the mobile device manufacturer's
user guide for Bluetooth functions before
pairing the device.
Pairing Information
.Touch the Phone icon on the home page
of the infotainment display.
.If no mobile device has been paired, a
message on the infotainment display will
show the Manage Phones option. Touch