2024 CHEVROLET CORVETTE change time
[x] Cancel search: change timePage 142 of 362
Chevrolet Corvette Owner Manual (GMNA-Localizing-U.S./Canada/Mexico-
17272984) - 2024 - CRC - 2/20/23
Infotainment System 141
1. Download the Android Auto app to yoursmartphone from the Google Play store
for phones running Android 9 and below.
There is no app required for Apple
CarPlay.
2. For first time connection, there are two ways to set up wireless projection:
.Connect your Android phone or Apple
iPhone by using the factory-provided
phone USB cable and plugging into a
USB data port. For best performance,
it is highly recommended to use the
device’s factory-provided USB cable,
which should be replaced after
significant wear to maintain
connection quality. Aftermarket or
third-party cables may not work.
.Connecting the phone over Bluetooth.
See Bluetooth (Overview) 0136 or
Bluetooth (Pairing and Using a Phone)
0 136.
3. Make sure Wi-Fi and Bluetooth is turned on the phone for wireless projection
to work.
4. When the phone is first connected to activate Apple CarPlay or Android Auto,
agree to the terms and conditions on
both the infotainment system and the
phone. 5. Follow the instructions on the phone.
The Android Auto and Apple CarPlay icons
on the Home Page will illuminate depending
on the smartphone. Android Auto and/or
Apple CarPlay may automatically launch
upon wireless connection. If not, touch the
Android Auto or Apple CarPlay icon on the
Home Page to launch.
Wireless CarPlay and/or Wireless Android
Auto may experience occasional service
disruption due to outside Wi-Fi interference.
To disconnect the phones wireless
projection: 1. Select the Settings icon from the Home Page or the Settings icon on the shortcut
tray near the left of the display.
2. Select Connections.
3. Touch Phones.
4. Touch Option on the phone card to show the cell phone’s or mobile device’s
settings.
5. Touch disconnect.
Press
{on the center stack to return to the
Home Page. Features are subject to change. For further
information on how to set up Android Auto
and Apple CarPlay in the vehicle, visit your
brand website. See
Online Account0332 for
details.
Android Auto is provided by Google and is
subject to Google’s terms and privacy policy.
Apple CarPlay is provided by Apple and is
subject to Apple’s terms and privacy policy.
Data plan rates apply. For Android Auto
support and to see if your phone is
compatible, see https:/www.android.com/
auto/compatability. For Apple CarPlay
support and to see if your phone is
compatible, see www.apple.com/ios/
carplay/. Apple or Google may change or
suspend availability at any time. Google,
Android, Android Auto, Google Maps, and
other marks are trademarks of Google LLC.
Apple CarPlay is a trademark of Apple Inc.
Press
{on the center stack to exit Android
Auto or Apple CarPlay. To enter back into
Android Auto or Apple CarPlay, press and
hold
{on the center stack.
Page 144 of 362
Chevrolet Corvette Owner Manual (GMNA-Localizing-U.S./Canada/Mexico-
17272984) - 2024 - CRC - 2/20/23
Infotainment System 143
Apps and Permissions
Shows a list of installed apps and the
permissions used.
Date / Time
Allows setting of the clock.
Display
Allows adjustment of the infotainment
display.
Sounds
Allows adjustment of the infotainment
system sounds.
Users
Modifies the infotainment system’s users.
Accounts
Allows adding or adjusting of the user
accounts.
Privacy
The menu may contain the following:
Location Services
Touch to view the Location Services screen.GM Privacy Statement
Touch to view the GM Privacy Statement
screen.
App permissions
Touch to view the Permission manager
screen.
Data Sharing with Google
Touch to manage data you share with
Google.
Google legal
Touch to view the Google legal screen.
Storage
This menu shows the storage info on the
infotainment system.
Security
This menu allows adjustment of the
infotainment security settings.
System
The menu may contain the following:
Language
This will set the display language used on
the infotainment display.Keyboard & speech
Touch to change keyboard and speech
settings.
Reset Options
Touch to change reset settings.
Quick Startup
This allows your infotainment system to
quickly resume its last session.
While the vehicle is in park, press and hold
the mute/end call button on the steering
wheel for 15 seconds to reboot the
infotainment system.
TTY Mode
Touch to turn off or on.
About
Touch to view the infotainment system
software information.
Legal Information
Touch to view legal and license information.Updates
This menu allows adjustment of the vehicle
update settings.
Page 146 of 362
Chevrolet Corvette Owner Manual (GMNA-Localizing-U.S./Canada/Mexico-
17272984) - 2024 - CRC - 2/20/23
Infotainment System 145
5. Touch Setup Keys or Add/Remove TeenDriver Keys. The system displays
instructions for registering or
unregistering a key. A confirmation
message displays.
Manage Settings or Teen Driver Settings
Depending on the options of your vehicle,
the following menu items may be displayed:
Buckle to Drive : When turned ON, Buckle to
Drive prevents the driver from shifting out
of P (Park) for a period of time after the
brake pedal is pressed if the driver, or on
some vehicles the detected passenger, has
not buckled their seat belt. On some
vehicles, Buckle to Drive is always ON when
Teen Driver is active and is not configurable.
See Buckle To Drive 046.
Audio Volume Limit : Allows a maximum
audio volume to be set. Turn the audio
volume limit on or off. Use the arrows to
choose the maximum allowable level for the
audio volume. On some infotainment
systems, touch Set Audio Volume Limit to
choose the maximum allowable audio
volume level.
Set Audio Volume Limit : Use the arrows to
choose the maximum allowable level for the
audio volume. Teen Driver Speed Limiter :
Limits the
maximum speed of the vehicle. When the
speed limiter is turned on and the vehicle is
started with a Teen Driver key, the DIC
displays a message that the top speed is
limited.
On certain vehicles, when the Speed Limiter
is turned ON, the vehicle’s maximum
acceleration will be limited. The DIC will
display a message that the acceleration is
limited.
Teen Driver Speed Warning : Displays a
warning in the DIC when exceeding a
selectable speed. Turn the speed warning on
or off and choose the desired speed warning
level. The speed warning does not limit the
speed of the vehicle. On some infotainment
systems, touch Set Teen Driver Speed
Warning to set the warning speed.
Set Teen Driver Speed Warning : Choose the
desired speed warning level. The speed
warning does not limit the speed of the
vehicle.
SiriusXM Explicit Content Filter : Allows the
SiriusXM Explicit Content Filter to be turned
ON or OFF. When ON, the teen driver will
not be able to listen to SiriusXM stations that contain explicit content, and the Explicit
Content Filter selection in the Audio Settings
will be unavailable for change.
When Teen Driver is Active:
.If equipped, the radio will mute when the
driver seat belt, and in some vehicles the
front passenger seat belt, is not buckled.
The audio from any device paired to the
vehicle will also be muted.
.An object placed on the front passenger
seat, such as a briefcase, handbag,
grocery bag, laptop, or other electronic
device, could cause the passenger sensing
system to falsely sense an unbuckled
front passenger and mute the radio.
If this happens, remove the object from
the seat. See
Passenger Sensing System
0 57.
.Some safety systems, such as Automatic
Emergency Braking, if equipped, cannot
be turned off.
.The gap setting for Adaptive Cruise
Control and alert timing for Forward
Collision Alert, if equipped, cannot be
changed.
.When trying to change a safety feature
that is not configurable in Teen Driver,
the feature may be grayed out or
removed from the infotainment menu,
Page 152 of 362
Chevrolet Corvette Owner Manual (GMNA-Localizing-U.S./Canada/Mexico-
17272984) - 2024 - CRC - 2/20/23
Climate Controls 151
5. Air Delivery Mode Controls
6. Fan Control
7.
O(Power)
8. A/C (Air Conditioning)
9. Recirculation
10. Defrost
11. Rear Window Defogger
12. Passenger Temperature Control
Climate Control Display
1. Driver and Passenger Temperature Settings
2. Fan Control
3. Driver and Passenger Temperature Controls 4. Recirculation
5. A/C (Air Conditioning)
6. Sync (Synchronized Temperature)
7. Air Delivery Mode Controls
8. Auto (Automatic Operation)
9. On/Off (Power)
The fan, air delivery mode, air conditioning,
driver and passenger temperatures, and Sync
settings can be controlled by touching
CLIMATE on the infotainment home screen
or the climate button in the climate control
display application tray. A selection can then
be made on the front climate control page
displayed.
Automatic Operation
The system automatically controls the fan
speed, air delivery, air conditioning, and
recirculation to heat or cool the vehicle to
the desired temperature.
When AUTO is pressed, all four functions
operate automatically. Each function can
also be manually set and the setting is
displayed. Functions not manually set will
continue to be automatically controlled,
even if the AUTO indicator is not lit. For automatic operation:
1. Press AUTO.
2. Set the temperature. Allow the system time to stabilize. Adjust the temperature
as needed for best comfort.
Manual Operation
O:Press to turn the fan off or on.
hori:Press to increase or decrease the
fan speed.
Driver and Passenger Temperature
Controls : The temperature can be adjusted
separately for the driver and passenger.
SYNC : Press to link the passenger
temperature setting to the driver setting.
The SYNC indicator light will turn on. When
the passenger setting is adjusted, the SYNC
indicator light will turn off.
Air Delivery Mode Control : Press
Y,[,
or
zto change the direction of the airflow.
Any combination of the three controls can
be selected. An indicator light comes on in
the selected mode button.
Changing the mode cancels the automatic
operation and the system goes into manual
mode. Press AUTO to return to automatic
operation.
Page 153 of 362
Chevrolet Corvette Owner Manual (GMNA-Localizing-U.S./Canada/Mexico-
17272984) - 2024 - CRC - 2/20/23
152 Climate Controls
To change the current mode, select one or
more of the following:
Y:Air is directed to the A/C outlets.
[:Air is directed to the floor outlets,
with some air directed to the windshield,
and side window outlets.
z: Air is directed to the windshield and
side window outlets.
0MAX : Air is directed to the windshield
and the fan runs at a higher speed if not
already above a medium fan speed. This
mode overrides the previous mode selected
and clears fog or frost from the windshield
more quickly. When the control is pressed
again, the system returns to the previous
mode setting and fan speed.
For best results, clear all snow and ice from
the windshield before defrosting.
@: Press to turn on recirculation. An
indicator light comes on. Air is recirculated
to quickly cool the inside of the vehicle.
It can also be used to help reduce outside
air and odors that enter the vehicle. Avoid using recirculation for long periods of
time in cold or damp conditions. Using
recirculation in cold or damp conditions can
result in window fogging.
A/C :
Press to turn the air conditioning on
or off. An indicator light comes on to show
that the air conditioning is enabled. If the
fan is turned off, the air conditioner will not
run. The A/C light will stay on even if the
outside temperatures are below freezing.
If the A/C is turned off, the air temperature
coming through the climate control system
may be warmer than the ambient
temperature. It is recommended to use auto
climate control to maintain comfort.
Rear Window Defogger
1REAR : If equipped, press to turn the
rear window defogger on or off. An indicator
light on the button comes on to show that
the rear window defogger is on.
The rear window defogger only works when
the engine is running. The defogger can be
turned off by turning the vehicle off or to
accessory mode.
If equipped with heated outside mirrors,
press
1REAR to turn them on or off. See
Heated Mirrors 026.
Caution
Using a razor blade or sharp object to
clear the inside rear window can damage
the rear window defogger. Repairs would
not be covered by the vehicle warranty.
Do not clear the inside rear window with
sharp objects.
Remote Start Climate Control Operation :
If equipped with remote start, the climate
control system may run when the vehicle is
started remotely. If equipped with heated or
ventilated seats or a heated steering wheel,
these features may come on during a
remote start. See Remote Vehicle Start 012,
Heated and Ventilated Front Seats 044, and
Heated Steering Wheel 075.
Afterblow Feature
If equipped, under certain conditions, the
fan may stay on or may turn on and off
several times after you turn off and lock the
vehicle. This is normal.
Page 180 of 362
Chevrolet Corvette Owner Manual (GMNA-Localizing-U.S./Canada/Mexico-
17272984) - 2024 - CRC - 2/20/23
Driving and Operating 179
With the ignition off, pressing the button
one time without the brake pedal applied
will place the ignition system in accessory.
The ignition will switch from accessory to
OFF after five minutes to prevent battery
rundown.
ON/RUN/START (Green Indicator Light) :This
mode is for driving and starting. With the
ignition off and the brake pedal applied,
pressing the button once will place the
ignition in ON/RUN/START. Once engine
cranking begins, release the button. Engine
cranking will continue until the engine
starts. See Starting the Engine 0179. The
ignition will then remain in ON/RUN.
Service Mode
This power mode is available for service and
diagnostics, and to verify the proper
operation of the malfunction indicator lamp
as may be required for emission inspection
purposes. With the vehicle off and the brake
pedal not applied, pressing and holding
ENGINE START/STOP for more than
five seconds will place the vehicle in Service
Mode. The instruments and audio systems
will operate as they do in ON/RUN, but the
vehicle will not be able to be driven. The engine will not start in Service Mode. Press
ENGINE START/STOP again to turn the
vehicle off.
Starting the Engine
Caution
If you add electrical parts or accessories,
you could change the way the engine
operates. Any resulting damage would
not be covered by the vehicle warranty.
See
Add-On Electrical Equipment 0230.
Caution
Do not try to shift to P (Park) if the
vehicle is moving. If you do, you could
damage the transmission. Shift to P (Park)
only when the vehicle is stopped.
Place the transmission in P (Park) or
N (Neutral). To restart the vehicle when it is
already moving, use N (Neutral) only.
Starting the Vehicle
The remote key must be inside the vehicle
for the ignition to work. Cell phone chargers can interfere with the
operation of the Keyless Access system.
Battery chargers should not be plugged in
when starting or turning off the engine.
1. Press the brake pedal, then press ENGINE START/STOP on the instrument panel.
If there is no remote key in the vehicle
or if there is something causing
interference with it, the Driver
Information Center (DIC) will display a
message.
2. When the engine begins cranking, let go of the button and the engine cranks
automatically until it starts.
If the battery in the remote key is weak,
the DIC will display a message. The
vehicle can still be driven.
See “Starting the Vehicle with a Low
Remote Key Battery” underRemote Key
Operation 07. If the remote key battery
is dead, insert it into the cupholder
remote key pocket to enable engine
starting.
3. Do not race the engine immediately after starting it. Operate the engine and
transmission gently until the oil warms
up and lubricates all moving parts.
Page 191 of 362
Chevrolet Corvette Owner Manual (GMNA-Localizing-U.S./Canada/Mexico-
17272984) - 2024 - CRC - 2/20/23
190 Driving and Operating
Z06 (LT6)
Upshift Allowed (into gear) At Approximately
km/h mph
2nd 14 9 3rd 24 15
4th 39 24 5th 52 32
6th 60 37 7th 77 48
8th 93 58
Maximum Downshift Inhibit Speed (into gear) At Approximately
km/h mph
1st 66 41
2nd 113 69 3rd 162 101
4th 225 140 5th 303 188
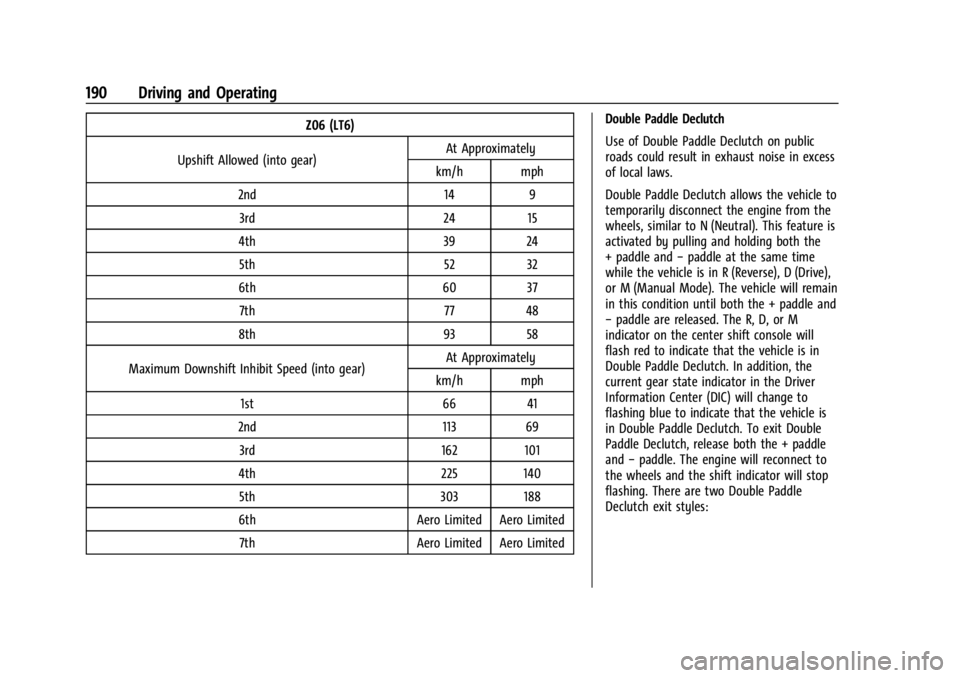
6th Aero Limited Aero Limited 7th Aero Limited Aero Limited Double Paddle Declutch
Use of Double Paddle Declutch on public
roads could result in exhaust noise in excess
of local laws.
Double Paddle Declutch allows the vehicle to
temporarily disconnect the engine from the
wheels, similar to N (Neutral). This feature is
activated by pulling and holding both the
+ paddle and
−paddle at the same time
while the vehicle is in R (Reverse), D (Drive),
or M (Manual Mode). The vehicle will remain
in this condition until both the + paddle and
− paddle are released. The R, D, or M
indicator on the center shift console will
flash red to indicate that the vehicle is in
Double Paddle Declutch. In addition, the
current gear state indicator in the Driver
Information Center (DIC) will change to
flashing blue to indicate that the vehicle is
in Double Paddle Declutch. To exit Double
Paddle Declutch, release both the + paddle
and −paddle. The engine will reconnect to
the wheels and the shift indicator will stop
flashing. There are two Double Paddle
Declutch exit styles:
Page 193 of 362
Chevrolet Corvette Owner Manual (GMNA-Localizing-U.S./Canada/Mexico-
17272984) - 2024 - CRC - 2/20/23
192 Driving and Operating
front and rear wheels to maximize driving
efficiency and improve driving dynamics.
Your vehicle has exceptional driving
capability, but care must always be taken to
adjust driving style to the traffic and road
conditions.
The vehicle eAWD settings may be
customized for the driver mode selected. See
Driver Mode Control0196 for more
information.
Brakes
Electric Brake Boost
Vehicles equipped with electric brake boost
have hydraulic brake circuits that are
electronically controlled when the brake
pedal is applied during normal operation.
The system performs routine tests and turns
off within a few minutes after the vehicle is
turned off. Noise may be heard during this
time. If the brake pedal is pressed during
the tests or when the electric brake boost
system is off, a noticeable change in pedal
force and travel may be felt. This is normal.
Antilock Brake System (ABS)
The Antilock Brake System (ABS) helps
prevent a braking skid and maintain steering
while braking hard.
If there is a problem with ABS, this warning
light stays on. See Antilock Brake System
(ABS) Warning Light 093.
ABS does not change the time needed to
get a foot on the brake pedal and does not
always decrease stopping distance. If you
get too close to the vehicle ahead, there will
not be enough time to apply the brakes if
that vehicle suddenly slows or stops. Always
leave enough room ahead to stop, even
with ABS.
Using ABS
Do not pump the brakes. Just hold the brake
pedal down firmly. Hearing and feeling ABS
operate is normal.
Braking in Emergencies
ABS allows steering and braking at the same
time. In many emergencies, steering can
help even more than braking.
Electric Parking Brake
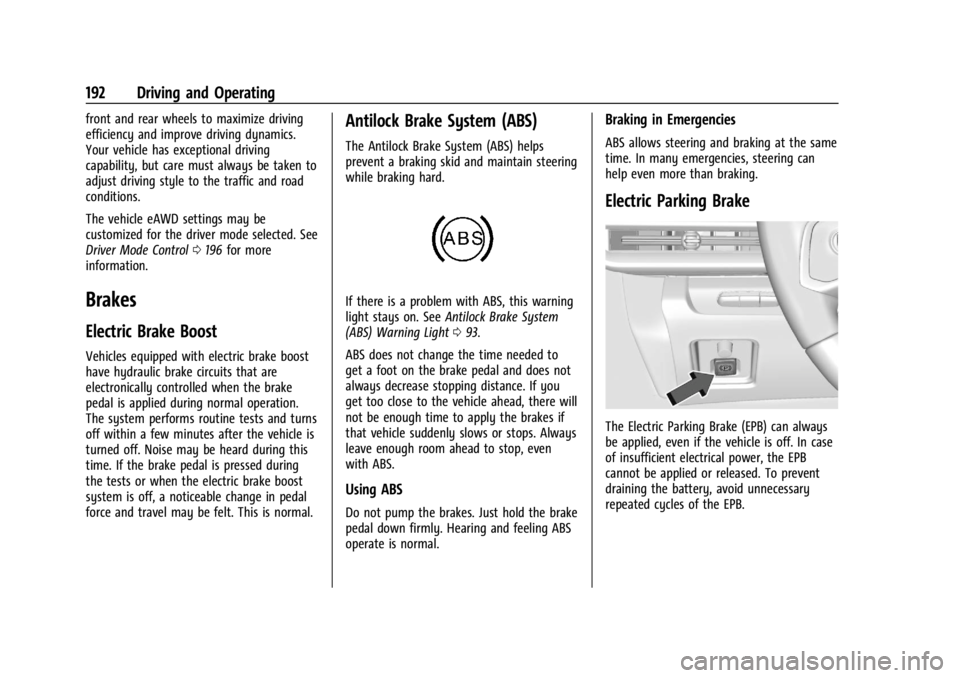
The Electric Parking Brake (EPB) can always
be applied, even if the vehicle is off. In case
of insufficient electrical power, the EPB
cannot be applied or released. To prevent
draining the battery, avoid unnecessary
repeated cycles of the EPB.