2024 CHEVROLET CORVETTE recommended oil
[x] Cancel search: recommended oilPage 102 of 362
Chevrolet Corvette Owner Manual (GMNA-Localizing-U.S./Canada/Mexico-
17272984) - 2024 - CRC - 2/20/23
Instruments and Controls 101
thumbwheel to save it. On the next
acceleration, the performance timer will
record the time. Pressing the thumbwheel
while the timer is running will cancel the
timer if done before reaching the End Speed.
Lap Timer (without PDR) :Press
Twhen
Lap Timer is displayed to start, stop, or reset
the lap timer. Press the thumbwheel while
the Lap Timer page is active to start the
timer. If the lap timer is active, pressing the
thumbwheel will stop the current lap timer
and start a new lap. Pressing the
thumbwheel within 10 seconds after
completing the last lap (Stop Lap Timer
option is displayed), the Lap Timer will stop.
Lap Timer (with PDR) : The lap times
recorded with the PDR system will
automatically be displayed in this window.
This only happens if a track has been
selected in the PDR system and a video
recording is started. See Performance Data
Recorder (PDR) 0130.
Maintenance
Press the thumbwheel to enter the
Maintenance menu. Scroll through the
available items. Oil Life :
Displays an estimate of the oil's
remaining useful life. If REMAINING OIL LIFE
99% is displayed, that means 99% of the
current oil life remains.
When the remaining oil life is low, the
CHANGE ENGINE OIL SOON message will
appear on the display. The oil should be
changed as soon as possible. See Engine Oil
(5.5L LT6 Engine) 0246 or
Engine Oil (6.2L LT2 Engine) 0249. In
addition to the engine oil life system
monitoring the oil life, additional
maintenance is recommended in the
Maintenance Schedule. See Maintenance
Schedule 0316.
The Oil Life display must be reset after each
oil change. It will not reset itself. Do not
reset the Oil Life display accidentally at any
time other than when the oil has just been
changed. It cannot be reset accurately until
the next oil change. To reset, see Engine Oil
Life System 0252.
Transmission Fluid Life : Displays an
estimate of the fluid's remaining useful life.
If REMAINING FLUID LIFE 99% is displayed,
that means 99% of the current fluid life
remains. When the remaining fluid life is low, the
CHANGE TRANSMISSION FLUID SOON
message will appear on the display. The
fluid should be changed as soon as possible.
See
Dual Clutch Transmission Fluid Life
System 0253. In addition to the
Transmission Fluid Life system monitoring
the fluid life, additional maintenance is
recommended in the Maintenance Schedule.
See Maintenance Schedule 0316.
The Fluid Life display must be reset after
each fluid change. It will not reset itself. Do
not reset the Fluid Life display accidentally
at any time other than when the fluid has
just been changed. It cannot be reset
accurately until the next fluid change. To
reset, see Dual Clutch Transmission Fluid Life
System 0253.
Transmission Filter Life : Displays an
estimate of the filter’s remaining useful life.
If REMAINING FILTER LIFE 99% is displayed,
that means 99% of the current filter life
remains.
When the remaining filter life is low, the
REPLACE TRANSMISSION FILTER SOON
message will appear on the display. The
external canister filter should be replaced as
soon as possible. See Dual Clutch
Transmission Fluid Life System 0253. In
Page 103 of 362
Chevrolet Corvette Owner Manual (GMNA-Localizing-U.S./Canada/Mexico-
17272984) - 2024 - CRC - 2/20/23
102 Instruments and Controls
addition to the Transmission Filter Life
system monitoring the filter life, additional
maintenance is recommended in the
Maintenance Schedule. SeeMaintenance
Schedule 0316.
The Transmission Filter Life display must be
reset after each filter replacement. It will
not reset itself. Do not reset the
Transmission Filter Life display accidentally
at any time other than when the filter has
just been replaced. It cannot be reset
accurately until the next filter change. To
reset, see Dual Clutch Transmission Fluid Life
System 0253.
Engine Life : Displays the total number of
hours the engine has run, and the total
number of hours the engine has sat idle.
It also shows total engine revolutions
divided by 10,000.
Air Filter Life : Shows an estimate of the
engine air filter’s remaining useful life and
the state of the system. Engine Air Filter Life
95% means 95% of the current air filter life
remains. Messages are displayed based on
the engine air filter life and the state of the
system. When the REPLACE AT NEXT OIL
CHANGE message displays, the engine air
filter should be replaced at the time of the next oil change. When the REPLACE NOW
message displays, the engine air filter
should be replaced as soon as possible.
Air filter life message states:
.Green
–OK
.Yellow –Replace at Next Oil Change
.Red –Replace Now, and Check System
Head-Up Display (HUD)
{Warning
If the HUD image is too bright, or too
high in your field of view, it may take
you more time to see things you need to
see when it is dark outside. Be sure to
keep the HUD image dim and placed low
in your field of view.
If equipped with HUD, some information
concerning the operation of the vehicle is
projected onto the windshield.
The HUD information appears as an image
focused out toward the front of the vehicle.
Caution
If you try to use the HUD image as a
parking aid, you may misjudge the
distance and damage your vehicle. Do not
use the HUD image as a parking aid.
The HUD information can be displayed in
various languages. The speedometer reading
and other numerical values can be displayed
in either English or metric units.
The language selection is changed through
the radio and the units of measurement are
changed through the instrument cluster. See
Settings 0142 and “Options” under
Instrument Cluster 081.
The HUD may display different alerts and
information for vehicles equipped with these
features:
.Speedometer
.Tachometer
.Manual Paddle Shift Gear Indicator
These displays on the HUD are for use
when using the manual paddle shift
controls to shift the transmission. See
“Manual Paddle Shift” inDual Clutch
Transmission 0184.
.G-Force Gauge
Page 167 of 362
Chevrolet Corvette Owner Manual (GMNA-Localizing-U.S./Canada/Mexico-
17272984) - 2024 - CRC - 2/20/23
166 Driving and Operating
Aerodynamics
Underbody Strake Inspection (For Z06
Vehicles With Spoiler Regular Production
Options (RPO) TOF or TOG)
Left Side Shown, Right Side Similar
For optimal aero performance, ensure the
front strakes are solidly attached to the
underbody and damage free. If not, replace
with service parts. Corvette Z06 and E-Ray Recommended
Aerodynamic Configurations
Rear Spoiler With Tall Wickers Shown, Short
Wickers Similar
Front Underwing Stall Gurney Flaps
Refer to the following table for setting up
the Z06 for optimized aerodynamic
performance. Street Driving targets the
lowest aerodynamic drag, whereas Track
Driving targets optimal downforce balance.
Setup will vary based on the vehicle’s
front splitter, front underwing, and rear
spoiler/wing configuration.
Page 168 of 362
Chevrolet Corvette Owner Manual (GMNA-Localizing-U.S./Canada/Mexico-
17272984) - 2024 - CRC - 2/20/23
Driving and Operating 167
RPO CodeStreet Driving - Recommended Aerodynamic
Configuration
Track Driving - Recommended Aerodynamic
Configuration
Front RearFront Rear
Z06 Front underwing stall Gurney flaps installed.
Front fascia aero cover
installed. Short rear spoiler wickers
installed. No rear lower
control arm brake duct.
Remove front underwing
stall Gurney flaps. Remove
front fascia aero cover.Install tall rear spoiler
wickers. Install rear lower
control arm brake duct.
Z06 and E-Ray with ZER and CFV/CFZ (Carbon
Fiber Ground Effects) Front underwing stall
Gurney flaps installed.
Front fascia aero cover
installed. Short rear spoiler wickers
installed. No rear lower
control arm brake duct.
Front underwing stall
Gurney flaps installed.
Remove front fascia aero
cover.Install tall rear spoiler
wickers. Install rear lower
control arm brake duct.
Z06 and CFV/CFZ
(Carbon Fiber Ground Effects) and T0G/T0F
(Carbon Aero Package) No front underwing stall
Gurney flaps. Front fascia
aero cover installed.
No rear lower control arm
brake duct.
No underwing stall Gurney
flaps. Remove front fascia
aero cover. Install four
underbody strakes.Install rear lower control
arm brake duct.
Z06 and Z07 No front underwing stall Gurney flaps. Front fascia
aero cover installed. No rear lower control arm
brake duct.
No underwing stall Gurney
flaps. Remove front fascia
aero cover. Install four
underbody strakes.Install rear lower control
arm brake duct.
Z06 and 5V5 Front underwing stall Gurney flaps installed.
Front fascia aero cover
installed. No rear lower control arm
brake duct.
Front underwing stall
Gurney flaps installed.
Remove front fascia aero
cover.Install rear lower control
arm brake duct.
Page 169 of 362
Chevrolet Corvette Owner Manual (GMNA-Localizing-U.S./Canada/Mexico-
17272984) - 2024 - CRC - 2/20/23
168 Driving and Operating
RPO CodeStreet Driving - Recommended Aerodynamic
Configuration
Track Driving - Recommended Aerodynamic
Configuration
Front RearFront Rear
E-Ray with ZER and XFR Tire Front underwing stall
Gurney flaps installed.
Front fascia aero cover
installed. Short rear spoiler (from
factory) installed. No rear
lower control arm
brake duct.No change.
Short rear spoiler (from
factory) installed. Install
lower control arm
brake duct.
Shock Spring Seat Adjustment
The front shocks, on vehicles without
hydraulic front lift and rear shocks, have
threaded spring seats that allow adjustment
of the preload on the coil springs. The
vehicle corner weights can be adjusted for
track use. If the vehicle trim height is
modified, it should be returned to normal
trim height before street use.
The spring seat can be adjusted
approximately 20 mm (0.8 in) up or down
from the nominal position. Each complete
turn of the spring seat will change the
vehicle height approximately 1.5 mm
(0.06 in). When adjusting the seat to the
upper limit, lift the dust boot and ensure
the seat does not thread off the center
support tube (stop adjustment when threads no longer visible). When adjusting the seat
to the lower limit, leave approximately
10 mm (0.4 in) of thread visible for the
lower lock nut to have full thread
engagement.
The following procedure can be complex and
should only be performed by trained
personnel. See your dealer.
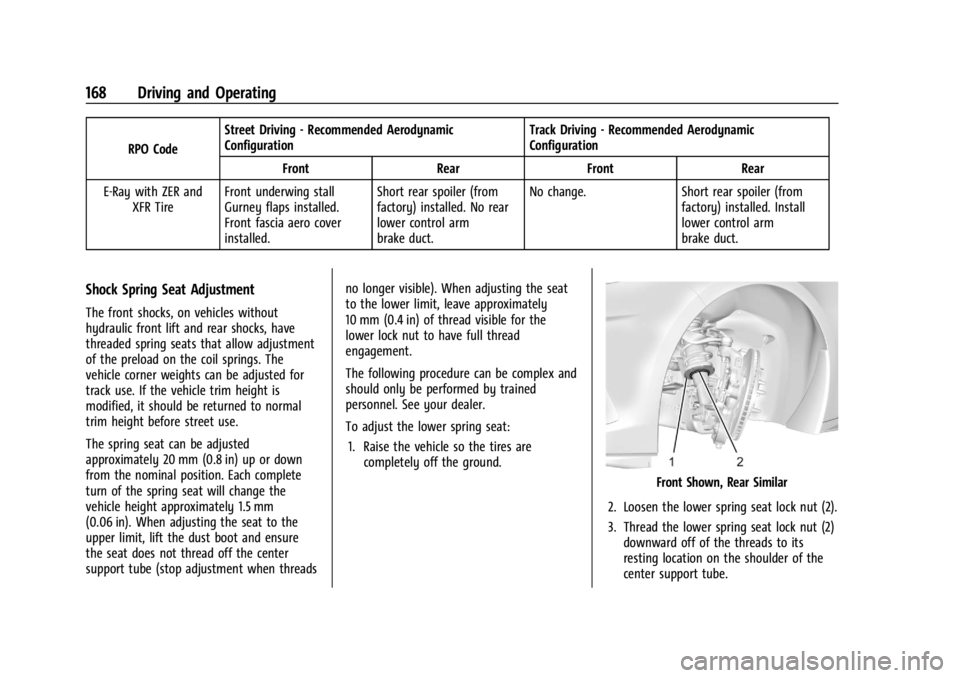
To adjust the lower spring seat:
1. Raise the vehicle so the tires are completely off the ground.
Front Shown, Rear Similar
2. Loosen the lower spring seat lock nut (2).
3. Thread the lower spring seat lock nut (2) downward off of the threads to its
resting location on the shoulder of the
center support tube.
Page 178 of 362
Chevrolet Corvette Owner Manual (GMNA-Localizing-U.S./Canada/Mexico-
17272984) - 2024 - CRC - 2/20/23
Driving and Operating 177
Starting and Operating
New Vehicle Break-In
Follow these recommended guidelines
during the first 2 414 km (1,500 mi) of driving
this vehicle. Parts have a break-in period and
performance will be better in the long run.
During the first 800 km (500 mi), engine
torque will be limited in low gears.
To remove the engine torque limitation after
the initial 500-mile break-in period, turn the
vehicle off, and open and close the driver
door. Ensure all doors are closed for
15 minutes.
For the first 322 km (200 mi):
.To break in new tires, drive at moderate
speeds and avoid hard cornering.
.New brake linings also need a break-in
period. Avoid making hard stops. This is
recommended every time brake linings
are replaced.
For the first 800 km (500 mi):
.Avoid full throttle starts and abrupt stops.
.Do not exceed 4000 rpm.
.Avoid driving at any one constant speed,
fast or slow, including the use of cruise
control.
.Avoid downshifting to brake or slow the
vehicle when the engine speed will
exceed 4000 rpm.
.Do not let the engine labor. Never lug the
engine. This rule applies at all times, not
just during the break-in period.
For the first 2 414 km (1,500 mi):
.Do not participate in track events, sport
driving schools, or similar activities.
.Check engine oil with every refueling and
add if necessary. Oil and fuel
consumption may be higher than normal.
Front Air Dam (and Splitter)
If equipped, the front air dam and splitter
have minimal ground clearance.
Under normal operation, the components
will occasionally contact some road surfaces
(speed bumps, driveway ramps, etc.). This
can be heard inside the vehicle as a scraping
noise. This is normal and does not indicate a
problem.
Use care when approaching bumps or
objects on road surfaces and avoid them
when possible.
If equipped, the Front Lift System may be
used to increase front air dam or splitter
clearance. See Front Lift System 0205.
Composite Materials
This vehicle may be equipped with parts
containing carbon fiber, sheet-molding
compound, or other composite materials.
Dealer-installed accessories may also contain
composite materials. These parts and
accessories may include the splitter or rocker
extensions.
{Warning
Exposed edges of parts containing carbon
fiber and other composite materials can
be sharp. Contact with these parts could
result in injury. Use caution to avoid
contacting these parts, including when
washing the vehicle. If the parts are
damaged, replace the parts promptly
with replacements from your dealer.
{Warning
Rocker extensions may break under
pressure, resulting in property damage or
injury. Do not stand on the rocker
extension or use it as a step.
Page 229 of 362
Chevrolet Corvette Owner Manual (GMNA-Localizing-U.S./Canada/Mexico-
17272984) - 2024 - CRC - 2/20/23
228 Driving and Operating
Fuels in Foreign Countries
The U.S., Canada, and Mexico post fuel
octane ratings in anti-knock index (AKI). For
fuel not to use in a foreign country, see
Prohibited Fuels0227.
Fuel Additives
TOP TIER Detergent Gasoline is highly
recommended for use with your vehicle.
If your country does not have TOP TIER
Detergent Gasoline, add ACDelco Fuel
System Treatment Plus−Gasoline to the
vehicle’s gasoline fuel tank at every oil
change or 15 000 km (9,000 mi), whichever
occurs first. TOP TIER Detergent Gasoline and
ACDelco Fuel System Treatment Plus
−Gasoline will help keep your vehicle’s
engine fuel deposit free and performing
optimally.
Filling the Tank
An arrow on the fuel gauge indicates which
side of the vehicle the fuel door is on. See
Fuel Gauge 086.
{Warning
Fuel vapors and fuel fires burn violently
and can cause injury or death.
Follow these guidelines to help avoid
injuries to you and others:
.Read and follow all the instructions on
the fuel pump island.
.Turn off the engine when refueling.
.Keep sparks, flames, and smoking
materials away from fuel.
.Do not leave the fuel pump
unattended.
.Avoid using electronic devices while
refueling.
.Do not re-enter the vehicle while
pumping fuel.
.Keep children away from the fuel
pump and never let children
pump fuel.
.Before touching the fill nozzle, touch a
metallic object to discharge static
electricity from your body.
(Continued)
Warning (Continued)
.Fuel can spray out if the fill nozzle is
inserted too quickly. This spray can
happen if the tank is nearly full, and is
more likely in hot weather. Insert the
fill nozzle slowly and wait for any hiss
noise to stop before beginning to
flow fuel.
The fuel door unlocks when the vehicle
doors are unlocked. See Remote Key
Operation 07.
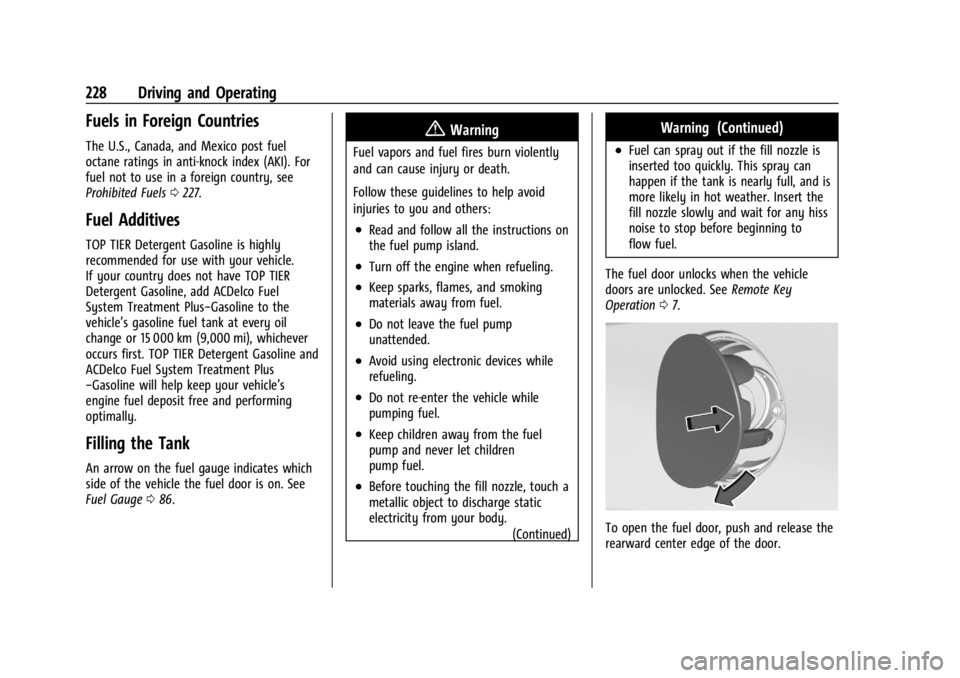
To open the fuel door, push and release the
rearward center edge of the door.
Page 248 of 362
Chevrolet Corvette Owner Manual (GMNA-Localizing-U.S./Canada/Mexico-
17272984) - 2024 - CRC - 2/20/23
Vehicle Care 247
4. Remove the dipstick again and read thelevel on the cross-hatched area. Re-insert
the dipstick and push it all the way in
until it stops.
5. Turn the engine off.
When to Add Engine Oil
If the oil is below the cross-hatched area at
the tip of the dipstick, add 1 L (1 qt) of the
recommended oil through the oil fill cap
opening in the oil tank fill tube and then
recheck the level. See “Selecting the Right
Engine Oil” later in this section for the type
of oil to use. For engine oil crankcase
capacity, see Capacities and Specifications
0 325.
Caution
Do not add too much oil. Oil levels above
or below the acceptable operating range
shown on the dipstick are harmful to the
engine. If the oil level is above the
operating range (i.e., the engine has so
much oil that the oil level gets above the
cross-hatched area that shows the proper
operating range), the engine could be
damaged. Drain the excess oil or limit
driving of the vehicle, and seek a service
professional to remove the excess oil.
See Engine Compartment Overview 0238 for
the location of the external engine oil tank
dipstick and fill cap.
Add enough oil to put the level somewhere
in the proper operating range. Push the
dipstick all the way back into the oil tank
tube when finished.
Changing the Engine Oil and Filter
The vehicle requires a special procedure
when changing the engine oil and filter.
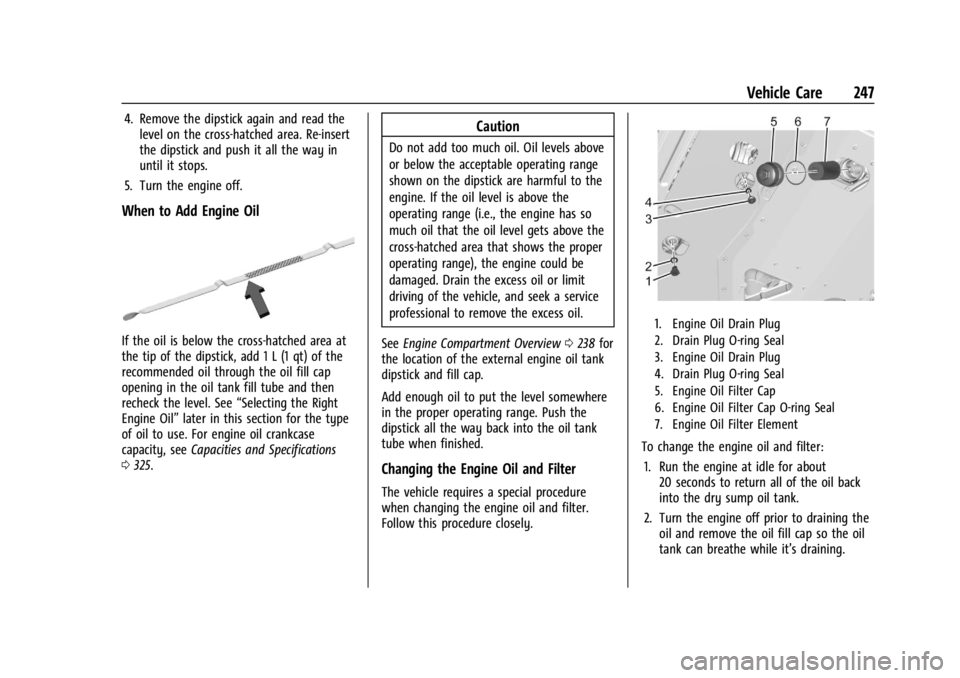
Follow this procedure closely.
1. Engine Oil Drain Plug
2. Drain Plug O-ring Seal
3. Engine Oil Drain Plug
4. Drain Plug O-ring Seal
5. Engine Oil Filter Cap
6. Engine Oil Filter Cap O-ring Seal
7. Engine Oil Filter Element
To change the engine oil and filter:
1. Run the engine at idle for about 20 seconds to return all of the oil back
into the dry sump oil tank.
2. Turn the engine off prior to draining the oil and remove the oil fill cap so the oil
tank can breathe while it’s draining.