2024 CHEVROLET CORVETTE change time
[x] Cancel search: change timePage 115 of 362
Chevrolet Corvette Owner Manual (GMNA-Localizing-U.S./Canada/Mexico-
17272984) - 2024 - CRC - 2/20/23
114 Lighting
Engine Compartment Lamp
Your vehicle may be equipped with an
engine compartment lamp. The vehicle must
be in P (Park) and it must be dark outside
for the engine compartment to activate.
The engine compartment lamp will turn on
briefly when:
.Kis pressed on the remote key.
.Keyless Access is used to unlock the door.
.Any door is opened.
.The engine compartment hatch is opened.
.The vehicle is remote started.
The engine compartment lamp will turn
off when:
.The vehicle begins to move after shifting
out of P (Park).
.It is bright outside.
.All doors and the engine compartment
hatch are closed.
.Qis pressed on the remote key.
If any door, or the engine compartment
hatch/trunk remains open while the vehicle
is off, a timer will turn the lamp off.
Lighting Features
Entry Lighting
The interior lamps turn on when pressingK
on the remote key or opening any doors,
and the dome lamp control is in the door
position.
Some exterior lamps also turn on when
pressing
Kon the remote key or opening
any doors. Low-Beam lamps will only turn
on briefly at night, or in areas with limited
lighting.
All lamps will gradually fade out after about
30 seconds.
Entry lighting can be disabled manually by
closing all doors, pressing
Qon the remote
key, or starting the vehicle.
This feature can be changed. On the
infotainment home screen, select Settings
T
VehicleTVehicle Locator Lights.
Exit Lighting
Some exterior lamps and interior lamps turn
on when the driver door is opened after the
vehicle is turned off.
The exterior and interior lamps remain on
for a set amount of time, then automatically
turn off.
The interior lights turn on when the vehicle
is turned off.
The exterior lamps turn off immediately by
turning the exterior lamp control off.
This feature can be changed. On the
infotainment home screen, select Settings
T
VehicleTExit Lighting.
Battery Power Protection
This feature helps prevent the battery from
being drained, if the interior courtesy lamps
or reading lamps are accidentally left on.
If any of these lamps are left on, they
automatically turn off after 10 minutes,
if the ignition is off. The lamps will not
come back on again until one of the
following occurs:
.The ignition is turned on.
.The doors are closed and then re-opened.
Page 126 of 362
Chevrolet Corvette Owner Manual (GMNA-Localizing-U.S./Canada/Mexico-
17272984) - 2024 - CRC - 2/20/23
Infotainment System 125
USB Audio
To play music via USB:1. On the audio now playing page, touch source and select USB.
2. If there is no device connected, follow the screen prompts to connect the
device.
3. Supported media content will appear on the display.
Auxiliary Jack
If equipped, this vehicle has an auxiliary
input jack in the center console. Possible
auxiliary audio sources include:
.Laptop computer
.Audio music player
This jack is not an audio output. Do not
plug headphones into the auxiliary input
jack. Set up an auxiliary device while the
vehicle is in P (Park).
Connect a 3.5 mm (1/8 in) cable from the
auxiliary device to the auxiliary input jack.
When a device is connected, the system can
play audio from the device over the vehicle
speakers. If an auxiliary device has already been
connected, but a different source is currently
active, touch More and then touch AUX to
make the source active.
Shuffle and Browse are not available in the
AUX source menu.
Bluetooth Audio
Music may be played from a connected
Bluetooth device.
Volume and song selection may be
controlled by using the infotainment
controls. If Bluetooth is selected and no
volume is present, check the volume setting
on the infotainment system or the
connected phone.
To play music via Bluetooth:
1. On the audio now playing page, touch source and select the desired Bluetooth
device.
2. If there is no device connected, follow the screen prompts to pair the device.
3. Supported media content will appear on the display. Manage Bluetooth Devices
Managing Bluetooth devices allows you to
add, delete, or select another paired device.
Only one Bluetooth device can be active at
a time.
Some smartphones support sending
Bluetooth music information to display on
the radio. When the radio receives this
information, it will check to see if any is
available and display it. For more
information about supported Bluetooth
features, visit your brand website. See
Online Account
0332 for details.
See Radio Frequency Statement 0337.
Navigation
Using the Navigation System
The Navigation software is provided by
Google Maps. The information provided in
this section is a general overview and is
subject to change. For the latest functional
information, see g.co/mapsincar.
Accept the Terms and Conditions to use.
Page 129 of 362
Chevrolet Corvette Owner Manual (GMNA-Localizing-U.S./Canada/Mexico-
17272984) - 2024 - CRC - 2/20/23
128 Infotainment System
Traffic Layers1. Open Google Maps.
2. Touch the settings icon.
3. Toggle between Traffic on or off.
Global Positioning System (GPS)
The current position of the vehicle is
determined by using satellite signals and
various vehicle signals.
At times, other interference such as the
satellite condition, road configuration,
condition of the vehicle, and/or other
circumstances can affect the navigation
system's ability to determine the accurate
position of the vehicle.
This system might not be available or
interference can occur if any of the
following are true:
.Signals are obstructed by tall buildings,
trees, large trucks, or a tunnel.
.Satellites are being repaired or improved.
For more information if the GPS is not
functioning properly, see Problems with
Route Guidance 0128.
Vehicle Positioning
At times, the position of the vehicle on the
map could be inaccurate due to one or more
of the following reasons:
.The road system has changed.
.The vehicle is driving on slippery road
surfaces such as sand, gravel, or snow.
.The vehicle is traveling on winding roads
or long, straight roads.
.The vehicle is approaching a tall building
or a large vehicle.
.The surface streets run parallel to a
freeway.
.The vehicle has been transferred by a
vehicle carrier or a ferry.
.The current position calibration is set
incorrectly.
.The vehicle is traveling at high speed.
.The vehicle changes directions more than
once, or the vehicle is turning on a turn
table in a parking lot.
.The vehicle is entering and/or exiting a
parking lot, garage, or a lot with a roof.
.The GPS signal is not received.
.A roof carrier is installed on the vehicle.
.Tire chains are installed on the vehicle.
.The tires are replaced or worn.
.The tire pressure for the tires is incorrect.
.This is the first navigation use after the
map data is updated.
.The 12-volt battery has been disconnected
for several days.
.The vehicle is driving in heavy traffic
where driving is at low speeds, and the
vehicle is stopped and started repeatedly.
Problems with Route Guidance
Inappropriate route guidance can occur
under one or more of the following
conditions:
.The turn was not made on the road
indicated.
.Route guidance might not be available
when using automatic rerouting for the
next right or left turn.
.The route might not be changed when
using automatic rerouting.
.There is no route guidance when turning
at an intersection.
.Automatic rerouting might display a route
returning to the set waypoint if heading
for a destination without passing through
a set waypoint.
Page 130 of 362
Chevrolet Corvette Owner Manual (GMNA-Localizing-U.S./Canada/Mexico-
17272984) - 2024 - CRC - 2/20/23
Infotainment System 129
.The route prohibits the entry of a vehicle
due to a regulation by time or season or
any other regulation which may be given.
.Some routes might not be searched.
.The route to the destination might not be
shown if there are new roads, if roads
have recently changed, or if certain roads
are not listed in Maps.
To recalibrate the vehicle's position on the
map, park with the vehicle running for two
to five minutes, until the vehicle position
updates. Make sure the vehicle is parked in
a location that is safe and has a clear view
of the sky and away from large
obstructions.
Voice Recognition
If equipped, Google Assistant allows for
hands-free use of media and messaging,
navigation and climate control functionality
in the vehicle. This feature can be started by
pressing
gon the steering wheel, touching
Google Assistant on the Home screen, or by
using the wake up words “Hey Google”or
“OK Google.”
However, not all features within these areas
are supported by voice commands and
requires the user to have a valid data subscription plan or connected to WiFi in
order to use some of the Google Assistant
features.
Using Voice Recognition
Voice recognition becomes available once
the system is initialized. This begins when
the vehicle is turned on. Initialization may
take a few moments.
1. Press
gon the steering wheel controls,
touch Google Assistant on the Home
screen, or use the wake up words “Hey
Google” or“OK Google” to activate voice
recognition. Google Assistant must be set
as the Default Assistant for the
gand
the wake word options to work.
2. Clearly speak one of the commands described later in this section.
Canceling Google Assistant
.Presscon the steering wheel controls
to cancel the Google Assistant request.
Helpful Hints for Speaking Commands
Voice recognition identifies commands that
are naturally stated in sentence form,
or direct commands that state the
application and the task. For best results:
.Speak the command naturally, not too
fast, not too slow.
.Use direct commands without a lot of
extra words. For example,
“Call
at work,” “Play” followed by the artist or
song name, or “Play”followed by the
radio station number.
Direct commands are more clearly
understood by the system. An example of a
direct command is “Dial
If a cell phone number was saved with a
name and a place, the direct command
should include both. For example “Call
Voice Recognition for the Radio
When voice is started, the voice recognition
commands for AM, FM, SiriusXM (if
equipped), and media apps (if supported) are
available.
“Play
radio station frequency identified in the
command (like “nine fifty”).
“Play
radio station frequency identified in the
command (like “one oh one point one”).
Page 135 of 362
Chevrolet Corvette Owner Manual (GMNA-Localizing-U.S./Canada/Mexico-
17272984) - 2024 - CRC - 2/20/23
134 Infotainment System
Once the Timing Overlay is selected, touch
Configure in the lower right corner to
choose which performance timing metrics
you would like to display on the Timing
Video Overlay.
.0–100 km/h (0–60 mph)
.0–200 km/h (0–100 mph)
.0–200–0 km/h (0–100–0 mph)
.400 m (1/4 Mile Timer)
.Custom Speed Timer
The timer starts recording as soon as the
vehicle accelerates. As the vehicle passes
each speed and distance milestone, it is
displayed on the overlay.
Lap Timing
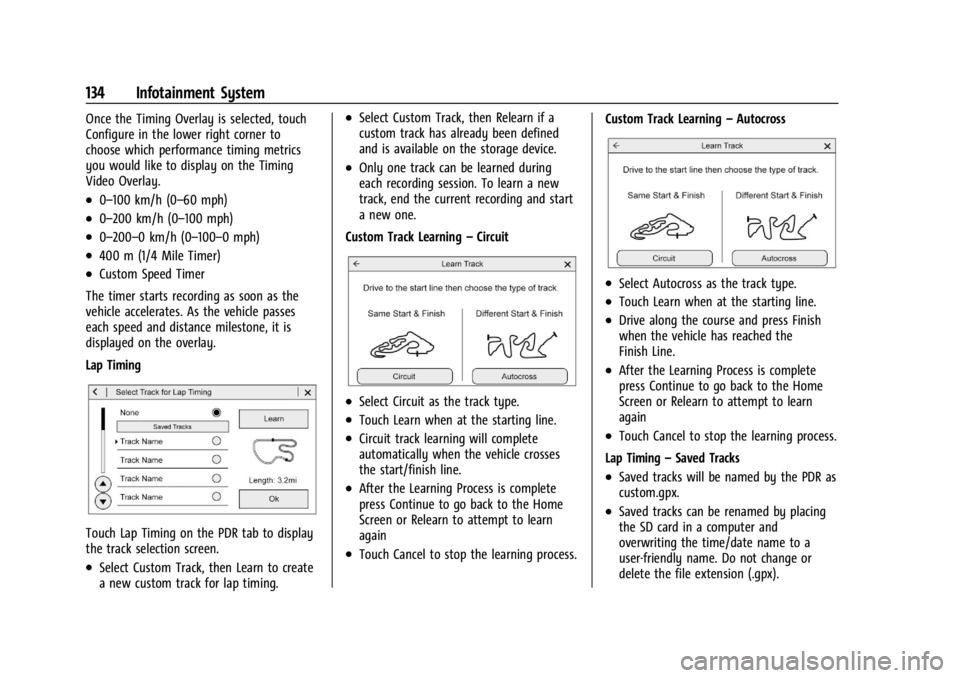
Touch Lap Timing on the PDR tab to display
the track selection screen.
.Select Custom Track, then Learn to create
a new custom track for lap timing.
.Select Custom Track, then Relearn if a
custom track has already been defined
and is available on the storage device.
.Only one track can be learned during
each recording session. To learn a new
track, end the current recording and start
a new one.
Custom Track Learning –Circuit
.Select Circuit as the track type.
.Touch Learn when at the starting line.
.Circuit track learning will complete
automatically when the vehicle crosses
the start/finish line.
.After the Learning Process is complete
press Continue to go back to the Home
Screen or Relearn to attempt to learn
again
.Touch Cancel to stop the learning process. Custom Track Learning
–Autocross
.Select Autocross as the track type.
.Touch Learn when at the starting line.
.Drive along the course and press Finish
when the vehicle has reached the
Finish Line.
.After the Learning Process is complete
press Continue to go back to the Home
Screen or Relearn to attempt to learn
again
.Touch Cancel to stop the learning process.
Lap Timing –Saved Tracks
.Saved tracks will be named by the PDR as
custom.gpx.
.Saved tracks can be renamed by placing
the SD card in a computer and
overwriting the time/date name to a
user-friendly name. Do not change or
delete the file extension (.gpx).
Page 136 of 362
Chevrolet Corvette Owner Manual (GMNA-Localizing-U.S./Canada/Mexico-
17272984) - 2024 - CRC - 2/20/23
Infotainment System 135
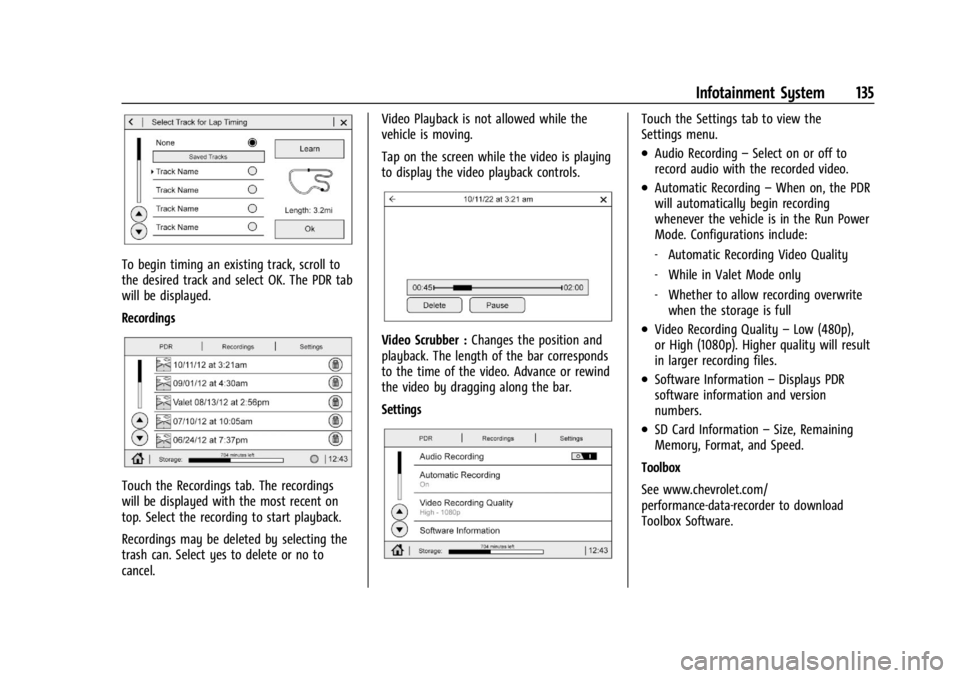
To begin timing an existing track, scroll to
the desired track and select OK. The PDR tab
will be displayed.
Recordings
Touch the Recordings tab. The recordings
will be displayed with the most recent on
top. Select the recording to start playback.
Recordings may be deleted by selecting the
trash can. Select yes to delete or no to
cancel.Video Playback is not allowed while the
vehicle is moving.
Tap on the screen while the video is playing
to display the video playback controls.
Video Scrubber :
Changes the position and
playback. The length of the bar corresponds
to the time of the video. Advance or rewind
the video by dragging along the bar.
Settings
Touch the Settings tab to view the
Settings menu.
.Audio Recording –Select on or off to
record audio with the recorded video.
.Automatic Recording –When on, the PDR
will automatically begin recording
whenever the vehicle is in the Run Power
Mode. Configurations include:
‐ Automatic Recording Video Quality
‐ While in Valet Mode only
‐ Whether to allow recording overwrite
when the storage is full
.Video Recording Quality –Low (480p),
or High (1080p). Higher quality will result
in larger recording files.
.Software Information –Displays PDR
software information and version
numbers.
.SD Card Information –Size, Remaining
Memory, Format, and Speed.
Toolbox
See www.chevrolet.com/
performance-data-recorder to download
Toolbox Software.
Page 138 of 362

Chevrolet Corvette Owner Manual (GMNA-Localizing-U.S./Canada/Mexico-
17272984) - 2024 - CRC - 2/20/23
Infotainment System 137
this option and the Phones screen will
display. See“Pairing a Phone” later in this
section.
.A Bluetooth smartphone with music
capability can be paired to the vehicle as
a smartphone and a music player at the
same time.
.Up to 10 devices can be paired to the
Bluetooth system.
.The pairing process is disabled when the
vehicle is moving.
.Pairing only needs to be completed once,
unless the pairing information on the cell
phone changes or the cell phone is
deleted from the system.
.If multiple paired cell phones are within
range of the system, the system connects
to the paired cell phone that is set to
First to Connect. If there is no cell phone
set to First to Connect, it will link to the
cell phone which was used last. To link to
a different paired cell phone, see “Linking
to a Different Phone” later in this section.
Pairing a Phone 1. Make sure Bluetooth has been enabled on the cell phone before starting the
pairing process. 2. Touch the Phone icon on the Home Page.
3. If no mobile device is connected, touch
Manage Phones and the Phones screen
will display.
If another mobile device is connected
already, touch Settings, Connections, and
then Phones.
4. Touch Add Phone. If a previously added phone is
disconnected, the “Add Phone”card will
just be a “+”card.
5. Follow the on-screen prompts to pair the cell phone.
6. Follow the instructions on the cell phone to confirm the six-digit code showing on
the infotainment display and touch Pair.
The code on the cell phone and
infotainment display needs to be
acknowledged for a successful pair.
7. Start the pairing process on the cell phone to be paired to the vehicle. See
the cell phone manufacturer's user guide
for information on this process. Once the
cell phone is paired, it will show as
Connected. 8. If the vehicle name does not appear on
your cell phone, there are a few ways to
start the pairing process over:
.Make sure there is not an entry for
the vehicle under the previously
connected list. If the vehicle and cell
phone were previously paired and
one still remembers the other, it will
not identify as a new device when
searching.
.Turn the Bluetooth off and on the
device.
.Go back to the beginning of the
Phone menus on the infotainment
display and restart the pairing
process.
.Turn the cell phone off and then
back on.
.Reset the cell phone, but this step
should be done as a last effort.
9. If the cell phone prompts to accept connection or allow phone book
download, touch Always Accept and
Allow. The phone book may not be
available if not accepted.
10. To pair additional cell phones, touch Settings, Connections, and then Phones.
Page 141 of 362
Chevrolet Corvette Owner Manual (GMNA-Localizing-U.S./Canada/Mexico-
17272984) - 2024 - CRC - 2/20/23
140 Infotainment System
.Touch Answer on the infotainment
display.
Declining a Call
There are two ways to decline a call:
.Presscon the steering wheel controls.
.Touch Decline on the infotainment
display.
Call Waiting
Call waiting must be supported on the
Bluetooth cell phone and enabled by the
wireless service carrier to work.
Accepting a Call
Press
gto answer, then touch Switch on
the infotainment display.
Declining a Call
Press
cto decline, then touch Decline on
the infotainment display.
Switching Between Calls (Call Waiting
Calls Only)
To switch between calls, touch Phone on the
Home Page to display Call View. While in
Call View, touch the call information of the
call on hold to change calls.
Ending a Call
.Presscon the steering wheel controls.
.Touch#on the infotainment display,
next to a call, to end only that call.
Dual Tone Multi-Frequency (DTMF) Tones
The in-vehicle Bluetooth system can send
numbers during a call. This is used when
calling a menu-driven phone system. Use the
Keypad to enter the number.
Apple CarPlay and Android Auto
If equipped, Android Auto and/or Apple
CarPlay capability may be available through
a compatible smartphone. If available, the
Android Auto and Apple CarPlay icons will
change from gray to color on the Home
Page of the infotainment display.
To use Android Auto and/or Apple CarPlay:
For Wired Phone Projection
1. Download the Android Auto app to your smartphone from the Google Play store
for phones running Android 9 and below.
There is no app required for Apple
CarPlay. 2. Connect your Android phone or Apple
iPhone by using the factory-provided
phone USB cable and plugging into a
USB data port. For best performance, it is
highly recommended to use the device’s
factory-provided USB cable, which should
be replaced after significant wear to
maintain connection quality. Aftermarket
or third-party cables may not work.
3. When the phone is first connected to activate Apple CarPlay or Android Auto,
accept the terms and conditions on both
the infotainment system and the phone.
4. Follow the instructions on the phone.
The Android Auto and Apple CarPlay icons
on the Home Page will illuminate depending
on the smartphone. Android Auto and/or
Apple CarPlay may automatically launch the
next time the USB is connected. If not,
touch the Android Auto or Apple CarPlay
icon on the Home Page to launch.
Press
{on the center stack to return to the
Home Page.
For Wireless Phone Projection
Verify your phone is wireless compatible by
visiting the Android Auto or Apple CarPlay
support page.