2024 CHEVROLET CORVETTE belt
[x] Cancel search: beltPage 68 of 362
Chevrolet Corvette Owner Manual (GMNA-Localizing-U.S./Canada/Mexico-
17272984) - 2024 - CRC - 2/20/23
Seats and Restraints 67
When securing an add-on child restraint,
refer to the following:
.Instruction labels provided on the child
restraint
.Instruction manual provided with the
child restraint
.This vehicle owner's manual
The child restraint instructions are
important, so if they are not available,
obtain a replacement copy from the
manufacturer.
Keep in mind that an unsecured child
restraint can move around in a collision or
sudden stop and injure people in the vehicle.
Be sure to properly secure any child
restraint in the vehicle —even when no
child is in it.
In some areas of the United States and
Canada, Certified Child Passenger Safety
Technicians (CPSTs) are available to inspect
and demonstrate how to correctly use and
install child restraints. In the U.S., refer to
the National Highway Traffic Safety
Administration (NHTSA) website to locate
the nearest child safety seat inspection
station. For CPST availability in Canada,
check with Transport Canada or the
Provincial Ministry of Transportation office.
Securing the Child Within the Child
Restraint
{Warning
A child can be seriously injured or killed
in a crash if the child is not properly
secured in the child restraint. Secure the
child properly following the instructions
that came with that child restraint.
Lower Anchors and Tethers for
Children (LATCH System)
Some child restraints have a LATCH system.
As part of the LATCH system, your child
restraint may have lower attachments
and/or a top tether. The LATCH system can
help hold the child restraint in place during
driving or in a crash. Some vehicles have
lower and/or top tether anchors designed to
secure a child restraint with lower
attachments and/or a top tether.
Some child restraints with a top tether are
designed to be used whether the top tether
is anchored or not. Other child restraints
require that the top tether be anchored.
A national or local law may require that the
top tether be anchored. In Canada, the law requires that
forward-facing child restraints have a top
tether, and that the tether be attached.
Your vehicle does not have lower anchors or
top tether anchors to secure a child restraint
with the LATCH system. If a national or local
law requires that your top tether be
anchored, do not use a child restraint in this
vehicle because a top tether cannot be
properly anchored. You must use the seat
belts to secure your child restraint in this
vehicle, unless a national or local law
requires that the top tether be anchored.
Refer to the child restraint instructions and
instructions in this manual for securing a
child restraint using the vehicle's seat belts.
See
Securing Child Restraints 067.
Securing Child Restraints
This vehicle has airbags. In addition, the
vehicle has a passenger sensing system
which is designed to turn off the front
outboard passenger frontal airbag under
certain conditions. See Passenger Sensing
System 057 and
Passenger Airbag Status Indicator 089 for
more information, including important
safety information.
Page 69 of 362
Chevrolet Corvette Owner Manual (GMNA-Localizing-U.S./Canada/Mexico-
17272984) - 2024 - CRC - 2/20/23
68 Seats and Restraints
Never put a rear-facing child seat in the
front. This is because the risk to the
rear-facing child is so great if the airbag
deploys.
{Warning
A child in a rear-facing child restraint can
be seriously injured or killed if the front
outboard passenger frontal airbag
inflates. This is because the back of the
rear-facing child restraint would be very
close to the inflating airbag. A child in a
forward-facing child restraint can be
seriously injured or killed if the front
outboard passenger frontal airbag inflates
and the passenger seat is in a forward
position.
Even if the passenger sensing system has
turned off the front outboard passenger
frontal airbag, no system is fail-safe. No
one can guarantee that an airbag will not
deploy under some unusual circumstance,
even though it is turned off.
Secure rear-facing child restraints in a
rear seat, even if the airbag is off. If you
secure a forward-facing child restraint in
the front outboard passenger seat,(Continued)
Warning (Continued)
always move the seat as far back as it
will go. It is better to secure the child
restraint in a rear seat.
SeePassenger Sensing System 057 for
additional information.
Rear-facing child restraints should not be
installed in the vehicle, even if the airbag
is off.
Do not secure a child seat in a position
without a top tether anchor if a national or
local law requires that the top tether be
anchored, or if the instructions that come
with the child restraint say that the top
tether must be anchored.
In Canada, the law requires that
forward-facing child restraints have a top
tether, and that the tether be attached.
When using the lap-shoulder belt to secure
the child restraint in this position, follow the
instructions that came with the child
restraint and the following instructions: 1. Move the seat as far back as it will go before securing the forward-facing child
restraint. Move the seat upward or the
seatback to an upright position, if needed, to get a tight installation of
the child restraint. There must be finger
clearance between the release
pushbutton and the child restraint.
When the passenger sensing system has
turned off the front outboard passenger
frontal airbag, the OFF indicator on the
passenger airbag status indicator should
light and stay lit when you start the
vehicle. See
Passenger Airbag Status
Indicator 089.
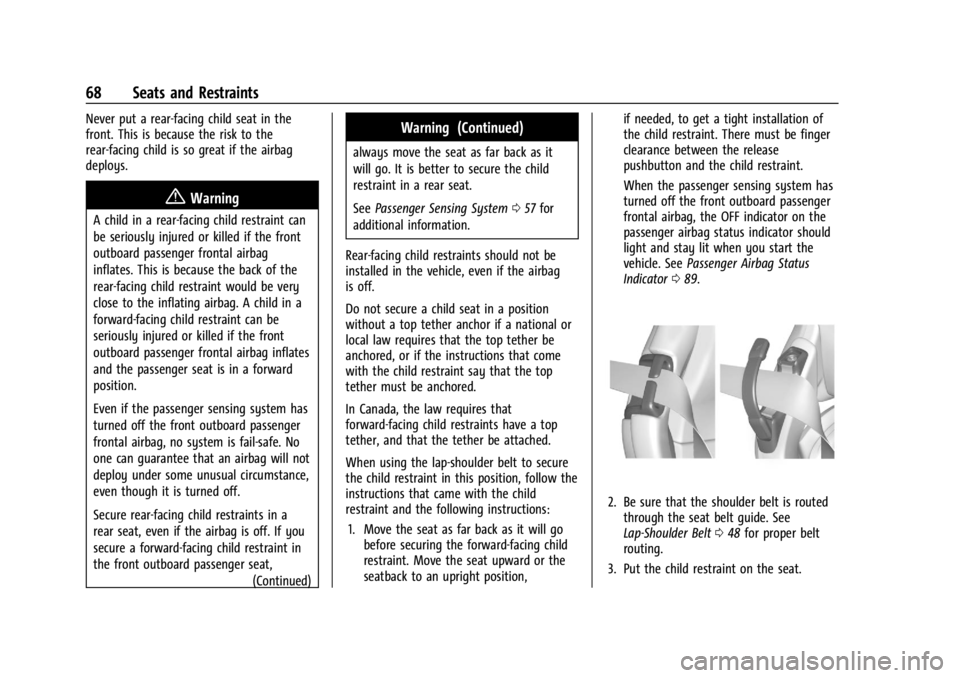
2. Be sure that the shoulder belt is routed
through the seat belt guide. See
Lap-Shoulder Belt 048 for proper belt
routing.
3. Put the child restraint on the seat.
Page 70 of 362
Chevrolet Corvette Owner Manual (GMNA-Localizing-U.S./Canada/Mexico-
17272984) - 2024 - CRC - 2/20/23
Seats and Restraints 69
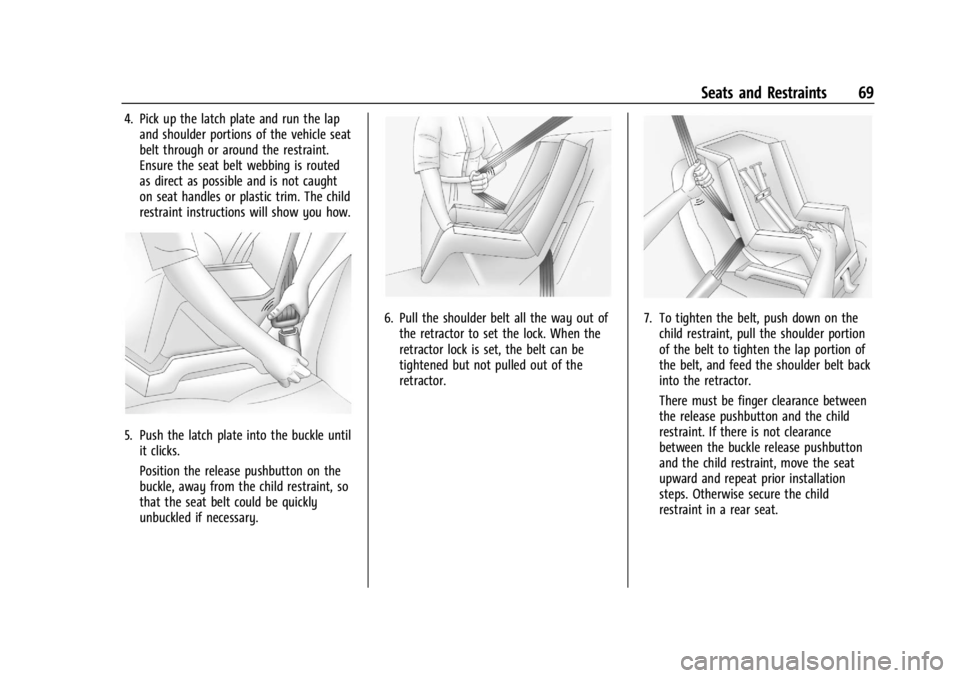
4. Pick up the latch plate and run the lapand shoulder portions of the vehicle seat
belt through or around the restraint.
Ensure the seat belt webbing is routed
as direct as possible and is not caught
on seat handles or plastic trim. The child
restraint instructions will show you how.
5. Push the latch plate into the buckle untilit clicks.
Position the release pushbutton on the
buckle, away from the child restraint, so
that the seat belt could be quickly
unbuckled if necessary.
6. Pull the shoulder belt all the way out ofthe retractor to set the lock. When the
retractor lock is set, the belt can be
tightened but not pulled out of the
retractor.7. To tighten the belt, push down on thechild restraint, pull the shoulder portion
of the belt to tighten the lap portion of
the belt, and feed the shoulder belt back
into the retractor.
There must be finger clearance between
the release pushbutton and the child
restraint. If there is not clearance
between the buckle release pushbutton
and the child restraint, move the seat
upward and repeat prior installation
steps. Otherwise secure the child
restraint in a rear seat.
Page 71 of 362
Chevrolet Corvette Owner Manual (GMNA-Localizing-U.S./Canada/Mexico-
17272984) - 2024 - CRC - 2/20/23
70 Seats and Restraints
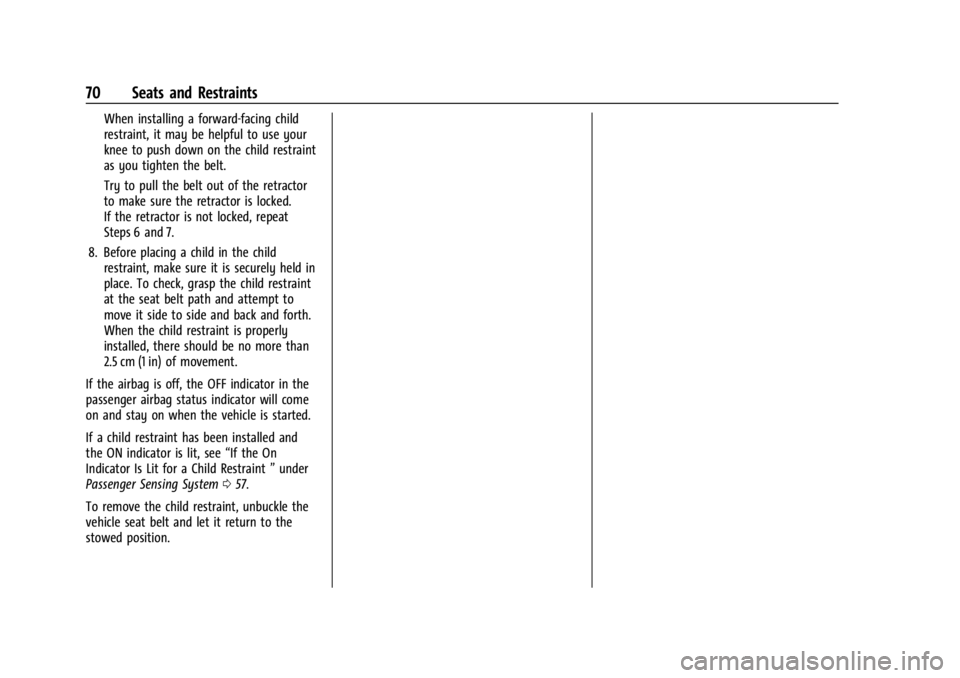
When installing a forward-facing child
restraint, it may be helpful to use your
knee to push down on the child restraint
as you tighten the belt.
Try to pull the belt out of the retractor
to make sure the retractor is locked.
If the retractor is not locked, repeat
Steps 6 and 7.
8. Before placing a child in the child restraint, make sure it is securely held in
place. To check, grasp the child restraint
at the seat belt path and attempt to
move it side to side and back and forth.
When the child restraint is properly
installed, there should be no more than
2.5 cm (1 in) of movement.
If the airbag is off, the OFF indicator in the
passenger airbag status indicator will come
on and stay on when the vehicle is started.
If a child restraint has been installed and
the ON indicator is lit, see “If the On
Indicator Is Lit for a Child Restraint ”under
Passenger Sensing System 057.
To remove the child restraint, unbuckle the
vehicle seat belt and let it return to the
stowed position.
Page 75 of 362

Chevrolet Corvette Owner Manual (GMNA-Localizing-U.S./Canada/Mexico-
17272984) - 2024 - CRC - 2/20/23
74 Instruments and Controls
Instruments and Controls
Controls
Steering Wheel Adjustment . . . . . . . . . . . . . 75
Heated Steering Wheel . . . . . . . . . . . . . . . . . 75
Horn . . . . . . . . . . . . . . . . . . . . . . . . . . . . . . . . . . . . 75
Windshield Wiper/Washer . . . . . . . . . . . . . . 75
Compass . . . . . . . . . . . . . . . . . . . . . . . . . . . . . . . 76
Clock . . . . . . . . . . . . . . . . . . . . . . . . . . . . . . . . . . . 76
Power Outlets . . . . . . . . . . . . . . . . . . . . . . . . . . 77
Wireless Charging . . . . . . . . . . . . . . . . . . . . . . 78
Warning Lights, Gauges, and Indicators
Warning Lights, Gauges, andIndicators . . . . . . . . . . . . . . . . . . . . . . . . . . . . 80
Instrument Cluster . . . . . . . . . . . . . . . . . . . . . . 81
Speedometer . . . . . . . . . . . . . . . . . . . . . . . . . . . 85
Odometer . . . . . . . . . . . . . . . . . . . . . . . . . . . . . . 85
Trip Odometer . . . . . . . . . . . . . . . . . . . . . . . . . . 85
Tachometer . . . . . . . . . . . . . . . . . . . . . . . . . . . . 85
Battery Gauge (High Voltage) . . . . . . . . . . 86
Stealth Drive Mode Capability Gauge . . . . . . . . . . . . . . . . . . . . . . . . . . . . . . . . 86
Fuel Gauge . . . . . . . . . . . . . . . . . . . . . . . . . . . . . 86
Hybrid Battery Charging Light (Charge+) . . . . . . . . . . . . . . . . . . . . . . . . . . . . . 87
Power Indicator Gauge . . . . . . . . . . . . . . . . . 87
Engine Coolant Temperature Gauge . . . . 87
Transmission Temperature Gauge . . . . . . 88
Seat Belt Reminders . . . . . . . . . . . . . . . . . . . . 88 Airbag Readiness Light . . . . . . . . . . . . . . . . . 88
Passenger Airbag Status Indicator . . . . . . 89
Charging System Light (12-Volt
Battery) . . . . . . . . . . . . . . . . . . . . . . . . . . . . . . 90
Malfunction Indicator Lamp (Check
Engine Light) . . . . . . . . . . . . . . . . . . . . . . . . . 90
Front Lift System Light . . . . . . . . . . . . . . . . . 91
Brake System Warning Light . . . . . . . . . . . 92
Electric Parking Brake Light . . . . . . . . . . . . . 92
Service Electric Parking Brake Light . . . . . 92
Antilock Brake System (ABS) Warning Light . . . . . . . . . . . . . . . . . . . . . . . . . . . . . . . . . . 93
Performance Transmission Active . . . . . . . 93
All-Wheel-Drive Light . . . . . . . . . . . . . . . . . . . 93
Lane Keep Assist (LKA) Light . . . . . . . . . . . 94
Automatic Emergency Braking (AEB) Disabled Light . . . . . . . . . . . . . . . . . . . . . . . . 94
Vehicle Ahead Indicator . . . . . . . . . . . . . . . . 94
Pedestrian Ahead Indicator . . . . . . . . . . . . . 94
Traction Off Light . . . . . . . . . . . . . . . . . . . . . . 95
Traction Control System (TCS)/Electronic Stability Control Light . . . . . . . . . . . . . . . . 95
Electronic Stability Control (ESC) Off Light . . . . . . . . . . . . . . . . . . . . . . . . . . . . . . . . . . 95
Engine Coolant Temperature Warning Light . . . . . . . . . . . . . . . . . . . . . . . . . . . . . . . . . 96
Driver Mode Control Light . . . . . . . . . . . . . . 96
Tire Pressure Light . . . . . . . . . . . . . . . . . . . . . . 97
Engine Oil Pressure Light . . . . . . . . . . . . . . . 97
Low Fuel Warning Light . . . . . . . . . . . . . . . . 97 Auto Stop Indicator . . . . . . . . . . . . . . . . . . . . 98
Traffic Sign Indicator . . . . . . . . . . . . . . . . . . . 98
Security Light . . . . . . . . . . . . . . . . . . . . . . . . . . 98
High-Beam On Light . . . . . . . . . . . . . . . . . . . . 98
Lamps On Reminder . . . . . . . . . . . . . . . . . . . . 99
Cruise Control Light . . . . . . . . . . . . . . . . . . . . 99
Door Ajar Light . . . . . . . . . . . . . . . . . . . . . . . . . 99
Information Displays
Driver Information Center (DIC) . . . . . . . . 99
Head-Up Display (HUD) . . . . . . . . . . . . . . . . 102
Vehicle Messages
Vehicle Messages . . . . . . . . . . . . . . . . . . . . . . 105
Engine Power Messages . . . . . . . . . . . . . . . 106
Vehicle Speed Messages . . . . . . . . . . . . . . . 106
Universal Remote System
Universal Remote System . . . . . . . . . . . . . 106
Universal Remote System
Programming . . . . . . . . . . . . . . . . . . . . . . . . 106
Universal Remote System Operation . . . . . . . . . . . . . . . . . . . . . . . . . . . 108
Page 89 of 362

Chevrolet Corvette Owner Manual (GMNA-Localizing-U.S./Canada/Mexico-
17272984) - 2024 - CRC - 2/20/23
88 Instruments and Controls
Transmission Temperature Gauge
This gauge will display when the
transmission is experiencing abnormal
temperatures.
As the transmission begins to overheat, the
gauge fills to the right.
The Transmission Temperature Gauge
monitors all aspects of the transmission.
Elevated transmission temperatures may not
be reflected in the Transmission Fluid
Temperature cluster display gauge.
Messages will display to indicate the
severity of the overheating. As the gauge
fills up there will be a reduction in vehicle
performance. Once full, the transmission is
overheated and a message to stop safely
will display. Do not drive the vehicle until
the message clears. SeeDual Clutch
Transmission 0184 for more information.
Seat Belt Reminders
Driver Seat Belt Reminder Light
There is a driver seat belt reminder light on
the instrument cluster.
When the vehicle is started, this light
flashes and a chime may come on to remind
the driver to fasten their seat belt.
Then the light stays on solid until the belt is
buckled. This cycle may continue several
times if the driver remains or becomes
unbuckled while the vehicle is moving.
If the driver seat belt is buckled, neither the
light nor the chime comes on.
Front Passenger Seat Belt Reminder
Light
The vehicle may have a front passenger seat
belt reminder light near the passenger
airbag status indicator. See Passenger
Sensing System 057.
When the vehicle is started, this light
flashes and a chime may come on to remind
passengers to fasten their seat belt.
Then the light stays on solid until the belt is
buckled. This cycle continues several times if
the front passenger remains or becomes
unbuckled while the vehicle is moving.
If the front passenger seat belt is buckled,
neither the chime nor the light comes on.
The front passenger seat belt reminder light
and chime may come on if an object is put
on the seat such as a briefcase, handbag,
grocery bag, laptop, or other electronic
device. To turn off the reminder light and/or
chime, remove the object from the seat or
buckle the seat belt.
Airbag Readiness Light
This light shows if there is an electrical
problem with the airbag system. It is
located in the instrument cluster. The
system check includes the airbag sensor(s),
Page 107 of 362
Chevrolet Corvette Owner Manual (GMNA-Localizing-U.S./Canada/Mexico-
17272984) - 2024 - CRC - 2/20/23
106 Instruments and Controls
.Cruise Control
.Front Lift System
.Lighting and Bulb Replacement
.Wiper/Washer Systems
.Doors and Windows
.Seat Belts
.Airbag Systems
.Propulsion
.Tire Pressure
.Battery
Engine Power Messages
REDUCED ACCELERATION DRIVE
WITH CARE
This message displays when the vehicle's
propulsion power is reduced. A reduction in
propulsion power can affect the vehicle's
ability to accelerate. If this message is on,
but there is no observed reduction in
performance, proceed to your destination.
Under certain conditions the performance
may be reduced the next time the vehicle is
driven. The vehicle may be driven while this
message is on, but maximum acceleration
and speed may be reduced. Anytime this
message stays on, or displays repeatedly,
the vehicle should be taken to your dealer
for service as soon as possible.Under certain operating conditions,
propulsion will be disabled. Try restarting
after the ignition has been off for
two minutes.
Vehicle Speed Messages
SPEED LIMITED TO XXX KM/H (MPH)
This message shows that the vehicle speed
has been limited to the speed displayed. The
limited speed is a protection for various
propulsion and vehicle systems, such as
lubrication, thermal, brakes, suspension,
Teen Driver if equipped, or tires.
Universal Remote System
See
Radio Frequency Statement 0337.
Universal Remote System
Programming
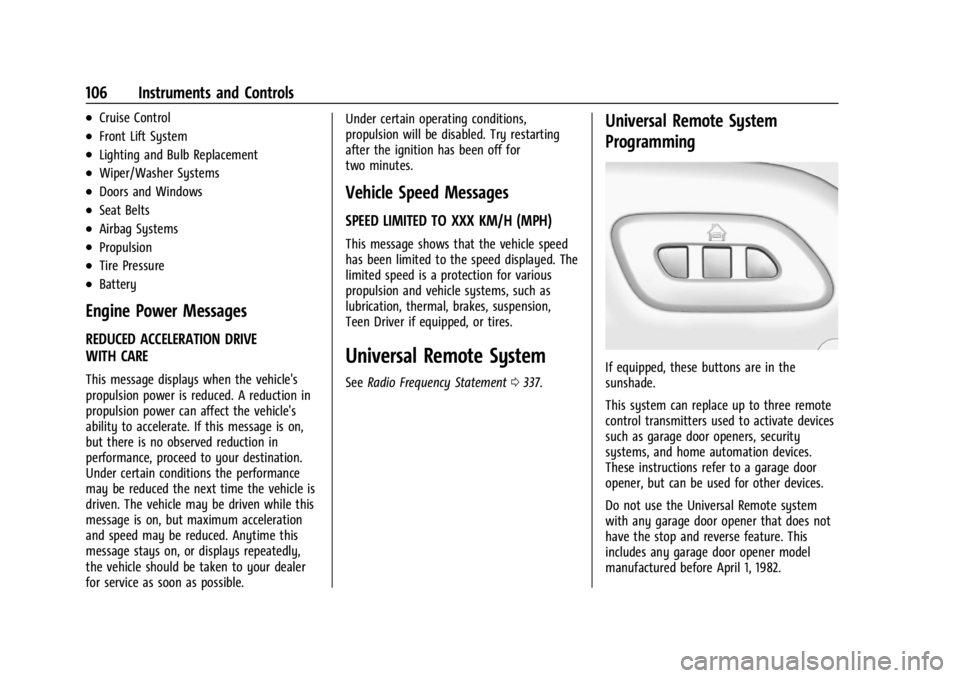
If equipped, these buttons are in the
sunshade.
This system can replace up to three remote
control transmitters used to activate devices
such as garage door openers, security
systems, and home automation devices.
These instructions refer to a garage door
opener, but can be used for other devices.
Do not use the Universal Remote system
with any garage door opener that does not
have the stop and reverse feature. This
includes any garage door opener model
manufactured before April 1, 1982.
Page 143 of 362

Chevrolet Corvette Owner Manual (GMNA-Localizing-U.S./Canada/Mexico-
17272984) - 2024 - CRC - 2/20/23
142 Infotainment System
Settings
To access the Settings menus:1. Touch Settings on the Home Page on the infotainment display.
2. Touch the desired category to display a list of available options.
3. Touch to select the desired feature setting.
4. Touch the options on the infotainment display to disable or enable a feature.
5. Touch
Sto go back.
The Settings menu may contain the
following:
Connections
The menu may contain the following:
Phones
Allows connecting to a different cell phone
or mobile device source, disconnect a cell
phone or media device, or delete a cell
phone or media device.
Wi-Fi Networks
Shows connected and available Wi-Fi
networks. Wi-Fi Hotspot
Allows adjustment of different Wi-Fi
features.
Vehicle-to-Phone Sharing
Allows GM apps to use vehicle data on the
listed phones shown.
Vehicle
The menu may contain the following:
Valet Mode
This will lock the infotainment system and
steering wheel controls. It may also limit
access to vehicle storage locations,
if equipped.
Motion Sensor
When activated and the vehicle is off, this
will activate the vehicle’s alarm when
movement is detected inside the vehicle.
Teen Driver
See
Teen Driver 0144.
Buckle to Drive
This feature can prevent shifting out of Park
when the driver’s, and if applicable the front
passenger’s, seat belt is not buckled. See
Buckle To Drive 046. Driver Mode Customization
See
“Driver Mode Customization” inDriver
Mode Control 0196.
Climate and Air Quality
Adjusts different climate settings.
Collision/Detection Systems
Adjusts different driver assistance system
settings.
Comfort and Convenience
Adjusts different comfort and convenience
settings.
Lighting
Adjusts different lighting settings.
Power Door Locks
Adjusts different door lock settings.
Remote Lock, Unlock, and Start
Adjusts different remote lock settings.
Ride Height
See Front Lift System 0205.
Seating Position
Adjusts different seating position settings.